USB RAM PROMASTER 2021 Owners Manual
[x] Cancel search | Manufacturer: RAM, Model Year: 2021, Model line: PROMASTER, Model: RAM PROMASTER 2021Pages: 288, PDF Size: 15.22 MB
Page 4 of 288
2
INTRODUCTION
Symbols Key ............................................................ 7
WARNINGS AND CAUTIONS ................................. 7
VAN CONVERSIONS/CAMPERS ........................... 7
VEHICLE MODIFICATIONS/ALTERATIONS ........... 7
Symbol Glossary ..................................................... 8
GETTING TO KNOW YOUR VEHICLE
KEYS ......................................................................10
Key Fob......................................................... 10
SENTRY KEY ..........................................................12
IGNITION SWITCH .................................................12
VEHICLE SECURITY SYSTEM —
IF EQUIPPED .........................................................13
To Arm The System ...................................... 13
To Disarm The System................................. 13
Rearming Of The System............................. 13
Security System Manual Override .............. 13
DOORS ..................................................................14
Power Door Locks ....................................... 14
Auto Unlock Doors ....................................... 15
Automatic Door Locks ................................. 15
STEERING WHEEL.................................................15
Telescoping Steering Column ..................... 15 SEATS .................................................................... 15
Manual Adjustments ................................... 16
Heated Seats — If Equipped ....................... 19
Fold Down Tray — If Equipped..................... 20
Adjustable Armrests — If Equipped ............ 20
Head Restraints .......................................... 20
UCONNECT VOICE RECOGNITION ....................... 22
Introducing Voice Recognition .................... 22
Basic Voice Commands............................... 22
Get Started ................................................... 22
Additional Information ................................. 22
MIRRORS ............................................................. 23
Inside Rearview Mirror ................................ 23
Outside Mirrors ........................................... 24
Power Mirrors — If Equipped ....................... 24
Power Folding Outside Mirrors —
If Equipped ................................................... 25 Heated Mirrors — If Equipped ..................... 25
EXTERIOR LIGHTS ................................................ 26
Multifunction Lever ..................................... 26
Headlights ................................................... 26
Daytime Running Lights (DRLs) —
If Equipped .................................................. 26 High/Low Beam Switch .............................. 26
Flash-To-Pass .............................................. 26
Parking Lights ............................................. 26
Follow Me Home/Headlight Delay .............. 27
Fog Lights — If Equipped ............................ 27 Turn Signals ................................................. 27
Lane Change Assist ..................................... 27
Battery Saver ............................................... 27
INTERIOR LIGHTS ................................................28
Courtesy Lights ............................................ 28
Illuminated Entry ......................................... 30
WIPERS AND WASHERS .....................................30
Windshield Wiper Operation ...................... 30
CLIMATE CONTROLS ...........................................31
Manual Climate Control Descriptions
And Functions .............................................. 31 Additional Rear Climate Control —
If Equipped ................................................... 34 Operating Tips.............................................. 34
INTERIOR STORAGE AND EQUIPMENT ..............36
Storage ......................................................... 36
USB/AUX Control — If Equipped ................ 37
Power Outlets............................................... 37
Auxiliary Switches — If Equipped ................ 38
WINDOWS ............................................................39
Power Windows .......................................... 39
Window Bar Grates — If Equipped .............. 39
Wind Buffeting ............................................ 40
HOOD......................................................................40
Opening ........................................................ 40
Closing.......................................................... 41
CARGO AREA FEATURES .....................................41
21_VF_OM_EN_USC_t.book Page 2
Page 39 of 288
GETTING TO KNOW YOUR VEHICLE37
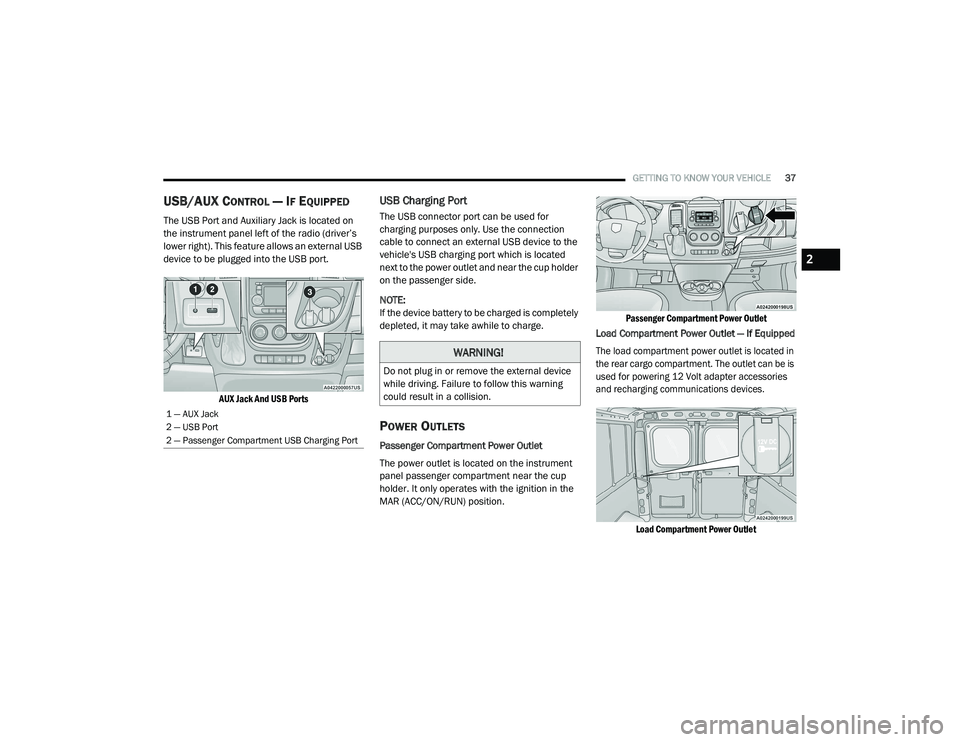
USB/AUX CONTROL — IF EQUIPPED
The USB Port and Auxiliary Jack is located on
the instrument panel left of the radio (driver’s
lower right). This feature allows an external USB
device to be plugged into the USB port.
AUX Jack And USB Ports
USB Charging Port
The USB connector port can be used for
charging purposes only. Use the connection
cable to connect an external USB device to the
vehicle's USB charging port which is located
next to the power outlet and near the cup holder
on the passenger side.
NOTE:
If the device battery to be charged is completely
depleted, it may take awhile to charge.
POWER OUTLETS
Passenger Compartment Power Outlet
The power outlet is located on the instrument
panel passenger compartment near the cup
holder. It only operates with the ignition in the
MAR (ACC/ON/RUN) position.
Passenger Compartment Power Outlet
Load Compartment Power Outlet — If Equipped
The load compartment power outlet is located in
the rear cargo compartment. The outlet can be is
used for powering 12 Volt adapter accessories
and recharging communications devices.
Load Compartment Power Outlet
1 — AUX Jack
2 — USB Port
2 — Passenger Compartment USB Charging Port
WARNING!
Do not plug in or remove the external device
while driving. Failure to follow this warning
could result in a collision.
2
21_VF_OM_EN_USC_t.book Page 37
Page 90 of 288
88
MULTIMEDIA
UCONNECT SYSTEMS
For detailed information about your
Uconnect 3/3 NAV With 5-inch Display
system Úpage 98.
NOTE:
Uconnect screen images are for illustration
purposes only and may not reflect exact soft -
ware for your vehicle.
CYBERSECURITY
Your vehicle may be a connected vehicle and
may be equipped with both wired and wireless
networks. These networks allow your vehicle to
send and receive information. This information
allows systems and features in your vehicle to
function properly. Your vehicle may be equipped with certain
security features to reduce the risk of
unauthorized and unlawful access to vehicle
systems and wireless communications. Vehicle
software technology continues to evolve over
time and FCA US LLC, working with its suppliers,
evaluates and takes appropriate steps as
needed. Similar to a computer or other devices,
your vehicle may require software updates to
improve the usability and performance of your
systems or to reduce the potential risk of
unauthorized and unlawful access to your
vehicle systems.
The risk of unauthorized and unlawful access to
your vehicle systems may still exist, even if the
most recent version of vehicle software (such as
Uconnect software) is installed.
WARNING!
It is not possible to know or to predict all of
the possible outcomes if your vehicle’s
systems are breached. It may be possible
that vehicle systems, including safety
related systems, could be impaired or a
loss of vehicle control could occur that may
result in an accident involving serious injury
or death.
ONLY insert media (e.g., USB, SD card, or
CD) into your vehicle if it came from a
trusted source. Media of unknown origin
could possibly contain malicious software,
and if installed in your vehicle, it may
increase the possibility for vehicle systems
to be breached.
As always, if you experience unusual
vehicle behavior, take your vehicle to your
nearest authorized dealer immediately.
21_VF_OM_EN_USC_t.book Page 88
Page 91 of 288
MULTIMEDIA89
NOTE:
FCA US LLC or your dealer may contact you
directly regarding software updates.
To help further improve vehicle security and
minimize the potential risk of a security
breach, vehicle owners should:
Routinely check www.driveucon -
nect.com/support/soft -
ware-update.html (US Residents) or
www.driveuconnect.ca (Canadian Resi -
dents) to learn about available Uconnect
software updates.
Only connect and use trusted media
devices (e.g. personal mobile phones,
USBs, CDs).
Privacy of any wireless and wired
communications cannot be assured. Third
parties may unlawfully intercept information
and private communications without your
consent Ú page 55.
UCONNECT SETTINGS
The Uconnect system uses a combination of
buttons on the touchscreen and buttons on the
faceplate located on the center of the
instrument panel. These buttons allow you to
access and change the customer
programmable features. Many features can
vary by vehicle.
Buttons on the faceplate are located below
and/or beside the Uconnect system in the
center of the instrument panel. In addition,
there is a Scroll/Enter control knob located on
the right side. Turn the control knob to scroll
through menus and change settings. Push the
center of the control knob one or more times to
select or change a setting. Your Uconnect system may also have Screen
Off and Mute buttons on the faceplate.
Push the Screen Off button on the faceplate to
turn off the Uconnect screen. Push the button
again or tap the screen to turn the screen on.
Press the Back Arrow button to exit out of a
Menu or certain option on the Uconnect system.
NOTE:
The NAV button in the middle of your Uconnect
System may also contain the word “TRIP”.
5
21_VF_OM_EN_USC_t.book Page 89
Page 102 of 288
100MULTIMEDIA
SAFETY AND GENERAL INFORMATION
Safety Guidelines
Please read the manual carefully before using
the system. It contains instructions on how to
use the system in a safe and effective manner. Please read and follow these safety
precautions. Failure to do so may result in injury
or property damage.
Glance at the screen only when it is safe to do
so. If prolonged viewing of the screen is
required, park in a safe location and set the
parking brake.
Stop use immediately if a problem occurs.
Failure to do so may cause injury or damage
to the product. Return it to an authorized
dealer to repair.
Ensure the volume level of the system is set
to a level that still allows you to hear outside
traffic and emergency vehicles.
Safe Usage Of The Uconnect System
Your system is a sophisticated electronic
device. Do not let young children use your
system.
Permanent hearing loss may occur if you play
your music or sound system at loud volumes.
Exercise caution when setting the volume on
your system.
Keep drinks, rain and other sources of mois
-
ture away from your system. Besides damage
to your system, moisture can cause electric
shocks as with any electronic device.
NOTE:
Many features of this system are speed depen -
dent. For your own safety, it is not possible to
use some of the touchscreen features while the
vehicle is in motion.
Care And Maintenance
Touchscreen
Do not press the touchscreen with any hard
or sharp objects (pen, USB stick, jewelry, etc.)
which could scratch the touchscreen surface!
Do not spray any liquid or caustic chemicals
directly on the screen! Use a clean and dry
microfiber lens cleaning cloth in order to
clean the touchscreen.
If necessary, use a lint-free cloth dampened
with a cleaning solution, such as isopropyl
alcohol or an isopropyl alcohol and water
solution ratio of 50:50. Be sure to follow the
solvent manufacturer's precautions and
directions Ú page 274.
WARNING!
ALWAYS drive safely with your hands on the
steering wheel. You have full responsibility
and assume all risks related to the use of the
Uconnect features and applications in this
vehicle. Only use Uconnect when it is safe to
do so. Failure to do so may result in an
accident involving serious injury or death.
CAUTION!
Do NOT attach any object to the touchscreen,
doing so can result in breaking the
touchscreen.
21_VF_OM_EN_USC_t.book Page 100
Page 110 of 288
108MULTIMEDIA
Audio Setting Description
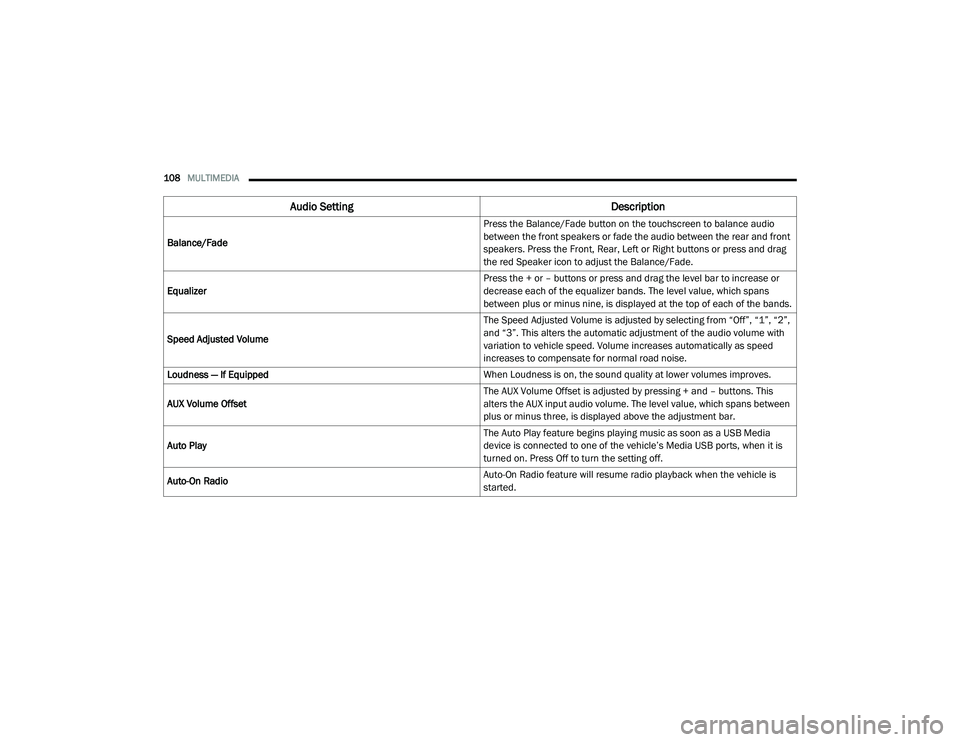
Balance/Fade Press the Balance/Fade button on the touchscreen to balance audio
between the front speakers or fade the audio between the rear and front
speakers. Press the Front, Rear, Left or Right buttons or press and drag
the red Speaker icon to adjust the Balance/Fade.
Equalizer Press the + or – buttons or press and drag the level bar to increase or
decrease each of the equalizer bands. The level value, which spans
between plus or minus nine, is displayed at the top of each of the bands.
Speed Adjusted Volume The Speed Adjusted Volume is adjusted by selecting from “Off”, “1”, “2”,
and “3”. This alters the automatic adjustment of the audio volume with
variation to vehicle speed. Volume increases automatically as speed
increases to compensate for normal road noise.
Loudness — If Equipped When Loudness is on, the sound quality at lower volumes improves.
AUX Volume Offset The AUX Volume Offset is adjusted by pressing + and – buttons. This
alters the AUX input audio volume. The level value, which spans between
plus or minus three, is displayed above the adjustment bar.
Auto Play The Auto Play feature begins playing music as soon as a USB Media
device is connected to one of the vehicle’s Media USB ports, when it is
turned on. Press Off to turn the setting off.
Auto-On Radio Auto-On Radio feature will resume radio playback when the vehicle is
started.
21_VF_OM_EN_USC_t.book Page 108
Page 111 of 288
MULTIMEDIA109
Radio Voice Commands
Use your voice to quickly get to the AM, FM, or
SiriusXM® Satellite Radio stations you would
like to hear. (Subscription or included
SiriusXM® Satellite Radio trial required.)
Push the VR button and wait for the beep to
say a command. See some examples below.
“Tune to ninety-five-point-five FM”
“Tune to Satellite Channel Hits 1”
Did You Know: At any time, if you are not sure of
what to say or want to learn a Voice Command,
push the VR button and say “ Help”. The
system provides you with a list of commands.
MEDIA MODE
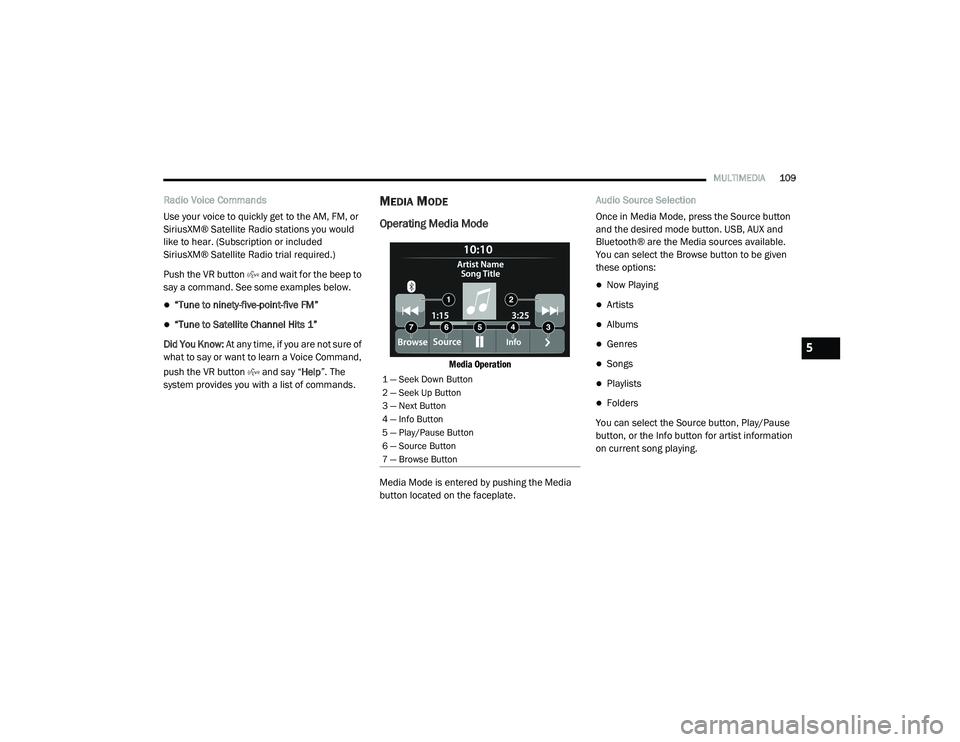
Operating Media Mode
Media Operation
Media Mode is entered by pushing the Media
button located on the faceplate. Audio Source Selection
Once in Media Mode, press the Source button
and the desired mode button. USB, AUX and
Bluetooth® are the Media sources available.
You can select the Browse button to be given
these options:
Now Playing
Artists
Albums
Genres
Songs
Playlists
Folders
You can select the Source button, Play/Pause
button, or the Info button for artist information
on current song playing.
1 — Seek Down Button
2 — Seek Up Button
3 — Next Button
4 — Info Button
5 — Play/Pause Button
6 — Source Button
7 — Browse Button
5
21_VF_OM_EN_USC_t.book Page 109
Page 112 of 288
110MULTIMEDIA
Seek Up/Seek Down
Seek Up/Seek Down
Press and release the Right Arrow button on
the touchscreen for the next selection. Press
and release the Left Arrow button on the
touchscreen to return to the beginning of the
current selection, or return to the beginning of
the previous selection if the track is within the
first few seconds of the current selection.
Fast Seek Up /Fast Seek Down
Press and hold the Right Arrow or Left Arrow button on the touchscreen and the desired
mode will begin to fast forward or reverse
through the current track until the button on the
touchscreen is released.
Track Selection (Browse)
Rotate the Browse button to scroll through and
select a desired track on the device or USB.
Press the Exit button on the touchscreen if you
wish to cancel the browse function. Repeat
Press the Repeat button on the touchscreen to
repeat the song selection. To cancel repeat,
press the Repeat button on the touchscreen a
second time.
Shuffle
Press the Shuffle button on the touchscreen to
play the selections on the USB or Bluetooth®
device in random order to provide an interesting
change of pace. Press the Shuffle button on
the touchscreen a second time to turn this
feature off.
Info
Press the Info button to display the current
track information. Press the X button to cancel
this feature.
USB Mode
USB Mode is entered by either inserting a USB
Jump Drive cable into the USB port or by pushing
the Media button located on the faceplate. Once
in Media Mode, press the Source button on the
touchscreen and select “USB”.
NOTE:
The system supports only FAT32 or ExFAT
formatted USB devices. The system does not
support devices with a capacity higher than
64GB. The system does not support USB hubs
connected to the USB port of the vehicle.
Connect your multimedia device directly to the
USB port using the specific connection cable for
the device if necessary.
Inserting USB Device
Gently insert the USB device into the USB Port.
If you insert a USB device with the ignition ON,
the unit will switch to USB Mode and begin to
play. The display will show the track number and
index time in minutes and seconds. Play will
begin at the start of track 1.
Browse
Press the Browse button on the touchscreen to
select Artist, Album, Genre, Song, Playlist or
Folder from the USB device. Once the desired
selection is made, you can chose from the
available media by pressing the button on the
touchscreen. Press the Exit button on the
touchscreen if you wish to cancel the browse
function.
21_VF_OM_EN_USC_t.book Page 110
Page 113 of 288
MULTIMEDIA111
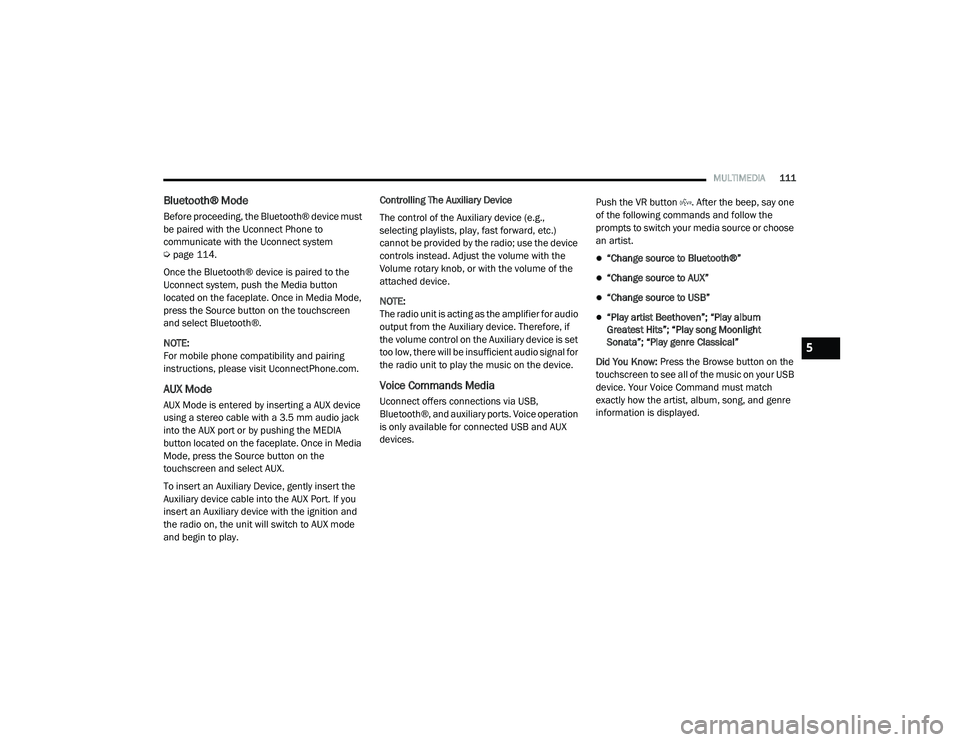
Bluetooth® Mode
Before proceeding, the Bluetooth® device must
be paired with the Uconnect Phone to
communicate with the Uconnect system
Úpage 114.
Once the Bluetooth® device is paired to the
Uconnect system, push the Media button
located on the faceplate. Once in Media Mode,
press the Source button on the touchscreen
and select Bluetooth®.
NOTE:
For mobile phone compatibility and pairing
instructions, please visit UconnectPhone.com.
AUX Mode
AUX Mode is entered by inserting a AUX device
using a stereo cable with a 3.5 mm audio jack
into the AUX port or by pushing the MEDIA
button located on the faceplate. Once in Media
Mode, press the Source button on the
touchscreen and select AUX.
To insert an Auxiliary Device, gently insert the
Auxiliary device cable into the AUX Port. If you
insert an Auxiliary device with the ignition and
the radio on, the unit will switch to AUX mode
and begin to play. Controlling The Auxiliary Device
The control of the Auxiliary device (e.g.,
selecting playlists, play, fast forward, etc.)
cannot be provided by the radio; use the device
controls instead. Adjust the volume with the
Volume rotary knob, or with the volume of the
attached device.
NOTE:
The radio unit is acting as the amplifier for audio
output from the Auxiliary device. Therefore, if
the volume control on the Auxiliary device is set
too low, there will be insufficient audio signal for
the radio unit to play the music on the device.
Voice Commands Media
Uconnect offers connections via USB,
Bluetooth®, and auxiliary ports. Voice operation
is only available for connected USB and AUX
devices.
Push the VR button . After the beep, say one
of the following commands and follow the
prompts to switch your media source or choose
an artist.
“Change source to Bluetooth®”
“Change source to AUX”
“Change source to USB”
“Play artist Beethoven”; “Play album
Greatest Hits”; “Play song Moonlight
Sonata”; “Play genre Classical”
Did You Know: Press the Browse button on the
touchscreen to see all of the music on your USB
device. Your Voice Command must match
exactly how the artist, album, song, and genre
information is displayed.
5
21_VF_OM_EN_USC_t.book Page 111
Page 232 of 288
230SERVICING AND MAINTENANCE
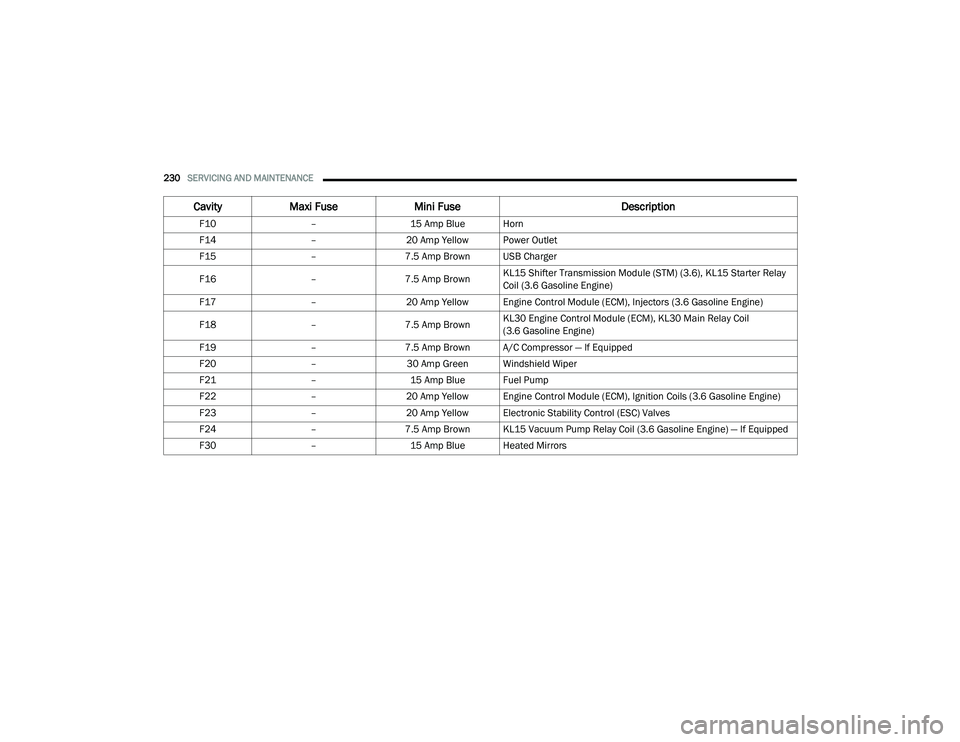
F10–15 Amp Blue Horn
F14 –20 Amp Yellow Power Outlet
F15 –7.5 Amp Brown USB Charger
F16 –7.5 Amp Brown KL15 Shifter Transmission Module (STM) (3.6), KL15 Starter Relay
Coil (3.6 Gasoline Engine)
F17 –20 Amp Yellow Engine Control Module (ECM), Injectors (3.6 Gasoline Engine)
F18 –7.5 Amp Brown KL30 Engine Control Module (ECM), KL30 Main Relay Coil
(3.6 Gasoline Engine)
F19 –7.5 Amp Brown A/C Compressor — If Equipped
F20 –30 Amp Green Windshield Wiper
F21 –15 Amp Blue Fuel Pump
F22 –20 Amp Yellow Engine Control Module (ECM), Ignition Coils (3.6 Gasoline Engine)
F23 –20 Amp Yellow Electronic Stability Control (ESC) Valves
F24 –7.5 Amp Brown KL15 Vacuum Pump Relay Coil (3.6 Gasoline Engine) — If Equipped
F30 –15 Amp Blue Heated Mirrors
CavityMaxi Fuse Mini Fuse Description
21_VF_OM_EN_USC_t.book Page 230