display RAM PROMASTER 2023 Owners Manual
[x] Cancel search | Manufacturer: RAM, Model Year: 2023, Model line: PROMASTER, Model: RAM PROMASTER 2023Pages: 296, PDF Size: 12.31 MB
Page 5 of 296
3
INTERIOR STORAGE AND EQUIPMENT ............... 44 Storage..............................................................44
USB Control — If Equipped ..............................45
Power Outlets ...................................................46
Power Inverter — If Equipped...........................47
Auxiliary Switches — If Equipped .....................47
Wireless Charging Pad —
If Equipped .......................................................48
WINDOWS ............................................................. 49
Power Windows ...............................................49
Window Bar Grates — If Equipped...................49
Wind Buffeting .................................................50
HOOD....................................................................... 50
Opening .............................................................50
Closing...............................................................51
CARGO AREA FEATURES ...................................... 51
GETTING TO KNOW YOUR
INSTRUMENT PANEL
BASE / MIDLINE INSTRUMENT CLUSTER........... 52
Base / Midline Instrument Cluster
Descriptions ......................................................53
INSTRUMENT CLUSTER......................................... 54
Instrument Cluster Descriptions .....................55
INSTRUMENT CLUSTER DISPLAY ........................ 56
Location And Controls ......................................56
Change Engine Oil — If Equipped ....................57
Main Menu........................................................57
Settings .............................................................59 WARNING LIGHTS AND MESSAGES ....................65
Red Warning Lights ..........................................65
Yellow Warning Lights ......................................68
Yellow Indicator Lights .....................................72
Green Indicator Lights .....................................72
Blue Indicator Lights ........................................73
White Indicator Lights ......................................73
ONBOARD DIAGNOSTIC SYSTEM — OBD II ........ 74
Onboard Diagnostic System
(OBD II) Cybersecurity ......................................74
EMISSIONS INSPECTION AND MAINTENANCE
PROGRAMS.............................................................74
STARTING AND OPERATING
STARTING THE ENGINE ........................................76
Automatic Transmission ..................................76
Normal Starting ................................................76
Tip Start Feature .............................................76
Cold Weather Operation
(Below –22°F Or −30°C) ...............................76
Extended Park Starting ....................................76
If Engine Fails To Start .....................................77
After Starting ....................................................77
ENGINE BLOCK HEATER — IF EQUIPPED ...........77
ENGINE BREAK-IN RECOMMENDATIONS ..........78
PARKING BRAKE ....................................................78
Electric Park Brake (EPB) ................................78 AUTOMATIC TRANSMISSION .............................. 81
Ignition Park Interlock (Keyless Vehicle) ........ 81
Brake/Transmission Shift Interlock (BTSI)
System ............................................................. 81
9-Speed Automatic Transmission ................... 82
POWER STEERING ................................................ 85
ACTIVE SPEED LIMITER — IF EQUIPPED ............ 86
Activation .......................................................... 86
Exceeding The Set Speed ................................ 86
Deactivation ..................................................... 86
INTELLIGENT SPEED ASSIST (ISA) —
IF EQUIPPED ........................................................... 87
Activation .......................................................... 87
Exceeding The Set Speed ................................ 87
Deactivation ..................................................... 87
CRUISE CONTROL SYSTEMS — IF EQUIPPED ... 87
Cruise Control .................................................. 88
Adaptive Cruise Control (ACC) ......................... 89
TRAFFIC SIGN ASSIST SYSTEM —
IF EQUIPPED ........................................................... 98
Activation/Deactivation ................................... 98
Traffic Sign Assist Modes ................................ 98
Indications On The Display .............................. 99
ACTIVE DRIVING ASSIST SYSTEM —
IF EQUIPPED ......................................................... 100
Operation ....................................................... 100Turning Active Driving Assist
On Or Off ........................................................ 101
23_VF_OM_EN_USC_t.book Page 3
Page 6 of 296

4
Indications On The Display ........................... 102
Minimum Risk Maneuver.............................. 103 System Status................................................ 103
System Operation/Limitations ..................... 103
PARKSENSE FRONT/REAR PARK ASSIST —
IF EQUIPPED ........................................................ 104
ParkSense Sensors ....................................... 105
ParkSense Warning Display.......................... 105
ParkSense Display ........................................ 105
Enabling And Disabling ParkSense .............. 108
Service The ParkSense Park Assist
System ........................................................... 108ParkSense Park Assist Failure Indications .. 108
Cleaning The ParkSense System ................. 108ParkSense Park Assist System Usage
Precautions .................................................... 109
Side Distance Warning System ................... 110
PARKSENSE ACTIVE PARK ASSIST
SYSTEM — IF EQUIPPED ..................................... 112
Enabling And Disabling The ParkSense
Active Park Assist System ............................. 112
Parallel/Perpendicular Parking Space
Assistance Operation .................................... 113
Exiting The Parking Space ............................ 116
LANESENSE — IF EQUIPPED ............................. 116
LaneSense Operation ................................... 116Turning LaneSense On Or Off ....................... 117
LaneSense Warning Message ...................... 117Changing LaneSense Status ........................ 119
PARKVIEW REAR BACK UP CAMERA .............. 119 SURROUND VIEW CAMERA SYSTEM —
IF EQUIPPED ........................................................ 120
REFUELING THE VEHICLE ................................... 122
Loose Fuel Filler Cap Message .................... 123
VEHICLE LOADING .............................................. 123
Vehicle Certification Label ............................ 123
Gross Vehicle Weight Rating (GVWR) .......... 123
Gross Axle Weight Rating (GAWR) ............... 123
Tire Size ......................................................... 123
Rim Size ......................................................... 124
Inflation Pressure .......................................... 124
Curb Weight ................................................... 124
Overloading.................................................... 124
Loading ......................................................... 124
TRAILER TOWING ................................................ 124
Common Towing Definitions......................... 124
Trailer Hitch Classification ............................ 126
Trailer Towing Weights (Maximum Trailer
Weight Ratings) ............................................ 126
Trailer And Tongue Weight ........................... 127Towing Requirements .................................. 127
Towing Tips ................................................... 130
RECREATIONAL TOWING (BEHIND
MOTORHOME) .................................................... 130
Towing This Vehicle Behind Another
Vehicle ........................................................... 130
Recreational Towing...................................... 131
DRIVING TIPS ....................................................... 131
Driving On Slippery Surfaces ....................... 131
Driving Through Water ................................. 131
MULTIMEDIA
UCONNECT SYSTEMS ......................................... 133
CYBERSECURITY ................................................. 133
UCONNECT SETTINGS ........................................ 134 Customer Programmable Features ............. 134
RADIO OPERATION AND MOBILE PHONES...... 151
Regulatory And Safety Information .............. 151
SAFETY
SAFETY FEATURES .............................................. 152Anti-Lock Brake System (ABS)...................... 152
Electronic Brake Control (EBC) System ...... 153
DROWSY DRIVER DETECTION (DDD) —
IF EQUIPPED ......................................................... 157
To Activate/Deactivate ................................. 157
System Operation.......................................... 157
AUXILIARY DRIVING SYSTEMS .......................... 158
Blind Spot Monitoring (BSM) —
If Equipped ................................................... 158
Forward Collision Warning (FCW) With
Mitigation — If Equipped ............................... 164
Tire Pressure Monitoring
System (TPMS) .............................................. 168
OCCUPANT RESTRAINT SYSTEMS ................... 170
Occupant Restraint Systems Features ....... 170
Important Safety Precautions ...................... 170
Seat Belt Systems ........................................ 171
Supplemental Restraint Systems (SRS) ...... 178Child Restraints ............................................. 185
23_VF_OM_EN_USC_t.book Page 4
Page 15 of 296
13
GETTING TO KNOW YOUR VEHICLE
KEYS
KEY FOB
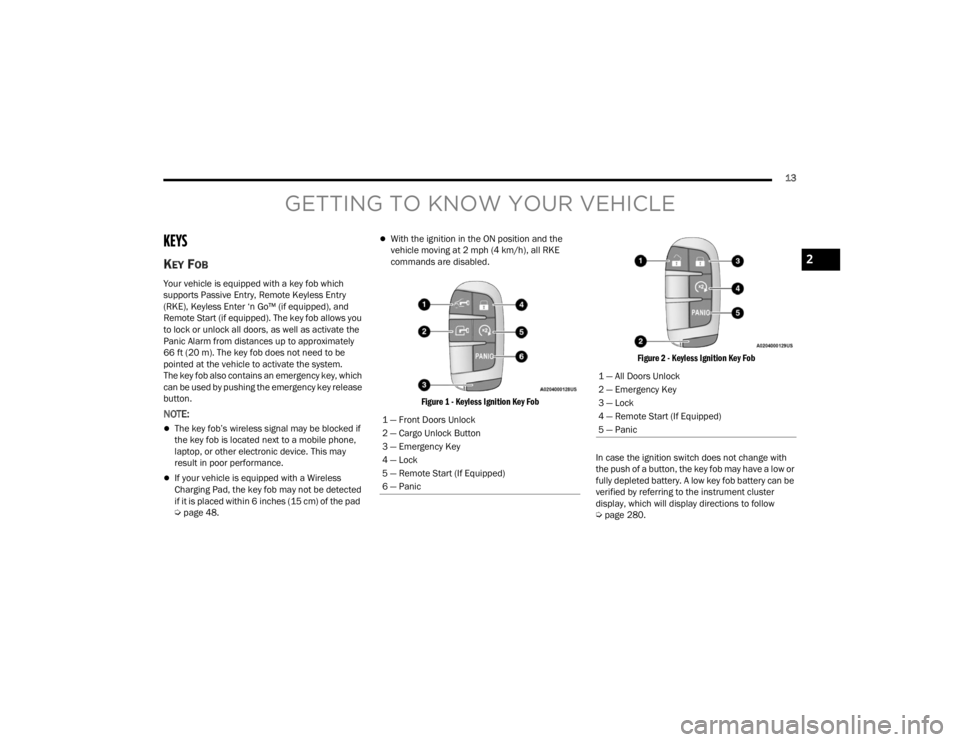
Your vehicle is equipped with a key fob which
supports Passive Entry, Remote Keyless Entry
(RKE), Keyless Enter ‘n Go™ (if equipped), and
Remote Start (if equipped). The key fob allows you
to lock or unlock all doors, as well as activate the
Panic Alarm from distances up to approximately
66 ft (20 m). The key fob does not need to be
pointed at the vehicle to activate the system.
The key fob also contains an emergency key, which
can be used by pushing the emergency key release
button.
NOTE:
The key fob’s wireless signal may be blocked if
the key fob is located next to a mobile phone,
laptop, or other electronic device. This may
result in poor performance.
If your vehicle is equipped with a Wireless
Charging Pad, the key fob may not be detected
if it is placed within 6 inches (15 cm) of the pad
Úpage 48.
With the ignition in the ON position and the
vehicle moving at 2 mph (4 km/h), all RKE
commands are disabled.
Figure 1 - Keyless Ignition Key Fob Figure 2 - Keyless Ignition Key Fob
In case the ignition switch does not change with
the push of a button, the key fob may have a low or
fully depleted battery. A low key fob battery can be
verified by referring to the instrument cluster
display, which will display directions to follow
Ú page 280.
1 — Front Doors Unlock
2 — Cargo Unlock Button
3 — Emergency Key
4 — Lock
5 — Remote Start (If Equipped)
6 — Panic
1 — All Doors Unlock
2 — Emergency Key
3 — Lock
4 — Remote Start (If Equipped)
5 — Panic
2
23_VF_OM_EN_USC_t.book Page 13
Page 16 of 296
14GETTING TO KNOW YOUR VEHICLE
To Lock/Unlock The Doors
To lock all of the doors, push and release the lock
button once. Push and release the front unlock
button on key fob once to unlock only the front doors
(figure 1) or push and release the unlock button on
key fob once to unlock all doors (figure 2). Push and
release the cargo unlock button on key fob once to
unlock the cargo area (rear lateral sliding doors and
rear door). The doors can also be locked and
unlocked manually by using the mechanical key.
When the doors are unlocked, the turn signals
will flash. When the doors are locked, the turn
signals will flash and the horn will chirp (if equipped
and activated through the Uconnect Settings
Ú
page 134). If a door is open when the lock button
is pushed, the turn signal lights will flash at an
increased rate to indicate that a door is still open.
Key Left Vehicle Feature
If a valid key fob is no longer detected inside
the vehicle while the vehicle’s ignition system is
in the ON/RUN or START position, the message
“Key Fob Has Left The Vehicle” will be shown in the
instrument cluster display along with an interior
chime. An exterior audible and visual alert will also
be activated to warn the driver. The vehicle’s horn will rapidly chirp three times
along with a single flash of the vehicle’s exterior
lights.
NOTE:
The doors have to be open and then closed in
order for the vehicle to detect a key fob; the Key
Left Vehicle feature will not activate until all of
the doors are closed.
These alerts will not be activated in situations
where the vehicle’s engine is left running with
the key fob inside.
Replacing The Battery In The Key Fob
The replacement battery is one CR2032 battery.
NOTE:
Customers are recommended to use a battery
obtained from Mopar®. Aftermarket coin
battery dimensions may not meet the original
OEM coin battery dimensions.
Perchlorate Material — special handling may apply.
See
www.dtsc.ca.gov/hazardouswaste/
perchlorate
for further information.
Do not touch the battery terminals that are on
the back housing or the printed circuit board.
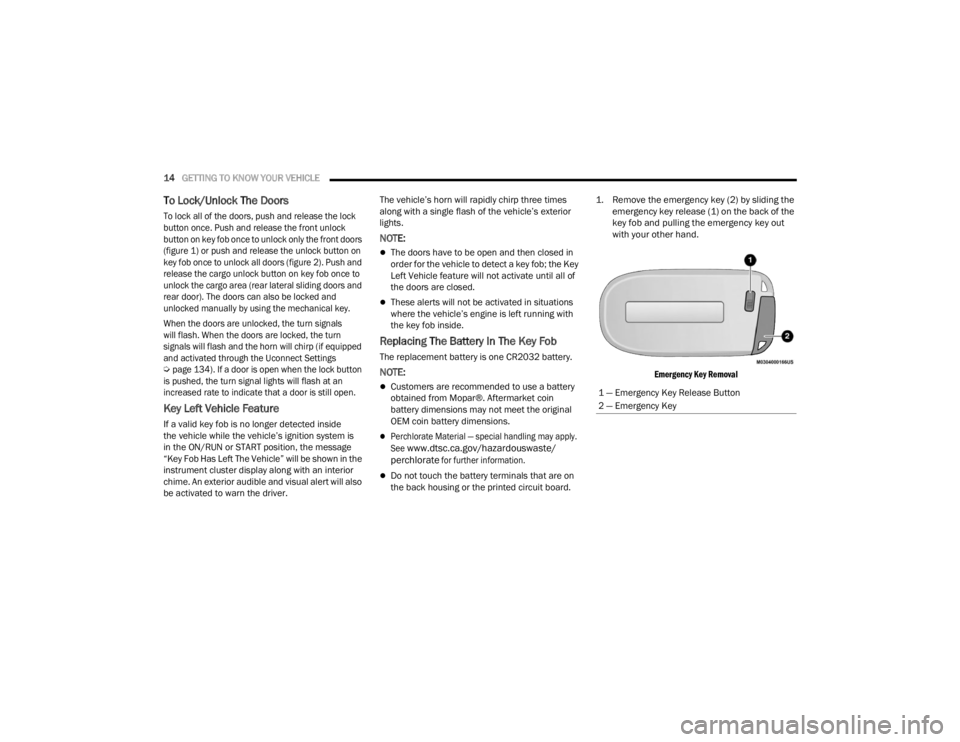
1. Remove the emergency key (2) by sliding the
emergency key release (1) on the back of the
key fob and pulling the emergency key out
with your other hand.
Emergency Key Removal
1 — Emergency Key Release Button
2 — Emergency Key
23_VF_OM_EN_USC_t.book Page 14
Page 19 of 296
GETTING TO KNOW YOUR VEHICLE17
ON/RUN
Driving position
All electrical devices are available (e.g. climate
controls, heated seats, etc.)
START
The engine will start (when foot is on the brake)
NOTE:
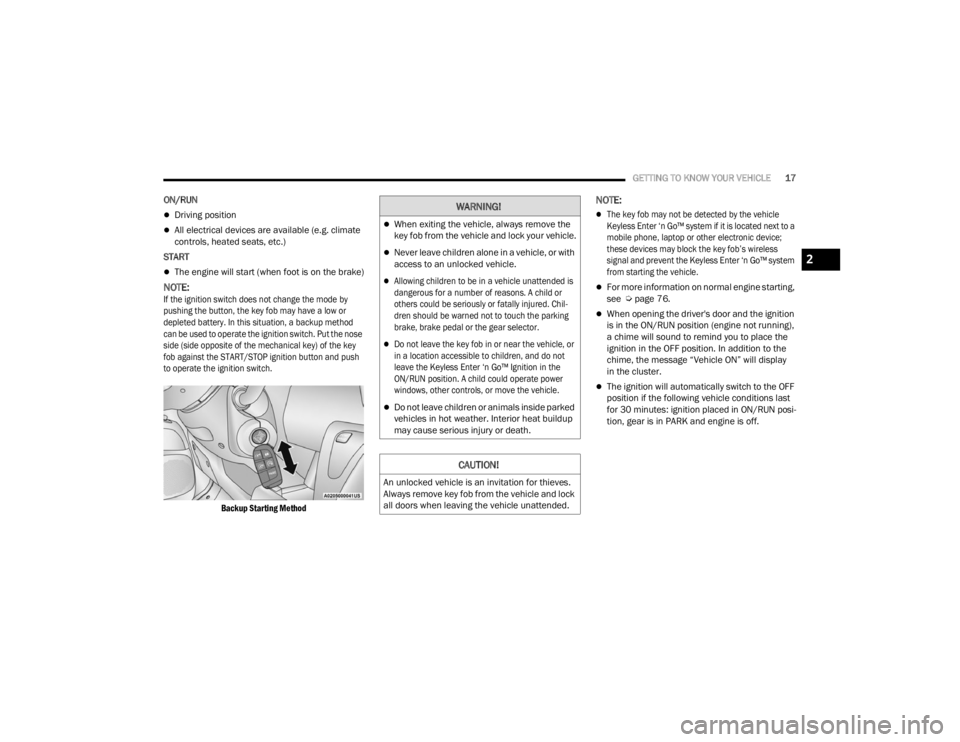
If the ignition switch does not change the mode by
pushing the button, the key fob may have a low or
depleted battery. In this situation, a backup method
can be used to operate the ignition switch. Put the nose
side (side opposite of the mechanical key) of the key
fob against the START/STOP ignition button and push
to operate the ignition switch.
Backup Starting Method
NOTE:
The key fob may not be detected by the vehicle
Keyless Enter ‘n Go™ system if it is located next to a
mobile phone, laptop or other electronic device;
these devices may block the key fob’s wireless
signal and prevent the Keyless Enter ‘n Go™ system
from starting the vehicle.
For more information on normal engine starting,
see Úpage 76.
When opening the driver's door and the ignition
is in the ON/RUN position (engine not running),
a chime will sound to remind you to place the
ignition in the OFF position. In addition to the
chime, the message “Vehicle ON” will display
in the cluster.
The ignition will automatically switch to the OFF
position if the following vehicle conditions last
for 30 minutes: ignition placed in ON/RUN posi -
tion, gear is in PARK and engine is off.
WARNING!
When exiting the vehicle, always remove the
key fob from the vehicle and lock your vehicle.
Never leave children alone in a vehicle, or with
access to an unlocked vehicle.
Allowing children to be in a vehicle unattended is
dangerous for a number of reasons. A child or
others could be seriously or fatally injured. Chil -
dren should be warned not to touch the parking
brake, brake pedal or the gear selector.
Do not leave the key fob in or near the vehicle, or
in a location accessible to children, and do not
leave the Keyless Enter ‘n Go™ Ignition in the
ON/RUN position. A child could operate power
windows, other controls, or move the vehicle.
Do not leave children or animals inside parked
vehicles in hot weather. Interior heat buildup
may cause serious injury or death.
CAUTION!
An unlocked vehicle is an invitation for thieves.
Always remove key fob from the vehicle and lock
all doors when leaving the vehicle unattended.
2
23_VF_OM_EN_USC_t.book Page 17
Page 21 of 296

GETTING TO KNOW YOUR VEHICLE19
TO EXIT REMOTE START MODE
To drive the vehicle after starting the Remote Start
system, push and release the START/STOP ignition
button while pressing the brake pedal prior to the
end of the 15 minute cycle.
The Remote Start system will turn the engine off if
the Remote Start button on the key fob is pushed
again, or if the engine is allowed to run for the
entire 15 minute cycle. Once the ignition is placed
in the ON/RUN position, the climate controls
will resume the previously set operations
(temperature, blower control, etc.).
NOTE:To avoid unintentional shutdowns, the system will
disable for two seconds after receiving a valid
Remote Start request.
For vehicles equipped with the Keyless Enter ‘n Go™ —
Passive Entry feature, the message “Remote Start
Active — Push Start Button” will display in the
instrument cluster display until you push the
START/STOP ignition button.
REMOTE START DEFROST MODE
A
CTIVATION — IF EQUIPPED
When Remote Start is active, and the outside
ambient temperature is 40°F (4.5°C) or below, the
system will automatically activate rear defrost for
15 minutes or less. The timing is dependent on
the ambient temperature. Once the timer expires,
the system will automatically adjust the settings
depending on ambient conditions. See “Remote
Start Comfort Systems — If Equipped” in the next
section for detailed operation.
REMOTE START COMFORT SYSTEMS —
I
F EQUIPPED
When Remote Start is activated, the rear defrost
will automatically turn on in cold weather.
The vehicle will adjust the climate control settings
depending on the outside ambient temperature.
Manual Temperature Control (MTC) — If Equipped
In ambient temperatures of 40°F (4.5°C) or
below, the climate settings will default to
maximum heat, with fresh air entering the
cabin. If the front defrost timer expires, the
vehicle will enter Mix Mode.
In ambient temperatures from 40°F (4.5°C) to
78°F (26°C), the climate settings will be based
on the last settings selected by the driver.
In ambient temperatures of 78°F (26°C)
or above, the climate settings will default to
MAX A/C, Bi-Level mode, with Recirculation on.
For more information on ATC, MTC, and climate
control settings, see Ú page 40.
NOTE:These features will stay on through the duration of
Remote Start, or until the ignition is placed in the
ON/RUN position. The climate control settings
will change, and exit the automatic defaults, if
manually adjusted by the driver while the vehicle is
in Remote Start mode. This includes turning the
climate controls off using the OFF button.
REMOTE START WINDSHIELD WIPER
D
E-ICER ACTIVATION — IF EQUIPPED
When Remote Start is active and the outside
ambient temperature is less than 33°F (0.6°C),
the Windshield Wiper De-Icer will activate. Exiting
Remote Start will resume its previous operation.
If the Windshield Wiper De-Icer was active, the
timer and operation will continue.
2
23_VF_OM_EN_USC_t.book Page 19
Page 22 of 296

20GETTING TO KNOW YOUR VEHICLE
REMOTE START ABORT MESSAGE
One of the following messages will display in the
instrument cluster display if the vehicle fails to
remote start or exits Remote Start prematurely:
Remote Start Canceled — Door Open
Remote Start Canceled — Hood Open
Remote Start Canceled — Fuel Low
Remote Start Canceled — Rear Cargo Door Open
Remote Start Canceled — Too Cold
Remote Start Canceled — Time Expired
Remote Start Canceled — System Fault
Remote Start Disabled — Start Vehicle to Reset
The message will stay active until the ignition is
placed in the ON/RUN position.
VEHICLE SECURITY SYSTEM — IF EQUIPPED
The Vehicle Security system monitors the vehicle
doors and ignition for unauthorized operation.
When the Vehicle Security system is activated,
interior switches for door locks are disabled.
The system provides both audible and visible
signals. For the first three minutes, the horn will
sound, and the turn signal lights will flash. For an
additional 15 minutes, only the turn signal lights
will flash.
TO ARM THE SYSTEM
Follow these steps to arm the Vehicle Security
system:
1. Make sure the vehicle’s ignition is placed in the OFF position.
2. If any doors are open, close them.
3. Perform one of the following methods to lock the vehicle:
Push the lock button on the exterior Passive
Entry door handle with a valid key fob avail -
able in the same exterior zone Ú page 22.
Push the lock button on the key fob.
When the Vehicle Security system is armed, the
Vehicle Security Light (on the lock/unlock button
on the instrument panel) will begin to flash every
three seconds until it is disarmed.
NOTE:If a door or the hood is not properly closed, the
system will not be armed.
TO DISARM THE SYSTEM
The Vehicle Security system can be disarmed using
any of the following methods:
Push the unlock button on the key fob.
Push the Passive Entry button next to the door
handle to unlock the door Ú page 22.
Cycle the ignition out of the OFF position to
disarm the system.
The Vehicle Security system is designed to protect
your vehicle. However, you can create conditions
where the system will give you a false alarm. If one
of the previously described arming sequences has
occurred, the Vehicle Security system will arm
regardless of whether you are in the vehicle or not.
If you remain in the vehicle and open a door, the
alarm will sound. If this occurs, disarm the Vehicle
Security system.
REARMING OF THE SYSTEM
If the system has not been disabled, the
Vehicle Security system will rearm itself after
the 15 additional minutes of the turn signals
flashing. If the condition which initiated the alarm is
still present, the system will ignore that condition
and monitor the remaining doors and ignition.
23_VF_OM_EN_USC_t.book Page 20
Page 25 of 296
GETTING TO KNOW YOUR VEHICLE23
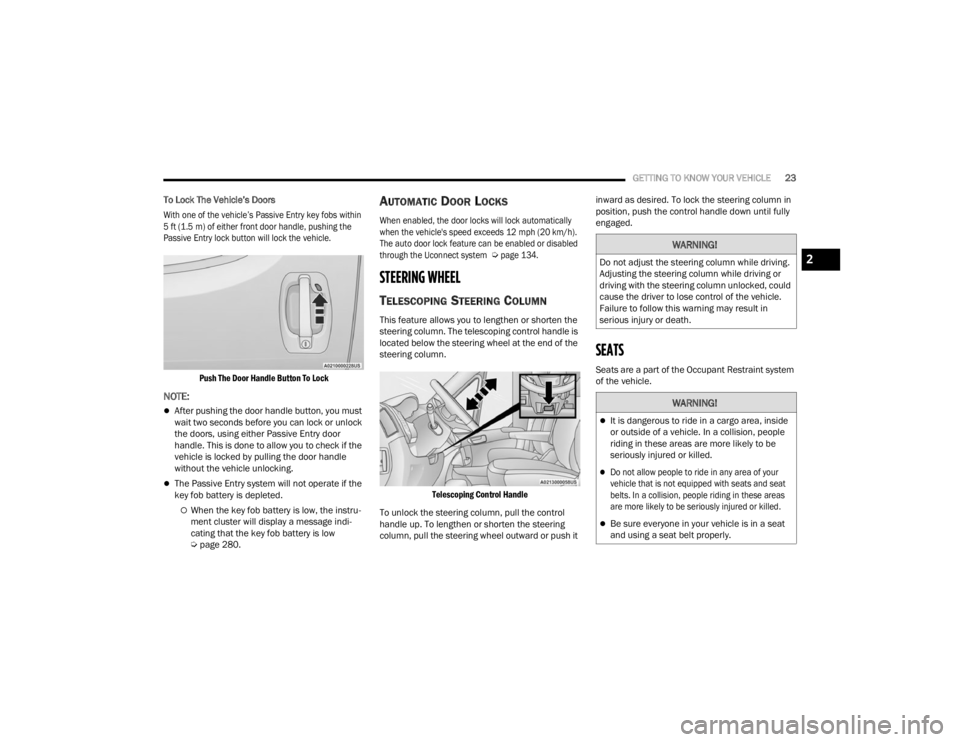
To Lock The Vehicle’s Doors
With one of the vehicle’s Passive Entry key fobs within
5 ft (1.5 m) of either front door handle, pushing the
Passive Entry lock button will lock the vehicle.
Push The Door Handle Button To Lock
NOTE:
After pushing the door handle button, you must
wait two seconds before you can lock or unlock
the doors, using either Passive Entry door
handle. This is done to allow you to check if the
vehicle is locked by pulling the door handle
without the vehicle unlocking.
The Passive Entry system will not operate if the
key fob battery is depleted.
When the key fob battery is low, the instru -
ment cluster will display a message indi -
cating that the key fob battery is low
Ú page 280.
AUTOMATIC DOOR LOCKS
When enabled, the door locks will lock automatically
when the vehicle's speed exceeds 12 mph (20 km/h).
The auto door lock feature can be enabled or disabled
through the Uconnect system
Ú
page 134.
STEERING WHEEL
TELESCOPING STEERING COLUMN
This feature allows you to lengthen or shorten the
steering column. The telescoping control handle is
located below the steering wheel at the end of the
steering column.
Telescoping Control Handle
To unlock the steering column, pull the control
handle up. To lengthen or shorten the steering
column, pull the steering wheel outward or push it inward as desired. To lock the steering column in
position, push the control handle down until fully
engaged.
SEATS
Seats are a part of the Occupant Restraint system
of the vehicle.
WARNING!
Do not adjust the steering column while driving.
Adjusting the steering column while driving or
driving with the steering column unlocked, could
cause the driver to lose control of the vehicle.
Failure to follow this warning may result in
serious injury or death.
WARNING!
It is dangerous to ride in a cargo area, inside
or outside of a vehicle. In a collision, people
riding in these areas are more likely to be
seriously injured or killed.
Do not allow people to ride in any area of your
vehicle that is not equipped with seats and seat
belts. In a collision, people riding in these areas
are more likely to be seriously injured or killed.
Be sure everyone in your vehicle is in a seat
and using a seat belt properly.
2
23_VF_OM_EN_USC_t.book Page 23
Page 28 of 296
26GETTING TO KNOW YOUR VEHICLE
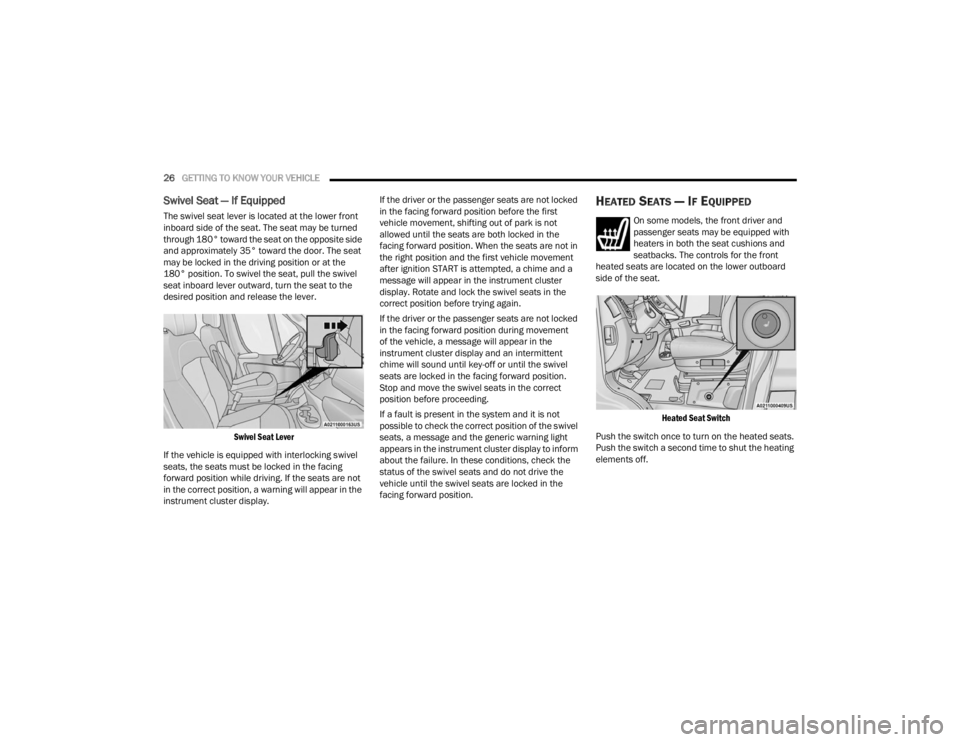
Swivel Seat — If Equipped
The swivel seat lever is located at the lower front
inboard side of the seat. The seat may be turned
through 180° toward the seat on the opposite side
and approximately 35° toward the door. The seat
may be locked in the driving position or at the
180° position. To swivel the seat, pull the swivel
seat inboard lever outward, turn the seat to the
desired position and release the lever.
Swivel Seat Lever
If the vehicle is equipped with interlocking swivel
seats, the seats must be locked in the facing
forward position while driving. If the seats are not
in the correct position, a warning will appear in the
instrument cluster display. If the driver or the passenger seats are not locked
in the facing forward position before the first
vehicle movement, shifting out of park is not
allowed until the seats are both locked in the
facing forward position. When the seats are not in
the right position and the first vehicle movement
after ignition START is attempted, a chime and a
message will appear in the instrument cluster
display. Rotate and lock the swivel seats in the
correct position before trying again.
If the driver or the passenger seats are not locked
in the facing forward position during movement
of the vehicle, a message will appear in the
instrument cluster display and an intermittent
chime will sound until key-off or until the swivel
seats are locked in the facing forward position.
Stop and move the swivel seats in the correct
position before proceeding.
If a fault is present in the system and it is not
possible to check the correct position of the swivel
seats, a message and the generic warning light
appears in the instrument cluster display to inform
about the failure. In these conditions, check the
status of the swivel seats and do not drive the
vehicle until the swivel seats are locked in the
facing forward position.
HEATED SEATS — IF EQUIPPED
On some models, the front driver and
passenger seats may be equipped with
heaters in both the seat cushions and
seatbacks. The controls for the front
heated seats are located on the lower outboard
side of the seat.
Heated Seat Switch
Push the switch once to turn on the heated seats.
Push the switch a second time to shut the heating
elements off.
23_VF_OM_EN_USC_t.book Page 26
Page 31 of 296
GETTING TO KNOW YOUR VEHICLE29
UCONNECT VOICE RECOGNITION —
IF EQUIPPED
INTRODUCING VOICE RECOGNITION
Start using Uconnect Voice Recognition with
these helpful quick tips. It provides the key Voice
Commands and tips you need to know to control
your vehicle’s Voice Recognition (VR) system.
NOTE:Voice Recognition is only available on the
Uconnect 5 NAV With 10.1-inch Display.
BASIC VOICE COMMANDS
The following can be given at any point while using
your Uconnect system.
Push the VR button and after the beep, say a
command. You can also say the system “Wake Up”
word, “Hey Uconnect” or “Hey Ram”, and then say
a command. The factory default Wake Up word is
set to “Hey Uconnect” and can be reprogrammed
through the Uconnect Settings. After the beep, say:
“Cancel ” to stop a current voice session.
“Help ” to hear a list of suggested Voice
Commands.
“ Repeat ” to listen to the system prompts again.
Notice the visual cues that inform you of your Voice
Recognition system’s status.
GET STARTED
The VR button is used to activate/deactivate
your Voice Recognition system. You can also use
the system’s “Wake Up” word to activate voice
recognition. The “Wake Up” word can be set
through the Uconnect Settings Ú page 134.
Helpful hints for using Voice Recognition:
Reduce background noise. Wind noise and
passenger conversations are examples of noise
that may impact recognition.
Speak clearly at a normal pace and volume
while facing straight ahead.
Each time you give a Voice Command, first push the
VR button, wait until after the beep, then say your
Voice Command. Also, you can say the vehicle
“Wake Up” word to issue a Voice Command.
The available “Wake Up” words are “Hey Uconnect”
and “Hey Ram”.
You can interrupt the help message or system
prompts by pushing the VR button and saying a
Voice Command from the current category.
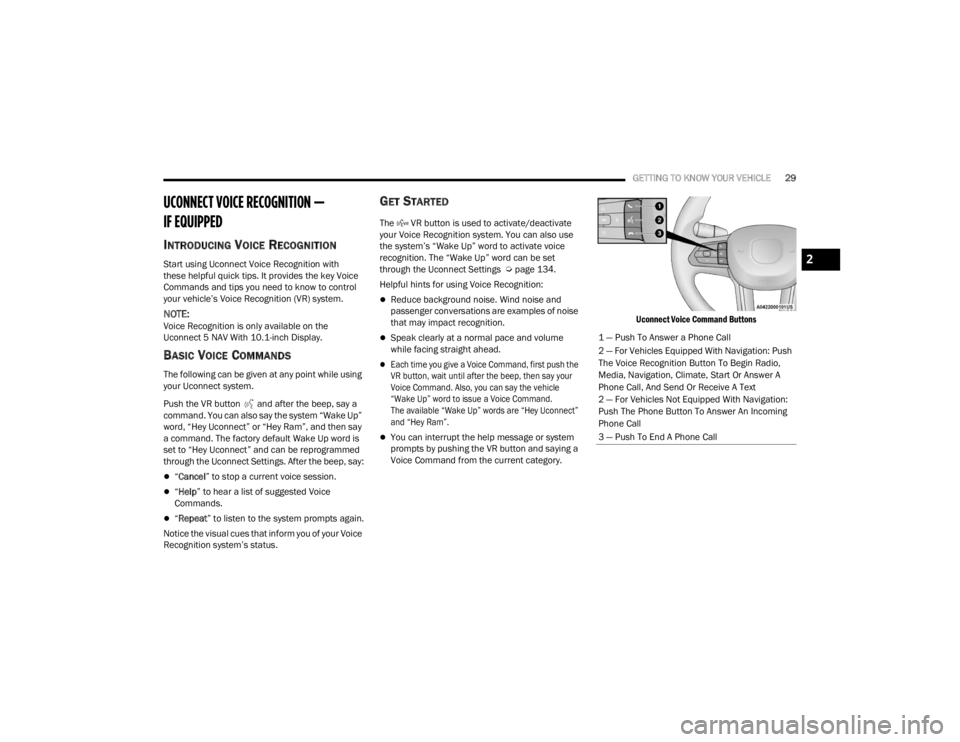
Uconnect Voice Command Buttons
1 — Push To Answer a Phone Call
2 — For Vehicles Equipped With Navigation: Push
The Voice Recognition Button To Begin Radio,
Media, Navigation, Climate, Start Or Answer A
Phone Call, And Send Or Receive A Text
2 — For Vehicles Not Equipped With Navigation:
Push The Phone Button To Answer An Incoming
Phone Call
3 — Push To End A Phone Call
2
23_VF_OM_EN_USC_t.book Page 29