warning RAM PROMASTER 2023 User Guide
[x] Cancel search | Manufacturer: RAM, Model Year: 2023, Model line: PROMASTER, Model: RAM PROMASTER 2023Pages: 296, PDF Size: 12.31 MB
Page 17 of 296
GETTING TO KNOW YOUR VEHICLE15
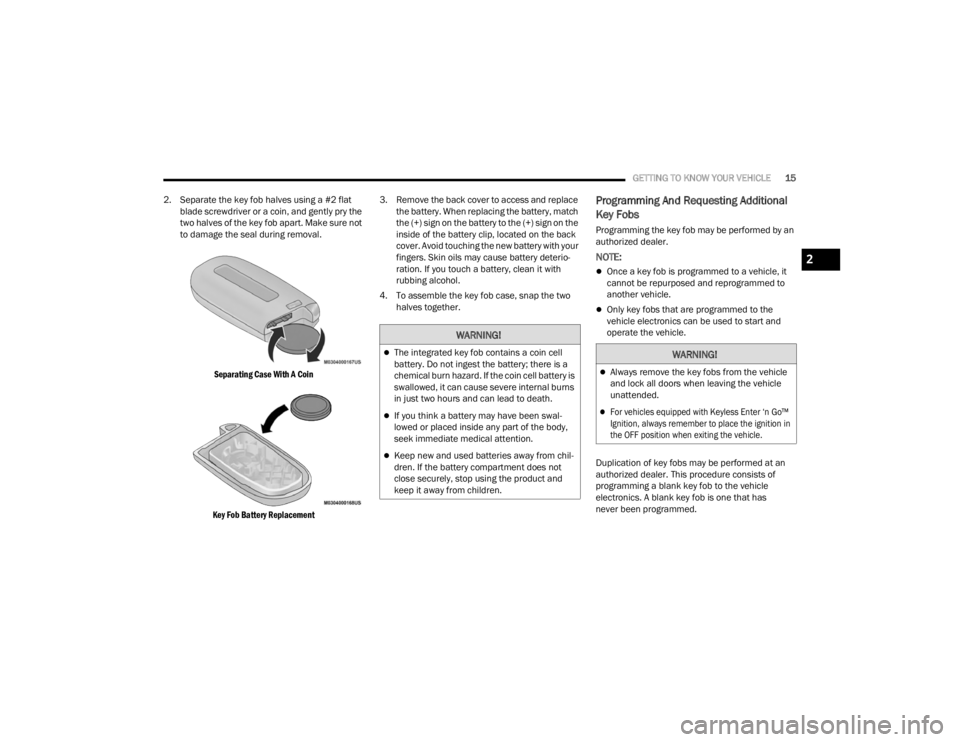
2. Separate the key fob halves using a #2 flat blade screwdriver or a coin, and gently pry the
two halves of the key fob apart. Make sure not
to damage the seal during removal.
Separating Case With A Coin
Key Fob Battery Replacement
3. Remove the back cover to access and replace
the battery. When replacing the battery, match
the (+) sign on the battery to the (+) sign on the
inside of the battery clip, located on the back
cover. Avoid touching the new battery with your
fingers. Skin oils may cause battery deterio -
ration. If you touch a battery, clean it with
rubbing alcohol.
4. To assemble the key fob case, snap the two halves together.
Programming And Requesting Additional
Key Fobs
Programming the key fob may be performed by an
authorized dealer.
NOTE:
Once a key fob is programmed to a vehicle, it
cannot be repurposed and reprogrammed to
another vehicle.
Only key fobs that are programmed to the
vehicle electronics can be used to start and
operate the vehicle.
Duplication of key fobs may be performed at an
authorized dealer. This procedure consists of
programming a blank key fob to the vehicle
electronics. A blank key fob is one that has
never been programmed.
WARNING!
The integrated key fob contains a coin cell
battery. Do not ingest the battery; there is a
chemical burn hazard. If the coin cell battery is
swallowed, it can cause severe internal burns
in just two hours and can lead to death.
If you think a battery may have been swal-
lowed or placed inside any part of the body,
seek immediate medical attention.
Keep new and used batteries away from chil -
dren. If the battery compartment does not
close securely, stop using the product and
keep it away from children.
WARNING!
Always remove the key fobs from the vehicle
and lock all doors when leaving the vehicle
unattended.
For vehicles equipped with Keyless Enter ‘n Go™
Ignition, always remember to place the ignition in
the OFF position when exiting the vehicle.
2
23_VF_OM_EN_USC_t.book Page 15
Page 19 of 296
GETTING TO KNOW YOUR VEHICLE17
ON/RUN
Driving position
All electrical devices are available (e.g. climate
controls, heated seats, etc.)
START
The engine will start (when foot is on the brake)
NOTE:
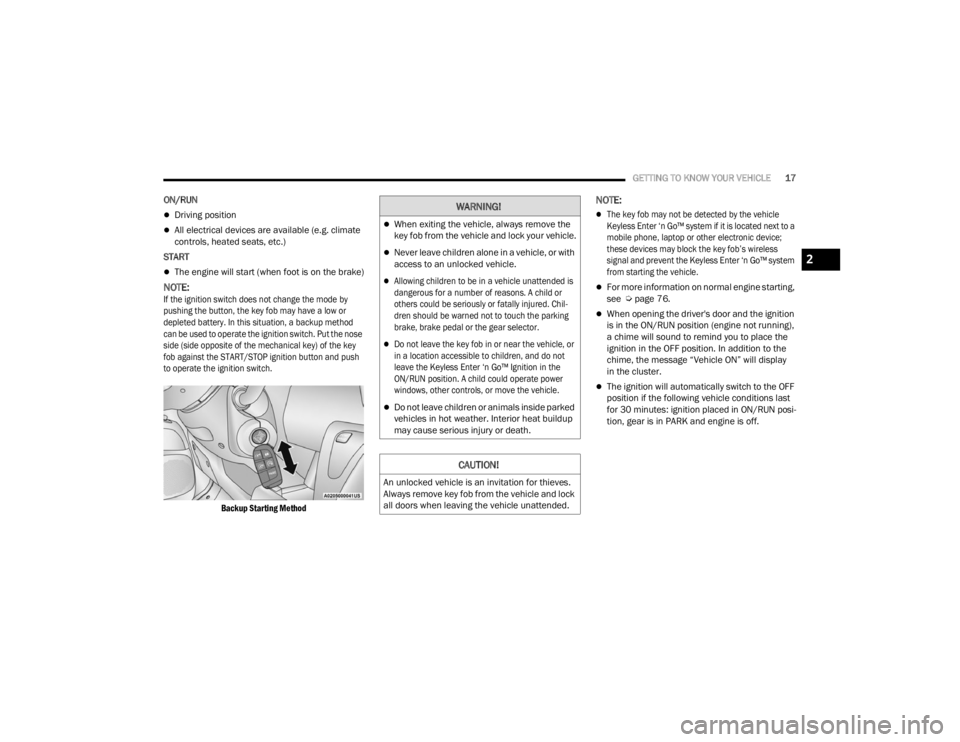
If the ignition switch does not change the mode by
pushing the button, the key fob may have a low or
depleted battery. In this situation, a backup method
can be used to operate the ignition switch. Put the nose
side (side opposite of the mechanical key) of the key
fob against the START/STOP ignition button and push
to operate the ignition switch.
Backup Starting Method
NOTE:
The key fob may not be detected by the vehicle
Keyless Enter ‘n Go™ system if it is located next to a
mobile phone, laptop or other electronic device;
these devices may block the key fob’s wireless
signal and prevent the Keyless Enter ‘n Go™ system
from starting the vehicle.
For more information on normal engine starting,
see Úpage 76.
When opening the driver's door and the ignition
is in the ON/RUN position (engine not running),
a chime will sound to remind you to place the
ignition in the OFF position. In addition to the
chime, the message “Vehicle ON” will display
in the cluster.
The ignition will automatically switch to the OFF
position if the following vehicle conditions last
for 30 minutes: ignition placed in ON/RUN posi -
tion, gear is in PARK and engine is off.
WARNING!
When exiting the vehicle, always remove the
key fob from the vehicle and lock your vehicle.
Never leave children alone in a vehicle, or with
access to an unlocked vehicle.
Allowing children to be in a vehicle unattended is
dangerous for a number of reasons. A child or
others could be seriously or fatally injured. Chil -
dren should be warned not to touch the parking
brake, brake pedal or the gear selector.
Do not leave the key fob in or near the vehicle, or
in a location accessible to children, and do not
leave the Keyless Enter ‘n Go™ Ignition in the
ON/RUN position. A child could operate power
windows, other controls, or move the vehicle.
Do not leave children or animals inside parked
vehicles in hot weather. Interior heat buildup
may cause serious injury or death.
CAUTION!
An unlocked vehicle is an invitation for thieves.
Always remove key fob from the vehicle and lock
all doors when leaving the vehicle unattended.
2
23_VF_OM_EN_USC_t.book Page 17
Page 20 of 296
18GETTING TO KNOW YOUR VEHICLE
REMOTE START — IF EQUIPPED
This system uses the key fob to start the
engine conveniently from outside the
vehicle while still maintaining security.
The system has a range of approximately
300 ft (91 m).
Remote Start is used to defrost windows in cold
weather, and to reach a comfortable climate in all
ambient conditions before the driver enters the
vehicle.
NOTE:Obstructions between the vehicle and the key fob
may reduce this range Ú page 280.
HOW TO USE REMOTE START
Push and release the Remote Start button on the
key fob twice within five seconds. The vehicle
doors will lock, the parking lights will flash, and the
horn will chirp twice (if programmed). Then, the
engine will start, and the vehicle will remain in the
Remote Start mode for a 15 minute cycle.
Pushing the Remote Start button a third time shuts
the engine off.
NOTE:
With Remote Start, the engine will only run for
15 minutes.
Remote Start can only be used twice.
If an engine fault is present or fuel level is low,
the vehicle will not start.
The parking lights will turn on and remain on
during Remote Start mode.
For security, power window is disabled when the
vehicle is in the Remote Start mode.
The ignition must be placed in the ON/RUN posi -
tion before the Remote Start sequence can be
repeated for a third cycle.
All of the following conditions must be met before
the engine will Remote Start:
Gear selector in PARK
Doors closed
Hood closed
Rear cargo doors closed
Hazard switch off
Brake switch inactive (brake pedal not pressed)
Battery at an acceptable charge level
Panic button not pushed
Fuel meets minimum requirement
System not disabled from previous Remote
Start event
Vehicle Security system not active
Malfunction Indicator Light (MIL) is not illuminated
Ignition in OFF position
WARNING!
Do not start or run an engine in a closed garage
or confined area. Exhaust gas contains carbon
monoxide (CO) which is odorless and colorless.
Carbon monoxide is poisonous and can cause
serious injury or death when inhaled.
Keep key fobs away from children. Operation
of the Remote Start system, windows, door
locks or other controls could cause serious
injury or death.
23_VF_OM_EN_USC_t.book Page 18
Page 23 of 296
GETTING TO KNOW YOUR VEHICLE21
(Continued)
SECURITY SYSTEM MANUAL OVERRIDE
The Vehicle Security system will not arm if you lock
the doors using the manual door lock.
DOORS
POWER DOOR LOCKS
The power lock/unlock button has an LED that
indicates whether the doors are locked or
unlocked.
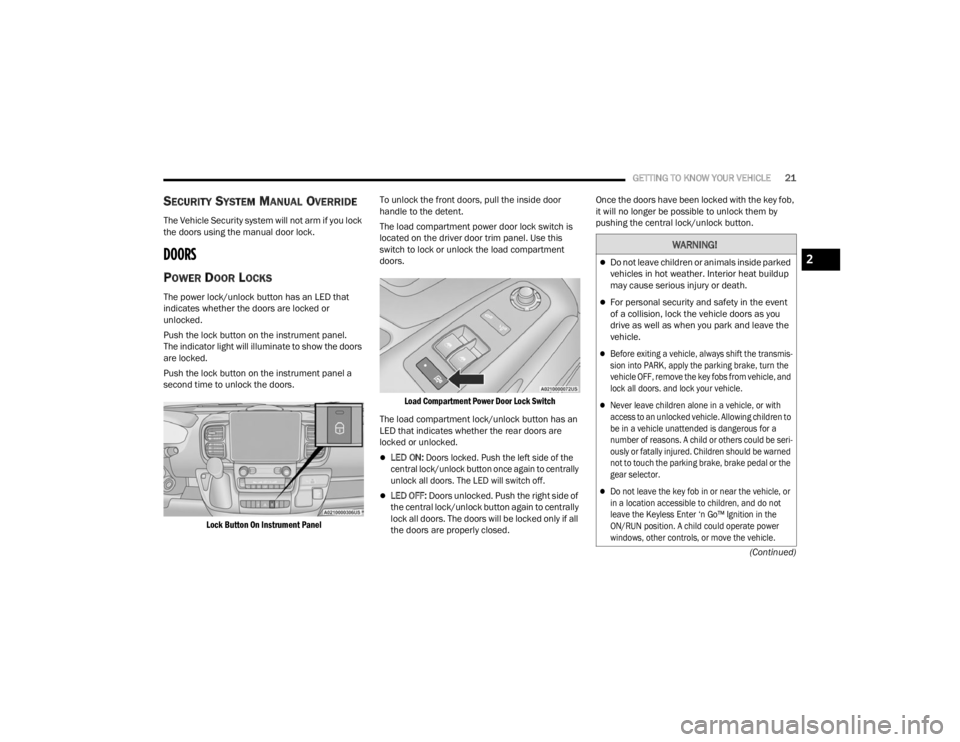
Push the lock button on the instrument panel.
The indicator light will illuminate to show the doors
are locked.
Push the lock button on the instrument panel a
second time to unlock the doors.
Lock Button On Instrument Panel
To unlock the front doors, pull the inside door
handle to the detent.
The load compartment power door lock switch is
located on the driver door trim panel. Use this
switch to lock or unlock the load compartment
doors.
Load Compartment Power Door Lock Switch
The load compartment lock/unlock button has an
LED that indicates whether the rear doors are
locked or unlocked.
LED ON:
Doors locked. Push the left side of the
central lock/unlock button once again to centrally
unlock all doors. The LED will switch off.
LED OFF: Doors unlocked. Push the right side of
the central lock/unlock button again to centrally
lock all doors. The doors will be locked only if all
the doors are properly closed. Once the doors have been locked with the key fob,
it will no longer be possible to unlock them by
pushing the central lock/unlock button.
WARNING!
Do not leave children or animals inside parked
vehicles in hot weather. Interior heat buildup
may cause serious injury or death.
For personal security and safety in the event
of a collision, lock the vehicle doors as you
drive as well as when you park and leave the
vehicle.
Before exiting a vehicle, always shift the transmis
-
sion into PARK, apply the parking brake, turn the
vehicle OFF, remove the key fobs from vehicle, and
lock all doors. and lock your vehicle.
Never leave children alone in a vehicle, or with
access to an unlocked vehicle. Allowing children to
be in a vehicle unattended is dangerous for a
number of reasons. A child or others could be seri -
ously or fatally injured. Children should be warned
not to touch the parking brake, brake pedal or the
gear selector.
Do not leave the key fob in or near the vehicle, or
in a location accessible to children, and do not
leave the Keyless Enter ‘n Go™ Ignition in the
ON/RUN position. A child could operate power
windows, other controls, or move the vehicle.
2
23_VF_OM_EN_USC_t.book Page 21
Page 24 of 296

22GETTING TO KNOW YOUR VEHICLE
AUTO UNLOCK DOORS
This feature unlocks all front doors when one front
door is opened.
NOTE:If the rear or side door is open, only the rear or side
door is unlocked. Automatic Unlock On Exit Feature
If Auto Unlock is enabled within Uconnect Settings
Ú
page 134, this feature will unlock all the doors
when any door is opened if the vehicle is stopped
and in PARK.
KEYLESS ENTER ‘N GO™ — PASSIVE
E
NTRY
The Passive Entry system is an enhancement
to the vehicle’s key fob and a feature of Keyless
Enter ‘n Go™ — Passive Entry. This feature allows
you to lock and unlock the vehicle’s door(s) without
having to push the key fob lock or unlock buttons.
NOTE:
Passive Entry may be programmed on or off
within Uconnect Settings Ú page 134.
The key fob may not be detected by the vehicle
Passive Entry system if it is located next to a
mobile phone, laptop, or other electronic device;
these devices may block the key fob’s wireless
signal and prevent the Passive Entry system
from locking/unlocking the vehicle.
Passive Entry Unlock initiates illuminated
approach (low beams, license plate lamp,
position lamps) for whichever duration is set
between 0, 30, 60 or 90 seconds. Passive Entry
Unlock also initiates two flashes of the turn
signals.
If the vehicle is unlocked by Passive Entry and
no door is opened within 60 seconds, the
vehicle will relock and (if equipped) will arm
the Vehicle Security system.
To Unlock From The Driver, Passenger or Rear
Door
With a valid Passive Entry key fob within 5 ft
(1.5 m) of the door handle, push the Passive Entry
button next to the handle to unlock the vehicle.
Unlock the front doors only if the Uconnect
setting is set to "Approach" and you press the
button located next to the front handle.
Unlock the load compartment doors only if the
Uconnect setting is set to "Approach" and you
press the button located next to the rear handle.
The Passive Entry feature will be disabled if the
Uconnect setting is set to "Off".
NOTE:
Either the load compartment and cabin
compartment or all doors will unlock when
you press Passive Entry button, depending on
the selected setting in the Uconnect system
Ú page 134.
Driving with the rear doors open can allow
poisonous exhaust gases into your vehicle.
You and your passengers could be injured by
these fumes. Keep the rear doors closed
when you are operating the vehicle.
If you are required to drive with the rear doors
open, make sure that all windows are closed and
the climate control blower control is set to a high
speed. DO NOT use the recirculation mode.
CAUTION!
An unlocked vehicle is an invitation. Always remove
the key fob from the vehicle and lock all of the doors
when leaving the vehicle unattended.
WARNING!
23_VF_OM_EN_USC_t.book Page 22
Page 25 of 296
GETTING TO KNOW YOUR VEHICLE23
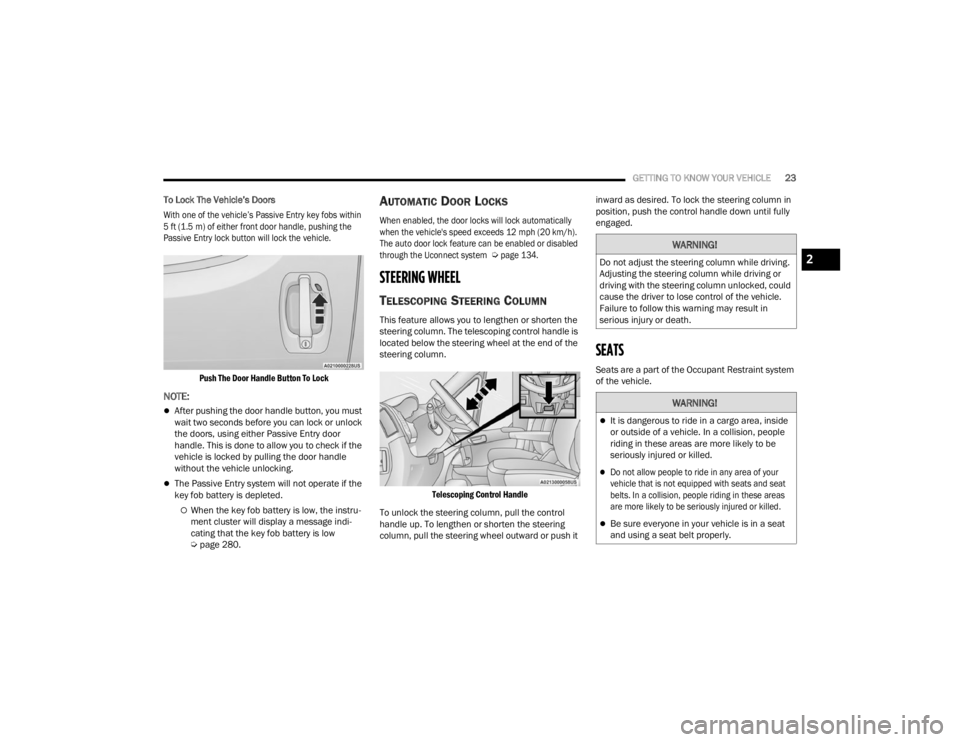
To Lock The Vehicle’s Doors
With one of the vehicle’s Passive Entry key fobs within
5 ft (1.5 m) of either front door handle, pushing the
Passive Entry lock button will lock the vehicle.
Push The Door Handle Button To Lock
NOTE:
After pushing the door handle button, you must
wait two seconds before you can lock or unlock
the doors, using either Passive Entry door
handle. This is done to allow you to check if the
vehicle is locked by pulling the door handle
without the vehicle unlocking.
The Passive Entry system will not operate if the
key fob battery is depleted.
When the key fob battery is low, the instru -
ment cluster will display a message indi -
cating that the key fob battery is low
Ú page 280.
AUTOMATIC DOOR LOCKS
When enabled, the door locks will lock automatically
when the vehicle's speed exceeds 12 mph (20 km/h).
The auto door lock feature can be enabled or disabled
through the Uconnect system
Ú
page 134.
STEERING WHEEL
TELESCOPING STEERING COLUMN
This feature allows you to lengthen or shorten the
steering column. The telescoping control handle is
located below the steering wheel at the end of the
steering column.
Telescoping Control Handle
To unlock the steering column, pull the control
handle up. To lengthen or shorten the steering
column, pull the steering wheel outward or push it inward as desired. To lock the steering column in
position, push the control handle down until fully
engaged.
SEATS
Seats are a part of the Occupant Restraint system
of the vehicle.
WARNING!
Do not adjust the steering column while driving.
Adjusting the steering column while driving or
driving with the steering column unlocked, could
cause the driver to lose control of the vehicle.
Failure to follow this warning may result in
serious injury or death.
WARNING!
It is dangerous to ride in a cargo area, inside
or outside of a vehicle. In a collision, people
riding in these areas are more likely to be
seriously injured or killed.
Do not allow people to ride in any area of your
vehicle that is not equipped with seats and seat
belts. In a collision, people riding in these areas
are more likely to be seriously injured or killed.
Be sure everyone in your vehicle is in a seat
and using a seat belt properly.
2
23_VF_OM_EN_USC_t.book Page 23
Page 26 of 296
24GETTING TO KNOW YOUR VEHICLE
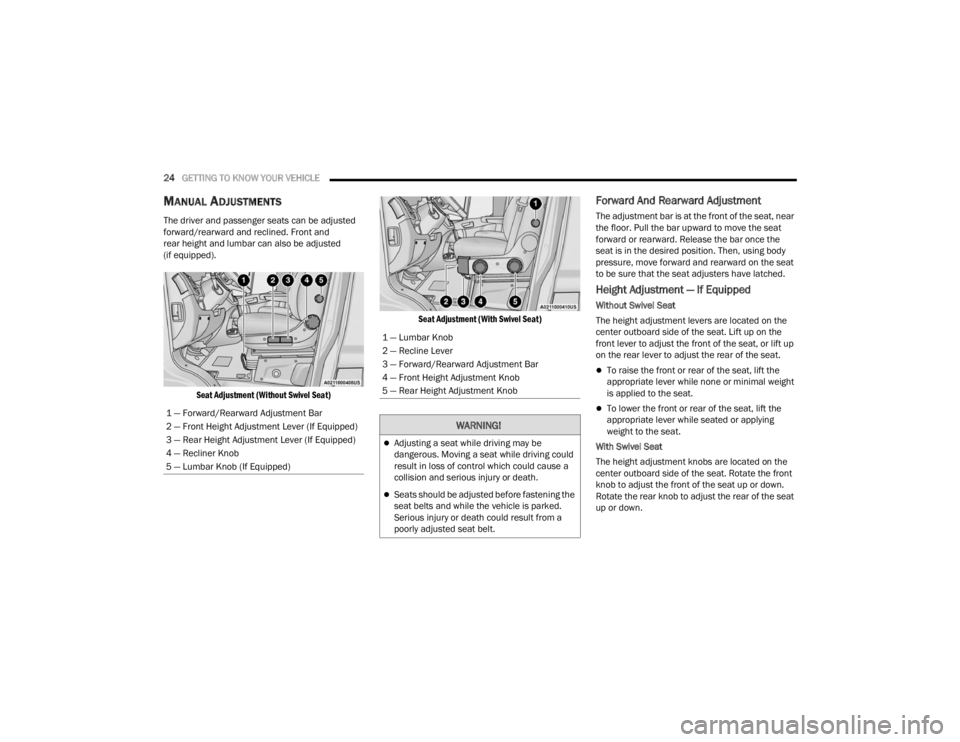
MANUAL ADJUSTMENTS
The driver and passenger seats can be adjusted
forward/rearward and reclined. Front and
rear height and lumbar can also be adjusted
(if equipped).
Seat Adjustment (Without Swivel Seat) Seat Adjustment (With Swivel Seat)
Forward And Rearward Adjustment
The adjustment bar is at the front of the seat, near
the floor. Pull the bar upward to move the seat
forward or rearward. Release the bar once the
seat is in the desired position. Then, using body
pressure, move forward and rearward on the seat
to be sure that the seat adjusters have latched.
Height Adjustment — If Equipped
Without Swivel Seat
The height adjustment levers are located on the
center outboard side of the seat. Lift up on the
front lever to adjust the front of the seat, or lift up
on the rear lever to adjust the rear of the seat.
To raise the front or rear of the seat, lift the
appropriate lever while none or minimal weight
is applied to the seat.
To lower the front or rear of the seat, lift the
appropriate lever while seated or applying
weight to the seat.
With Swivel Seat
The height adjustment knobs are located on the
center outboard side of the seat. Rotate the front
knob to adjust the front of the seat up or down.
Rotate the rear knob to adjust the rear of the seat
up or down.
1 — Forward/Rearward Adjustment Bar
2 — Front Height Adjustment Lever (If Equipped)
3 — Rear Height Adjustment Lever (If Equipped)
4 — Recliner Knob
5 — Lumbar Knob (If Equipped)
1 — Lumbar Knob
2 — Recline Lever
3 — Forward/Rearward Adjustment Bar
4 — Front Height Adjustment Knob
5 — Rear Height Adjustment Knob
WARNING!
Adjusting a seat while driving may be
dangerous. Moving a seat while driving could
result in loss of control which could cause a
collision and serious injury or death.
Seats should be adjusted before fastening the
seat belts and while the vehicle is parked.
Serious injury or death could result from a
poorly adjusted seat belt.
23_VF_OM_EN_USC_t.book Page 24
Page 27 of 296
GETTING TO KNOW YOUR VEHICLE25
(Continued)
Recliner Adjustment
Without Swivel Seat
The recliner knob is on the rear outboard side of the
seat. To recline the seatback, lean back and rotate
the knob rearward to position the seatback as desired.
To return the seatback to its normal upright position,
lean forward and rotate the knob forward until the
seatback is in the upright position.
With Swivel Seat
The recliner lever is located at the lower front outboard
side of the seat. To recline the seatback, lean forward
slightly, pull the lever outward, lean back to the desired
position and release the lever. To return the seatback
to its normal upright position, lean forward and pull the
lever outward. Release the lever once the seatback is
in the upright position.
Lumbar Support — If Equipped
This feature allows you to increase or decrease the
amount of lumbar support. The lumbar control
knob is located on the rear upper outboard side of
the driver's seatback. Rotate the control forward to
increase and rearward to decrease the desired
amount of lumbar support.
Suspension Seat — If Equipped
The seat is equipped with a mechanical spring
system and hydraulic shock absorber to ensure
maximum comfort and safety. The system of
springs also effectively absorbs impact from
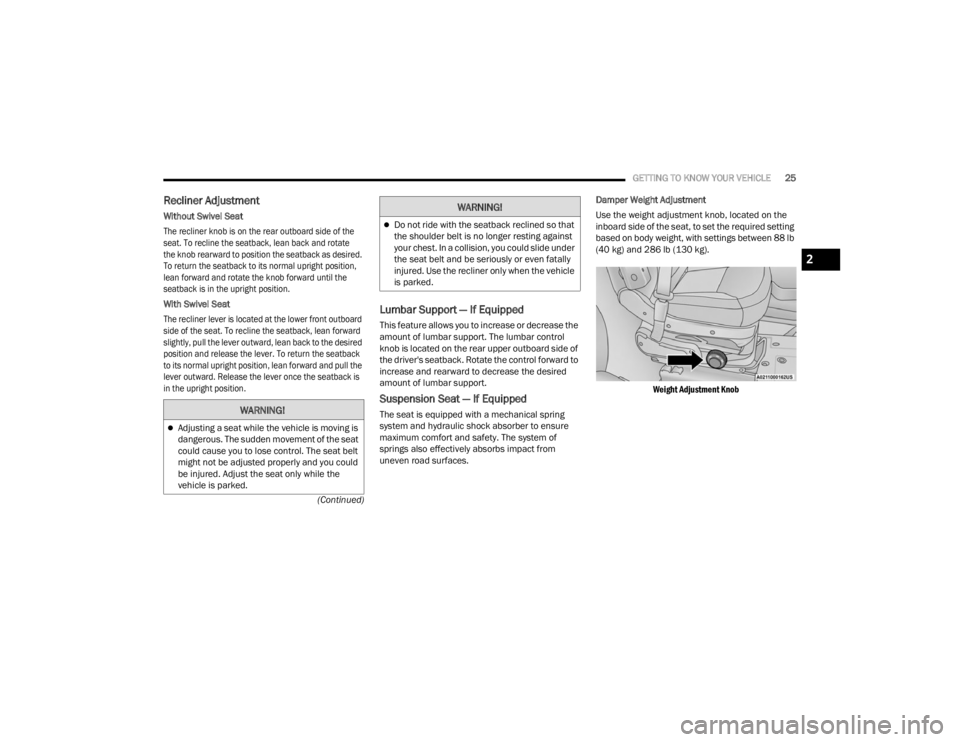
uneven road surfaces. Damper Weight Adjustment
Use the weight adjustment knob, located on the
inboard side of the seat, to set the required setting
based on body weight, with settings between 88 lb
(40 kg) and 286 lb (130 kg).
Weight Adjustment Knob
WARNING!
Adjusting a seat while the vehicle is moving is
dangerous. The sudden movement of the seat
could cause you to lose control. The seat belt
might not be adjusted properly and you could
be injured. Adjust the seat only while the
vehicle is parked.
Do not ride with the seatback reclined so that
the shoulder belt is no longer resting against
your chest. In a collision, you could slide under
the seat belt and be seriously or even fatally
injured. Use the recliner only when the vehicle
is parked.
WARNING!
2
23_VF_OM_EN_USC_t.book Page 25
Page 28 of 296
26GETTING TO KNOW YOUR VEHICLE
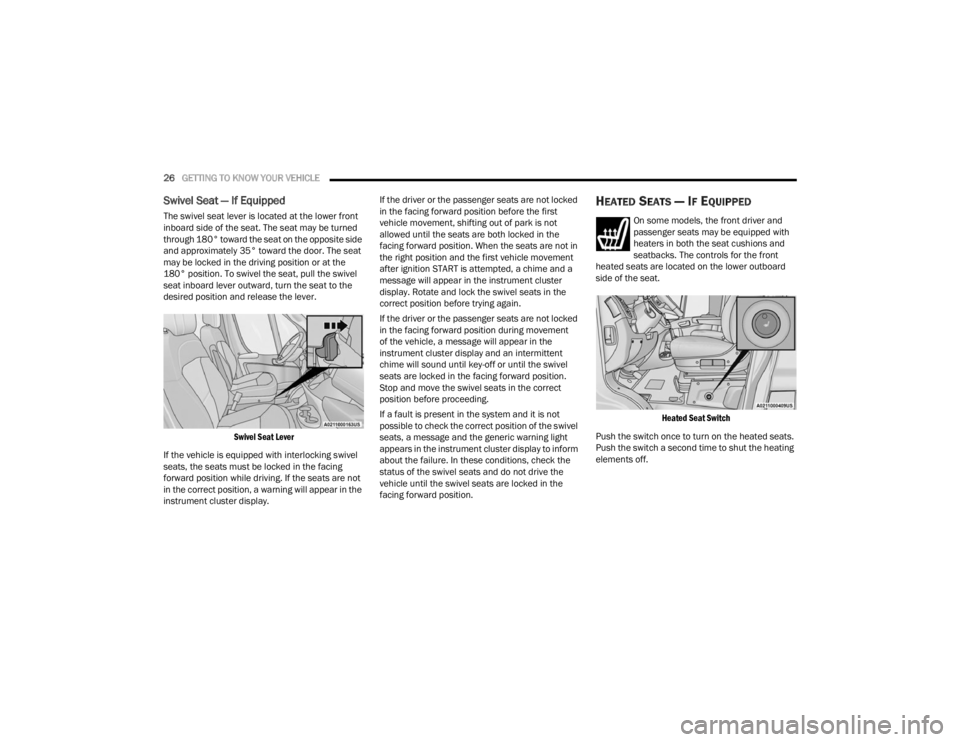
Swivel Seat — If Equipped
The swivel seat lever is located at the lower front
inboard side of the seat. The seat may be turned
through 180° toward the seat on the opposite side
and approximately 35° toward the door. The seat
may be locked in the driving position or at the
180° position. To swivel the seat, pull the swivel
seat inboard lever outward, turn the seat to the
desired position and release the lever.
Swivel Seat Lever
If the vehicle is equipped with interlocking swivel
seats, the seats must be locked in the facing
forward position while driving. If the seats are not
in the correct position, a warning will appear in the
instrument cluster display. If the driver or the passenger seats are not locked
in the facing forward position before the first
vehicle movement, shifting out of park is not
allowed until the seats are both locked in the
facing forward position. When the seats are not in
the right position and the first vehicle movement
after ignition START is attempted, a chime and a
message will appear in the instrument cluster
display. Rotate and lock the swivel seats in the
correct position before trying again.
If the driver or the passenger seats are not locked
in the facing forward position during movement
of the vehicle, a message will appear in the
instrument cluster display and an intermittent
chime will sound until key-off or until the swivel
seats are locked in the facing forward position.
Stop and move the swivel seats in the correct
position before proceeding.
If a fault is present in the system and it is not
possible to check the correct position of the swivel
seats, a message and the generic warning light
appears in the instrument cluster display to inform
about the failure. In these conditions, check the
status of the swivel seats and do not drive the
vehicle until the swivel seats are locked in the
facing forward position.
HEATED SEATS — IF EQUIPPED
On some models, the front driver and
passenger seats may be equipped with
heaters in both the seat cushions and
seatbacks. The controls for the front
heated seats are located on the lower outboard
side of the seat.
Heated Seat Switch
Push the switch once to turn on the heated seats.
Push the switch a second time to shut the heating
elements off.
23_VF_OM_EN_USC_t.book Page 26
Page 29 of 296
GETTING TO KNOW YOUR VEHICLE27
NOTE:Once a heat setting is selected, heat will be felt
within two to five minutes.
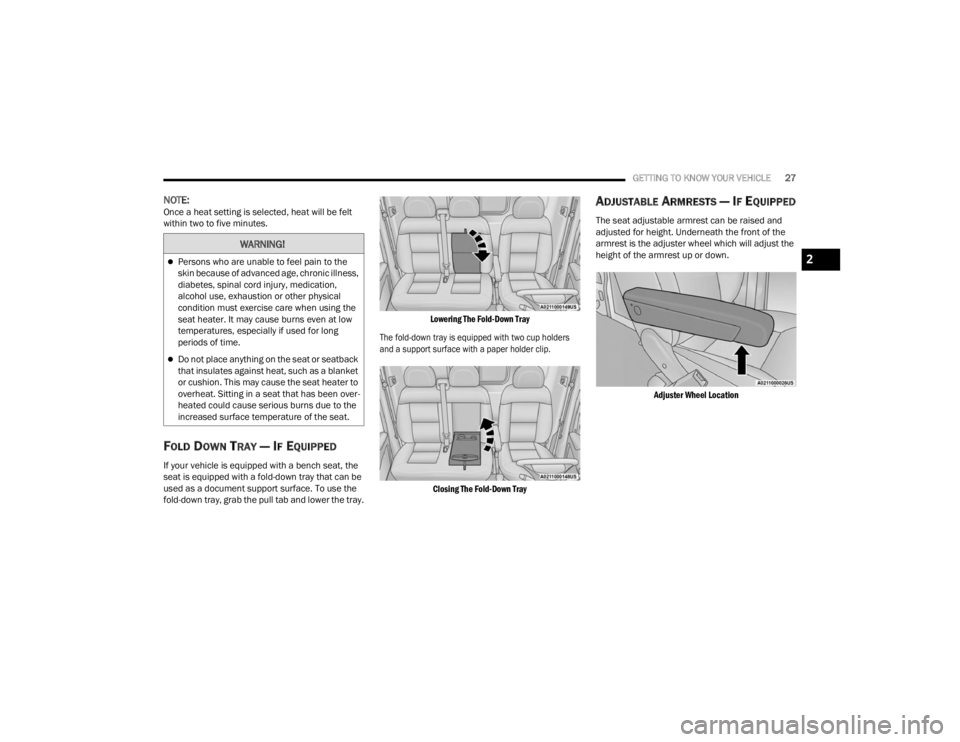
FOLD DOWN TRAY — IF EQUIPPED
If your vehicle is equipped with a bench seat, the
seat is equipped with a fold-down tray that can be
used as a document support surface. To use the
fold-down tray, grab the pull tab and lower the tray.
Lowering The Fold-Down Tray
The fold-down tray is equipped with two cup holders
and a support surface with a paper holder clip.
Closing The Fold-Down Tray
ADJUSTABLE ARMRESTS — IF EQUIPPED
The seat adjustable armrest can be raised and
adjusted for height. Underneath the front of the
armrest is the adjuster wheel which will adjust the
height of the armrest up or down.
Adjuster Wheel Location
WARNING!
Persons who are unable to feel pain to the
skin because of advanced age, chronic illness,
diabetes, spinal cord injury, medication,
alcohol use, exhaustion or other physical
condition must exercise care when using the
seat heater. It may cause burns even at low
temperatures, especially if used for long
periods of time.
Do not place anything on the seat or seatback
that insulates against heat, such as a blanket
or cushion. This may cause the seat heater to
overheat. Sitting in a seat that has been over -
heated could cause serious burns due to the
increased surface temperature of the seat.
2
23_VF_OM_EN_USC_t.book Page 27