display RAM PROMASTER CITY 2022 User Guide
[x] Cancel search | Manufacturer: RAM, Model Year: 2022, Model line: PROMASTER CITY, Model: RAM PROMASTER CITY 2022Pages: 260, PDF Size: 8.45 MB
Page 54 of 260
52
STARTING AND OPERATING
STARTING THE ENGINE
Before starting your vehicle, adjust your seat,
adjust both inside and outside mirrors, and fasten
your seat belts.
AUTOMATIC TRANSMISSION
The gear selector must be in the PARK (P) or
NEUTRAL (N) position before you can start the
engine. Press the brake pedal before shifting to
any driving gear.
NOTE:You must press the brake pedal before shifting out
of PARK.
NORMAL STARTING
Turn the ignition switch to the AVV (START) position
and release it when the engine starts. If the engine
fails to start within 10 seconds, turn the ignition
switch to the STOP (OFF/LOCK) position, wait 10 to
15 seconds, then repeat this procedure.
COLD WEATHER OPERATION
To ensure reliable starting at low temperatures,
use of an externally powered electric engine block
heater (available from an authorized dealer) is
recommended.
To prevent possible engine damage while starting
at low temperatures, this vehicle will inhibit engine
cranking when the ambient temperature is less
than -31°F (-35° C) and the oil temperature
sensor reading indicates an engine block heater
has not been used. The message “Plug In Engine
Heater” will be displayed in the instrument cluster
when the ambient temperature is below -25°F
(-32° C) at the time the engine is shut off as a
reminder.
EXTENDED PARK STARTING
NOTE:Extended Park condition occurs when the vehicle
has not been started or driven for at least 30 days.
1. Install a battery charger or jumper cables to the battery to ensure a full battery charge
during the crank cycle.
2. Place the ignition in the AVV (START) position and release it when the engine starts.
3. If the engine fails to start within ten seconds, place the ignition in the STOP (OFF/LOCK)
position, wait 10 to 15 seconds to allow the
starter to cool, then repeat the Extended Park
Starting procedure.
4. If the engine fails to start after eight attempts, allow the starter to cool for at least
10 minutes, then repeat the procedure.
WARNING!
Never leave children alone in a vehicle, or with
access to an unlocked vehicle.
Allowing children to be in a vehicle unattended
is dangerous for a number of reasons. A child
or others could be seriously or fatally injured.
Children should be warned not to touch the
parking brake, brake pedal or the transmis -
sion gear selector.
Do not leave the key fob in or near the vehicle
(or in a location accessible to children). A child
could operate power windows, other controls,
or move the vehicle.
CAUTION!
To prevent damage to the starter, do not crank
continuously for more than 10 seconds at a
time. Wait 10 to 15 seconds before trying again.
22_VM_OM_EN_USC_t.book Page 52
Page 56 of 260
54STARTING AND OPERATING
ENGINE BREAK-IN RECOMMENDATIONS
A long break-in period is not required for the engine
and drivetrain (transmission and axle) in your
vehicle.
Drive moderately during the first 300 miles
(500 km). After the initial 60 miles (100 km),
speeds up to 50 or 55 mph (80 or 90 km/h) are
desirable.
While cruising, brief full-throttle acceleration within
the limits of local traffic laws contributes to a good
break-in. Wide-open throttle acceleration in low
gear can be detrimental and should be avoided.
The engine oil installed in the engine at the factory
is a high-quality energy conserving type lubricant.
Oil changes should be consistent with anticipated
climate conditions under which vehicle operations
will occur. For the recommended viscosity and
quality grades Ú page 240.
NOTE:A new engine may consume some oil during its first
few thousand miles (kilometers) of operation. This
should be considered a normal part of the break-in
and not interpreted as a concern. Please check
your oil level with the engine oil indicator often
during the break-in period. Add oil as required.
PARKING BRAKE
Before leaving the vehicle, make sure that the
parking brake is fully applied. Also, be certain to
leave an automatic transmission in PARK.
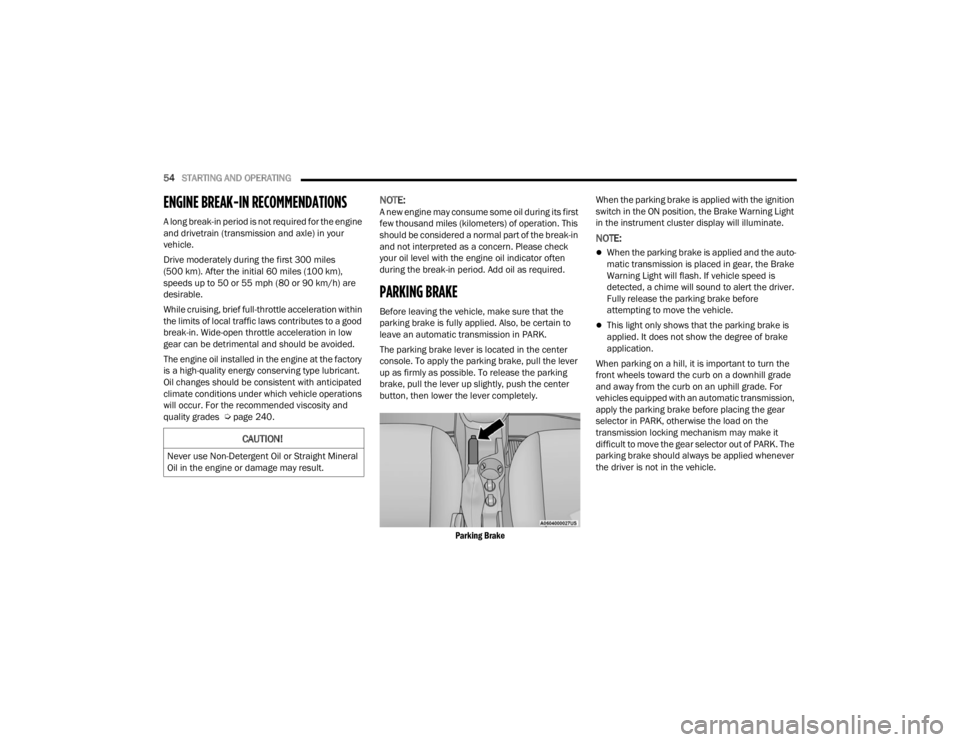
The parking brake lever is located in the center
console. To apply the parking brake, pull the lever
up as firmly as possible. To release the parking
brake, pull the lever up slightly, push the center
button, then lower the lever completely.
Parking Brake
When the parking brake is applied with the ignition
switch in the ON position, the Brake Warning Light
in the instrument cluster display will illuminate.
NOTE:
When the parking brake is applied and the auto
-
matic transmission is placed in gear, the Brake
Warning Light will flash. If vehicle speed is
detected, a chime will sound to alert the driver.
Fully release the parking brake before
attempting to move the vehicle.
This light only shows that the parking brake is
applied. It does not show the degree of brake
application.
When parking on a hill, it is important to turn the
front wheels toward the curb on a downhill grade
and away from the curb on an uphill grade. For
vehicles equipped with an automatic transmission,
apply the parking brake before placing the gear
selector in PARK, otherwise the load on the
transmission locking mechanism may make it
difficult to move the gear selector out of PARK. The
parking brake should always be applied whenever
the driver is not in the vehicle.
CAUTION!
Never use Non-Detergent Oil or Straight Mineral
Oil in the engine or damage may result.
22_VM_OM_EN_USC_t.book Page 54
Page 58 of 260
56STARTING AND OPERATING
KEY IGNITION PARK INTERLOCK
This vehicle is equipped with a Key Ignition Park
Interlock which requires the transmission to be in
PARK before the ignition can be turned to the full
STOP (OFF/LOCK) (key removal) position. The key
can only be removed from the ignition when the
ignition is in the STOP (OFF/LOCK) position, and
once removed, the transmission is locked in PARK.
BRAKE/TRANSMISSION SHIFT
I
NTERLOCK (BTSI) SYSTEM
This vehicle is equipped with a BTSI that holds the
transmission gear selector in PARK unless the
brakes are applied. To shift the transmission out of
PARK, the ignition must be in the MAR (ON/RUN)
position (engine running or not) and the brake
pedal must be pressed. The brake pedal must also be pressed to shift from
NEUTRAL into DRIVE or REVERSE when the vehicle
is stopped or moving at low speeds.
9-SPEED AUTOMATIC TRANSMISSION
The transmission gear range (PRND) is displayed
both beside the gear selector and in the
instrument cluster display. To select a gear range,
push the lock button on the gear selector and
move the lever rearward or forward. You must also
press the brake pedal to shift the transmission out
of PARK (or NEUTRAL, when the vehicle is stopped
or moving at low speeds). Select the DRIVE range
for normal driving.
NOTE:In the event of a mismatch between the gear
selector position and the actual transmission gear
(for example, driver selects REVERSE while driving
forward), the position indicator will blink continu
-
ously until the selector is returned to the proper
position, or the requested shift can be completed.
The electronically controlled transmission adapts
its shift schedule based on driver inputs, along
with environmental and road conditions. The
transmission electronics are self-calibrating;
therefore, the first few shifts on a new vehicle may
be somewhat abrupt. This is a normal condition,
and precision shifts will develop within a few
hundred miles or kilometers. The 9-speed transmission has been developed to
meet the needs of current and future FWD/AWD
vehicles. Software and calibration is refined to
optimize the customer’s driving experience and
fuel economy. By design, some vehicle and
driveline combinations utilize NINTH gear only in
very specific driving situations and conditions.
Only shift from DRIVE to PARK or REVERSE when
the accelerator pedal is released and the vehicle is
stopped. Be sure to keep your foot on the brake
pedal when shifting between these gears.
The transmission gear selector provides PARK,
REVERSE, NEUTRAL, DRIVE, and Electronic Range
Select (ERS) shift positions. Manual downshifts can
be made using the ERS shift control. Moving the gear
selector into the ERS “-”/”+” position (beside the
DRIVE position) activates ERS mode, displays the
current gear in the instrument cluster, and prevents
automatic upshifts beyond this gear. In ERS mode,
toggling the gear selector forward “-” or rearward “+”
will change the highest available gear
Ú
page 59.
NOTE:If the gear selector cannot be moved to the PARK,
REVERSE, or NEUTRAL position (when pushed
forward) it is probably in the ERS “+”/”-” position
(beside the DRIVE position). In ERS mode, the
transmission gear limit (1, 2, 3, etc.) is displayed in
the instrument cluster. Move the gear selector to
the right (into the DRIVE [D] position) for access to
PARK, REVERSE, and NEUTRAL.
CAUTION!
Shift into or out of PARK or REVERSE only after
the vehicle has come to a complete stop.
Do not shift between PARK, REVERSE,
NEUTRAL, or DRIVE when the engine is above
idle speed.
Before shifting into any gear, make sure your
foot is firmly pressing the brake pedal.
22_VM_OM_EN_USC_t.book Page 56
Page 60 of 260
58STARTING AND OPERATING
The following indicators should be used to ensure
that you have properly engaged the transmission
into the PARK position:
When shifting into PARK, push the lock button
on the gear selector and firmly move the gear
selector all the way forward until it stops and is
fully seated.
Look at the transmission gear position display
and verify that it indicates the PARK position.
With brake pedal released, verify that the gear
selector will not move out of PARK.
REVERSE (R)
This range is for moving the vehicle backward.
Shift into REVERSE only after the vehicle has come
to a complete stop.
NEUTRAL (N)
Use this range when the vehicle is standing for
prolonged periods with the engine running. Apply
the parking brake and shift the transmission into
PARK if you must exit the vehicle.
DRIVE (D)
This range should be used for most city and
highway driving. It provides the smoothest upshifts
and downshifts, and the best fuel economy. The
transmission automatically upshifts through all
forward gears.
When frequent transmission shifting occurs (such
as when operating the vehicle under heavy loading
conditions, in hilly terrain, traveling into strong
head winds, or while towing a heavy trailer), use
the Electronic Range Select (ERS) shift control to
select a lower gear range Úpage 59. Under these
conditions, using a lower gear range will improve
performance and extend transmission life by
reducing excessive shifting and heat buildup.
If the transmission temperature exceeds normal
operating limits, the transmission controller may
modify the transmission shift schedule, reduce
engine torque, and/or expand the range of torque
converter clutch engagement. This is done to
prevent transmission damage due to overheating.
Never leave children alone in a vehicle, or with
access to an unlocked vehicle. Allowing chil -
dren to be in a vehicle unattended is
dangerous for a number of reasons. A child or
others could be seriously or fatally injured.
Children should be warned not to touch the
parking brake, brake pedal or the transmis -
sion gear selector.
Do not leave the ignition key in or near the
vehicle (or in a location accessible to chil-
dren). A child could operate power windows,
other controls, or move the vehicle.
CAUTION!
Before moving the transmission gear selector
out of PARK, you must turn the ignition to the
ON/RUN position, and also press the brake
pedal. Otherwise, damage to the gear selector
could result.
DO NOT race the engine when shifting from
PARK or NEUTRAL into another gear range, as
this can damage the drivetrain.
WARNING!
WARNING!
Do not coast in NEUTRAL and never turn off the
ignition to coast down a hill. These are unsafe
practices that limit your response to changing
traffic or road conditions. You might lose control
of the vehicle and have a collision.
CAUTION!
Towing the vehicle, coasting, or driving for any
other reason with the transmission in NEUTRAL
can cause severe transmission damage.
For Recreational Towing Ú page 75.
For Towing A Disabled Vehicle Ú page 187.
22_VM_OM_EN_USC_t.book Page 58
Page 61 of 260
STARTING AND OPERATING59
If the transmission becomes extremely hot, the
Transmission Temperature Warning Light may
illuminate and the transmission may operate
differently until the transmission cools down.
During cold temperatures, transmission
operation may be modified depending on engine
and transmission temperature as well as vehicle
speed. This feature improves warm up time of the
engine and transmission to achieve maximum
efficiency. Engagement of the torque converter
clutch, and shifts into EIGHTH or NINTH gear, are
inhibited until the transmission fluid is warm
Ú
page 59. Normal operation will resume once
the transmission temperature has risen to a
suitable level.
Transmission Limp Home Mode
Transmission function is monitored electronically
for abnormal conditions. If a condition is detected
that could result in transmission damage,
Transmission Limp Home Mode is activated. In this
mode, the transmission may operate only in a fixed
gear, or may remain in NEUTRAL. The Malfunction
Indicator Light (MIL) may be illuminated. Limp
Home Mode may allow the vehicle to be driven to
an authorized dealer for service without damaging
the transmission. In the event of a momentary problem, the
transmission can be reset to regain all forward
gears by performing the following steps:
1. Stop the vehicle.
2. Shift the transmission into PARK.
3. Turn the ignition OFF.
4. Wait approximately 10 seconds.
5. Restart the engine.
6. Shift into the desired gear range. If the
problem is no longer detected, the
transmission will return to normal operation.
NOTE:
Even if the transmission can be reset, we recommend
that you visit an authorized dealer at your earliest
possible convenience. An authorized dealer has diag -
nostic equipment to assess the condition of your
transmission. If the transmission cannot be reset,
authorized dealer service is required.
Torque Converter Clutch
A feature designed to improve fuel economy has
been included in the automatic transmission on
your vehicle. A clutch within the torque converter
engages automatically at calibrated speeds. This
may result in a slightly different feeling or response
during normal operation in the upper gears. When
the vehicle speed drops or during some
accelerations, the clutch automatically
disengages.
NOTE:The torque converter clutch will not engage until
the transmission fluid is warm [usually after 1 to
3 miles (2 to 5 km) of driving]. Because the engine
speed is higher when the torque converter clutch is
not engaged, it may seem as if the transmission is
not shifting properly when cold. This is normal. The
torque converter clutch will function normally once
the transmission is sufficiently warm.
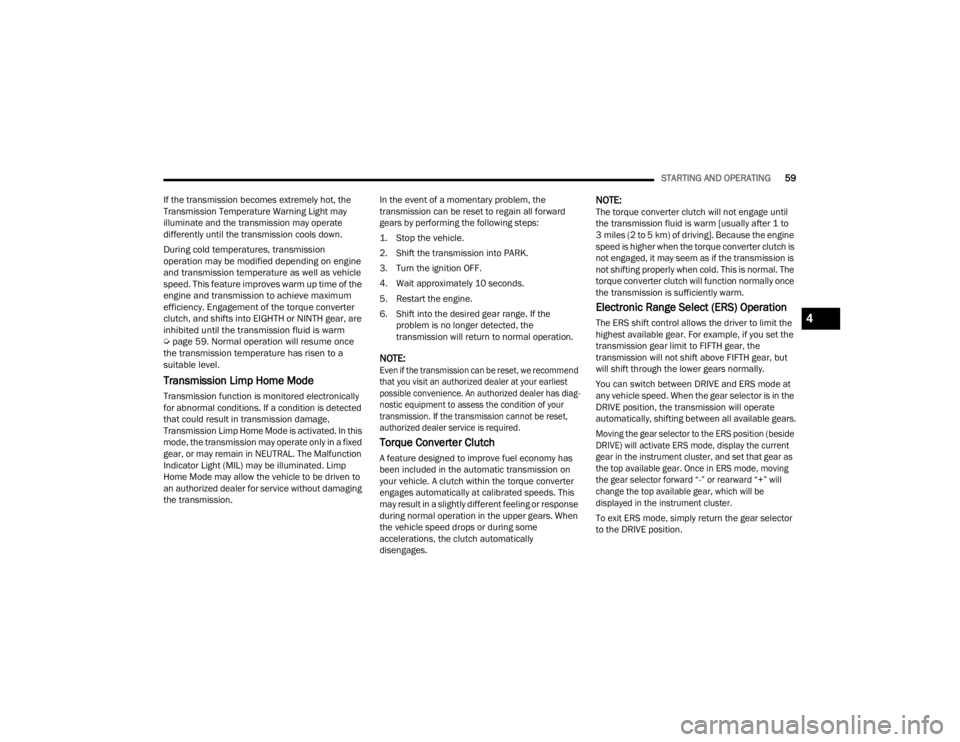
Electronic Range Select (ERS) Operation
The ERS shift control allows the driver to limit the
highest available gear. For example, if you set the
transmission gear limit to FIFTH gear, the
transmission will not shift above FIFTH gear, but
will shift through the lower gears normally.
You can switch between DRIVE and ERS mode at
any vehicle speed. When the gear selector is in the
DRIVE position, the transmission will operate
automatically, shifting between all available gears.
Moving the gear selector to the ERS position (beside
DRIVE) will activate ERS mode, display the current
gear in the instrument cluster, and set that gear as
the top available gear. Once in ERS mode, moving
the gear selector forward “-” or rearward “+” will
change the top available gear, which will be
displayed in the instrument cluster.
To exit ERS mode, simply return the gear selector
to the DRIVE position.4
22_VM_OM_EN_USC_t.book Page 59
Page 63 of 260
STARTING AND OPERATING61
Cruise Control Buttons
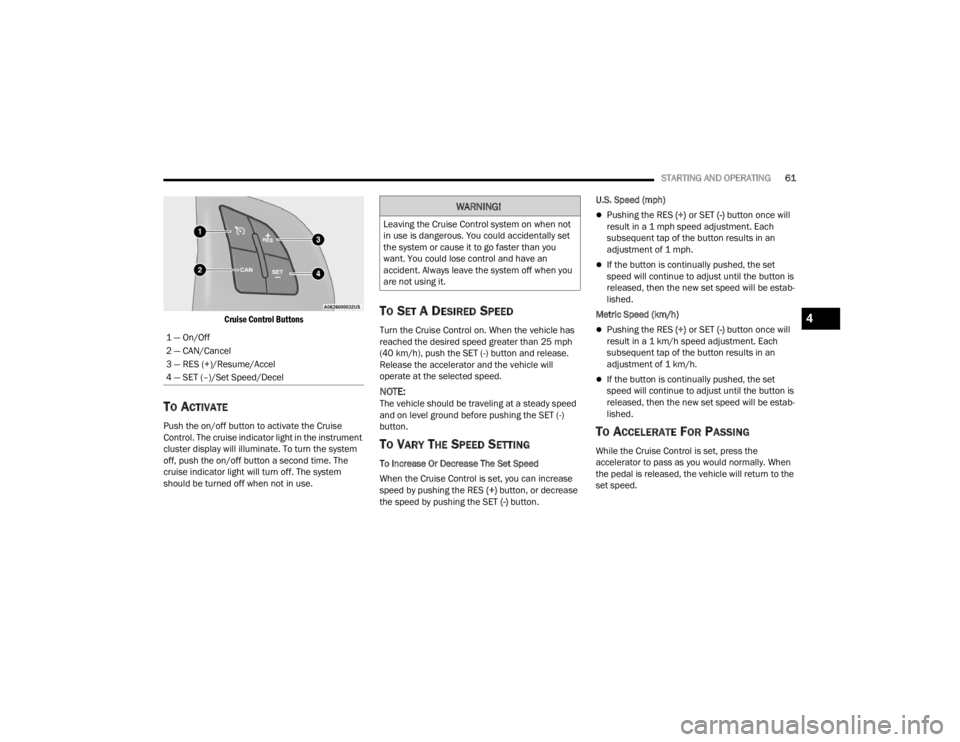
TO ACTIVATE
Push the on/off button to activate the Cruise
Control. The cruise indicator light in the instrument
cluster display will illuminate. To turn the system
off, push the on/off button a second time. The
cruise indicator light will turn off. The system
should be turned off when not in use.
TO SET A DESIRED SPEED
Turn the Cruise Control on. When the vehicle has
reached the desired speed greater than 25 mph
(40 km/h), push the SET (-) button and release.
Release the accelerator and the vehicle will
operate at the selected speed.
NOTE:The vehicle should be traveling at a steady speed
and on level ground before pushing the SET (-)
button.
TO VARY THE SPEED SETTING
To Increase Or Decrease The Set Speed
When the Cruise Control is set, you can increase
speed by pushing the RES (+) button, or decrease
the speed by pushing the SET (-) button. U.S. Speed (mph)
Pushing the RES
(+) or SET (-) button once will
result in a 1 mph speed adjustment. Each
subsequent tap of the button results in an
adjustment of 1 mph.
If the button is continually pushed, the set
speed will continue to adjust until the button is
released, then the new set speed will be estab -
lished.
Metric Speed (km/h)
Pushing the RES (+) or SET (-) button once will
result in a 1 km/h speed adjustment. Each
subsequent tap of the button results in an
adjustment of 1 km/h.
If the button is continually pushed, the set
speed will continue to adjust until the button is
released, then the new set speed will be estab -
lished.
TO ACCELERATE FOR PASSING
While the Cruise Control is set, press the
accelerator to pass as you would normally. When
the pedal is released, the vehicle will return to the
set speed.
1 — On/Off
2 — CAN/Cancel
3 — RES (+)/Resume/Accel
4 — SET (–)/Set Speed/Decel
WARNING!
Leaving the Cruise Control system on when not
in use is dangerous. You could accidentally set
the system or cause it to go faster than you
want. You could lose control and have an
accident. Always leave the system off when you
are not using it.
4
22_VM_OM_EN_USC_t.book Page 61
Page 65 of 260

STARTING AND OPERATING63
PARKSENSE REAR PARK ASSIST
A
LERTS
If an obstacle is behind the vehicle when REVERSE gear is engaged, an audible alert is activated.
The tones emitted by the loudspeaker inform the driver that the vehicle is approaching an obstacle. The pauses between the tones are directly proportional to
the distance from the obstacle. Pulses emitted in quick succession indicate the presence of a very close obstacle. A continuous tone indicates that the obstacle
is less than 12 inches (30 cm) away.
While audible signals are emitted, the audio system is muted.
The audible signal is turned off immediately if the distance increases. The tone cycle remains constant if the distance measured by the inner sensors is constant.
If this condition occurs for the external sensors, the signal is turned off after three seconds (stopping warnings during maneuvers parallel to walls).
Audible And Visual Signals Supplied By The Park Assist System
SIGNAL MEANING INDICATION
Obstacle Distance
An obstacle is present within the sensors' field of view
Audible signal
(dashboard loudspeaker)
• Sound pulses emitted at a rate that increases as
the distance decreases
• Emits continuous tone at 12 inches (30 cm)
• Adjustable volume level programmable through
personal settings in the instrument cluster display
Ú page 40
Failure Sensor or system failuresVisual Signal
(instrument panel)
• Icon appears on display
• Message is displayed on instrument cluster
display (if equipped)4
22_VM_OM_EN_USC_t.book Page 63
Page 66 of 260

64STARTING AND OPERATING
PARKSENSE REAR PARK ASSIST
F
AILURE INDICATIONS
A malfunction of the ParkSense sensors
or system is indicated, during REVERSE
gear engagement, by the instrument
panel warning icon.
The warning icon is illuminated and a message is
displayed on the instrument cluster display (if
equipped) Ú page 44.
The sensors and wiring are tested continuously
when the ignition is in the MAR (ACC/ON/RUN)
position. Failures are indicated immediately if they
occur when the system is on.
Even if the system is able to identify that a specific
sensor is in failure condition, the instrument
cluster display shall indicate that the ParkSense
system is unavailable, without reference to the
sensor in failure condition. If even a single sensor
fails, the entire system will be disabled. The system
is turned off automatically.
CLEANING THE PARKSENSE REAR PARK
A
SSIST SYSTEM
Clean the ParkSense sensors with water, car wash
soap and a soft cloth. Do not use rough or hard
cloths. In washing stations, clean sensors quickly
while keeping the vapor jet/high pressure washing
nozzles at least 4 inches (10 cm) from the sensors. Do not scratch or poke the sensors. Otherwise, you
could damage the sensors.
PARKSENSE REAR PARK ASSIST
S
YSTEM USAGE PRECAUTIONS
NOTE:
Ensure that the outer surface and the underside
of the rear fascia/bumper is clean and clear of
snow, ice, mud, dirt or other obstruction to keep
the ParkSense Rear Park Assist system oper -
ating properly.
Jackhammers, large trucks, and other vibra -
tions could affect the performance of the
ParkSense system.
Clean the ParkSense sensors regularly, taking
care not to scratch or damage them. The sensors
must not be covered with ice, snow, slush, mud,
dirt or debris. Failure to do so can result in the
system not working properly. The ParkSense
system might not detect an obstacle behind the
fascia/bumper, or it could provide a false indica -
tion that an obstacle is behind the fascia/bumper.
Objects such as bicycle carriers, etc., must not
be placed within 12 inches (30 cm) from the
rear fascia/bumper while driving the vehicle.
Failure to do so can result in the system misin -
terpreting a close object as a sensor problem,
causing a failure indication to be displayed in
the instrument cluster display.
WARNING!
Drivers must be careful when backing up even
when using ParkSense. Always check carefully
behind your vehicle, look behind you, and be
sure to check for pedestrians, animals, other
vehicles, obstructions, and blind spots before
backing up. You are responsible for safety and
must continue to pay attention to your
surroundings. Failure to do so can result in
serious injury or death.
Before using ParkSense, it is strongly recom -
mended that the ball mount and hitch ball
assembly be disconnected from the vehicle
when the vehicle is not used for towing.
Failure to do so can result in injury or damage
to vehicles or obstacles because the hitch
ball will be much closer to the obstacle than
the rear fascia when the vehicle sounds the
continuous tone. Also, the sensors could
detect the ball mount and hitch ball
assembly, depending on its size and shape,
giving a false indication that an obstacle is
behind the vehicle.
22_VM_OM_EN_USC_t.book Page 64
Page 67 of 260

STARTING AND OPERATING65
If it’s necessary to keep the ball mount and hitch
ball assembly mounted for a long period, it is
possible to filter out the ball mount and hitch ball
assembly presence in the sensor field of view. The
filtering operation must be performed only by an
authorized dealer.
PARKVIEW REAR BACK UP CAMERA
Your vehicle is equipped with the ParkView Rear
Back Up Camera that allows you to see an
on-screen image of the rear surroundings of your
vehicle whenever the gear selector is put into
REVERSE. The image will be displayed on the
touchscreen display along with a caution note to “Check Entire Surroundings” across the top of the
screen. After five seconds this note will disappear.
The ParkView camera is located on the rear of the
vehicle above the rear license plate.
The Rear Back Up Camera can also be activated
when the vehicle is not in REVERSE through the
Uconnect system Ú
page 79.
NOTE:If one of the rear cargo doors is not completely
closed, the Back Up Camera cannot provide an
accurate image of the area behind the vehicle. A
dedicated message will appear on the Uconnect
display indicating the camera is not in the correct
position.
The Camera Delay setting can be set to on/off in
the rear camera settings menu. When the vehicle
is shifted out of REVERSE and the Camera Delay is
turned off, the rear camera mode is exited and the
navigation or audio screen appears on display
again.
When the transmission is shifted out of REVERSE,
and Camera Delay is activated in the menu screen,
the camera image will continue to be displayed for
up to 10 seconds, unless the speed of the vehicle
is greater than 8 mph (13 km/h), the transmission
is in PARK, or the ignition is placed in the STOP
(OFF/LOCK) position. When displayed, static grid lines will illustrate the
width of the vehicle and will show separate zones
that will help indicate the distance to the rear of
the vehicle. The following table shows the
approximate distances for each zone:
CAUTION!
ParkSense is only a parking aid and it is
unable to recognize every obstacle, including
small obstacles. Parking curbs might be
temporarily detected or not detected at all.
Obstacles located above or below the sensors
will not be detected when they are in close
proximity.
The vehicle must be driven slowly when using
ParkSense in order to be able to stop in time
when an obstacle is detected. It is recom
-
mended that the driver looks over his/her
shoulder when using ParkSense.
Zone Distance To The Rear
Of The Vehicle
Red 0 - 1 ft (0 - 30 cm)
Yellow 1 ft - 3 ft (30 cm - 1 m)
Green 3 ft or greater
(1 m or greater)
WARNING!
Drivers must be careful when backing up even
when using the ParkView Rear Back Up Camera.
Always check carefully behind your vehicle, and
be sure to check for pedestrians, animals, other
vehicles, obstructions, or blind spots before
backing up. You are responsible for the safety of
your surroundings and must continue to pay
attention while backing up. Failure to do so can
result in serious injury or death.
4
22_VM_OM_EN_USC_t.book Page 65
Page 81 of 260
MULTIMEDIA79
UCONNECT SETTINGS
The Uconnect system uses a combination of
buttons on the touchscreen and buttons on the
faceplate located on the center of the instrument
panel. These buttons allow you to access and
change the customer programmable features.
Many features can vary by vehicle.
Buttons on the faceplate are located below and/or
beside the Uconnect system in the center of the
instrument panel. In addition, there is a Scroll/
Enter control knob located on the right side. Turn
the control knob to scroll through menus and
change settings. Push the center of the control
knob one or more times to select or change a
setting.
Your Uconnect system may also have Screen Off
and Mute buttons on the faceplate.
Push the Screen Off button on the faceplate to turn
off the Uconnect screen. Push the button again or
tap the screen to turn the screen on.
Push the Back Arrow button to exit out of a menu
or certain option on the Uconnect system.
NOTE:The NAV button in the middle of your Uconnect
System may also contain the word CAMERA.
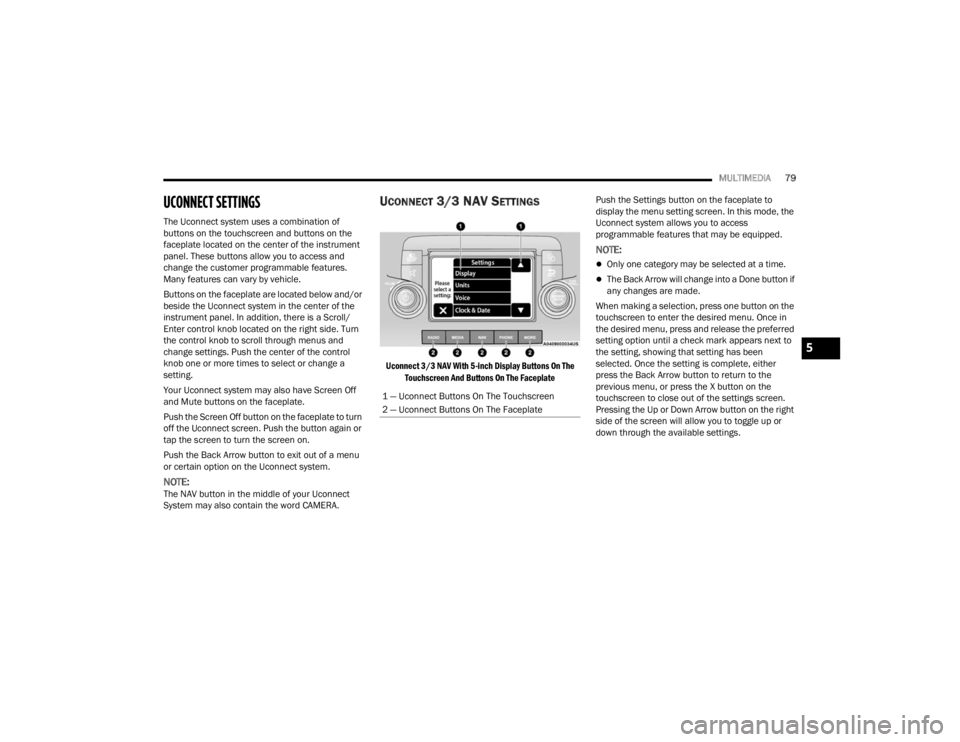
UCONNECT 3/3 NAV SETTINGS
Uconnect 3/3 NAV With 5-inch Display Buttons On The
Touchscreen And Buttons On The Faceplate
Push the Settings button on the faceplate to
display the menu setting screen. In this mode, the
Uconnect system allows you to access
programmable features that may be equipped.
NOTE:
Only one category may be selected at a time.
The Back Arrow will change into a Done button if
any changes are made.
When making a selection, press one button on the
touchscreen to enter the desired menu. Once in
the desired menu, press and release the preferred
setting option until a check mark appears next to
the setting, showing that setting has been
selected. Once the setting is complete, either
press the Back Arrow button to return to the
previous menu, or press the X button on the
touchscreen to close out of the settings screen.
Pressing the Up or Down Arrow button on the right
side of the screen will allow you to toggle up or
down through the available settings.
1 — Uconnect Buttons On The Touchscreen
2 — Uconnect Buttons On The Faceplate
5
22_VM_OM_EN_USC_t.book Page 79