display RAM PROMASTER CITY 2022 Service Manual
[x] Cancel search | Manufacturer: RAM, Model Year: 2022, Model line: PROMASTER CITY, Model: RAM PROMASTER CITY 2022Pages: 260, PDF Size: 8.45 MB
Page 106 of 260
104MULTIMEDIA
CONNECTING TO A PARTICULAR MOBILE
PHONE OR AUDIO DEVICE AFTER PAIRING
Uconnect Phone will automatically connect to the
highest priority paired phone and/or Audio Device
within range. If you need to choose a particular
phone or audio device follow these steps:
1. Press the
Settings
button on the faceplate.
2. Press the Paired Phones/Audio Sources buttons.
3. Press to select the particular phone or the particular audio device. A pop-up menu will
appear; press “Connect Phone”.
4. Press the X to exit out of the Settings screen.
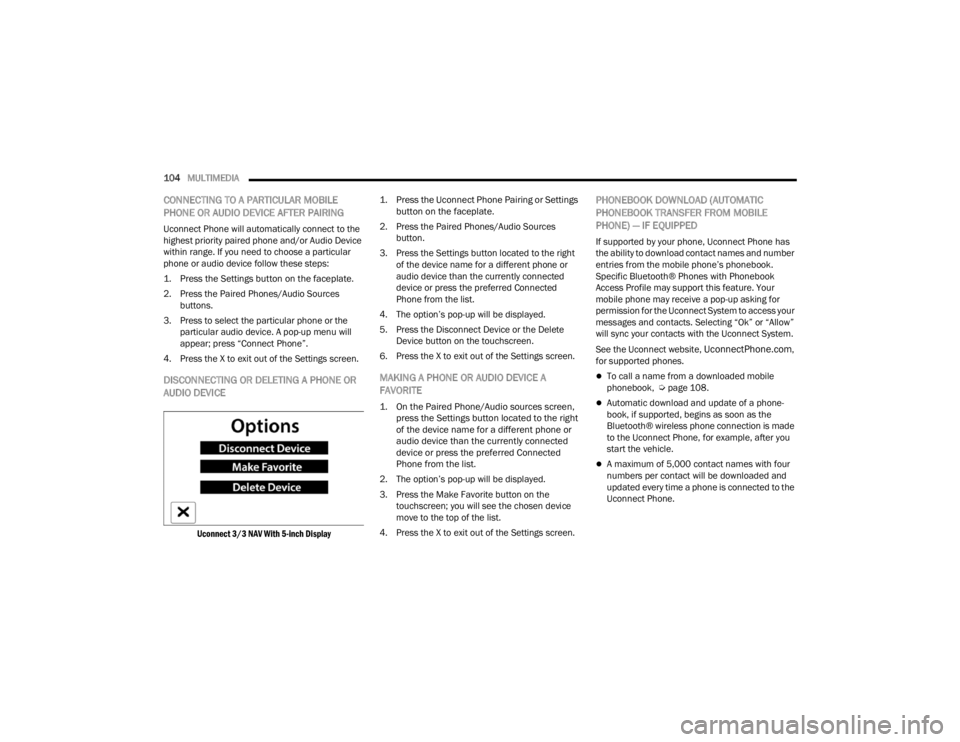
DISCONNECTING OR DELETING A PHONE OR
AUDIO DEVICE
Uconnect 3/3 NAV With 5-inch Display
1. Press the Uconnect Phone Pairing or Settings
button on the faceplate.
2. Press the Paired Phones/Audio Sources button.
3. Press the Settings button located to the right of the device name for a different phone or
audio device than the currently connected
device or press the preferred Connected
Phone from the list.
4. The option’s pop-up will be displayed.
5. Press the Disconnect Device or the Delete Device button on the touchscreen.
6. Press the X to exit out of the Settings screen.
MAKING A PHONE OR AUDIO DEVICE A
FAVORITE
1. On the Paired Phone/Audio sources screen, press the Settings button located to the right
of the device name for a different phone or
audio device than the currently connected
device or press the preferred Connected
Phone from the list.
2. The option’s pop-up will be displayed.
3. Press the Make Favorite button on the touchscreen; you will see the chosen device
move to the top of the list.
4. Press the X to exit out of the Settings screen.
PHONEBOOK DOWNLOAD (AUTOMATIC
PHONEBOOK TRANSFER FROM MOBILE
PHONE) — IF EQUIPPED
If supported by your phone, Uconnect Phone has
the ability to download contact names and number
entries from the mobile phone’s phonebook.
Specific Bluetooth® Phones with Phonebook
Access Profile may support this feature. Your
mobile phone may receive a pop-up asking for
permission for the Uconnect System to access your
messages and contacts. Selecting “Ok” or “Allow”
will sync your contacts with the Uconnect System.
See the Uconnect website,
UconnectPhone.com,
for supported phones.
To call a name from a downloaded mobile
phonebook, Ú page 108.
Automatic download and update of a phone -
book, if supported, begins as soon as the
Bluetooth® wireless phone connection is made
to the Uconnect Phone, for example, after you
start the vehicle.
A maximum of 5,000 contact names with four
numbers per contact will be downloaded and
updated every time a phone is connected to the
Uconnect Phone.
22_VM_OM_EN_USC_t.book Page 104
Page 107 of 260
MULTIMEDIA105
Depending on the maximum number of entries
downloaded, there may be a short delay before
the latest downloaded names can be used. Until
then, if available, the previously downloaded
phonebook is available for use.
Only the phonebook of the currently connected
mobile phone is accessible.
This downloaded phonebook cannot be edited
or deleted on the Uconnect Phone. These can
only be edited on the mobile phone. The
changes are transferred and updated to
Uconnect Phone on the next phone connection.
MANAGING YOUR FAVORITES — IF EQUIPPED
There are two ways you can add an entry to your
favorites:
1. After loading the mobile phonebook, press
the Favorites button on the touchscreen, and
then press one of the +Add Favorite Contact
buttons that appears on the list.
2. After loading the mobile phonebook, select “Contacts” from the Phone main screen, and
then select the appropriate number. Press the
Down Arrow button next to the selected
number to display the options pop-up. In the
pop-up, select “Add to Favorites”.
NOTE:If the Favorites list is full, you will be asked to
remove an existing favorite.
TO REMOVE A FAVORITE — IF EQUIPPED
1. To remove a Favorite, select “Favorites” from the Phone main screen.
2. Next, select the Down Arrow icon next to the contact you want to remove from your
favorites. This will bring up the options for that
Favorite contact.
3. Deselect the Star icon to delete the Favorite.
Phone Call Features
The following features can be accessed through
the Uconnect Phone if the feature(s) are available
and supported by Bluetooth® on your mobile
service plan. For example, if your mobile service
plan provides three-way calling, this feature can be
accessed through the Uconnect Phone. Check with
your mobile service provider for the features that
you have.
Listed below are the phone options with Uconnect
Phone:
Redial
Dial by pressing in the number
Voice Commands (Dial by Saying a Name, Call
by Saying a Phonebook Name, Redial or Call
Back)
Favorites
Mobile Phonebook
Recent Call Log
SMS Message Viewer
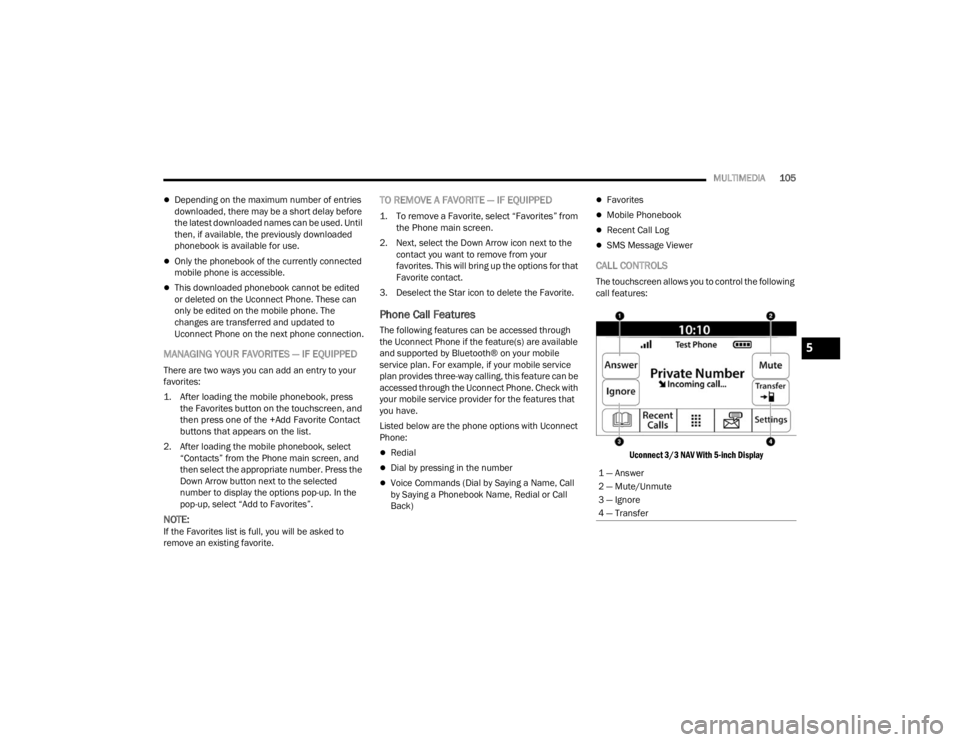
CALL CONTROLS
The touchscreen allows you to control the following
call features:
Uconnect 3/3 NAV With 5-inch Display
1 — Answer
2 — Mute/Unmute
3 — Ignore
4 — Transfer
5
22_VM_OM_EN_USC_t.book Page 105
Page 108 of 260
106MULTIMEDIA
Other phone call features include:
End Call
Hold/Unhold/Resume
Swap two active calls
KEY PAD NUMBER ENTRY
1. Press the Phone button on the faceplate.
2. Press the Dial/Keypad button on the touchscreen.
3. The Touch-Tone screen will be displayed.
4. Use the numbered buttons on the touchscreens to enter the number and press
“Dial/Call”.
RECENT CALLS
You may browse a list of the most recent of each of
the following call types:
All Calls
Incoming Calls or Calls Received
Outgoing Calls or Calls Made
Missed Calls
Calls without a reply
These can be accessed by pressing the Recent
Calls button on the phone main screen.
You can also push the VR button on your steering
wheel and perform the above operation. For
example, say “Show my incoming calls”.
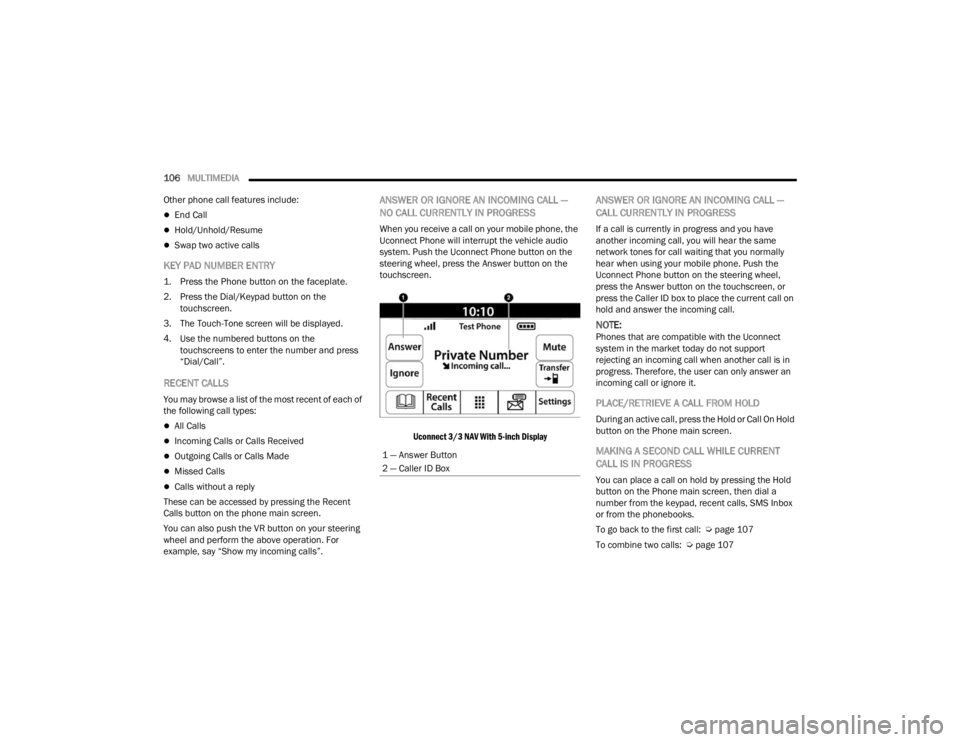
ANSWER OR IGNORE AN INCOMING CALL —
NO CALL CURRENTLY IN PROGRESS
When you receive a call on your mobile phone, the
Uconnect Phone will interrupt the vehicle audio
system. Push the Uconnect Phone button on the
steering wheel, press the Answer button on the
touchscreen.
Uconnect 3/3 NAV With 5-inch Display
ANSWER OR IGNORE AN INCOMING CALL —
CALL CURRENTLY IN PROGRESS
If a call is currently in progress and you have
another incoming call, you will hear the same
network tones for call waiting that you normally
hear when using your mobile phone. Push the
Uconnect Phone button on the steering wheel,
press the Answer button on the touchscreen, or
press the Caller ID box to place the current call on
hold and answer the incoming call.
NOTE:Phones that are compatible with the Uconnect
system in the market today do not support
rejecting an incoming call when another call is in
progress. Therefore, the user can only answer an
incoming call or ignore it.
PLACE/RETRIEVE A CALL FROM HOLD
During an active call, press the Hold or Call On Hold
button on the Phone main screen.
MAKING A SECOND CALL WHILE CURRENT
CALL IS IN PROGRESS
You can place a call on hold by pressing the Hold
button on the Phone main screen, then dial a
number from the keypad, recent calls, SMS Inbox
or from the phonebooks.
To go back to the first call: Ú page 107
To combine two calls: Ú page 107
1 — Answer Button
2 — Caller ID Box
22_VM_OM_EN_USC_t.book Page 106
Page 109 of 260
MULTIMEDIA107
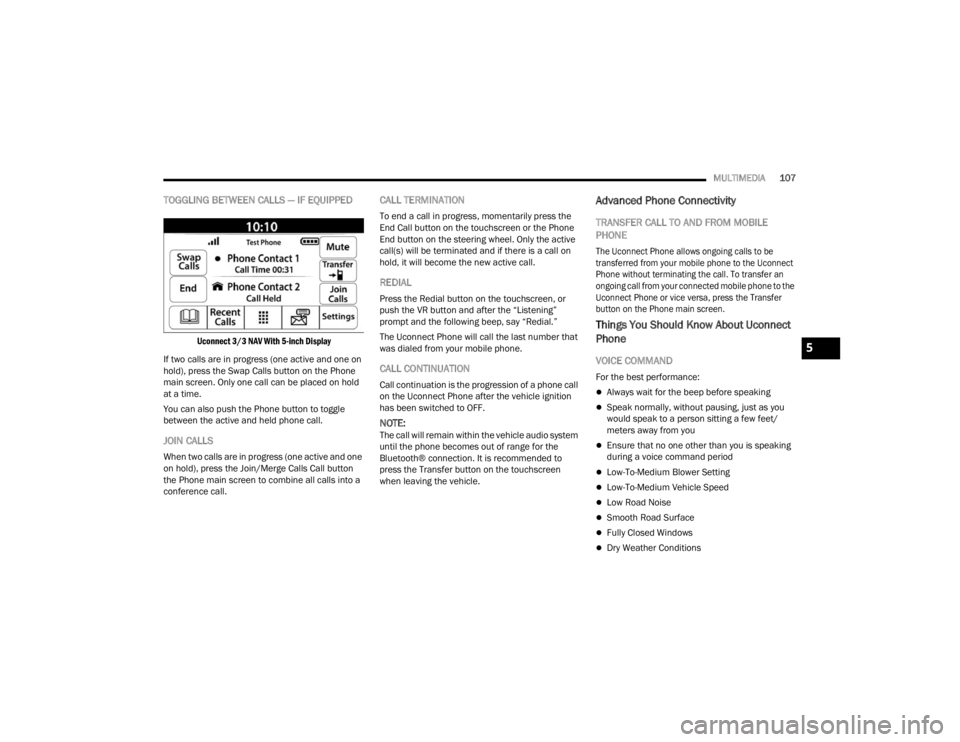
TOGGLING BETWEEN CALLS — IF EQUIPPED
Uconnect 3/3 NAV With 5-inch Display
If two calls are in progress (one active and one on
hold), press the Swap Calls button on the Phone
main screen. Only one call can be placed on hold
at a time.
You can also push the Phone button to toggle
between the active and held phone call.
JOIN CALLS
When two calls are in progress (one active and one
on hold), press the Join/Merge Calls Call button
the Phone main screen to combine all calls into a
conference call.
CALL TERMINATION
To end a call in progress, momentarily press the
End Call button on the touchscreen or the Phone
End button on the steering wheel. Only the active
call(s) will be terminated and if there is a call on
hold, it will become the new active call.
REDIAL
Press the Redial button on the touchscreen, or
push the VR button and after the “Listening”
prompt and the following beep, say “Redial.”
The Uconnect Phone will call the last number that
was dialed from your mobile phone.
CALL CONTINUATION
Call continuation is the progression of a phone call
on the Uconnect Phone after the vehicle ignition
has been switched to OFF.
NOTE:The call will remain within the vehicle audio system
until the phone becomes out of range for the
Bluetooth® connection. It is recommended to
press the Transfer button on the touchscreen
when leaving the vehicle.
Advanced Phone Connectivity
TRANSFER CALL TO AND FROM MOBILE
PHONE
The Uconnect Phone allows ongoing calls to be
transferred from your mobile phone to the Uconnect
Phone without terminating the call. To transfer an
ongoing call from your connected mobile phone to the
Uconnect Phone or vice versa, press the Transfer
button on the Phone main screen.
Things You Should Know About Uconnect
Phone
VOICE COMMAND
For the best performance:
Always wait for the beep before speaking
Speak normally, without pausing, just as you
would speak to a person sitting a few feet/
meters away from you
Ensure that no one other than you is speaking
during a voice command period
Low-To-Medium Blower Setting
Low-To-Medium Vehicle Speed
Low Road Noise
Smooth Road Surface
Fully Closed Windows
Dry Weather Conditions
5
22_VM_OM_EN_USC_t.book Page 107
Page 112 of 260
110MULTIMEDIA
NAVIGATION MODE — IF EQUIPPED
OPERATING NAVIGATION MODE —
I
F EQUIPPED
Planning A Route
Using the search bar provides a wide range of ways
to find places and then navigate to them. You can
search for your destination in different ways:
A specific address
A partial address
A type of place
A zip code
A city to navigate to a city center
A Point of Interest (POI) near your current location
Latitude and longitude coordinates Using Search
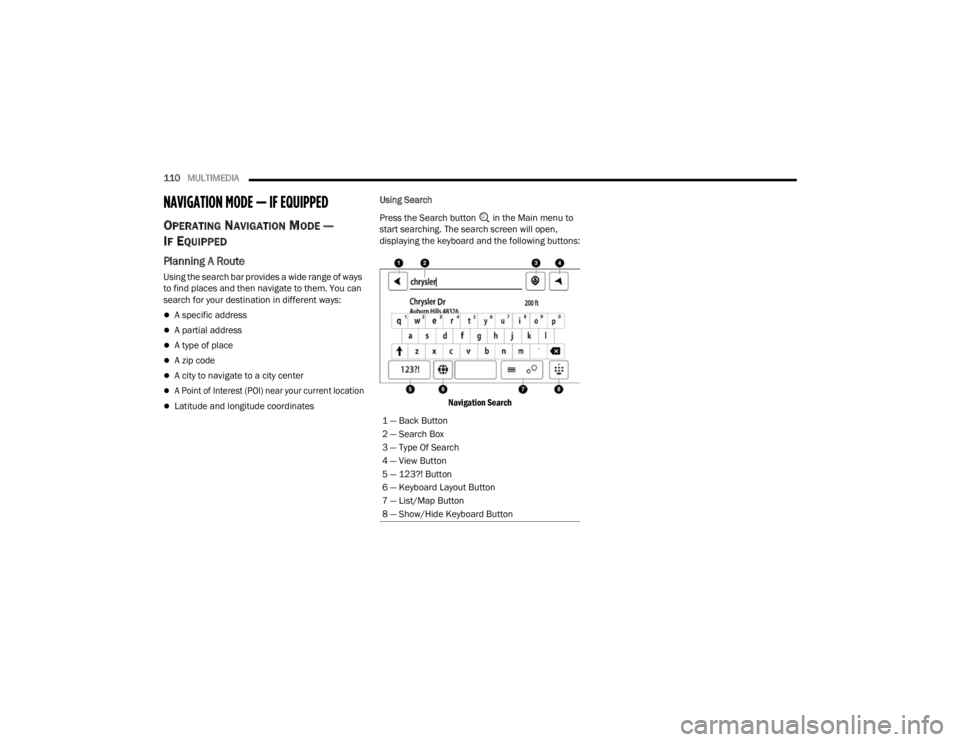
Press the Search button in the Main menu to
start searching. The search screen will open,
displaying the keyboard and the following buttons:
Navigation Search
1 — Back Button
2 — Search Box
3 — Type Of Search
4 — View Button
5 — 123?! Button
6 — Keyboard Layout Button
7 — List/Map Button
8 — Show/Hide Keyboard Button
22_VM_OM_EN_USC_t.book Page 110
Page 124 of 260
122MULTIMEDIA
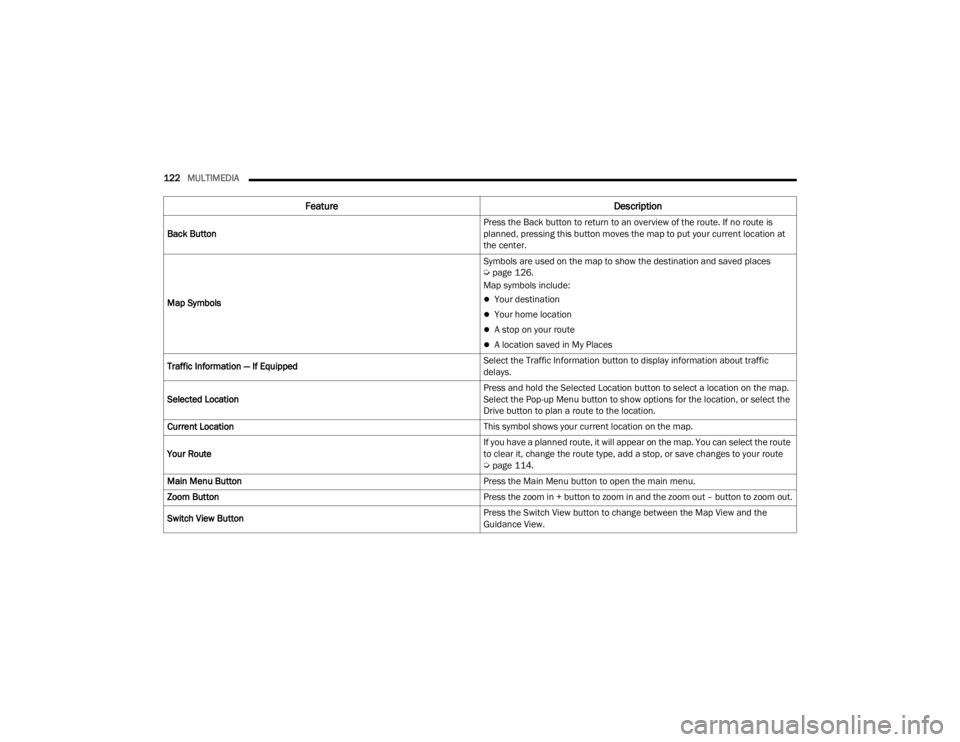
Feature Description
Back Button Press the Back button to return to an overview of the route. If no route is
planned, pressing this button moves the map to put your current location at
the center.
Map Symbols Symbols are used on the map to show the destination and saved places
Ú
page 126.
Map symbols include:
Your destination
Your home location
A stop on your route
A location saved in My Places
Traffic Information — If Equipped Select the Traffic Information button to display information about traffic
delays.
Selected Location Press and hold the Selected Location button to select a location on the map.
Select the Pop-up Menu button to show options for the location, or select the
Drive button to plan a route to the location.
Current Location This symbol shows your current location on the map.
Your Route If you have a planned route, it will appear on the map. You can select the route
to clear it, change the route type, add a stop, or save changes to your route
Ú
page 114.
Main Menu Button Press the Main Menu button to open the main menu.
Zoom Button Press the zoom in + button to zoom in and the zoom out – button to zoom out.
Switch View Button Press the Switch View button to change between the Map View and the
Guidance View.
22_VM_OM_EN_USC_t.book Page 122
Page 127 of 260
MULTIMEDIA125
Safety Warnings: You can change settings for
whether you want to be warned, never warned,
or warned only if you are speeding. The following
options are available:
When speeding: This warning is given when
you exceed the speed limit by more than
3 mph (5 km/h). When you are speeding,
the speed panel also turns red in the Guid -
ance View.
Driver Safety: Select this setting to make
some features locked while the vehicle is in
motion.
NOTE:This feature increases safety by minimizing driver
distraction. When driver safety is on, a message
tells you when the lock is enabled.
SYSTEM
Select this setting to reset all other settings.
Selecting “Reset” will delete all saved places and
settings and restore the standard settings. This
includes the language, voice settings, warning
settings, and theme.
NOTE:This is not a software update and will not affect the
version of the software application installed on
your Uconnect system.
Points Of Interest
ABOUT POINTS OF INTEREST
Points Of Interest (POI) are useful places on the
map.
Here are some examples:
Restaurants
Hotels
Museums
Parking lots
Gas stations
Emergency Services
USING POIS TO PLAN A ROUTE
When you plan a route, you can use a POI for the
destination or as a stop along the route. Using Search
1. Select “Search” on the Main Menu to begin a
search. The search screen will open,
displaying the keyboard. Enter the name of
your desired destination. Your search results
will be displayed in two lists. Addresses and
city matches are shown in the list called
“Addresses.” POIs, types of POIs, and Places
are shown in the list called “Points of
Interest.” You can also select a POI category
to only see POI search results from that
category.
2. Select the desired POI. The location will appear on the map. From here, you can save the POI
to “My Places,” use this POI as a starting point,
begin navigation to this destination, or view
more details about this POI. By pressing “More
Information,” you can view the phone number
and full address of the POI.
3. If a route is already planned, you can add the location to your current route. To plan a route
to this destination, press the Drive button on
the touchscreen.
NOTE:Your Navigation system will calculate a route, and
guidance to your destination will begin. Guidance
View will begin as soon as you start driving.
5
22_VM_OM_EN_USC_t.book Page 125
Page 138 of 260
136SAFETY
NOTE:
The TPMS is not intended to replace normal tire
care and maintenance or to provide warning of
a tire failure or condition.
The TPMS should not be used as a tire pressure
gauge while adjusting your tire pressure.
Driving on a significantly underinflated tire
causes the tire to overheat and can lead to tire
failure. Underinflation also reduces fuel effi -
ciency and tire tread life, and may affect the
vehicle’s handling and stopping ability.
The TPMS is not a substitute for proper tire
maintenance, and it is the driver’s responsibility
to maintain correct tire pressure using an accu -
rate tire pressure gauge, even if underinflation
has not reached the level to trigger illumination
of the TPMS Warning Light.
Seasonal temperature changes will affect tire
pressure, and the TPMS will monitor the actual
tire pressure in the tire Ú page 245.
Base System
This is the TPMS Warning Light located
in the instrument cluster.
The TPMS uses wireless technology with
wheel rim mounted electronic sensors
to monitor tire pressure levels. Sensors, mounted
to each wheel as part of the valve stem, transmit
tire pressure readings to the receiver module.
NOTE:It is particularly important for you to check the tire
pressure in all of the tires on your vehicle regularly
and to maintain the proper pressure.
The TPMS consists of the following components:
Receiver module
Four TPMS sensors
Tire Pressure Monitoring System Warning Light
Tire Pressure Monitoring System Low
Pressure Warnings
The Tire Pressure Monitoring System Warning Light
will illuminate in the instrument cluster, an audible
chime will be activated, and the “Check tire
pressure” text message will display when one or
more of the four active road tire pressures are low.
Should this occur, you should stop as soon as
possible, check the inflation pressure of each tire
on your vehicle, and inflate each tire to the
vehicle’s recommended cold placard pressure
value. The system will automatically update and
the TPMS Warning Light will extinguish once the
updated tire pressures have been received. The
vehicle may need to be driven for up to 20 minutes
above 15 mph (24 km/h) to receive this
information.
Check TPMS Warnings
The TPMS Warning Light will flash on and off for 75
seconds and remain on solid when a system fault
is detected, an audible chime will be activated and
a proper text message will be displayed. If the
ignition key is cycled, this sequence will repeat
providing the system fault still exists. The TPMS
Warning Light will turn off when the fault condition
no longer exists. A system fault can occur with any
of the following scenarios:
1. Jamming due to electronic devices or driving next to facilities emitting the same radio
frequencies as the TPMS sensors.
2. Installing some form of aftermarket window tinting that affects radio wave signals.
3. Snow or ice around the wheels or wheel housings.
4. Using tire chains on the vehicle.
5. Using wheels/tires not equipped with TPMS sensors.
NOTE:Your vehicle can be equipped with either a Tire
Service Kit, a compact spare tire or a regular size
spare tire (with or without original TPMS sensor).
22_VM_OM_EN_USC_t.book Page 136
Page 191 of 260
189
SERVICING AND MAINTENANCE
SCHEDULED SERVICING
Your vehicle is equipped with an automatic oil
change indicator system. The oil change indicator
system will remind you that it is time to take your
vehicle in for scheduled maintenance.
Based on engine operation conditions, the oil
change indicator message will illuminate. This
means that service is required for your vehicle.
Operating conditions such as frequent short-trips,
trailer tow, extended engine idle time, extremely
hot or cold ambient temperatures will influence
when the “Oil Change Required” message is
displayed. Have your vehicle serviced as soon as
possible, within the next 500 miles (805 km).An authorized dealer will reset the oil change
indicator message after completing the scheduled
oil change. If a scheduled oil change is performed
by someone other than an authorized dealer, to
reset the message Ú
page 41.
NOTE:Under no circumstances should oil change
intervals exceed 10,000 miles (16,000 km), 350
hours of engine run time or 12 months, whichever
comes first. The 350 hours of engine run or idle
time is generally only a concern for fleet
customers. Once A Month Or Before A Long Trip:
Check engine oil level.
Check windshield washer fluid level.
Check tire pressure and look for unusual wear
or damage. Rotate tires at the first sign of irreg
-
ular wear, even if it occurs before the oil indi -
cator system turns on.
Check the fluid levels of the coolant reservoir
and brake master cylinder, fill as needed.
Check function of all interior and exterior lights.
8
22_VM_OM_EN_USC_t.book Page 189
Page 249 of 260

247
C
Camera, Rear
.................................................. 65Capacities, Fluid............................................ 240Caps, Filler Fuel............................................................. 66Oil (Engine)................................................ 193Power Steering............................................ 60Radiator (Coolant Pressure)...................... 201Car Washes................................................... 234Carbon Monoxide Warning............................ 170Cargo Area Cover............................................. 37Cargo Compartment........................................ 37Cargo Tie-Downs.............................................. 37Certification Label........................................... 67Chains, Tire.................................................... 232Changing A Flat Tire....................................... 171Chart, Tire Sizing............................................ 218Check Engine Light (Malfunction
Indicator Light)................................................ 51Checking Your Vehicle For Safety.................. 168Checks, Safety............................................... 168Child Restraint............................................... 152Child RestraintsBooster Seats............................................ 155Child Seat Installation..................... 164, 166How To Stow An unused ALR Seat Belt..... 161Infant And Child Restraints....................... 154
Locating The LATCH Anchorages.............. 160Lower Anchors And Tethers For Children.. 157Older Children And Child Restraints......... 154Seating Positions...................................... 156Clean Air Gasoline......................................... 238CleaningWheels..................................................... 231Climate Control................................................ 28Cold Weather Operation.................................. 52Compact Spare Tire...................................... 229Contract, Service.......................................... 243Cooling Pressure Cap (Radiator Cap)............ 201Cooling System............................................. 199Adding Coolant (Antifreeze)...................... 200Coolant Level............................................ 201Cooling Capacity....................................... 240Disposal Of Used Coolant......................... 201Drain, Flush, And Refill............................. 200Inspection........................................ 199, 201Points To Remember................................ 202Pressure Cap............................................ 201Radiator Cap............................................ 201Selection Of Coolant (Antifreeze)..... 200, 240Corrosion Protection..................................... 233Cruise Light...................................................... 50Customer Assistance.................................... 242Customer Programmable Features.................. 79Cybersecurity................................................... 78
D
Defroster, Windshield................................... 168Deleting A Phone........................................... 104Diagnostic System, Onboard............................50DipsticksOil (Engine)............................................... 194Power Steering............................................60Disable Vehicle Towing................................. 187Disconnecting............................................... 104DisplayedValues..........................................................44DisposalAntifreeze (Engine Coolant)...................... 201Door Ajar..........................................................45Door Ajar Light.................................................45Door Locks.......................................................13Doors...............................................................13Driver’s Seat Back Tilt......................................16DrivingThrough Flowing, Rising, Or Shallow Standing Water
.......................................76
E
Electric Brake Control System....................... 132Electric Remote Mirrors...................................23Electrical Outlet, Auxiliary (Power Outlet).........32Electronic Range Select (ERS).........................5911
22_VM_OM_EN_USC_t.book Page 247