display RENAULT ALASKAN 2017 Owner's Manual
[x] Cancel search | Manufacturer: RENAULT, Model Year: 2017, Model line: ALASKAN, Model: RENAULT ALASKAN 2017Pages: 340, PDF Size: 6.93 MB
Page 76 of 340
![RENAULT ALASKAN 2017 Owners Manual [Turn Indicator]:
Select this sub-menu to enable/disable the items
described below to ONorOFF.
• [3 Flash On]
Select this sub-menu to enable/disable the [3
Flash On] lane change signal feature. See, RENAULT ALASKAN 2017 Owners Manual [Turn Indicator]:
Select this sub-menu to enable/disable the items
described below to ONorOFF.
• [3 Flash On]
Select this sub-menu to enable/disable the [3
Flash On] lane change signal feature. See,](/img/7/58394/w960_58394-75.png)
[Turn Indicator]:
Select this sub-menu to enable/disable the items
described below to ONorOFF.
• [3 Flash On]
Select this sub-menu to enable/disable the [3
Flash On] lane change signal feature. See, “Turn
signal switch” in the “2. Instruments and
controls” section.
[Unlocking] (where fitted):
Select this sub-menu to enable/disable the items
described below to ONorOFF.
• [I-Key Door Lock]
Select this item to activate/deactivate the request
switch on the door. See, “Doors” in the “3. Pre-
driving checks and adjustments” section.
[Wipers]:
Select this sub-menu to enable/disable the items
described below to ONorOFF.
• [Speed Dependent]
Select this item to activate/deactivate the speed
dependent wiper speed feature. See, “Wiper
and washer switch” in the “2. Instruments and
controls” section.
[Maintenance]
The following sub-menus are available under the
[Maintenance] menu.
• [Service] •
[Filter]
• [Tyre]
• [Other]
[Service] (where fitted):
Select this item to show the remaining distance until
servicing is required.
To reset the service indicator, push
select [Yes].
The distance to service interval cannot be adjusted
manually. The interval is set automatically.
NOTE
Be sure the distance to service indicator is reset
after servicing. Otherwise, the service indicator
will continue to be displayed.
[Filter] (where fitted):
Select this item to set or reset the distance for re-
placing the oil filter.
The distance can be set from [———](off) to
30.000 km in 500 km increments.
[Tyre]:
Select this item to set or reset the distance for re-
placing the tyres.
The distance can be set from [———](off) to
30.000 km in 500 km increments. [Other]:
Select this item to set or reset
areminder for replac-
ing something other than service, the oil filter, or
tyres.
The distance can be set from [———](off) to
30.000 km in 500 km increments.
[Alert]
The following items are available under the [Alert]
menu.
• [Timer]
• [Navigation] (where fitted)
• [Phone] (where fitted)
• [Mail] (where fitted)
[Timer]:
Select this sub-menu to specify when the [Time for
ad river break?] message activates.
The time can be set from [———](off) to6hours
in increments of 30 minutes.
[Navigation] (where fitted):
Select this item to enable/disable the navigation sys-
tem information in the vehicle information display.
[Phone] (where fitted):
Select this item to enable/disable incoming call in-
formation in the vehicle information display.
[Mail] (where fitted):
Select this item to enable/disable incoming mail in-
formation in the vehicle information display.
2-18 Instruments and controls
Page 77 of 340
![RENAULT ALASKAN 2017 Owners Manual [Tyre Pressures] (where fitted)
The settings in the Tyre pressures] menu are all
related to the Tyre pressure monitoring system
TPMS (where fitted) (see “Tyre Pressure Monitor-
ing System (TPMS) (wh RENAULT ALASKAN 2017 Owners Manual [Tyre Pressures] (where fitted)
The settings in the Tyre pressures] menu are all
related to the Tyre pressure monitoring system
TPMS (where fitted) (see “Tyre Pressure Monitor-
ing System (TPMS) (wh](/img/7/58394/w960_58394-76.png)
[Tyre Pressures] (where fitted)
The settings in the Tyre pressures] menu are all
related to the Tyre pressure monitoring system
TPMS (where fitted) (see “Tyre Pressure Monitor-
ing System (TPMS) (where fitted)” in the “5. Start-
ing and driving” section).
• [Target Front]
• [Target Rear]
• [Tyre Pressure Unit]
• [Calibrate]
[Target Front]:
The [Target Front] tyre pressure is the pressure specified for the front tyres on the tyre placard (see
“Tyre placard” in the “9. Technical information” sec-
tion and “Tyre Pressure Monitoring System (TPMS)
(where fitted)” in the “5. Starting and driving” sec-
tion).
Use the or and the
and change the value for the [Target Front] tyre
pressure.
[Target Rear]:
The [Target Rear] tyre pressure is the pressure
specified for the rear tyres on the tyre placard (see
“Tyre placard” in the “9. Technical information” sec-
tion and “Tyre Pressure Monitoring System (TPMS)
(where fitted)” in the “5. Starting and driving” sec- tion). Use the or and the
and change the value for the [Target Rear] tyre pres-
sure.
[Tyre Pressure Unit]:
The unit for tyre pressure that displays in the vehicle
information display can be changed to:
• psi
• bar
• kPa
• Kgf/cm
2
Use the or and
the
and change the unit. Pressure units conversion table kPa psi bar kgf/cm
2
200 29 2.0 2.0
210 30 2.1 2.1
220 32 2.2 2.2
230 33 2.3 2.3
240 35 2.4 2.4
250 36 2.5 2.5
250 36 2.5 2.5
260 38 2.6 2.6
270 39 2.7 2.7
280 41 2.8 2.8
290 42 2.9 2.9
300 44 3.0 3.0
310 45 3.1 3.1
320 46 3.2 3.2
330 48 3.3 3.3
340 49 3.4 3.4
[Calibrate]:
The tyre pressure is affected by the temperature of
the tyre; the tyre temperature increases when the
vehicle is driven. The TPMS system uses tempera-
ture sensors in the tyres to compensate for changes
in temperature in order to prevent false TPMS warn-
ings.
The [CALIBRATE] function resets the previously
stored temperature value. It is recommended that
this function is performed after the tyre pressures
are adjusted.
Instruments and controls 2-19
Page 78 of 340
See “Tyre Pressure Monitoring System (TPMS)
(where fitted)” in the “5. Starting and driving” sec-
tion.
Use the or and the
or cancel the calibration process. While the calibra-
tion process is active, the message: [Resetting tyre
pressure system] will be displayed.
[Units]
The following items are available under the [Units]
menu.
• [Distance/Fuel]
• [Tyre Pressures] (where fitted)
• [Temperature]
[Distance/Fuel]:
The unit for the distance and fuel consumption that
displays in the vehicle information display can be
changed to:
• [km, l/100km]
• [km, km/l]
• [miles, MPG]
[Tyre Pressures] (where fitted):
The unit for tyre pressure that displays in the vehicle
information display can be changed to:
• psi
• bar
• kPa •
Kgf/cm
2
Use the or and
the
and change the unit.
[Temperature]:
The temperature that displays in the vehicle informa-
tion display can be changed from:
• °C (Celsius)
• °F (Fahrenheit)
[Language]
The language of the vehicle information display can
be changed to:
• English
• French
• German
• Italian
• Portuguese
• Dutch
• Spanish
• Turkish
• Russian
Use the or and the
and change the language of the vehicle information
display. [Factory Reset]
The settings in the vehicle information display can
be reset back to the factory default. To reset the
vehicle information display:
1. Use the or buttons to select [Settings], and
press the
2. Select [Factory Reset] using the or buttons
and press the
3. Select [Yes] to return all settings back to default by pressing the
To cancel the reset operation select [No] or press
the BACK button located on the left side of the
steering wheel.
2-20 Instruments and controls
Page 80 of 340
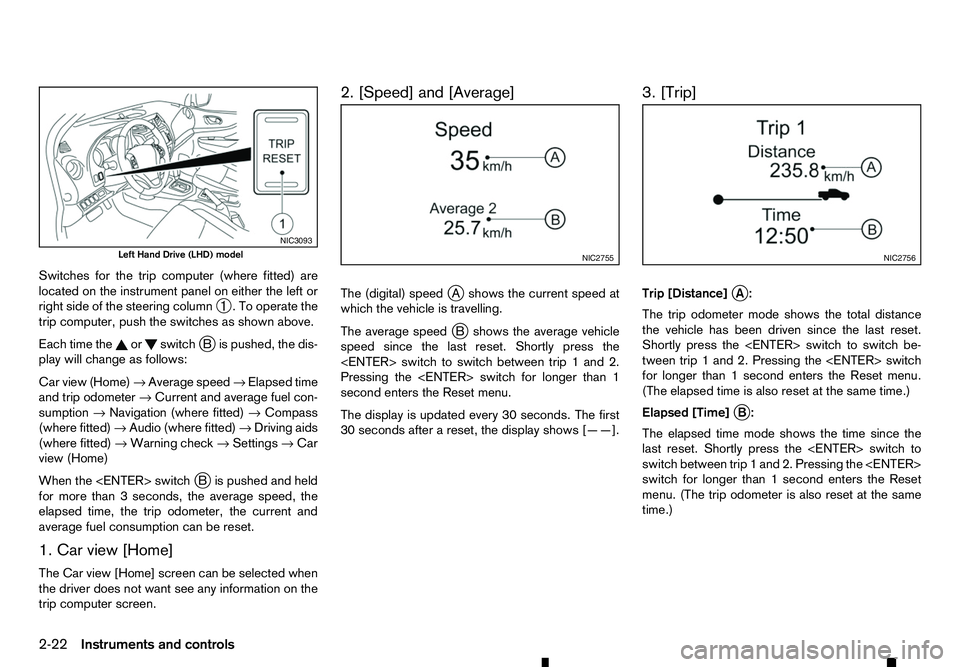
Switches for the trip computer (where fitted) are
located on the instrument panel on either the left or
right side of the steering column ➀.Too
perate the
trip computer, push the switches as shown above.
Each time the or switch
jBi spushed, the dis-
play will change as follows:
Car view (Home) →Average speed →Elapsed time
and trip odometer →Current and average fuel con-
sumption →Navigation (where fitted) →Compass
(where fitted) →Audio (where fitted) →Driving aids
(where fitted) →Warning check →Settings →Car
view (Home)
When the
Bi spushed and held
for more than 3seconds, the average speed, the
elapsed time, the trip odometer, the current and
average fuel consumption can be reset.
1. Car view [Home]
The Car view [Home] screen can be selected when
the driver does not want see any information on the
trip computer screen. 2. [Speed] and [Average]
The (digital) speed
jAs hows the current speed at
which the vehicle is travelling.
The average speed j
Bs hows the average vehicle
speed since the last reset. Shortly press the
Pressing the
second enters the Reset menu.
The display is updated every 30 seconds. The first
30 seconds after areset, the display shows [——]. 3. [Trip]
Trip [Distance]
jA:
The trip odometer mode shows the total distance
the vehicle has been driven since the last reset.
Shortly press the
tween trip 1and 2. Pressing the
for longer than 1second enters the Reset menu.
(The elapsed time is also reset at the same time.)
Elapsed [Time] j
B:
The elapsed time mode shows the time since the
last reset. Shortly press the
switch between trip 1and 2. Pressing the
switch for longer than 1second enters the Reset
menu. (The trip odometer is also reset at the same
time.) NIC3093
Left Hand Drive (LHD) model
NIC2755 NIC2756
2-22 Instruments and controls
Page 81 of 340
![RENAULT ALASKAN 2017 Owners Manual 4. [Fuel Economy]
[Average] fuel consumption jA:
The average fuel consumption mode shows the av-
erage fuel consumption since the last reset. Push
the <ENTER> switch for longer than 1second to
enter t RENAULT ALASKAN 2017 Owners Manual 4. [Fuel Economy]
[Average] fuel consumption jA:
The average fuel consumption mode shows the av-
erage fuel consumption since the last reset. Push
the <ENTER> switch for longer than 1second to
enter t](/img/7/58394/w960_58394-80.png)
4. [Fuel Economy]
[Average] fuel consumption jA:
The average fuel consumption mode shows the av-
erage fuel consumption since the last reset. Push
the
enter the Reset menu.
The display is updated every 30 seconds. For about
the first 500 m(1/3 mile) after areset, the display
shows [——].
Push
Economy page.
The unit of measurement (l/100km, km/l, or MPG)
can be set in the settings menu. See, “[Units]” in the
“2. Instruments and controls” section.
Current fuel consumption jB:
The scale shows the current fuel consumption. 5. [Navigation] (where fitted)
When the route guidance is set in the navigation
system, this item shows the navigation route infor-
mation.
6. Compass (where fitted)
This display indicates the heading direction of the
vehicle jAa swell as acompass rose jBa round
the vehicle representation.
7. [Audio] (where fitted) j
A Current source
j B Current frequency
j C Current radio station name
The audio mode shows the status of audio informa-
tion.
For more details, see “FM AM radio with compact
disc (CD) player (Type A)” in the “4. Display screen,
heater and air conditioner, and audio system” sec-
tion or the separately provided Touchscreen Navi-
gation Owner’s manual.
8. [Driving Aids] (where fitted)
The driving aids mode shows the operating condi-
tion for the driving aids.
• Active Emergency Braking
Push
menu. NIC2758
NIC2732
NIC3105 NIC2734
Instruments and controls
2-23
Page 82 of 340
For more details, see “Active Emergency Braking
system (where fitted)” in the “5. Starting and driving”
section.
9. Warnings
The present warnings are displayed. If no warnings
are present, [No Warnings] is displayed.
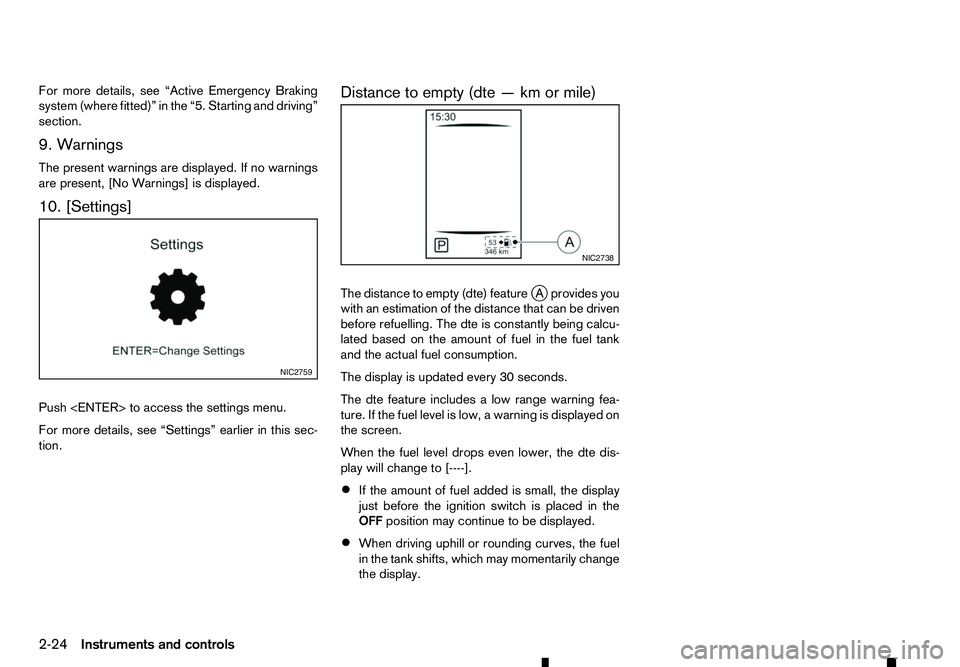
10. [Settings]
Push
For more details, see “Settings” earlier in this sec-
tion. Distance to empty (dte
—kmormile)
The distance to empty (dte) feature jAp rovides you
with an estimation of the distance that can be driven
before refuelling. The dte is constantly being calcu-
lated based on the amount of fuel in the fuel tank
and the actual fuel consumption.
The display is updated every 30 seconds.
The dte feature includes alow range warning fea-
ture. If the fuel level is low, awarning is displayed on
the screen.
When the fuel level drops even lower, the dte dis-
play will change to [----].
• If the amount of fuel added is small, the display
just before the ignition switch is placed in the
OFF position may continue to be displayed.
• When driving uphill or rounding curves, the fuel
in the tank shifts, which may momentarily change
the display. NIC2759 NIC2738
2-24 Instruments and controls
Page 85 of 340
13. Door open warning
This warning appears if any of the doors are open or
not closed securely. The vehicle icon indicates
which door is open on the display. Make sure that all
of the doors are closed.
14. Second row seat belt warning
(where fitted)
This second row seat belt warning appears after the
ignition switch is placed in the ON position. If any of
the second row seat passenger seat belts is not fas-
tened, achime will sound and the seat icon illumi-
nates in red to show which seat belt is not fastened.
The seat icon illuminates in red until the correspond-
ing second row seat passenger’s seat belt is fas-
tened. The warning will automatically turn off after approximately 35 seconds.
For more details and precautions on seat belt us-
age, see “Seat belts” in the “1. Safety —seats, seat
belts and supplemental restraint system” section.
15. 4WD mode indicator (where fitted)
This indicator shows the drive mode of the 4WD
system.
See “Four-Wheel Drive (4WD) (where fitted)” in the
“5. Starting and driving” section for details. 16. Low washer fluid warning
(where fitted)
This warning appears when the washer tank fluid is
at
alow level. Add washer fluid as necessary. (See
“Window washer fluid” in the “8. Maintenance and
do-it-yourself” section.)
17. Key System Error warning
(where fitted)
This warning appears if there is amalfunction in the
Remote Control Key system.
If this warning appears while the engine is stopped,
the engine cannot be started. If this warning ap-
pears while the engine is running, the vehicle can be
driven. However, contact an approved dealer or
qualified workshop for repair as soon as possible.
18. Oil Level Low indicator
(where fitted)
If the low level indicator is displayed, the engine oil
level is low. If the low level indicator is displayed, check the level using the engine oil dipstick. (See
“Checking engine oil level” in the “8. Maintenance
and do-it-yourself” section.)
CAUTION
The oil level should be checked regularly using
the engine oil dipstick. Operating with an insuffi-
cient amount of oil can damage the engine and such damage is not covered by the warranty. 19. Oil level sensor warning
(where fitted)
If the oil level sensor warning is displayed, the en-
gine oil level sensor may be malfunctioning. Contact
an approved dealer or qualified workshop immedi-
ately.
20. Low Oil Pressure Stop vehicle
warning (where fitted)
This warning appears if low engine oil pressure is
detected. If the warning appears during normal driv-
ing, pull off the road in
asafe area, stop the engine
immediately and call an approved dealer or qualified
workshop.
The low oil pressure warning is not designed to indi-
cate alow oil level. Use the dipstick to check the oil
level. (See “Checking engine oil level” in the
“8. Maintenance and do-it-yourself” section.)
CAUTION
Running the engine with the engine oil pressure
warning displayed could cause serious damage
to the engine.
21. 4WD Error warning (where fitted)
This warning appears when the four wheel drive
(4WD) system is not functioning properly while the
engine is running. Reduce vehicle speed and have
your vehicle checked by an approved dealer or quali-
fied workshop. See “Four-Wheel Drive (4WD)
(where fitted)” in the “5. Starting and driving” sec-
tion.
Instruments and controls 2-27
Page 87 of 340
31. Low fuel level warning
The low fuel level warning appears on the vehicle
information display when the fuel level in the tank is
getting low. Refuel as soon as it is convenient, pref-
erably before the gauge reads the empty position.
For further details, see “Fuel gauge” earlier in this
section. OIL CONTROL SYSTEM (where fitted
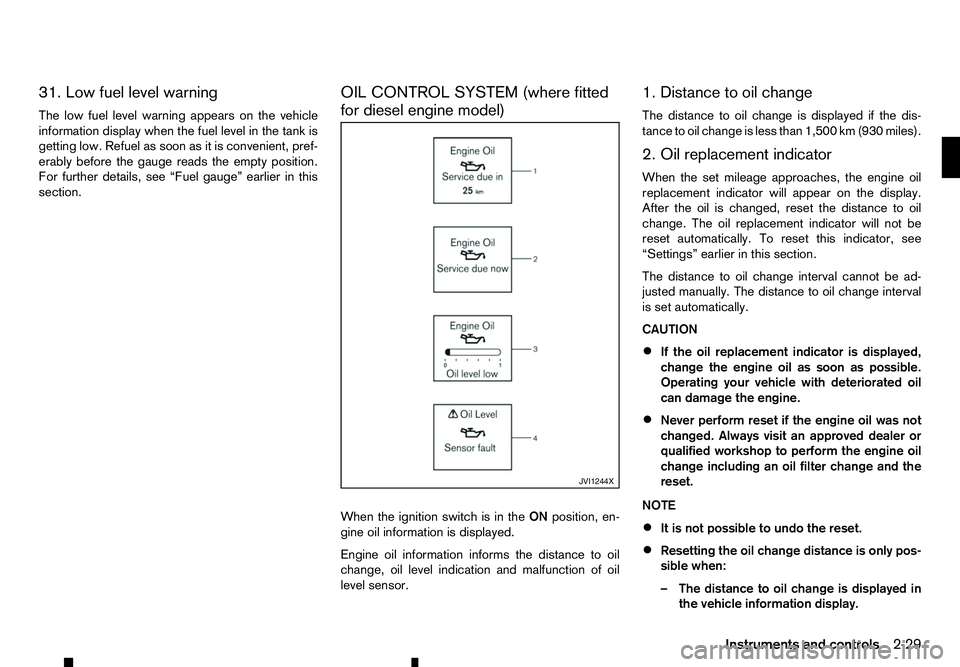
for diesel engine model)
When the ignition switch is in the
ONposition, en-
gine oil information is displayed.
Engine oil information informs the distance to oil
change, oil level indication and malfunction of oil
level sensor. 1. Distance to oil change
The distance to oil change is displayed if the dis-
tance to oil change is less than 1,500 km (930 miles).
2. Oil replacement indicator
When the set mileage approaches, the engine oil
replacement indicator will appear on the display.
After the oil is changed, reset the distance to oil
change. The oil replacement indicator will not be
reset automatically. To reset this indicator, see
“Settings” earlier in this section.
The distance to oil change interval cannot be ad-
justed manually. The distance to oil change interval
is set automatically.
CAUTION
•
If the oil replacement indicator is displayed,
change the engine oil as soon as possible.
Operating your vehicle with deteriorated oil
can damage the engine.
• Never perform reset if the engine oil was not
changed. Always visit an approved dealer or
qualified workshop to perform the engine oil
change including an oil filter change and the
reset.
NOTE
• It is not possible to undo the reset.
• Resetting the oil change distance is only pos-
sible when:
–T
he distance to oil change is displayed in
the vehicle information display. JVI1244X
Instruments and controls
2-29
Page 88 of 340
–T
he oil replacement indicator is displayed
in the vehicle information display.
• The engine oil should be changed before the
distance to oil change reaches
0km(0miles).
Continued driving after the distance to oil
change reaches 0km(0miles) may result in
reduced engine performance.
• The Diesel Particulate Filter (DPF) may also
become saturated because regeneration is
restricted once the distance to oil change
reaches 0km(0m iles).
Have the vehicle inspected by an approved
dealer or qualified workshop if the above con-
dition occurs.
• The oil change interval will reduce faster with
certain types of driving, especially at low
speeds in urban conditions.
3. Low level reminder
If the low level indicator is displayed, the engine oil level is low. If the low level reminder is displayed,
check the level using the engine oil dipstick. (See
“Checking engine oil level” in the “8. Maintenance
and do-it-yourself” section.)
CAUTION
The oil level should be checked regularly using
the engine oil dipstick. Operating with an insuffi-
cient amount of oil can damage the engine and
such damage is not covered by the warranty. 4. Oil level sensor warning
If the oil sensor warning is displayed, the engine oil
level sensor may be malfunctioning. Contact an ap-
proved dealer or qualified workshop immediately.
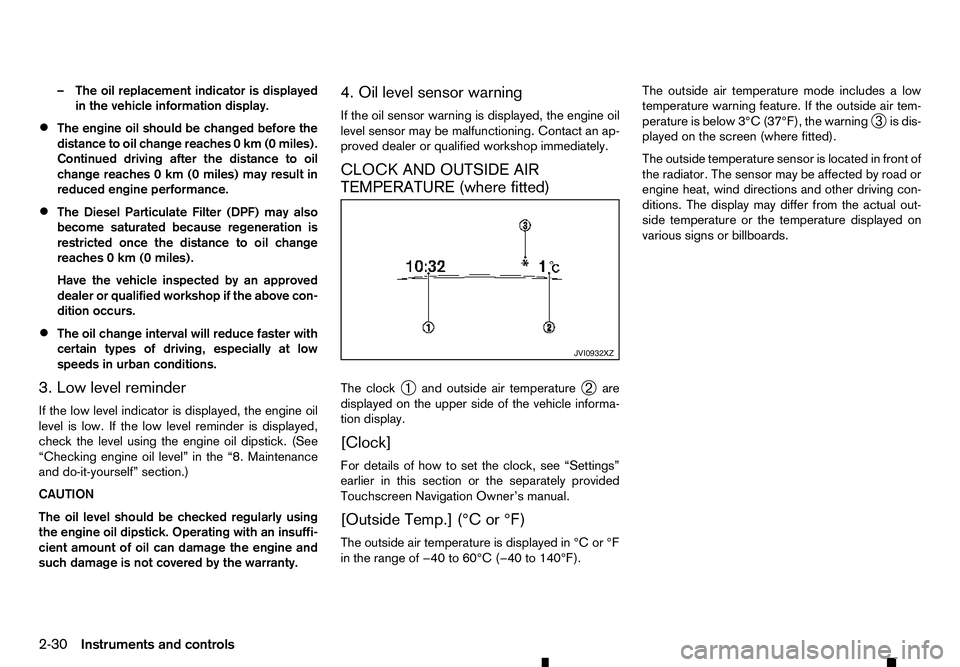
CLOCK AND OUTSIDE AIR
TEMPERATURE (where fitted)
The clock
➀and outside air temperature
➁are
displayed on the upper side of the vehicle informa-
tion display.
[Clock]
For details of how to set the clock, see “Settings”
earlier in this section or the separately provided
Touchscreen Navigation Owner’s manual.
[Outside Temp.] (°C or °F)
The outside air temperature is displayed in °C or °F
in the range of −40 to 60°C (−40 to 140°F). The outside air temperature mode includes
alow
temperature warning feature. If the outside air tem-
perature is below 3°C (37°F), the warning ➂is dis-
played on the screen (where fitted).
The outside temperature sensor is located in front of
the radiator. The sensor may be affected by road or
engine heat, wind directions and other driving con-
ditions. The display may differ from the actual out-
side temperature or the temperature displayed on
various signs or billboards. JVI0932XZ
2-30 Instruments and controls
Page 115 of 340
•
The shift lever is in the
P(Park) position (auto-
matic transmission model).
WARNING AND AUDIBLE
REMINDERS
The Remote Control Key system is equipped with a
function that is designed to minimise improper op-
erations of the Remote Control Key and to help pre-
vent the vehicle from being stolen. Achime or beep
sounds inside and outside the vehicle and awarning
message appears in the vehicle information display.
See the troubleshooting guide on the next page and
“Vehicle information display” in the “2. Instruments
and controls” section.
CAUTION
When the chime or beep sounds or the warning
message appears, be sure to check both the ve-
hicle and the Remote Control Key.
Pre-driving checks and adjustments3-11