glove box RENAULT ALASKAN 2017 Owners Manual
[x] Cancel search | Manufacturer: RENAULT, Model Year: 2017, Model line: ALASKAN, Model: RENAULT ALASKAN 2017Pages: 340, PDF Size: 6.93 MB
Page 14 of 340
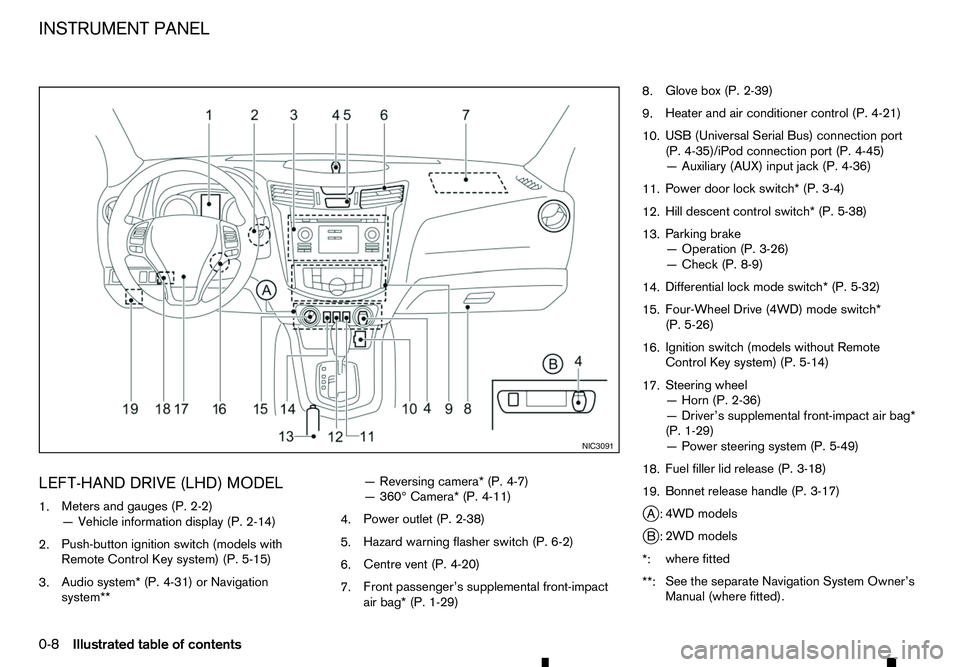
LEFT-HAND DRIVE (LHD) MODEL
1. Meters and gauges (P. 2-2)
—V ehicle information display (P. 2-14)
2. Push-button ignition switch (models with
Remote Control Key system) (P. 5-15)
3. Audio system* (P. 4-31) or Navigation
system** —R
eversing camera* (P. 4-7)
—3 60° Camera* (P. 4-11)
4. Power outlet (P. 2-38)
5. Hazard warning flasher switch (P. 6-2)
6. Centre vent (P. 4-20)
7. Front passenger’s supplemental front-impact
air bag* (P. 1-29) 8.
Glove box (P. 2-39)
9. Heater and air conditioner control (P. 4-21)
10. USB (Universal Serial Bus) connection port
(P. 4-35)/iPod connection port (P. 4-45)
—A
uxiliary (AUX) input jack (P. 4-36)
11. Power door lock switch* (P. 3-4)
12. Hill descent control switch* (P. 5-38)
13. Parking brake
—O
peration (P. 3-26)
—C heck (P. 8-9)
14. Differential lock mode switch* (P. 5-32)
15. Four-Wheel Drive (4WD) mode switch*
(P. 5-26)
16. Ignition switch (models without Remote
Control Key system) (P. 5-14)
17. Steering wheel
—H
orn (P. 2-36)
—D river’s supplemental front-impact air bag*
(P. 1-29)
—P ower steering system (P. 5-49)
18. Fuel filler lid release (P. 3-18)
19. Bonnet release handle (P. 3-17)
j A: 4WD models
j B: 2WD models
*: where fitted
**: See the separate Navigation System Owner’s
Manual (where fitted). NIC3091
INSTRUMENT PANEL
0-8 Illustrated table of contents
Page 15 of 340
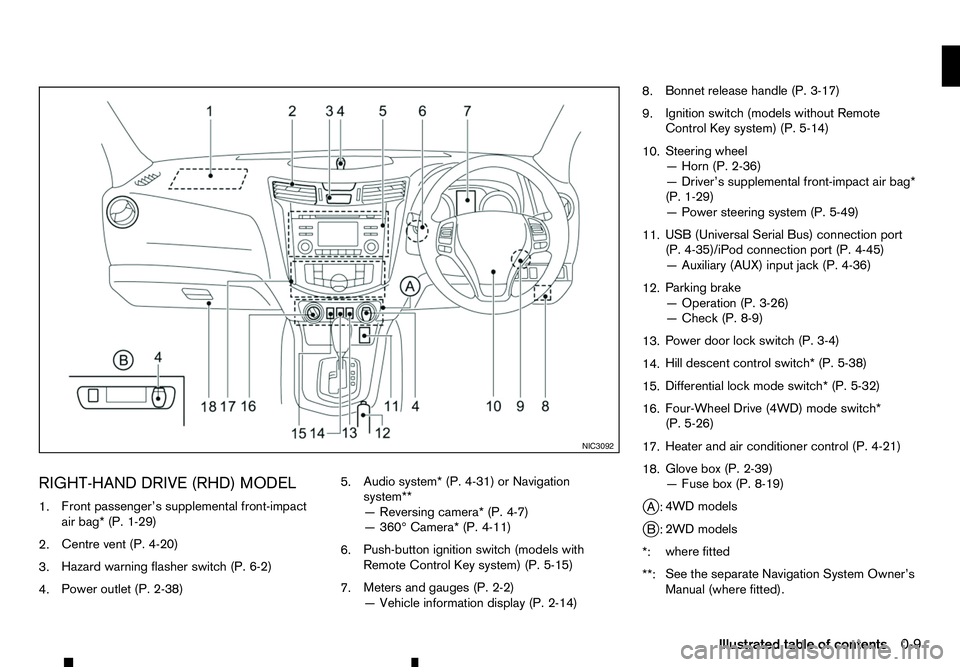
RIGHT-HAND DRIVE (RHD) MODEL
1. Front passenger’s supplemental front-impact
air bag* (P. 1-29)
2. Centre vent (P. 4-20)
3. Hazard warning flasher switch (P. 6-2)
4. Power outlet (P. 2-38) 5.
Audio system* (P. 4-31) or Navigation
system**
—R
eversing camera* (P. 4-7)
—3 60° Camera* (P. 4-11)
6. Push-button ignition switch (models with
Remote Control Key system) (P. 5-15)
7. Meters and gauges (P. 2-2)
—V
ehicle information display (P. 2-14) 8.
Bonnet release handle (P. 3-17)
9. Ignition switch (models without Remote
Control Key system) (P. 5-14)
10. Steering wheel
—H
orn (P. 2-36)
—D river’s supplemental front-impact air bag*
(P. 1-29)
—P ower steering system (P. 5-49)
11. USB (Universal Serial Bus) connection port
(P. 4-35)/iPod connection port (P. 4-45)
—A
uxiliary (AUX) input jack (P. 4-36)
12. Parking brake
—O
peration (P. 3-26)
—C heck (P. 8-9)
13. Power door lock switch (P. 3-4)
14. Hill descent control switch* (P. 5-38)
15. Differential lock mode switch* (P. 5-32)
16. Four-Wheel Drive (4WD) mode switch*
(P. 5-26)
17. Heater and air conditioner control (P. 4-21)
18. Glove box (P. 2-39)
—F
use box (P. 8-19)
j A: 4WD models
j B: 2WD models
*: where fitted
**: See the separate Navigation System Owner’s
Manual (where fitted). NIC3092
Illustrated table of contents
0-9
Page 45 of 340
Front-facing child restraint:
Be sure to follow the child restraint manufacturer’s
instructions for the proper use of your child restraint.
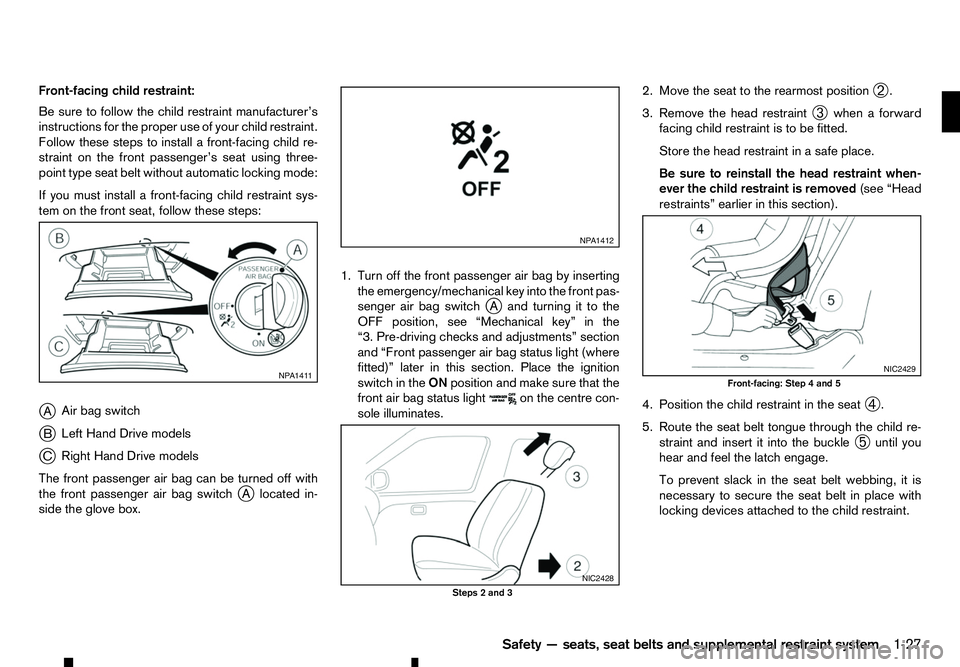
Follow these steps to install afront-facing child re-
straint on the front passenger’s seat using three-
point type seat belt without automatic locking mode:
If you must install afront-facing child restraint sys-
tem on the front seat, follow these steps:
j A Air bag switch
j B Left Hand Drive models
j C Right Hand Drive models
The front passenger air bag can be turned off with
the front passenger air bag switch j
Al ocated in-
side the glove box. 1. Turn off the front passenger air bag by inserting
the emergency/mechanical key into the front pas-
senger air bag switch jAa nd turning it to the
OFF position, see “Mechanical key” in the
“3. Pre-driving checks and adjustments” section
and “Front passenger air bag status light (where
fitted)” later in this section. Place the ignition
switch in the ONposition and make sure that the
front air bag status light on the centre con-
sole illuminates. 2. Move the seat to the rearmost position
➁.
3. Remove the head restraint ➂when
aforward
facing child restraint is to be fitted.
Store the head restraint in asafe place.
Be sure to reinstall the head restraint when-
ever the child restraint is removed (see “Head
restraints” earlier in this section).
4. Position the child restraint in the seat ➃.
5. Route the seat belt tongue through the child re- straint and insert it into the buckle ➄until you
hear and feel the latch engage.
To prevent slack in the seat belt webbing, it is
necessary to secure the seat belt in place with
locking devices attached to the child restraint. NP A1411 NP A1412
NIC2428
Steps 2and 3 NIC2429
Front-facing: Step
4and 5
Safety —seats, seat belts and supplemental restraint system 1-27
Page 46 of 340

6. Remove any additional slack from the seat belt;
press downward ➅and rearward
j6a firmly in
the centre of the child restraint with your knee to
compress the vehicle seat cushion and seatback
while pulling up on the seat belt.
7. Test the child restraint before you place the child in it ➆.P
ush the child restraint from side to side
and tug it forward to make sure that it is held
securely in place. 8. Check to make sure that the child restraint is
properly secured prior to each use. If the child
restraint is loose, repeat steps 1through 7.
Rear-facing child restraint:
Be sure to follow the child restraint manufacturer’s
instructions for the proper use of your child restraint.
Follow these steps to install afront-facing child re-
straint on the front passenger’s seat using three-
point type seat belt without automatic locking mode:
If you must install arear-facing child restraint system
on the front seat, follow these steps:
j A Air bag switch
j B Left Hand Drive models
j C Right Hand Drive models
The front passenger air bag can be turned off with
the front passenger air bag switch jAl ocated in-
side the glove box. 1. Turn off the front passenger air bag by inserting
the emergency/mechanical key into the front pas-
senger air bag switch jA, see “Mechanical key”
in the “3. Pre-driving checks and adjustments”
section and “Front passenger air bag status light
(where fitted)” later in this section. Place the igni-
tion switch in the ONposition and make sure that
the front air bag status light on the centre
console illuminates.
2. Move the seat to the rearmost position ➁. NIC2430
Step 6
NIC2431
Step 7 NP A1411 NP A1412
NIC2428
Steps 2and 3
1-28 Safety —seats, seat belts and supplemental restraint system
Page 55 of 340
•
Tampering with the supplemental air bag sys-
tems may result in serious personal injury.
Tampering includes changes to the steering
wheel and the instrument panel by placing
materials over the steering wheel pad and
above, around or on the instrument panel or
by installing additional trim materials around
the supplemental air bag systems.
• Work on and around the supplemental air bag
systems should be done by an approved
dealer or qualified workshop. The SRS wiring
should not be modified or disconnected. Un-
authorised electrical test equipment and
probing devices should not be used on the
supplemental air bag systems.
• The SRS wiring harness connectors are yel-
low for easy identification.
• Never install
arear-facing child restraint sys-
tem on the front passenger seat without first
deactivating the passenger air bag with the
front passenger air bag switch. In afrontal
collision, supplemental front-impact air bags
inflate with great force. An inflating supple-
mental front-impact air bag could seriously
injure or kill your child.
When the air bags inflate, afairly loud noise may be
heard, followed by the release of smoke. This smoke
is not harmful and does not indicate afire. Care
should be taken not to inhale it, as it may cause irri-
tation and choking. Those with ahistory of abreath-
ing condition should get fresh air promptly. Supplemental front-impact air bag
system
The driver’s supplemental front-impact air bag is
located at the centre of the steering wheel. The pas-
senger’s supplemental front-impact air bag is lo-
cated at the instrument panel above the glove box.
The supplemental front-impact air bag system is de-
signed to inflate in higher severity frontal collisions,
although it may inflate if the forces in another type of
collision are similar to those of
ahigher severity fron-
tal impact. It may not inflate in certain frontal colli-
sions. Vehicle damage (or lack of it) is not always an
indication of proper supplemental front-impact air
bag system operation. WARNING
Never install
arear-facing child restraint system
on the front passenger seat without first deacti-
vating the passenger air bag with the front pas-
senger air bag switch (where fitted), see “Front
passenger air bag switch (where fitted)” later in
this section. In afrontal collision, supplemental
front-impact air bags inflate with great force. An
inflating supplemental front-impact air bag could
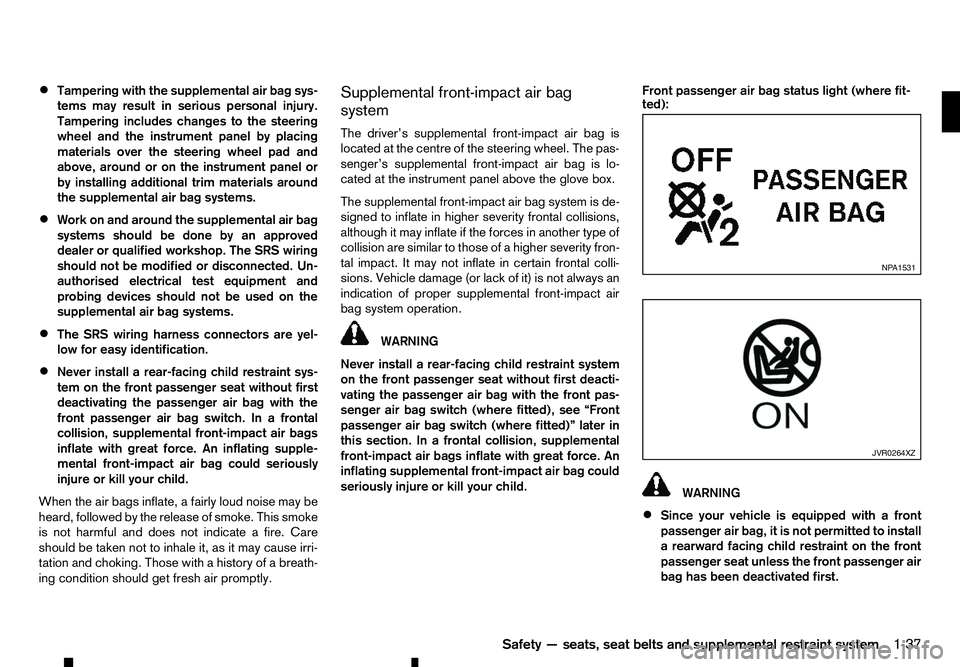
seriously injure or kill your child. Front passenger air bag status light (where fit-
ted):
WARNING
• Since your vehicle is equipped with
af
ront
passenger air bag, it is not permitted to install
ar earward facing child restraint on the front
passenger seat unless the front passenger air
bag has been deactivated first. NP A1531
JVR0264XZ
Safety —seats, seat belts and supplemental restraint system
1-37
Page 56 of 340
•
Do not fit
arearward facing child seat on the
front passenger seat if the air bag activation/
deactivation system (where fitted) is malfunc-
tioning. Your vehicle must immediately be
taken to an approved dealer or qualified work-
shop in such asituation.
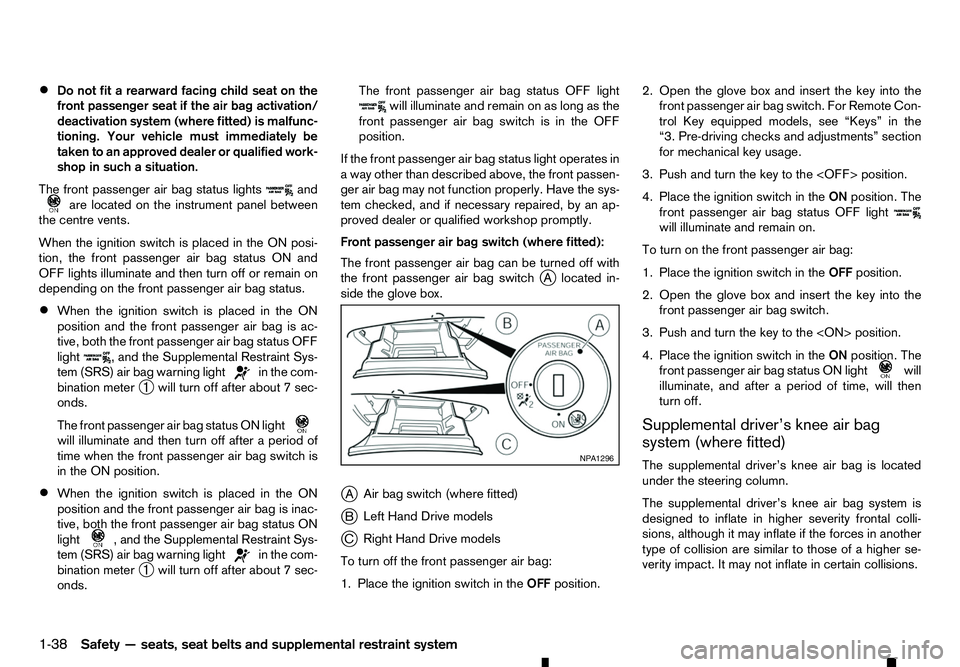
The front passenger air bag status lights and
are located on the instrument panel between
the centre vents.
When the ignition switch is placed in the ON posi-
tion, the front passenger air bag status ON and
OFF lights illuminate and then turn off or remain on
depending on the front passenger air bag status.
• When the ignition switch is placed in the ON
position and the front passenger air bag is ac-
tive, both the front passenger air bag status OFF
light ,a
nd the Supplemental Restraint Sys-
tem (SRS) air bag warning light in the com-
bination meter ➀will turn off after about
7sec-
onds.
The front passenger air bag status ON light will illuminate and then turn off after
aperiod of
time when the front passenger air bag switch is
in the ON position.
• When the ignition switch is placed in the ON
position and the front passenger air bag is inac-
tive, both the front passenger air bag status ON
light ,a
nd the Supplemental Restraint Sys-
tem (SRS) air bag warning light in the com-
bination meter ➀will turn off after about
7sec-
onds. The front passenger air bag status OFF light will illuminate and remain on as long as the
front passenger air bag switch is in the OFF
position.
If the front passenger air bag status light operates in
aw ay other than described above, the front passen-
ger air bag may not function properly. Have the sys-
tem checked, and if necessary repaired, by an ap-
proved dealer or qualified workshop promptly.
Front passenger air bag switch (where fitted):
The front passenger air bag can be turned off with
the front passenger air bag switch j
Al ocated in-
side the glove box.
j A Air bag switch (where fitted)
j B Left Hand Drive models
j C Right Hand Drive models
To turn off the front passenger air bag:
1. Place the ignition switch in the OFFposition. 2. Open the glove box and insert the key into the
front passenger air bag switch. For Remote Con-
trol Key equipped models, see “Keys” in the
“3. Pre-driving checks and adjustments” section
for mechanical key usage.
3. Push and turn the key to the
4. Place the ignition switch in the ONposition. The
front passenger air bag status OFF light will illuminate and remain on.
To turn on the front passenger air bag:
1. Place the ignition switch in the OFFposition.
2. Open the glove box and insert the key into the front passenger air bag switch.
3. Push and turn the key to the
4. Place the ignition switch in the ONposition. The
front passenger air bag status ON light will
illuminate, and after
aperiod of time, will then
turn off.
Supplemental driver’s knee air bag
system (where fitted)
The supplemental driver’s knee air bag is located
under the steering column.
The supplemental driver’s knee air bag system is
designed to inflate in higher severity frontal colli-
sions, although it may inflate if the forces in another
type of collision are similar to those of ahigher se-
verity impact. It may not inflate in certain collisions. NP A1296
1-38 Safety —seats, seat belts and supplemental restraint system
Page 59 of 340
2
Instruments and controls
Instruments and controls
Meters and gauges .................................................. 2-2 Speedometer and Fuel gauge ............................. 2-2
Tachometer and Engine coolant temperature
gauge ................................................................. 2-3
Instrument brightness control .............................. 2-4
Warning lights, indicator lights and audible
reminders ................................................................ 2-5 Checking lights................................................... 2-6
Warning lights .................................................... 2-6
Indicator lights .................................................... 2-12
Audible reminders............................................... 2-14
Vehicle information display ....................................... 2-14
How to use the Vehicle Information Display ......... 2-15
Settings .............................................................. 2-15
Trip computer ..................................................... 2-21
Indicators for operation ....................................... 2-25
Oil control system (where fitted for diesel
engine model) ..................................................... 2-29
Clock and outside air temperature (where
fitted).................................................................. 2-30
Headlight and turn signal switch............................... 2-31 Headlight switch ................................................. 2-31
Headlight aiming control (where fitted) ................ 2-32
Battery saver system (where fitted) ..................... 2-32
Turn signal switch ............................................... 2-32
Fog light switch (where fitted) .................................. 2-33
Front fog lights (where fitted) .............................. 2-33
Rear fog light (where fitted)................................. 2-33
Wiper and washer switch ........................................ 2-34 Windscreen wiper and washer switch ................. 2-34
Defogger switch (where fitted) ................................. 2-34
Headlight cleaner (where fitted) ............................... 2-35 Headlight cleaner switch (where fitted) ............... 2-35
Horn ........................................................................V
2-36
Windows ................................................................. 2-36 Manual windows (where fitted) ........................... 2-36
Power windows (where fitted)............................. 2-36
Power outlets .......................................................... 2-38
Storage ................................................................... 2-39 Glove box ........................................................... 2-39
Console box ....................................................... 2-40
Sunglasses holder .............................................. 2-40
Console side pockets ......................................... 2-40
Cup holders (where fitted) .................................. 2-40
Roof rail (where fitted) ........................................ 2-41
Card holder (where fitted)................................... 2-41
Sun visors ............................................................... 2-41
Sunroof (where fitted) .............................................. 2-42 Automatic sunroof............................................... 2-42
Interior lights ............................................................ 2-43 Interior light switch (where fitted) ........................ 2-43
Console light (where fitted) ................................. 2-43
Map lights........................................................... 2-43
Map light control switch (where fitted)................. 2-44
Room light (where fitted)..................................... 2-44
Rear personal light (where fitted) ........................ 2-45
Vanity mirror lights (where fitted) ......................... 2-45
Battery saver system........................................... 2-45
Page 97 of 340
•
This power outlet is not designed for use with
ac igarette lighter unit.
• Do not use accessories that exceed
acom-
bined power draw of 12 volt, 120W (10A)
• Do not use double adapters or more than one
electrical accessory.
• Use this power outlet with the engine running
to avoid discharging the vehicle battery.
• Avoid using when the air conditioner, head-
lights or rear window defogger is on (where
fitted).
• Push the plug in as far as it will go. If good
contact is not made, the plug may overheat or the internal temperature fuse may blow.
• Before inserting or disconnecting
aplug, be
sure that the electrical accessory being used
is turned OFF.
• When not in use, be sure to close the cap. Do
not allow water or any liquid to contact the
outlet. WARNING
• The storage compartments should not be
used while driving so that the full attention
may be given to vehicle operation.
• Keep the storage lids closed while driving to
help prevent injury in an accident or
asudden
stop.
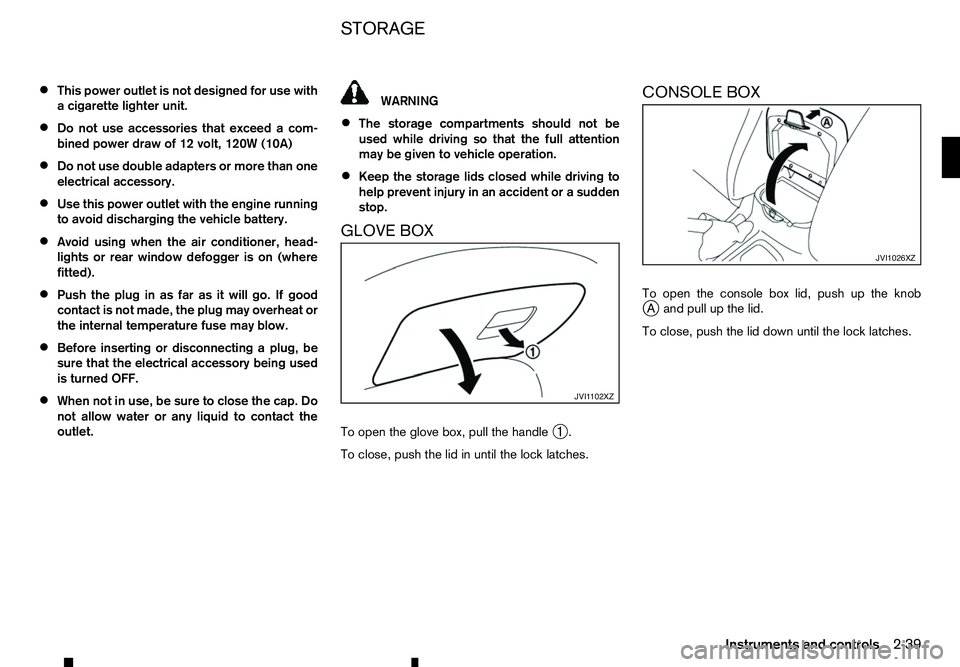
GLOVE BOX
To open the glove box, pull the handle ➀.
To close, push the lid in until the lock latches. CONSOLE BOX
To open the console box lid, push up the knob
j
Aa nd pull up the lid.
To close, push the lid down until the lock latches. JVI1 102XZ JVI1026XZ
STORAGE
Instruments and controls
2-39
Page 114 of 340
•
Do not pull the door handle before pushing the
door handle request switch. The door will be
unlocked but will not open. Release the door
handle once and pull it again to open the door.
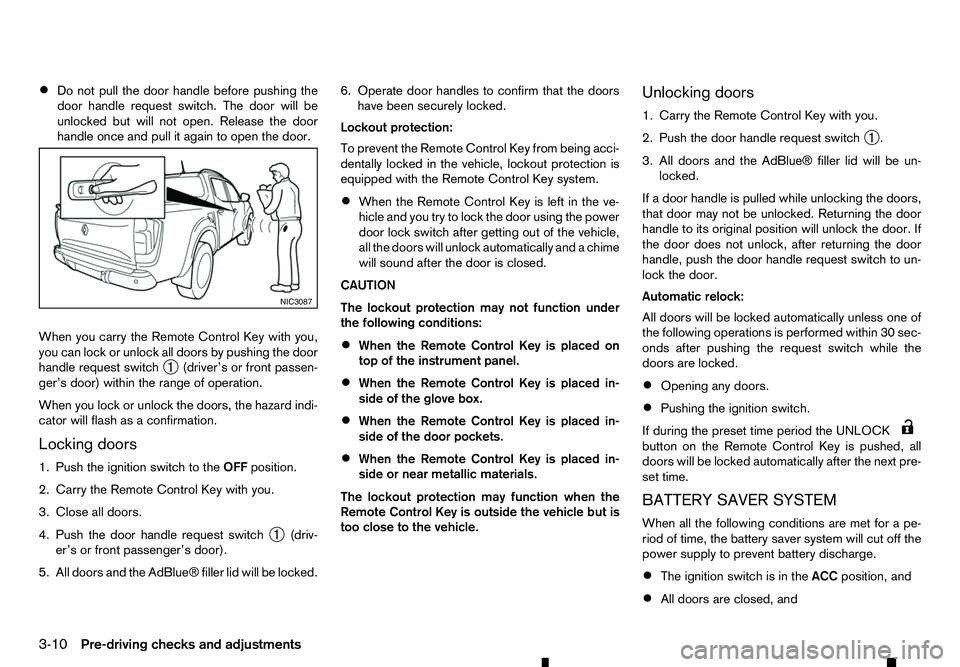
When you carry the Remote Control Key with you,
you can lock or unlock all doors by pushing the door
handle request switch ➀(driver’s or front passen-
ger’s door) within the range of operation.
When you lock or unlock the doors, the hazard indi-
cator will flash as aconfirmation.
Locking doors
1. Push the ignition switch to the OFFposition.
2. Carry the Remote Control Key with you.
3. Close all doors.
4. Push the door handle request switch ➀(driv-
er’s or front passenger’s door).
5. All doors and the AdBlue® filler lid will be locked. 6. Operate door handles to confirm that the doors
have been securely locked.
Lockout protection:
To prevent the Remote Control Key from being acci-
dentally locked in the vehicle, lockout protection is
equipped with the Remote Control Key system.
• When the Remote Control Key is left in the ve-
hicle and you try to lock the door using the power
door lock switch after getting out of the vehicle,
all the doors will unlock automatically and
achime
will sound after the door is closed.
CAUTION
The lockout protection may not function under
the following conditions:
• When the Remote Control Key is placed on
top of the instrument panel.
• When the Remote Control Key is placed in-
side of the glove box.
• When the Remote Control Key is placed in-
side of the door pockets.
• When the Remote Control Key is placed in-
side or near metallic materials.
The lockout protection may function when the
Remote Control Key is outside the vehicle but is
too close to the vehicle. Unlocking doors
1. Carry the Remote Control Key with you.
2. Push the door handle request switch
➀.
3. All doors and the AdBlue® filler lid will be un- locked.
If ad oor handle is pulled while unlocking the doors,
that door may not be unlocked. Returning the door
handle to its original position will unlock the door. If
the door does not unlock, after returning the door
handle, push the door handle request switch to un-
lock the door.
Automatic relock:
All doors will be locked automatically unless one of
the following operations is performed within 30 sec-
onds after pushing the request switch while the
doors are locked.
• Opening any doors.
• Pushing the ignition switch.
If during the preset time period the UNLOCK button on the Remote Control Key is pushed, all
doors will be locked automatically after the next pre-
set time.
BATTERY SAVER SYSTEM
When all the following conditions are met for ape-
riod of time, the battery saver system will cut off the
power supply to prevent battery discharge.
• The ignition switch is in the
ACCposition, and
• All doors are closed, and NIC3087
3-10 Pre-driving checks and adjustments
Page 218 of 340
range, it is possible for anyone, even someone who
does not carry the Remote Control Key, to push the
ignition switch to start the engine.
• The cargo bed area is not included in the operat-
ing range of the engine start function.
• If the Remote Control Key is placed on the in-
strument panel, inside the glove box, door pocket
or the corner of the interior compartment, the
Remote Control Key may not function.
• If the Remote Control Key is placed near the
door or window outside the vehicle, the Remote
Control Key may function.
AUTOMATIC TRANSMISSION (AT)
The ignition lock is designed so that the ignition
switch cannot be switched to the “LOCK” position
until the shift lever is moved to the P(Park) position.
When pushing the ignition switch to the “OFF” posi-
tion, make sure the shift lever is in the P(Park) posi-
tion.
When the ignition switch cannot be switched to the
“LOCK” position:
1. [Shift to Park] warning appears on the vehicle
information display and achime sounds.
2. Move the shift lever to the P(Park) position.
3. If the ignition switch is in the “ACC” position, [PUSH] warning appears on the vehicle informa-
tion display.
4. Push the ignition switch. The ignition switch is switched to the “OFF” position. 5. Open the door. The ignition switch turns to the
“LOCK” position.
For warnings and indicators on the vehicle informa-
tion display, see “Indicators for operation” in the
“2. Instruments and controls” section.
If the ignition switch is switched to the “LOCK”
position, the shift lever cannot be moved from the P
(Park) position. The shift lever can be moved if the
ignition switch is in the “ON” position with the foot-
brake pedal depressed.
STEERING LOCK
The ignition switch is equipped with an anti-theft
steering lock device.
To lock steering wheel
1. Place the ignition switch in the “OFF” position where the ignition switch position indicator will
not illuminate.
2. Open or close the door. The ignition switch turns to the “LOCK” position.
3. Turn the steering wheel 1/6 of aturn to the right
or left from the straight up position.
To unlock steering wheel
Push the ignition switch, and the steering wheel will
be automatically unlocked.
CAUTION
• If the battery of the vehicle is discharged, the
push-button ignition switch cannot be
switched from the “LOCK” position. •
If the steering lock release malfunction indi-
cator (where fitted) appears in the vehicle in-
formation display, push the ignition switch
again while rotating the steering wheel slightly
to the right and left. (See “Vehicle information
display” in the “2. Instruments and controls”
section.)
IGNITION SWITCH POSITIONS WARNING
Never place the ignition switch in the “OFF” posi-
tion while driving. The steering wheel may lock
and cause the driver to lose control of the ve-
hicle, resulting in serious vehicle damage or per-
sonal injury.
CAUTION
• Do not leave the vehicle for extended periods
of time when the ignition switch is in the “ON”
position and the engine is not running. This
can discharge the battery.
• Use electrical accessories with the engine
running to avoid discharging the vehicle bat-
tery. If you must use accessories while the
engine is not running, do not use them for
extended periods of time and do not use mul-
tiple electrical accessories at the same time.
5-16 Starting and driving