brake light RENAULT ALASKAN 2017 Owners Manual
[x] Cancel search | Manufacturer: RENAULT, Model Year: 2017, Model line: ALASKAN, Model: RENAULT ALASKAN 2017Pages: 340, PDF Size: 6.93 MB
Page 63 of 340
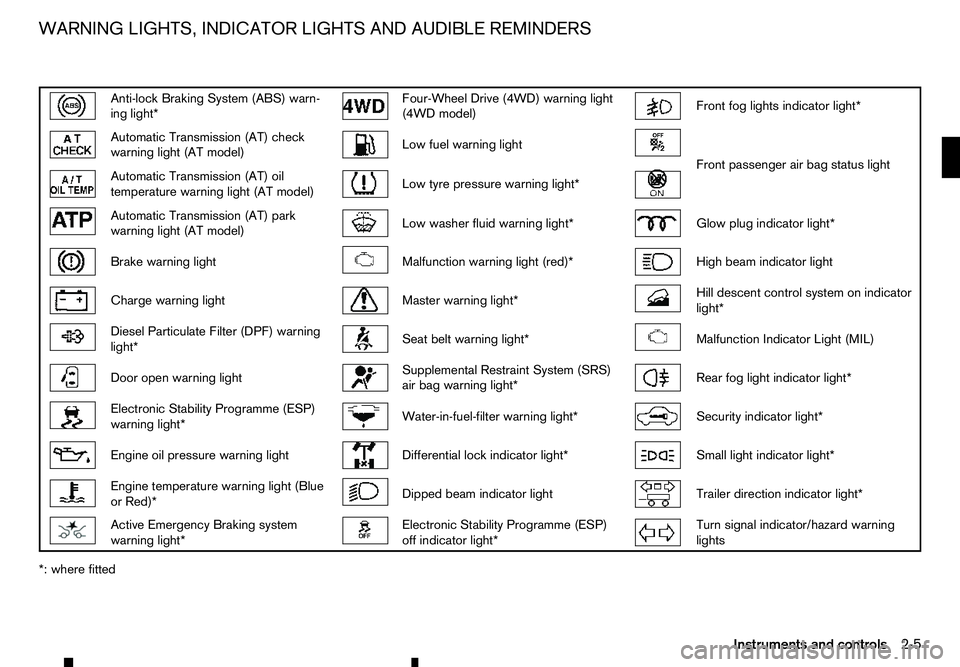
Anti-lock Braking System (ABS) warn-
ing light* Four-Wheel Drive (4WD) warning light
(4WD model) Front fog lights indicator light*
Automatic Transmission (AT) check
warning light (AT model) Low fuel warning light
Front passenger air bag status light
Automatic Transmission (AT) oil
temperature warning light (AT model) Low tyre pressure warning light*
Automatic Transmission (AT) park
warning light (AT model) Low washer fluid warning light*
Glow plug indicator light*
Brake warning light
Malfunction warning light (red)*
High beam indicator light
Charge warning light
Master warning light*
Hill descent control system on indicator
light* Diesel Particulate Filter (DPF) warning
light* Seat belt warning light*
Malfunction Indicator Light (MIL)
Door open warning light
Supplemental Restraint System (SRS)
air bag warning light* Rear fog light indicator light*
Electronic Stability Programme (ESP)
warning light* Water-in-fuel-filter warning light*
Security indicator light*
Engine oil pressure warning light
Differential lock indicator light*
Small light indicator light*
Engine temperature warning light (Blue
or Red)* Dipped beam indicator light
Trailer direction indicator light*
Active Emergency Braking system
warning light* Electronic Stability Programme (ESP)
off indicator light* Turn signal indicator/hazard warning
lights
*: where fitted WARNING LIGHTS, INDICATOR LIGHTS AND AUDIBLE REMINDERS
Instruments and controls2-5
Page 64 of 340
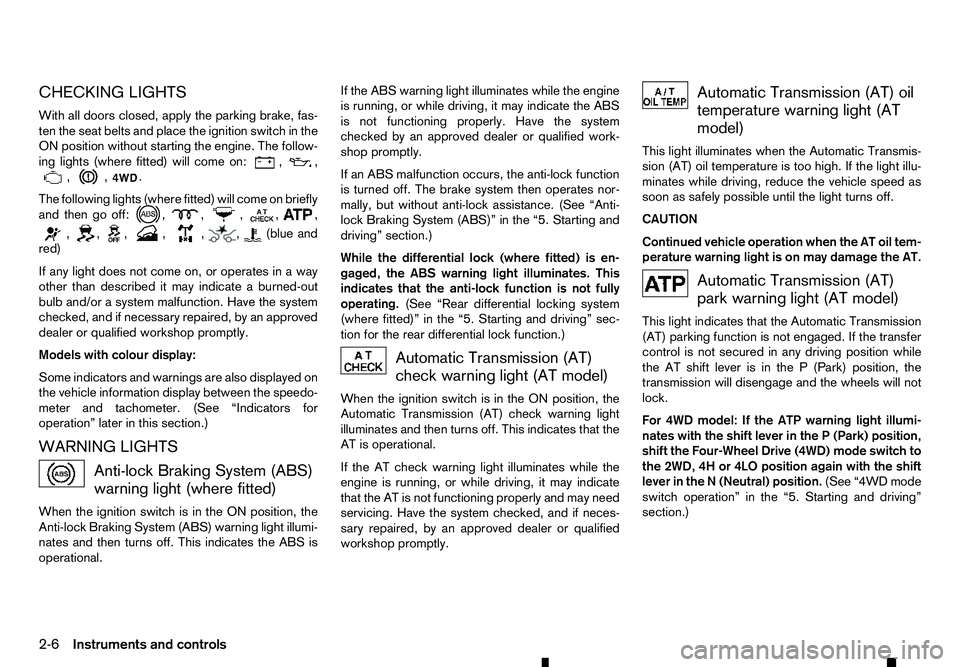
CHECKING LIGHTS
With all doors closed, apply the parking brake, fas-
ten the seat belts and place the ignition switch in the
ON position without starting the engine. The follow-
ing lights (where fitted) will come on: , ,
, , .
The following lights (where fitted) will come on briefly
and then go off: , , ,
, ,
, , , , , , (blue and
red)
If any light does not come on, or operates in away
other than described it may indicate aburned-out
bulb and/or asystem malfunction. Have the system
checked, and if necessary repaired, by an approved
dealer or qualified workshop promptly.
Models with colour display:
Some indicators and warnings are also displayed on
the vehicle information display between the speedo-
meter and tachometer. (See “Indicators for
operation” later in this section.)
WARNING LIGHTS Anti-lock Braking System (ABS)
warning light (where fitted)
When the ignition switch is in the ON position, the
Anti-lock Braking System (ABS) warning light illumi- nates and then turns off. This indicates the ABS is
operational. If the ABS warning light illuminates while the engine
is running, or while driving, it may indicate the ABS
is not functioning properly. Have the system
checked by an approved dealer or qualified work-
shop promptly.
If an ABS malfunction occurs, the anti-lock function
is turned off. The brake system then operates nor-
mally, but without anti-lock assistance. (See “Anti-
lock Braking System (ABS)” in the “5. Starting and
driving” section.)
While the differential lock (where fitted) is en-
gaged, the ABS warning light illuminates. This
indicates that the anti-lock function is not fully
operating. (See “Rear differential locking system
(where fitted)” in the “5. Starting and driving” sec-
tion for the rear differential lock function.) Automatic Transmission (AT)
check warning light (AT model)
When the ignition switch is in the ON position, the
Automatic Transmission (AT) check warning light
illuminates and then turns off. This indicates that the
AT is operational.
If the AT check warning light illuminates while the
engine is running, or while driving, it may indicate
that the AT is not functioning properly and may need
servicing. Have the system checked, and if neces-
sary repaired, by an approved dealer or qualified
workshop promptly. Automatic Transmission (AT) oil
temperature warning light (AT
model)
This light illuminates when the Automatic Transmis-
sion (AT) oil temperature is too high. If the light illu-
minates while driving, reduce the vehicle speed as
soon as safely possible until the light turns off.
CAUTION
Continued vehicle operation when the AT oil tem-
perature warning light is on may damage the AT. Automatic Transmission (AT)
park warning light (AT model)
This light indicates that the Automatic Transmission
(AT) parking function is not engaged. If the transfer
control is not secured in any driving position while
the AT shift lever is in the P(Park) position, the
transmission will disengage and the wheels will not
lock.
For 4WD model: If the ATP warning light illumi-
nates with the shift lever in the P(Park) position,
shift the Four-Wheel Drive (4WD) mode switch to
the 2WD, 4H or 4LO position again with the shift
lever in the N(Neutral) position. (See “4WD mode
switch operation” in the “5. Starting and driving”
section.)
2-6 Instruments and controls
Page 65 of 340
WARNING
If the 4WD mode indicator (see “Four-Wheel Drive
(4WD) warning light (4WD model)” later in this
section) is OFF or the ATP warning light is ON,
this indicates that the automatic transmission P
(Park) position will not function and could result
in the vehicle moving unexpectedly, causing seri-
ous personal injury or property damage. Always
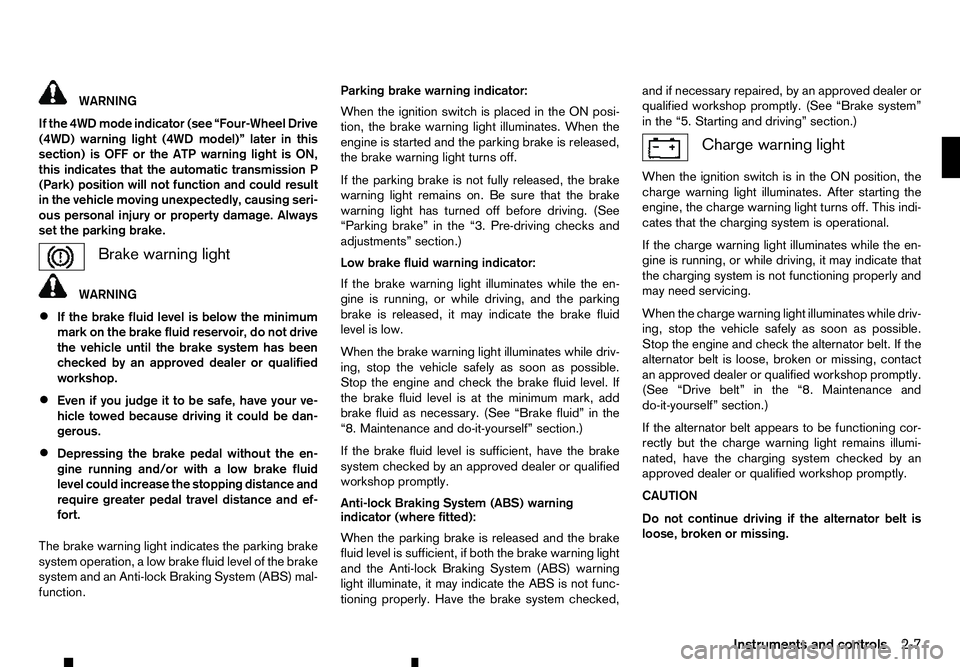
set the parking brake. Brake warning light
WARNING
• If the brake fluid level is below the minimum
mark on the brake fluid reservoir, do not drive
the vehicle until the brake system has been
checked by an approved dealer or qualified
workshop.
• Even if you judge it to be safe, have your ve-
hicle towed because driving it could be dan-
gerous.
• Depressing the brake pedal without the en-
gine running and/or with
alow brake fluid
level could increase the stopping distance and
require greater pedal travel distance and ef-
fort.
The brake warning light indicates the parking brake
system operation, alow brake fluid level of the brake
system and an Anti-lock Braking System (ABS) mal-
function. Parking brake warning indicator:
When the ignition switch is placed in the ON posi-
tion, the brake warning light illuminates. When the
engine is started and the parking brake is released,
the brake warning light turns off.
If the parking brake is not fully released, the brake
warning light remains on. Be sure that the brake
warning light has turned off before driving. (See
“Parking brake” in the “3. Pre-driving checks and
adjustments” section.)
Low brake fluid warning indicator:
If the brake warning light illuminates while the en-
gine is running, or while driving, and the parking
brake is released, it may indicate the brake fluid
level is low.
When the brake warning light illuminates while driv-
ing, stop the vehicle safely as soon as possible.
Stop the engine and check the brake fluid level. If
the brake fluid level is at the minimum mark, add
brake fluid as necessary. (See “Brake fluid” in the
“8. Maintenance and do-it-yourself” section.)
If the brake fluid level is sufficient, have the brake
system checked by an approved dealer or qualified
workshop promptly.
Anti-lock Braking System (ABS) warning
indicator (where fitted):
When the parking brake is released and the brake
fluid level is sufficient, if both the brake warning light
and the Anti-lock Braking System (ABS) warning
light illuminate, it may indicate the ABS is not func-
tioning properly. Have the brake system checked, and if necessary repaired, by an approved dealer or
qualified workshop promptly. (See “Brake system”
in the “5. Starting and driving” section.) Charge warning light
When the ignition switch is in the ON position, the
charge warning light illuminates. After starting the
engine, the charge warning light turns off. This indi-
cates that the charging system is operational.
If the charge warning light illuminates while the en-
gine is running, or while driving, it may indicate that
the charging system is not functioning properly and
may need servicing.
When the charge warning light illuminates while driv-
ing, stop the vehicle safely as soon as possible.
Stop the engine and check the alternator belt. If the
alternator belt is loose, broken or missing, contact
an approved dealer or qualified workshop promptly.
(See “Drive belt” in the “8. Maintenance and
do-it-yourself” section.)
If the alternator belt appears to be functioning cor-
rectly but the charge warning light remains illumi-
nated, have the charging system checked by an
approved dealer or qualified workshop promptly.
CAUTION
Do not continue driving if the alternator belt is
loose, broken or missing.
Instruments and controls 2-7
Page 67 of 340
•
If the engine overheats, continued operation
of the vehicle may seriously damage the en- gine. See “If your vehicle overheats” in the
“6. In case of emergency” section for immedi-
ate required action.
Low temperature indicator light (Blue):
When the ignition switch is placed in the ON posi-
tion, the engine temperature warning light (blue)
comes on. After afew seconds, it should go out and
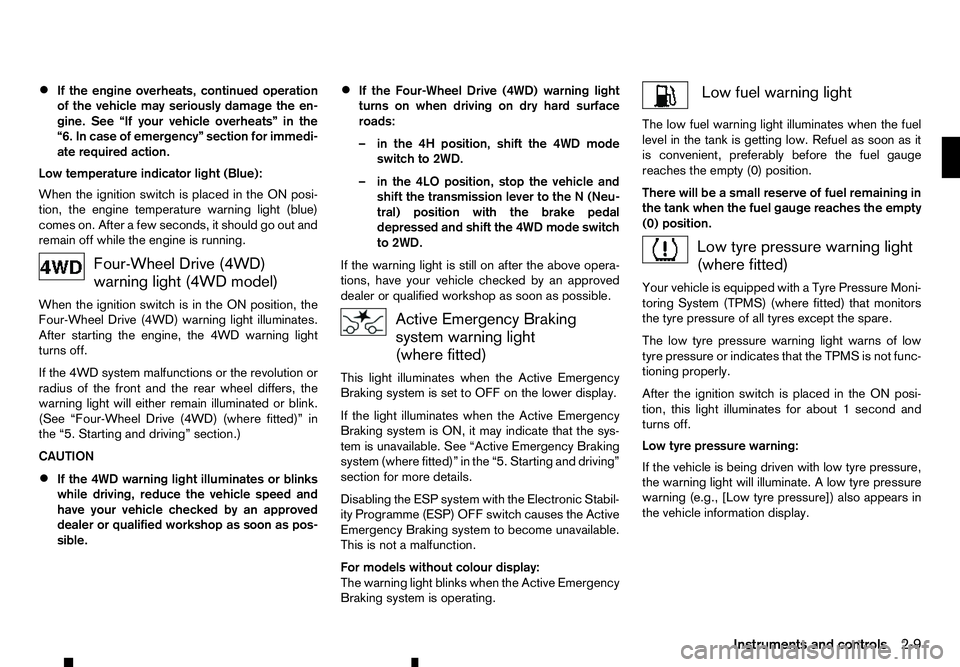
remain off while the engine is running. Four-Wheel Drive (4WD)
warning light (4WD model)
When the ignition switch is in the ON position, the
Four-Wheel Drive (4WD) warning light illuminates.
After starting the engine, the 4WD warning light
turns off.
If the 4WD system malfunctions or the revolution or
radius of the front and the rear wheel differs, the
warning light will either remain illuminated or blink.
(See “Four-Wheel Drive (4WD) (where fitted)” in
the “5. Starting and driving” section.)
CAUTION
• If the 4WD warning light illuminates or blinks
while driving, reduce the vehicle speed and
have your vehicle checked by an approved
dealer or qualified workshop as soon as pos-
sible. •
If the Four-Wheel Drive (4WD) warning light
turns on when driving on dry hard surface
roads:
–i
nthe 4H position, shift the 4WD mode
switch to 2WD.
–i nthe 4LO position, stop the vehicle and
shift the transmission lever to the N(Neu-
tral) position with the brake pedal
depressed and shift the 4WD mode switch
to 2WD.
If the warning light is still on after the above opera-
tions, have your vehicle checked by an approved
dealer or qualified workshop as soon as possible. Active Emergency Braking
system warning light
(where fitted)
This light illuminates when the Active Emergency
Braking system is set to OFF on the lower display.
If the light illuminates when the Active Emergency
Braking system is ON, it may indicate that the sys-
tem is unavailable. See “Active Emergency Braking
system (where fitted)” in the “5. Starting and driving”
section for more details.
Disabling the ESP system with the Electronic Stabil-
ity Programme (ESP) OFF switch causes the Active
Emergency Braking system to become unavailable.
This is not amalfunction.
For models without colour display:
The warning light blinks when the Active Emergency
Braking system is operating. Low fuel warning light
The low fuel warning light illuminates when the fuel
level in the tank is getting low. Refuel as soon as it
is convenient, preferably before the fuel gauge
reaches the empty (0) position.
There will be asmall reserve of fuel remaining in
the tank when the fuel gauge reaches the empty (0) position. Low tyre pressure warning light
(where fitted)
Your vehicle is equipped with aTyre Pressure Moni-
toring System (TPMS) (where fitted) that monitors
the tyre pressure of all tyres except the spare.
The low tyre pressure warning light warns of low
tyre pressure or indicates that the TPMS is not func-
tioning properly.
After the ignition switch is placed in the ON posi-
tion, this light illuminates for about 1second and
turns off.
Low tyre pressure warning:
If the vehicle is being driven with low tyre pressure,
the warning light will illuminate. Alow tyre pressure
warning (e.g., [Low tyre pressure]) also appears in
the vehicle information display.
Instruments and controls 2-9
Page 69 of 340
•
When
aspare tyre is mounted or
awheel is
replaced, the TPMS will not function and the
low tyre pressure warning light will flash for
approximately 1minute. The light will remain
on after 1minute. Contact an approved dealer
or qualified workshop as soon as possible for
tyre replacement and/or system resetting.
• Replacing tyres with those not originally speci-
fied by RENAULT could affect the proper op-
eration of the TPMS.
CAUTION
• The TPMS is not
asubstitute for the regular
tyre pressure check. Be sure to check the tyre
pressure regularly.
• If the vehicle is being driven at speeds of less
than 25 km/h (16 MPH), the TPMS may not
operate correctly.
• Be sure to install the specified size of tyres to
all four wheels correctly. Low washer fluid warning light
(where fitted)
The low washer fluid warning light illuminates when
the washer fluid in the reservoir is at alow level. Add
washer fluid as necessary. (See “Window washer
fluid” in the “8. Maintenance and do-it-yourself” sec-
tion.) Malfunction warning light (red)
(where fitted)
When the ignition switch is placed in the ON posi-
tion, the malfunction warning light illuminates in red.
This means that the system is operational. After
starting the engine, the warning light turns off.
For the orange Malfunction Indicator Light (MIL),
see “Malfunction Indicator Light (MIL)” later in this
section for details.
If the malfunction warning light (red) illuminates con-
tinuously while the engine is running, it may indicate
an engine control system malfunction. Have your
vehicle inspected by an approved dealer or qualified
workshop. You do not need to have your vehicle
towed to the dealer.
CAUTION
Continuing vehicle operation without proper ser-
vicing of the engine control system could lead to
poor driveability, reduced fuel economy, and
damage to the engine control system, which may
affect the vehicle’s warranty coverage. Master warning light (where
fitted)
When the ignition switch is in the ON position, the
master warning light illuminates if any of the follow-
ing are displayed on the vehicle information display.
• No Key Detected warning (where fitted)
• Shift to Park warning (Automatic Transmission
(AT) models) •
Key ID Incorrect warning (where fitted)
• Release Parking Brake warning
• Low fuel warning
• Door open warning
• Low Washer warning (where fitted)
• Key System Error warning (where fitted)
• Low Oil Pressure warning (where fitted)
• AdBlue® warning (where fitted)
• 4WD Error (where fitted)
• Shipping Mode On Push Storage Fuse warning
(where fitted)
• Headlight System Error warning (where fitted)
• Automatic Transmission (AT) Error warning (Au-
tomatic Transmission (AT) models)
• Parking Sensor Error (where fitted)
See “Vehicle information display” later in this sec-
tion. Seat belt warning light
(where fitted)
Front seat belts:
When the ignition switch is in the ON position, the
seat belt warning light illuminates. The light will con-
tinue to illuminate until the driver’s seat belt is fas-
tened.
Instruments and controls 2-11
Page 72 of 340
Turn signal/hazard warning
lights
The turn signal/hazard warning lights blink when the
turn signal switch lever or hazard warning flasher
switch is on. (See “Turn signal switch” later in this
section or “Hazard warning flasher switch” in the
“6. In case of emergency” section.)
AUDIBLE REMINDERS
Brake pad wear warning The disc brake pads have audible wear warnings.
When abrake pad requires replacement, it will make
ah igh pitched scraping sound when the vehicle is in
motion. This scraping sound will first occur only
when the brake pedal is depressed. After more wear
of the brake pad, the sound will always be heard
even if the brake pedal is not depressed. Have the
brakes checked as soon as possible if the wear
warning sound is heard.
Have the system checked, and if necessary re-
paired, by an approved dealer or qualified workshop
promptly. (See “Brakes” in the “8. Maintenance and
do-it-yourself” section.)
Key reminder chime
The chime will sound if any of the following opera-
tions are detected:
Models with Remote Control Key system:
The chime will sound if the driver side door is opened
while the ignition switch is placed in the ACC posi-
tion. Models without Remote Control Key system:
The chime sounds if the driver’s side door is opened
while the key is left in the ignition switch and the
ignition switch is in the ACC, OFF or LOCK posi-
tion. Remove the key and take it with you when leav-
ing the vehicle.
Light reminder chime
The light reminder chime will sound if the driver’s
side door is opened and the headlight switch is in
either the or position, and the ignition
switch is in the ACC, OFF or LOCK position.
Be sure to turn the headlight switch to the
or
the vehicle.
Parking brake reminder chime
The parking brake reminder chime will sound if the
vehicle is driven at more than 7km/h (4 MPH) with
the parking brake applied. Stop the vehicle and re-
lease the parking brake.
Seat belt warning chime (where fitted)
When the vehicle speed exceeds 15 km/h (10
MPH), the chime will sound unless the driver’s and/
or the front passenger’s seat belts are securely fas-
tened. The chime will continue to sound for about
95 seconds until the seat belt is fastened. The vehicle information display
➀is located be-
tween the tachometer and the speedometer, and it
displays the warnings and information. The follow-
ing items are also displayed:
• Automatic Transmission (AT) (where fitted)
—“
Driving with Automatic Transmission (AT)” in
the “5. Starting and driving” section
• Four-Wheel Drive (4WD) (where fitted)
—“
Four-Wheel Drive (4WD) (where fitted)” in
the “5. Starting and driving” section
• Clock
—“
[Clock]” later in this section
• Trip computer
—“
Trip computer” later in this section
• Cruise control (where fitted)
—“
Cruise control (where fitted)” in the “5. Start-
ing and driving” section JVI0899XZ
VEHICLE INFORMATION DISPLAY
2-14 Instruments and controls
Page 83 of 340
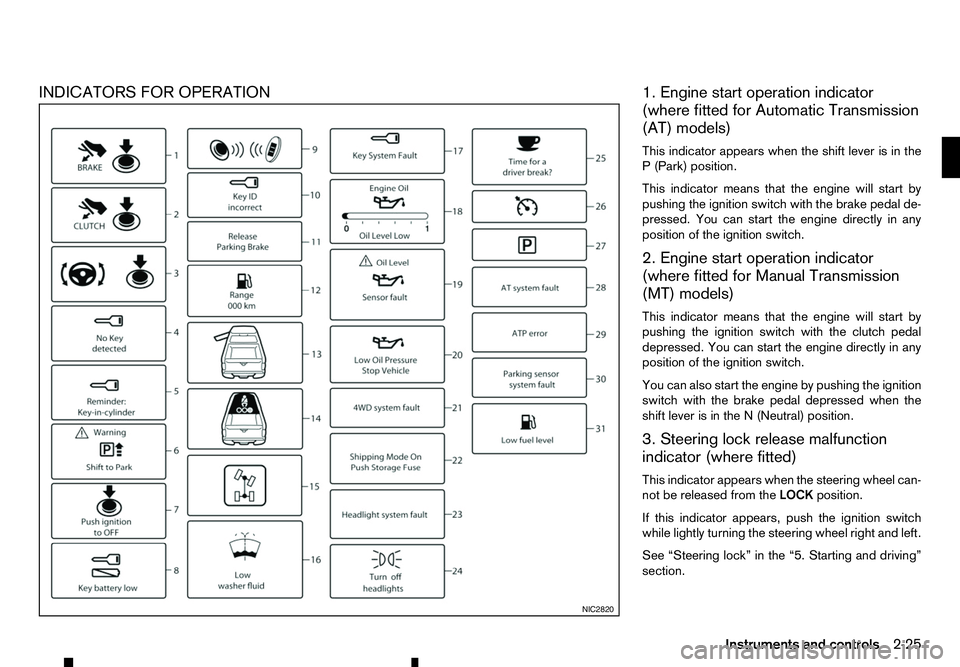
INDICATORS FOR OPERATION
1. Engine start operation indicator
(where fitted for Automatic Transmission
(AT) models)
This indicator appears when the shift lever is in the P( Park) position.
This indicator means that the engine will start by
pushing the ignition switch with the brake pedal de-
pressed. You can start the engine directly in any
position of the ignition switch.
2. Engine start operation indicator
(where fitted for Manual Transmission
(MT) models)
This indicator means that the engine will start by
pushing the ignition switch with the clutch pedal depressed. You can start the engine directly in any
position of the ignition switch.
You can also start the engine by pushing the ignition
switch with the brake pedal depressed when the
shift lever is in the N(Neutral) position.
3. Steering lock release malfunction
indicator (where fitted)
This indicator appears when the steering wheel can-
not be released from the LOCKposition.
If this indicator appears, push the ignition switch
while lightly turning the steering wheel right and left.
See “Steering lock” in the “5. Starting and driving”
section. NIC2820
Instruments and controls
2-25
Page 86 of 340
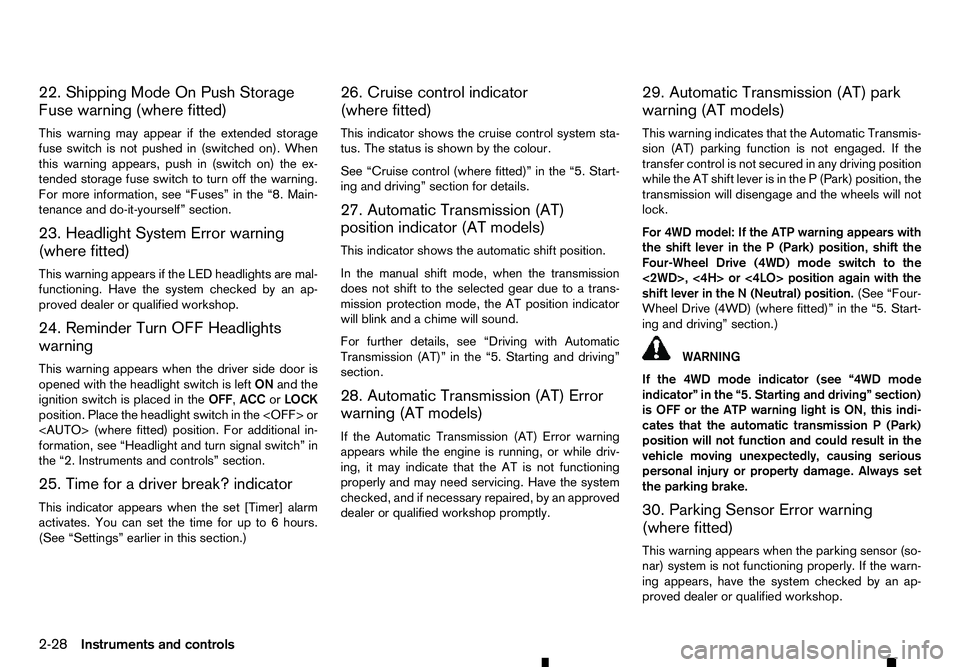
22. Shipping Mode On Push Storage
Fuse warning (where fitted)
This warning may appear if the extended storage
fuse switch is not pushed in (switched on). When
this warning appears, push in (switch on) the ex- tended storage fuse switch to turn off the warning.
For more information, see “Fuses” in the “8. Main-
tenance and do-it-yourself” section.
23. Headlight System Error warning
(where fitted)
This warning appears if the LED headlights are mal-
functioning. Have the system checked by an ap-
proved dealer or qualified workshop.
24. Reminder Turn OFF Headlights
warning
This warning appears when the driver side door is
opened with the headlight switch is left ONand the
ignition switch is placed in the OFF,ACCorLOCK
position. Place the headlight switch in the
formation, see “Headlight and turn signal switch” in
the “2. Instruments and controls” section.
25. Time for adriver break? indicator
This indicator appears when the set [Timer] alarm activates. You can set the time for up to 6hours.
(See “Settings” earlier in this section.) 26. Cruise control indicator
(where fitted)
This indicator shows the cruise control system sta-
tus. The status is shown by the colour.
See “Cruise control (where fitted)” in the “5. Start-
ing and driving” section for details.
27. Automatic Transmission (AT)
position indicator (AT models)
This indicator shows the automatic shift position.
In the manual shift mode, when the transmission
does not shift to the selected gear due to
atrans-
mission protection mode, the AT position indicator
will blink and achime will sound.
For further details, see “Driving with Automatic
Transmission (AT)” in the “5. Starting and driving”
section.
28. Automatic Transmission (AT) Error
warning (AT models)
If the Automatic Transmission (AT) Error warning
appears while the engine is running, or while driv-
ing, it may indicate that the AT is not functioning
properly and may need servicing. Have the system
checked, and if necessary repaired, by an approved
dealer or qualified workshop promptly. 29. Automatic Transmission (AT) park
warning (AT models)
This warning indicates that the Automatic Transmis-
sion (AT) parking function is not engaged. If the
transfer control is not secured in any driving position
while the AT shift lever is in the
P(Park) position, the
transmission will disengage and the wheels will not
lock.
For 4WD model: If the ATP warning appears with
the shift lever in the P(Park) position, shift the
Four-Wheel Drive (4WD) mode switch to the
<2WD>, <4H> or <4LO> position again with the
shift lever in the N(Neutral) position. (See “Four-
Wheel Drive (4WD) (where fitted)” in the “5. Start-
ing and driving” section.) WARNING
If the 4WD mode indicator (see “4WD mode
indicator” in the “5. Starting and driving” section)
is OFF or the ATP warning light is ON, this indi-
cates that the automatic transmission P(Park)
position will not function and could result in the
vehicle moving unexpectedly, causing serious
personal injury or property damage. Always set
the parking brake.
30. Parking Sensor Error warning
(where fitted)
This warning appears when the parking sensor (so-
nar) system is not functioning properly. If the warn-
ing appears, have the system checked by an ap-
proved dealer or qualified workshop.
2-28 Instruments and controls
Page 130 of 340
VANITY MIRROR (where fitted)
To use the front vanity mirror, pull down the sun
visor and pull up the cover. WARNING
• Never drive the vehicle with the parking brake
applied. The brake will overheat and fail to
operate and will lead to an accident.
• Never release the parking brake from outside
the vehicle. If the vehicle moves, it will be
impossible to push the brake pedal and will
lead to an accident.
• Never use the shift lever in place of the park-
ing brake. When parking, be sure the parking
brake is fully applied.
• To help avoid risk of injury or death through
unintended operation of the vehicle and/or its
systems, do not leave children, people who
require the assistance of others, or pets unat-
tended in your vehicle. Additionally, the tem-
perature inside
aclosed vehicle on awarm
day can quickly become high enough to cause
as ignificant risk of injury or death to people
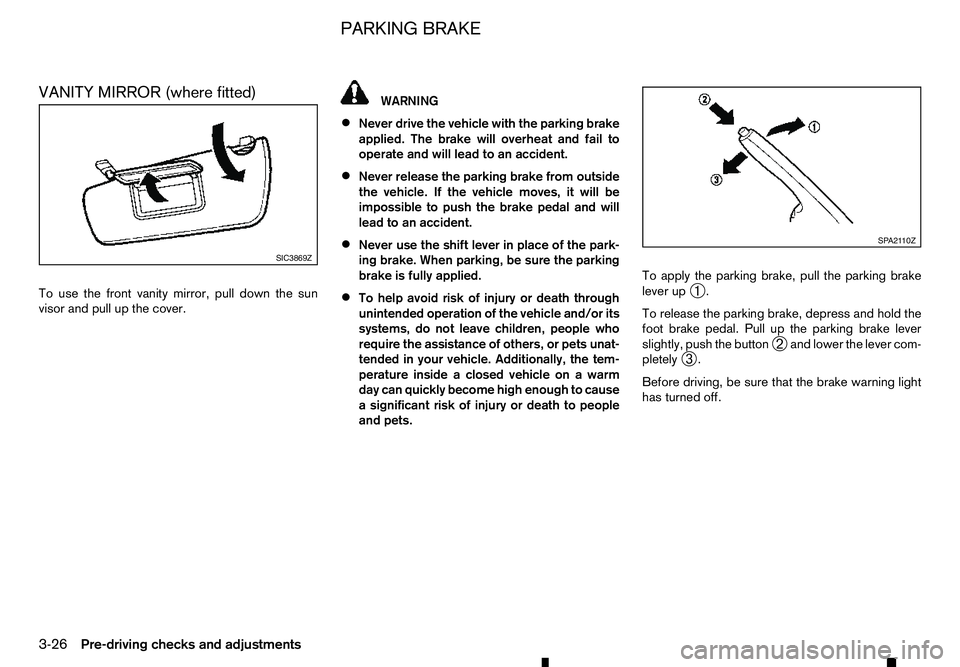
and pets. To apply the parking brake, pull the parking brake
lever up
➀.
To release the parking brake, depress and hold the
foot brake pedal. Pull up the parking brake lever
slightly, push the button ➁and lower the lever com-
pletely ➂.
Before driving, be sure that the brake warning light
has turned off. SIC3869Z SP A2110Z
PARKING BRAKE
3-26 Pre-driving checks and adjustments
Page 151 of 340
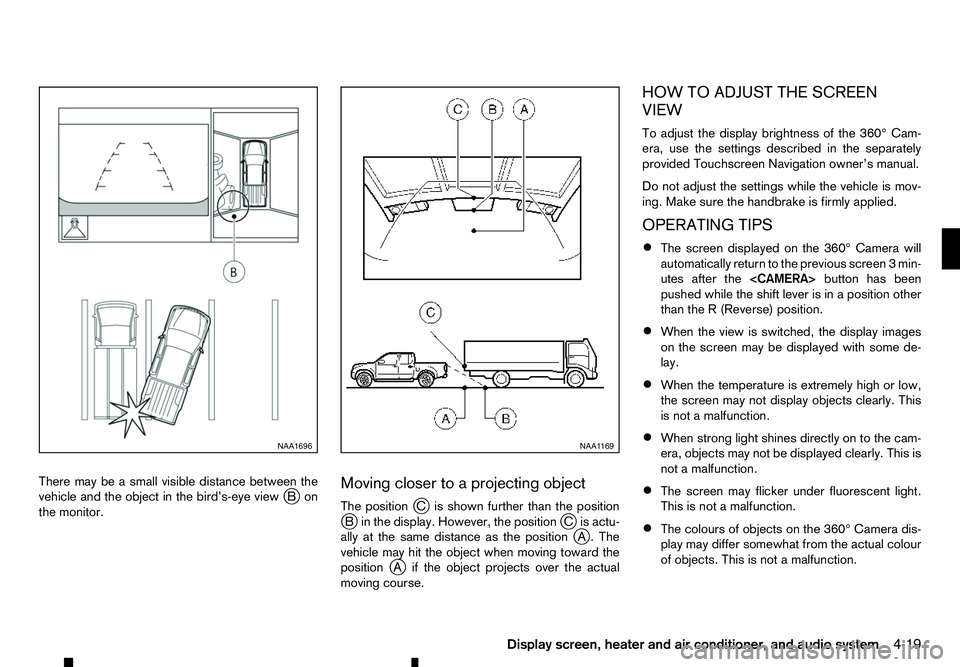
There may be
asmall visible distance between the
vehicle and the object in the bird’s-eye view j
Bon
the monitor. Moving closer to
aprojecting object
The position jCi sshown further than the position
j Bi nthe display. However, the position jCi sactu-
ally at the same distance as the position j
A. The
vehicle may hit the object when moving toward the
position j
Ai fthe object projects over the actual
moving course. HOW TO ADJUST THE SCREEN
VIEW
To adjust the display brightness of the 360° Cam-
era, use the settings described in the separately
provided Touchscreen Navigation owner’s manual.
Do not adjust the settings while the vehicle is mov-
ing. Make sure the handbrake is firmly applied.
OPERATING TIPS
• The screen displayed on the 360° Camera will
automatically return to the previous screen
3min-
utes after the
pushed while the shift lever is in aposition other
than the R(Reverse) position.
• When the view is switched, the display images
on the screen may be displayed with some de-
lay.
• When the temperature is extremely high or low,
the screen may not display objects clearly. This
is not
amalfunction.
• When strong light shines directly on to the cam-
era, objects may not be displayed clearly. This is
not
amalfunction.
• The screen may flicker under fluorescent light.
This is not
amalfunction.
• The colours of objects on the 360° Camera dis-
play may differ somewhat from the actual colour
of objects. This is not
amalfunction. NAA1696 NAA1 169
Display screen, heater and air conditioner, and audio system 4-19