cooling RENAULT ALASKAN 2017 Owners Manual
[x] Cancel search | Manufacturer: RENAULT, Model Year: 2017, Model line: ALASKAN, Model: RENAULT ALASKAN 2017Pages: 340, PDF Size: 6.93 MB
Page 156 of 340
Heater operation
Heating:
This mode is used to direct heated air from the foot
outlets.
1. Push the air recirculation button for normal
heating. (The indicator light will turn off.)
2. Turn the air flow control dial to the position.
3. Turn the fan speed control
dial to the de-
sired position.
4. Turn the temperature control dial to the desired position between the middle and the hot (right)
position.
Ventilation:
This mode directs outside air from the side and
centre vents.
1. Push the air recirculation button. (The indi-
cator light will turn off.)
2. Turn the air flow control dial to the position.
3. Turn the fan speed control
dial to the de-
sired position.
4. Turn the temperature control dial to the desired position.
Defrosting or defogging:
This mode directs the air to the defogger outlets to
defrost/defog the windows.
1. Turn the air flow control dial to the position.2. Push the air recirculation
button. (The indi-
cator light will turn off.)
3. Turn the fan speed control dial to the de-
sired position.
4. Turn the temperature control dial to the desired position between the middle and the hot (right)
position.
• To remove frost from the windscreen quickly,
turn the temperature control dial to the maximum
position and the fan speed control dial to
the maximum position.
• If it is difficult to defog the windscreen, turn the
A/C
button on.
Bi-level heating:
This mode directs cool air from the side and centre
vents and warm air from the foot outlets. When the
temperature control dial is turned to the maximum
hot or cool position, the air between the vents and
the foot outlets is the same temperature.
1. Push the air recirculation button. (The indi-
cator light will turn off.)
2. Turn the air flow control dial to the position.
3. Turn the fan speed control
dial to the de-
sired position.
4. Turn the temperature control dial to the desired position. Heating and defogging:
This mode heats the interior and defogs the win-
dows.
1. Push the air recirculation button. (The indi-
cator light will turn off.)
2. Turn the air flow control dial to the position.
3. Turn the fan speed control dial to the desired
position.
4. Turn the temperature control dial to the maximum hot (right) position.
Air conditioner operation
The air conditioner system should be operated for
approximately 10 minutes at least once amonth.
This helps prevent damage to the air conditioner
system due to the lack of lubrication.
Cooling:
This mode is used to cool and dehumidify the air.
1. Push the air recirculation button. (The indi-
cator light will turn off.)
2. Turn the air flow control dial to the position.
3. Turn the fan speed control dial to the desired
position.
4. Push the A/Cbutton on. (The A/Cindicator light
will illuminate.)
5. Turn the temperature control dial to the desired position between the middle and the cool (left)
position.
4-24 Display screen, heater and air conditioner, and audio system
Page 157 of 340
Av
isible mist may be seen coming from the vents in
hot, humid conditions as the air is cooled rapidly.
This does not indicate amalfunction.
• For quick cooling when the outside temperature
is high, push the air recirculation button.
(The indicator light will turn on.) Be sure to return
the air recirculation button to turn off for
normal cooling.
Dehumidified heating:
This mode is used to heat and dehumidify the air.
1. Push the air recirculation button. (The indi-
cator light will turn off.)
2. Turn the air flow control dial to the position.
3. Turn the fan speed control
dial to the de-
sired position.
4. Push the A/Cbutton on. (The A/Cindicator light
will illuminate.)
5. Turn the temperature control dial to the desired position between the middle and the hot (right)
position.
Dehumidified defogging:
This mode is used to defog the windows and dehu-
midify the air.
1. Push the air recirculation button. (The indi-
cator light will turn off.)
2. Turn the air flow control dial to the position.
3. Turn the fan speed control
dial to the de-
sired position. 4. Push the
A/Cbutton on. (The A/Cindicator light
will illuminate.)
5. Turn the temperature control dial to the desired position.
Display screen, heater and air conditioner, and audio system 4-25
Page 159 of 340
A/C (Air Conditioner) operation:
Push the A/Cbutton to turn on or off the air condi-
tioner. When the air conditioner is on, the A/Cindi-
cator light on the button illuminates.
Heater operation
Heating:
This mode is used to direct heated air from the foot
outlets.
1. Push the air recirculation button for normal
heating. (The indicator light will turn off.)
2. Push the button. (The indicator light will
turn on.)
3. Turn the fan speed control dial to the de-
sired position.
4. Turn the temperature control dial to the desired position between the middle and the hot (right)
position.
Defrosting or defogging:
This mode directs the air to the defogger outlets to
defrost/defog the windows.
1. Turn the fan speed control dial to the de-
sired position.
2. Push the front defogger button. (The indi-
cator lights on the front defogger button
and the
A/C button will turn on.) Then the air
recirculation indicator light will turn off. 3. Turn the temperature control dial to the desired
position between the middle and the hot (right)
position.
To remove frost from the windscreen quickly,
turn the temperature control dial to the maximum
hot (right) position and the fan speed control dial to the maximum position. For the best
bi-level heating performance, do not select the
air recirculation mode. For the best defogging
performance, do not select the air recirculation
mode.
Bi-level heating:
This mode directs cool air from the side/centre vents
and warm air from the foot outlets. (When the tem-
perature control dial is turned to the maximum hot
(right) or cool (left) position, the temperatures from
the side/centre vents and the foot outlets will be the
same.)
1. Push the air recirculation button. (The indi-
cator light will turn off.)
2. Push the button. (The indicator light will
turn on.)
3. Turn the fan speed control dial to the de-
sired position.
4. Turn the temperature control dial to the desired position. Heating and defogging:
This mode heats the interior and defogs the win-
dows.
1. Push the air recirculation button. (The indi-
cator light will turn off.)
2. Push the button. (The indicator light will
turn on.)
3. Turn the fan speed control dial to the de-
sired position.
4. Turn the temperature control dial to the maximum hot (right) position.
Air conditioner operation
The air conditioner system should be operated for
approximately 10 minutes at least once amonth.
This helps prevent damage to the air conditioner
system due to the lack of lubrication.
Cooling:
This mode is used to cool and dehumidify the air.
1. Push the air recirculation button. (The indi-
cator light will turn off.)
2. Push the button. (The indicator light will
turn on.)
3. Turn the fan speed control dial to the de-
sired position.
4. Push the A/Cbutton. (The indicator light will turn
on.)
Display screen, heater and air conditioner, and audio system 4-27
Page 160 of 340
5. Turn the temperature control dial to the desired
position between the middle and the cool (left)
position.
Av isible mist may be seen coming from the vents in
hot, humid conditions as the air is cooled rapidly.
This does not indicate amalfunction.
• For quick cooling when the outside temperature
is high, push the air recirculation button.
(The indicator light will turn on.) Be sure to return
the air recirculation button to turn off for
normal cooling.
Dehumidified heating:
This mode is used to heat and dehumidify the air.
1. Push the air recirculation button. (The indi-
cator light will turn off.)
2. Push the button. (The indicator light will
turn on.)
3. Turn the fan speed control dial to the de-
sired position.
4. Push the A/Cbutton. (The indicator light will turn
on.)
5. Turn the temperature control dial to the desired position between the middle and the hot (right)
position. Dehumidified defogging:
This mode is used to defog the windows and dehu-
midify the air.
1. Push the front defogger button. (The indi-
cator lights on the front defogger button
and the
A/C button will turn on.) Then the air
recirculation indicator light will turn off.
2. Turn the fan speed control dial to the de-
sired position.
3. Turn the temperature control dial to the desired position.
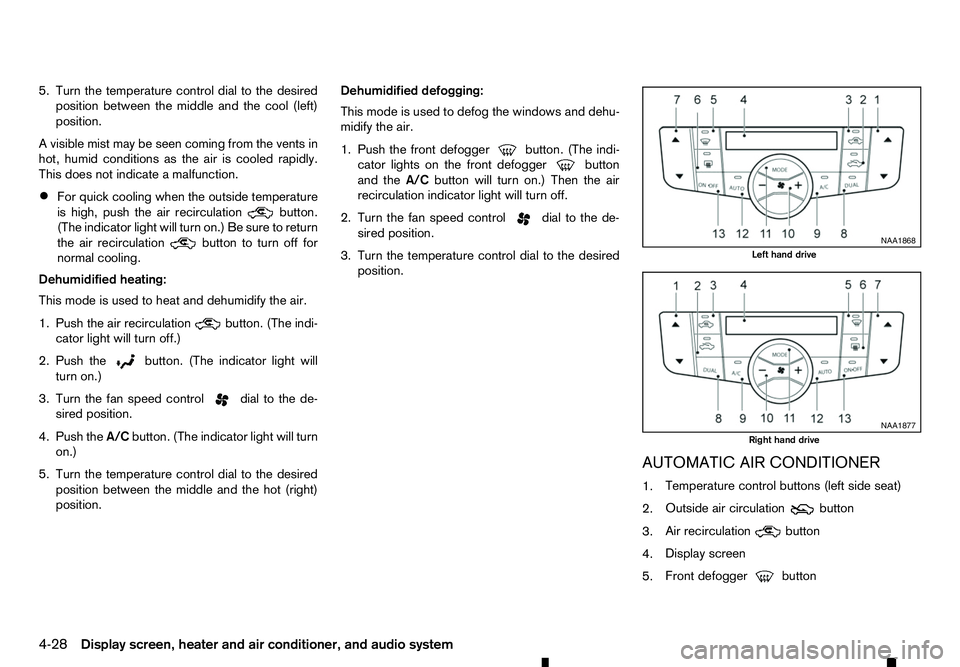
AUTOMATIC AIR CONDITIONER
1.Temperature control buttons (left side seat)
2. Outside air circulation button
3. Air recirculation
button
4. Display screen
5. Front defogger button NAA1868
Left hand drive
NAA1877
Right hand drive
4-28 Display screen, heater and air conditioner, and audio system
Page 161 of 340
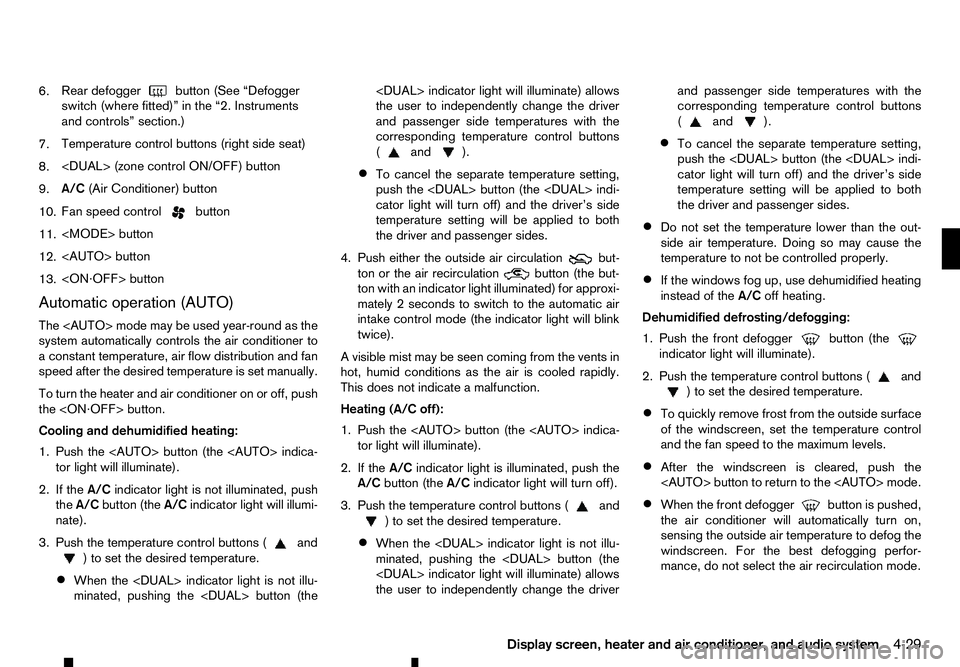
6.
Rear defogger
button (See “Defogger
switch (where fitted)” in the “2. Instruments
and controls” section.)
7. Temperature control buttons (right side seat)
8.
9. A/C
(Air Conditioner) button
10. Fan speed control button
11.
12.
13.
Automatic operation (AUTO)
The
system automatically controls the air conditioner to
ac onstant temperature, air flow distribution and fan
speed after the desired temperature is set manually.
To turn the heater and air conditioner on or off, push
the
Cooling and dehumidified heating:
1. Push the
2. If the A/Cindicator light is not illuminated, push
the A/C button (the A/Cindicator light will illumi-
nate).
3. Push the temperature control buttons ( and
)t os
et the desired temperature.
• When the
minated, pushing the
the user to independently change the driver
and passenger side temperatures with the
corresponding temperature control buttons
( and ).
• To cancel the separate temperature setting,
push the
cator light will turn off) and the driver’s side
temperature setting will be applied to both
the driver and passenger sides.
4. Push either the outside air circulation but-
ton or the air recirculation
button (the but-
ton with an indicator light illuminated) for approxi-
mately 2seconds to switch to the automatic air
intake control mode (the indicator light will blink
twice).
Av isible mist may be seen coming from the vents in
hot, humid conditions as the air is cooled rapidly.
This does not indicate amalfunction.
Heating (A/C off):
1. Push the
2. If the A/Cindicator light is illuminated, push the
A/C button (the A/Cindicator light will turn off).
3. Push the temperature control buttons ( and
)t os
et the desired temperature.
• When the
minated, pushing the
the user to independently change the driver and passenger side temperatures with the
corresponding temperature control buttons
( and ).
• To cancel the separate temperature setting,
push the
cator light will turn off) and the driver’s side
temperature setting will be applied to both
the driver and passenger sides.
• Do not set the temperature lower than the out-
side air temperature. Doing so may cause the
temperature to not be controlled properly.
• If the windows fog up, use dehumidified heating
instead of the
A/Coff heating.
Dehumidified defrosting/defogging:
1. Push the front defogger button (the
indicator light will illuminate).
2. Push the temperature control buttons ( and
)t os
et the desired temperature.
• To quickly remove frost from the outside surface
of the windscreen, set the temperature control
and the fan speed to the maximum levels.
• After the windscreen is cleared, push the
• When the front defogger button is pushed,
the air conditioner will automatically turn on,
sensing the outside air temperature to defog the windscreen. For the best defogging perfor-
mance, do not select the air recirculation mode.
Display screen, heater and air conditioner, and audio system 4-29
Page 210 of 340
•
Be sure to check the brakes immediately af-
ter driving in mud or water. See “Brake
system” later in this section for wet brakes.
• Avoid parking your vehicle on steep hills. If
you get out of the vehicle and it rolls forward,
backward or sideways, you could be injured.
• Whenever you drive off-road through sand,
mud or water as deep as the wheel hub, more
frequent maintenance may be required. See
the maintenance information in
aseparate
maintenance booklet.
• Rinse the underside of the vehicle with fresh
water after driving through mud or sand. Re-
move any brush or sticks that are trapped. The turbocharger system uses engine oil for lubrica-
tion and cooling of its rotating components. The tur-
bocharger turbine turns at extremely high speeds
and it can reach an extremely high temperature. It is
essential to maintain
aflow of clean oil through the
turbocharger system. Asudden interruption to the
oil supply may cause amalfunction in the turbo-
charger.
To ensure prolonged life and performance of the
turbocharger, it is essential to comply with the fol-
lowing maintenance procedure:
CAUTION
• Change the engine oil of the turbo-charged
diesel engine as prescribed. See the sepa-
rately provided maintenance booklet for addi-
tional information.
• Use only the recommended engine oil. For
details, refer to the maintenance service
booklet for your vehicle.
• If the engine has been operating at high rpm
for an extended period of time, let it idle for a
few minutes prior to shutdown.
• Do not accelerate the engine to high rpm im-
mediately after starting it.
• When starting the engine at ambient tempera-
tures below −5°C (23°F), an engine protection
mode may be activated. During this time, the
engine output is reduced. The engine protec-
tion mode is switched off automatically after
am
aximum of 3minutes (provided the accel-
erator pedal is released completely). Driving your vehicle to fit the circumstances is es-
sential for your safety and comfort. As
adriver, you
should be the one who knows best how to drive in
the given circumstances.
ENGINE COLD START PERIOD
Due to the higher engine speeds, when the engine
is cold, extra caution must be exercised when se-
lecting agear during the engine warm-up period
after starting the engine.
LOADING LUGGAGE
Loads and their distribution and the attachment of
equipment (roof baggage carriers, etc.) will consid-
erably change the driving characteristics of the ve-
hicle. Your driving style and speed must be adjusted
according to the circumstances.
DRIVING IN WET CONDITIONS
• Avoid accelerating or stopping suddenly.
• Avoid sharp turning or lane changing suddenly.
• Avoid following too close to the vehicle in front.
When water covers the road surface with water
puddles, small water streams, etc., reduce speed to
prevent hydroplaning which can cause skidding and
loss of control. Worn tyres will increase this risk.
DRIVING IN WINTER CONDITIONS • Drive cautiously.
• Avoid accelerating or stopping suddenly.
• Avoid sharp turning or lane changing suddenly.
TURBOCHARGER SYSTEM CARE WHEN DRIVING
5-8 Starting and driving
Page 226 of 340
NOTE
When the Stop/Start System indicator illumi-
nates, the engine starts running automatically
under at least one of the following conditions:
• The battery voltage becomes low (due to elec-
trical load from other vehicle systems like
headlights, heaters, etc., or auxiliary devices
connected to the 12 volt socket inside the
vehicle).
• The vehicle speed is above about
2km/h (1
MPH).
• The front defogger is operated.
• When the temperature inside the vehicle is
too high or low. (When the air conditioner is
off, the Stop/Start System will operate.)
• When the front defogger is turned on. (The
engine may not start depending on the out-
side temperature.)
• When the battery capacity is low.
• When the power consumption is high.
• When the clutch pedal is depressed.
CAUTION
Only engage gear when the clutch pedal is fully
depressed. NOTE
The following conditions will prevent the Stop/
Start System from automatically restarting the
engine. Starting the engine with the ignition
switch operation is then necessary:
• The driver’s seat belt is unfastened, and driv-
er’s door is open.
• The bonnet is open.
Use this system while waiting at stoplight, etc. When
the vehicle is stopped for long periods of time, turn
off the engine.
When the engine is stopped by the Stop/Start Sys-
tem, heating, cooling and dehumidifying functions
will be deactivated. To avoid the air conditioning
functions from being deactivated, turn off the Idling
Stop mode by pressing the Stop/Start OFF switch.
STOP/START SYSTEM DISPLAY
Engine stop When the engine is stopped the information is dis-
played for
afew seconds.
Stop/Start System ON or OFF
If the Stop/Start System is activated or deactivated
using the Stop/Start System OFF switch, the mes-
sage is shown.
CO2 or fuel saved and engine stop time JVS0341XZ JVS0638XZ
JVS0430XZ
5-24 Starting and driving
Page 253 of 340
When the ABS senses that one or more wheels are
close to locking up, the actuator rapidly applies and
releases hydraulic pressure. This action is similar to
pumping the brakes very quickly. You may feel a
pulsation in the brake pedal and hear anoise from
under the bonnet or feel avibration from the actua-
tor when it is operating. This is normal and indicates
that the ABS is operating properly. However, the
pulsation may indicate that road conditions are haz-
ardous and extra care is required while driving.
When the differential lock (where fitted) is engaged,
the ABS warning light illuminates. This indicates that
the anti-lock function is not fully operating. (See
“Rear differential locking system (where fitted)” ear-
lier in this section for the rear differential lock func-
tion.) WARNING
• Whatever the condition, drive with caution.
Accelerate and decelerate with great care. If
accelerating or decelerating too fast, the drive
wheels will lose even more traction.
• Allow more stopping distance in cold weather
driving. Braking should be started sooner than
on dry pavement.
• Keep at
agreater distance from the vehicle in
front of you on slippery roads.
• Wet ice (0°C, 32°F and freezing rain), very cold
snow and ice can be slick and very difficult to
drive on. The vehicle will have
alot less trac-
tion or grip under these conditions. Try to
avoid driving on wet ice until the road is salted
or sanded.
• Watch for slippery spots (glaring ice). These
may appear on an otherwise clear road in
shaded areas. If
apatch of ice is seen ahead,
brake before reaching it. Try not to brake while
actually on the ice, and avoid any sudden
steering manoeuvres.
• Do not use cruise control on slippery roads.
• Snow can trap dangerous exhaust gas under
your vehicle. Keep snow clear of the exhaust
pipe and from around your vehicle. BATTERY
If the battery is not fully charged during extremely
cold weather conditions, the battery fluid may freeze
and damage the battery. To maintain maximum effi-
ciency, the battery should be checked regularly. For
details, see “Battery” in the “8. Maintenance and
do-it-yourself” section of this manual.
ENGINE COOLANT
If the vehicle is to be left outside without anti-freeze,
drain the cooling system, including the engine block.
Refill before operating the vehicle. For details, see
“Engine cooling system” in the “8. Maintenance and
do-it-yourself” section of this manual.
TYRE EQUIPMENT
1. If you have snow tyres installed on the front/rear
wheels of your vehicle, they should be of the
same size, loading range, construction and type
(bias, bias-belted or radial) as the rear/front tyres.
2. If the vehicle is to be operated in severe winter conditions, snow tyres should be installed on all
four wheels.
3. For additional traction on icy roads, studded tyres may be used. However, some countries, prov-
inces and states prohibit their use. Check local,
state and provincial laws before installing stud-
ded tyres.
Skid and traction capabilities of studded snow
tyres, on wet or dry surfaces, may be poorer
than that of non-studded snow tyres.
COLD WEATHER DRIVING
Starting and driving5-51
Page 266 of 340
11. Start the engine of the jumped vehicle
jBi nthe
normal manner.
CAUTION
Never keep the starter motor engaged for
more than 10 seconds. If the engine does not
start right away, place the ignition switch in
the “LOCK” position and wait at least 10 sec-
onds before trying again.
12. After the engine is started, carefully disconnect the jumper cables in the opposite sequence
from that illustrated ( ➃,
➂ ,
➁ ,
➀ ).
13. Remove and dispose of the cloth properly as it may be contaminated with corrosive acid.
14. Replace the vent caps, if removed. Do not attempt to start the engine by pushing the
vehicle.
CAUTION
• Automatic Transmission (AT) model cannot
be started by pushing. Attempting to do so
may cause damage to the transmission.
• Three-way catalyst equipped model should
not be started by pushing. Attempting to do
so may cause damage to the three-way cata-
lyst.
• Diesel Oxidation Catalyst equipped model
should not be started by pushing. Attempting
to do so may cause damage to the catalyst.
• Never try to start the engine by towing. When
the engine starts, the forward surge could
cause the vehicle to collide with the towing
vehicle. WARNING
• Never continue driving if your vehicle over-
heats. Doing so could cause engine damage
and/or avehicle fire.
• Never open the bonnet if steam is coming
out.
• Never remove the radiator or coolant reser-
voir cap while the engine is hot. If the radiator
or coolant reservoir cap is removed when the
engine is hot, pressurised hot water will spurt
out and possibly cause burning, scalding or
serious injury.
• If steam or coolant is coming from the engine,
stand clear of the vehicle to prevent getting
scalded.
• The engine cooling fan can start at any time
when the coolant temperature exceeds pre-
set degrees.
• Be careful not to allow your hands, hair, jewel-
lery or clothing to come into contact with, or
to get caught in the cooling fan or drive belts.
If your vehicle is overheating, or if you feel alack of
engine power, detect unusual noise, etc., take the
following steps:
1. Safely move the vehicle off the road away from traffic.
2. Turn on the hazard indicator flashers.
3. Apply the parking brake.
PUSH STARTING
IF YOUR VEHICLE OVERHEATS
6-12 In case of emergency
Page 267 of 340
4.
Automatic transmission model:
Move the shift lever to the P(Park) position.
Manual transmission model:
Move the shift lever to the N(Neutral) position.
DO NOT STOP THE ENGINE.
5. Open all the windows.
6. Turn off the air conditioner. Move the tempera- ture control to maximum hot and the fan control
to high speed.
7. Get out from the vehicle.
8. Visually inspect and listen for steam or coolant escaping from the radiator before opening the
bonnet. Wait until no steam or coolant can be
seen before proceeding.
9. Open the engine bonnet.
10. Visually inspect if the cooling fan is running.
11. Visually inspect the radiator and radiator hoses for leakage. If the cooling fan is not running or
the coolant is leaking, stop the engine.
12. After the engine cools down, check the coolant level in the reservoir with the engine running.
Do not open the radiator or coolant reservoir
cap.
13. Add coolant to the reservoir if necessary.
Have your vehicle inspected/repaired at an
approved dealer or qualified workshop. When towing your vehicle, local regulations for tow-
ing must be followed. Incorrect towing equipment
could damage your vehicle. To assure proper tow-
ing and to prevent accidental damage to your ve-
hicle, RENAULT recommends that you have profes-
sional road assistance personnel tow your vehicle. It
is advisable to have the professional road assistant
carefully read the following precautions.
TOWING PRECAUTIONS
• Be sure that the transmission, steering system
and powertrain are in working condition before
towing. If any units are damaged, the vehicle
must be towed using
adolly or flatbed tow truck.
(Two- Wheel Drive (2WD) model)
• RENAULT recommends that your vehicle be
towed with the driving wheels off the ground.
(Two- Wheel Drive (2WD) model)
• To tow
avehicle with automatic transmission,
and appropriate vehicle dolly MUSTbe placed
under the towed vehicles drive wheels. Always
follow the dolly manufacturer’s recommenda-
tions when using their product.
• Always attach safety chains before towing.
• Never tow Four-Wheel Drive (4WD) model with
any of the wheels on the ground as this may
cause serious and expensive damage to the driv-
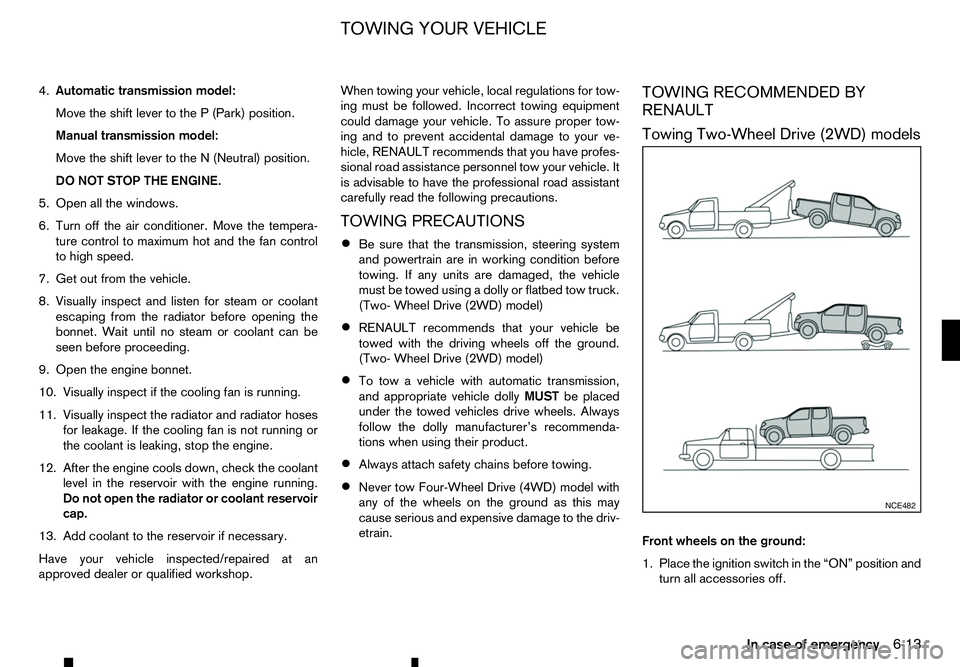
etrain. TOWING RECOMMENDED BY
RENAULT
Towing Two-Wheel Drive (2WD) models
Front wheels on the ground:
1. Place the ignition switch in the “ON” position and
turn all accessories off. NCE482
TOWING YOUR VEHICLE
In case of emergency6-13