remove seats RENAULT ALASKAN 2017 Owners Manual
[x] Cancel search | Manufacturer: RENAULT, Model Year: 2017, Model line: ALASKAN, Model: RENAULT ALASKAN 2017Pages: 340, PDF Size: 6.93 MB
Page 19 of 340

1
Safety —seats, seat belts and supplemental
restraint system Safety
—seats, seat belts and supplemental
restraint system
Seats ....................................................................... 1-2 Front seats ......................................................... 1-2
Rear seats (Double Cab model) .......................... 1-5
Jump seats (where fitted for King Cab models) ... 1-6
Head restraints ........................................................ 1-6 Adjustable head restraint .................................... 1-7
Non-adjustable head restraint.............................. 1-7
Remove .............................................................. 1-7
Install.................................................................. 1-7
Adjust ................................................................. 1-8
Seat belts ................................................................ 1-9 Precautions on seat belt usage ........................... 1-9
Child safety ........................................................ 1-11
Pregnant women ................................................ 1-11
Injured persons................................................... 1-11
Centre mark on seat belts (where fitted) ............. 1-11
Three-point type seat belts .................................. 1-12
Two-point type seat belts (where fitted) ............... 1-13 Seat belt maintenance ........................................ 1-14
Child restraints ........................................................ 1-14
Precautions on child restraint usage.................... 1-14
Universal child restraints for front seat and rear
seats (for Europe) ............................................... 1-15
ISOFIX and i-Size child restraint system (for
second row seats) .............................................. 1-20
Child restraint anchorage (where fitted) .............. 1-21
Child restraint installation using ISOFIX .............. 1-22
Child restraint installation using three-point
type seat belt ...................................................... 1-24
Supplemental Restraint System (SRS) (where
fitted) ....................................................................... 1-29 Precautions on Supplemental Restraint
System (SRS)..................................................... 1-29
Supplemental air bag systems ............................ 1-36
Pre-tensioner seat belt system (where fitted) ....... 1-39
Repair and replacement procedure ..................... 1-40
Page 23 of 340
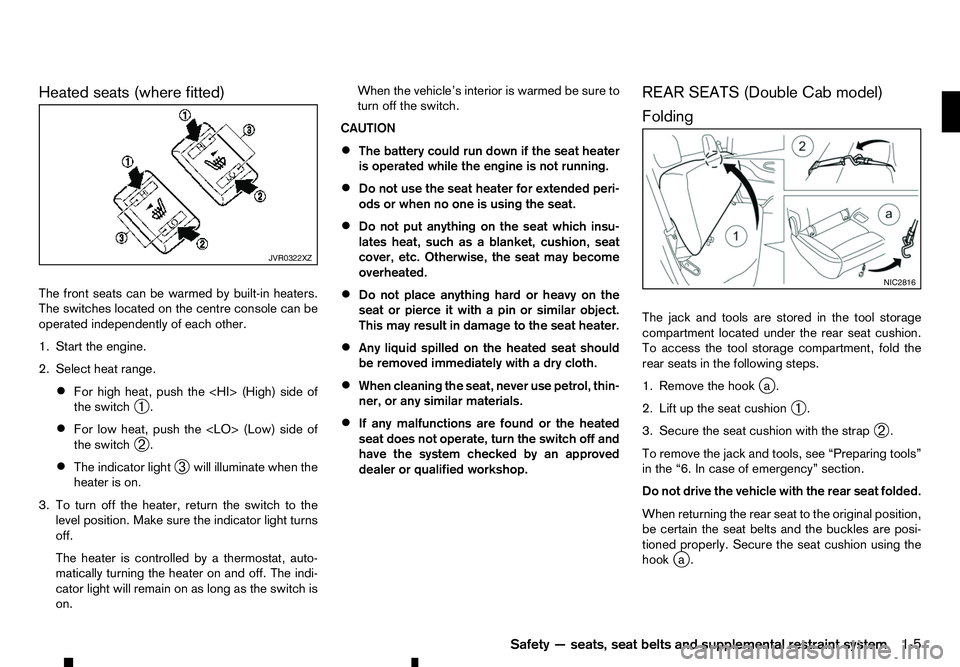
Heated seats (where fitted)
The front seats can be warmed by built-in heaters.
The switches located on the centre console can be
operated independently of each other.
1. Start the engine.
2. Select heat range. • For high heat, push the (High) side of
the switch
➀.
• For low heat, push the
Page 24 of 340
WARNING
• Never allow anyone to ride on the rear seats
when they are in the fold-up position. Use of
this area by passengers without proper re-
straints could result in serious injury or death
in an accident or sudden stop.
• When folding or returning the rear seat, be
careful not to squeeze your finger between
the seat cushion and the body side.
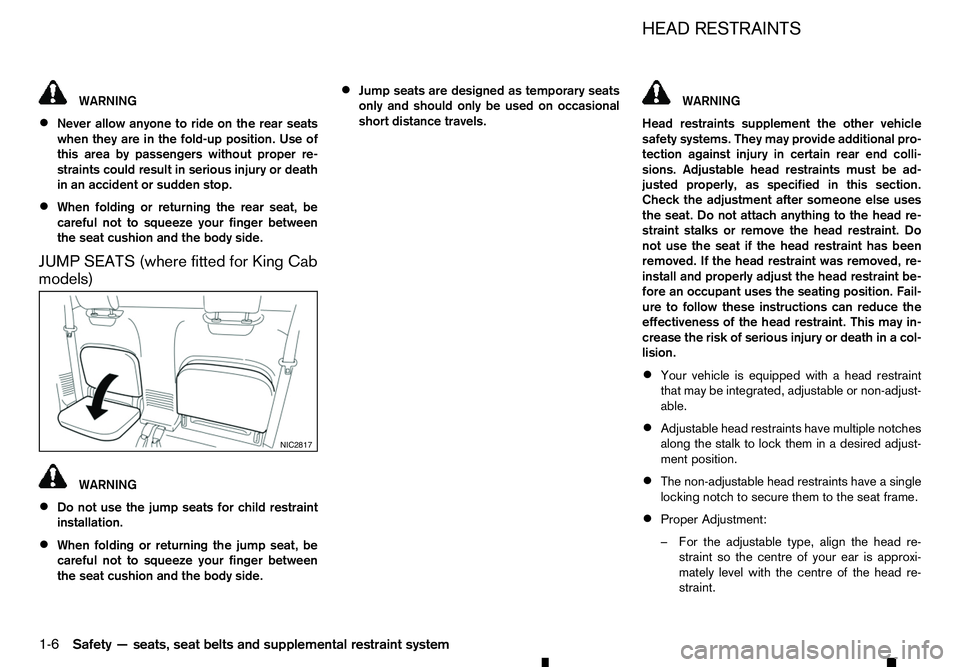
JUMP SEATS (where fitted for King Cab
models) WARNING
• Do not use the jump seats for child restraint
installation.
• When folding or returning the jump seat, be
careful not to squeeze your finger between
the seat cushion and the body side. •
Jump seats are designed as temporary seats
only and should only be used on occasional
short distance travels. WARNING
Head restraints supplement the other vehicle
safety systems. They may provide additional pro-
tection against injury in certain rear end colli-
sions. Adjustable head restraints must be ad-
justed properly, as specified in this section. Check the adjustment after someone else uses
the seat. Do not attach anything to the head re-
straint stalks or remove the head restraint. Do
not use the seat if the head restraint has been
removed. If the head restraint was removed, re-
install and properly adjust the head restraint be-
fore an occupant uses the seating position. Fail-
ure to follow these instructions can reduce the
effectiveness of the head restraint. This may in-
crease the risk of serious injury or death in acol-
lision.
• Your vehicle is equipped with
ahead restraint
that may be integrated, adjustable or non-adjust-
able.
• Adjustable head restraints have multiple notches
along the stalk to lock them in
adesired adjust-
ment position.
• The non-adjustable head restraints have
asingle
locking notch to secure them to the seat frame.
• Proper Adjustment:
–F
or the adjustable type, align the head re-
straint so the centre of your ear is approxi-
mately level with the centre of the head re-
straint. NIC2817 HEAD RESTRAINTS
1-6 Safety —seats, seat belts and supplemental restraint system
Page 25 of 340
–I
fyour ear position is still higher than the rec-
ommended alignment, place the head
restraint at the highest position.
• If the head restraint has been removed, ensure
that it is reinstalled and locked in place before
riding in that designated seating position.
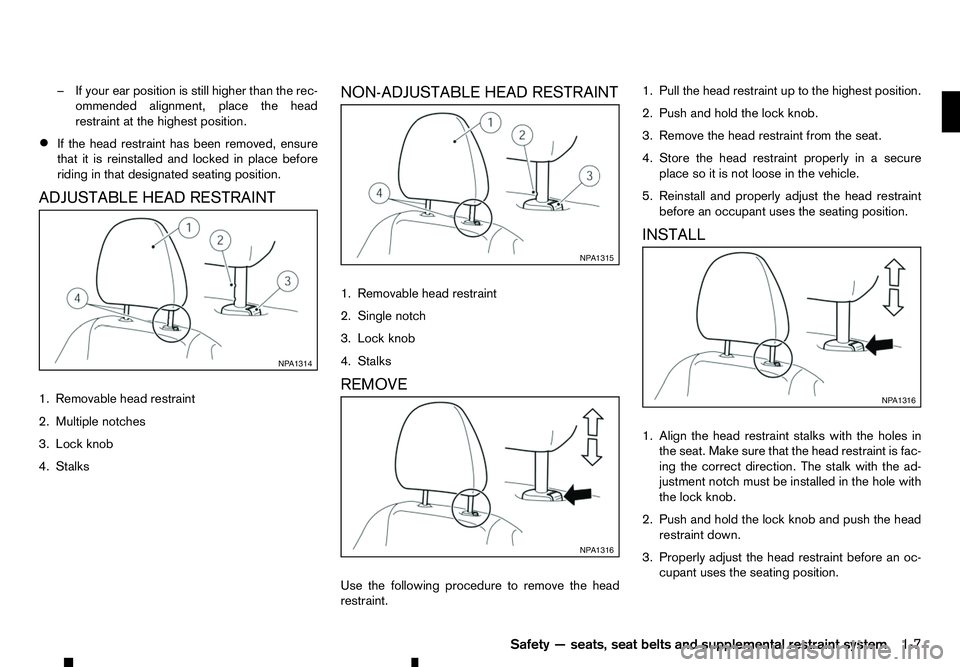
ADJUSTABLE HEAD RESTRAINT
1. Removable head restraint
2. Multiple notches
3. Lock knob
4. Stalks NON-ADJUSTABLE HEAD RESTRAINT
1. Removable head restraint
2. Single notch
3. Lock knob
4. Stalks
REMOVE
Use the following procedure to remove the head
restraint. 1. Pull the head restraint up to the highest position.
2. Push and hold the lock knob.
3. Remove the head restraint from the seat.
4. Store the head restraint properly in
asecure
place so it is not loose in the vehicle.
5. Reinstall and properly adjust the head restraint before an occupant uses the seating position.
INSTALL
1. Align the head restraint stalks with the holes in the seat. Make sure that the head restraint is fac-
ing the correct direction. The stalk with the ad-
justment notch must be installed in the hole with
the lock knob.
2. Push and hold the lock knob and push the head restraint down.
3. Properly adjust the head restraint before an oc- cupant uses the seating position. NP A1314 NP A1315
NP A1316 NP A1316
Safety —seats, seat belts and supplemental restraint system 1-7
Page 28 of 340
WARNING
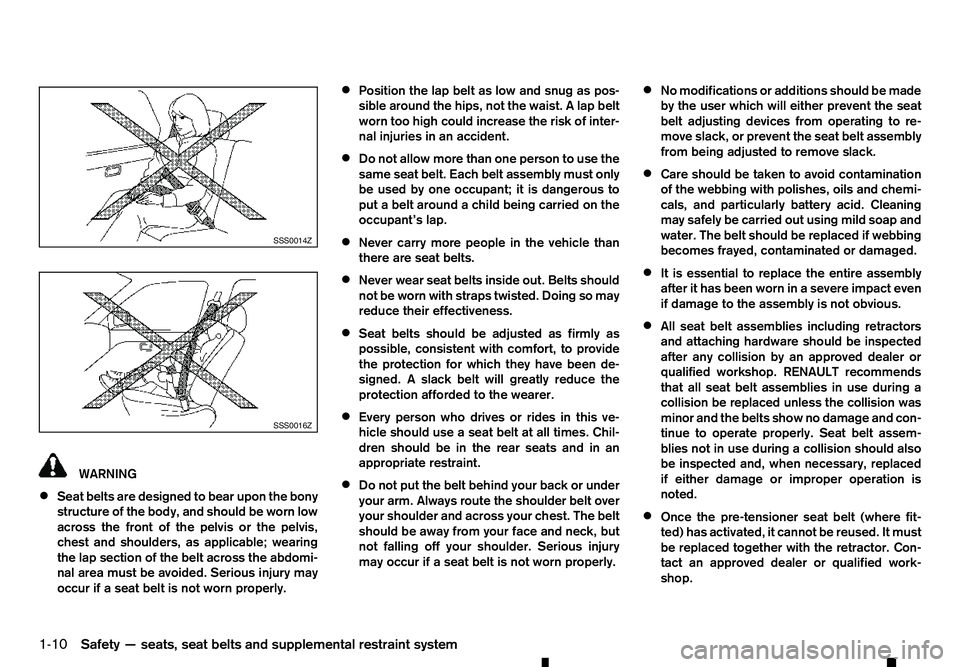
• Seat belts are designed to bear upon the bony
structure of the body, and should be worn low
across the front of the pelvis or the pelvis,
chest and shoulders, as applicable; wearing
the lap section of the belt across the abdomi-
nal area must be avoided. Serious injury may
occur if aseat belt is not worn properly. •
Position the lap belt as low and snug as pos-
sible around the hips, not the waist.
Alap belt
worn too high could increase the risk of inter-
nal injuries in an accident.
• Do not allow more than one person to use the
same seat belt. Each belt assembly must only
be used by one occupant; it is dangerous to
put
abelt around achild being carried on the
occupant’s lap.
• Never carry more people in the vehicle than
there are seat belts.
• Never wear seat belts inside out. Belts should
not be worn with straps twisted. Doing so may
reduce their effectiveness.
• Seat belts should be adjusted as firmly as
possible, consistent with comfort, to provide
the protection for which they have been de-
signed.
Aslack belt will greatly reduce the
protection afforded to the wearer.
• Every person who drives or rides in this ve-
hicle should use
aseat belt at all times. Chil-
dren should be in the rear seats and in an
appropriate restraint.
• Do not put the belt behind your back or under
your arm. Always route the shoulder belt over
your shoulder and across your chest. The belt
should be away from your face and neck, but
not falling off your shoulder. Serious injury
may occur if aseat belt is not worn properly. •
No modifications or additions should be made
by the user which will either prevent the seat
belt adjusting devices from operating to re-
move slack, or prevent the seat belt assembly
from being adjusted to remove slack.
• Care should be taken to avoid contamination
of the webbing with polishes, oils and chemi-
cals, and particularly battery acid. Cleaning
may safely be carried out using mild soap and
water. The belt should be replaced if webbing
becomes frayed, contaminated or damaged.
• It is essential to replace the entire assembly
after it has been worn in
asevere impact even
if damage to the assembly is not obvious.
• All seat belt assemblies including retractors
and attaching hardware should be inspected
after any collision by an approved dealer or
qualified workshop. RENAULT recommends
that all seat belt assemblies in use during a
collision be replaced unless the collision was
minor and the belts show no damage and con-
tinue to operate properly. Seat belt assem-
blies not in use during
acollision should also
be inspected and, when necessary, replaced
if either damage or improper operation is
noted.
• Once the pre-tensioner seat belt (where fit-
ted) has activated, it cannot be reused. It must
be replaced together with the retractor. Con-
tact an approved dealer or qualified work-
shop. SSS0014Z
SSS0016Z
1-10 Safety —seats, seat belts and supplemental restraint system
Page 35 of 340
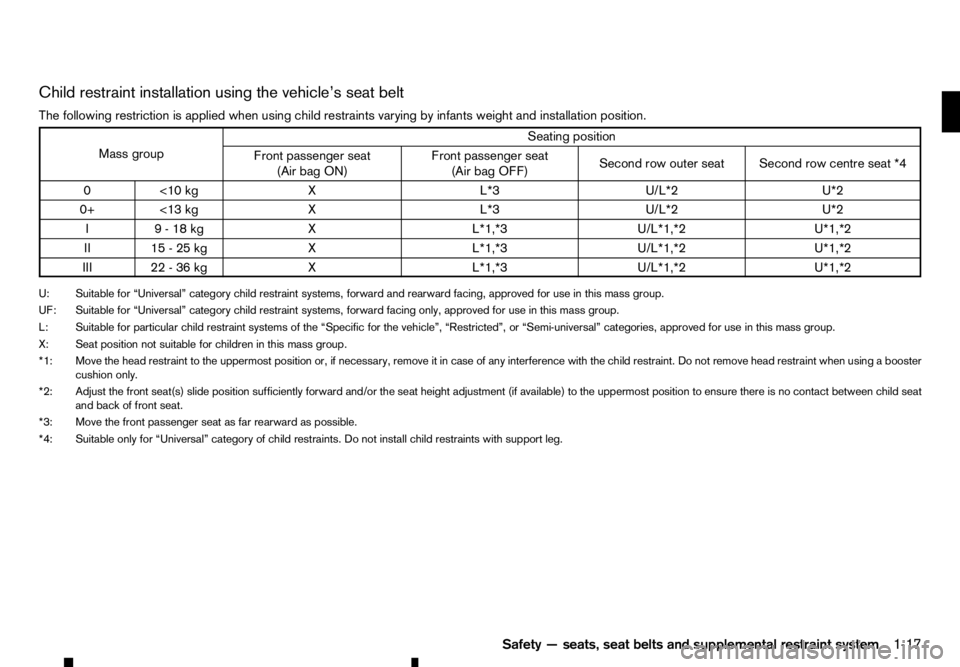
Child restraint installation using the vehicle’s seat belt
The following restriction is applied when using child restraints varying by infants weight and installation position. Mass group
Seating position
Front passenger seat (Air bag ON) Front passenger seat
(Air bag OFF) Second row outer seat Second row centre seat *4
0< 10 kg XL *3U/L*2 U*2
0+ <13 kg XL *3U/L*2 U*2
I9 -18kgX L*1,*3U/L*1,*2 U*1,*2
II 15 -25kgX L*1,*3U/L*1,*2 U*1,*2
III 22 -36kgX L*1,*3U/L*1,*2 U*1,*2
U: Suitable for “Universal” category child restraint systems, forward and rearward facing, approved for use in this mass group.
UF: Suitable for “Universal” category child restraint systems, forward facing only, approved for use in this mass group.
L: Suitable for particular child restraint systems of the “Specific for the vehicle”, “Restricted”, or “Semi-universal” categories, approved for use in this mass group. X: Seat position not suitable for children in this mass group.
*1: Move the head restraint to the uppermost position or, if necessary, remove it in case of any interference with the child restraint. Do not remove head restraint when using abooster
cushion only.
*2: Adjust the front seat(s) slide position sufficiently forward and/or the seat height adjustment (if available) to the uppermost position to ensure there is no contact between child seat and back of front seat.
*3: Move the front passenger seat as far rearward as possible.
*4: Suitable only for “Universal” category of child restraints. Do not install child restraints with support leg.
Safety—seats, seat belts and supplemental restraint system 1-17
Page 36 of 340
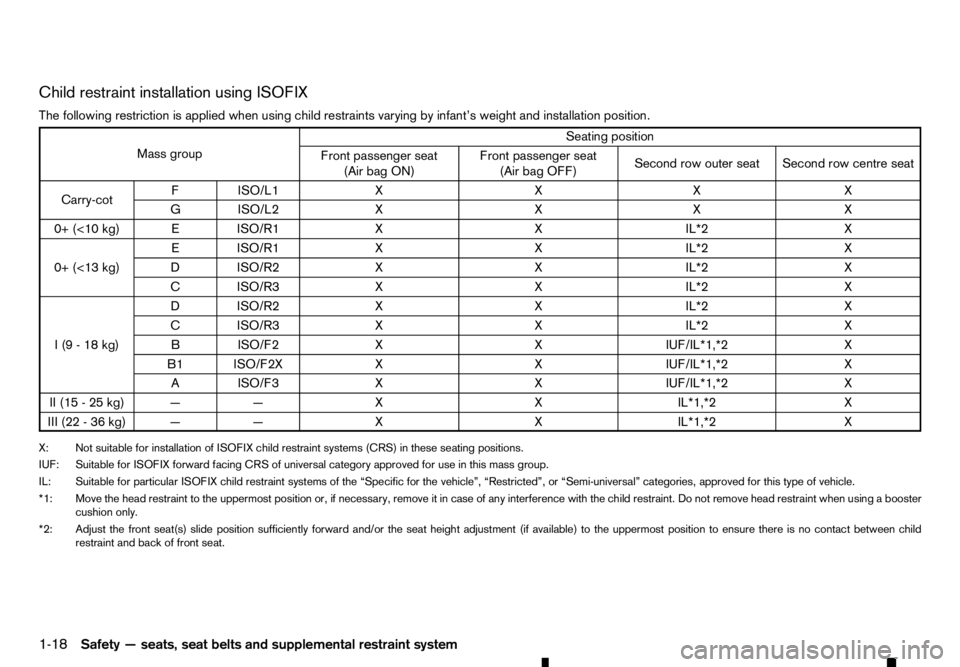
Child restraint installation using ISOFIX
The following restriction is applied when using child restraints varying by infant’s weight and installation position. Mass group
Seating position
Front passenger seat (Air bag ON) Front passenger seat
(Air bag OFF) Second row outer seat Second row centre seat
Carry-cot FI
SO/L1 XX XX
GI SO/L2 XX XX
0+ (<10 kg) EISO/R1 XX IL*2X
0+ (<13 kg) EI
SO/R1 XX IL*2X
DI SO/R2 XX IL*2X
CI SO/R3 XX IL*2X
I(9-18k g) DI
SO/R2 XX IL*2X
CI SO/R3 XX IL*2X
BI SO/F2 XX IUF/IL*1,*2X
B1 ISO/F2X XX IUF/IL*1,*2X
AI SO/F3 XX IUF/IL*1,*2X
II (15 -25kg) —— XX IL*1,*2X
III (22 -36kg) —— XX IL*1,*2X
X: Not suitable for installation of ISOFIX child restraint systems (CRS) in these seating positions.
IUF: Suitable for ISOFIX forward facing CRS of universal category approved for use in this mass group.
IL: Suitable for particular ISOFIX child restraint systems of the “Specific for the vehicle”, “Restricted”, or “Semi-universal” categories, approved for this type of vehicle.
*1: Move the head restraint to the uppermost position or, if necessary, remove it in case of any interference with the child restraint. Do not remove head restraint when using abooster
cushion only.
*2: Adjust the front seat(s) slide position sufficiently forward and/or the seat height adjustment (if available) to the uppermost position to ensure there is no contact between child restraint and back of front seat.
1-18 Safety —seats, seat belts and supplemental restraint system
Page 37 of 340
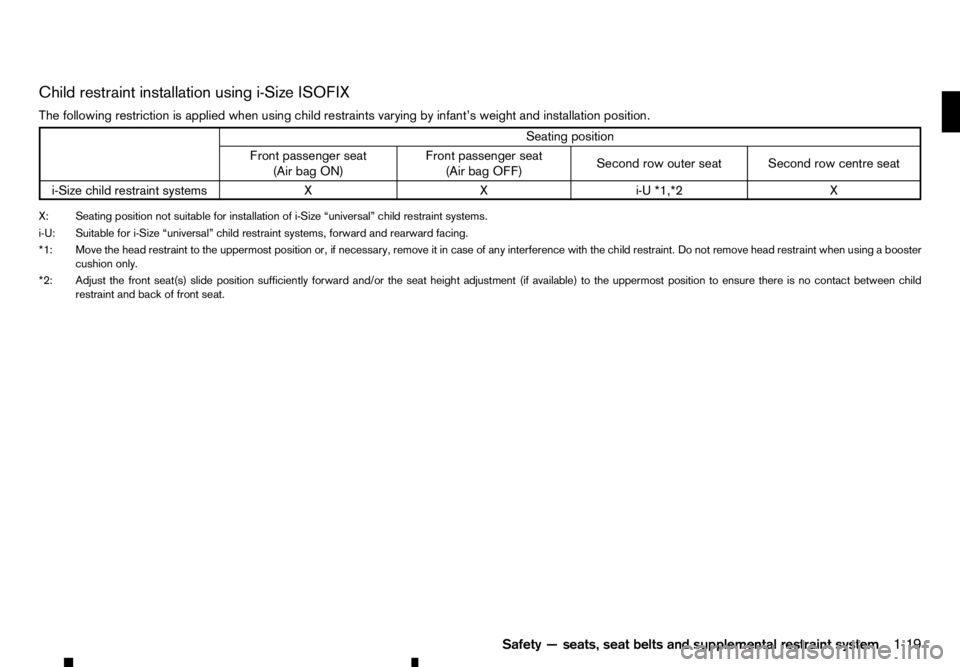
Child restraint installation using i-Size ISOFIX
The following restriction is applied when using child restraints varying by infant’s weight and installation position. Seating position
Front passenger seat (Air bag ON) Front passenger seat
(Air bag OFF) Second row outer seat Second row centre seat
i-Size child restraint systems XX i-U *1,*2X
X: Seating position not suitable for installation of i-Size “universal” child restraint systems.
i-U: Suitable for i-Size “universal” child restraint systems, forward and rearward facing.
*1: Move the head restraint to the uppermost position or, if necessary, remove it in case of any interference with the child restraint. Do not remove head restraint when using abooster
cushion only.
*2: Adjust the front seat(s) slide position sufficiently forward and/or the seat height adjustment (if available) to the uppermost position to ensure there is no contact between child restraint and back of front seat.
Safety—seats, seat belts and supplemental restraint system 1-19
Page 39 of 340
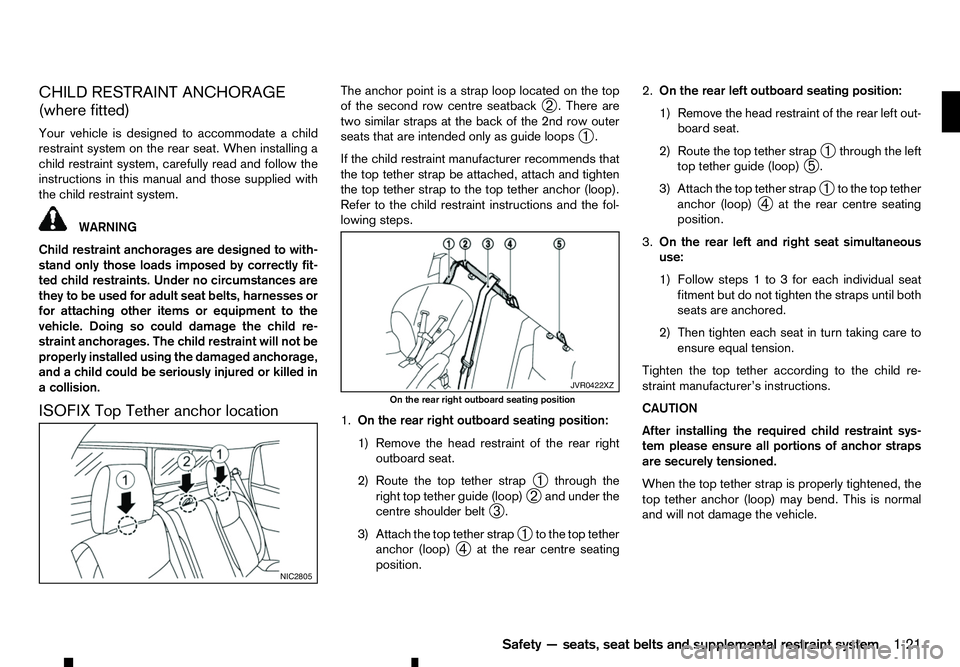
CHILD RESTRAINT ANCHORAGE
(where fitted)
Your vehicle is designed to accommodate achild
restraint system on the rear seat. When installing a
child restraint system, carefully read and follow the instructions in this manual and those supplied with
the child restraint system. WARNING
Child restraint anchorages are designed to with-
stand only those loads imposed by correctly fit-
ted child restraints. Under no circumstances are
they to be used for adult seat belts, harnesses or
for attaching other items or equipment to the
vehicle. Doing so could damage the child re-
straint anchorages. The child restraint will not be
properly installed using the damaged anchorage,
and achild could be seriously injured or killed in
ac ollision.
ISOFIX Top Tether anchor location The anchor point is
astrap loop located on the top
of the second row centre seatback ➁.T
here are
two similar straps at the back of the 2nd row outer
seats that are intended only as guide loops ➀.
If the child restraint manufacturer recommends that
the top tether strap be attached, attach and tighten
the top tether strap to the top tether anchor (loop).
Refer to the child restraint instructions and the fol-
lowing steps.
1. On the rear right outboard seating position:
1) Remove the head restraint of the rear right
outboard seat.
2) Route the top tether strap ➀through the
right top tether guide (loop) ➁and under the
centre shoulder belt ➂.
3) Attach the top tether strap ➀to the top tether
anchor (loop) ➃at the rear centre seating
position. 2.
On the rear left outboard seating position:
1) Remove the head restraint of the rear left out-
board seat.
2) Route the top tether strap ➀through the left
top tether guide (loop) ➄.
3) Attach the top tether strap ➀to the top tether
anchor (loop) ➃at the rear centre seating
position.
3. On the rear left and right seat simultaneous
use:
1) Follow steps 1to3for each individual seat
fitment but do not tighten the straps until both
seats are anchored.
2) Then tighten each seat in turn taking care to ensure equal tension.
Tighten the top tether according to the child re-
straint manufacturer’s instructions.
CAUTION
After installing the required child restraint sys-
tem please ensure all portions of anchor straps
are securely tensioned.
When the top tether strap is properly tightened, the
top tether anchor (loop) may bend. This is normal
and will not damage the vehicle. NIC2805 JVR0422XZ
On the rear right outboard seating position
Safety—seats, seat belts and supplemental restraint system 1-21
Page 40 of 340
CHILD RESTRAINT INSTALLATION
USING ISOFIX WARNING
• Attach ISOFIX and i-Size child restraints only
at the specified locations. For the ISOFIX
lower anchor locations, see “ISOFIX lower an-
chor point locations” earlier in this section. If
ac hild restraint is not secured properly, your
child could be seriously injured or killed in an
accident.
• Do not install child restraints that require the
use of
atop tether strap to seating positions
that do not have atop tether anchor.
• Do not secure
achild restraint in the centre
rear seating position using the ISOFIX lower
anchors. The child restraint will not be se-
cured properly.
• Inspect the lower anchors by inserting your
fingers into the lower anchor area and feeling
to make sure there are no obstructions over the ISOFIX anchors, such as seat belt web-
bing or seat cushion material. The child re-
straint will not be secured properly if the
ISOFIX anchors are obstructed.
• Child restraint anchorages are designed to
withstand only those loads imposed by cor-
rectly fitted child restraints. Under no circum-
stance are they to be used for adult seat belts,
harnesses or for attaching other items or
equipment to the vehicle. Doing so could damage the child restraint anchorages. The
child restraint will not be properly installed
using the damaged anchorage, and
achild
could be seriously injured or killed in acolli-
sion.
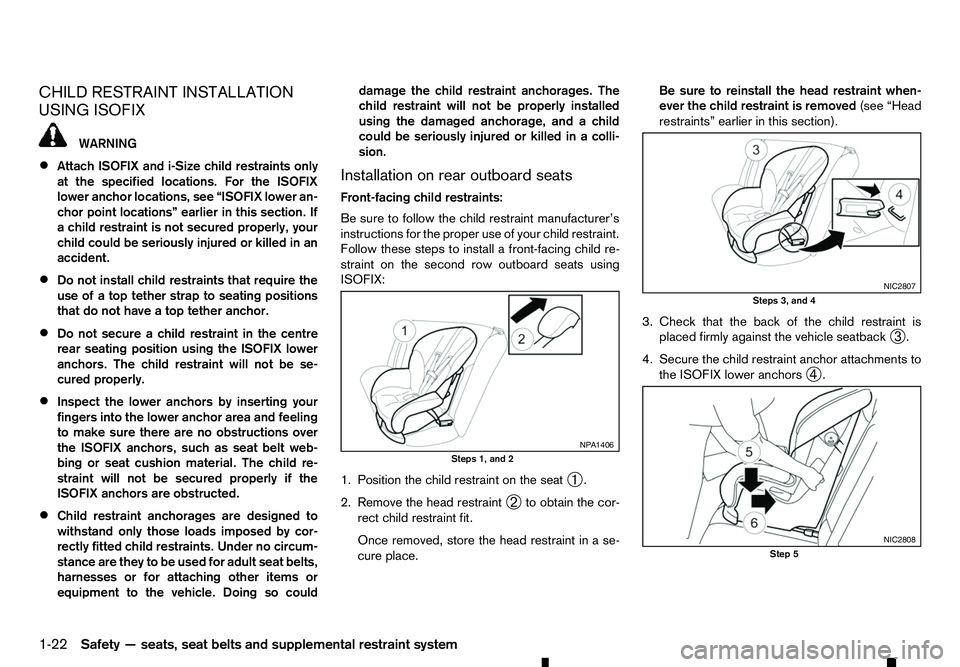
Installation on rear outboard seats
Front-facing child restraints:
Be sure to follow the child restraint manufacturer’s
instructions for the proper use of your child restraint.
Follow these steps to install afront-facing child re-
straint on the second row outboard seats using
ISOFIX:
1. Position the child restraint on the seat ➀.
2. Remove the head restraint ➁to obtain the cor-
rect child restraint fit.
Once removed, store the head restraint in ase-
cure place. Be sure to reinstall the head restraint when-
ever the child restraint is removed
(see “Head
restraints” earlier in this section).
3. Check that the back of the child restraint is placed firmly against the vehicle seatback ➂.
4. Secure the child restraint anchor attachments to the ISOFIX lower anchors ➃. NP A1406
Steps 1, and 2 NIC2807
Steps 3, and 4
NIC2808
Step 5
1-22 Safety —seats, seat belts and supplemental restraint system