transmission oil RENAULT ALASKAN 2017 Owners Manual
[x] Cancel search | Manufacturer: RENAULT, Model Year: 2017, Model line: ALASKAN, Model: RENAULT ALASKAN 2017Pages: 340, PDF Size: 6.93 MB
Page 17 of 340
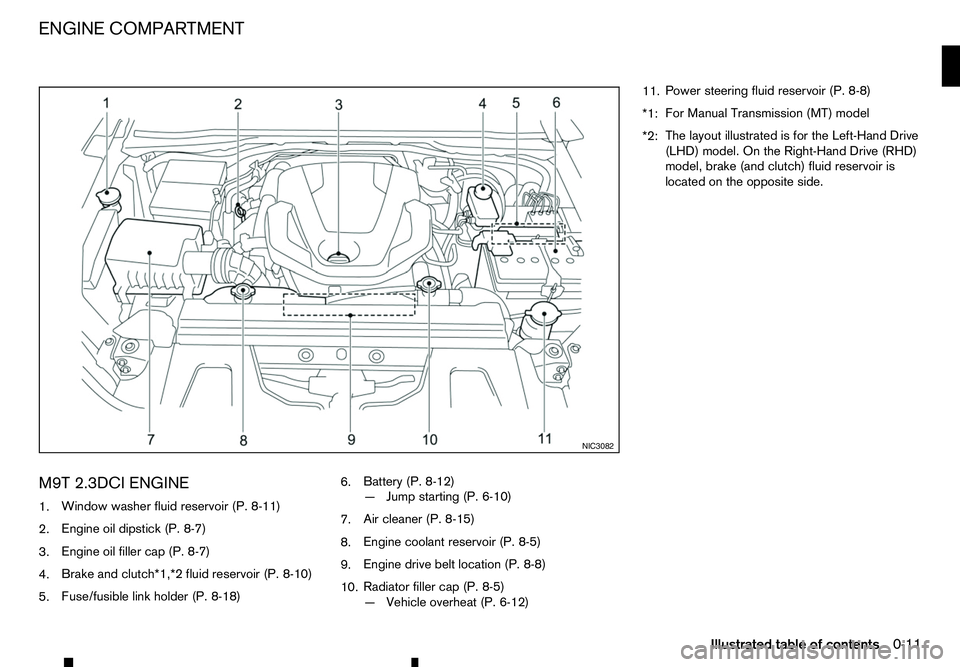
M9T 2.3DCI ENGINE
1. Window washer fluid reservoir (P. 8-11)
2. Engine oil dipstick (P. 8-7)
3. Engine oil filler cap (P. 8-7)
4. Brake and clutch*1,*2 fluid reservoir (P. 8-10)
5. Fuse/fusible link holder (P. 8-18) 6.
Battery (P. 8-12)
—J
ump starting (P. 6-10)
7. Air cleaner (P. 8-15)
8. Engine coolant reservoir (P. 8-5)
9. Engine drive belt location (P. 8-8)
10. Radiator filler cap (P. 8-5)
—V
ehicle overheat (P. 6-12) 11.
Power steering fluid reservoir (P. 8-8)
*1: For Manual Transmission (MT) model
*2: The layout illustrated is for the Left-Hand Drive
(LHD) model. On the Right-Hand Drive (RHD)
model, brake (and clutch) fluid reservoir is
located on the opposite side. NIC3082
ENGINE COMPARTMENT
Illustrated table of contents0-11
Page 63 of 340
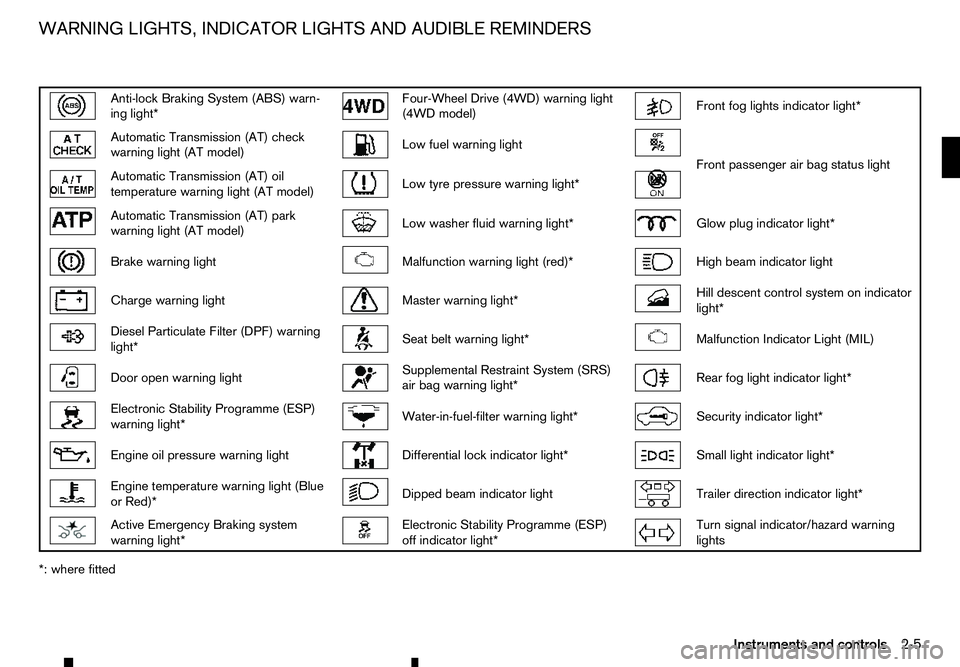
Anti-lock Braking System (ABS) warn-
ing light* Four-Wheel Drive (4WD) warning light
(4WD model) Front fog lights indicator light*
Automatic Transmission (AT) check
warning light (AT model) Low fuel warning light
Front passenger air bag status light
Automatic Transmission (AT) oil
temperature warning light (AT model) Low tyre pressure warning light*
Automatic Transmission (AT) park
warning light (AT model) Low washer fluid warning light*
Glow plug indicator light*
Brake warning light
Malfunction warning light (red)*
High beam indicator light
Charge warning light
Master warning light*
Hill descent control system on indicator
light* Diesel Particulate Filter (DPF) warning
light* Seat belt warning light*
Malfunction Indicator Light (MIL)
Door open warning light
Supplemental Restraint System (SRS)
air bag warning light* Rear fog light indicator light*
Electronic Stability Programme (ESP)
warning light* Water-in-fuel-filter warning light*
Security indicator light*
Engine oil pressure warning light
Differential lock indicator light*
Small light indicator light*
Engine temperature warning light (Blue
or Red)* Dipped beam indicator light
Trailer direction indicator light*
Active Emergency Braking system
warning light* Electronic Stability Programme (ESP)
off indicator light* Turn signal indicator/hazard warning
lights
*: where fitted WARNING LIGHTS, INDICATOR LIGHTS AND AUDIBLE REMINDERS
Instruments and controls2-5
Page 64 of 340
CHECKING LIGHTS
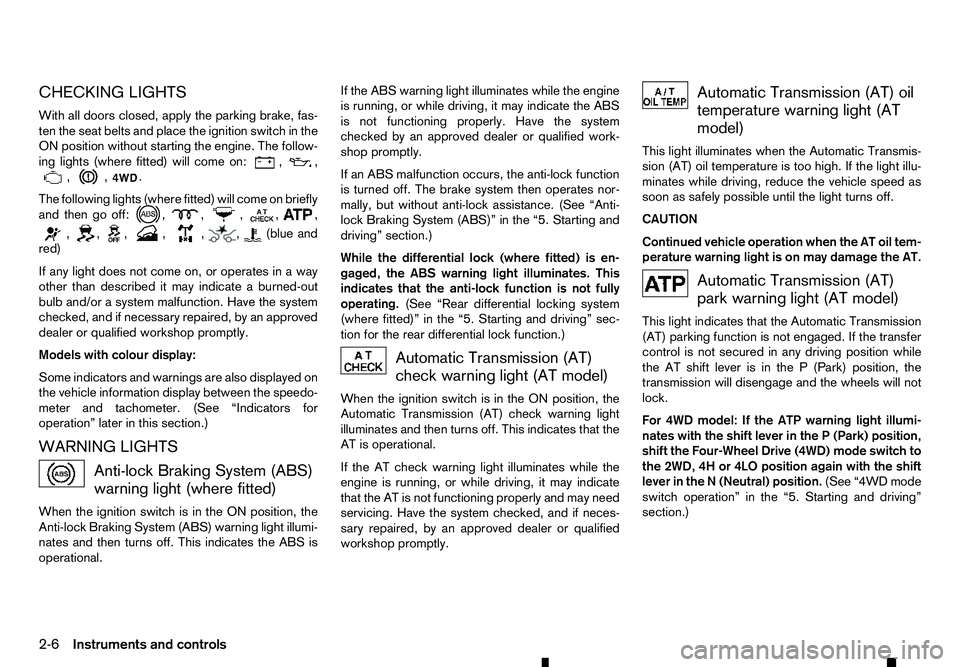
With all doors closed, apply the parking brake, fas-
ten the seat belts and place the ignition switch in the
ON position without starting the engine. The follow-
ing lights (where fitted) will come on: , ,
, , .
The following lights (where fitted) will come on briefly
and then go off: , , ,
, ,
, , , , , , (blue and
red)
If any light does not come on, or operates in away
other than described it may indicate aburned-out
bulb and/or asystem malfunction. Have the system
checked, and if necessary repaired, by an approved
dealer or qualified workshop promptly.
Models with colour display:
Some indicators and warnings are also displayed on
the vehicle information display between the speedo-
meter and tachometer. (See “Indicators for
operation” later in this section.)
WARNING LIGHTS Anti-lock Braking System (ABS)
warning light (where fitted)
When the ignition switch is in the ON position, the
Anti-lock Braking System (ABS) warning light illumi- nates and then turns off. This indicates the ABS is
operational. If the ABS warning light illuminates while the engine
is running, or while driving, it may indicate the ABS
is not functioning properly. Have the system
checked by an approved dealer or qualified work-
shop promptly.
If an ABS malfunction occurs, the anti-lock function
is turned off. The brake system then operates nor-
mally, but without anti-lock assistance. (See “Anti-
lock Braking System (ABS)” in the “5. Starting and
driving” section.)
While the differential lock (where fitted) is en-
gaged, the ABS warning light illuminates. This
indicates that the anti-lock function is not fully
operating. (See “Rear differential locking system
(where fitted)” in the “5. Starting and driving” sec-
tion for the rear differential lock function.) Automatic Transmission (AT)
check warning light (AT model)
When the ignition switch is in the ON position, the
Automatic Transmission (AT) check warning light
illuminates and then turns off. This indicates that the
AT is operational.
If the AT check warning light illuminates while the
engine is running, or while driving, it may indicate
that the AT is not functioning properly and may need
servicing. Have the system checked, and if neces-
sary repaired, by an approved dealer or qualified
workshop promptly. Automatic Transmission (AT) oil
temperature warning light (AT
model)
This light illuminates when the Automatic Transmis-
sion (AT) oil temperature is too high. If the light illu-
minates while driving, reduce the vehicle speed as
soon as safely possible until the light turns off.
CAUTION
Continued vehicle operation when the AT oil tem-
perature warning light is on may damage the AT. Automatic Transmission (AT)
park warning light (AT model)
This light indicates that the Automatic Transmission
(AT) parking function is not engaged. If the transfer
control is not secured in any driving position while
the AT shift lever is in the P(Park) position, the
transmission will disengage and the wheels will not
lock.
For 4WD model: If the ATP warning light illumi-
nates with the shift lever in the P(Park) position,
shift the Four-Wheel Drive (4WD) mode switch to
the 2WD, 4H or 4LO position again with the shift
lever in the N(Neutral) position. (See “4WD mode
switch operation” in the “5. Starting and driving”
section.)
2-6 Instruments and controls
Page 69 of 340
•
When
aspare tyre is mounted or
awheel is
replaced, the TPMS will not function and the
low tyre pressure warning light will flash for
approximately 1minute. The light will remain
on after 1minute. Contact an approved dealer
or qualified workshop as soon as possible for
tyre replacement and/or system resetting.
• Replacing tyres with those not originally speci-
fied by RENAULT could affect the proper op-
eration of the TPMS.
CAUTION
• The TPMS is not
asubstitute for the regular
tyre pressure check. Be sure to check the tyre
pressure regularly.
• If the vehicle is being driven at speeds of less
than 25 km/h (16 MPH), the TPMS may not
operate correctly.
• Be sure to install the specified size of tyres to
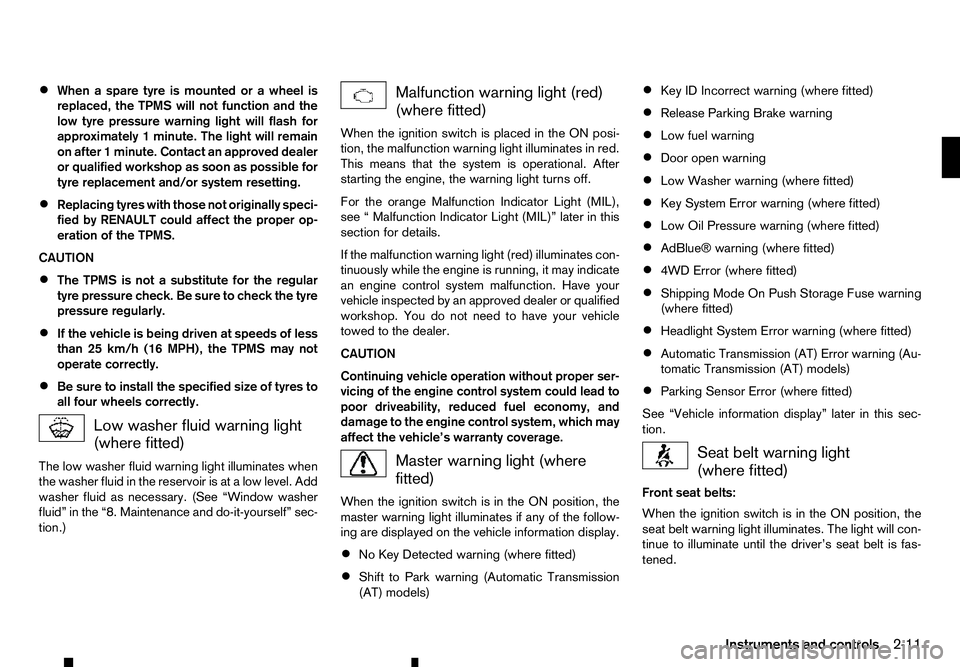
all four wheels correctly. Low washer fluid warning light
(where fitted)
The low washer fluid warning light illuminates when
the washer fluid in the reservoir is at alow level. Add
washer fluid as necessary. (See “Window washer
fluid” in the “8. Maintenance and do-it-yourself” sec-
tion.) Malfunction warning light (red)
(where fitted)
When the ignition switch is placed in the ON posi-
tion, the malfunction warning light illuminates in red.
This means that the system is operational. After
starting the engine, the warning light turns off.
For the orange Malfunction Indicator Light (MIL),
see “Malfunction Indicator Light (MIL)” later in this
section for details.
If the malfunction warning light (red) illuminates con-
tinuously while the engine is running, it may indicate
an engine control system malfunction. Have your
vehicle inspected by an approved dealer or qualified
workshop. You do not need to have your vehicle
towed to the dealer.
CAUTION
Continuing vehicle operation without proper ser-
vicing of the engine control system could lead to
poor driveability, reduced fuel economy, and
damage to the engine control system, which may
affect the vehicle’s warranty coverage. Master warning light (where
fitted)
When the ignition switch is in the ON position, the
master warning light illuminates if any of the follow-
ing are displayed on the vehicle information display.
• No Key Detected warning (where fitted)
• Shift to Park warning (Automatic Transmission
(AT) models) •
Key ID Incorrect warning (where fitted)
• Release Parking Brake warning
• Low fuel warning
• Door open warning
• Low Washer warning (where fitted)
• Key System Error warning (where fitted)
• Low Oil Pressure warning (where fitted)
• AdBlue® warning (where fitted)
• 4WD Error (where fitted)
• Shipping Mode On Push Storage Fuse warning
(where fitted)
• Headlight System Error warning (where fitted)
• Automatic Transmission (AT) Error warning (Au-
tomatic Transmission (AT) models)
• Parking Sensor Error (where fitted)
See “Vehicle information display” later in this sec-
tion. Seat belt warning light
(where fitted)
Front seat belts:
When the ignition switch is in the ON position, the
seat belt warning light illuminates. The light will con-
tinue to illuminate until the driver’s seat belt is fas-
tened.
Instruments and controls 2-11
Page 231 of 340
WARNING
AT model: If the 4WD mode indicator is “OFF” or
the ATP warning light is “ON”, this indicates that
the automatic transmission P(Park) position will
not function and could result in the vehicle mov-
ing unexpectedly, causing serious personal in-
jury or property damage. Always set the parking
brake.
CAUTION
To avoid vehicle damage:
• Do not operate the 4WD mode switch when
cornering, reversing or if the rear wheels are
spinning freely. The vehicle must be moving
straight ahead.
• Do not move the shift lever (AT model) or
release the clutch pedal (MT model) when the
4LO indicator is blinking. Failure to do this
may cause the gears to grind and damaging
the powertrain.
• MT model: Do not accelerate rapidly from a
stopped position when the 4LO indicator is
blinking. Drive straight ahead at
alow speed
until the 4LO indicator is lit. The 4LO indicator
blinks when shifting between <4LO> and
<4H>.
• If the 4WD warning light comes on, perform
the following procedure:
1) Turn off the engine.
2) Start the engine. 3) Check if the 4WD warning light comes on.
If the 4WD warning light is still on after following
the above procedure, have the system checked
and serviced immediately by an approved dealer
or qualified workshop.
The transfer case 4WD mode switch is used to
select either Two-Wheel Drive (2WD) or
Four-Wheel Drive (4WD) depending on the driving
conditions. Turn the 4WD mode switch to select a drive mode (<2WD>, <4H> or <4LO>).
To change into or out of 4LO mode:
1. The vehicle MUST BE standing still.
2. Depress the clutch pedal (MT model) and the brake pedal and move the shift lever to N(Neu-
tral).
3. Depress and turn the 4WD mode switch to change into or out of <4LO>. WARNING
• When parking, apply the parking brake before
stopping the engine and make sure that the
4WD mode indicator is on and that the ATP
warning light or ATP warning message is off,
otherwise, the vehicle could unexpectedly
move even if the automatic transmission is in
the P(Park) position.
• The 4LO indicator must stop blinking and re-
main on or turn off before shifting the trans-
mission into gear. The vehicle may move un- expectedly if the shift lever is shifted from the
N(
Neutral) position to any other gear while
the 4LO indicator is blinking.
CAUTION
• Never turn the 4WD mode switch between
<4LO> and <4H> while driving.
• The <4H> drive mode provides greater power
and traction. Avoid excessive speed as it will
cause increased fuel consumption and higher
oil temperatures, and could damage power
train components. Speeds over 100 km/h (60
MPH) in <4H> are not recommended.
• The <4LO> drive mode provides maximum
power and traction. Avoid raising vehicle
speed excessively. The maximum speed is
approximately 50 km/h (30 MPH).
• The 4WD mode switch can be turned between
<2WD> and <4H> while driving straight ahead.
Do not turn the 4WD mode switch while mak-
ing
aturn or reversing.
• Do not turn the 4WD mode switch between
<2WD> and <4H> while driving on steep
downhill grades. Use the engine brake and
low transmission gears for engine braking.
• Do not turn the 4WD mode switch between
<2WD> and <4H> with the rear wheels spin-
ning.
Starting and driving 5-29
Page 277 of 340
8
Maintenance and do-it-yourself
Maintenance and do-it-yourself
Maintenance requirements ....................................... 8-2 Scheduled maintenance...................................... 8-2
General maintenance .......................................... 8-2
Where to go for service ...................................... 8-2
General maintenance ............................................... 8-2 Explanation of general maintenance items ........... 8-2
Maintenance precautions .................................... 8-4
Engine compartment check locations ....................... 8-5
Engine cooling system ............................................. 8-5 Checking engine coolant level............................. 8-6
Changing engine coolant .................................... 8-6
Engine oil................................................................. 8-6
Checking engine oil level .................................... 8-6
Changing engine oil and oil filter ......................... 8-7
Protect environment ............................................ 8-7
AdBlue® tank (where fitted for diesel engine
model) ..................................................................... 8-7 Refilling the AdBlue® tank .................................. 8-7
Drive belt ................................................................. 8-8
Automatic Transmission Fluid (ATF) (where fitted).... 8-8 7-speed Automatic Transmission (AT) model....... 8-8
Power steering fluid ................................................. 8-8
Brakes ..................................................................... 8-9 Checking parking brake ...................................... 8-9
Checking footbrake ............................................ 8-9
Brake booster ..................................................... 8-9
Brake fluid ............................................................... 8-10
Clutch fluid (where fitted) ......................................... 8-11 Window washer fluid ............................................... 8-11
Battery..................................................................... 8-12
Vehicle battery .................................................... 8-13
Remote controller battery (where fitted) .............. 8-13
Remote Control Key battery (where fitted)........... 8-14
Air cleaner filter........................................................ 8-15
Wiper blades ........................................................... 8-16 Windscreen wiper blades ................................... 8-16
Variable voltage control system (where fitted) ........... 8-17
Fuses ...................................................................... 8-18 Engine compartment ........................................... 8-18
Passenger compartment ..................................... 8-19
Lights ...................................................................... 8-20
Headlights .......................................................... 8-20
Exterior lights ...................................................... 8-21
Interior lights....................................................... 8-22
Light locations .................................................... 8-23
Tyres and wheels ..................................................... 8-26 Tyre inflation pressure......................................... 8-26
Types of tyres ..................................................... 8-26
Tyre chains ......................................................... 8-27
Tyre rotation ....................................................... 8-27
Tyre wear and damage ....................................... 8-28
Tyre age ............................................................. 8-28
Changing tyres and wheels................................. 8-28
Wheel balance.................................................... 8-28
Spare tyre .......................................................... 8-28
Page 280 of 340
Windscreen wiper and washer*:
Check that the wipers and washer operate properly
and that the wipers do not streak.
Under bonnet and vehicle
The maintenance items listed here should be
checked periodically (for example, each time you
check the engine oil or refuel).
Battery (except for maintenance free batter-
ies)*:
Check the fluid level in each cell. It should be be-
tween the
operated in high temperatures or under severe con-
ditions require frequent checks of the battery fluid
level.
Brake (and clutch) fluid level(s)*:
For Manual Transmission (MT) model: make sure
that the brake and clutch fluid levels are between
the
Except for Manual Transmission (MT) model: make
sure that the brake fluid level is between the
and
Engine coolant level*:
Check the coolant level when the engine is cold.
Make sure that the coolant level is between the
Engine drive belt(s)*:
Make sure that drive belt(s) is/are not frayed, worn,
cracked or oily. Engine oil level*:
Check the level after parking the vehicle (on
alevel
ground) and turning off the engine.
Fluid leaks:
Check under the vehicle for fuel, oil, water or other
fluid leaks after the vehicle has been parked for a
while. Water dripping from the air conditioner after
use is normal. If you should notice any leaks or if fuel
fumes are evident, check for cause and have it cor-
rected immediately.
Power steering fluid level and lines*:
Check the level when the fluid is cold, with the en-
gine off. Check the lines for proper attachment,
leaks, cracks, etc.
Windscreen washer fluid*:
Check that there is adequate fluid in the reservoir.
MAINTENANCE PRECAUTIONS
When performing any inspection or maintenance
work on your vehicle, always take care to prevent
serious accidental injury to yourself or damage to
the vehicle. The following are general precautions
which should be closely observed. WARNING
• Park the vehicle on
alevel surface, apply the
parking brake securely and block the wheels
to prevent the vehicle from moving. Move the
shift lever to the P(Park) position (AT model)
or the shift lever to the N(Neutral) position
(MT model). •
Be sure the ignition switch is in the LOCK
position when performing any parts replace-
ment or repairs.
• Do not work under the bonnet while the en-
gine is hot. Always turn off the engine and
wait until it cools down.
• If you must work with the engine running,
keep your hands, clothing, hair and tools away
from moving fans, belts and any other moving
parts.
• It is advisable to secure or remove any loose
clothing and any jewellery, such as rings,
watches, etc. before working on your vehicle.
• If you must run the engine in an enclosed
space such as
agarage, be sure there is
proper ventilation for exhaust gasses to es-
cape.
• DO NOT GET UNDER
AVEHICLE THAT IS
SUPPORTED BY AJACK.
• Keep smoking materials, flame and sparks
away from fuel and the battery.
• Never connect or disconnect either the bat-
tery or any transistorised component connec-
tor while the ignition switch is in the ON posi-
tion.
8-4 Maintenance and do-it-yourself
Page 281 of 340
•
Your vehicle is fitted with an automatic en-
gine cooling fan. It may come on at any time
without warning, even if the ignition switch is
in the OFF position and the engine is not run-
ning. To avoid injury, always disconnect the
negative battery cable before working near
the fan.
• Always wear eye protection whenever you
work on your vehicle.
• Never leave the engine or the transmission
related component harness connector
disconnected while the ignition switch is in
the ON position.
• Avoid direct contact with used engine oil and
coolant. Improperly disposed engine oil, en-
gine coolant, and/or other vehicle fluids can
hurt the environment. Always conform to lo-
cal regulations for disposal of vehicle fluids.
This “8. Maintenance and do-it-yourself” section
provides instructions regarding only those items
which are relatively easy for an owner to perform.
You should be aware that incomplete or improper
servicing may result in operating difficulties or ex-
cessive emissions, and could affect your warranty
coverage. If in doubt about any servicing, have it
done by an approved dealer or qualified work-
shop. For an overview of the engine compartment, see
“Engine compartment” in the “0. Illustrated table
of contents” section. WARNING
• Never remove the radiator or coolant reser-
voir cap when the engine is hot. Serious burns
could be caused by high-pressure fluid es-
caping from the radiator. Wait until the engine
and radiator cool down.
• Engine coolant is poisonous and should be
stored carefully in marked containers out of
the reach of children.
The engine cooling system is filled at the factory
with ahigh-quality, year-round, anti-freeze coolant
solution. The anti-freeze solution contains rust and
corrosion inhibitors, therefore additional cooling sys-
tem additives are not necessary.
CAUTION
• Never use any cooling system additives such
as radiator sealer. Additives may clog the
cooling system and cause damage to the en-
gine, transmission and/or cooling system.
• When adding or replacing coolant, be sure to
use the proper mixture ratio. Examples of the
mixture ratio of coolant and water are shown
in the following table: Outside
temperature
down to
Engine coolant
(concentrated) Demineralised
or distilled water
°C °F
−35 −30 50% 50%
ENGINE COMPARTMENT CHECK
LOCATIONS
ENGINE COOLING SYSTEM
Maintenance and do-it-yourself 8-5
Page 283 of 340
9. Recheck the oil level with the dipstick.
CAUTION
• The oil level should be checked regularly. Op-
erating your vehicle with an insufficient
amount of oil can damage the engine, and
such damage is not covered by the warranty.
• It is normal to add some oil between oil main-
tenance intervals or during the running-in pe-
riod, depending on the severity of operating
conditions.
CHANGING ENGINE OIL AND OIL
FILTER
Contact an approved dealer or qualified workshop
when the engine oil and oil filter require replace-
ment.
PROTECT ENVIRONMENT
It is illegal to pollute drains, watercourses and soil.
Use authorised waste collection facilities, including
civil amenity sites and garages providing facilities
for disposal of used oil and used oil filters. If in
doubt, contact your local authority for advice on dis-
posal.
The regulations concerning the pollution of the
environment will vary from country to country. REFILLING THE AdBlue® TANK
When the [Refill AdBlue] warning appears in the
vehicle information display, refill the AdBlue® tank
before the tank is empty (see “AdBlue® Selective
Catalytic Reduction (SCR) system (where fitted for
diesel engine model)” in the “5. Starting and driving”
section for the AdBlue® warning display.) Refill the
AdBlue® tank according to the procedures shown
in this section.
CAUTION
•
Use only AdBlue®. Using other fluids will
damage the AdBlue® Selective Catalytic Re-
duction (SCR) system.
• Be careful not to spill AdBlue®. If the AdBlue®
is spilled on the vehicle body, wipe it away
with
awet cloth immediately to avoid paint
damage.
• AdBlue® residues crystallize after
aperiod of
time and contaminate the paint surfaces. If
the spilled AdBlue® has crystallized, use a
sponge and cold water to clean it.
• Be careful not to inhale any ammonia vapours
that may be released. Fill the AdBlue® tank in
well-ventilated areas.
The AdBlue® tank is located underneath the ve-
hicle. (see “AdBlue® filler lid and cap” in the “3. Pre-
driving checks and adjustments” section for the
AdBlue® filler lid location.)
1. Apply the parking brake. 2. Automatic Transmission (AT) model: Move the
shift lever to the P(Park) position.
Manual Transmission (MT) model: Move the shift
lever to the N(Neutral) position.
3. Place the ignition switch in the OFFposition.
4. Open the AdBlue® filler lid.
5. Remove the AdBlue® tank cap by turning it anticlockwise.
6. Refill the AdBlue® tank.
7. Securely install the AdBlue® tank cap.
8. Close the AdBlue® filler lid.
9. Place the ignition switch in the ONposition and
wait for approximately 1minute until the [Refill
AdBlue] warning turns off.
NOTE
In the case that the [ENG can’t start Refill
AdBlue] warning was displayed, check that
the warning turned off, place the ignition
switch in the OFF position once and then startthe engine.
AdBlue® TANK (where fitted for
diesel engine model)
Maintenance and do-it-yourself8-7
Page 308 of 340
Refer to the maintenance service booklet for your
vehicle for details of recommended fluids/lubricants
and capacities.
FUEL INFORMATION
Diesel engine*
M9T 2.3DCI engine:
Diesel fuel above 50 cetane and with less than 10
ppm of sulphur (EN590) must be used.
* If two types of diesel fuel are available, use
summer or winter fuel properly according to
the following temperature conditions.
• Above –7°C (20°F) ... Summer type diesel fuel.
• Below –7°C (20°F) ... Winter type diesel fuel.
CAUTION
• Do not use home heating oil, petrol or other
alternate fuels in your diesel engine. The use
of those or adding those to diesel fuel can
cause engine damage.
• Do not use summer fuel at temperatures be-
low –7°C (20°F). The cold temperatures will
cause wax to form in the fuel. As
aresult, it
may prevent the engine from running
smoothly. AUTOMATIC TRANSMISSION FLUID
(ATF)
Contact an approved dealer or qualified workshop if
checking or replacement is required.
CAUTION
• Use only ATF that is recommended in the
Maintenance Service Booklet. Do not mix with
other fluids.
• Using automatic transmission fluid other than
the ATF that is recommended in the Mainte-
nance Service Booklet may cause deteriora-
tion in driveability and automatic transmission
durability and may damage the automatic
transmission. Such damage is not covered by
the warranty.
AIR CONDITIONER SYSTEM
REFRIGERANT AND LUBRICANT
The air conditioner system of your vehicle must be
charged with the refrigerant HFC-134a (R134a) and the lubricant specified in the maintenance service
booklet for your vehicle..
CAUTION
Use of any other refrigerants or lubricants will
cause severe damage, and you may need to re-
place your vehicle’s entire air conditioner sys-
tem. The release of refrigerants into the atmosphere is
prohibited in many countries and regions. The re-
frigerant HFC-134a (R-134a) in your vehicle will not
harm the Earth’s ozone layer. However, it may con-
tribute in asmall part to the global warming effect.
RENAULT recommends that the refrigerant be ap-
propriately recovered and recycled. Contact an ap-
proved dealer or qualified workshop when servicing
the air conditioner system.
RECOMMENDED FLUIDS/
LUBRICANTS AND CAPACITIES
9-2
Technical information