check engine RENAULT CLIO 2009 X85 / 3.G Service Manual
[x] Cancel search | Manufacturer: RENAULT, Model Year: 2009, Model line: CLIO, Model: RENAULT CLIO 2009 X85 / 3.GPages: 264, PDF Size: 15.68 MB
Page 153 of 264
Downloaded from www.Manualslib.com manuals search engine
JauneNoirNoir texte
3.21
ENG_UD10576_1Toit ouvrant à commande électrique (X85 - B85 - C85 - S85 - K85 - \
Renault)ENG_NU_853-3_BCSK85_Renault_3
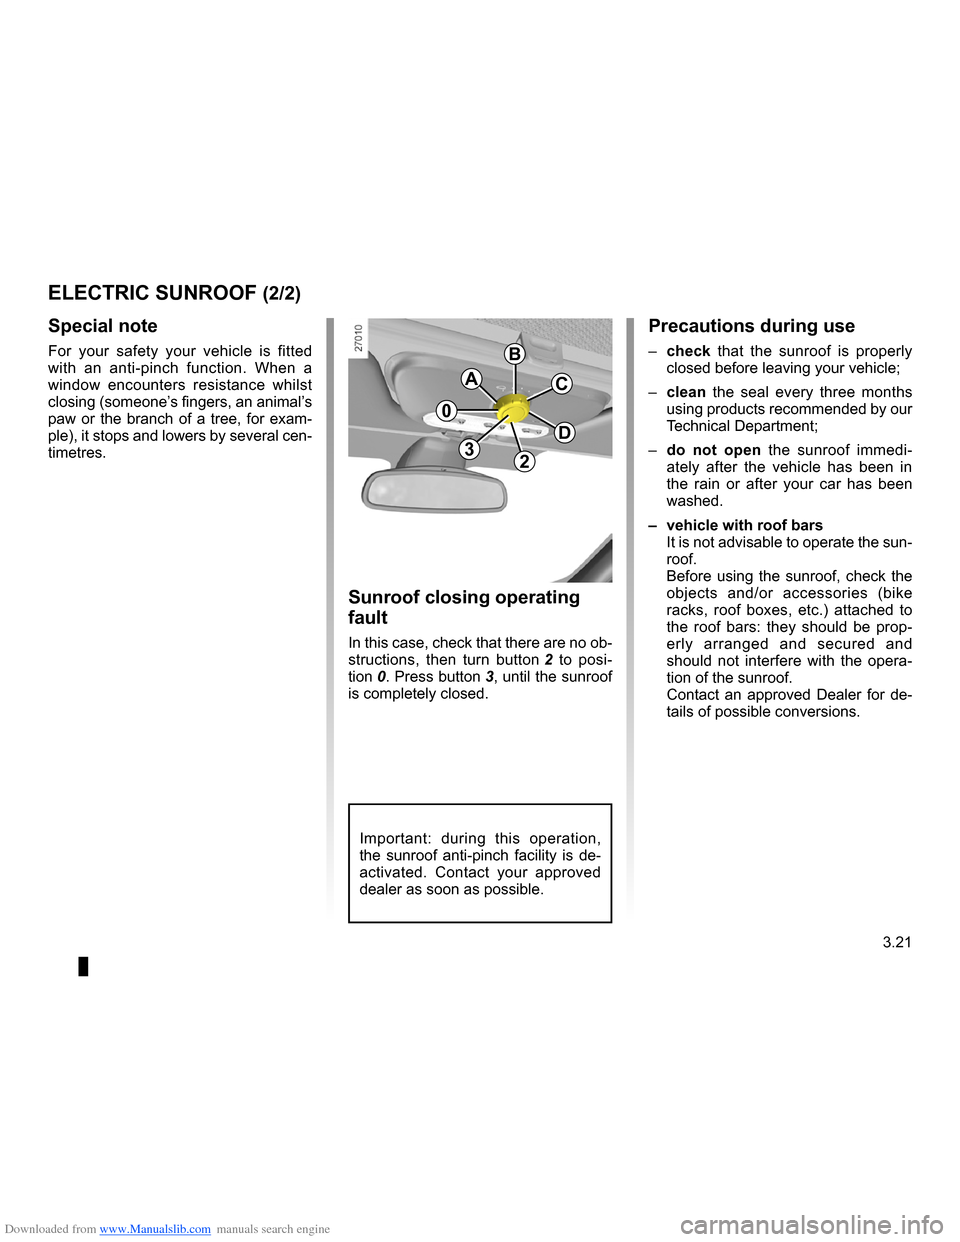
Sunroof closing operating
fault
In this case, check that there are no ob-
structions, then turn button 2 to posi-
tion 0 . Press button 3, until the sunroof is completely closed.
Special note
For your safety your vehicle is fitted with an anti-pinch function. When a window encounters resistance whilst closing (someone’s fingers, an animal’s paw or the branch of a tree, for exam- ple), it stops and lowers by several cen- timetres.
Precautions during use
– check that the sunroof is properly closed before leaving your vehicle;
–
clean the seal every three months using products recommended by our Technical Department;
–
do not open the sunroof immedi- ately after the vehicle has been in the rain or after your car has been washed.
– vehicle with roof bars
It is not advisable to operate the sun- roof.Before using the sunroof, check the objects and/or accessories (bike racks, roof boxes, etc.) attached to the roof bars: they should be prop- erly arranged and secured and should not interfere with the opera- tion of the sunroof.Contact an approved Dealer for de- tails of possible conversions.
ELECTRIC SUNROOF (2/2)
A
B
C
D
23
0
Important: during this operation, the sunroof anti-pinch facility is de- activated. Contact your approved dealer as soon as possible.
Page 161 of 264
Downloaded from www.Manualslib.com manuals search engine
headrest................................................(up to the end of the DU)adjusting your driving position ..............(up to the end of the DU)
3.29
ENG_UD10520_1Appuis-tête arrière (X85 - B85 - C85 - S85 - K85 - Renault)ENG_NU_853-3_BCSK85_Renault_3
The headrest is a safety component; check that it is fitted and in the correct po- sition. The top of the head- rest should be as close as possible to the top of the head.
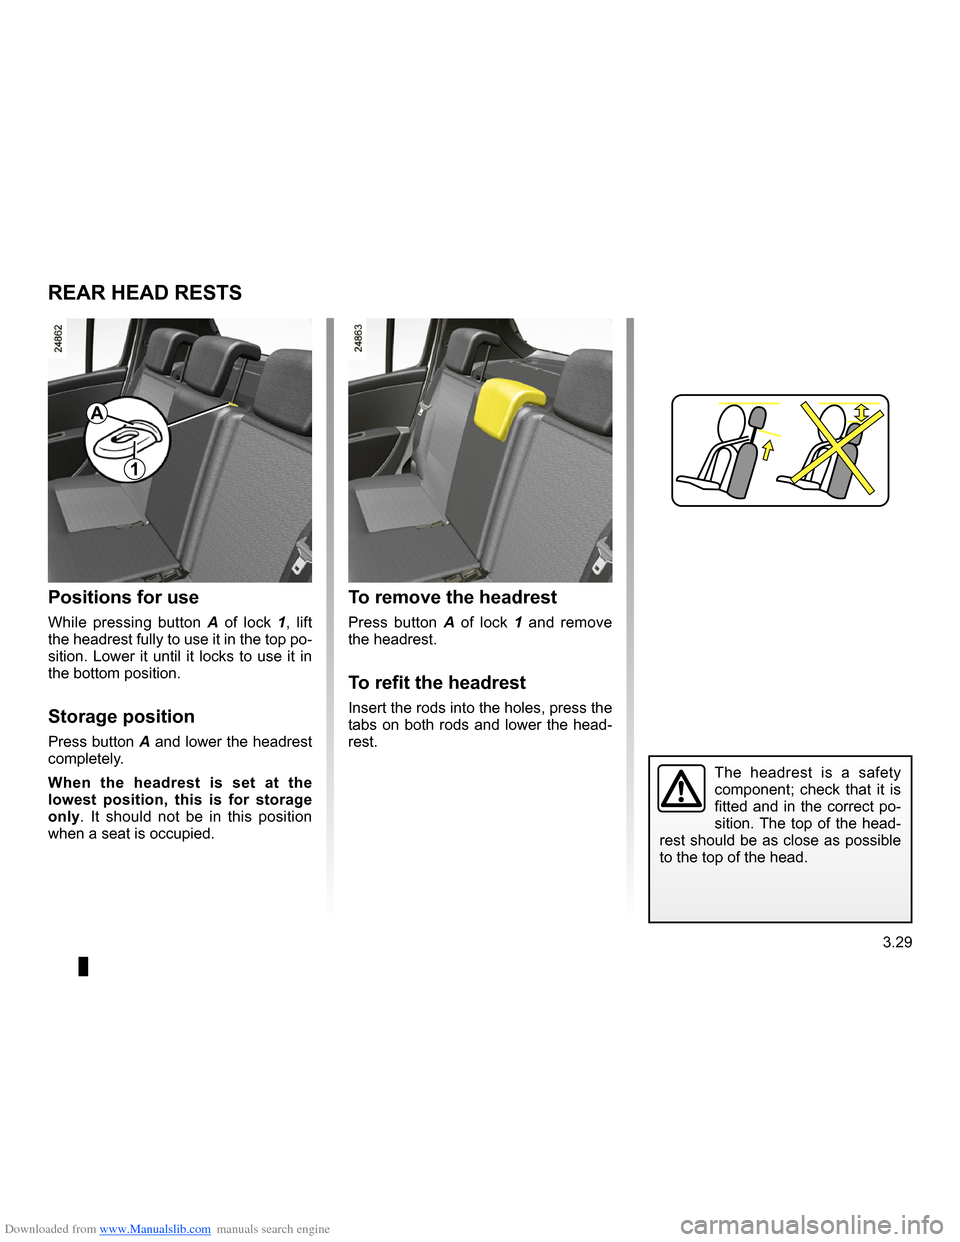
To remove the headrest
Press button A of lock 1 and remove the headrest.
To refit the headrest
Insert the rods into the holes, press the tabs on both rods and lower the head- rest.
Positions for use
While pressing button A of lock 1, lift the headrest fully to use it in the top po- sition. Lower it until it locks to use it in the bottom position.
Storage position
Press button A and lower the headrest completely.
When the headrest is set at the lowest position, this is for storage only. It should not be in this position when a seat is occupied.
REAR HEAD RESTS
1
A
Page 162 of 264
Downloaded from www.Manualslib.com manuals search engine
rear bench seat.....................................(up to the end of the DU)rear seatsfunctions .........................................(up to the end of the DU)
3.30
ENG_UD10581_1Banquette arrière : fonctionnalités (X85 - B85 - C85 - S85 - K85 \
- Renault)ENG_NU_853-3_BCSK85_Renault_3
JauneNoirNoir texte
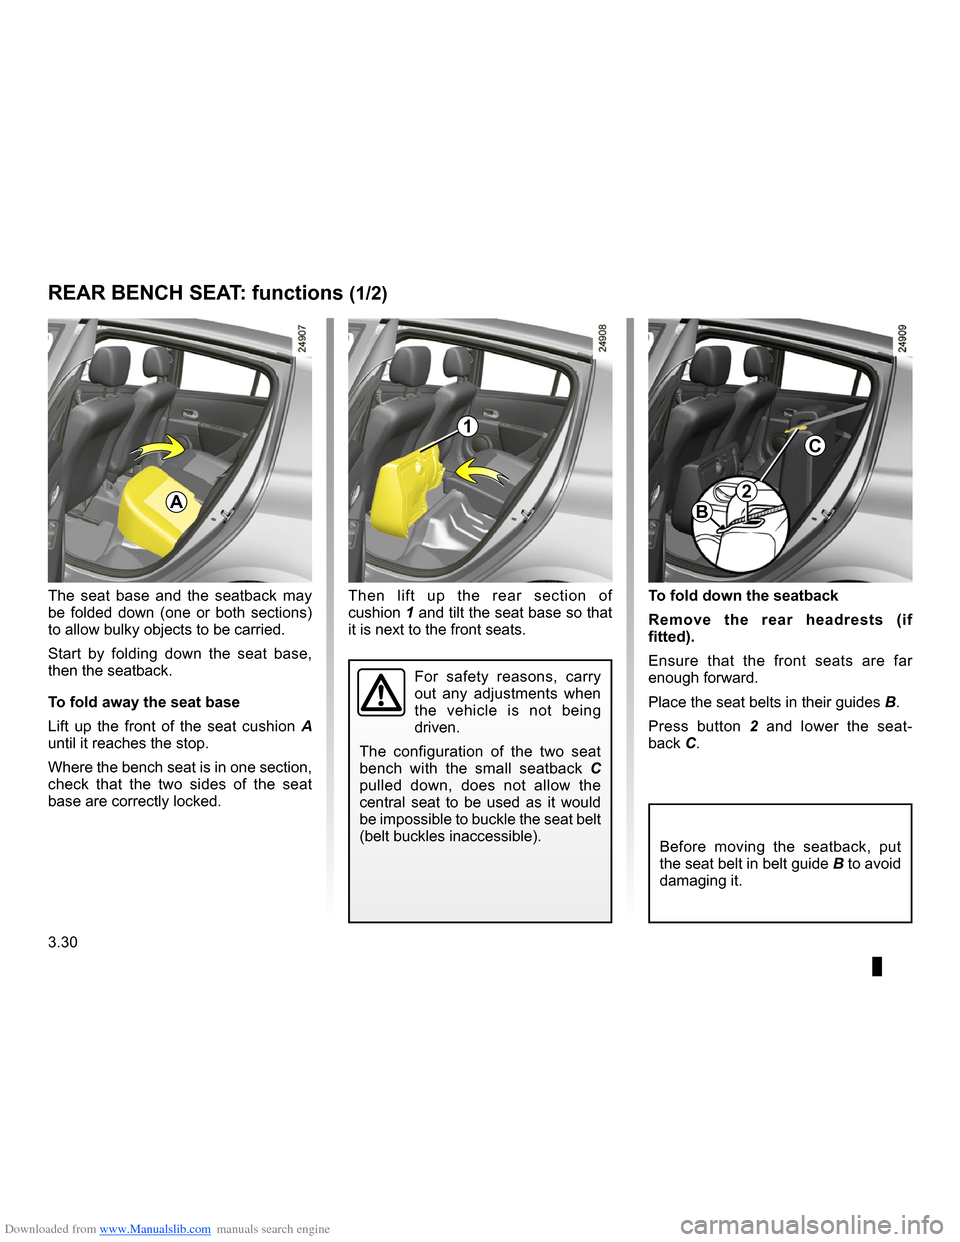
Then lift up the rear section of cushion 1 and tilt the seat base so that it is next to the front seats.
To fold down the seatback
Remove the rear headrests (if fitted).
Ensure that the front seats are far enough forward.
Place the seat belts in their guides
B.
Press button 2 and lower the seat-
back C.
Rear bench seat: functions
Before moving the seatback, put the seat belt in belt guide B to avoid damaging it.
For safety reasons, carry out any adjustments when the vehicle is not being driven.
The configuration of the two seat bench with the small seatback C pulled down, does not allow the central seat to be used as it would be impossible to buckle the seat belt (belt buckles inaccessible).
The seat base and the seatback may be folded down (one or both sections) to allow bulky objects to be carried.
Start by folding down the seat base, then the seatback.
To fold away the seat base
Lift up the front of the seat cushion A until it reaches the stop.
Where the bench seat is in one section, check that the two sides of the seat base are correctly locked.
REAR BENCH SEAT: functions (1/2)
A
1
C
B
2
Page 173 of 264
Downloaded from www.Manualslib.com manuals search engine
JauneNoirNoir texte
3.41
ENG_UD10586_1Barres de toit / Becquet (X85 - B85 - C85 - S85 - K85 - Renault)ENG_NU_853-3_BCSK85_Renault_3
For information on the range of equipment adapted to your vehi- cle, we advise you to consult an ap- proved Dealer.
Refer to the manufacturer’s instruc- tions for information on how to fit
and use the roof rack bar.
Please keep these instructions with the rest of the vehicle documenta- tion.
Maximum permissible load on
roof rack: 80 kg (including the car- rying device).
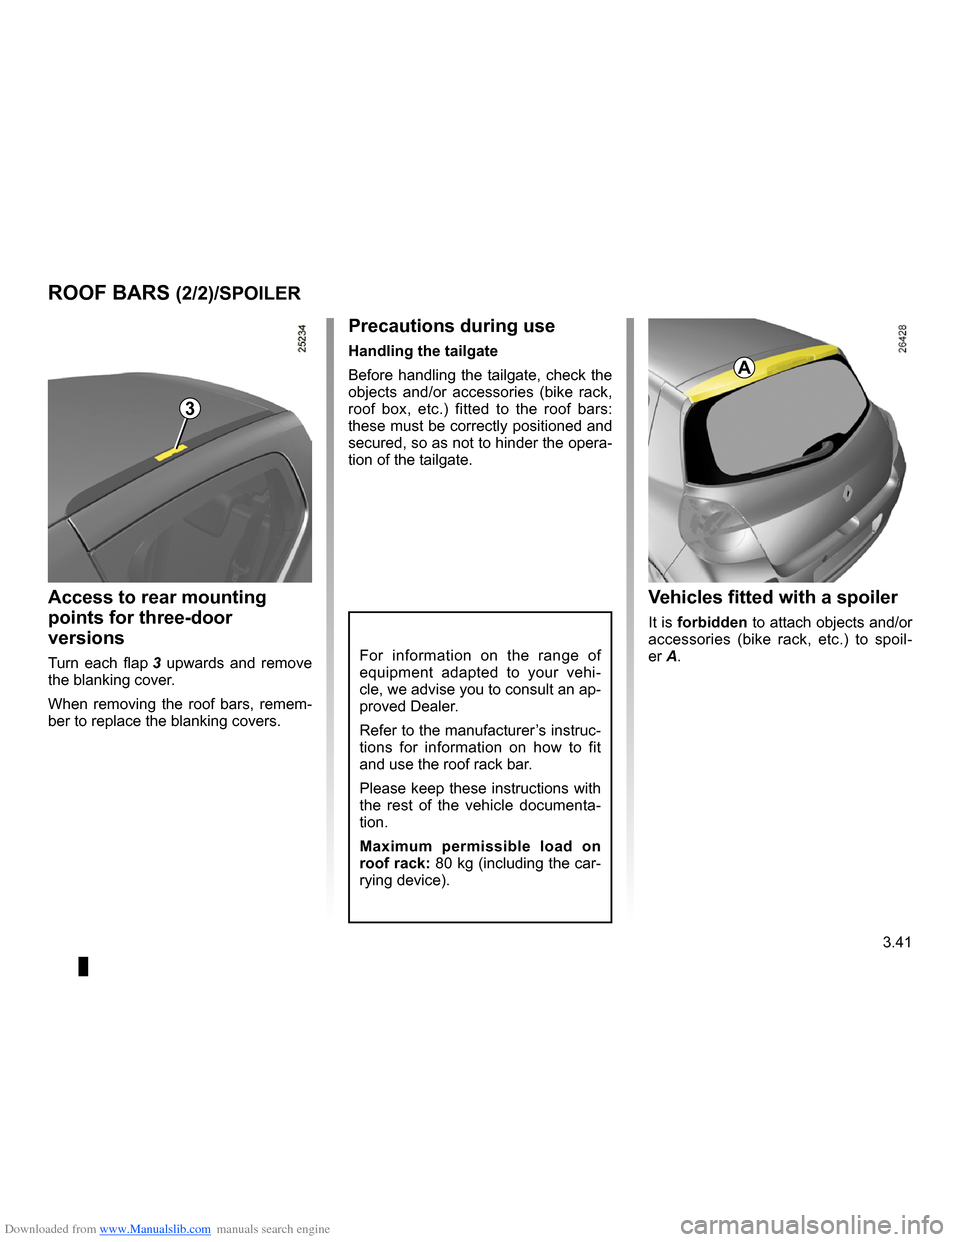
Vehicles fitted with a spoiler
It is forbidden to attach objects and/or accessories (bike rack, etc.) to spoil-
er A.
Precautions during use
Handling the tailgate
Before handling the tailgate, check the objects and/or accessories (bike rack, roof box, etc.) fitted to the roof bars: these must be correctly positioned and secured, so as not to hinder the opera- tion of the tailgate.
Access to rear mounting
points for three-door
versions
Turn each flap 3 upwards and remove the blanking cover.
When removing the roof bars, remem- ber to replace the blanking covers.
ROOF BARS (2/2)/SPOILER
A
3
Page 176 of 264
Downloaded from www.Manualslib.com manuals search engine
bonnet...................................................(up to the end of the DU)
4.2
ENG_UD14669_3Capot moteur (X85 - B85 - C85 - S85 - K85 - Renault)ENG_NU_853-3_BCSK85_Renault_4
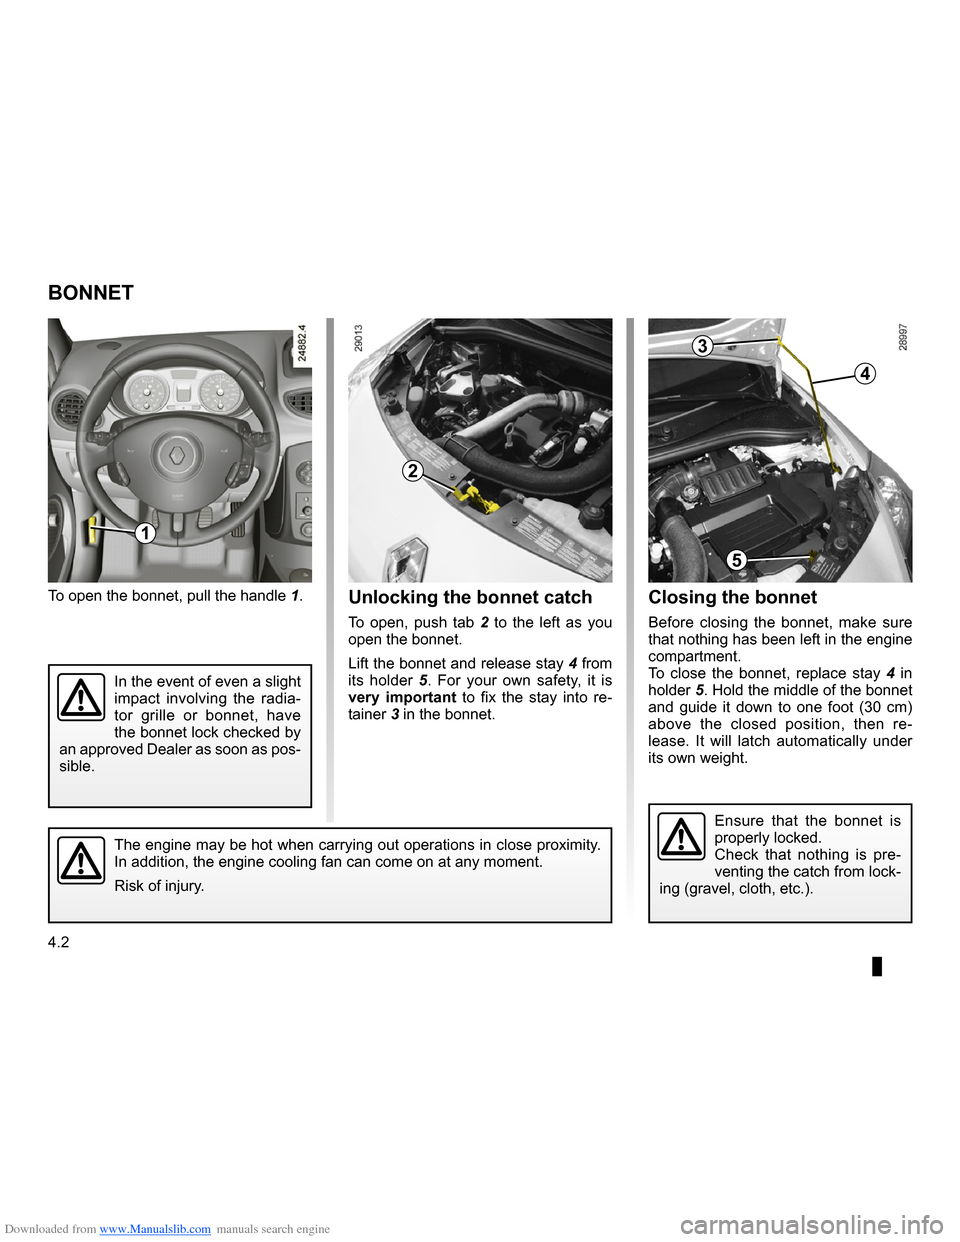
Closing the bonnet
Before closing the bonnet, make sure that nothing has been left in the engine compartment.To close the bonnet, replace stay 4 in holder 5. Hold the middle of the bonnet and guide it down to one foot (30 cm) above the closed position, then re- lease. It will latch automatically under its own weight.
Bonnet
To open the bonnet, pull the handle 1.
BONNET
1
2
The engine may be hot when carrying out operations in close proximity. In addition, the engine cooling fan can come on at any moment.
Risk of injury.
3
4
5
Unlocking the bonnet catch
To open, push tab 2 to the left as you open the bonnet.
Lift the bonnet and release stay 4 from its holder 5. For your own safety, it is very important to fix the stay into re- tainer 3 in the bonnet.
In the event of even a slight impact involving the radia- tor grille or bonnet, have the bonnet lock checked by an approved Dealer as soon as pos- sible.
2
Ensure that the bonnet is properly locked.Check that nothing is pre- venting the catch from lock- ing (gravel, cloth, etc.).
Page 177 of 264
Downloaded from www.Manualslib.com manuals search engine
maintenance:mechanical ......................................(up to the end of the DU)engine oil level ......................................(up to the end of the DU)engine oil ..............................................(up to the end of the DU)
4.3
ENG_UD12585_2Niveau huile moteur/Vidange moteur (X85 - B85 - C85 - S85 - K85 - Renault)ENG_NU_853-3_BCSK85_Renault_4
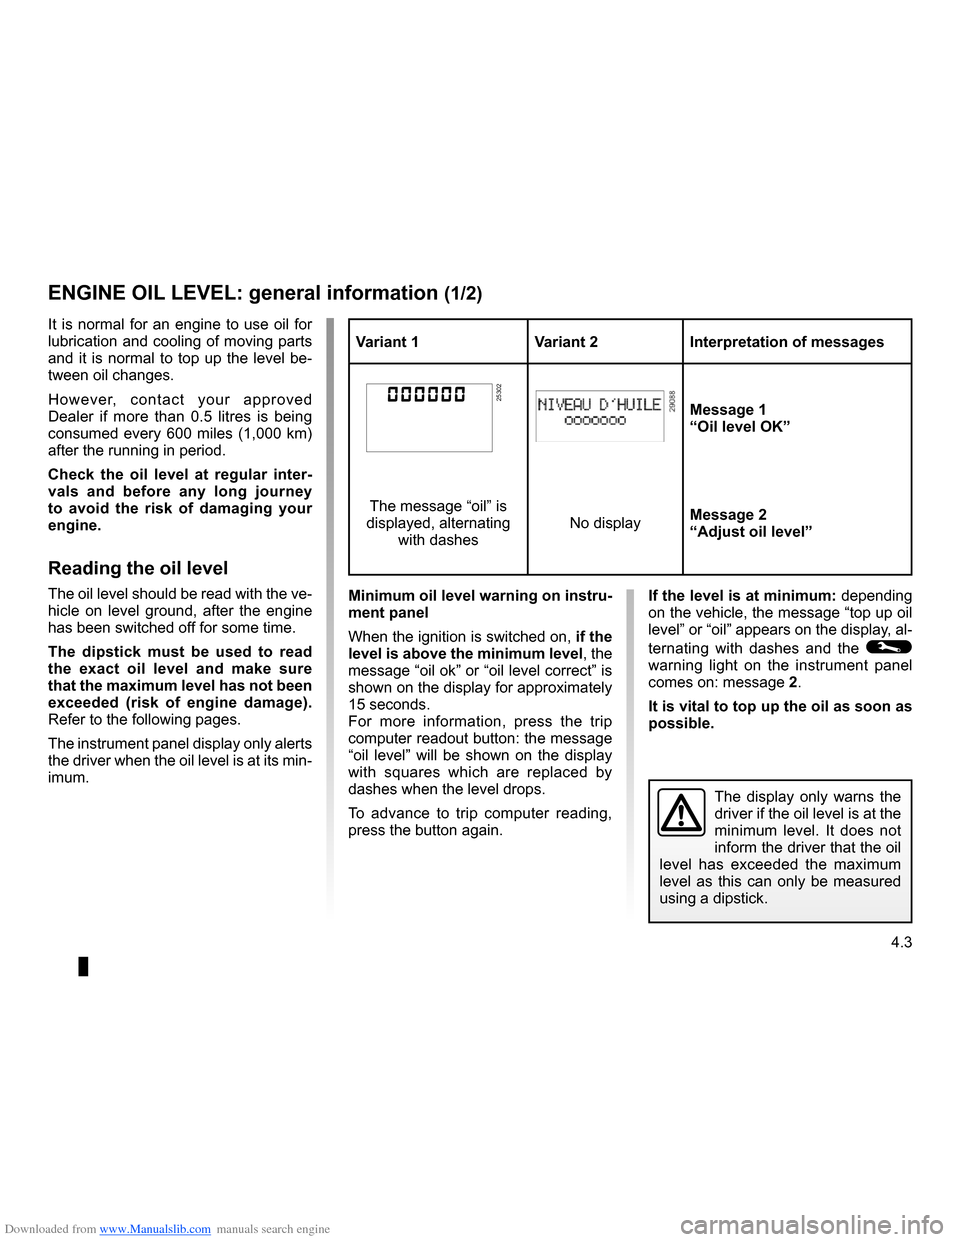
Variant 1Variant 2Interpretation of messages
25302Message 1“Oil level OK”
The message “oil” is
displayed, alternating
with dashes
No displayMessage 2“Adjust oil level”
If the level is at minimum: depending on the vehicle, the message “top up oil level” or “oil” appears on the display, al-
ternating with dashes and the © warning light on the instrument panel comes on: message 2.
It is vital to top up the oil as soon as possible.
Engine oil level: general information
The display only warns the driver if the oil level is at the minimum level. It does not inform the driver that the oil level has exceeded the maximum level as this can only be measured
using a dipstick.
Minimum oil level warning on instru- ment panel
When the ignition is switched on, if the level is above the minimum level, the message “oil ok” or “oil level correct” is shown on the display for approximately 15 seconds.For more information, press the trip computer readout button: the message
“oil level” will be shown on the display with squares which are replaced by dashes when the level drops.
To advance to trip computer reading, press the button again.
It is normal for an engine to use oil for lubrication and cooling of moving parts and it is normal to top up the level be- tween oil changes.
However, contact your approved Dealer if more than 0.5 litres is being consumed every 600 miles (1,000 km) after the running in period.
Check the oil level at regular inter- vals and before any long journey to avoid the risk of damaging your engine.
Reading the oil level
The oil level should be read with the ve- hicle on level ground, after the engine has been switched off for some time.
The dipstick must be used to read the exact oil level and make sure that the maximum level has not been exceeded (risk of engine damage). Refer to the following pages.
The instrument panel display only alerts the driver when the oil level is at its min- imum.
ENGINE OIL LEVEL: general information (1/2)
Page 179 of 264
Downloaded from www.Manualslib.com manuals search engine
4.5
ENG_UD12586_2Niveau huile moteur : appoint/remplissage (X85 - B85 - C85 - S85 - K85 \
- Renault)ENG_NU_853-3_BCSK85_Renault_4
Engine oil level: topping up/filling
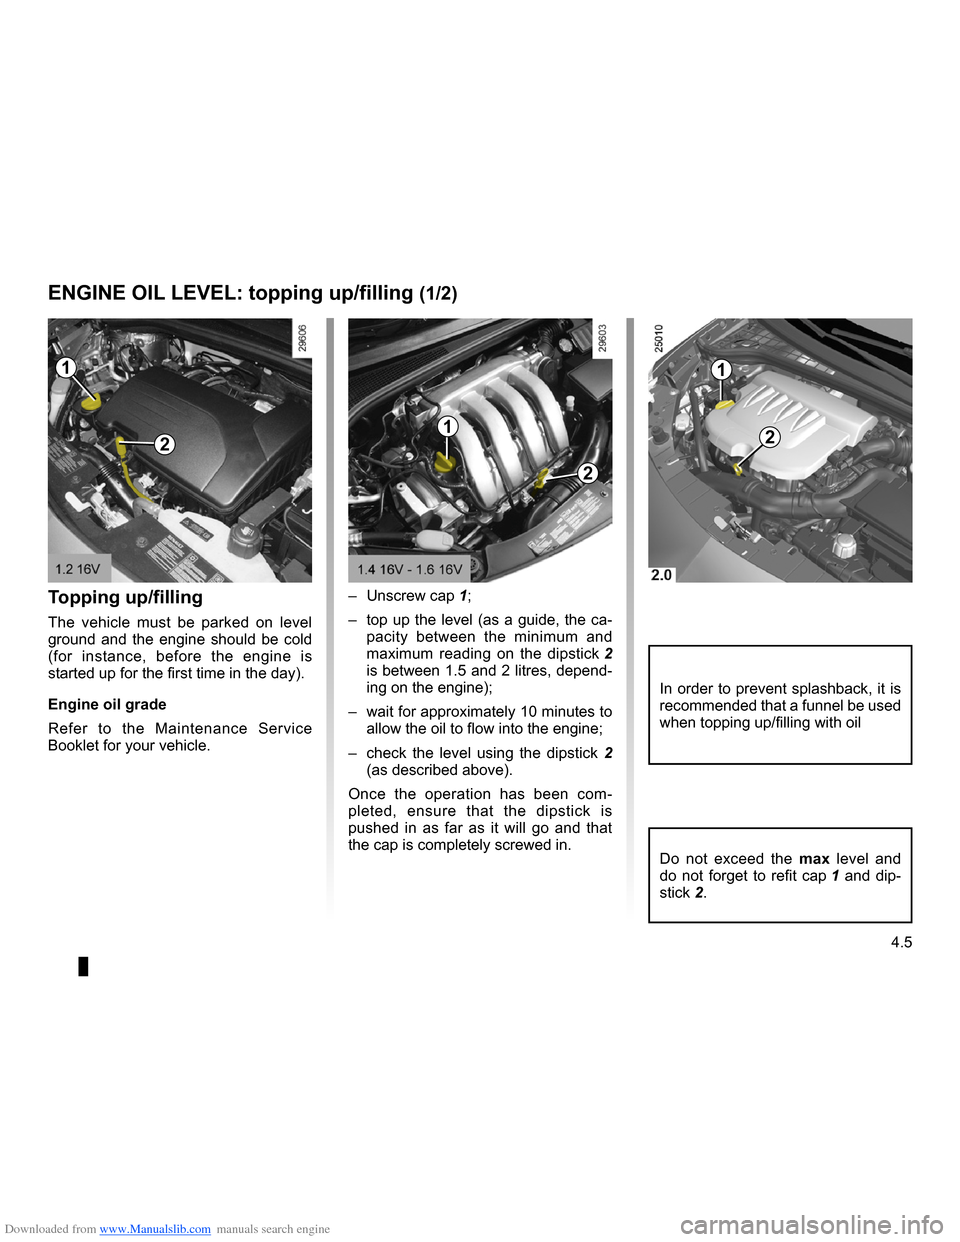
Topping up/filling
The vehicle must be parked on level ground and the engine should be cold (for instance, before the engine is started up for the first time in the day).
Engine oil grade
Refer to the Maintenance Service Booklet for your vehicle.–
Unscrew cap
1;
– top up the level (as a guide, the ca
- pacity between the minimum and
maximum reading on the dipstick 2 is between 1.5 and 2 litres, depend- ing on the engine);
– wait for approximately 10 minutes to
allow the oil to flow into the engine;
– check the level using the dipstick
2 (as described above).
Once the operation has been com- pleted, ensure that the dipstick is pushed in as far as it will go and that the cap is completely screwed in.
ENGINE OIL LEVEL: topping up/filling (1/2)
1
1
1
22
2
Do not exceed the max level and
do not forget to refit cap
1 and dip-
stick 2.
In order to prevent splashback, it is recommended that a funnel be used when topping up/filling with oil
Page 181 of 264
Downloaded from www.Manualslib.com manuals search engine
levels ....................................................(up to the end of the DU)engine coolant .......................................................(current page)tanks and reservoirscoolant .............................................................(current page)levels:coolant .............................................................(current page)
4.7
ENG_UD14670_2Niveau / Filtres (X85 - B85 - C85 - S85 - K85 - Renault)ENG_NU_853-3_BCSK85_Renault_4
Frequency of checking coolant level
Check the coolant level regularly (very severe damage is likely to be caused to the engine if it runs out of coolant).
If the level needs to be topped up, only use products approved by our Technical Department which ensure:
– protection against freezing;
– an anti-corrosion protection for the
cooling system.
Levelsengine coolant
Consult your approved dealer at
once if you notice an abnormal or repeated drop in any of the fluid levels.
No operations should be carried out on the cooling circuit when the engine is hot.
Risk of burns.
Replacement interval
Refer to the Maintenance Service Booklet for your vehicle.
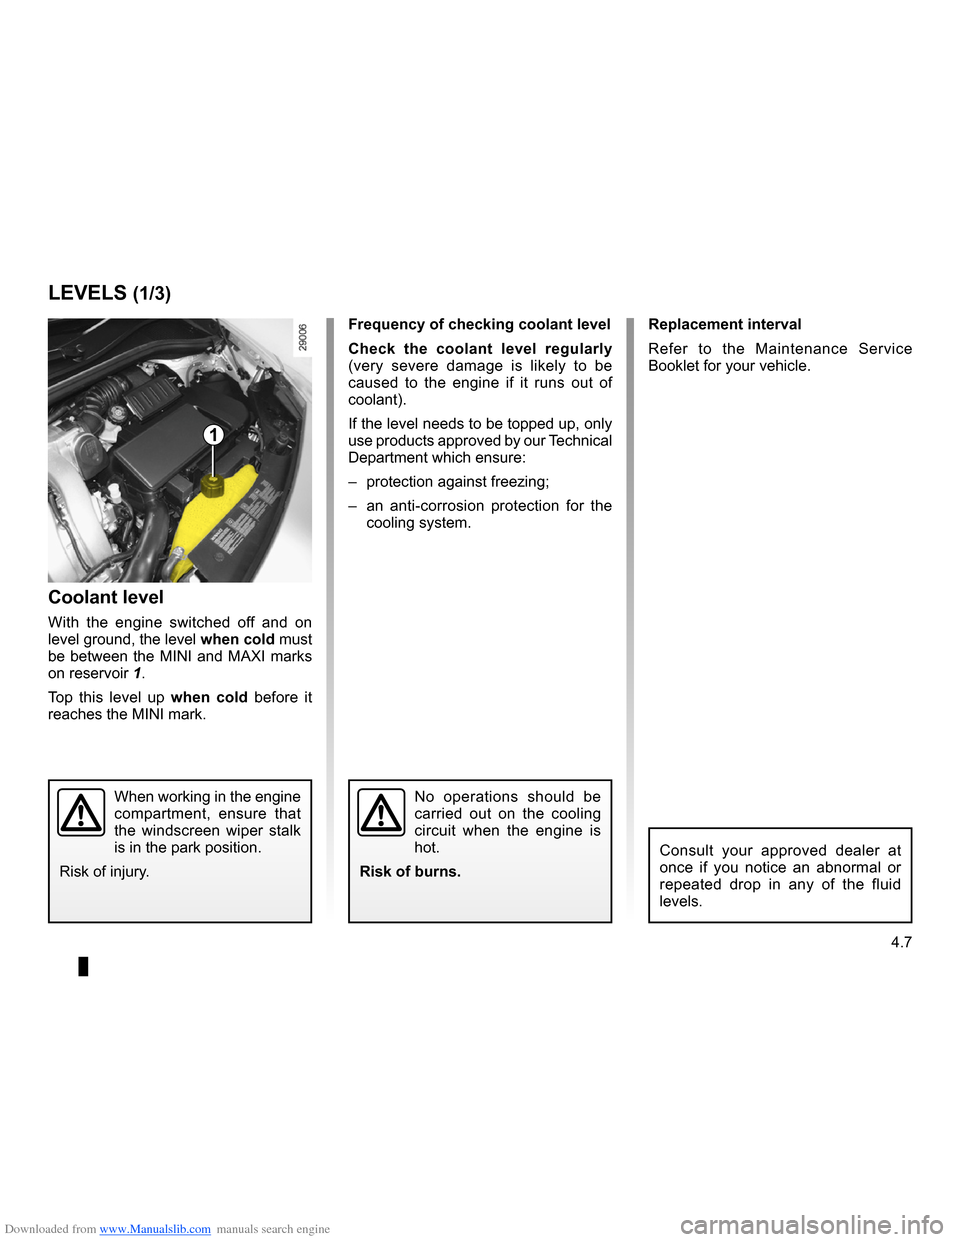
Coolant level
With the engine switched off and on level ground, the level when cold must be between the MINI and MAXI marks
on reservoir 1.
Top this level up when cold before it reaches the MINI mark.
LEVELS (1/3)
1
When working in the engine compartment, ensure that the windscreen wiper stalk is in the park position.
Risk of injury.
Page 182 of 264
Downloaded from www.Manualslib.com manuals search engine
brake fluid ..............................................................(current page)levels:brake fluid ........................................................(current page)tanks and reservoirsbrake fluid ........................................................(current page)
4.8
ENG_UD14670_2Niveau / Filtres (X85 - B85 - C85 - S85 - K85 - Renault)ENG_NU_853-3_BCSK85_Renault_4
JauneNoirNoir texte
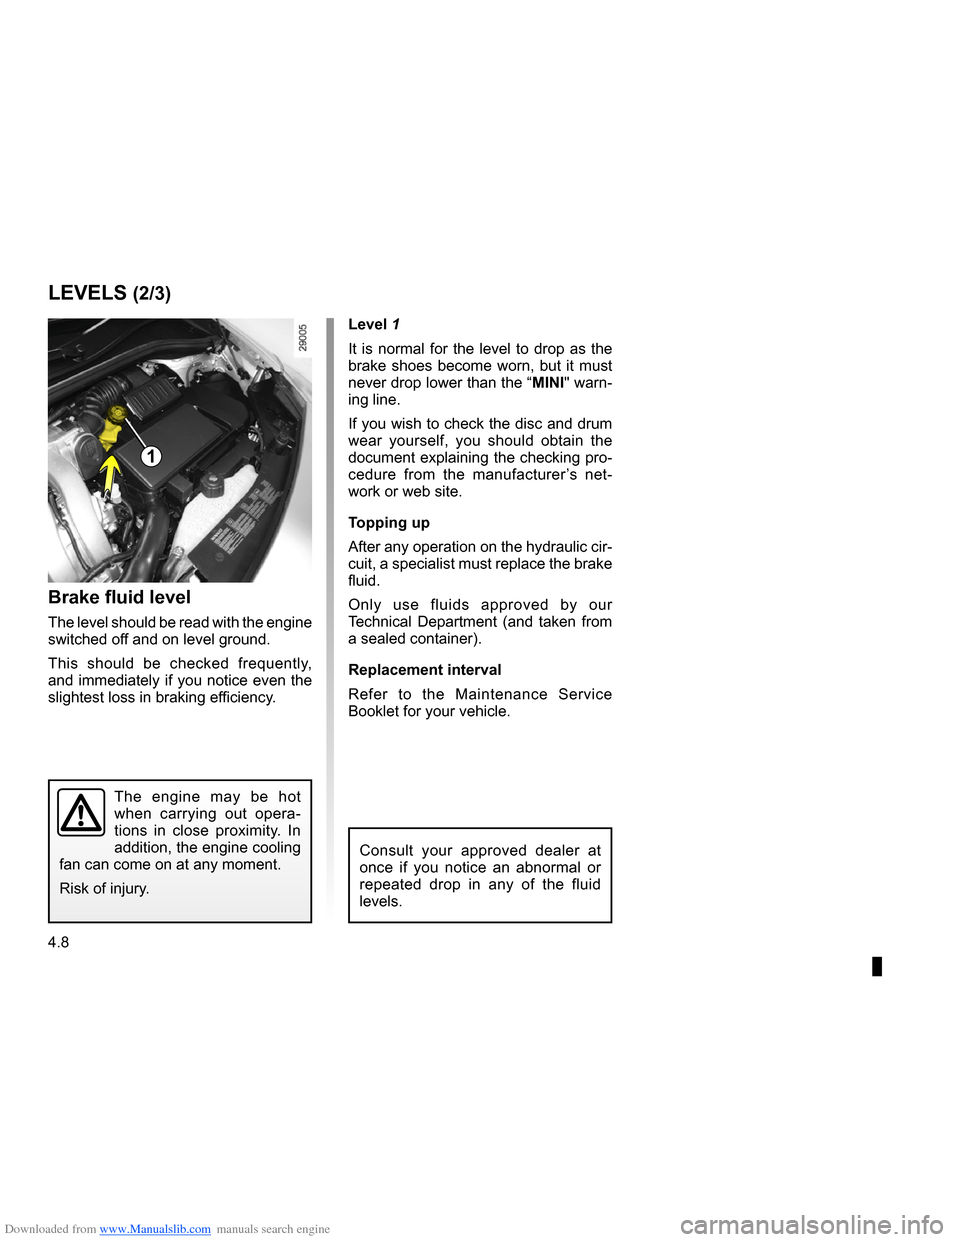
brake fluid
Level 1
It is normal for the level to drop as the brake shoes become worn, but it must never drop lower than the “MINI" warn- ing line.
If you wish to check the disc and drum wear yourself, you should obtain the document explaining the checking pro- cedure from the manufacturer ’s net- work or web site.
Topping up
After any operation on the hydraulic cir- cuit, a specialist must replace the brake fluid.
Only use fluids approved by our Technical Department (and taken from a sealed container).
Replacement interval
Refer to the Maintenance Service Booklet for your vehicle.
Brake fluid level
The level should be read with the engine switched off and on level ground.
This should be checked frequently, and immediately if you notice even the slightest loss in braking efficiency.
LEVELS (2/3)
1
The engine may be hot when carrying out opera- tions in close proximity. In addition, the engine cooling fan can come on at any moment.
Risk of injury.
Consult your approved dealer at once if you notice an abnormal or repeated drop in any of the fluid levels.
Page 187 of 264
Downloaded from www.Manualslib.com manuals search engine
JauneNoirNoir texte
4.13
ENG_UD11386_4Entretien de la carrosserie (X45 - H45 - X85 - B85 - C85 - S85 - K85 - \
X95 - B95 - D95 - Renault)ENG_NU_853-3_BCSK85_Renault_4
– Before going through a roller type car wash, return the windscreen wiper stalk to the Park position (refer to the information on the “Windscreen wash/wipe” in Section 1). Check the mounting of external accessories, additional lights and mirrors, and ensure that the wiper blades are se- cured with adhesive tape.
Remove the radio aerial mast if your vehicle is fitted with this equipment.
Remember to remove the tape and refit the antenna after washing.
– Spray mechanical components,
hinges, etc. with products approved by our Technical Department to protect them after they have been cleaned.
BODyWORK MAINTENANCE (2/2)
We have selected special products to care for your vehicle and you can obtain these from the manufactur- er’s accessory outlets.
– Observe the vehicle stopping dis- tances when driving on gravelled surfaces to prevent paint damage.
– Repair, or have repaired quickly,
areas where the paint has been dam- aged, to prevent corrosion spread- ing.
– Remember to visit the body shop
periodically if your vehicle has an anti-corrosion warranty. Refer to the Maintenance Service Booklet.
– Respect local regulations about
washing vehicles (e.g. do not wash your vehicle on a public highway).
you should
– Wash your car frequently, with the engine off, with cleaning products recommended by our Technical Department (never use abrasive products) and be sure to jet-rinse off:
– spots of tree resin and industrial
grime;
–
bird droppings, which cause a chemical reaction with the paint that rapidly discolours paint- work and may even cause the paint to peel off; Wash the vehicle immediately to remove these marks since it is impossible to remove them by polishing;
– salt, particularly in the wheel
arches and underneath the body after driving in areas where the roads have been gritted;
– mud in the wheel arches and un
- derneath the body which form damp patches.