engine RENAULT KANGOO 2013 X61 / 2.G Diesel DCM 1.2 Injection User Guide
[x] Cancel search | Manufacturer: RENAULT, Model Year: 2013, Model line: KANGOO, Model: RENAULT KANGOO 2013 X61 / 2.GPages: 204, PDF Size: 0.99 MB
Page 17 of 204
13B-17V1 MR-376-X76-13B000$040.mif
13B
DCM 1.2 Injection
Program no.: 4C
Vdiag No.: 08
COMPUTER REPLACEMENT, PROGRAMMING AND REPROGRAMMING OPERATIONS
The system can be programmed via the diagnostic socket using the diagnostic tool (see Technical Note 3585A
Computer programming and reprogramming procedure and Technical Note 9869A Computer programming
and reprogramming procedure and following the instructions provided by the diagnostic tool).
Before removing the computer in After-Sales, save the computer data using the diagnostic tool by running
command SC003 Save computer data. This command saves the following information:
–C2I parameters (individual injector correction) and engine parameters,
–Measuring system information,
–Injection system reset data. IMPORTANT
– Switch on the diagnostic tool (mains or cigarette lighter supply).
– Connect a battery charger.
– Switch off all electrical consumers (lights, interior lights, air conditioning, radio/CD, etc.).
– Wait for the engine to cool (engine coolant temperature below 60°C and air temperature below 50°C).
IMPORTANT
It is not possible to try an injection computer coming from the Parts Department because it will no longer be
possible to use it on another vehicle.
DIESEL INJECTION
Fault finding – Replacement of components
Page 18 of 204
13B-18V1 MR-376-X76-13B000$040.mif
DIESEL INJECTION
Fault finding – Replacement of components13B
DCM 1.2 Injection
Program no.: 4C
Vdiag No.: 08
After the computer has been programmed:
– Switch off the ignition.
– Switch on the ignition again and use the diagnostic tool to carry out the following steps:
– Use command SC001 Write saved data to restore the C2I and the engine adaptive programming.
– Run command VP010 Write VIN.
– Run command AC028 Static test.
– Run command AC154 Low speed fan assembly to test the operation of the 1st speed fan assembly.
– Run command AC153 High speed fan assembly to test the operation of the 2nd speed fan assembly.
– Run command AC250 Heating resistor 1 relay to test the operation of passenger compartment heating resistor 1.
– Run command AC251 Heating resistor 2 relay to test the operation of passenger compartment heating resistor 2.
– Run command AC100 Stop electrical consumer inhibition.
– Run command AC212 Fill new pump chamber.
– Run the starter motor without releasing the key until the engine starts (the pump reprime time until the engine starts
can be up to 20 seconds).
– After the engine has started, refer to ET637 Fill new pump chamber and check that it is Done; if not, repeat the
starting procedure.
–Stop the engine, switch off the ignition (to initialise the computer) and wait 30 seconds.
– After injection system programming, stored faults may appear in other computers.
– If DF1083 Water in diesel fuel warning light circuit appears in the injection computer: on a vehicle fitted with
a water in diesel fuel warning light, perform the fault finding operations described in DF1083 then run command
AC028 Static test; on other vehicles, do not deal with the fault.
– Clear the computer memory RZ001 Fault memory.
IMPORTANT
AFTER A (RE)PROGRAMMING OPERATION, DO NOT DISCONNECT THE BATTERY FOR AT LEAST
30 MINUTES (to carry out other work on the vehicle).
Note:
If commands SC003 Save computer data and SC001 Write saved data have been lost or do not work, after
programming the computer, enter the C2I for each injector manually by reading the C2I on each injector (see
Replacing the injectors).
Page 19 of 204
13B-19V1 MR-376-X76-13B000$040.mif
DIESEL INJECTION
Fault finding – Replacement of components13B
DCM 1.2 Injection
Program no.: 4C
Vdiag No.: 08
REPLACING THE INJECTORS
The system can be configured with the diagnostic socket using the diagnostic tool.
The C2I parameters must be replaced after replacing an injector/injectors.
To do this, enter the C2I again into the injection computer using the following commands:
- VP001 Cylinder 1 injector for the cylinder 1 injector (cylinder on flywheel end),
- VP002 Cylinder 2 injector for the cylinder 2 injector,
- VP003 Cylinder 3 injector for the cylinder 3 injector,
- VP004 Cylinder 4 injector for the cylinder 4 injector.
It is also possible to enter all four C2I using command SC002 Enter injector codes.
REPLACING THE HIGH PRESSURE PUMP
PROCEDURE
– Switch on the ignition and use the diagnostic tool to re-establish dialogue with the injection computer.
– Use command AC212 New pump chamber filling.
– Operate the starter (Important: starting the engine may take 20 seconds due to the time taken to reprime the
pump).
– After the engine has started, refer to ET637 Fill new pump chamber and check that it is Done; if not, repeat the
starting procedure. Note:
C2I (individual injector correction) is a calibration carried out in the factory on each injector to adjust the flow
of each injector precisely.
The correction values are written on a label affixed to each injector, then entered in the computer which can then
actuate each injector by taking account of their manufacturing variations.
Only after simultaneously replacing at least three injectors, reset the injector adaptives, using command RZ004
Pressure regulation adaptives.
IMPORTANT
When reprogramming the computer, only carry out the following procedure after running command AC028
Static test (see Computer reprogramming operation).
Page 20 of 204
13B-20V1 MR-376-X76-13B000$040.mif
DIESEL INJECTION
Fault finding – Replacement of components13B
DCM 1.2 Injection
Program no.: 4C
Vdiag No.: 08
REPLACING THE EGR VALVE
If the EGR valve is replaced, program the new valve's offset position.
Switch on the ignition and use the diagnostic tool to carry out the following:
– run command RZ002 EGR adaptives to clear the old offset using the EGR programming deletion procedure.
– Special feature of the K9K796 Euro 2 engine (Indonesia): The EGR solenoid valve is present on the vehicle, but
not used. It always remains closed. It must not be replaced on this vehicle (unless there is a mechanical fault).
IMPORTANT
Do not use this command if the valve is not new.
Page 21 of 204
13B-21V1 MR-376-X76-13B000$050.mif
13B
DCM 1.2 Injection
Program no.: 4C
Vdiag No.: 08
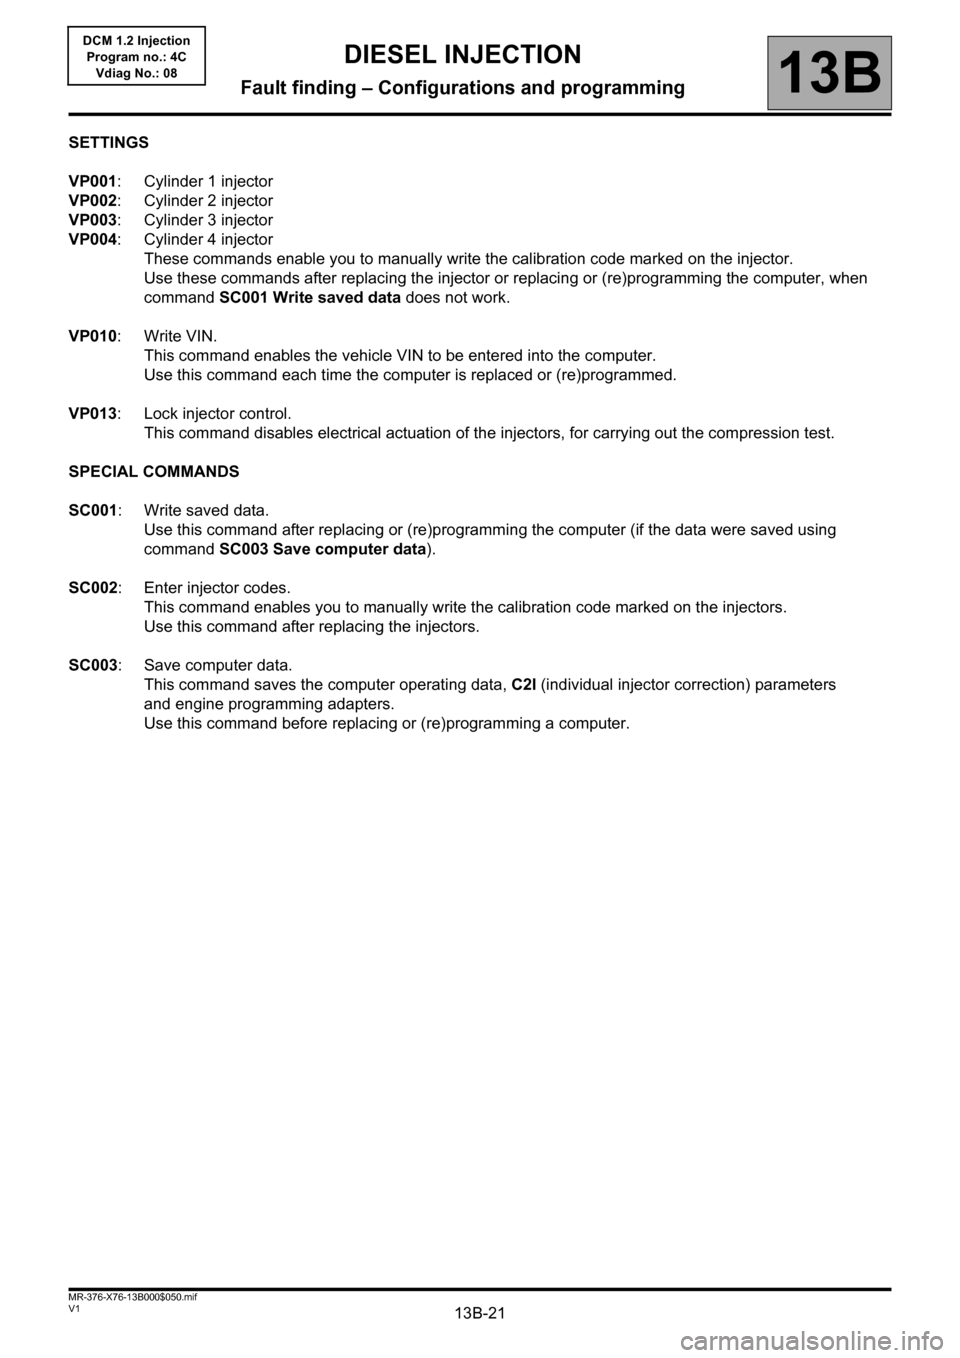
SETTINGS
VP001: Cylinder 1 injector
VP002: Cylinder 2 injector
VP003: Cylinder 3 injector
VP004: Cylinder 4 injector
These commands enable you to manually write the calibration code marked on the injector.
Use these commands after replacing the injector or replacing or (re)programming the computer, when
command SC001 Write saved data does not work.
VP010: Write VIN.
This command enables the vehicle VIN to be entered into the computer.
Use this command each time the computer is replaced or (re)programmed.
VP013: Lock injector control.
This command disables electrical actuation of the injectors, for carrying out the compression test.
SPECIAL COMMANDS
SC001: Write saved data.
Use this command after replacing or (re)programming the computer (if the data were saved using
command SC003 Save computer data).
SC002: Enter injector codes.
This command enables you to manually write the calibration code marked on the injectors.
Use this command after replacing the injectors.
SC003: Save computer data.
This command saves the computer operating data, C2I (individual injector correction) parameters
and engine programming adapters.
Use this command before replacing or (re)programming a computer.
DIESEL INJECTION
Fault finding – Configurations and programming
Page 22 of 204
13B-22V1 MR-376-X76-13B000$060.mif
13B
DCM 1.2 Injection
Program no.: 4C
Vdiag No.: 08
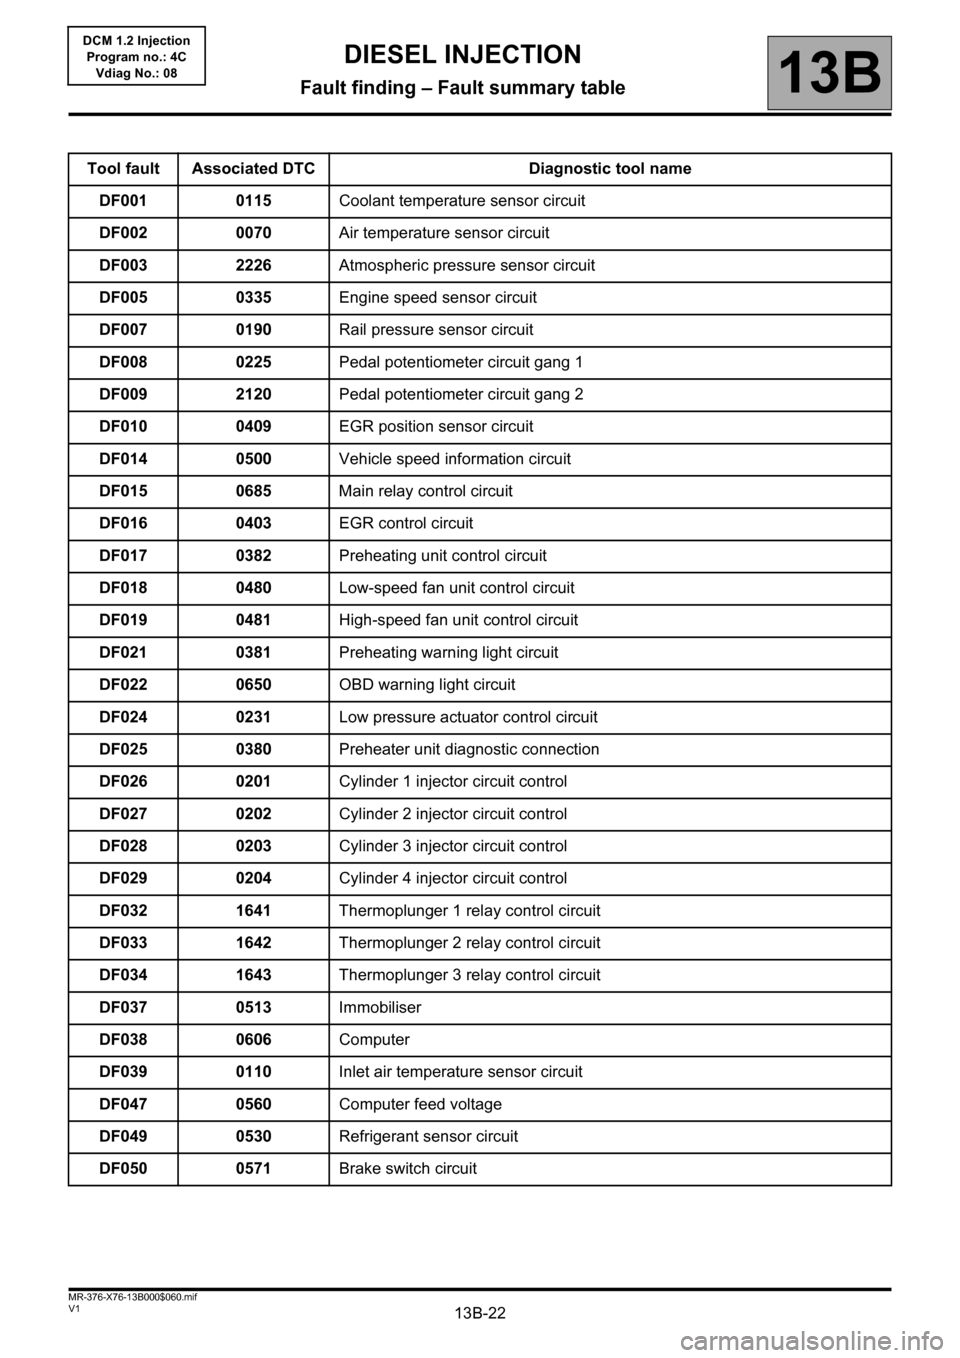
Tool fault Associated DTC Diagnostic tool name
DF001 0115Coolant temperature sensor circuit
DF002 0070Air temperature sensor circuit
DF003 2226Atmospheric pressure sensor circuit
DF005 0335Engine speed sensor circuit
DF007 0190Rail pressure sensor circuit
DF008 0225Pedal potentiometer circuit gang 1
DF009 2120Pedal potentiometer circuit gang 2
DF010 0409EGR position sensor circuit
DF014 0500Vehicle speed information circuit
DF015 0685Main relay control circuit
DF016 0403EGR control circuit
DF017 0382Preheating unit control circuit
DF018 0480Low-speed fan unit control circuit
DF019 0481High-speed fan unit control circuit
DF021 0381Preheating warning light circuit
DF022 0650OBD warning light circuit
DF024 0231Low pressure actuator control circuit
DF025 0380Preheater unit diagnostic connection
DF026 0201Cylinder 1 injector circuit control
DF027 0202Cylinder 2 injector circuit control
DF028 0203Cylinder 3 injector circuit control
DF029 0204Cylinder 4 injector circuit control
DF032 1641Thermoplunger 1 relay control circuit
DF033 1642Thermoplunger 2 relay control circuit
DF034 1643Thermoplunger 3 relay control circuit
DF037 0513Immobiliser
DF038 0606Computer
DF039 0110Inlet air temperature sensor circuit
DF047 0560Computer feed voltage
DF049 0530Refrigerant sensor circuit
DF050 0571Brake switch circuit
DIESEL INJECTION
Fault finding – Fault summary table
Page 23 of 204
13B-23V1 MR-376-X76-13B000$060.mif
DIESEL INJECTION
Fault finding – Fault summary table13B
DCM 1.2 Injection
Program no.: 4C
Vdiag No.: 08
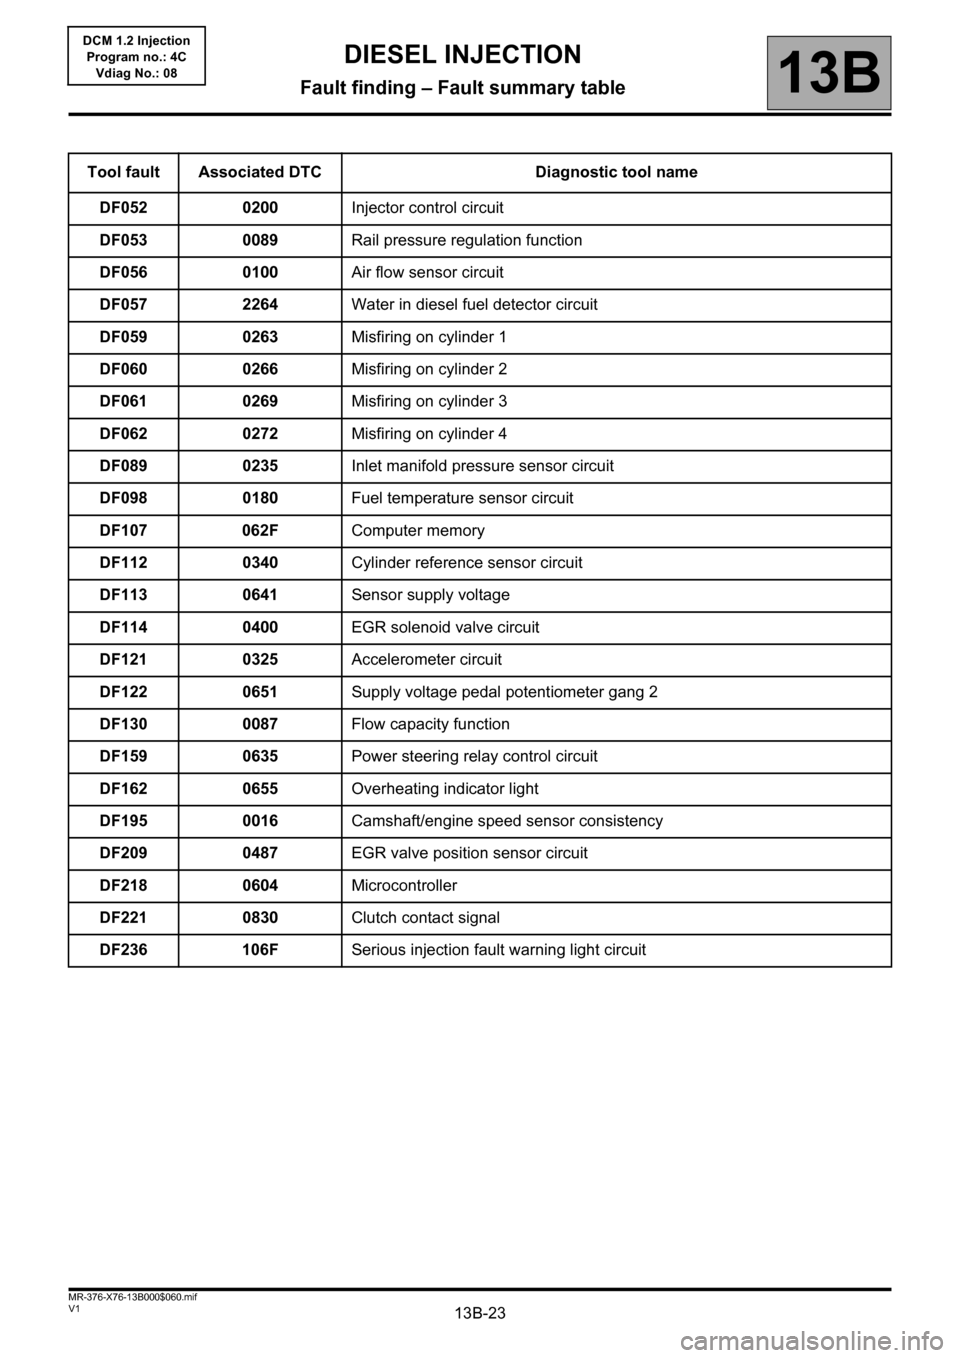
Tool fault Associated DTC Diagnostic tool name
DF052 0200Injector control circuit
DF053 0089Rail pressure regulation function
DF056 0100Air flow sensor circuit
DF057 2264Water in diesel fuel detector circuit
DF059 0263Misfiring on cylinder 1
DF060 0266Misfiring on cylinder 2
DF061 0269Misfiring on cylinder 3
DF062 0272Misfiring on cylinder 4
DF089 0235Inlet manifold pressure sensor circuit
DF098 0180Fuel temperature sensor circuit
DF107 062FComputer memory
DF112 0340Cylinder reference sensor circuit
DF113 0641Sensor supply voltage
DF114 0400EGR solenoid valve circuit
DF121 0325Accelerometer circuit
DF122 0651Supply voltage pedal potentiometer gang 2
DF130 0087Flow capacity function
DF159 0635Power steering relay control circuit
DF162 0655Overheating indicator light
DF195 0016Camshaft/engine speed sensor consistency
DF209 0487EGR valve position sensor circuit
DF218 0604Microcontroller
DF221 0830Clutch contact signal
DF236 106FSerious injection fault warning light circuit
Page 24 of 204
13B-24V1 MR-376-X76-13B000$060.mif
DIESEL INJECTION
Fault finding – Fault summary table13B
DCM 1.2 Injection
Program no.: 4C
Vdiag No.: 08
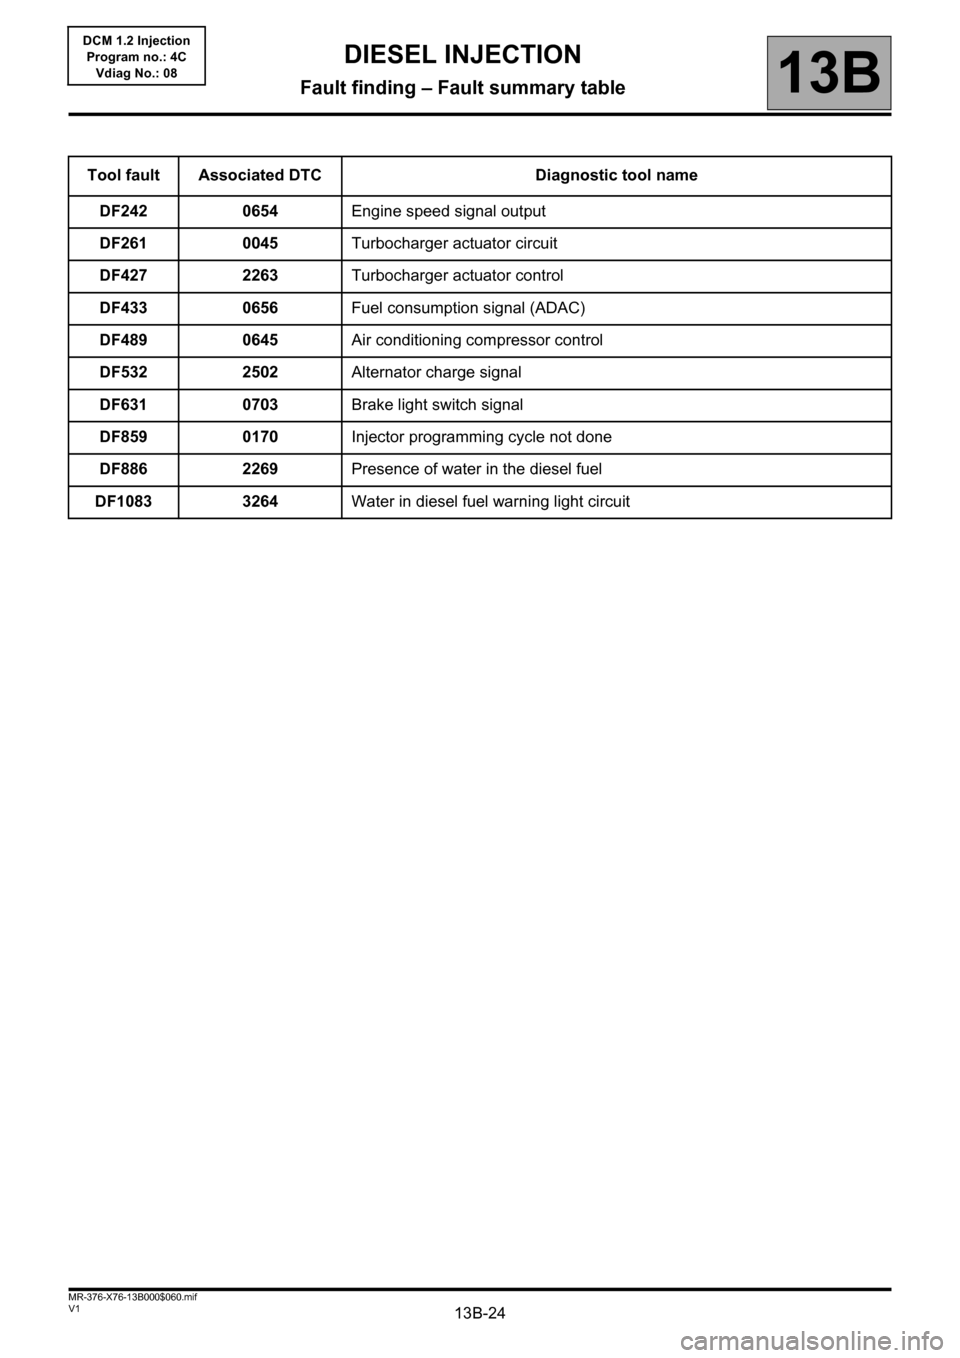
Tool fault Associated DTC Diagnostic tool name
DF242 0654Engine speed signal output
DF261 0045Turbocharger actuator circuit
DF427 2263Turbocharger actuator control
DF433 0656Fuel consumption signal (ADAC)
DF489 0645Air conditioning compressor control
DF532 2502Alternator charge signal
DF631 0703Brake light switch signal
DF859 0170Injector programming cycle not done
DF886 2269Presence of water in the diesel fuel
DF1083 3264Water in diesel fuel warning light circuit
Page 25 of 204
13B-25
AFTER REPAIRDeal with any faults declared by the diagnostic tool.
Clear the computer memory.
Carry out a road test followed by another check with the diagnostic tool.
V1 MR-376-X76-13B000$071.mif
13B
DCM 1.2 Injection
Program no.: 4C
Vdiag No.: 08
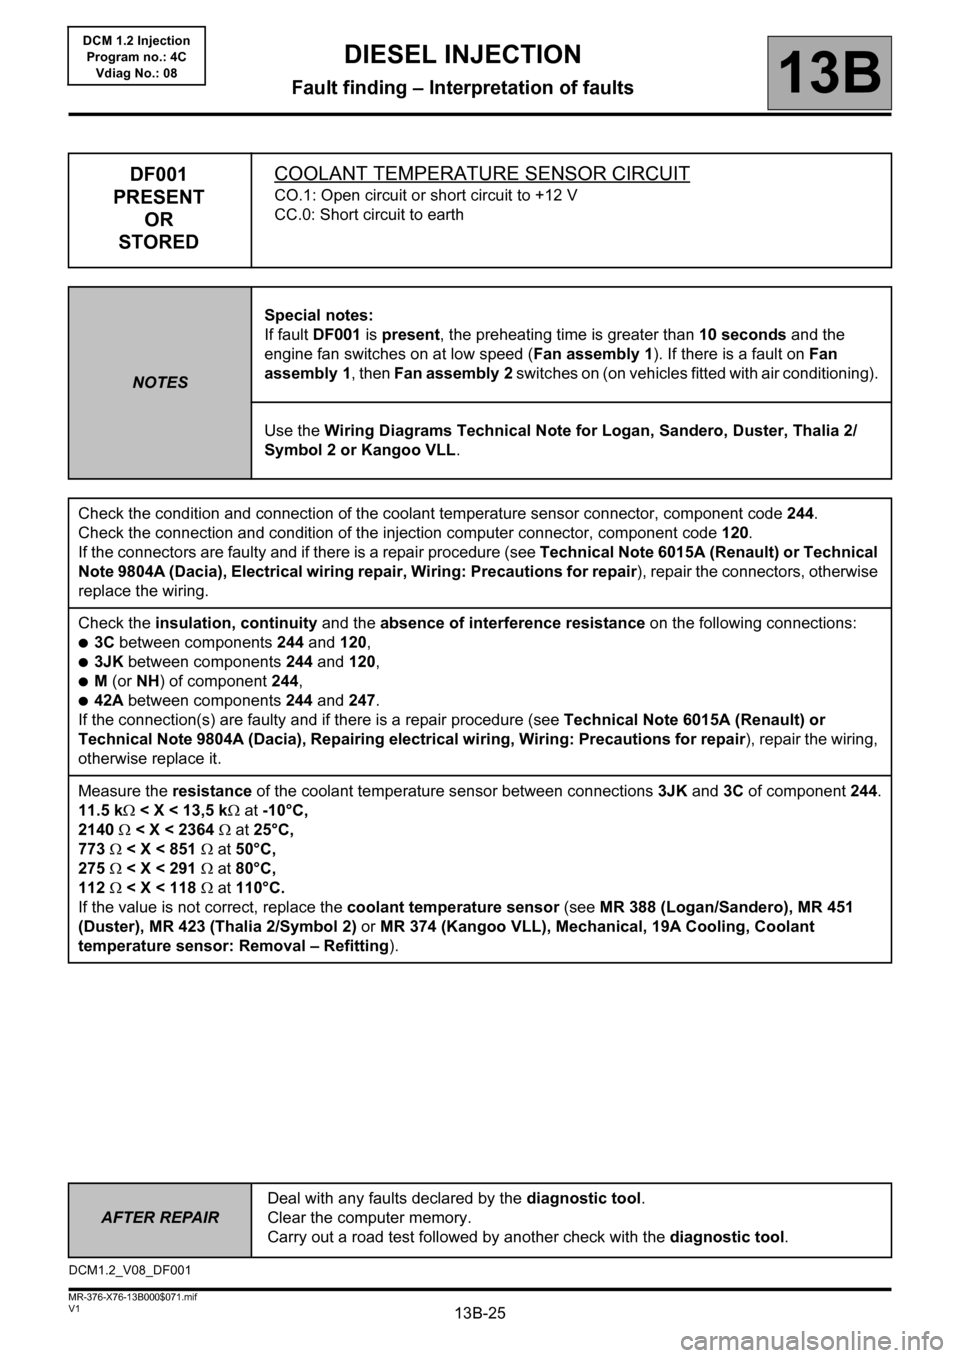
DF001
PRESENT
OR
STOREDCOOLANT TEMPERATURE SENSOR CIRCUIT
CO.1: Open circuit or short circuit to +12 V
CC.0: Short circuit to earth
NOTESSpecial notes:
If fault DF001 is present, the preheating time is greater than 10 seconds and the
engine fan switches on at low speed (Fan assembly 1). If there is a fault on Fan
assembly 1, then Fan assembly 2 switches on (on vehicles fitted with air conditioning).
Use the Wiring Diagrams Technical Note for Logan, Sandero, Duster, Thalia 2/
Symbol 2 or Kangoo VLL.
Check the condition and connection of the coolant temperature sensor connector, component code 244.
Check the connection and condition of the injection computer connector, component code 120.
If the connectors are faulty and if there is a repair procedure (see Technical Note 6015A (Renault) or Technical
Note 9804A (Dacia), Electrical wiring repair, Wiring: Precautions for repair), repair the connectors, otherwise
replace the wiring.
Check the insulation, continuity and the absence of interference resistance on the following connections:
●3C between components 244 and 120,
●3JK between components 244 and 120,
●M (or NH) of component 244,
●42A between components 244 and 247.
If the connection(s) are faulty and if there is a repair procedure (see Technical Note 6015A (Renault) or
Technical Note 9804A (Dacia), Repairing electrical wiring, Wiring: Precautions for repair), repair the wiring,
otherwise replace it.
Measure the resistance of the coolant temperature sensor between connections 3JK and 3C of component 244.
11.5 k < X < 13,5 k at -10°C,
2140 < X < 2364 at 25°C,
773 < X < 851 at 50°C,
275 < X < 291 at 80°C,
112 < X < 118 at 110°C.
If the value is not correct, replace the coolant temperature sensor (see MR 388 (Logan/Sandero), MR 451
(Duster), MR 423 (Thalia 2/Symbol 2) or MR 374 (Kangoo VLL), Mechanical, 19A Cooling, Coolant
temperature sensor: Removal – Refitting).
DCM1.2_V08_DF001
DIESEL INJECTION
Fault finding – Interpretation of faults
Page 29 of 204
13B-29
AFTER REPAIRDeal with any faults declared by the diagnostic tool.
Clear the computer memory.
Carry out a road test followed by another check with the diagnostic tool.
V1 MR-376-X76-13B000$071.mif
DIESEL INJECTION
Fault finding – Interpretation of faults13B
DCM 1.2 Injection
Program no.: 4C
Vdiag No.: 08
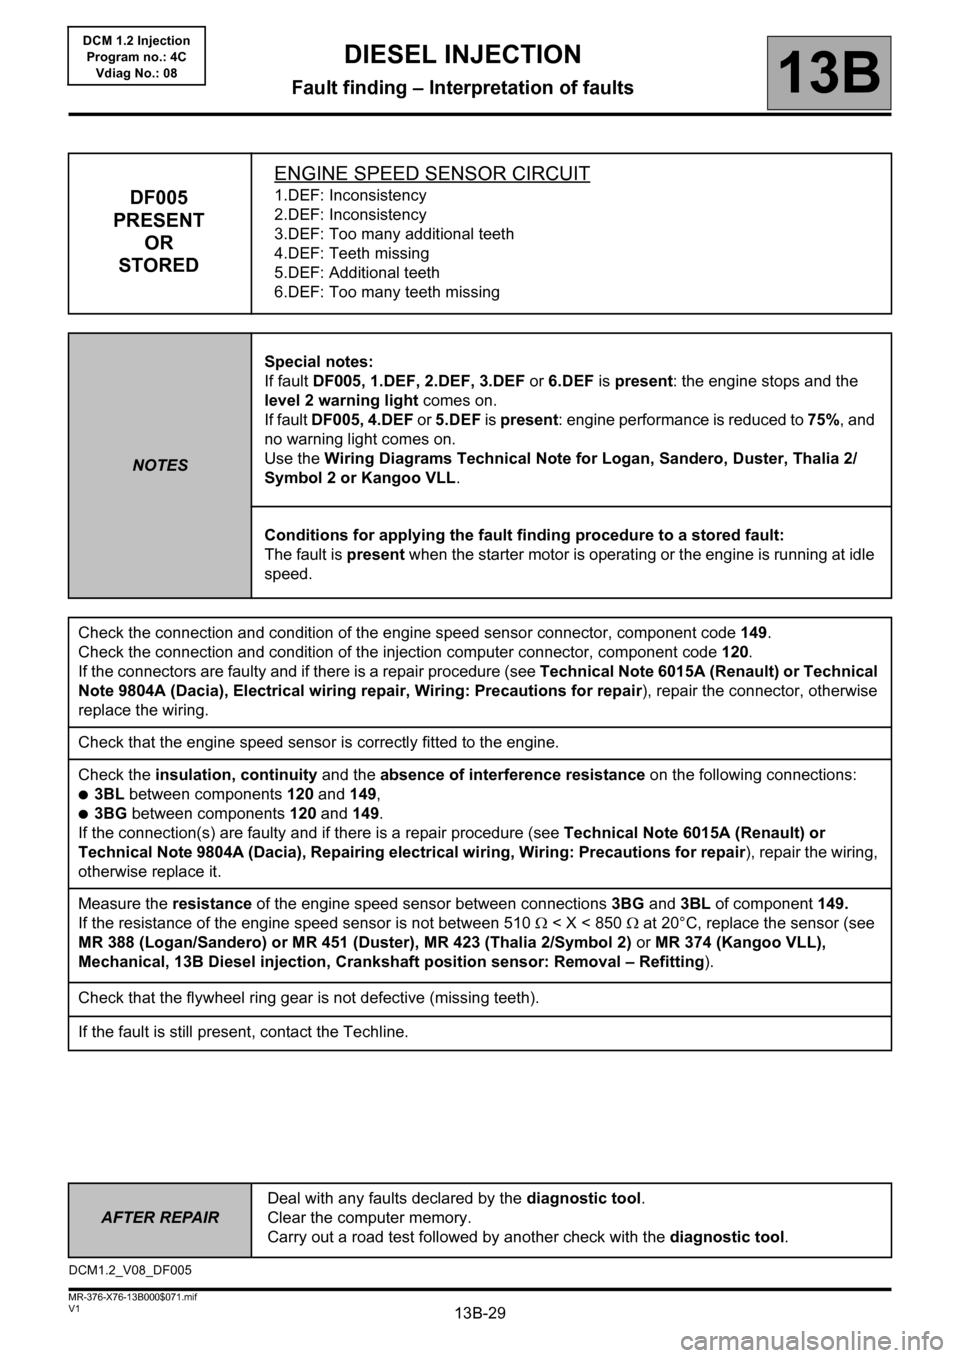
DF005
PRESENT
OR
STOREDENGINE SPEED SENSOR CIRCUIT1.DEF: Inconsistency
2.DEF: Inconsistency
3.DEF: Too many additional teeth
4.DEF: Teeth missing
5.DEF: Additional teeth
6.DEF: Too many teeth missing
NOTESSpecial notes:
If fault DF005, 1.DEF, 2.DEF, 3.DEF or 6.DEF is present: the engine stops and the
level 2 warning light comes on.
If fault DF005, 4.DEF or 5.DEF is present: engine performance is reduced to 75%, and
no warning light comes on.
Use the Wiring Diagrams Technical Note for Logan, Sandero, Duster, Thalia 2/
Symbol 2 or Kangoo VLL.
Conditions for applying the fault finding procedure to a stored fault:
The fault is present when the starter motor is operating or the engine is running at idle
speed.
Check the connection and condition of the engine speed sensor connector, component code 149.
Check the connection and condition of the injection computer connector, component code 120.
If the connectors are faulty and if there is a repair procedure (see Technical Note 6015A (Renault) or Technical
Note 9804A (Dacia), Electrical wiring repair, Wiring: Precautions for repair), repair the connector, otherwise
replace the wiring.
Check that the engine speed sensor is correctly fitted to the engine.
Check the insulation, continuity and the absence of interference resistance on the following connections:
●3BL between components 120 and 149,
●3BG between components 120 and 149.
If the connection(s) are faulty and if there is a repair procedure (see Technical Note 6015A (Renault) or
Technical Note 9804A (Dacia), Repairing electrical wiring, Wiring: Precautions for repair), repair the wiring,
otherwise replace it.
Measure the resistance of the engine speed sensor between connections 3BG and 3BL of component 149.
If the resistance of the engine speed sensor is not between 510 < X < 850 at 20°C, replace the sensor (see
MR 388 (Logan/Sandero) or MR 451 (Duster), MR 423 (Thalia 2/Symbol 2) or MR 374 (Kangoo VLL),
Mechanical, 13B Diesel injection, Crankshaft position sensor: Removal – Refitting).
Check that the flywheel ring gear is not defective (missing teeth).
If the fault is still present, contact the Techline.
DCM1.2_V08_DF005