instrument panel RENAULT KOLEOS 2012 1.G User Guide
[x] Cancel search | Manufacturer: RENAULT, Model Year: 2012, Model line: KOLEOS, Model: RENAULT KOLEOS 2012 1.GPages: 233, PDF Size: 7.81 MB
Page 50 of 233
instrument panel ................................... (up to the end of the DU)
warning lights ........................................ (up to the end of the DU)
driver’s position .................................... (up to the end of the DU)
trip computer and warning system ........(up to the end of the DU)
indicators: instrument panel ............................. (up to the end of the DU)
display .................................................. (up to the end of the DU)
1.44
ENG_UD23307_5
Témoins lumineux (X45 - H45 - Renault)
ENG_NU_977-2_H45_Ph2_Renault_1
Jaune NoirNoir texte
Warning lights
WARNINg LIghTs (1/4)
åAir bag warning light
This comes on when the igni -
tion is switched on and goes out after a
few seconds. If it does not light up when
the ignition is switched on, or if it lights
up when the engine is running, it indi -
cates a fault in the system. Contact an
authorised dealer as soon as possible.
Îc ruise control/speed limiter
indicator lights
Refer to the information on the “Cruise
control/Speed limiter” in Section 2.
ðh eating passenger seat op -
erating indicator light
This indicates that the front passen -
ger’s heated seat is on.
ÄToxic fume filter system
Warning Light
This lights up when the ignition is
switched on and goes out when the
engine is started.
– If it comes on continuously, consult
your authorised dealer as soon as
possible.
– If it flashes, reduce the engine speed
until the light stops flashing. Contact
your approved Dealer as soon as
possible.
R e f e r t o t h e i n f o r m a t i o n o n
“Antipollution, fuel economy and driv -
ing” in Section 2.
If no lights or sounds are ap-
parent, this indicates a fault
in the instrument panel. This
indicates that it is essential
to stop immediately (as soon as traf-
fic conditions allow). Ensure that the
vehicle is correctly immobilised and
contact an approved Dealer.
The warning light © means
you should drive very carefully to
an authorised dealer as soon as
possible. If you fail to follow this rec-
ommendation, you risk damaging
your vehicle.
Warning light ® re -
quires you to stop immedi -
ately, for your own safety,
as soon as traffic conditions allow.
Switch off the engine and do not re-
start it. Contact an approved Dealer.
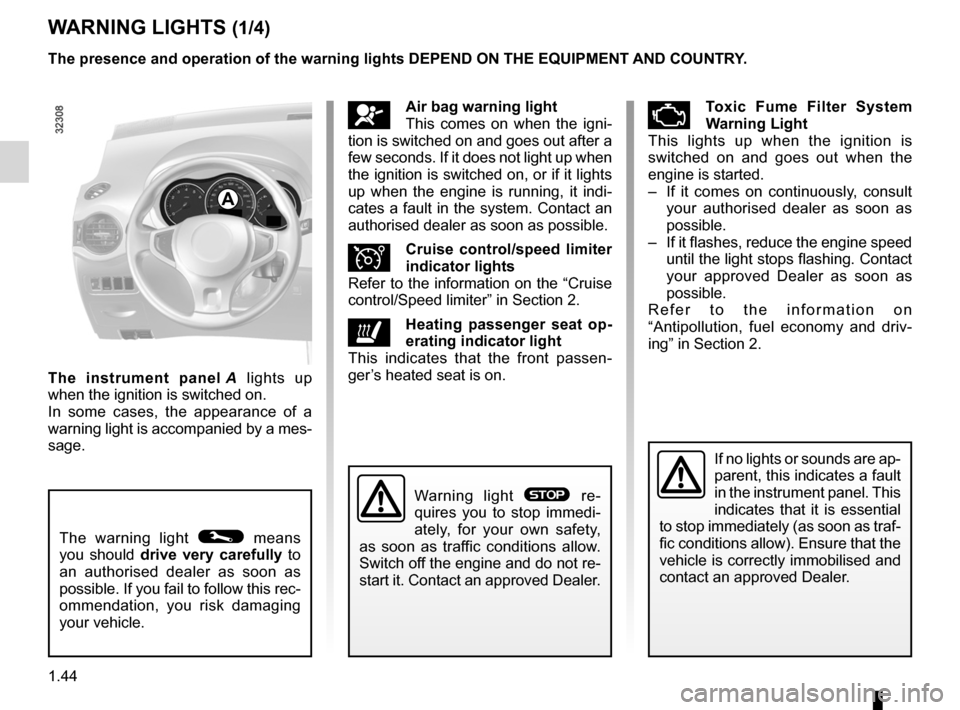
The instrument panel A lights up
when the ignition is switched on.
In some cases, the appearance of a
warning light is accompanied by a mes-
sage. The presence and operation of the warning lights dEpENd ON ThE EQUIpMENT ANd cOUNTRY.
A
Page 51 of 233
JauneNoirNoir texte
1.45
ENG_UD23307_5
Témoins lumineux (X45 - H45 - Renault)
ENG_NU_977-2_H45_Ph2_Renault_1
W ARNINg LIghTs (2/4)
ÚBattery charge warning light
If the light comes on accompa -
nied by the
® warning light, this in-
dicates that the electrical circuit is over-
charged or undercharged.
ÀOil pressure warning light
If it comes on when you are
driving accompanied by the
®
warning light and a beep, it is essential
to stop and switch off the ignition.
Check the oil level (refer to the informa-
tion on the “Engine oil level” in Section
4). If the level is normal, the light has
come on for another reason: contact an
authorised dealer.
A
®sTOp light
This lights up when the ignition
is switched on and goes out as soon as
the engine is started. It comes on with
other warning lights and/or messages,
and is accompanied by a beep.
It requires you to stop immediately, for
your own safety, as soon as traffic con-
ditions allow. Switch off the engine and
do not restart it.
Contact an approved Dealer.
DElectronic parking brake
and brake circuit fault warn-
ing light
If it lights up while braking, accompa -
nied by the
® warning light, this in-
dicates a low level in one of the circuits
or a fault in the braking system.
Stop as soon as traffic conditions allow
and contact an authorised dealer.©Warning light
This lights up when the ignition
is switched on and goes out as soon as
the engine is started. It can light up in
conjunction with other indicator lights
and/or messages on the instrument
panel.
It means you should drive very care-
fully to an authorised dealer as soon
as possible. If you fail to follow this rec-
ommendation, you risk damaging your
vehicle. The presence and operation of the warning lights dEpENd ON ThE EQUIpMENT ANd cOUNTRY.
Page 54 of 233
control instruments ............................... (up to the end of the DU)
indicators: instrument panel ............................. (up to the end of the DU)
display .................................................. (up to the end of the DU)
instrument panel ................................... (up to the end of the DU)
coolant ................................................................... (current page)
fuel level ................................................................ (current page)
1.48
ENG_UD23488_3
Tableau de bord : afficheurs et indicateurs (X45 - H45 - Renault)
ENG_NU_977-2_H45_Ph2_Renault_1
Jaune NoirNoir texte
Instrument panel
INsTRUMENT p ANEL: displays and indicators (1/2)
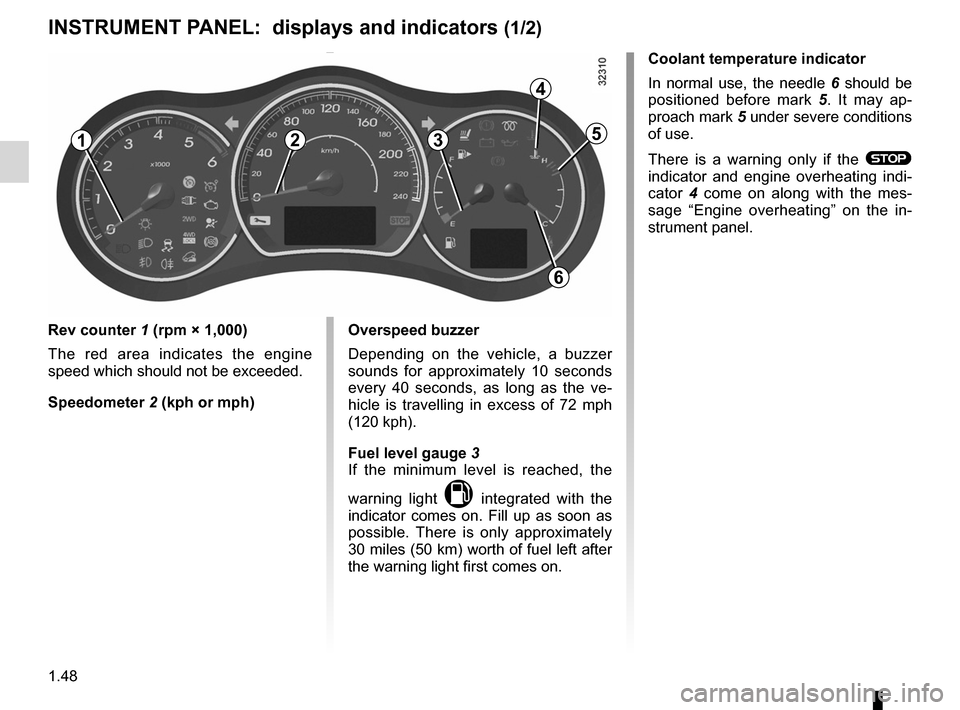
Rev counter 1 (rpm × 1,000)
The red area indicates the engine
speed which should not be exceeded.
speedometer 2 (kph or mph) Overspeed buzzer
Depending on the vehicle, a buzzer
sounds for approximately 10 seconds
every 40 seconds, as long as the ve
-
hicle is travelling in excess of 72 mph
(120 kph).
fuel level gauge 3
If the minimum level is reached, the
warning light
M integrated with the
indicator comes on. Fill up as soon as
possible. There is only approximately
30 miles (50 km) worth of fuel left after
the warning light first comes on. coolant temperature indicator
In normal use, the needle
6 should be
positioned before mark 5 . It may ap -
proach mark 5 under severe conditions
of use.
There is a warning only if the
® indicator and engine overheating indi -
cator 4 come on along with the mes -
sage “ Engine overheating ” on the in-
strument panel.
123
4
5
6
Page 56 of 233
control instruments ............................... (up to the end of the DU)
trip computer and warning system ........(up to the end of the DU)
indicators: instrument panel ............................. (up to the end of the DU)
instrument panel ................................... (up to the end of the DU)
warning lights ........................................ (up to the end of the DU)
1.50
ENG_UD27277_8
Ordinateur de bord (X45 - H45 - Renault)
ENG_NU_977-2_H45_Ph2_Renault_1
Jaune NoirNoir texte
trip computer and warning system
TRIp cOMpUTER ANd WARNINg sYsTEM (1/10)
c) mileage before service;
d) programmed speed (speed limiter/
cruise control);
e) trip log, operating faults and informa-
tion message readout.
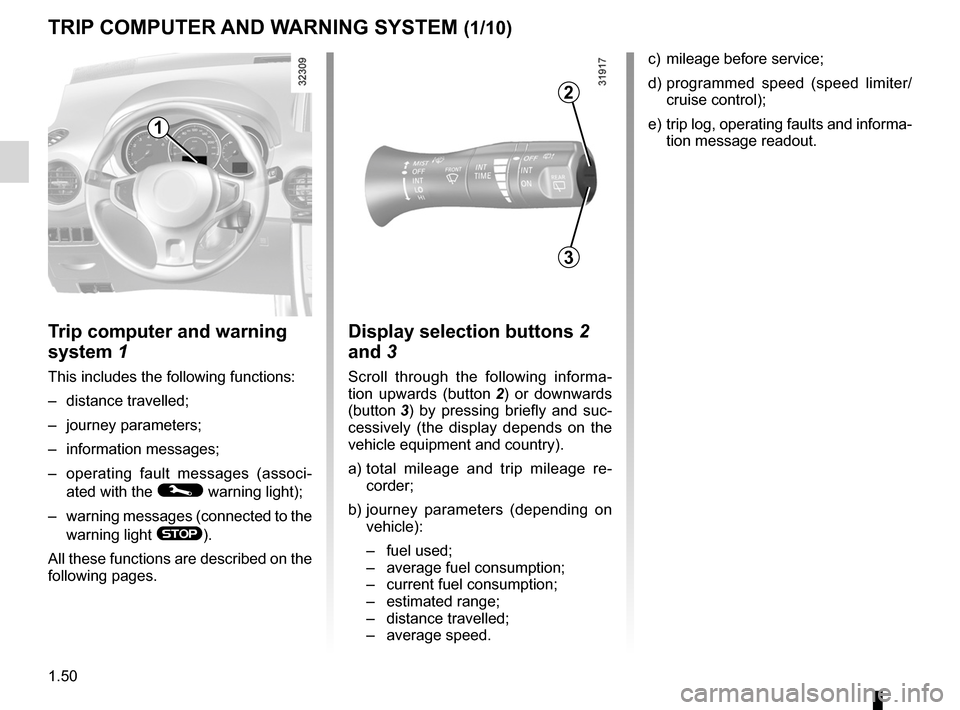
Trip computer and warning
system 1
This includes the following functions:
– distance travelled;
– journey parameters;
– information messages;
– operating fault messages (associ -
ated with the
© warning light);
– warning messages (connected to the
warning light
®).
All these functions are described on the
following pages.
display selection buttons 2
and 3
Scroll through the following informa -
tion upwards (button 2 ) or downwards
(button 3 ) by pressing briefly and suc -
cessively (the display depends on the
vehicle equipment and country).
a) total mileage and trip mileage re -
corder;
b) journey parameters (depending on
vehicle):
– fuel used;
– average fuel consumption;
– current fuel consumption;
– estimated range;
– distance travelled;
– average speed.
3
2
1
Page 58 of 233
instrument panel messages..................(up to the end of the DU)
1.52
ENG_UD27277_8
Ordinateur de bord (X45 - H45 - Renault)
ENG_NU_977-2_H45_Ph2_Renault_1
Jaune NoirNoir texte
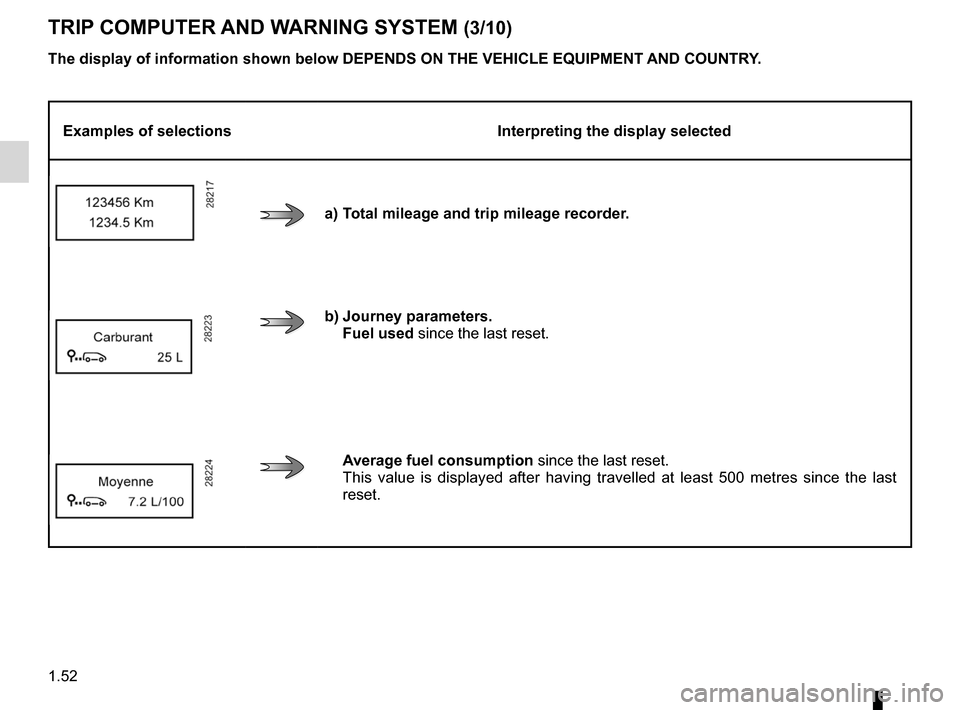
TRIp cOMpUTER ANd WARNINg sYsTEM (3/10)
The display of information shown below dEpENds ON ThE vEhIcLE EQUIpMENT ANd cOUNTRY.
Examples of selections Interpreting the display selected
a) Total mileage and trip mileage recorder.
b) Journey parameters.
fuel used since the last reset.
Average fuel consumption since the last reset.
This value is displayed after having travelled at least 500 metres since the last
reset.
Page 66 of 233
steering wheeladjustment ...................................... (up to the end of the DU)
power-assisted steering ........................(up to the end of the DU)
power-assisted steering ........................(up to the end of the DU)
1.60
ENG_UD27278_4
Volant de direction/Direction assist e (X45 - H45 - Renault)
ENG_NU_977-2_H45_Ph2_Renault_1
Operating faults
–
If the message “Check power steer-
ing ” is displayed on the instrument
panel accompanied by the
©
warning light, consult an authorised
dealer straight away.
–
If the message "Power steering fault"
is displayed on the instrument panel
and the warning light
® comes
on, stop the vehicle as soon as pos-
sible and contact an authorised
dealer.
Steering wheel
Power-assisted steering
sTEERINg WhEEL/pOWER-AssIsTEd sTEERINg
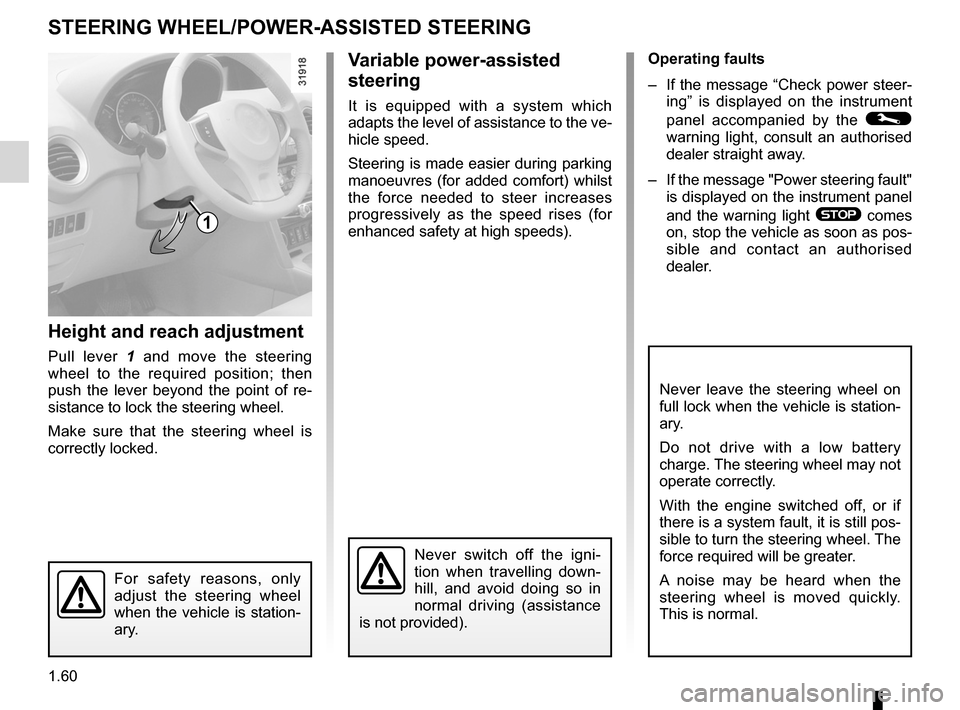
height and reach adjustment
Pull lever 1 and move the steering
wheel to the required position; then
push the lever beyond the point of re -
sistance to lock the steering wheel.
Make sure that the steering wheel is
correctly locked.
For safety reasons, only
adjust the steering wheel
when the vehicle is station-
ary.
Never switch off the igni -
tion when travelling down -
hill, and avoid doing so in
normal driving (assistance
is not provided).
1
v ariable power-assisted
steering
It is equipped with a system which
adapts the level of assistance to the ve-
hicle speed.
Steering is made easier during parking
manoeuvres (for added comfort) whilst
the force needed to steer increases
progressively as the speed rises (for
enhanced safety at high speeds).
Never leave the steering wheel on
full lock when the vehicle is station-
ary.
Do not drive with a low battery
charge. The steering wheel may not
operate correctly.
With the engine switched off, or if
there is a system fault, it is still pos-
sible to turn the steering wheel. The
force required will be greater.
A noise may be heard when the
steering wheel is moved quickly.
This is normal.
Page 69 of 233
lighting:exterior ............................................ (up to the end of the DU)
instrument panel ................................... (up to the end of the DU)
lights: side lights ........................................ (up to the end of the DU)
lights: dipped beam headlights .................. (up to the end of the DU)
hazard warning lights signal ................. (up to the end of the DU)
signals and lights .................................. (up to the end of the DU)
lighting: instrument panel ............................. (up to the end of the DU)
1.63
ENG_UD23490_3
Eclairages et signalisations extérieures (X45 - H45 - Renault)
ENG_NU_977-2_H45_Ph2_Renault_1
Exterior lighting and signals
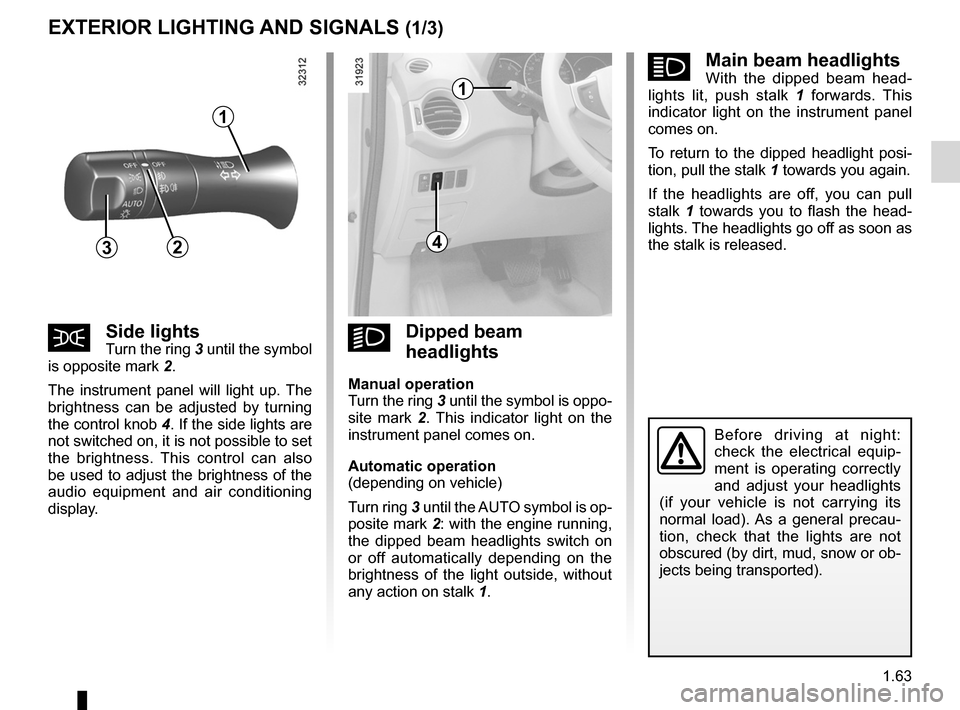
EXTERIOR LIghTINg ANd sIgNALs (1/3)
kdipped beam
headlights
Manual operation
Turn the ring 3 until the symbol is oppo -
site mark 2 . This indicator light on the
instrument panel comes on.
Automatic operation
(depending on vehicle)
Turn ring 3 until the AUTO symbol is op-
posite mark 2: with the engine running,
the dipped beam headlights switch on
or off automatically depending on the
brightness of the light outside, without
any action on stalk 1.
šside lightsTurn the ring 3 until the symbol
is opposite mark 2.
The instrument panel will light up. The
brightness can be adjusted by turning
the control knob 4. If the side lights are
not switched on, it is not possible to set
the brightness. This control can also
be used to adjust the brightness of the
audio equipment and air conditioning
display.
áMain beam headlightsWith the dipped beam head -
lights lit, push stalk 1 forwards. This
indicator light on the instrument panel
comes on.
To return to the dipped headlight posi-
tion, pull the stalk 1 towards you again.
If the headlights are off, you can pull
stalk 1 towards you to flash the head -
lights. The headlights go off as soon as
the stalk is released.
Before driving at night:
check the electrical equip -
ment is operating correctly
and adjust your headlights
(if your vehicle is not carrying its
normal load). As a general precau -
tion, check that the lights are not
obscured (by dirt, mud, snow or ob-
jects being transported).
1
432
1
Page 71 of 233
lights:fog lights .......................................................... (current page)
JauneNoirNoir texte
1.65
ENG_UD23490_3
Eclairages et signalisations extérieures (X45 - H45 - Renault)
ENG_NU_977-2_H45_Ph2_Renault_1
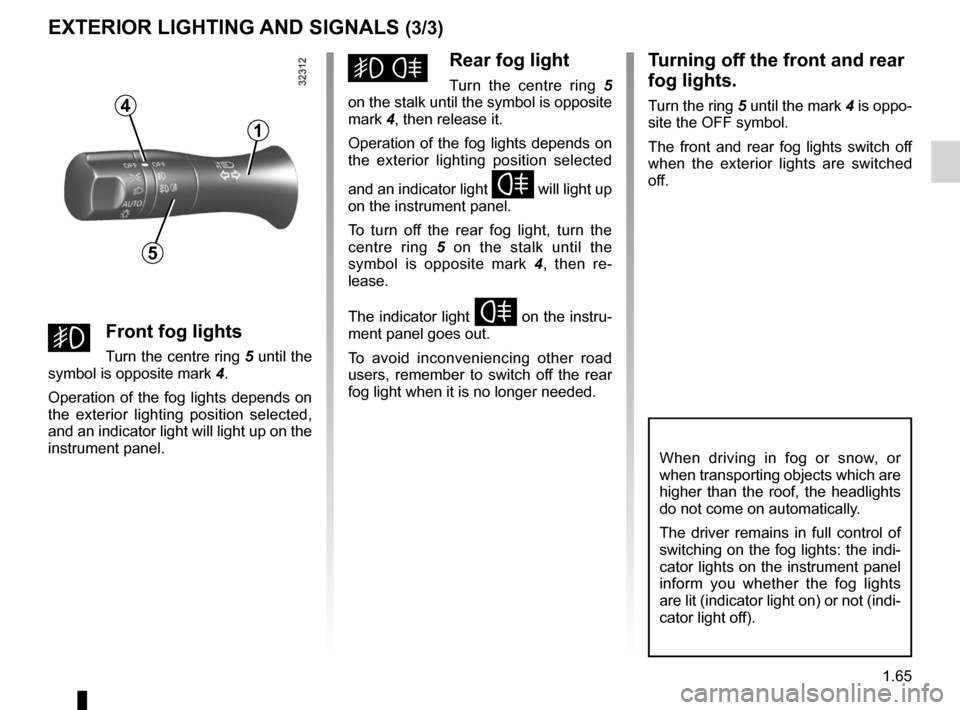
EXTERIOR LIghTINg ANd sIgNALs (3/3)
gfront fog lights
Turn the centre ring 5 until the
symbol is opposite mark 4.
Operation of the fog lights depends on
the exterior lighting position selected,
and an indicator light will light up on the
instrument panel.
hRear fog light
Turn the centre ring 5
on the stalk until the symbol is opposite
mark 4, then release it.
Operation of the fog lights depends on
the exterior lighting position selected
and an indicator light
f will light up
on the instrument panel.
To turn off the rear fog light, turn the
centre ring 5 on the stalk until the
symbol is opposite mark 4 , then re -
lease.
The indicator light
f on the instru-
ment panel goes out.
To avoid inconveniencing other road
users, remember to switch off the rear
fog light when it is no longer needed.
Turning off the front and rear
fog lights.
Turn the ring 5 until the mark 4 is oppo-
site the OFF symbol.
The front and rear fog lights switch off
when the exterior lights are switched
off.
When driving in fog or snow, or
when transporting objects which are
higher than the roof, the headlights
do not come on automatically.
The driver remains in full control of
switching on the fog lights: the indi-
cator lights on the instrument panel
inform you whether the fog lights
are lit (indicator light on) or not (indi-
cator light off).
4
1
5
Page 81 of 233
starting the engine ................................ (up to the end of the DU)
driving ................................................... (up to the end of the DU)
engine start/stop button ........................ (up to the end of the DU)
starting the engine ................................ (up to the end of the DU)
2.3
ENG_UD27279_4
D marrage du moteur (X45 - H45 - obsol te - Renault)
ENG_NU_977-2_H45_Ph2_Renault_2
Starting the engine
STARTING THE ENGINE (1/2)
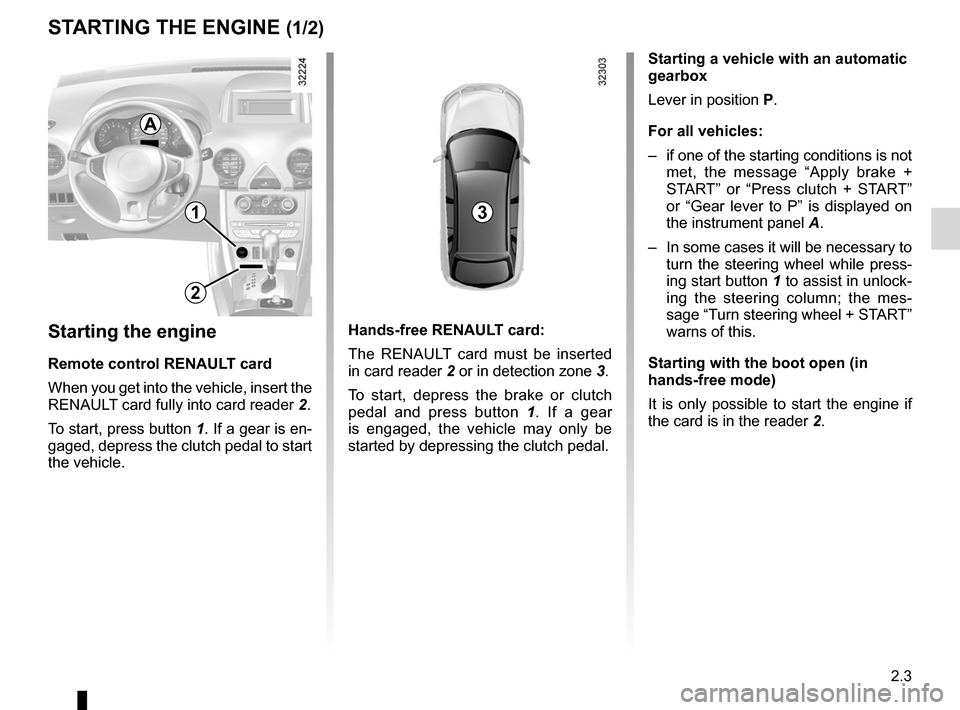
1
2
3
Starting the engine
Remote control RENAULT card
When you get into the vehicle, insert the
RENAULT card fully into card reader 2.
To start, press button 1. If a gear is en-
gaged, depress the clutch pedal to start
the vehicle. Hands-free RENAULT card:
The RENAULT card must be inserted
in card reader
2 or in detection zone 3.
To start, depress the brake or clutch
pedal and press button 1 . If a gear
is engaged, the vehicle may only be
started by depressing the clutch pedal. Starting a vehicle with an automatic
gearbox
Lever in position
P.
For all vehicles:
– if one of the starting conditions is not
met, the message “ Apply brake +
START ” or “Press clutch + START ”
or “ Gear lever to P ” is displayed on
the instrument panel A.
– In some cases it will be necessary to
turn the steering wheel while press-
ing start button 1 to assist in unlock-
ing the steering column; the mes -
sage “Turn steering wheel + START”
warns of this.
Starting with the boot open (in
hands-free mode)
It is only possible to start the engine if
the card is in the reader 2.
A
Page 82 of 233
2.4
ENG_UD27279_4
D marrage du moteur (X45 - H45 - obsol te - Renault)
ENG_NU_977-2_H45_Ph2_Renault_2
STARTING THE ENGINE (2/2)
Accessories function(Switching on the ignition)
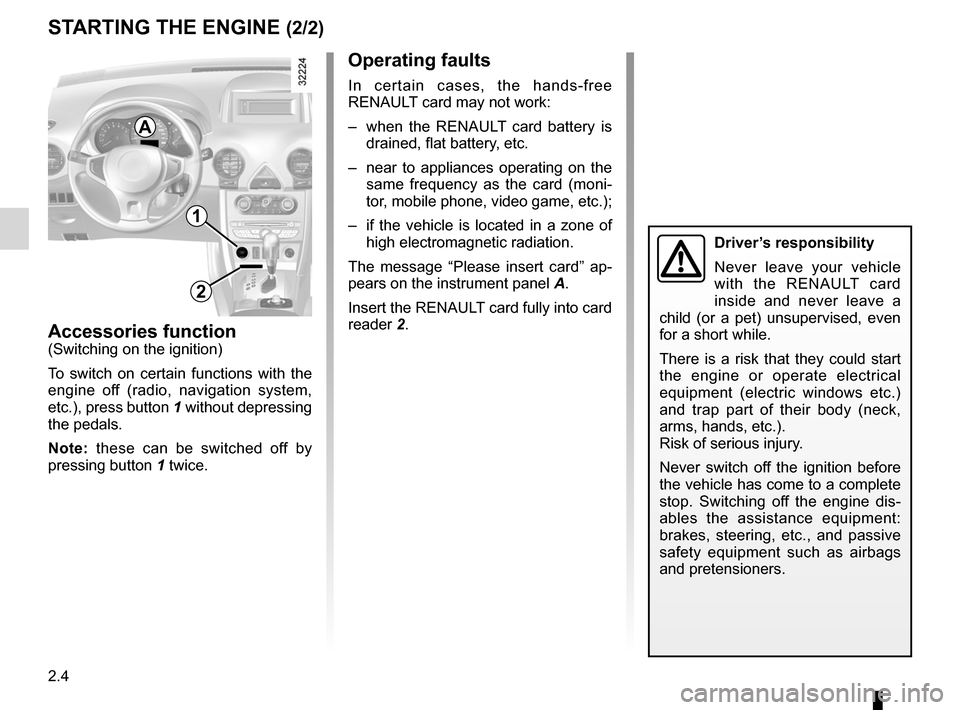
To switch on certain functions with the
engine off (radio, navigation system,
etc.), press button 1 without depressing
the pedals.
Note: these can be switched off by
pressing button 1 twice.
1
2
Operating faults
In certain cases, the hands-free
RENAULT card may not work:
– when the RENAULT card battery is
drained, flat battery, etc.
– near to appliances operating on the
same frequency as the card (moni -
tor, mobile phone, video game, etc.);
– if the vehicle is located in a zone of
high electromagnetic radiation.
The message “ Please insert card ” ap-
pears on the instrument panel A.
Insert the RENAULT card fully into card
reader 2.
A
Driver’s responsibility
Never leave your vehicle
with the RENAULT card
inside and never leave a
child (or a pet) unsupervised, even
for a short while.
There is a risk that they could start
the engine or operate electrical
equipment (electric windows etc.)
and trap part of their body (neck,
arms, hands, etc.).
Risk of serious injury.
Never switch off the ignition before
the vehicle has come to a complete
stop. Switching off the engine dis -
ables the assistance equipment:
brakes, steering, etc., and passive
safety equipment such as airbags
and pretensioners.