instrument panel RENAULT KOLEOS 2012 1.G Service Manual
[x] Cancel search | Manufacturer: RENAULT, Model Year: 2012, Model line: KOLEOS, Model: RENAULT KOLEOS 2012 1.GPages: 233, PDF Size: 7.81 MB
Page 113 of 233
JauneNoirNoir texte
2.35
ENG_UD23498_5
Régulateur-limiteur de vitesse : fonction régulateur (X45 - H45 - Renault)
ENG_NU_977-2_H45_Ph2_Renault_2
CRUISE CONTROL, SPEED LIMITER: cruise control function (4/4)
Putting the function on
standby
The function is suspended when you:
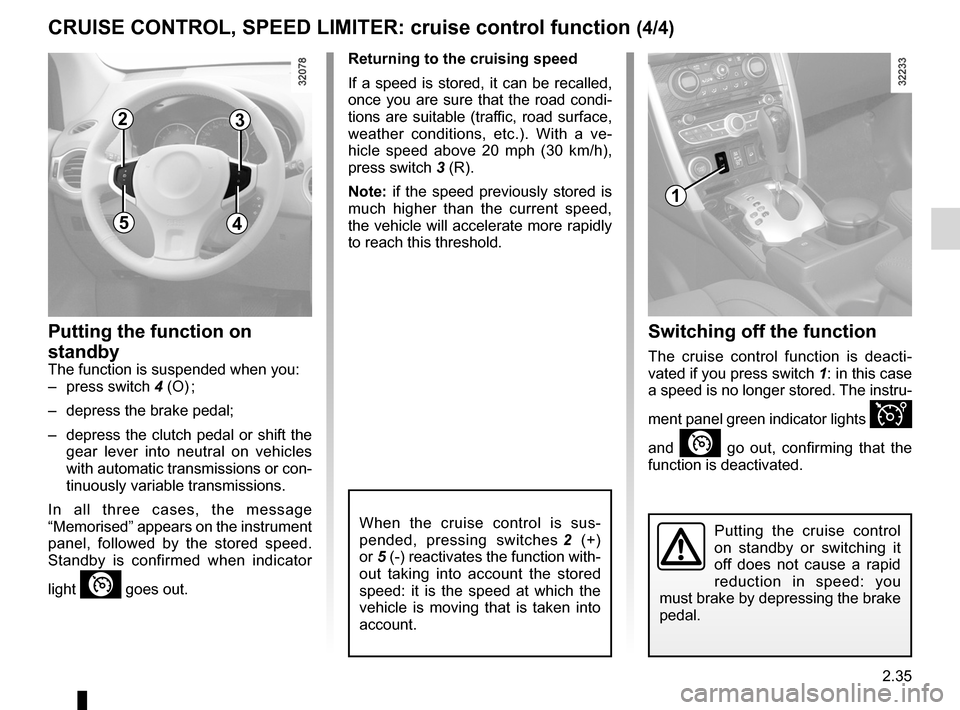
– press switch 4 (O) ;
– depress the brake pedal;
– depress the clutch pedal or shift the
gear lever into neutral on vehicles
with automatic transmissions or con-
tinuously variable transmissions.
In all three cases, the message
“Memorised ” appears on the instrument
panel, followed by the stored speed.
Standby is confirmed when indicator
light
” goes out.
Returning to the cruising speed
If a speed is stored, it can be recalled,
once you are sure that the road condi -
tions are suitable (traffic, road surface,
weather conditions, etc.). With a ve -
hicle speed above 20 mph (30 km/h),
press switch 3 (R).
Note: if the speed previously stored is
much higher than the current speed,
the vehicle will accelerate more rapidly
to reach this threshold.
When the cruise control is sus -
pended, pressing switches 2 (+)
or 5 (-) reactivates the function with-
out taking into account the stored
speed: it is the speed at which the
vehicle is moving that is taken into
account.
Switching off the function
The cruise control function is deacti -
vated if you press switch 1: in this case
a speed is no longer stored. The instru-
ment panel green indicator lights
Î
and
” go out, confirming that the
function is deactivated.
Putting the cruise control
on standby or switching it
off does not cause a rapid
reduction in speed: you
must brake by depressing the brake
pedal.
1
23
45
Page 116 of 233
2.38
ENG_UD27281_8
Aide au parking (X45 - H45 - Renault)
ENG_NU_977-2_H45_Ph2_Renault_2
Temporary activation/deactivation
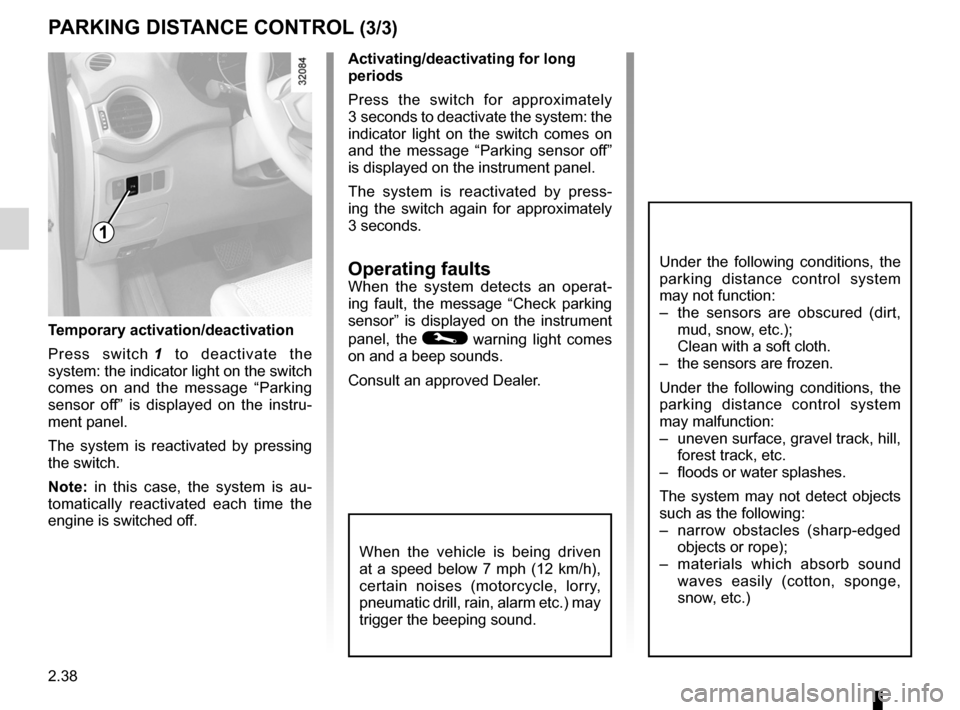
Press switch 1 to deactivate the
system: the indicator light on the switch
comes on and the message “ Parking
sensor off ” is displayed on the instru -
ment panel.
The system is reactivated by pressing
the switch.
Note: in this case, the system is au -
tomatically reactivated each time the
engine is switched off.
1
Activating/deactivating for long
periods
Press the switch for approximately
3 seconds to deactivate the system: the
indicator light on the switch comes on
and the message “ Parking sensor off”
is displayed on the instrument panel.
The system is reactivated by press -
ing the switch again for approximately
3 seconds.
Operating faultsWhen the system detects an operat -
ing fault, the message “ Check parking
sensor ” is displayed on the instrument
panel, the
© warning light comes
on and a beep sounds.
Consult an approved Dealer.
When the vehicle is being driven
at a speed below 7 mph (12 km/h),
certain noises (motorcycle, lorry,
pneumatic drill, rain, alarm etc.) may
trigger the beeping sound.
PARKING DISTANCE CONTROL (3/3)
Under the following conditions, the
parking distance control system
may not function:
– the sensors are obscured (dirt,
mud, snow, etc.);
Clean with a soft cloth.
– the sensors are frozen.
Under the following conditions, the
parking distance control system
may malfunction:
– uneven surface, gravel track, hill,
forest track, etc.
– floods or water splashes.
The system may not detect objects
such as the following:
– narrow obstacles (sharp-edged
objects or rope);
– materials which absorb sound
waves easily (cotton, sponge,
snow, etc.)
Page 117 of 233

automatic gearbox (use) ....................... (up to the end of the DU)
automatic gearbox selector lever ..........(up to the end of the DU)
driving ................................................... (up to the end of the DU)
reverse gear selecting .......................................... (up to the end of the DU)
changing gear ....................................... (up to the end of the DU)
continuous variation ..............................(up to the end of the DU)
continuously variable transmission ....... (up to the end of the DU)
2.39
ENG_UD27292_7
Bo tes de vitesses automatiques ou variation continue (X45 - H45 - Renault)
ENG_NU_977-2_H45_Ph2_Renault_2
Automatic or continuously variable transmission
AUTOMATIC OR CONTINUOUSLY vARIABLE TRANSMISSION (1/3)
Depending on the vehicle, the vehicle is
either fitted with an automatic transmis-
sion, or a continuously variable trans -
mission.
Selector lever 2
Display A on the instrument panel
shows the mode and gear selected.
3: P: park
4: R: reverse gear
5: N: neutral
6: D: automatic mode
7: manual mode
8: zone displaying gearbox mode or
gear engaged in manual mode
1
2
8
3
6
5
4
7
Operation
N With the gear lever 2 in position P,
switch on the ignition.
To move out of position P, you must de-
press the brake pedal before pressing
the unlocking button 1.
With the foot on the brake pedal (warn-
ing light
c on display A goes out),
move the lever out of position P.
Only engage D or R when the vehi -
cle is stopped, with your foot on the
brake and the accelerator pedal re -
leased.
A
Driving in automatic mode
Select position D. In most traffic con -
ditions, you will not have to touch the
gear selector lever again: the gears will
change automatically at the right time
and at the most suitable engine speed
because the automatic system takes
into account the vehicle load and road
contour and adjusts itself to the particu-
lar driving style you have chosen.
Economical driving
When driving, always leave the lever
in position D, keeping the accelerator
pedal lightly depressed to ensure auto-
matic gear changes at a lower engine
speed.
Accelerating and overtaking
Depress the accelerator pedal firmly
and fully (so that it goes beyond the
kickdown point).
This will enable you to change down
to the optimum gear within the
engine range.
Page 118 of 233
2.40
ENG_UD27292_7
Bo tes de vitesses automatiques ou variation continue (X45 - H45 - Renault)
ENG_NU_977-2_H45_Ph2_Renault_2
Jaune NoirNoir texte
AUTOMATIC OR CONTINUOUSLY vARIABLE TRANSMISSION (2/3)
Driving in manual mode
With the selector lever in position D,
move the lever to the left. Shifting the
lever repeatedly allows you to change
gears manually:
– backwards to shift down the gears;
– forwards to shift up the gears.
The gear selected is displayed on the
instrument panel.
Special cases
Under certain driving conditions (e.g.
engine protection, or electronic stability
control (ESC) operational etc.) the au -
tomatic system may change gear auto-
matically.
Likewise, to prevent incorrect manoeu -
vres, a gear change may be refused by
the automatic system: in this case the
gear display flashes for a few seconds
as a warning.
Special circumstances
– If the bends and road surface do
not allow you to stay in automatic
mode (e.g. in the mountains), we
recommend that you change to
manual mode.
This will prevent repeated gear
changes when climbing and will
enable engine braking on long de -
scents.
– In very cold weather, to avoid stall-
ing the engine, start the engine and
wait a few seconds before moving
the lever from position P or N to po-
sition D or R.
– v ehicles not fitted with traction
control: to avoid wheelspin when
starting on a slippery or low grip sur-
face, change to manual mode and
select second gear before moving
off.
Parking the vehicle
When the vehicle is stopped, move the
lever to position P while keeping your
foot on the brake pedal: the gearbox is
in neutral and the drive wheels are me-
chanically locked by the driveshaft.
Depending on the vehicle, apply the
handbrake or check that the elec -
tronic parking brake is on (refer to
the information on the Parking brake in
Section 2).
In very cold weather, the system may prevent the gears from being shifted in
manual mode until the gearbox reaches the right temperature.
An impact to the under -
side of the vehicle while
manoeuvring (e.g.: strik -
ing a post, raised kerb or
other street furniture) may result in
damage to the vehicle (e.g.: defor -
mation of an axle).
To avoid any risk of accident, have
your vehicle checked by an ap -
proved Dealer.
Page 119 of 233
JauneNoirNoir texte
2.41
ENG_UD27292_7
Bo tes de vitesses automatiques ou variation continue (X45 - H45 - Renault)
ENG_NU_977-2_H45_Ph2_Renault_2
AUTOMATIC OR CONTINUOUSLY vARIABLE TRANSMISSION (3/3)
Operating faults
– when driving, if the “Check auto
gearbox ” message appears on the
instrument panel, it indicates a fault.
Contact your approved Dealer as
soon as possible.
– when driving , if the message “Auto
gearbox overheating ” appears on
the instrument panel, shift the gear
lever into position N, as soon as pos-
sible.
Contact your approved dealer as
soon as possible.
– If a vehicle with an automatic
gearbox breaks down , refer to the
information on “Towing” in Section 5.
Special note for vehicles equipped
with continuously variable
transmissions:
Under certain driving conditions at high
speeds, the gearbox may temporarily
limit the maximum engine speed. This
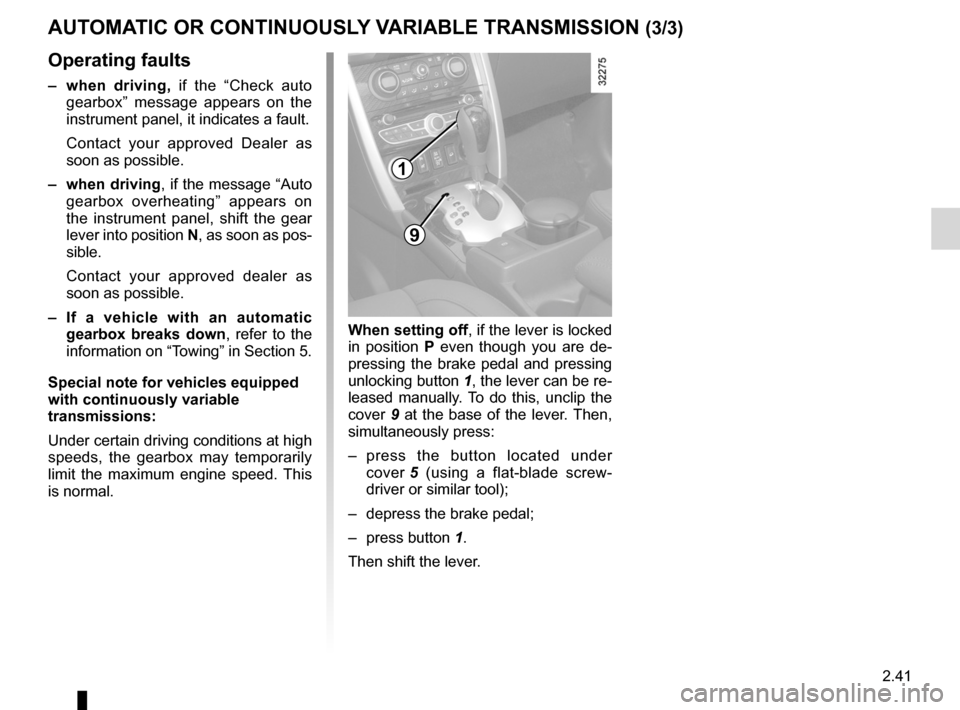
is normal. when setting off, if the lever is locked
in position
P even though you are de -
pressing the brake pedal and pressing
unlocking button 1, the lever can be re-
leased manually. To do this, unclip the
cover 9 at the base of the lever. Then,
simultaneously press:
– press the button located under
cover 5 (using a flat-blade screw -
driver or similar tool);
– depress the brake pedal;
– press button 1.
Then shift the lever.
9
1
Page 161 of 233
maintenance:mechanical ...................................... (up to the end of the DU)
4.3
ENG_UD27282_7
Niveau huile moteur : g n ralit s (X45 - H45 - Renault)
ENG_NU_977-2_H45_Ph2_Renault_4
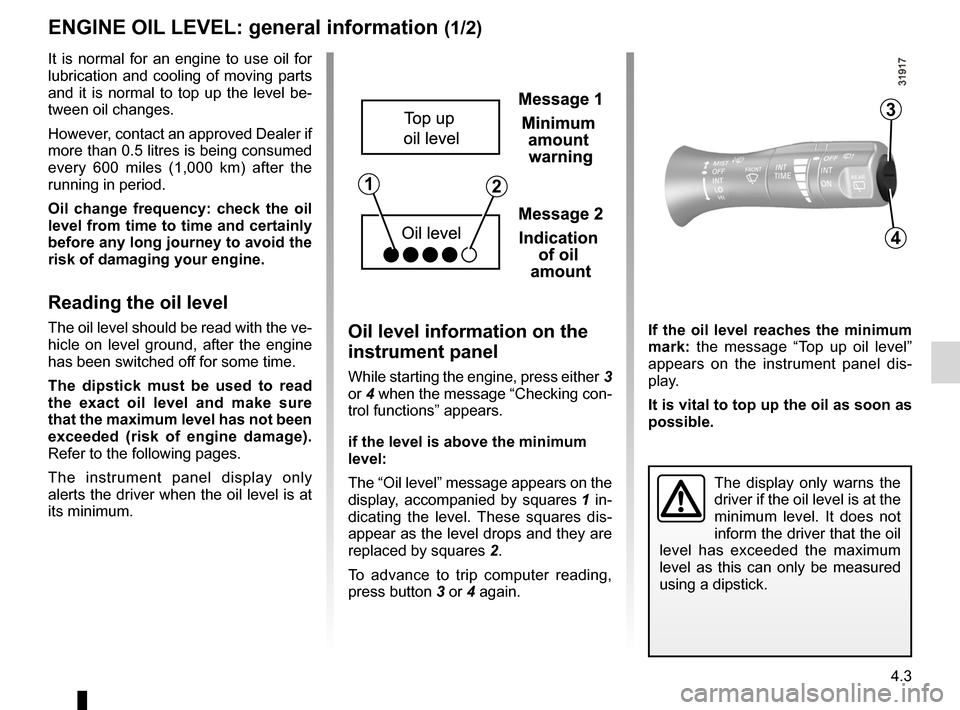
If the oil level reaches the minimum
mark: the message “ Top up oil level ”
appears on the instrument panel dis -
play.
It is vital to top up the oil as soon as
possible.
Engine oil level: general information
enGIne OIL LeVeL: general information (1/2)
The display only warns the
driver if the oil level is at the
minimum level. It does not
inform the driver that the oil
level has exceeded the maximum
level as this can only be measured
using a dipstick.
It is normal for an engine to use oil for
lubrication and cooling of moving parts
and it is normal to top up the level be-
tween oil changes.
However, contact an approved Dealer if
more than 0.5 litres is being consumed
every 600 miles (1,000 km) after the
running in period.
Oil change frequency: check the oil
level from time to time and certainly
before any long journey to avoid the
risk of damaging your engine.
Reading the oil level
The oil level should be read with the ve-
hicle on level ground, after the engine
has been switched off for some time.
t he dipstick must be used to read
the exact oil level and make sure
that the maximum level has not been
exceeded (risk of engine damage).
Refer to the following pages.
The instrument panel display only
alerts the driver when the oil level is at
its minimum.Oil level information on the
instrument panel
While starting the engine, press either 3
or 4 when the message “Checking con-
trol functions” appears.
if the level is above the minimum
level:
The “Oil level ” message appears on the
display, accompanied by squares 1 in -
dicating the level. These squares dis -
appear as the level drops and they are
replaced by squares 2.
To advance to trip computer reading,
press button 3 or 4 again.
12
3
4
Page 172 of 233
maintenance:interior trim ...................................... (up to the end of the DU)
interior trim maintenance ................................... (up to the end of the DU)
cleaning: inside the vehicle ............................ (up to the end of the DU)
4.14
ENG_UD22866_8
Entretien des garnitures intérieures (X35 - X45 - X65 - J77 - X81 - J81 - X85 - X91 - B91 - K91 - D91 - X83 - X61 - X77 ph2 - X95 - B95 - D95 - E95 - K95 - J95 - R95 -
ENG_NU_977-2_H45_Ph2_Renault_4
Jaune NoirNoir texte
Interior trim maintenance
Glass instrument panel(e.g. instrument panel, clock, exterior
temperature display, radio display, etc.)
Use a soft cloth (or cotton wool).
If this does not clean it properly, use a
soft cloth (or cotton wool) slightly mois-
tened with soapy water and then wipe
clean with a soft damp cloth or cotton
wool.
Finally, carefully dry off with a soft dry
cloth.
Cleaning products containing alco -
hol must not be used under any cir-
cumstances.
Seat belts
These must be kept clean.
Use products selected by our Technical
Department (Approved outlets) or
warm, soapy water and a sponge and
wipe with a dry cloth.
Detergents or dyes must not be used
under any circumstances.
InteRIOR tRIM MAIntenAnCe (1/2)
textiles (seats, door trim, etc)
Vacuum-clean the textiles regularly.
Liquid stain
Use soapy water.
Dab lightly (never rub) with a soft cloth,
rinse and remove the excess.
Solid or pasty stain
Carefully remove the excess solid or
pasty material immediately with a
spatula (working from the edges to the
centre to avoid spreading the stain).
Clean as for a liquid stain.
Special instructions for sweets or
chewing gum
Put an ice cube on the stain to solidify
it, then proceed as for a solid stain.
A well-maintained vehicle will last
longer. It is therefore recommended to
maintain the interior of the vehicle regu-
larly.
A stain should always be dealt with
swiftly.
Whatever type of stain is on the trim,
use
cold (or warm) soapy water with
natural soap.
Detergents (washing-up liquid, pow -
dered products, alcohol-based prod-
ucts) should not be used.
Use a soft cloth.
Rinse and soak up the excess.
For further recommendations for
maintaining the interior, and/or for
any unsatisfactory results, please
see an authorised dealer.
Page 196 of 233
RENAULT cardbattery ............................................. (up to the end of the DU)
RENAULT card battery .........................(up to the end of the DU)
5.22
ENG_UD27283_6
Carte RENAULT : pile (X45 - H45 - X91 - B91 - K91 - X95 - B95 - D95 - E95 - K95 - J95 - R95 - L38 - X38 - X32 - B32 - X98 - Renault)
ENG_NU_977-2_H45_Ph2_Renault_5
Operating faultsIf the battery is too weak to ensure cor-
rect operation, you may start (insert the
RENAULT card in the card reader) and
lock/unlock the vehicle (refer to the in-
formation on “Locking/unlocking the
doors” in Section 1).
RENAULT card: battery
renault carD: battery
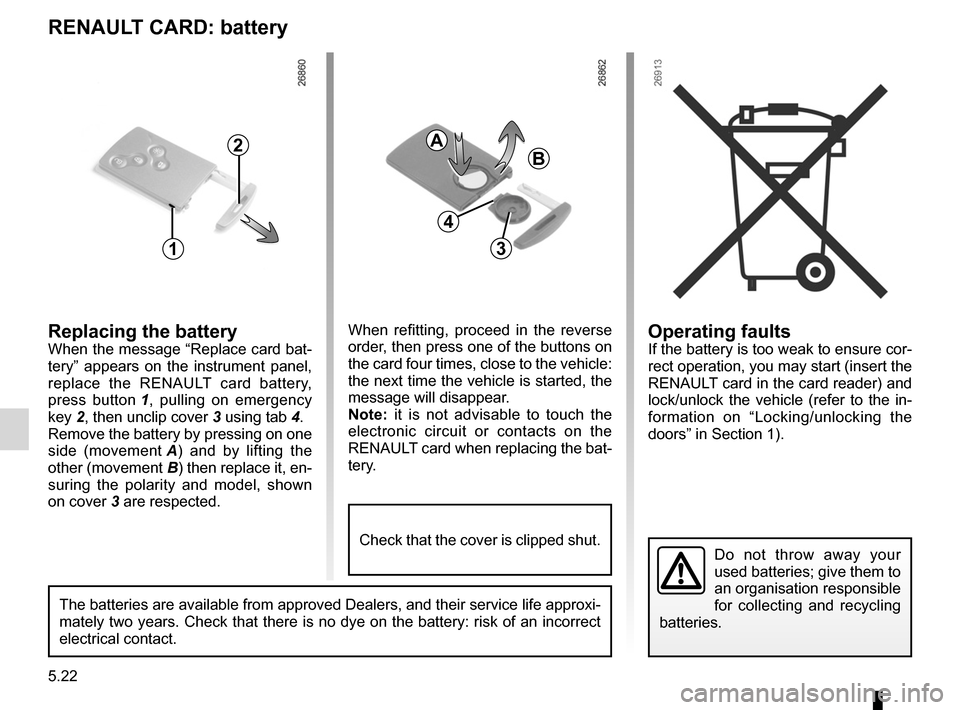
replacing the batteryWhen the message “Replace card bat-
tery” appears on the instrument panel,
replace the RENAULT card battery,
press button 1 , pulling on emergency
key 2, then unclip cover 3 using tab 4.
Remove the battery by pressing on one
side (movement A ) and by lifting the
other (movement B) then replace it, en-
suring the polarity and model, shown
on cover 3 are respected.
Do not throw away your
used batteries; give them to
an organisation responsible
for collecting and recycling
batteries.
1
2
When refitting, proceed in the reverse
order, then press one of the buttons on
the card four times, close to the vehicle:
the next time the vehicle is started, the
message will disappear.
n ote: it is not advisable to touch the
electronic circuit or contacts on the
RENAULT card when replacing the bat-
tery.
a
B
3
The batteries are available from approved Dealers, and their service life approxi -
mately two years. Check that there is no dye on the battery: risk of an incorrect
electrical contact.
4
Check that the cover is clipped shut.
Page 204 of 233
5.30
ENG_UD21017_3
Anomalies de fonctionnement (X45 - H45 - X95 - J95 - R95 - Renault)
ENG_NU_977-2_H45_Ph2_Renault_5
Jaune NoirNoir texte
OPeratIng F aults (2/5)
the starter is activated POssIBle causeswhat tO DO
The instrument panel indicator lights
are weak or fail to light up and the
starter does not turn. Battery terminals not tight,
battery terminals discon
-
nected or oxidised. Retighten or reconnect the terminals, or clean
them if they are oxidised.
Discharged battery or not
operational. Connect another battery to the faulty battery.
Refer to information on “Battery: troubleshooting”
in Section 5 or replace the battery if necessary.
Do not push the vehicle if the steering column is
locked.
The engine will not start. Starting conditions are not
fulfilled.Refer to the information on “Starting/stopping the
engine” in Section 2.
The RENAULT “hands-free”
card does not work. Insert the card in the card reader in order to start
the engine.
Refer to the information on “Starting/stopping the
engine” in Section 2.
The engine cannot be switched off. Card not detected.Insert the card in card reader.
Electronic fault. Press the starter button quickly five times.
The steering column remains locked. Steering wheel locked.Move the steering wheel while pressing the engine
start button (refer to the information on “Starting
the engine” in Section 2).
Page 229 of 233
JauneNoirNoir texte
7.3
ENG_UD27169_2
Index (X45 - H45 - Renault)
ENG_NU_977-2_H45_Ph2_Renault_7
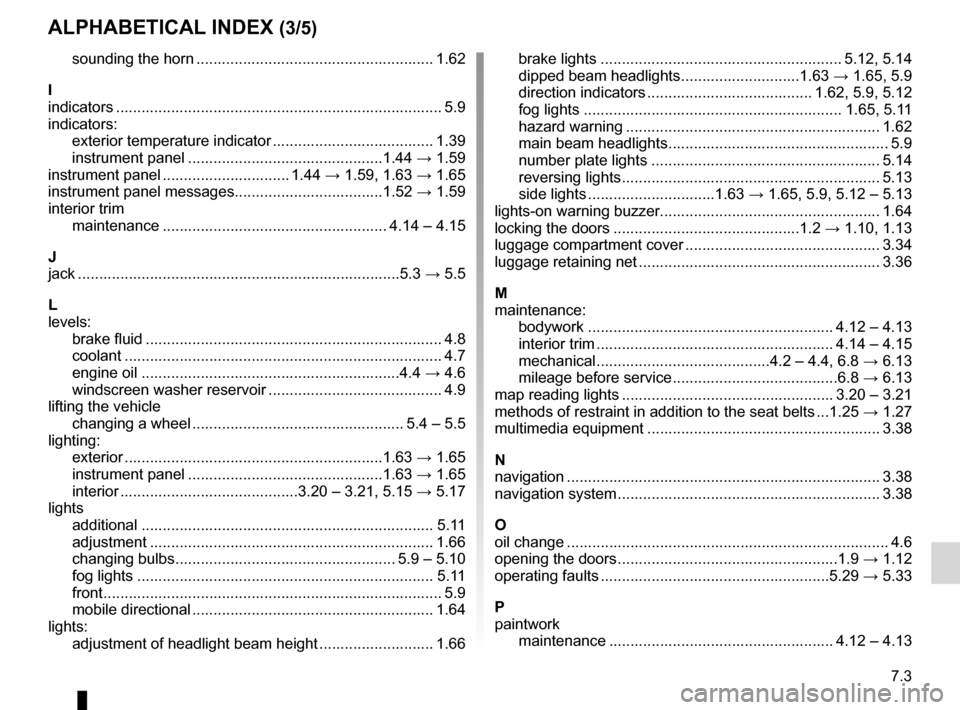
AlphAbeticAl index (3/5)
sounding the horn ........................................................ 1.62
i
indicators ............................................................................. 5.9
indicators: exterior temperature indicator ...................................... 1.39
instrument panel .............................................. 1.44 → 1.59
instrument panel .............................. 1.44 → 1.59, 1.63 → 1.65
instrument panel messages ...................................1.52 → 1.59
interior trim maintenance ..................................................... 4.14 – 4.15
J
jack ............................................................................ 5.3 → 5.5
l
levels: brake fluid ...................................................................... 4.8
coolant ........................................................................... 4.7
engine oil ............................................................. 4.4 → 4.6
windscreen washer reservoir ......................................... 4.9
lifting the vehicle changing a wheel .................................................. 5.4 – 5.5
lighting: exterior ............................................................. 1.63 → 1.65
instrument panel .............................................. 1.63 → 1.65
interior .......................................... 3.20 – 3.21, 5.15 → 5.17
lights additional ..................................................................... 5.11
adjustment ................................................................... 1.66
changing bulbs .................................................... 5.9 – 5.10
fog lights ...................................................................... 5.11
front ................................................................................ 5.9
mobile directional ......................................................... 1.64
lights: adjustment of headlight beam height ........................... 1.66brake lights
......................................................... 5.12, 5.14
dipped beam headlights ............................ 1.63 → 1.65, 5.9
direction indicators ....................................... 1.62, 5.9, 5.12
fog lights ............................................................. 1.65, 5.11
hazard warning ............................................................ 1.62
main beam headlights .................................................... 5.9
number plate lights ...................................................... 5.14
reversing lights ............................................................. 5.13
side lights ..............................1.63 → 1.65, 5.9, 5.12 – 5.13
lights-on warning buzzer .................................................... 1.64
locking the doors ............................................ 1.2 → 1.10, 1.13
luggage compartment cover .............................................. 3.34
luggage retaining net ......................................................... 3.36
M
maintenance: bodywork .......................................................... 4.12 – 4.13
interior trim ........................................................ 4.14 – 4.15
mechanical .........................................4.2 – 4.4, 6.8 → 6.13
mileage before service ....................................... 6.8 → 6.13
map reading lights .................................................. 3.20 – 3.21
methods of restraint in addition to the seat belts ... 1.25 → 1.27
multimedia equipment ....................................................... 3.38
n
navigation .......................................................................... 3.38
navigation system .............................................................. 3.38
O
oil change ............................................................................ 4.6
opening the doors .................................................... 1.9 → 1.12
operating faults ...................................................... 5.29 → 5.33
p
paintwork maintenance ..................................................... 4.12 – 4.13