RENAULT SCENIC 2014 J95 / 3.G Petrol Injection - Sagem3000 Owner's Manual
Manufacturer: RENAULT, Model Year: 2014, Model line: SCENIC, Model: RENAULT SCENIC 2014 J95 / 3.GPages: 181
Page 21 of 181
PETROL INJECTION
Fault finding – Interpretation of faults17B
17B-21V12 MR-372-J84-17B000$315.mif
SAGEM 3000
Program No.: A7
Vdiag No.: 44, 48PETROL INJECTION
Fault finding – Interpretation of faults
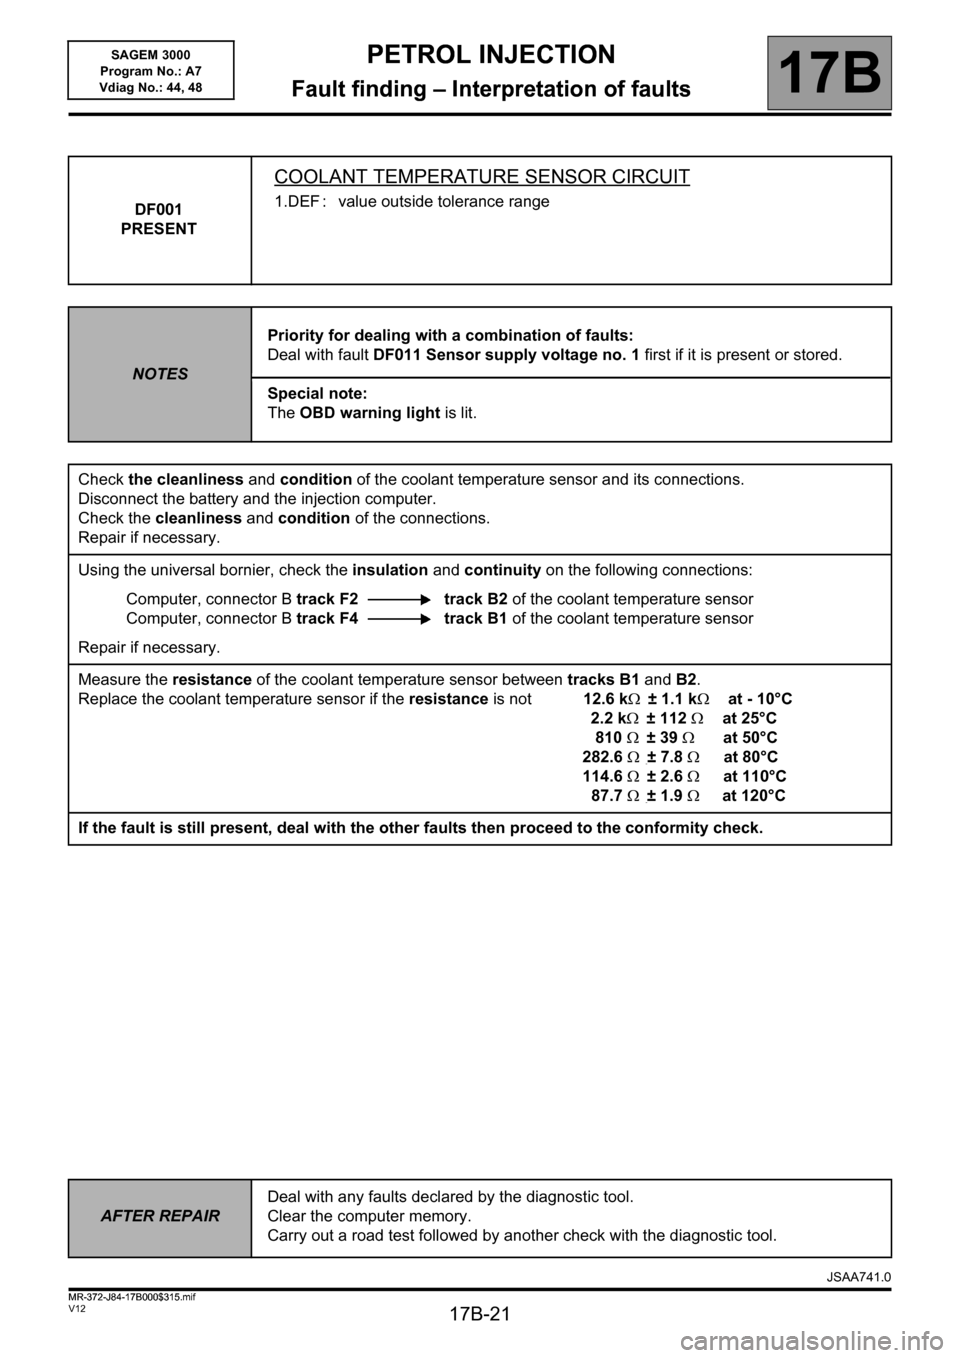
DF001
PRESENT
COOLANT TEMPERATURE SENSOR CIRCUIT
1.DEF : value outside tolerance range
NOTESPriority for dealing with a combination of faults:
Deal with fault DF011 Sensor supply voltage no. 1 first if it is present or stored.
Special note:
The OBD warning light is lit.
Check the cleanliness and condition of the coolant temperature sensor and its connections.
Disconnect the battery and the injection computer.
Check the cleanliness and condition of the connections.
Repair if necessary.
Using the universal bornier, check the insulation and continuity on the following connections:
Computer, connector B track F2 track B2 of the coolant temperature sensor
Computer, connector B track F4 track B1 of the coolant temperature sensor
Repair if necessary.
Measure the resistance of the coolant temperature sensor between tracks B1 and B2.
Replace the coolant temperature sensor if the resistance is not 12.6 k± 1.1 kat - 10°C
2.2 k±112at 25°C
810±39at 50°C
282.6±7.8at 80°C
114.6±2.6at 110°C
87.7±1.9at 120°C
If the fault is still present, deal with the other faults then proceed to the conformity check.
AFTER REPAIRDeal with any faults declared by the diagnostic tool.
Clear the computer memory.
Carry out a road test followed by another check with the diagnostic tool.
JSAA741.0
MR-372-J84-17B000$315.mif
Page 22 of 181
PETROL INJECTION
Fault finding – Interpretation of faults17B
17B-22V12 MR-372-J84-17B000$315.mif
SAGEM 3000
Program No.: A7
Vdiag No.: 44, 48
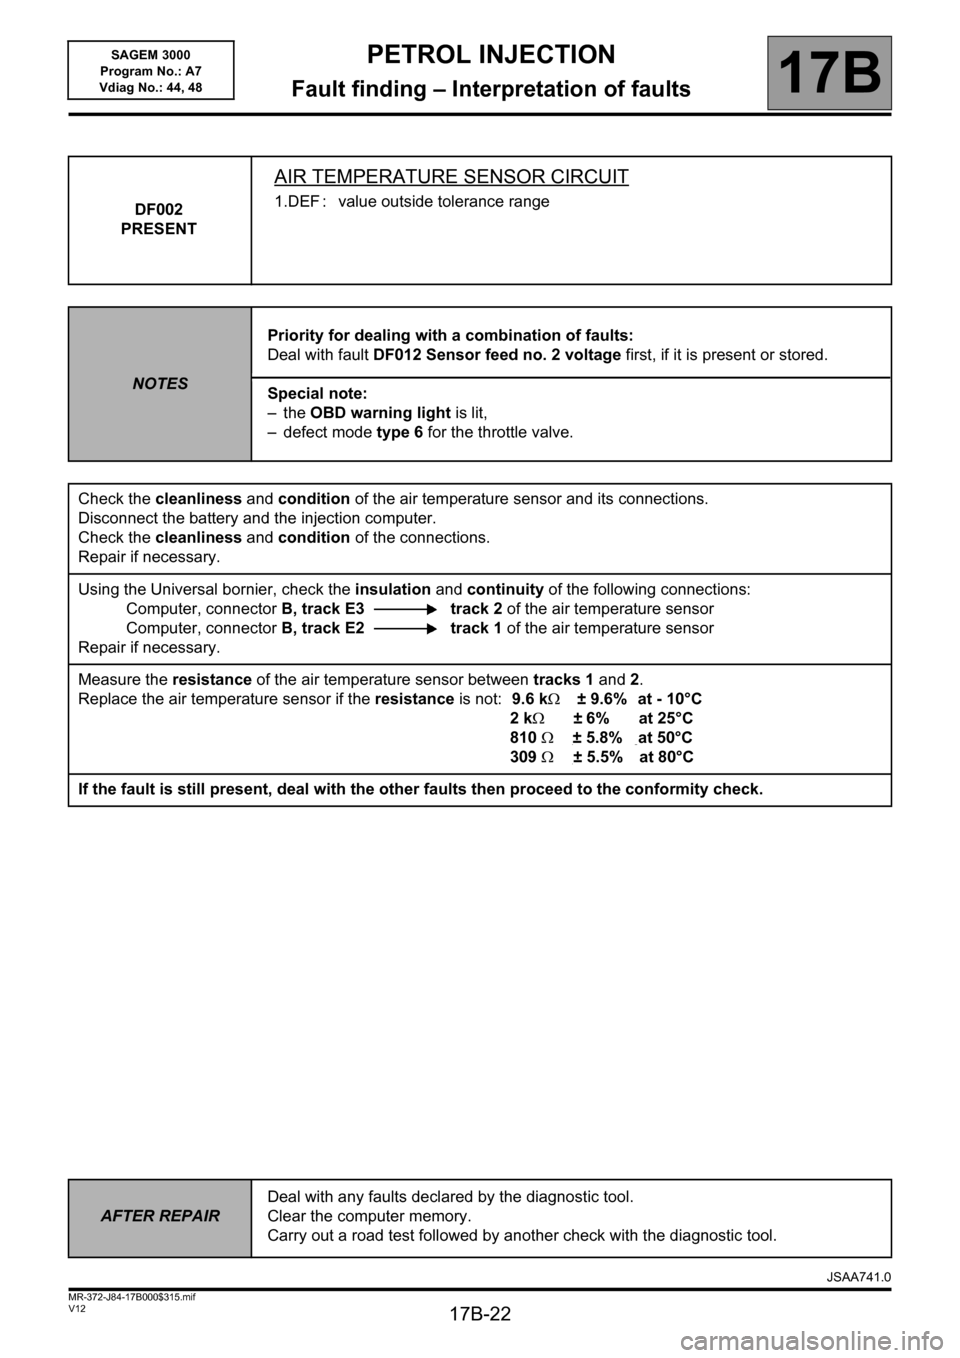
DF002
PRESENT
AIR TEMPERATURE SENSOR CIRCUIT
1.DEF : value outside tolerance range
NOTESPriority for dealing with a combination of faults:
Deal with fault DF012 Sensor feed no. 2 voltage first, if it is present or stored.
Special note:
– the OBD warning light is lit,
– defect mode type 6 for the throttle valve.
Check the cleanliness and condition of the air temperature sensor and its connections.
Disconnect the battery and the injection computer.
Check the cleanliness and condition of the connections.
Repair if necessary.
Using the Universal bornier, check the insulation and continuity of the following connections:
Computer, connectorB, track E3 track 2 of the air temperature sensor
Computer, connectorB, track E2 track 1 of the air temperature sensor
Repair if necessary.
Measure the resistance of the air temperature sensor between tracks 1 and 2.
Replace the air temperature sensor if the resistance is not:9.6 k± 9.6% at - 10°C
2k±6% at 25°C
810±5.8% at 50°C
309±5.5% at 80°C
If the fault is still present, deal with the other faults then proceed to the conformity check.
AFTER REPAIRDeal with any faults declared by the diagnostic tool.
Clear the computer memory.
Carry out a road test followed by another check with the diagnostic tool.
JSAA741.0
Page 23 of 181
PETROL INJECTION
Fault finding – Interpretation of faults17B
17B-23V12 MR-372-J84-17B000$315.mif
SAGEM 3000
Program No.: A7
Vdiag No.: 44, 48
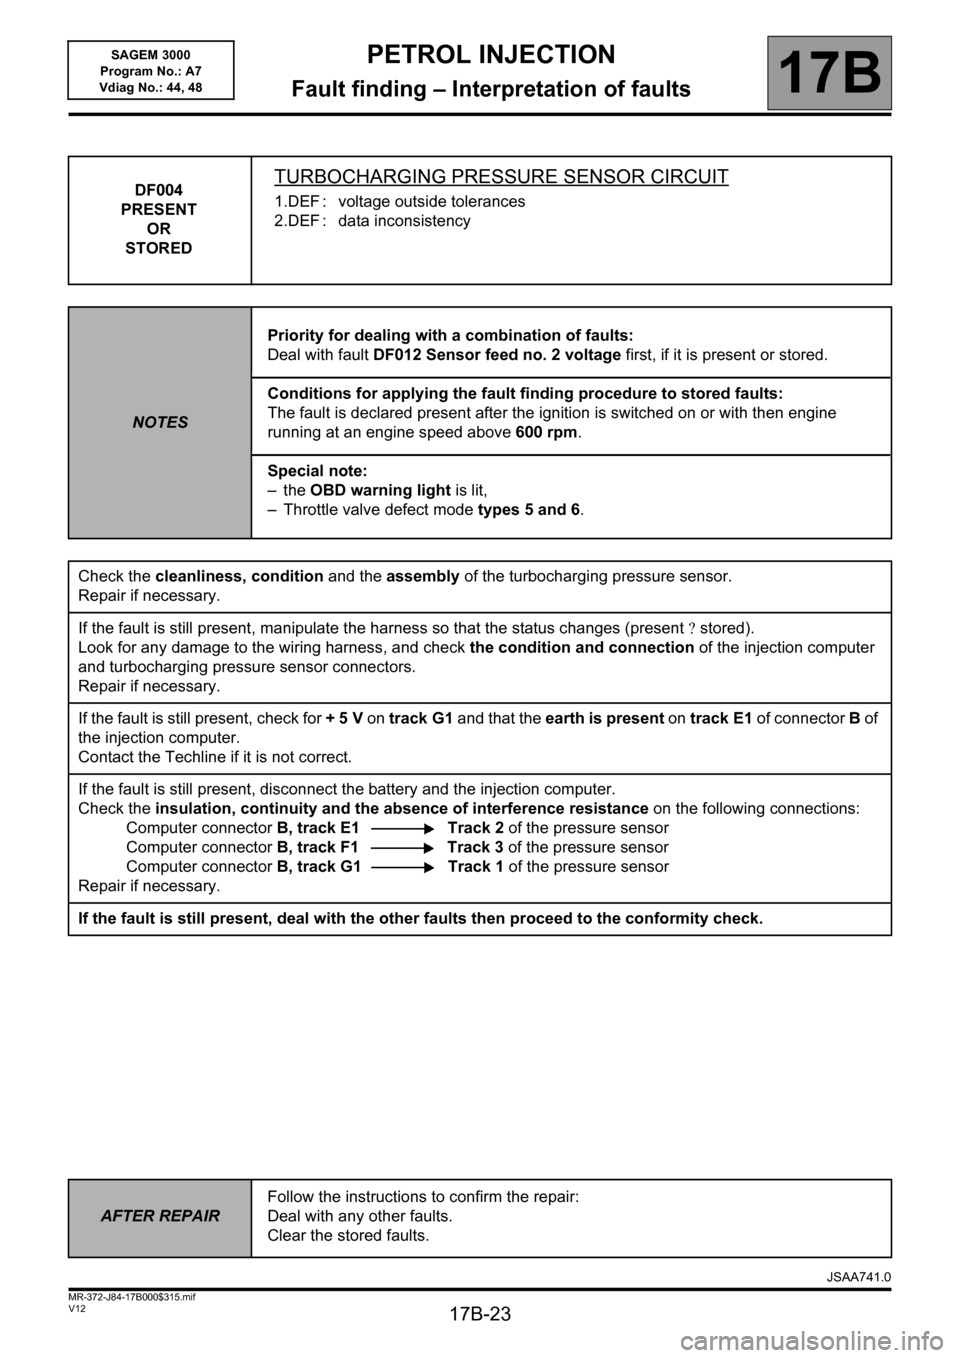
DF004
PRESENT
OR
STOREDTURBOCHARGING PRESSURE SENSOR CIRCUIT
1.DEF : voltage outside tolerances
2.DEF : data inconsistency
NOTESPriority for dealing with a combination of faults:
Deal with fault DF012 Sensor feed no. 2 voltage first, if it is present or stored.
Conditions for applying the fault finding procedure to stored faults:
The fault is declared present after the ignition is switched on or with then engine
running at an engine speed above 600 rpm.
Special note:
– the OBD warning light is lit,
– Throttle valve defect mode types 5 and 6.
Check the cleanliness, condition and the assembly of the turbocharging pressure sensor.
Repair if necessary.
If the fault is still present, manipulate the harness so that the status changes (present stored).
Look for any damage to the wiring harness, and check the condition and connection of the injection computer
and turbocharging pressure sensor connectors.
Repair if necessary.
If the fault is still present, check for + 5 V on track G1 and that the earth is present on track E1 of connector B of
the injection computer.
Contact the Techline if it is not correct.
If the fault is still present, disconnect the battery and the injection computer.
Check the insulation, continuity and the absence of interference resistance on the following connections:
Computer connectorB, track E1 Track 2 of the pressure sensor
Computer connectorB, track F1 Track 3 of the pressure sensor
Computer connectorB, track G1 Track 1 of the pressure sensor
Repair if necessary.
If the fault is still present, deal with the other faults then proceed to the conformity check.
AFTER REPAIRFollow the instructions to confirm the repair:
Deal with any other faults.
Clear the stored faults.
JSAA741.0
Page 24 of 181
PETROL INJECTION
Fault finding – Interpretation of faults17B
17B-24V12 MR-372-J84-17B000$315.mif
SAGEM 3000
Program No.: A7
Vdiag No.: 44, 48
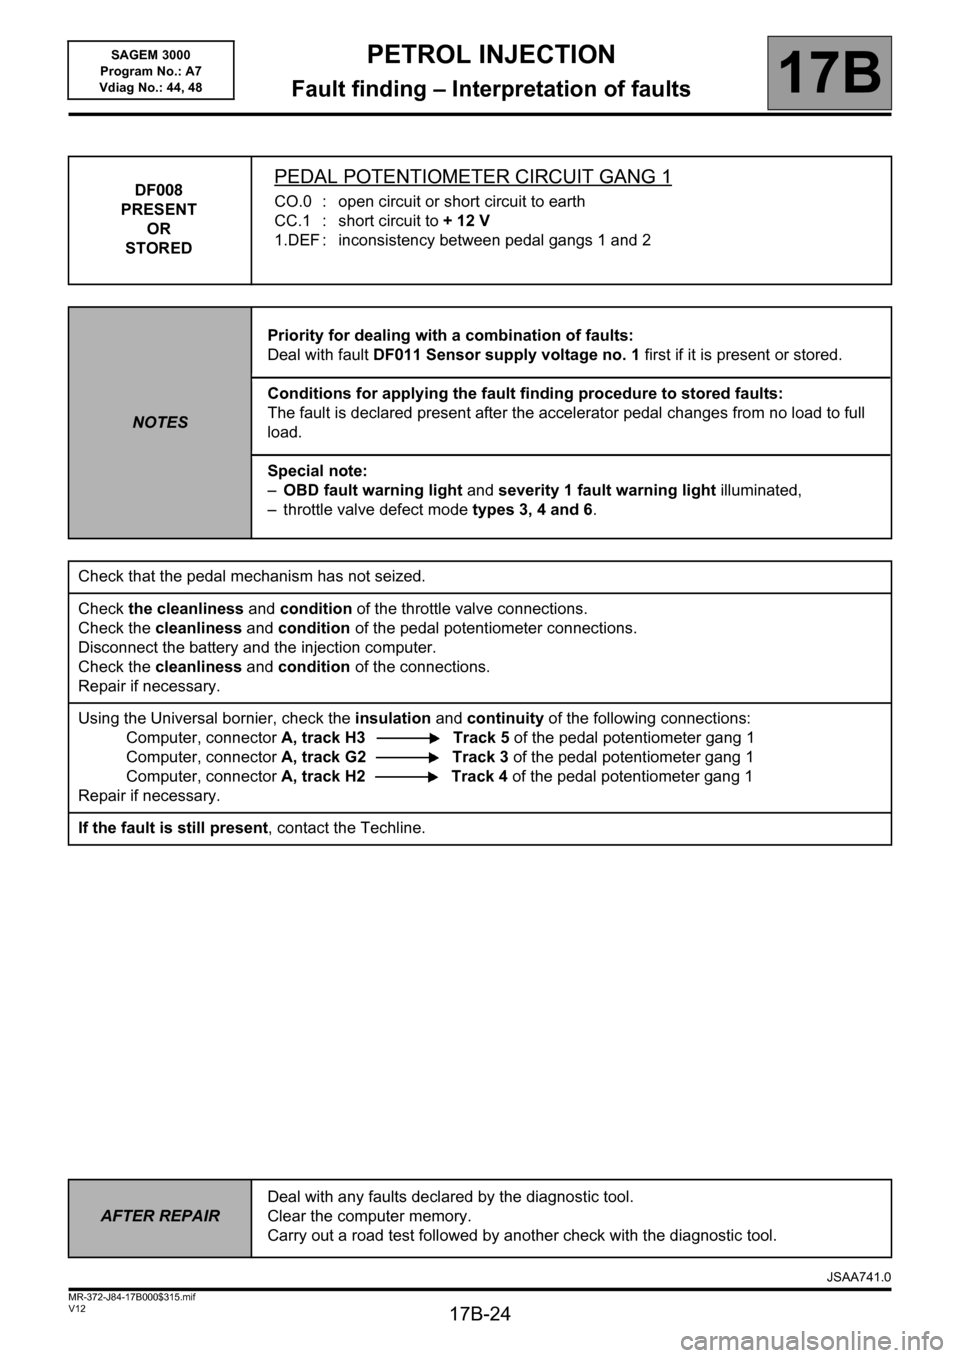
DF008
PRESENT
OR
STOREDPEDAL POTENTIOMETER CIRCUIT GANG 1
CO.0 : open circuit or short circuit to earth
CC.1 : short circuit to + 12 V
1.DEF : inconsistency between pedal gangs 1 and 2
NOTESPriority for dealing with a combination of faults:
Deal with fault DF011 Sensor supply voltage no. 1 first if it is present or stored.
Conditions for applying the fault finding procedure to stored faults:
The fault is declared present after the accelerator pedal changes from no load to full
load.
Special note:
–OBD fault warning light and severity 1 fault warning light illuminated,
– throttle valve defect mode types 3, 4 and 6.
Check that the pedal mechanism has not seized.
Check the cleanliness and condition of the throttle valve connections.
Check the cleanliness and condition of the pedal potentiometer connections.
Disconnect the battery and the injection computer.
Check the cleanliness and condition of the connections.
Repair if necessary.
Using the Universal bornier, check the insulation and continuity of the following connections:
Computer, connectorA, track H3 Track 5 of the pedal potentiometer gang 1
Computer, connectorA, track G2 Track 3 of the pedal potentiometer gang 1
Computer, connectorA, track H2 Track 4 of the pedal potentiometer gang 1
Repair if necessary.
If the fault is still present, contact the Techline.
AFTER REPAIRDeal with any faults declared by the diagnostic tool.
Clear the computer memory.
Carry out a road test followed by another check with the diagnostic tool.
JSAA741.0
Page 25 of 181
PETROL INJECTION
Fault finding – Interpretation of faults17B
17B-25V12 MR-372-J84-17B000$315.mif
SAGEM 3000
Program No.: A7
Vdiag No.: 44, 48
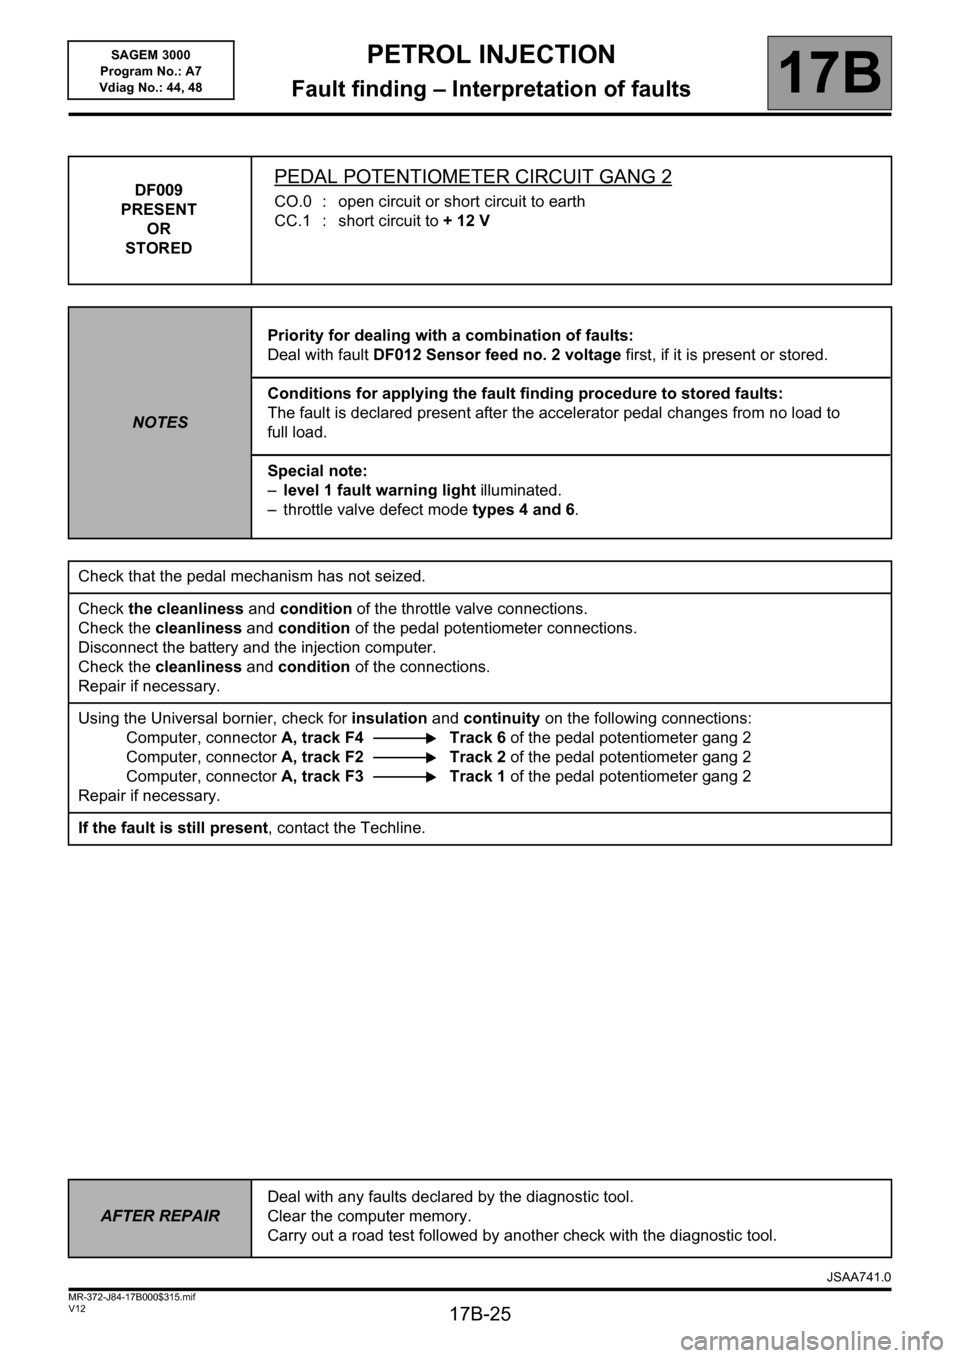
DF009
PRESENT
OR
STOREDPEDAL POTENTIOMETER CIRCUIT GANG 2
CO.0 : open circuit or short circuit to earth
CC.1 : short circuit to + 12 V
NOTESPriority for dealing with a combination of faults:
Deal with fault DF012 Sensor feed no. 2 voltage first, if it is present or stored.
Conditions for applying the fault finding procedure to stored faults:
The fault is declared present after the accelerator pedal changes from no load to
full load.
Special note:
–level 1 fault warning light illuminated.
– throttle valve defect mode types 4 and 6.
Check that the pedal mechanism has not seized.
Check the cleanliness and condition of the throttle valve connections.
Check the cleanliness and condition of the pedal potentiometer connections.
Disconnect the battery and the injection computer.
Check the cleanliness and condition of the connections.
Repair if necessary.
Using the Universal bornier, check for insulation and continuity on the following connections:
Computer, connectorA, track F4 Track 6 of the pedal potentiometer gang 2
Computer, connectorA, track F2 Track 2 of the pedal potentiometer gang 2
Computer, connectorA, track F3 Track 1 of the pedal potentiometer gang 2
Repair if necessary.
If the fault is still present, contact the Techline.
AFTER REPAIRDeal with any faults declared by the diagnostic tool.
Clear the computer memory.
Carry out a road test followed by another check with the diagnostic tool.
JSAA741.0
Page 26 of 181
PETROL INJECTION
Fault finding – Interpretation of faults17B
17B-26V12 MR-372-J84-17B000$315.mif
SAGEM 3000
Program No.: A7
Vdiag No.: 44, 48
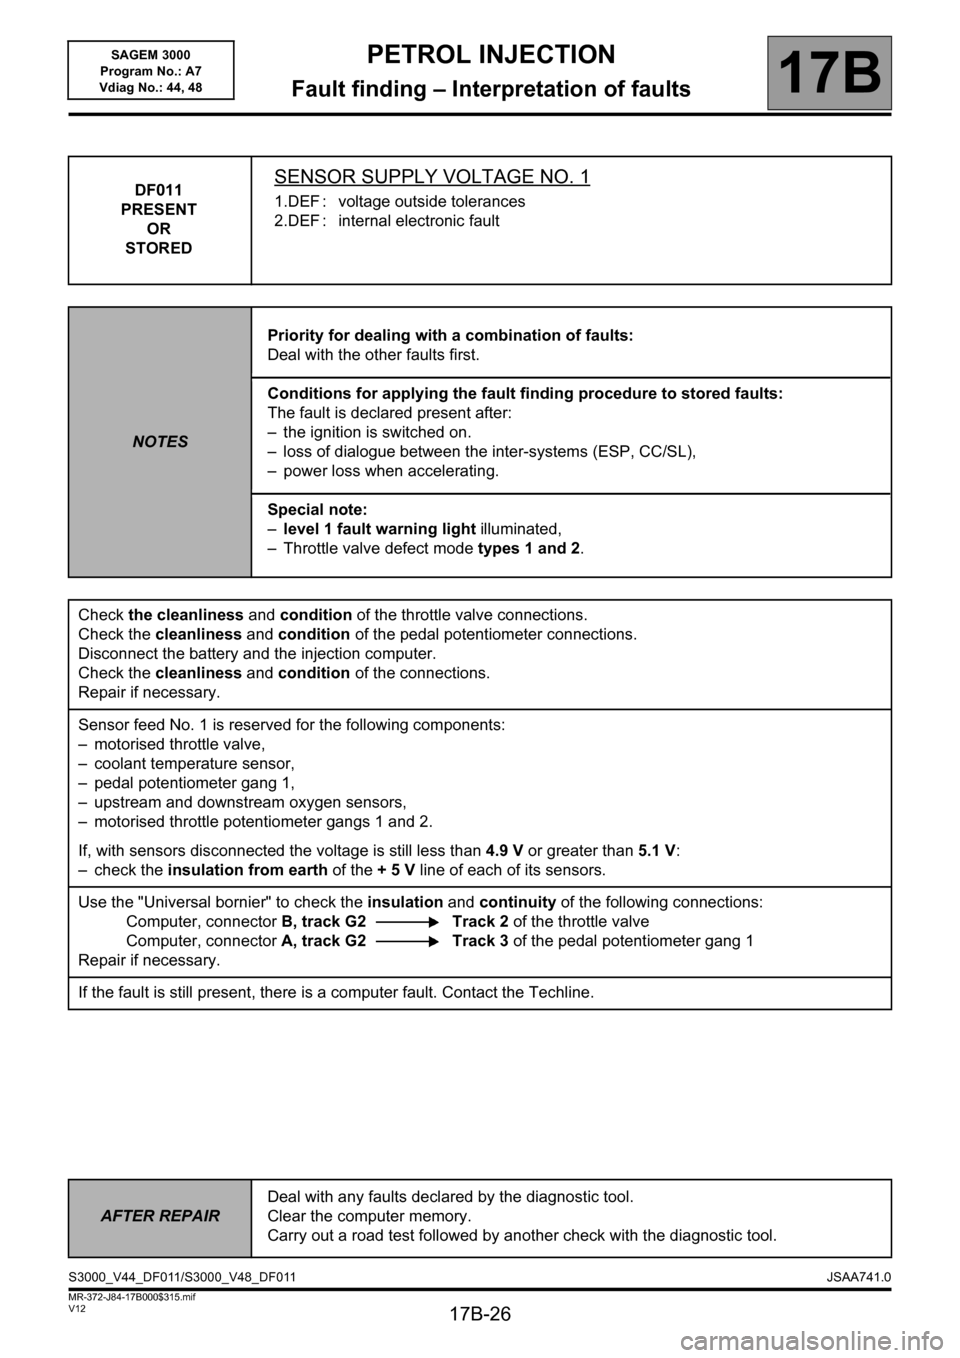
DF011
PRESENT
OR
STOREDSENSOR SUPPLY VOLTAGE NO. 1
1.DEF : voltage outside tolerances
2.DEF : internal electronic fault
NOTESPriority for dealing with a combination of faults:
Deal with the other faults first.
Conditions for applying the fault finding procedure to stored faults:
The fault is declared present after:
– the ignition is switched on.
– loss of dialogue between the inter-systems (ESP, CC/SL),
– power loss when accelerating.
Special note:
–level 1 fault warning light illuminated,
– Throttle valve defect mode types 1 and 2.
Check the cleanliness and condition of the throttle valve connections.
Check the cleanliness and condition of the pedal potentiometer connections.
Disconnect the battery and the injection computer.
Check the cleanliness and condition of the connections.
Repair if necessary.
Sensor feed No. 1 is reserved for the following components:
– motorised throttle valve,
– coolant temperature sensor,
– pedal potentiometer gang 1,
– upstream and downstream oxygen sensors,
– motorised throttle potentiometer gangs 1 and 2.
If, with sensors disconnected the voltage is still less than 4.9 V or greater than 5.1 V:
– check the insulation from earth of the + 5 V line of each of its sensors.
Use the "Universal bornier" to check the insulation and continuity of the following connections:
Computer, connector B, track G2 Track 2 of the throttle valve
Computer, connectorA, track G2 Track 3 of the pedal potentiometer gang 1
Repair if necessary.
If the fault is still present, there is a computer fault. Contact the Techline.
AFTER REPAIRDeal with any faults declared by the diagnostic tool.
Clear the computer memory.
Carry out a road test followed by another check with the diagnostic tool.
S3000_V44_DF011/S3000_V48_DF011JSAA741.0
Page 27 of 181

PETROL INJECTION
Fault finding – Interpretation of faults17B
17B-27V12 MR-372-J84-17B000$315.mif
SAGEM 3000
Program No.: A7
Vdiag No.: 44, 48
DF012
PRESENT
OR
STOREDSENSOR SUPPLY VOLTAGE No. 2
1.DEF : voltage outside tolerances
2.DEF : internal electronic fault
NOTESPriority for dealing with a combination of faults:
Deal with the other faults first.
Conditions for applying the fault finding procedure to stored faults:
The fault is declared present after:
– the ignition is switched on.
– loss of power when accelerating,
– loss of inter-systems (ESP, CC/SL).
Special note:
–level 1 fault warning light illuminated.
– throttle valve defect mode types 4 and 6.
Check the cleanliness and condition of the throttle valve connections.
Check the cleanliness and condition of the pedal potentiometer connections.
Disconnect the battery and the injection computer.
Check the cleanliness and condition of the connections.
Repair if necessary.
Sensor feed no. 2 is reserved for the following components:
– turbocharger pressure sensor,
– pedal potentiometer gang 2,
– coolant pressure sensor,
– Inlet manifold pressure sensor.
If, with the sensors disconnected, the voltage is still less than 4.9 V or greater than 5.1 V:
– check the insulation from earth of the + 5 V line of each of its sensors.
Using the Universal bornier, check the insulation and continuity on the following connection:
Computer, connectorA, track F2 Track 2 of the pedal potentiometer gang 2
Repair if necessary.
If the fault is still present, contact the Techline.
AFTER REPAIRDeal with any faults declared by the diagnostic tool.
Clear the computer memory.
Carry out a road test followed by another check with the diagnostic tool.
S3000_V44_DF012/S3000_V48_DF012JSAA741.0
Page 28 of 181
PETROL INJECTION
Fault finding – Interpretation of faults17B
17B-28V12 MR-372-J84-17B000$315.mif
SAGEM 3000
Program No.: A7
Vdiag No.: 44, 48
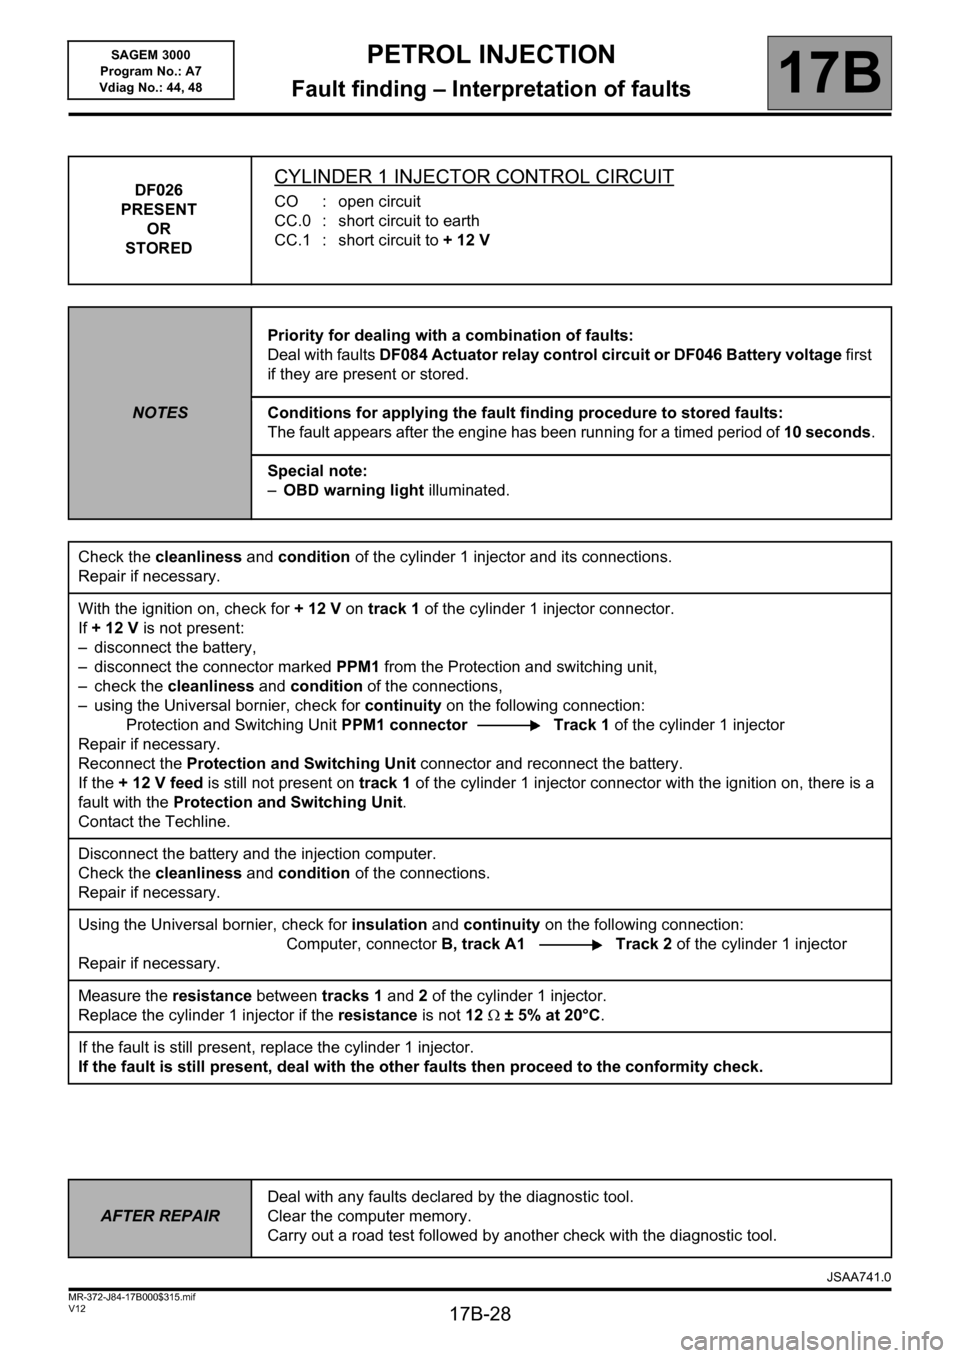
DF026
PRESENT
OR
STOREDCYLINDER 1 INJECTOR CONTROL CIRCUIT
CO : open circuit
CC.0 : short circuit to earth
CC.1 : short circuit to + 12 V
NOTESPriority for dealing with a combination of faults:
Deal with faults DF084 Actuator relay control circuit or DF046 Battery voltage first
if they are present or stored.
Conditions for applying the fault finding procedure to stored faults:
The fault appears after the engine has been running for a timed period of 10 seconds.
Special note:
–OBD warning light illuminated.
Check the cleanliness and condition of the cylinder 1 injector and its connections.
Repair if necessary.
With the ignition on, check for + 12 V on track 1 of the cylinder 1 injector connector.
If +12V is not present:
– disconnect the battery,
– disconnect the connector marked PPM1 from the Protection and switching unit,
– check the cleanliness and condition of the connections,
– using the Universal bornier, check for continuity on the following connection:
Protection and Switching Unit PPM1 connector Track 1 of the cylinder 1 injector
Repair if necessary.
Reconnect the Protection and Switching Unit connector and reconnect the battery.
If the + 12 V feed is still not present on track 1 of the cylinder 1 injector connector with the ignition on, there is a
fault with the Protection and Switching Unit.
Contact the Techline.
Disconnect the battery and the injection computer.
Check the cleanliness and condition of the connections.
Repair if necessary.
Using the Universal bornier, check for insulation and continuity on the following connection:
Computer, connector B, track A1 Track 2 of the cylinder 1 injector
Repair if necessary.
Measure the resistance between tracks 1 and 2 of the cylinder 1 injector.
Replace the cylinder 1 injector if the resistance is not 12 ± 5% at 20°C.
If the fault is still present, replace the cylinder 1 injector.
If the fault is still present, deal with the other faults then proceed to the conformity check.
AFTER REPAIRDeal with any faults declared by the diagnostic tool.
Clear the computer memory.
Carry out a road test followed by another check with the diagnostic tool.
JSAA741.0
Page 29 of 181

PETROL INJECTION
Fault finding – Interpretation of faults17B
17B-29V12 MR-372-J84-17B000$315.mif
SAGEM 3000
Program No.: A7
Vdiag No.: 44, 48
DF027
PRESENT
OR
STOREDCYLINDER 2 INJECTOR CONTROL CIRCUIT
CO : open circuit
CC.0 : short circuit to earth
CC.1 : short circuit to + 12 V
NOTESPriority for dealing with a combination of faults:
Deal with faults DF084 Actuator relay control circuit or DF046 Battery voltage first
if they are present or stored.
Conditions for applying the fault finding procedure to stored faults:
The fault is declared present after the engine has been running for a timed period of
10 seconds.
Special note:
–OBD warning light illuminated.
Check the cleanliness and condition of the cylinder 2 injector and its connections.
Repair if necessary.
With the ignition on, check for + 12 V on track 1 of the cylinder 2 injector connector.
If +12V is not present:
– disconnect the battery,
– disconnect the connector marked PPM1 from the Protection and switching unit,
– check the cleanliness and condition of the connections,
– using the Universal bornier, check for continuity on the following connection:
Protection and Switching Unit PPM1 connector Track 1 of the cylinder 2 injector
Repair if necessary.
Reconnect the Protection and Switching Unit connector and reconnect the battery.
If the + 12 V feed on track 1 is still not present on the cylinder 2 injector connector with the ignition on, there is a
fault with the Protection and Switching Unit.
Contact the Techline.
Disconnect the battery and the injection computer.
Check the cleanliness and condition of the connections.
Repair if necessary.
Using the universal bornier, check for insulation and continuity on the following connection:
Computer, connector B, track A2 Track 2 of the cylinder 2 injector
Repair if necessary.
Measure the resistance of the cylinder 2 injector between tracks 1 and 2.
Replace the cylinder 2 injector if the resistance is not 12 ± 5% at 20°C.
If the fault is still present, replace the cylinder 2 injector.
If the fault is still present, deal with the other faults then proceed to the conformity check.
AFTER REPAIRDeal with any faults declared by the diagnostic tool.
Clear the computer memory.
Carry out a road test followed by another check with the diagnostic tool.
JSAA741.0
Page 30 of 181
PETROL INJECTION
Fault finding – Interpretation of faults17B
17B-30V12 MR-372-J84-17B000$315.mif
SAGEM 3000
Program No.: A7
Vdiag No.: 44, 48
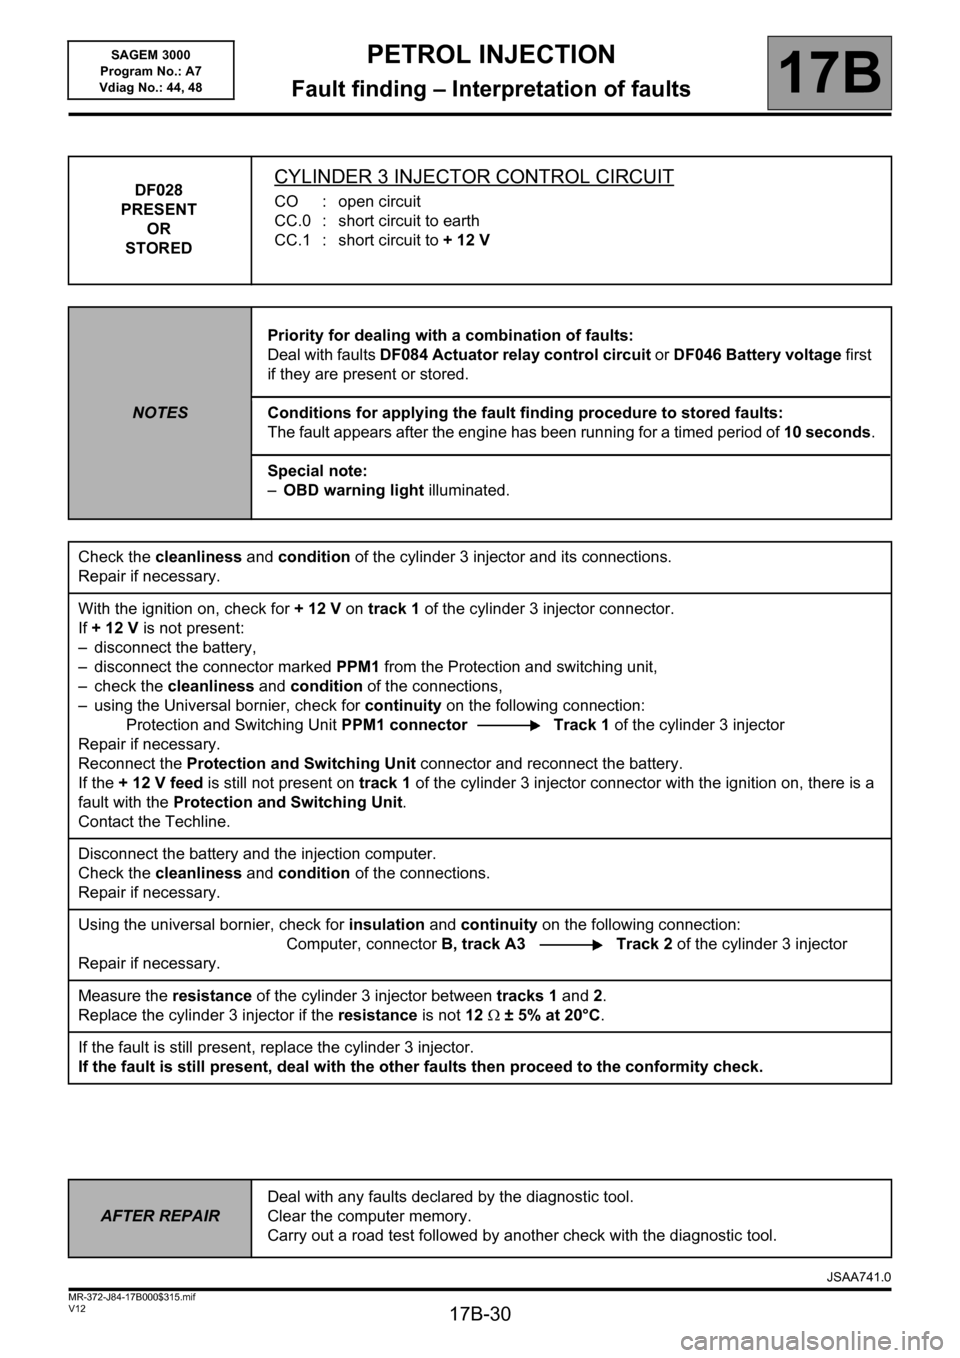
DF028
PRESENT
OR
STOREDCYLINDER 3 INJECTOR CONTROL CIRCUIT
CO : open circuit
CC.0 : short circuit to earth
CC.1 : short circuit to + 12 V
NOTESPriority for dealing with a combination of faults:
Deal with faults DF084 Actuator relay control circuit or DF046 Battery voltage first
if they are present or stored.
Conditions for applying the fault finding procedure to stored faults:
The fault appears after the engine has been running for a timed period of 10 seconds.
Special note:
–OBD warning light illuminated.
Check the cleanliness and condition of the cylinder 3 injector and its connections.
Repair if necessary.
With the ignition on, check for + 12 V on track 1 of the cylinder 3 injector connector.
If +12V is not present:
– disconnect the battery,
– disconnect the connector marked PPM1 from the Protection and switching unit,
– check the cleanliness and condition of the connections,
– using the Universal bornier, check for continuity on the following connection:
Protection and Switching Unit PPM1 connector Track 1 of the cylinder 3 injector
Repair if necessary.
Reconnect the Protection and Switching Unit connector and reconnect the battery.
If the + 12 V feed is still not present on track 1 of the cylinder 3 injector connector with the ignition on, there is a
fault with the Protection and Switching Unit.
Contact the Techline.
Disconnect the battery and the injection computer.
Check the cleanliness and condition of the connections.
Repair if necessary.
Using the universal bornier, check for insulation and continuity on the following connection:
Computer, connector B, track A3 Track 2 of the cylinder 3 injector
Repair if necessary.
Measure the resistance of the cylinder 3 injector between tracks 1 and 2.
Replace the cylinder 3 injector if the resistance is not 12 ± 5% at 20°C.
If the fault is still present, replace the cylinder 3 injector.
If the fault is still present, deal with the other faults then proceed to the conformity check.
AFTER REPAIRDeal with any faults declared by the diagnostic tool.
Clear the computer memory.
Carry out a road test followed by another check with the diagnostic tool.
JSAA741.0