LED RENAULT SCENIC 2018 Owners Manual
[x] Cancel search | Manufacturer: RENAULT, Model Year: 2018, Model line: SCENIC, Model: RENAULT SCENIC 2018Pages: 364, PDF Size: 10.43 MB
Page 3 of 364

0.1
Translated from English. Copying or translation, in part or in full, is f\
orbidden unless prior written permission has been obtained from the vehicle manu-
facturer.
Welcome to your new vehicle
The descriptions of the models given in this handbook are based on the t\
echnical specifications at the time of writing. This hand-
book covers all items of equipment (both standard and optional) available for these models but whether or not these are
fitted to the vehicle depends on the version, options selected and the c\
ountry where the vehicle is sold.
This handbook may also contain information about items of equipment to b\
e introduced later in the model year.
Throughout the manual, the “approved Dealer” is your RENAULT Dealer.
Enjoy driving your new vehicle. This driver’s handbook contains the information necessary:
– for you to familiarise yourself with your vehicle, to use it to its best\
advantage and to benefit fully from the all the func tions and
the technical developments it incorporates.
– to ensure that it always gives the best performance by following the sim\
ple, but comprehensive advice concerning regular main -
tenance.
– to enable you to deal quickly with minor faults not requiring specialist\
attention.
It is well worth taking a few minutes to read this handbook to familiari\
se yourself with the information and guidelines it cont ains
about the vehicle and its functions and new features. If certain points \
are still unclear, our Network technicians will be only too
pleased to provide you with any additional information.
To help you, you will find the following symbols:
and These appear in the vehicle and indicate that you should consult the man\
ual for detailed information and/or
limits on operations with respect to your vehicle’s equipment.
anywhere in the manual indicates a hazard, danger or a safety recommenda\
tion.
Page 16 of 364
1.10
RENAULT “HANDS-FREE” CARD: usage (3/4)
Particular features of the locking
system (continued)
If a door is open or not properly closed:
– when locking using the sensor 3,
the vehicle will lock/unlock in quick
succession, but the hazard warning
lights and the side indicator lights will
not flash;
– the vehicle will not lock as you move away.
If the RENAULT card has been within
range for approximately 15 minutes,
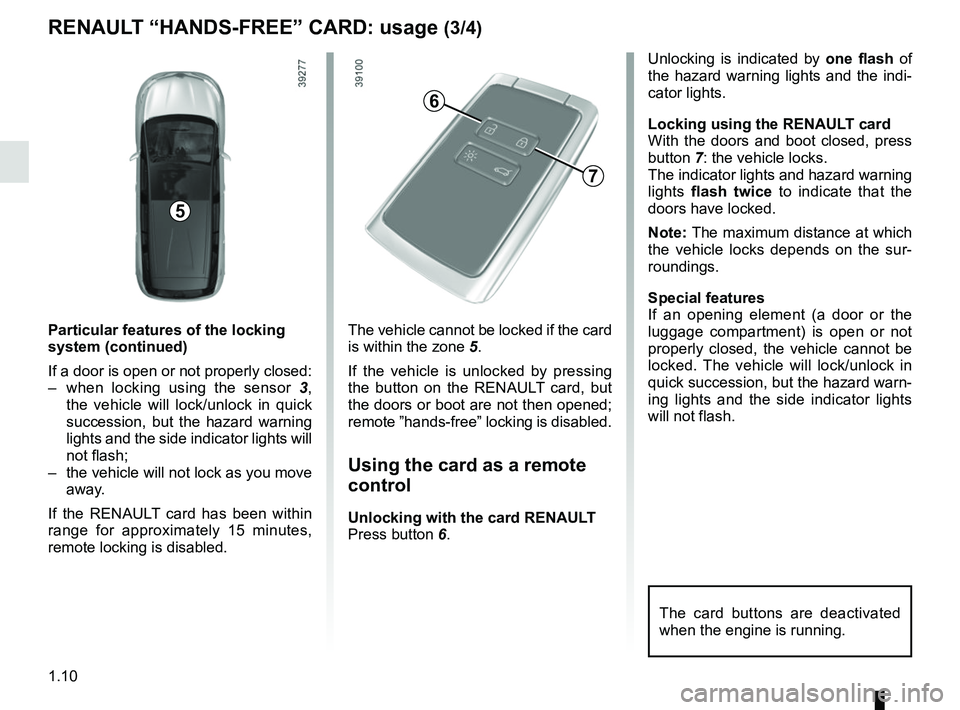
remote locking is disabled.The vehicle cannot be locked if the card
is within the zone 5.
If the vehicle is unlocked by pressing
the button on the RENAULT card, but
the doors or boot are not then opened;
remote ”hands-free” locking is disabled.
Using the card as a remote
control
Unlocking with the card RENAULT
Press button 6. Unlocking is indicated by
one flash of
the hazard warning lights and the indi-
cator lights.
Locking using the RENAULT card
With the doors and boot closed, press
button 7: the vehicle locks.
The indicator lights and hazard warning
lights flash twice to indicate that the
doors have locked.
Note: The maximum distance at which
the vehicle locks depends on the sur-
roundings.
Special features
If an opening element (a door or the
luggage compartment) is open or not
properly closed, the vehicle cannot be
locked. The vehicle will lock/unlock in
quick succession, but the hazard warn-
ing lights and the side indicator lights
will not flash.
6
7
5
The card buttons are deactivated
when the engine is running.
Page 31 of 364
1.25
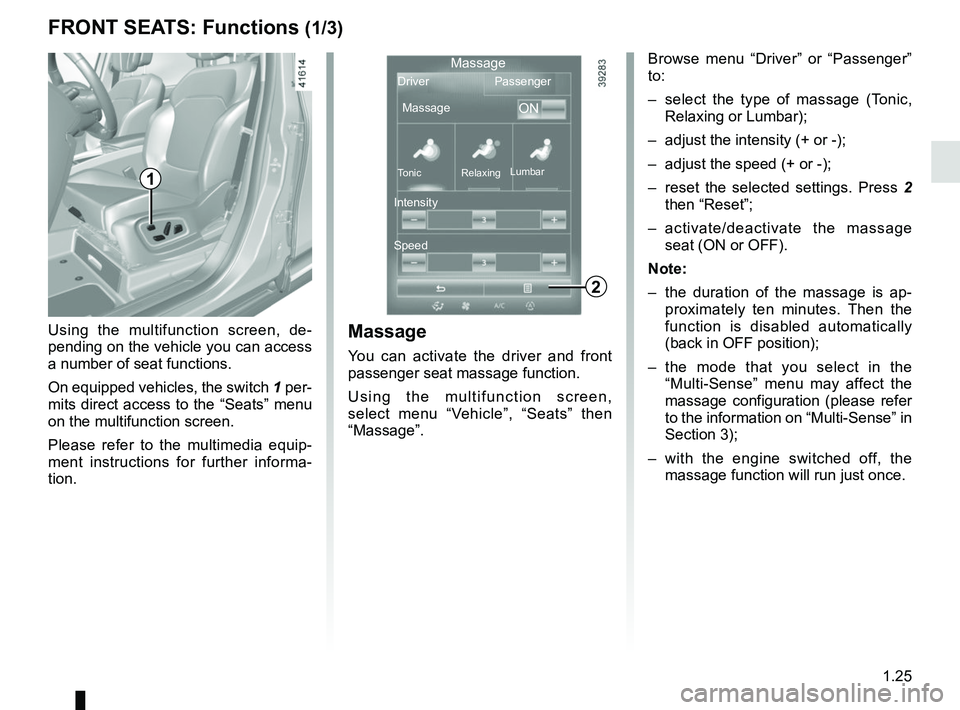
FRONT SEATS: Functions (1/3)Massage
You can activate the driver and front
passenger seat massage function.
Using the multifunction screen,
select menu “Vehicle”, “Seats” then
“Massage”. Browse menu “Driver” or “Passenger”
to:
– select the type of massage (Tonic,
Relaxing or Lumbar);
– adjust the intensity (+ or -);
– adjust the speed (+ or -);
– reset the selected settings. Press 2
then “Reset”;
– activate/deactivate the massage seat (ON or OFF).
Note:
– the duration of the massage is ap- proximately ten minutes. Then the
function is disabled automatically
(back in OFF position);
– the mode that you select in the “Multi-Sense” menu may affect the
massage configuration (please refer
to the information on “Multi-Sense” in
Section 3);
– with the engine switched off, the massage function will run just once.
2
Using the multifunction screen, de-
pending on the vehicle you can access
a number of seat functions.
On equipped vehicles, the switch 1 per-
mits direct access to the “Seats” menu
on the multifunction screen.
Please refer to the multimedia equip-
ment instructions for further informa-
tion.
1
Massage
Passenger
Driver
Massage
ON
Tonic Relaxing Lumbar
Intensity
Speed
Page 33 of 364
1.27
FRONT SEATS: Functions (3/3)
Position
It is possible to store the driving posi-
tion of the driver seat.
The driving position includes all the
electric settings for the seat base and
seatback.
The driving position can be stored and
recalled by pressing the buttons:
– RENAULT hands-free card detected;
– when the driver’s door is opened.
3
3
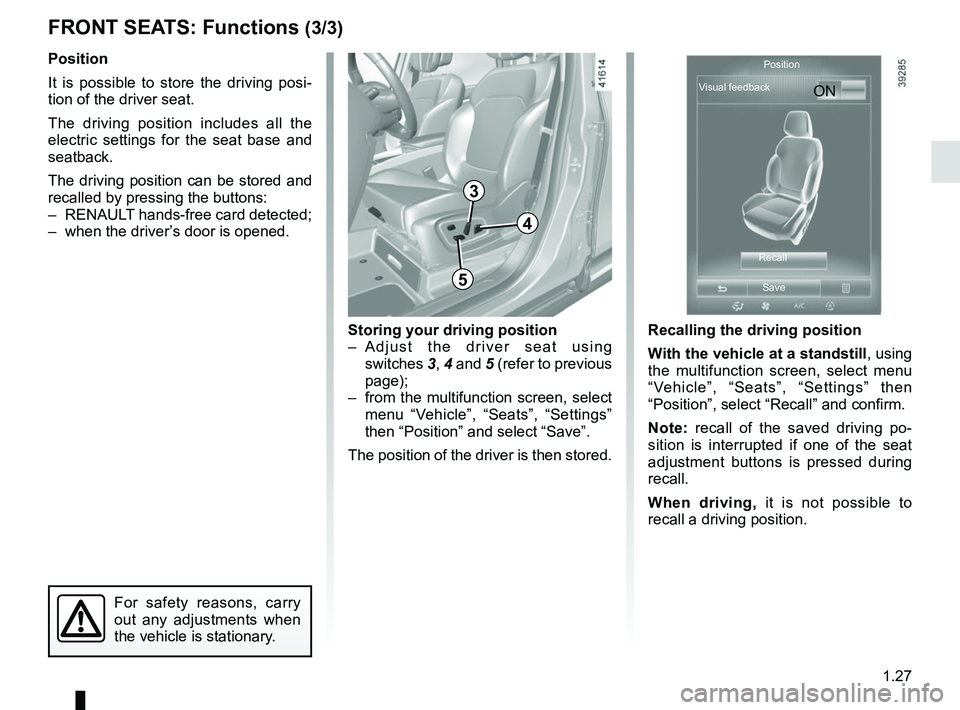
Recalling the driving position
With the vehicle at a standstill, using
the multifunction screen, select menu
“Vehicle”, “Seats”, “Settings” then
“Position”, select “Recall” and confirm.
Note: recall of the saved driving po-
sition is interrupted if one of the seat
adjustment buttons is pressed during
recall.
When driving, it is not possible to
recall a driving position.
4
5
For safety reasons, carry
out any adjustments when
the vehicle is stationary.
Storing your driving position
– Adjust the driver seat using switches 3, 4 and 5 (refer to previous
page);
– from the multifunction screen, select menu “Vehicle”, “Seats”, “Settings”
then “Position” and select “Save”.
The position of the driver is then stored. ON
Position
Visual feedback
RecallSave
Page 48 of 364
1.42
CHILD SAFETY: choosing a child seat mounting (1/3)
There are two ways of attaching child
seats: via the seat belt or using the
ISOFIX system.
The seat belt must never
be twisted or the tension
relieved. Never pass the
shoulder strap under the
arm or behind the back.
Check that the seat belt has not
been damaged by sharp edges.
If the seat belt does not operate nor-
mally, it will not protect the child.
Consult an approved dealer. Do not
use this seat until the seat belt has
been repaired.
Do not use the child seat
if it may unfasten the seat
belt restraining it: the base
of the seat must not rest on
the buckle and/or catch of the seat
belt.
Attachment via the seat belt
The seat belt must be adjusted to
ensure that it is effective in the event of
harsh braking or an impact.
Ensure that the strap paths indicated
by the child seat manufacturer are re-
spected.
Always check that the seat belt is cor-
rectly fastened by pulling it up, then
pulling it out fully whilst pressing on the
child seat.
Check that the seat is correctly held by
moving it from side to side and back
to front: the seat should remain firmly
fixed.
Check that the child seat has not been
installed at an angle and that it is not
resting against a window.
Page 49 of 364
1.43
The ISOFIX anchorage
points have been exclu-
sively designed for child
seats with the ISOFIX
system. Never fit a different type of
child seat, seat belt or other objects
to these anchorage points. Check
that nothing is obstructing the an-
chorage points.
If your vehicle has been involved in
a road accident, have the ISOFIX
anchorage points checked and re-
place your child seat.
Attachment using the ISOFIX
system
Approved child seats ISOFIX are stand-
ardised in accordance with current reg-
ulations if any of the four cases below
applies:
– ISOFIX universal 3-point forward- facing seat;
– ISOFIX semi-universal 2-point seat;
– Specific;
– i-Size Which has:
– either a belt which attaches to the
third ring of the seat concerned;
– or a strut that rests on the vehi-
cle floor, compatible with the ap-
proved seat i-Size, the role of
which is to prevent the child seat
from moving in the event of a col-
lision.
In the latter three cases check that your
child seat can be installed by consulting
the list of compatible vehicles.
No modifications may be
made to the component
parts of the restraint system
(ISOFIX seat belts, seats
and their mountings) originally fitted.
Before using an ISOFIX
child seat that you pur-
chased for another vehicle,
check that its installation is
authorised. Consult the list of ve-
hicles which can be fitted with the
seat from the equipment manufac-
turer.
CHILD SAFETY: choosing a child seat mounting (2/3)
Attach the child seat with the ISOFIX
locks, if these are provided. The ISOFIX
system allows quick, easy, safe fitting.
The ISOFIX system consists of 2 rings
and, in some cases, a third ring.
Page 52 of 364
1.46
CHILD SAFETY: fitting a child seat, general information (2/2)
In the rear seat
A carrycot can be installed across the
vehicle and will take up at least two
seats. Position the child with his or her
feet nearest the door.
Move the front seat as far forward as
possible to install a rear-facing child
seat, then move back the seat in front
as far as it will go, although without al-
lowing it to come into contact with the
child seat.
For the safety of the child in the for-
ward-facing position:
– move the relevant seat backwards as far as possible;
– move the seat in front of the child forwards, and set the position of the
seatback to avoid contact between
the seat and the child’s legs.
Always remove the headrest from the
rear seat used for the child seat (see
“Rear headrests” in Section 3). If nec-
essary, position the rear seat as far
back as possible. This must be done
before fitting the child seat.
Check that the child seat is resting
against the back of the rear seat.
Ensure that the child seat
or the child’s feet do not
prevent the front seat from
locking correctly. Refer to
the information on the “Front seat”
in Section 1 or the “Rear seats” in
Section 3.
The floor of your vehicle
has storage spaces. Before
installing a child seat with
a floor support, ensure that
this seat can be correctly installed
by consulting the list of compatible
vehicles supplied with the child seat.
Risk of serious injury in the event
of sudden braking or accident.
When fitting a child seat
(Group 2 or 3 booster seat),
check that the seat belts op-
erate (wind) correctly: refer
to Section 1 “Rear seat belts”. If
necessary, adjust the position of the
vehicle seat.
For 7-seater vehicles, a
child seat with a floor sup-
port should never be in-
stalled on the third row rear
seats.
For 7-seater vehicles, the second row
rear seats must be pushed forward
before a child is seated in the third row
rear seats.
Page 55 of 364

1.49
X = Seat not suitable for fitting child seats of this type.
U = Seat which allows a child seat with “Universal” approval to be ins\
talled using a seat belt; check that it can be fitted.
(2) A carrycot can be installed across the vehicle and will take up at least \
two seats. Position the child with his or her feet nea rest
the door.
(3) If necessary, position the vehicle seat as far back as possible. Move the front seat\
as far forward as possible to install a re ar-
facing child seat, then move back the seat in front as far as it will go\
, although without allowing it to come into contact with the
child seat.
(4) In all situations, remove the rear headrest of the seat on which the chi\
ld seat is positioned. This must be done before fitting the
child seat. Please refer to the information on the “Rear headrests”\
in Section 3. Move the seat in front of the child forwards,
move the seatback forward to avoid contact between the seat and the chil\
d’s legs.
(5) Raise the seat to the maximum and position it as far back as possible, \
tilting the seatback slightly (approximately 25°).
CHILD SEATS: attachment by seat belt (3/6)
Page 57 of 364

X = Seat not suitable for fitting child seats of this type.
U = Seat which allows a child seat with “Universal” approval to be ins\
talled using")
1.51
CHILD SEATS: attachment by seat belt (5/6)
X = Seat not suitable for fitting child seats of this type.
U = Seat which allows a child seat with “Universal” approval to be ins\
talled using a seat belt; check that it can be fitted.
(2) A carrycot can be installed across the vehicle and will take up at least \
two seats. Position the child with his or her feet nea rest
the door.
(3) If necessary, position the vehicle seat as far back as possible. Move the front seat\
as far forward as possible to install a re ar-
facing child seat, then move back the seat in front as far as it will go\
, although without allowing it to come into contact with the
child seat.
(4) In all situations, remove the rear headrest of the seat on which the chi\
ld seat is positioned. This must be done before fitting the
child seat. Please refer to the information on the “Rear headrests”\
in Section 3. Move the seat in front of the child forwards,
move the seatback forward to avoid contact between the seat and the chil\
d’s legs.
(5) Push the seat(s) in front of the child in a third row seat as far forw\
ard as possible.
(6) Raise the seat to the maximum and position it as far back as possible, t\
ilting the seatback slightly (approximately 25°).
(7) RISK OF DEATH OR SERIOUS INJURY: a child seat with a floor support must never be fitted.
Page 84 of 364
1.78
TRIP COMPUTER: general information (1/2)
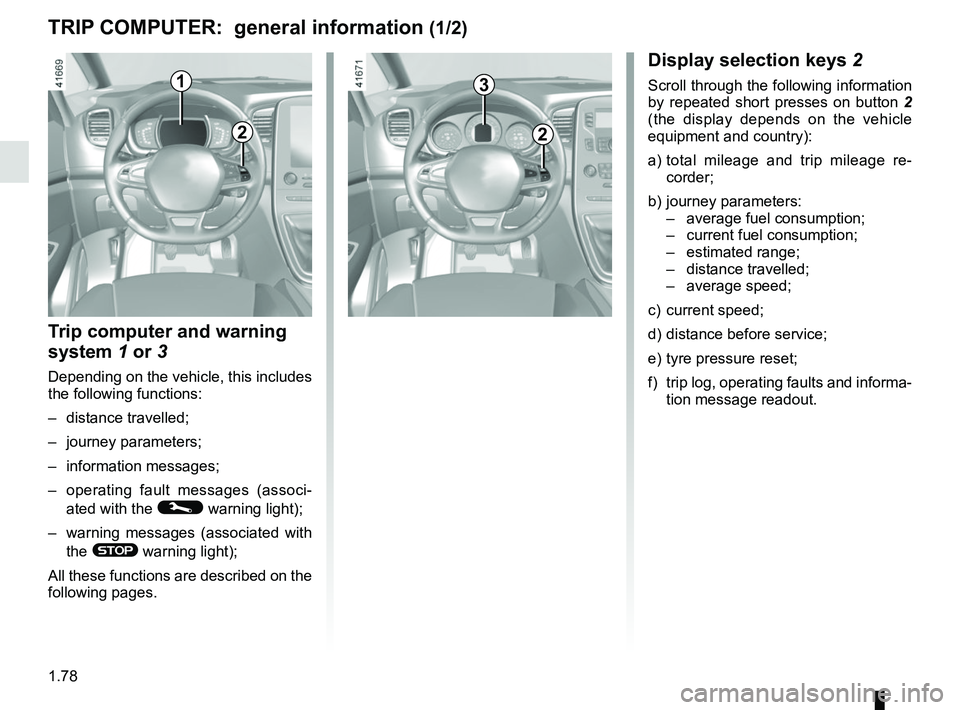
1
Display selection keys 2
Scroll through the following information
by repeated short presses on button 2
(the display depends on the vehicle
equipment and country):
a) total mileage and trip mileage re-
corder;
b) journey parameters: – average fuel consumption;
– current fuel consumption;
– estimated range;
– distance travelled;
– average speed;
c) current speed;
d) distance before service;
e) tyre pressure reset;
f) trip log, operating faults and informa- tion message readout.
Trip computer and warning
system 1 or 3
Depending on the vehicle, this includes
the following functions:
– distance travelled;
– journey parameters;
– information messages;
– operating fault messages (associ-
ated with the
© warning light);
– warning messages (associated with the
® warning light);
All these functions are described on the
following pages.
2
3
2