LED RENAULT TALISMAN 2016 1.G Owners Manual
[x] Cancel search | Manufacturer: RENAULT, Model Year: 2016, Model line: TALISMAN, Model: RENAULT TALISMAN 2016 1.GPages: 328, PDF Size: 3.39 MB
Page 16 of 328
1.10
RENAULT CARD: use (4/5)
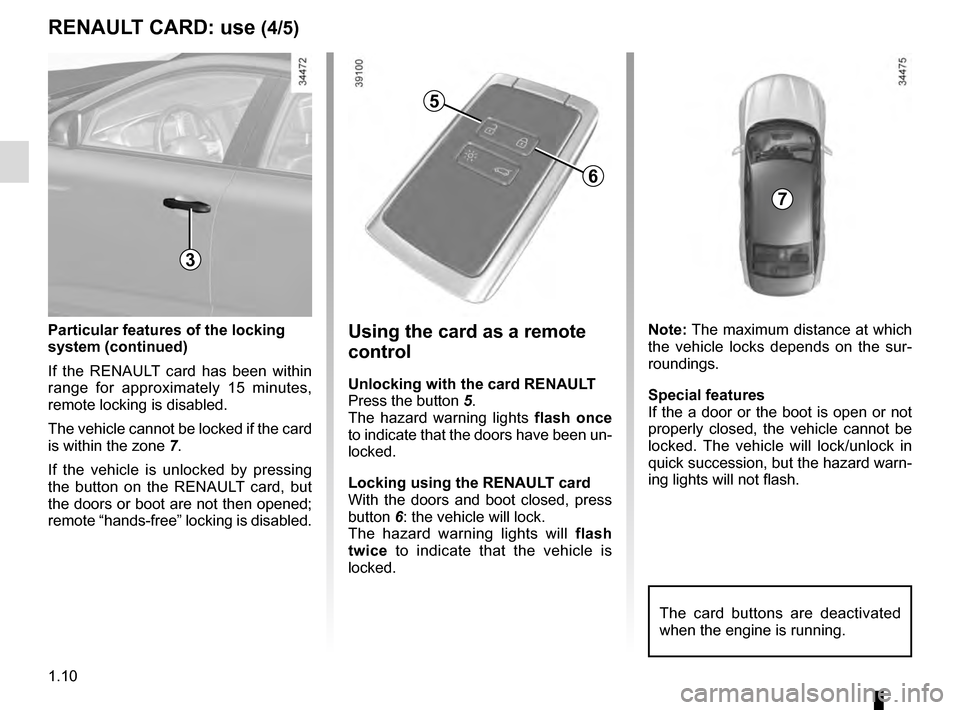
Particular features of the locking
system (continued)
If the RENAULT card has been within
range for approximately 15 minutes,
remote locking is disabled.
The vehicle cannot be locked if the card
is within the zone 7.
If the vehicle is unlocked by pressing
the button on the RENAULT card, but
the doors or boot are not then opened;
remote “hands-free” locking is disabled.Using the card as a remote
control
Unlocking with the card RENAULT
Press the button 5.
The hazard warning lights flash once
to indicate that the doors have been un-
locked.
Locking using the RENAULT card
With the doors and boot closed, press
button 6: the vehicle will lock.
The hazard warning lights will flash
twice to indicate that the vehicle is
locked. Note: The maximum distance at which
the vehicle locks depends on the sur-
roundings.
Special features
If the a door or the boot is open or not
properly closed, the vehicle cannot be
locked. The vehicle will lock/unlock in
quick succession, but the hazard warn-
ing lights will not flash.
5
6
7
The card buttons are deactivated
when the engine is running.
3
Page 47 of 328
1.41
Attachment using the ISOFIX
system
Approved child seats ISOFIX are stand-
ardised in accordance with current reg-
ulations if any of the four cases below
applies:
– ISOFIX universal 3-point forward- facing seat;
– ISOFIX semi-universal 2-point seat;
– Specific;
– i-Size Which has:
– either a belt which attaches to the
third ring of the seat concerned;
– or a stay that rests on the vehi-
cle floor, compatible with the ap-
proved seat i-Size, the role of
which is to prevent the child seat
from moving in the event of a col-
lision.
In the latter three cases check that your
child seat can be installed by consulting
the list of compatible vehicles.
CHILD SAFETY: choosing a child seat mounting (1/2)
There are two ways of attaching child
seats: via the seat belt or using the
ISOFIX system.
Attachment via the seat belt
The seat belt must be adjusted to
ensure that it is effective in the event of
harsh braking or an impact.
Ensure that the strap paths indicated
by the child seat manufacturer are re-
spected.
Always check that the seat belt is cor-
rectly fastened by pulling it up, then
pulling it out fully whilst pressing on the
child seat.
Check that the seat is correctly held by
moving it from side to side and back
to front: the seat should remain firmly
fixed.
Check that the child seat has not been
installed at an angle and that it is not
resting against a window.
No modifications may be
made to the component
parts of the restraint system
(ISOFIX seat belts, seats
and their mountings) originally fitted.
The seat belt must never
be twisted or the tension
relieved. Never pass the
shoulder strap under the
arm or behind the back.
Check that the seat belt has not
been damaged by sharp edges.
If the seat belt does not operate nor-
mally, it will not protect the child.
Consult an approved dealer. Do not
use this seat until the seat belt has
been repaired.
Do not use the child seat
if it may unfasten the seat
belt restraining it: the base
of the seat must not rest on
the buckle and/or catch of the seat
belt.
Before using an ISOFIX
child seat that you pur-
chased for another vehicle,
check that its installation is
authorised. Consult the list of ve-
hicles which can be fitted with the
seat from the equipment manufac-
turer.
Page 50 of 328
1.44
CHILD SAFETY: fitting a child seat, general information (2/2)
In the rear seat
A carrycot can be installed across the
vehicle and will take up at least two
seats. Position the child with his or her
feet nearest the door.
Move the front seat as far forward as
possible to install a rear-facing child
seat, then move back the seat in front
as far as it will go, although without al-
lowing it to come into contact with the
child seat.
For the safety of a child in the facing
forwards, move the seat as far back as
possible and move the seat in front of
the child forward, remembering to move
the seatback forwards to avoid contact
between the seat and the child’s legs.
Always remove the headrest from the
rear seat used for the child seat (see
“Rear headrests” in Section 3). If nec-
essary, position the vehicle seat as far
back as possible. This must be done
before fitting the child seat.
Check that the child seat is resting
against the back of the vehicle seat.
Ensure that the child seat or
the child’s feet do not pre-
vent the front seat from loc-
king correctly. Refer to the
information on the “Front seat” in
Section 1 or “Rear seat operation”
in Section 3.
When fitting a child seat
(Group 2 or 3 booster seat),
check that the seat belts op-
erate (wind) correctly: refer
to Section 1 “Rear seat belts”. If
necessary, adjust the position of the
vehicle seat.
A child seat with support
struts must never be in-
stalled on the rear centre
seat. RISK OF DEATH OR
SERIOUS INJURY.
Page 53 of 328

X = Seat not suitable for fitting child seats of this type.
U = Seat which allows a child seat with “Universal” approval to be ins\
talled using")
1.47
CHILD SEATS: attachment by seat belt (3/3)
X = Seat not suitable for fitting child seats of this type.
U = Seat which allows a child seat with “Universal” approval to be ins\
talled using a seat belt; check that it can be fitted.
(2) A carrycot can be installed across the vehicle and will take up at least \
two seats. Position the child with his or her feet nea rest
the door.
(3) If necessary, position the vehicle seat as far back as possible. Move the front seat\
as far forward as possible to install a re ar-
facing child seat, then move back the seat in front as far as it will go\
, although without allowing it to come into contact with the
child seat.
(4) In all situations, remove the rear headrest of the seat on which the chi\
ld seat is positioned. This must be done before fitting the
child seat. Please refer to the information on the “Rear headrests”\
in Section 3. Move the seat in front of the child forwards,
move the seatback forward to avoid contact between the seat and the chil\
d’s legs.
(5) Raise the seat to the maximum and position it as far back as possible, \
tilting the seatback slightly (approximately 25°).
Page 55 of 328

1.49
X = Seat not suitable for fitting child seats ISOFIX.
IUF/IL = On equipped vehicles, seat which allows an approved “Universal/semi-u\
niversal” or “vehicle specific” child seat to be at-
tached using the ISOFIX system; check that it can be fitted.
i-U = Suitable for the i-Size restraint devices in the “universal” forwa\
rd-facing and backward-facing category.
(1) A carrycot can be installed across the vehicle and will take up at least \
two seats. Position the child with his or her feet nea rest
the door.
(2) If necessary, position the vehicle seat as far back as possible. Move the front seat\
as far forward as possible to install a re ar-
facing child seat, then move back the seat in front as far as it will go\
, although without allowing it to come into contact with the
child seat.
(3) In all situations, remove the rear headrest of the seat on which the chi\
ld seat is positioned. This must be done before fitting the
child seat. Please refer to the information on the “Rear headrests”\
in Section 3. Move the seat in front of the child forwards,
move the seatback forward to avoid contact between the seat and the chil\
d’s legs.
CHILD SEATS: attachment using the ISOFIX system (2/3)
Page 72 of 328
1.66
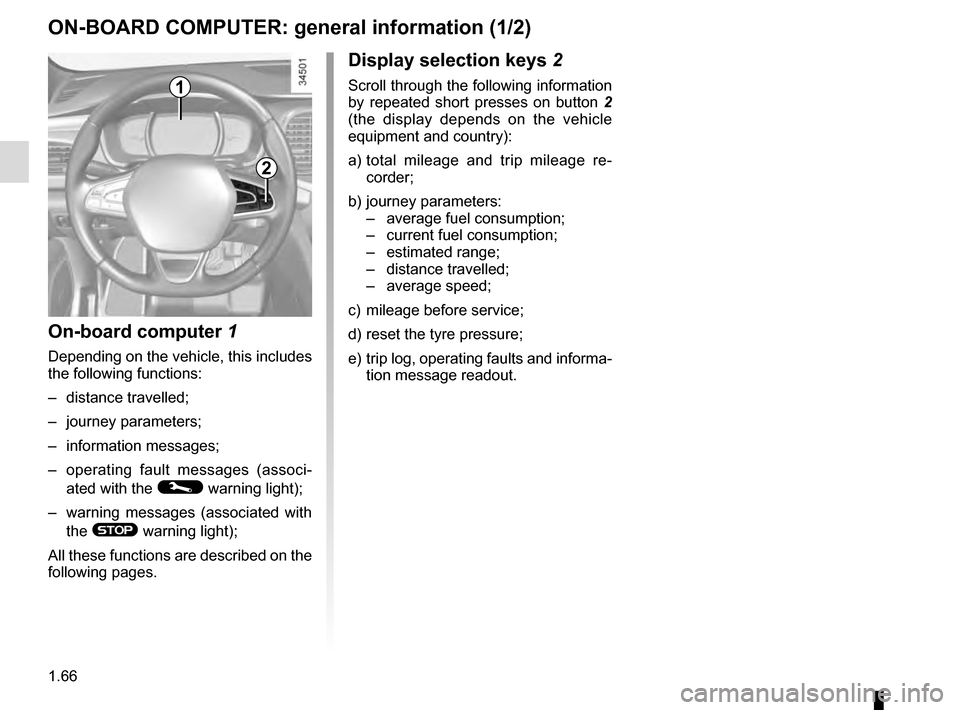
1
Display selection keys 2
Scroll through the following information
by repeated short presses on button 2
(the display depends on the vehicle
equipment and country):
a) total mileage and trip mileage re-
corder;
b) journey parameters: – average fuel consumption;
– current fuel consumption;
– estimated range;
– distance travelled;
– average speed;
c) mileage before service;
d) reset the tyre pressure;
e) trip log, operating faults and informa- tion message readout.
On-board computer 1
Depending on the vehicle, this includes
the following functions:
– distance travelled;
– journey parameters;
– information messages;
– operating fault messages (associ-
ated with the
© warning light);
– warning messages (associated with the
® warning light);
All these functions are described on the
following pages.
ON-BOARD COMPUTER: general information (1/2)
2
Page 73 of 328
1.67
3
ON-BOARD COMPUTER: general information (2/2)
Interpreting some of the
values displayed after
resetting
The values showing average fuel con-
sumption and average speed will
become more stable and reliable the
further you have travelled since the last
time the Reset button was pressed.
The average fuel consumption may de-
crease when:
– the vehicle stops accelerating;
– the engine reaches its operating
temperature (if the engine was cold
when the reset key was pressed);
– when driving from an urban area
onto the open road.
Automatic resetting of the
journey parameters
Resetting occurs automatically when
the maximum value of any of the pa-
rameters is exceeded.
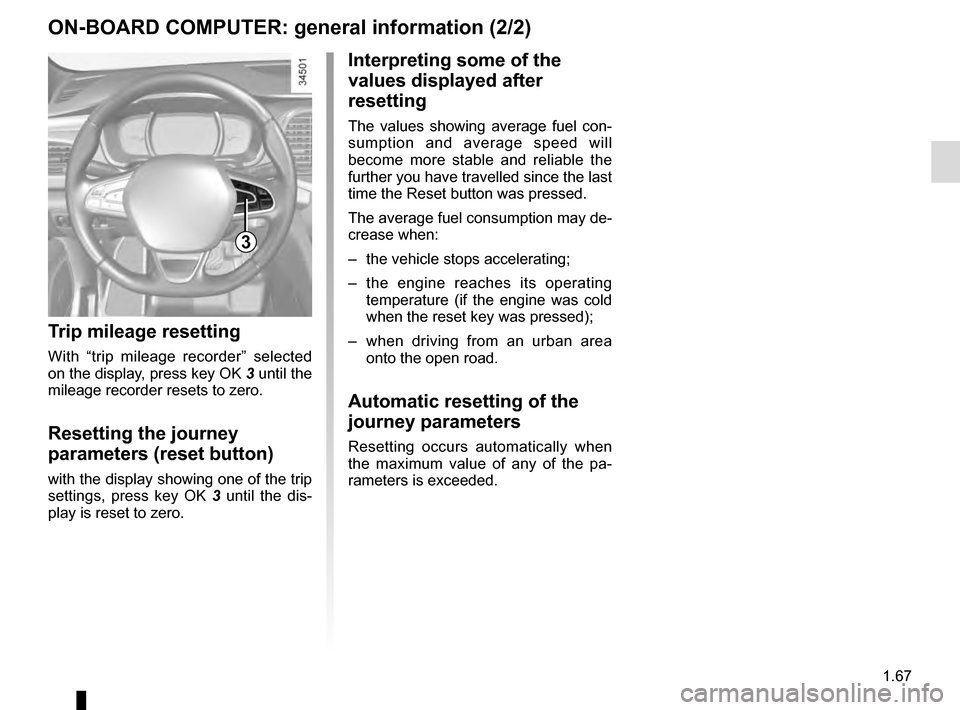
Trip mileage resetting
With “trip mileage recorder” selected
on the display, press key OK 3 until the
mileage recorder resets to zero.
Resetting the journey
parameters (reset button)
with the display showing one of the trip
settings, press key OK 3 until the dis-
play is reset to zero.
Page 74 of 328

The display of information shown below DEPENDS ON THE VEHICLE EQUIPMENT \
AND COUNTRY.
Examples of selectionsInterpreting the display selected
101778 km
a)")
1.68
ON-BOARD COMPUTER: trip settings (1/5)
The display of information shown below DEPENDS ON THE VEHICLE EQUIPMENT \
AND COUNTRY.
Examples of selectionsInterpreting the display selected
101778 km
a) Total mileage and trip mileage recorder.
112.4 km
Middle
b) Journey parameters: Average fuel consumption.
The value is displayed after having travelled at least 400 metres since \
the last
reset.
5.8 L/100
Current
Current fuel consumption. This value is displayed after a speed of approximately 20 mph (30 km/h)\
is reached.
7.4 L/100
Page 75 of 328

The display of information shown below DEPENDS ON THE VEHICLE EQUIPMENT \
AND COUNTRY.
Examples of selectionsInterpreting the display selected
Range
b) Jou")
1.69
ON-BOARD COMPUTER: trip settings (2/5)
The display of information shown below DEPENDS ON THE VEHICLE EQUIPMENT \
AND COUNTRY.
Examples of selectionsInterpreting the display selected
Range
b) Journey parameters (continued):
Estimated range with remaining fuel.
The value is displayed after driving 400 metres.
541 km
Distance
Distance travelled since last reset.522 km
Middle
Average speed since the last reset.
The value is displayed after driving 400 metres.
123.4 km/H
Page 77 of 328

Examples of selectionsInterpreting the display selected
On-board comp")
1.71
The display of information shown below DEPENDS ON THE VEHICLE EQUIPMENT \
AND COUNTRY.
ON-BOARD COMPUTER: trip settings (4/5)
Examples of selectionsInterpreting the display selected
On-board computer with distance before
next service message (cntd.)
c) Mileage before service or oil change.Mileage before service
With the ignition on, the engine not running and the display
selected “Reichweite bis zur Wartung”, press button OK for about
5 seconds to display the mileage before the next service, then
press button 2 to view the mileage before the next oil change
(distance or time remaining before the next service). When the
distance value approaches its limit, there are several possible
scenarios:
– distance/time remaining less than 900 miles (1,500 km) or
one month : the message “Service due in” is displayed, ac-
companied by the nearest term (distance or time);
– range equal to 0 km/miles or service date reached: the
message “Service required” is displayed accompanied by
warning light
©.
The vehicle requires an oil change as soon as possible.
Service Intervals
Oil change in
30 000 Kms / 24 mo
Service due in
300 Kms / 24 days
Service required
Depending on the vehicle, the mileage before an oil change varies accord\
ing to the driving style (frequent driving at low speed ,
door-to-door journeys, extensive use at idling speed, towing a trailer, etc.). The distance remaining until the next oil change can
therefore decrease more quickly in some cases than the actual distance t\
ravelled.
Resetting: to reset the mileage before a service, press and hold button 2 for approximately 10 seconds until the display shows
the range permanently.
Note: If a service is performed without changing the engine oil, only the mi\
leage before the next service should be reset. In the
event of an oil change, both the distance before the next service and th\
e next oil change should be reset.