RENAULT TWINGO 2012 2.G Owners Manual
Manufacturer: RENAULT, Model Year: 2012, Model line: TWINGO, Model: RENAULT TWINGO 2012 2.GPages: 220, PDF Size: 6.73 MB
Page 121 of 220
sunroof.................................................. (up to the end of the DU)
3.23
ENG_UD4077_2
Toit ouvrant à commande électrique (X44 - Renault)
ENG_NU_952-4_X44_Renault_3
Toit ouvrant à commande électrique
ElECTRIC SuNRooF
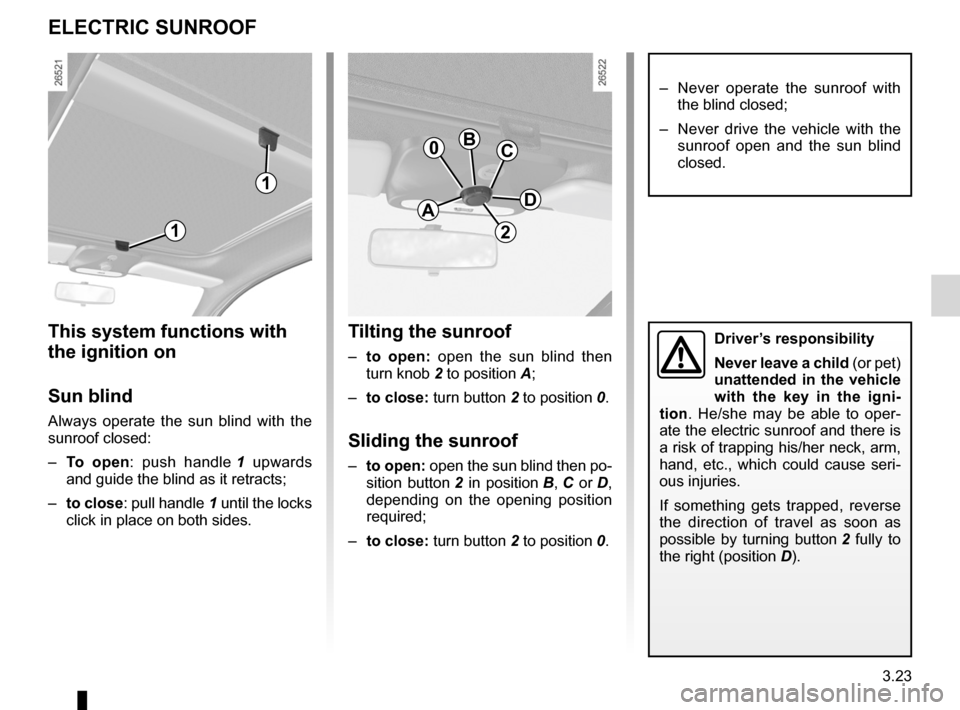
This system functions with
the ignition on
Sun blind
Always operate the sun blind with the
sunroof closed:
– To open : push handle 1 upwards
and guide the blind as it retracts;
– to close: pull handle 1 until the locks
click in place on both sides.
Tilting the sunroof
– to open: open the sun blind then
turn knob 2 to position A;
– to close: turn button 2 to position 0.
Sliding the sunroof
– to open: open the sun blind then po-
sition button 2 in position B , C or D ,
depending on the opening position
required;
– to close: turn button 2 to position 0.
– Never operate the sunroof with
the blind closed;
– Never drive the vehicle with the
sunroof open and the sun blind
closed.
Driver’s responsibility
Never leave a child (or pet)
unattended in the vehicle
with the key in the igni -
tion . He/she may be able to oper -
ate the electric sunroof and there is
a risk of trapping his/her neck, arm,
hand, etc., which could cause seri -
ous injuries.
If something gets trapped, reverse
the direction of travel as soon as
possible by turning button 2 fully to
the right (position D).
1
1
A
0BC
D
2
Page 122 of 220
3.24
ENG_UD4077_2
Toit ouvrant à commande électrique (X44 - Renault)
ENG_NU_952-4_X44_Renault_3
Special features
For your safety your vehicle is fitted
with an anti-pinch facility. When a
window encounters resistance whilst
closing (e.g. someone’s fingers, an ani-
mal’s paw or the branch of a tree, etc.),
it stops and lowers by several centime-
tres.
ElECTRIC SuNRooF (continued)
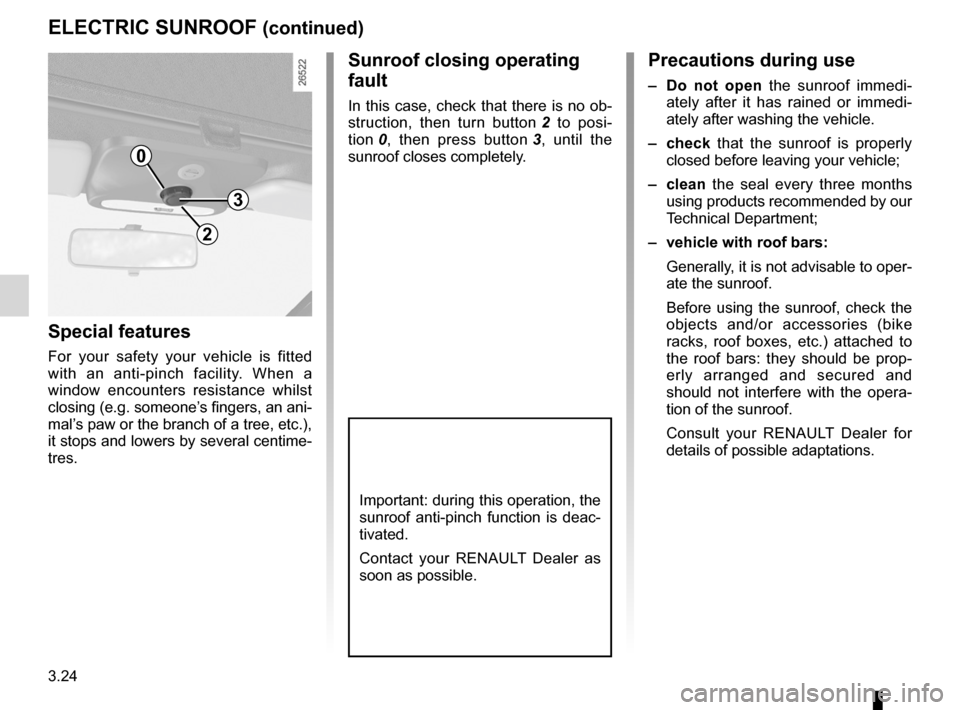
Sunroof closing operating
fault
In this case, check that there is no ob-
struction, then turn button 2 to posi -
tion 0 , then press button 3 , until the
sunroof closes completely.
Important: during this operation, the
sunroof anti-pinch function is deac-
tivated.
Contact your RENAULT Dealer as
soon as possible.
Precautions during use
– Do not open the sunroof immedi -
ately after it has rained or immedi -
ately after washing the vehicle.
– check that the sunroof is properly
closed before leaving your vehicle;
– clean the seal every three months
using products recommended by our
Technical Department;
– vehicle with roof bars:
Generally, it is not advisable to oper-
ate the sunroof.
Before using the sunroof, check the
objects and/or accessories (bike
racks, roof boxes, etc.) attached to
the roof bars: they should be prop -
erly arranged and secured and
should not interfere with the opera -
tion of the sunroof.
Consult your RENAULT Dealer for
details of possible adaptations.
0
3
2
Page 123 of 220
storage compartments .......................... (up to the end of the DU)
storage compartment ............................(up to the end of the DU)
3.25
ENG_UD24510_5
Rangements / Aménagements de l habitacle (X44 - Renault)
ENG_NU_952-4_X44_Renault_3
Passenger compartment storage space and fittings
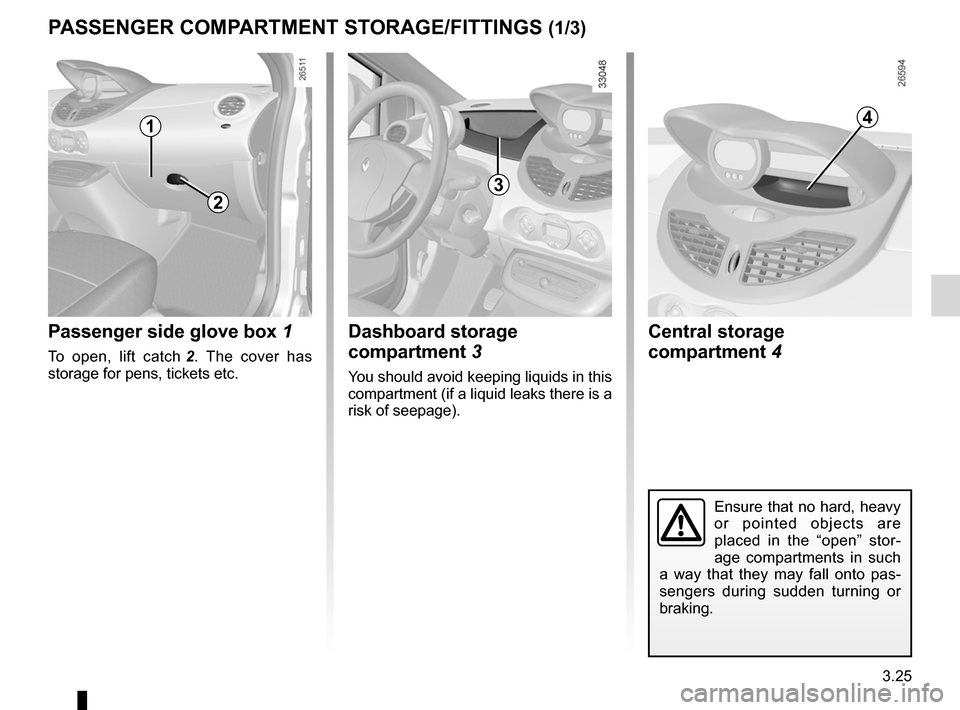
PASSENgER CoMPARTMENT ST oRAgE/FITTINgS (1/3)
Passenger side glove box 1
To open, lift catch 2 . The cover has
storage for pens, tickets etc.
Dashboard storage
compartment 3
You should avoid keeping liquids in this
compartment (if a liquid leaks there is a
risk of seepage).
Central storage
compartment 4
Ensure that no hard, heavy
or pointed objects are
placed in the “open” stor -
age compartments in such
a way that they may fall onto pas -
sengers during sudden turning or
braking.
2
1
3
4
Page 124 of 220
3.26
ENG_UD24510_5
Rangements / Aménagements de l habitacle (X44 - Renault)
ENG_NU_952-4_X44_Renault_3
Jaune NoirNoir texte
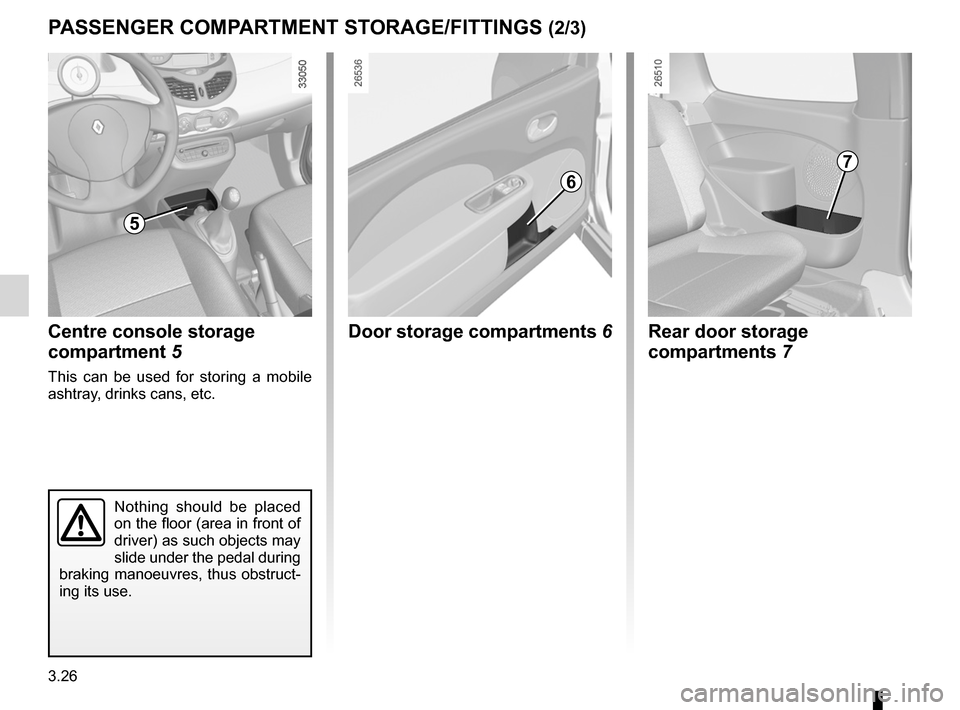
PASSENgER CoMPARTMENT ST oRAgE/FITTINgS (2/3)
Centre console storage
compartment 5
This can be used for storing a mobile
ashtray, drinks cans, etc.
5
Nothing should be placed
on the floor (area in front of
driver) as such objects may
slide under the pedal during
braking manoeuvres, thus obstruct-
ing its use.
Door storage compartments 6Rear door storage
compartments 7
6
7
Page 125 of 220
JauneNoirNoir texte
3.27
ENG_UD24510_5
Rangements / Aménagements de l habitacle (X44 - Renault)
ENG_NU_952-4_X44_Renault_3
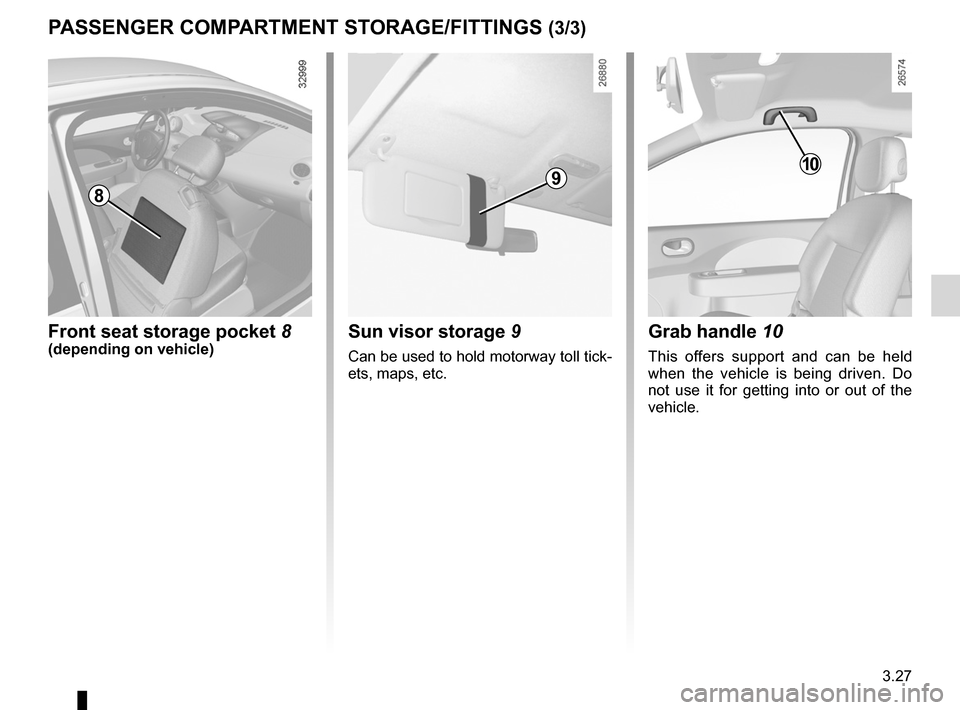
PASSENgER CoMPARTMENT ST oRAgE/FITTINgS (3/3)
Front seat storage pocket 8
(depending on vehicle)Sun visor storage 9
Can be used to hold motorway toll tick-
ets, maps, etc.
grab handle 10
This offers support and can be held
when the vehicle is being driven. Do
not use it for getting into or out of the
vehicle.
8
109
Page 126 of 220
ashtray .................................................. (up to the end of the DU)
cigar lighter ........................................... (up to the end of the DU)
accessories socket ............................... (up to the end of the DU)
MP3 ....................................................................... (current page)
3.28
ENG_UD24717_4
Cendrier - Allume-cigares (X44 - Renault)
ENG_NU_952-4_X44_Renault_3
Ashtray/cigarette lighter/accessories sockets
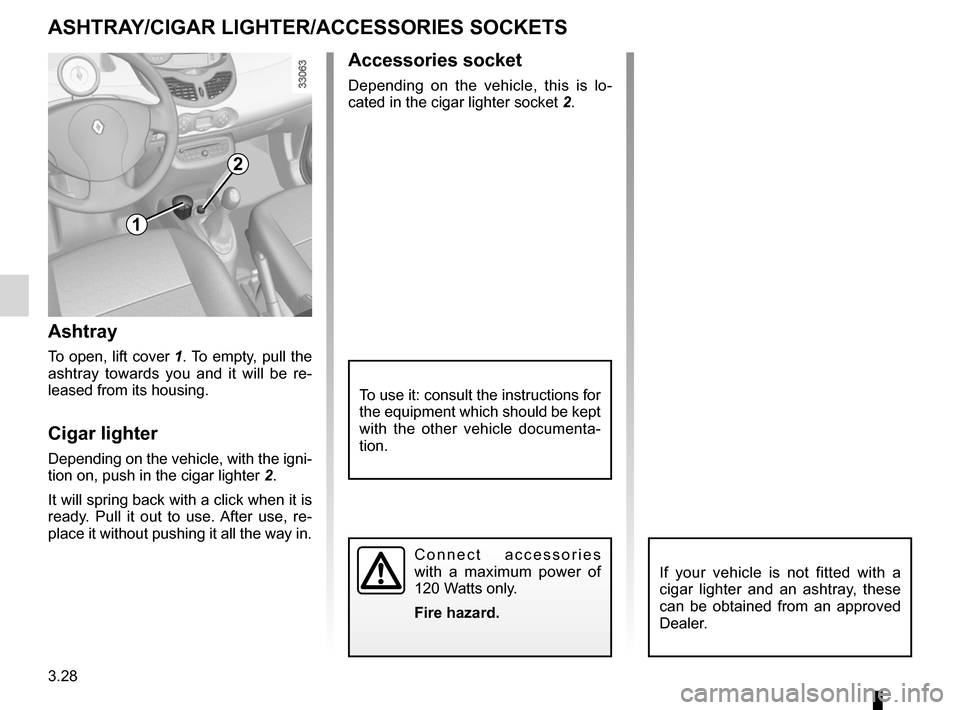
AShTRA y/CIgAR lIghTER/ACCESSoRIES SoCkETS
Ashtray
To open, lift cover 1. To empty, pull the
ashtray towards you and it will be re -
leased from its housing.
Cigar lighter
Depending on the vehicle, with the igni -
tion on, push in the cigar lighter 2.
It will spring back with a click when it is
ready. Pull it out to use. After use, re -
place it without pushing it all the way in.
Accessories socket
Depending on the vehicle, this is lo -
cated in the cigar lighter socket 2.
1
2
To use it: consult the instructions for
the equipment which should be kept
with the other vehicle documenta -
tion.
C o n n e c t a c c e s s o r i e s
with a maximum power of
120 Watts only.
Fire hazard.
If your vehicle is not fitted with a
cigar lighter and an ashtray, these
can be obtained from an approved
Dealer.
Page 127 of 220
headrest................................................................. (current page)
seats adjustment ....................................................... (current page)
3.29
ENG_UD20300_3
Appuis-tête arrière (X44 - Renault)
ENG_NU_952-4_X44_Renault_3
Rear headrests
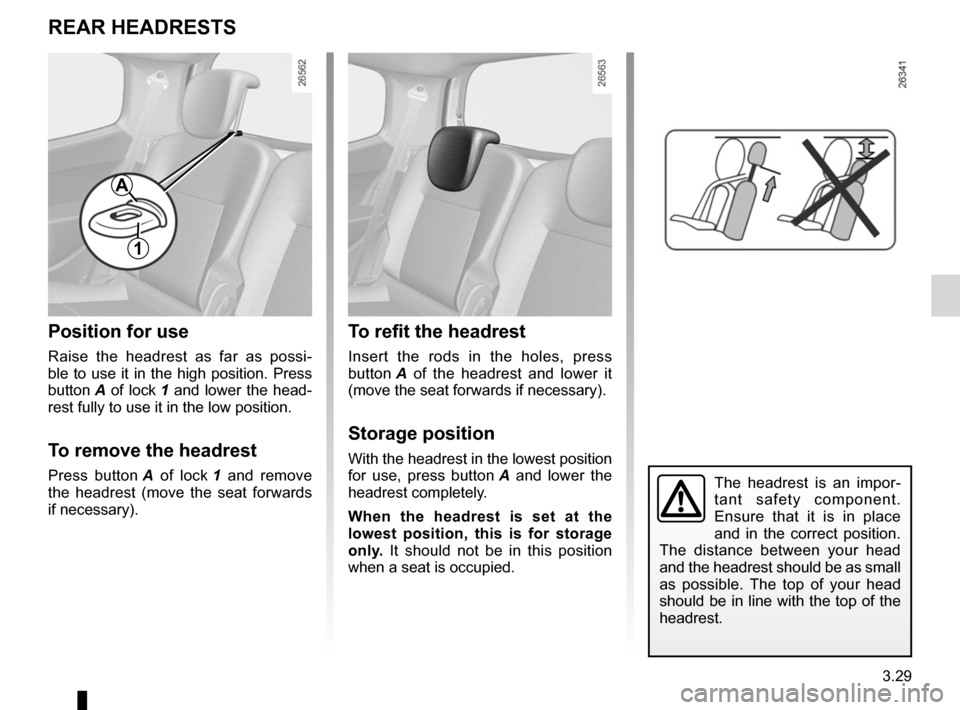
REAR hEADRESTS
Position for use
Raise the headrest as far as possi -
ble to use it in the high position. Press
button A of lock 1 and lower the head -
rest fully to use it in the low position.
To remove the headrest
Press button A of lock 1 and remove
the headrest (move the seat forwards
if necessary).
To refit the headrest
Insert the rods in the holes, press
button A of the headrest and lower it
(move the seat forwards if necessary).
Storage position
With the headrest in the lowest position
for use, press button A and lower the
headrest completely.
When the headrest is set at the
lowest position, this is for storage
only. It should not be in this position
when a seat is occupied.
The headrest is an impor -
tant safety component.
Ensure that it is in place
and in the correct position.
The distance between your head
and the headrest should be as small
as possible. The top of your head
should be in line with the top of the
headrest.
A
1
Page 128 of 220
seatsadjustment ...................................... (up to the end of the DU)
3.30
ENG_UD24498_2
Sièges arrière : réglages (X44 - Renault)
ENG_NU_952-4_X44_Renault_3
Rear seats: adjustment
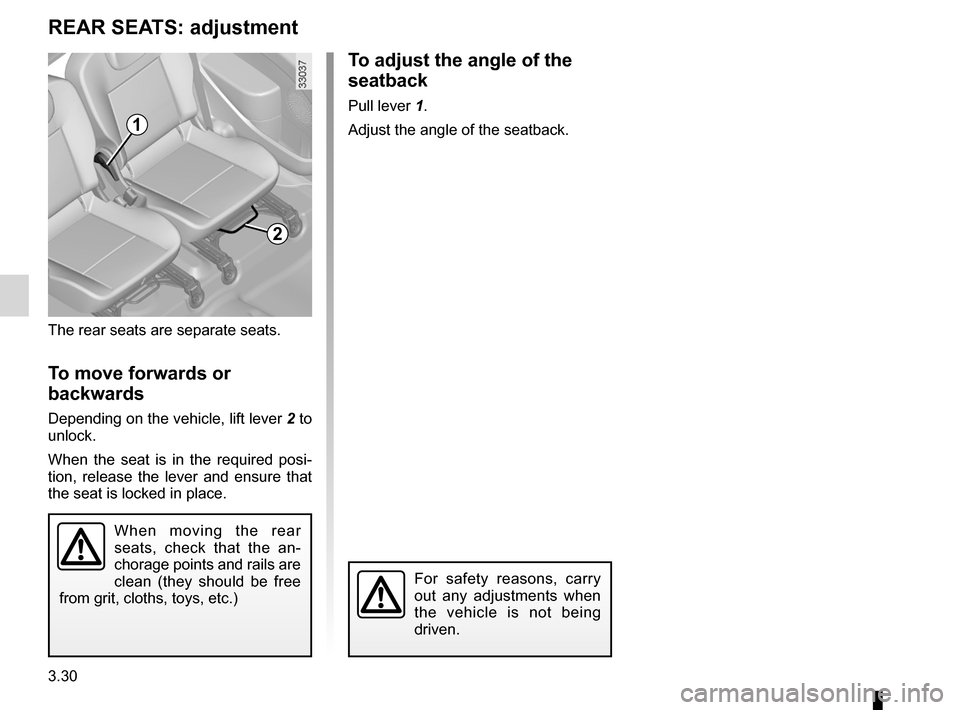
REAR SEATS: adjustment
The rear seats are separate seats.
To move forwards or
backwards
Depending on the vehicle, lift lever 2 to
unlock.
When the seat is in the required posi -
tion, release the lever and ensure that
the seat is locked in place.
To adjust the angle of the
seatback
Pull lever 1.
Adjust the angle of the seatback.
When moving the rear
seats, check that the an -
chorage points and rails are
clean (they should be free
from grit, cloths, toys, etc.)
For safety reasons, carry
out any adjustments when
the vehicle is not being
driven.
2
1
Page 129 of 220
rear seatsfunctions ......................................... (up to the end of the DU)
adjusting the seats ................................ (up to the end of the DU)
rear seats .............................................. (up to the end of the DU)
3.31
ENG_UD24499_5
Sièges arrière : fonctionnalités (X44 - Renault)
ENG_NU_952-4_X44_Renault_3
Rear seats: functions
REAR SEATS: functions
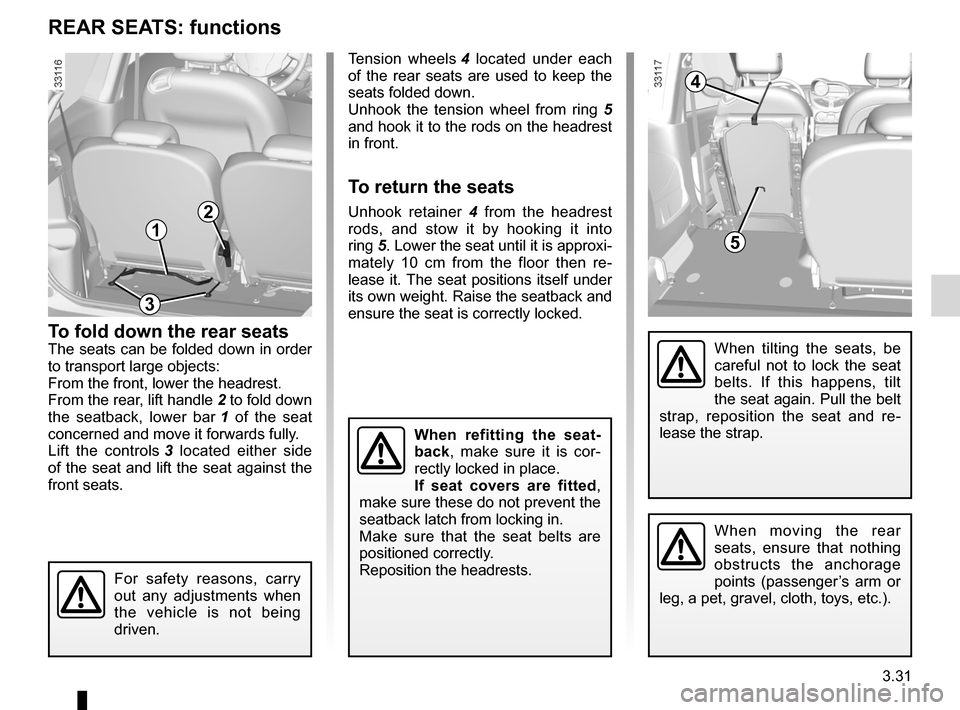
To fold down the rear seatsThe seats can be folded down in order
to transport large objects:
From the front, lower the headrest.
From the rear, lift handle 2 to fold down
the seatback, lower bar 1 of the seat
concerned and move it forwards fully.
Lift the controls 3 located either side
of the seat and lift the seat against the
front seats. Tension wheels
4 located under each
of the rear seats are used to keep the
seats folded down.
Unhook the tension wheel from ring 5
and hook it to the rods on the headrest
in front.
To return the seats
Unhook retainer 4 from the headrest
rods, and stow it by hooking it into
ring 5. Lower the seat until it is approxi -
mately 10 cm from the floor then re -
lease it. The seat positions itself under
its own weight. Raise the seatback and
ensure the seat is correctly locked.
When moving the rear
seats, ensure that nothing
obstructs the anchorage
points (passenger’s arm or
leg, a pet, gravel, cloth, toys, etc.).
When tilting the seats, be
careful not to lock the seat
belts. If this happens, tilt
the seat again. Pull the belt
strap, reposition the seat and re -
lease the strap.
For safety reasons, carry
out any adjustments when
the vehicle is not being
driven.
When refitting the seat -
back , make sure it is cor -
rectly locked in place.
If seat covers are fitted ,
make sure these do not prevent the
seatback latch from locking in.
Make sure that the seat belts are
positioned correctly.
Reposition the headrests.
3
2
1
4
5
Page 130 of 220
rear bench seat..................................... (up to the end of the DU)
3.32
ENG_UD24500_4
Banquette arrière : fonctionnalité (X44 - Renault)
ENG_NU_952-4_X44_Renault_3
Rear bench seat: functions
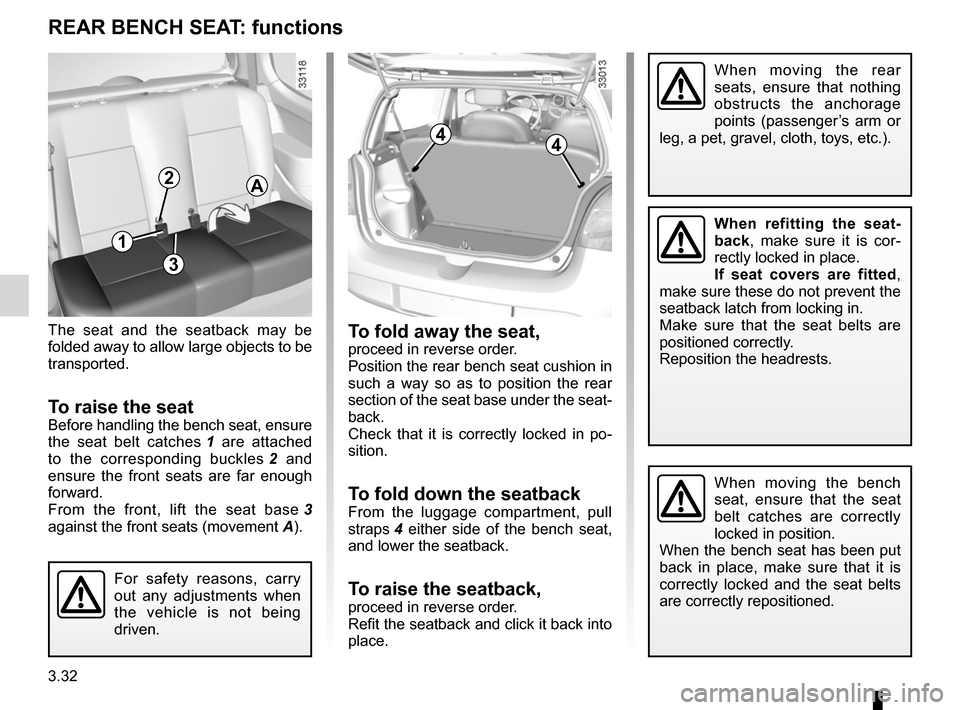
The seat and the seatback may be
folded away to allow large objects to be
transported.
To raise the seatBefore handling the bench seat, ensure
the seat belt catches 1 are attached
to the corresponding buckles 2 and
ensure the front seats are far enough
forward.
From the front, lift the seat base 3
against the front seats (movement A).
To fold away the seat, proceed in reverse order.
Position the rear bench seat cushion in
such a way so as to position the rear
section of the seat base under the seat-
back.
Check that it is correctly locked in po -
sition.
To fold down the seatbackFrom the luggage compartment, pull
straps 4 either side of the bench seat,
and lower the seatback.
To raise the seatback, proceed in reverse order.
Refit the seatback and click it back into
place.
For safety reasons, carry
out any adjustments when
the vehicle is not being
driven.
REAR BENCh SEAT: functions
When moving the bench
seat, ensure that the seat
belt catches are correctly
locked in position.
When the bench seat has been put
back in place, make sure that it is
correctly locked and the seat belts
are correctly repositioned.
When refitting the seat -
back , make sure it is cor -
rectly locked in place.
If seat covers are fitted ,
make sure these do not prevent the
seatback latch from locking in.
Make sure that the seat belts are
positioned correctly.
Reposition the headrests.
When moving the rear
seats, ensure that nothing
obstructs the anchorage
points (passenger’s arm or
leg, a pet, gravel, cloth, toys, etc.).
A
3
2
44
1