engine RENAULT TWINGO 2012 2.G Workshop Manual
[x] Cancel search | Manufacturer: RENAULT, Model Year: 2012, Model line: TWINGO, Model: RENAULT TWINGO 2012 2.GPages: 220, PDF Size: 6.73 MB
Page 158 of 220
5.4
ENG_UD28665_3
Kit de gonflage des pneumatiques (X77 - X85 - B85 - C85 - S85 - X77 ph2\
- K85 - X95 - E95 - X67 - X92 - X10 - X98 - X52 - Renault)
ENG_NU_952-4_X44_Renault_5
Jaune NoirNoir texte
tYre PreSSure KIt (2/3)
Depending on the vehicle, in the event
of a puncture, use the kit located in the
boot or underneath the luggage com -
partment carpet.
With the engine running and the
parking brake applied,
– unroll the hose from the container;
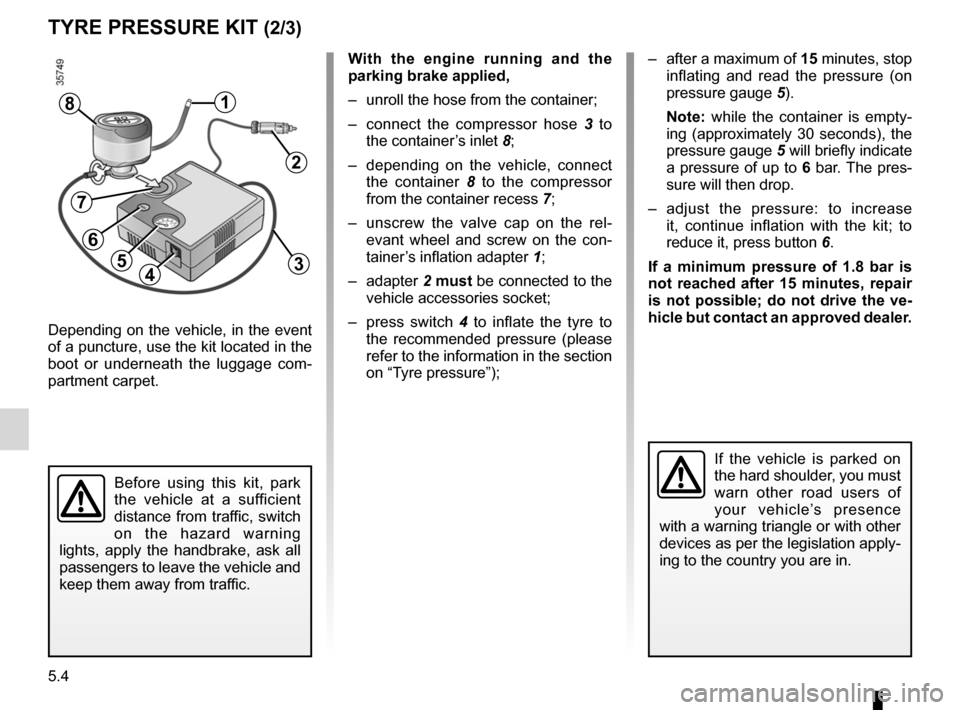
– connect the compressor hose 3 to
the container’s inlet 8;
– depending on the vehicle, connect
the container 8 to the compressor
from the container recess 7;
– unscrew the valve cap on the rel -
evant wheel and screw on the con -
tainer’s inflation adapter 1;
– adapter 2 must be connected to the
vehicle accessories socket;
– press switch 4 to inflate the tyre to
the recommended pressure (please
refer to the information in the section
on “Tyre pressure”);
45
1
Before using this kit, park
the vehicle at a sufficient
distance from traffic, switch
on the hazard warning
lights, apply the handbrake, ask all
passengers to leave the vehicle and
keep them away from traffic.
8
If the vehicle is parked on
the hard shoulder, you must
warn other road users of
your vehicle’s presence
with a warning triangle or with other
devices as per the legislation apply-
ing to the country you are in.
– after a maximum of 15 minutes, stop
inflating and read the pressure (on
pressure gauge 5).
n ote: while the container is empty -
ing (approximately 30 seconds), the
pressure gauge 5 will briefly indicate
a pressure of up to 6 bar. The pres-
sure will then drop.
– adjust the pressure: to increase
it, continue inflation with the kit; to
reduce it, press button 6.
If a minimum pressure of 1.8 bar is
not reached after 15 minutes, repair
is not possible; do not drive the ve-
hicle but contact an approved dealer.
2
3
7
6
Page 168 of 220
lights:main beam headlights ...................................... (current page)
lights: dipped beam headlights ................................... (current page)
front lights changing bulbs ................................ (up to the end of the DU)
lights changing bulbs ................................ (up to the end of the DU)
lights front ................................................. (up to the end of the DU)
bulbs changing ......................................... (up to the end of the DU)
5.14
ENG_UD26876_6
Projecteurs avant avec lampes halogènes : remplacement des lampes (X\
44 - Renault)
ENG_NU_952-4_X44_Renault_5
Jaune NoirNoir texte
Main beam headlights,
dipped beam headlights
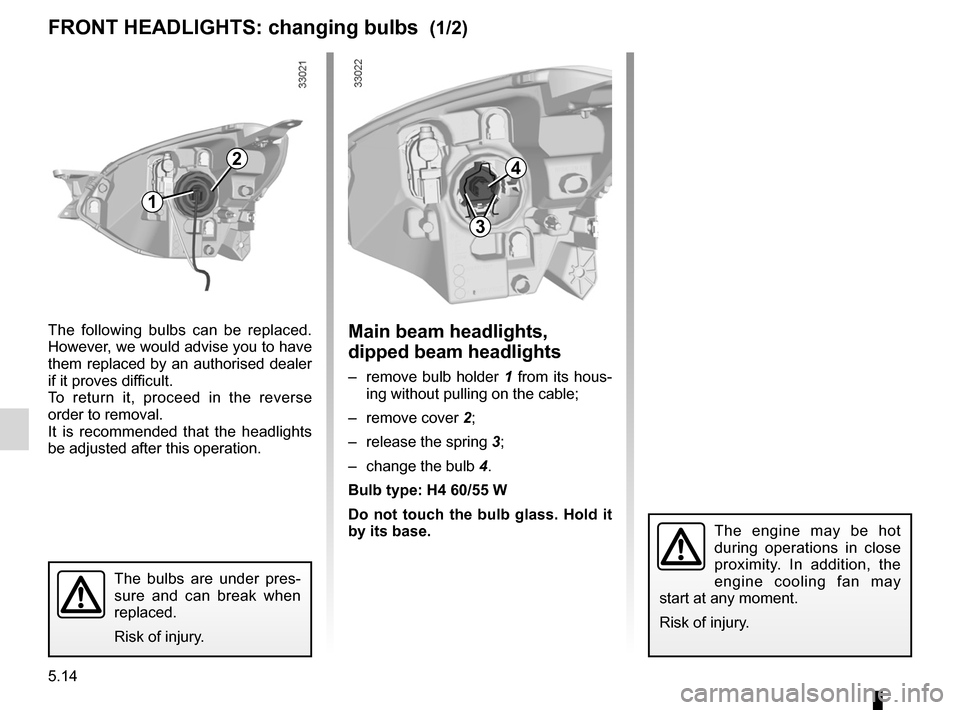
– remove bulb holder 1 from its hous-
ing without pulling on the cable;
– remove cover 2;
– release the spring 3;
– change the bulb 4.
Bulb type: H4 60/55 W
Do not touch the bulb glass. Hold it
by its base.
The following bulbs can be replaced.
However, we would advise you to have
them replaced by an authorised dealer
if it proves difficult.
To return it, proceed in the reverse
order to removal.
It is recommended that the headlights
be adjusted after this operation.
FrOnt HeADLIgHtS:
changing bulbs (1/2)
The bulbs are under pres -
sure and can break when
replaced.
Risk of injury.
The engine may be hot
during operations in close
proximity. In addition, the
engine cooling fan may
start at any moment.
Risk of injury.
4
1
2
3
Page 178 of 220
batterytroubleshooting ............................... (up to the end of the DU)
5.24
ENG_UD24705_3
Batterie : dépannage (X44 - Renault)
ENG_NU_952-4_X44_Renault_5
Jaune NoirNoir texte
Battery: troubleshooting
BAtter Y: troubleshooting
to avoid all risk of sparks:
– Ensure that any consumers are
switched off before disconnecting or
reconnecting the battery;
– When charging, stop the charger
before connecting or disconnecting
the battery.
– Do not place metal objects on the
battery to avoid creating a short cir-
cuit between the terminals.
connecting a battery charger
the battery charger should be com-
patible with a battery with nominal
voltage of 12 Volts.
With the engine off, it is essential to dis-
connect the leads connected to both
battery terminals , starting with the
negative terminal.
Do not disconnect the battery when the
engine is running. Follow the instruc-
tions given by the manufacturer of
the battery charger you are using. Only a fully charged and well
-main -
tained battery will have a long and
useful service life and enable you to
start the vehicle’s engine normally.
The battery must be kept clean and dry.
Have the battery’s charge status
checked regularly:
– especially if you use your vehicle for
short journeys or for frequent driving
in town;
– when the exterior temperature drops
(in winter), the charge decreases .
In winter, only use the electrical
equipment that is really necessary;
– finally, you should understand that
the charge decreases naturally as a
result of certain permanent electrical
consumers such as the clock, after-
sales accessories, etc.
When many accessories are fitted to
the vehicle, have them connected to
the + after ignition feed. In this case,
it is advisable to have your vehicle
fitted with a battery which has an in -
creased nominal capacity. Contact an
approved Dealer. If your vehicle is to
be left stationary for a relatively long
time, disconnect the battery or have it
recharged regularly, particularly during
cold weather. The equipment with a
memory, radio, etc. will then have to
be reprogrammed. The battery must
be stored in a cool dry place, protected
from frost.
Special procedures may be
required to charge some
batteries. Contact an ap -
proved Dealer.
Avoid all risk of sparks which may
cause an immediate explosion, and
charge the battery in a well-venti -
lated area. Risk of serious injury.
Page 179 of 220
JauneNoirNoir texte
5.25
ENG_UD24705_3
Batterie : dépannage (X44 - Renault)
ENG_NU_952-4_X44_Renault_5
BA tter Y: troubleshooting (continued)
Starting the vehicle using the
battery from another vehicle
Proceed as follows when starting your
vehicle from another vehicle’s battery:
Obtain suitable jump leads (large) from
an approved Dealer or, if you already
have jump leads, ensure that they are
in perfect condition.
the two batteries must have an iden-
tical nominal voltage of 12 volts. The
battery supplying the current should
have a capacity (amp-hours, Ah) which
is at least the same as that of the dis-
charged battery.
Ensure that there is no risk of contact
between the two vehicles (risk of short
circuiting when the positive terminals
are connected) and that the discharged
battery is properly connected. Switch
off your vehicle ignition.
Start the engine of the vehicle supply -
ing the current and run it at an interme-
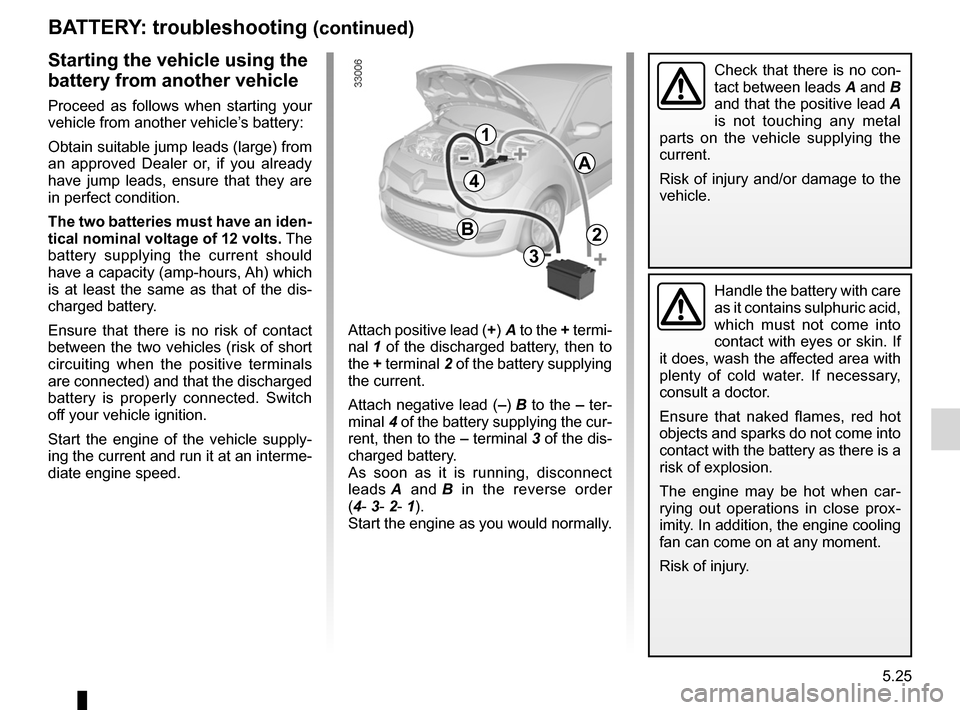
diate engine speed. Attach positive lead (+) A to the
+ termi-
nal 1 of the discharged battery, then to
the + terminal 2 of the battery supplying
the current.
Attach negative lead (–) B to the – ter-
minal 4 of the battery supplying the cur-
rent, then to the – terminal 3 of the dis-
charged battery.
As soon as it is running, disconnect
leads A and B in the reverse order
(4- 3- 2- 1).
Start the engine as you would normally.
A
B
1
4
2
3
Handle the battery with care
as it contains sulphuric acid,
which must not come into
contact with eyes or skin. If
it does, wash the affected area with
plenty of cold water. If necessary,
consult a doctor.
Ensure that naked flames, red hot
objects and sparks do not come into
contact with the battery as there is a
risk of explosion.
The engine may be hot when car -
rying out operations in close prox -
imity. In addition, the engine cooling
fan can come on at any moment.
Risk of injury.
Check that there is no con-
tact between leads A and B
and that the positive lead A
is not touching any metal
parts on the vehicle supplying the
current.
Risk of injury and/or damage to the
vehicle.
Page 189 of 220
operating faults ..................................... (up to the end of the DU)
faults operating faults ............................... (up to the end of the DU)
5.35
ENG_UD18961_2
Anomalies de fonctionnement (X44 - Renault)
ENG_NU_952-4_X44_Renault_5
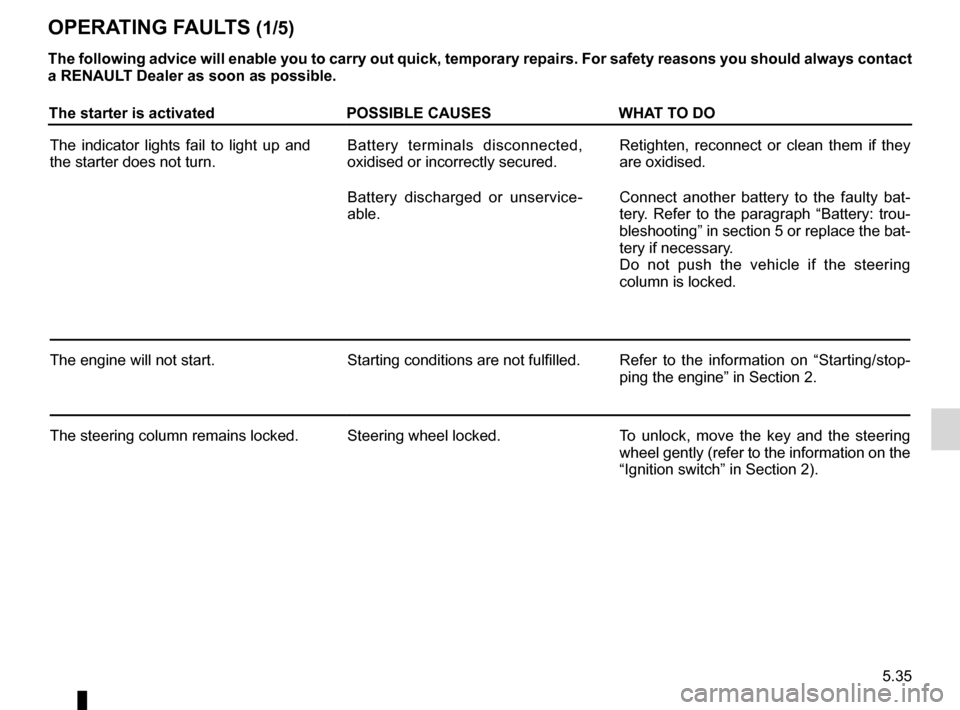
Operating faults
OPerA tIng FAuL tS (1/5)
the following advice will enable you to carry out quick, temporary repairs. For safety reasons you should always contact
a renAuLt Dealer as soon as possible.
the starter is activated POSSIBLe cAuSeSWHAt tO DO
The indicator lights fail to light up and
the starter does not turn. Battery terminals disconnected,
oxidised or incorrectly secured.Retighten, reconnect or clean them if they
are oxidised.
Battery discharged or unservice -
able. Connect another battery to the faulty bat
-
tery. Refer to the paragraph “Battery: trou-
bleshooting” in section 5 or replace the bat-
tery if necessary.
Do not push the vehicle if the steering
column is locked.
The engine will not start. Starting conditions are not fulfilled.Refer to the information on “Starting/stop -
ping the engine” in Section 2.
The steering column remains locked. Steering wheel locked.To unlock, move the key and the steering
wheel gently (refer to the information on the
“Ignition switch” in Section 2).
Page 190 of 220
5.36
ENG_UD18961_2
Anomalies de fonctionnement (X44 - Renault)
ENG_NU_952-4_X44_Renault_5
Jaune NoirNoir texte
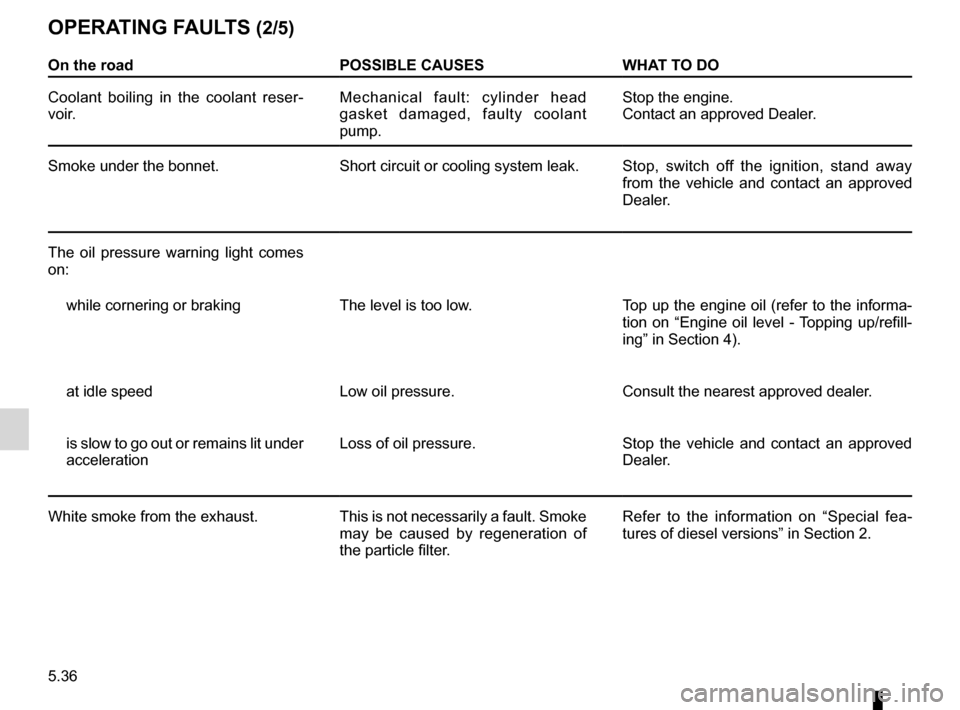
OPerA tIng FAuL tS (2/5)
On the road POSSIBLe cAuSeSWHAt tO DO
Coolant boiling in the coolant reser -
voir. Mechanical fault: cylinder head
gasket damaged, faulty coolant
pump.Stop the engine.
Contact an approved Dealer.
Smoke under the bonnet. Short circuit or cooling system leak.Stop, switch off the ignition, stand away
from the vehicle and contact an approved
Dealer.
The oil pressure warning light comes
on:
while cornering or braking The level is too low. Top up the engine oil (refer to the informa-
tion on “Engine oil level - Topping up/refill -
ing” in Section 4).
at idle speed Low oil pressure. Consult the nearest approved dealer.
is slow to go out or remains lit under
acceleration Loss of oil pressure.
Stop the vehicle and contact an approved
Dealer.
White smoke from the exhaust. This is not necessarily a fault. Smoke
may be caused by regeneration of
the particle filter.Refer to the information on “Special fea
-
tures of diesel versions” in Section 2.
Page 191 of 220
JauneNoirNoir texte
5.37
ENG_UD18961_2
Anomalies de fonctionnement (X44 - Renault)
ENG_NU_952-4_X44_Renault_5
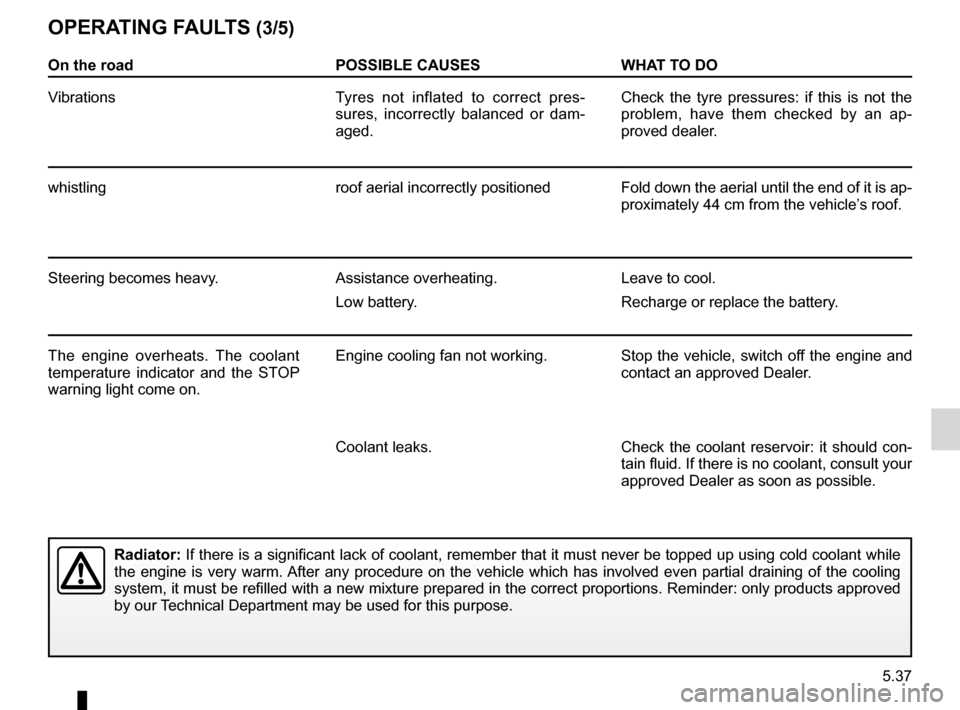
OPerA tIng FAuL tS (3/5)
On the road POSSIBLe cAuSeSWHAt tO DO
Vibrations Tyres not inflated to correct pres-
sures, incorrectly balanced or dam -
aged. Check the tyre pressures: if this is not the
problem, have them checked by an ap
-
proved dealer.
whistling roof aerial incorrectly positionedFold down the aerial until the end of it is ap-
proximately 44 cm from the vehicle’s roof.
Steering becomes heavy. Assistance overheating.
Low battery.Leave to cool.
Recharge or replace the battery.
The engine overheats. The coolant
temperature indicator and the STOP
warning light come on. Engine cooling fan not working.
Stop the vehicle, switch off the engine and
contact an approved Dealer.
Coolant leaks. Check the coolant reservoir: it should con-
tain fluid. If there is no coolant, consult your
approved Dealer as soon as possible.
radiator: If there is a significant lack of coolant, remember that it must never be topped up using cold coolant while
the engine is very warm. After any procedure on the vehicle which has involved even partial draining of the cooling
system, it must be refilled with a new mixture prepared in the correct proportions. Reminder: only products approved
by our Technical Department may be used for this purpose.
Page 195 of 220
6.1
ENG_UD30798_17
Sommaire 6 (X44 - Renault)
ENG_NU_952-4_X44_Renault_6
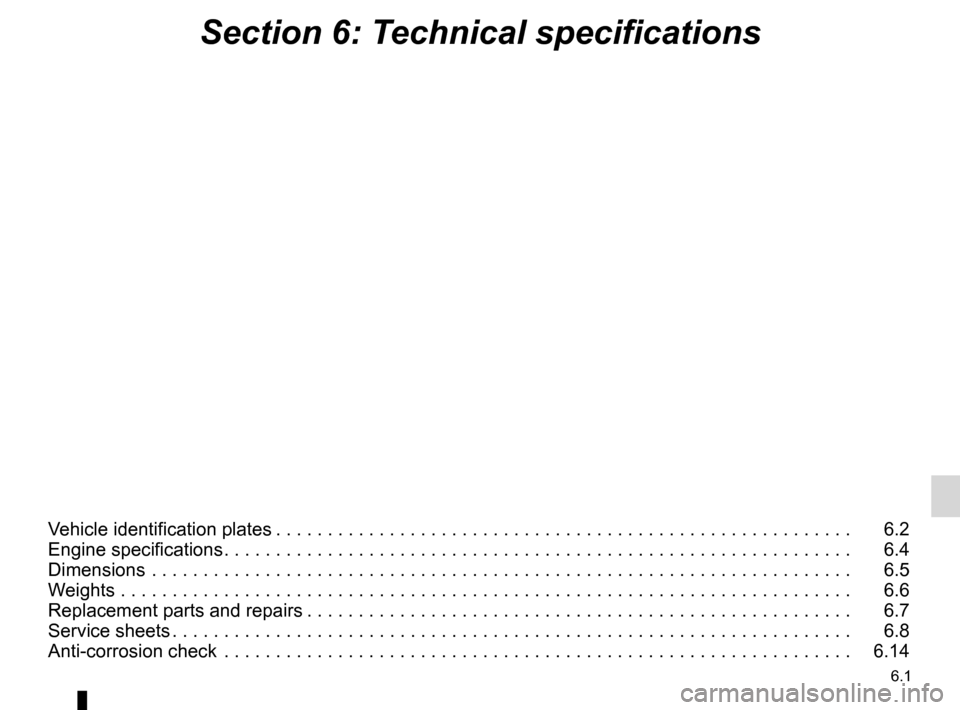
Section 6: Technical specifications
Vehicle identification plates . . . . . . . . . . . . . . . . . . . . . . . . . . . . . . . . . . . . . . . . . . . . . . . . . . . . . . . . 6.2
Engine specifications . . . . . . . . . . . . . . . . . . . . . . . . . . . . . . . . . . . . . . . . . . . . . . . . . . . . . . . . . . . . . 6.4
Dimensions . . . . . . . . . . . . . . . . . . . . . . . . . . . . . . . . . . . . . . . . . . . . . . . . . . . . . . . . . . . . . . . . . . . . 6.5
Weights . . . . . . . . . . . . . . . . . . . . . . . . . . . . . . . . . . . . . . . . . . . . . . . . . . . . . . . . . . . . . . . . . . . . . . . 6.6
Replacement parts and repairs . . . . . . . . . . . . . . . . . . . . . . . . . . . . . . . . . . . . . . . . . . . . . . . . . . . . . 6.7
Service sheets . . . . . . . . . . . . . . . . . . . . . . . . . . . . . . . . . . . . . . . . . . . . . . . . . . . . . . . . . . . . . . . . . . 6.8
Anti-corrosion check . . . . . . . . . . . . . . . . . . . . . . . . . . . . . . . . . . . . . . . . . . . . . . . . . . . . . . . . . . . . . 6.14
Page 197 of 220
JauneNoirNoir texte
6.3
ENG_UD29237_7
Plaques d identification (X44 - Renault)
ENG_NU_952-4_X44_Renault_6
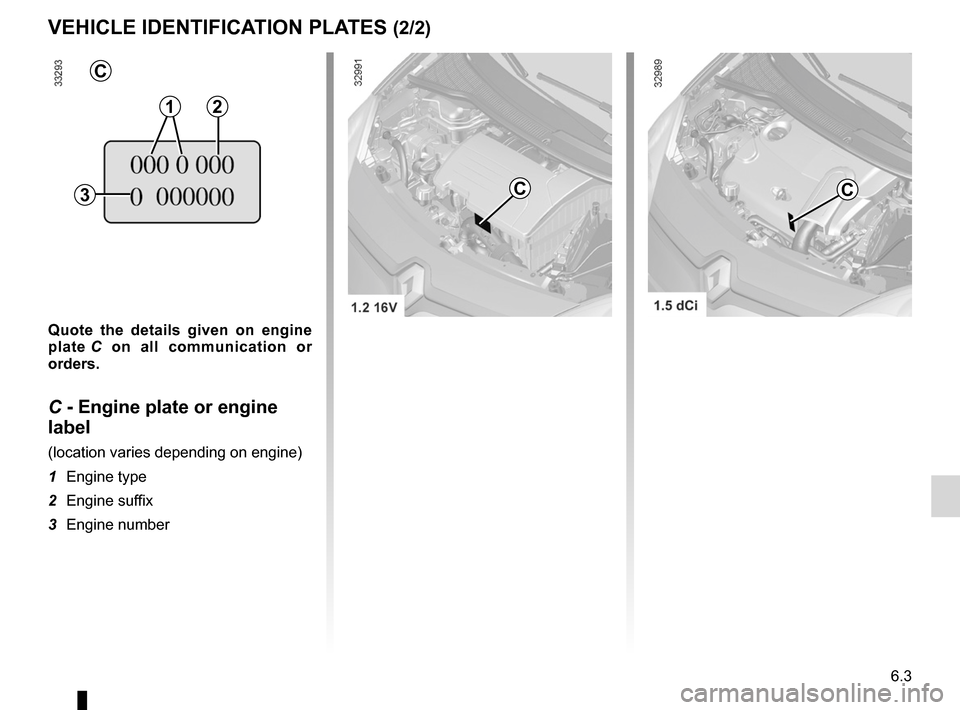
Quote the details given on engine
plate C on all communication or
orders.
C - Engine plate or engine
label
(location varies depending on engine)
1 Engine type
2 Engine suffix
3 Engine number
VEHICLE IDENTIFICATION PLATES (2/2)
C
1
3
C
2
C
Page 198 of 220
engine specifications ............................ (up to the end of the DU)
fuel grade ............................................... (up to the end of the DU)
engine technical specifications ................... (up to the end of the DU)
6.4
ENG_UD25114_2
Caractéristiques moteurs (X44 - Renault)
ENG_NU_952-4_X44_Renault_6
Engine specifications
ENGINE SPECIFICATIONS
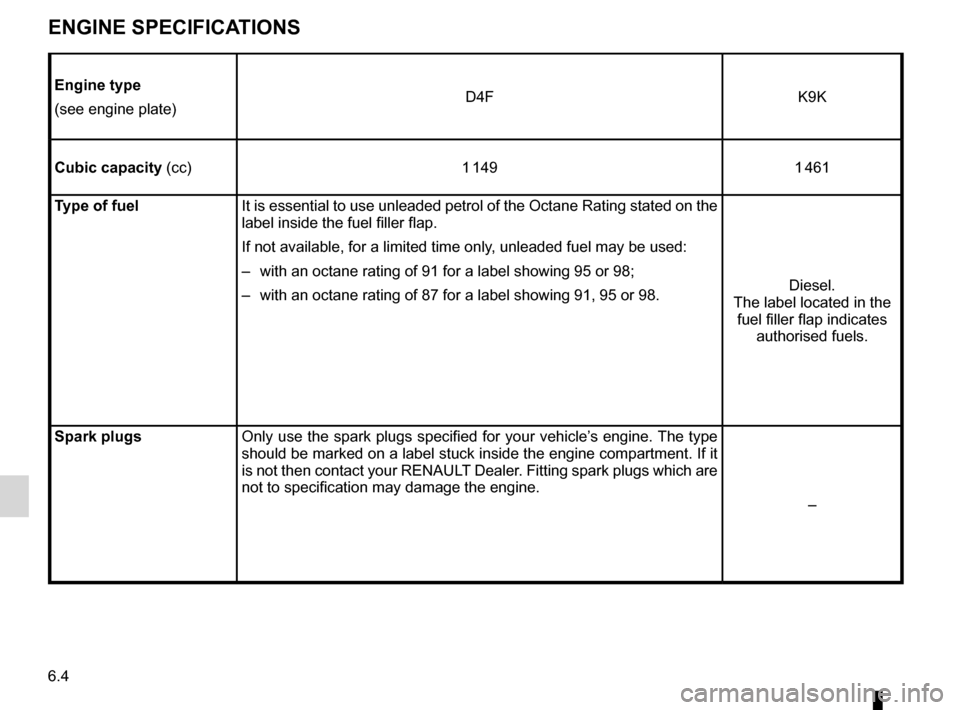
Engine type
(see engine plate) D4F
K9K
Cubic capacity (cc) 1 149 1 461
Type of fuel It is essential to use unleaded petrol of the Octane Rating stated on the
label inside the fuel filler flap.
If not available, for a limited time only, unleaded fuel may be used:
– with an octane rating of 91 for a label showing 95 or 98;
– with an octane rating of 87 for a label showing 91, 95 or 98. Diesel.
The label located in the fuel filler flap indicates authorised fuels.
Spark plugs Only use the spark plugs specified for your vehicle’s engine. The type
should be marked on a label stuck inside the engine compartment. If it
is not then contact your RENAULT Dealer. Fitting spark plugs which are
not to specification may damage the engine.
–