SAAB 9-3 2006 Owners Manual
Manufacturer: SAAB, Model Year: 2006, Model line: 9-3, Model: SAAB 9-3 2006Pages: 318, PDF Size: 28.05 MB
Page 91 of 318
91 Instruments and controls
If the needle repeatedly enters the red zone
and the engine at the same time loses
power, because the monitoring system is
limiting the boost pressure, you should
contact a Saab dealer as soon as possible.
When the speed of the car exceeds
143 mph (230 km/h), acceleration is limited
by reducing the boost pressure. The pres-
sure gauge then moves towards the middle
of the white field, indicating a drop in engine
power and consequently the car’s speed.
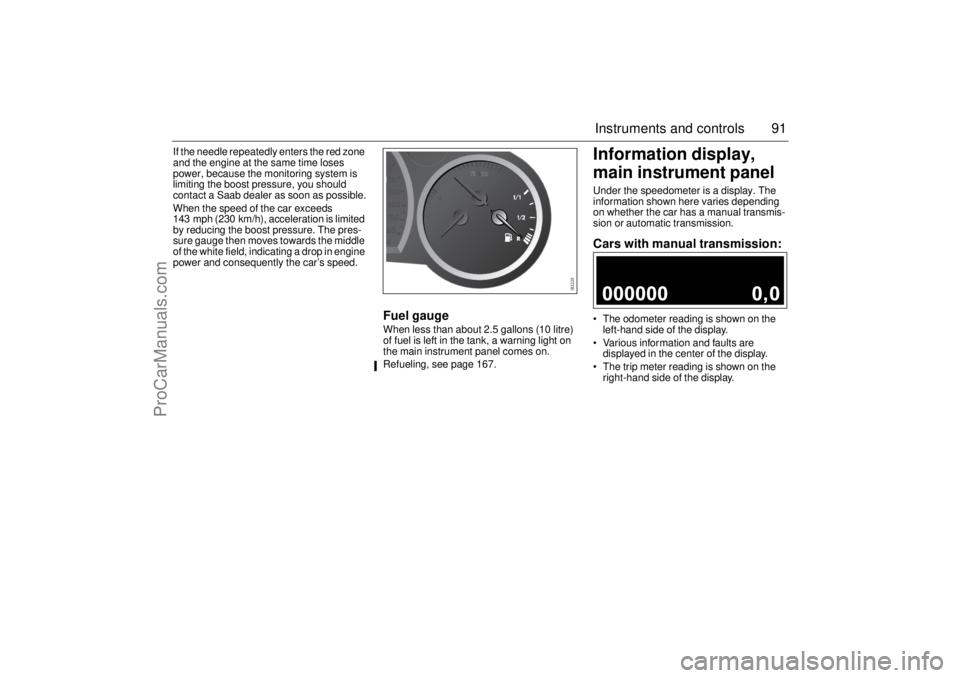
Fuel gaugeWhen less than about 2.5 gallons (10 litre)
of fuel is left in the tank, a warning light on
the main instrument panel comes on.
Refueling, see page 167.
Information display,
main instrument panelUnder the speedometer is a display. The
information shown here varies depending
on whether the car has a manual transmis-
sion or automatic transmission.Cars with manual transmission: The odometer reading is shown on the
left-hand side of the display.
Various information and faults are
displayed in the center of the display.
The trip meter reading is shown on the
right-hand side of the display.
93U S M 06.book Page 91 Friday, February 18, 2005 1:15 PM
ProCarManuals.com
Page 92 of 318
92 Instruments and controlsCars with automatic
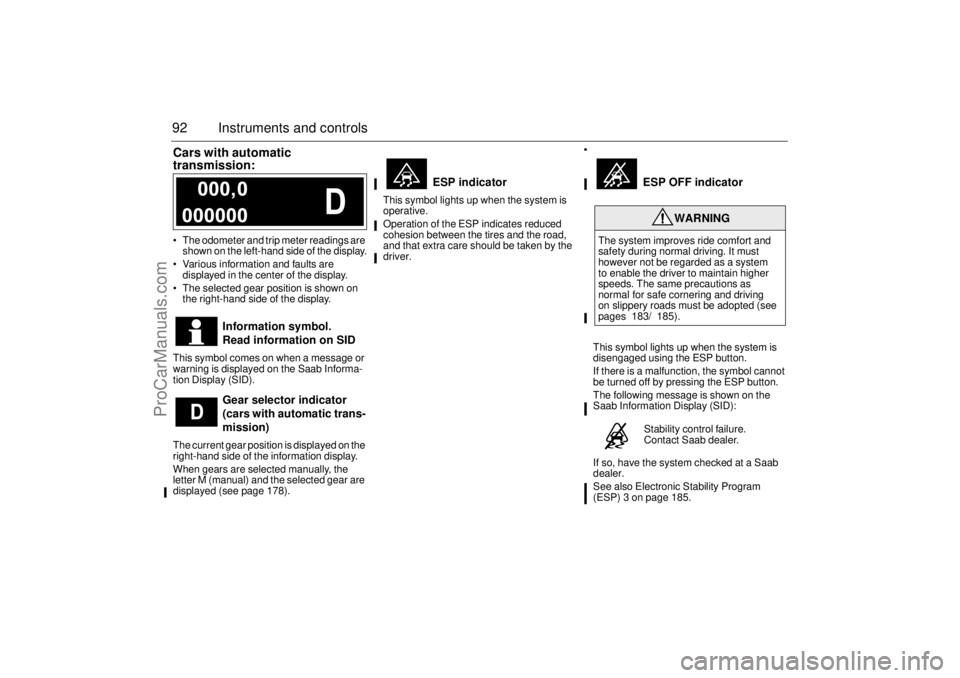
transmission: The odometer and trip meter readings are
shown on the left-hand side of the display.
Various information and faults are
displayed in the center of the display.
The selected gear position is shown on
the right-hand side of the display.
This symbol comes on when a message or
warning is displayed on the Saab Informa-
tion Display (SID).
The current gear position is displayed on the
right-hand side of the information display.
When gears are selected manually, the
letter M (manual) and the selected gear are
displayed (see page 178).This symbol lights up when the system is
operative.
Operation of the ESP indicates reduced
cohesion between the tires and the road,
and that extra care should be taken by the
driver.
This symbol lights up when the system is
disengaged using the ESP button.
If there is a malfunction, the symbol cannot
be turned off by pressing the ESP button.
The following message is shown on the
Saab Information Display (SID):
If so, have the system checked at a Saab
dealer.
See also Electronic Stability Program
(ESP) 3 on page 185.
Information symbol.
Read information on SID
Gear selector indicator
(cars with automatic trans-
mission)
ESP indicator
ESP OFF indicator
WARNING
The system improves ride comfort and
safety during normal driving. It must
however not be regarded as a system
to enable the driver to maintain higher
speeds. The same precautions as
normal for safe cornering and driving
on slippery roads must be adopted (see
pages 183/ 185).
Stability control failure.
Contact Saab dealer.
93U S M 06.book Page 92 Friday, February 18, 2005 1:15 PM
ProCarManuals.com
Page 93 of 318
93 Instruments and controls
Saab Information
Display (SID)Various types of information are shown on
the SID: warnings, indications, trip com-
puter information and information from the
car’s Infotainment System.
The warnings and indications that can be
shown on the SID are listed on page 310.
When the engine is switched off, the current
warnings and indications are displayed.
If there is more than one message on the
SID, a plus sign will be displayed to the left
of the first message. Each message will be
displayed for 10 seconds.
Press the CLEAR button to acknowledge
a SID message. If you acknowledge a mes-
sage but do nothing about it, the message
will be displayed again the next time you
start the car.
When the engine is switched off the warn-
ing/indicator lights still active are displayed,
this is to remind the driver. At this point the
warning/indicator lights previously acknowl-
edged with the CLEAR button are also dis-
played.
You can adjust the settings of several of the
car’s systems, such as the clock, alarm and
climate control system. These are known as
Profiler.
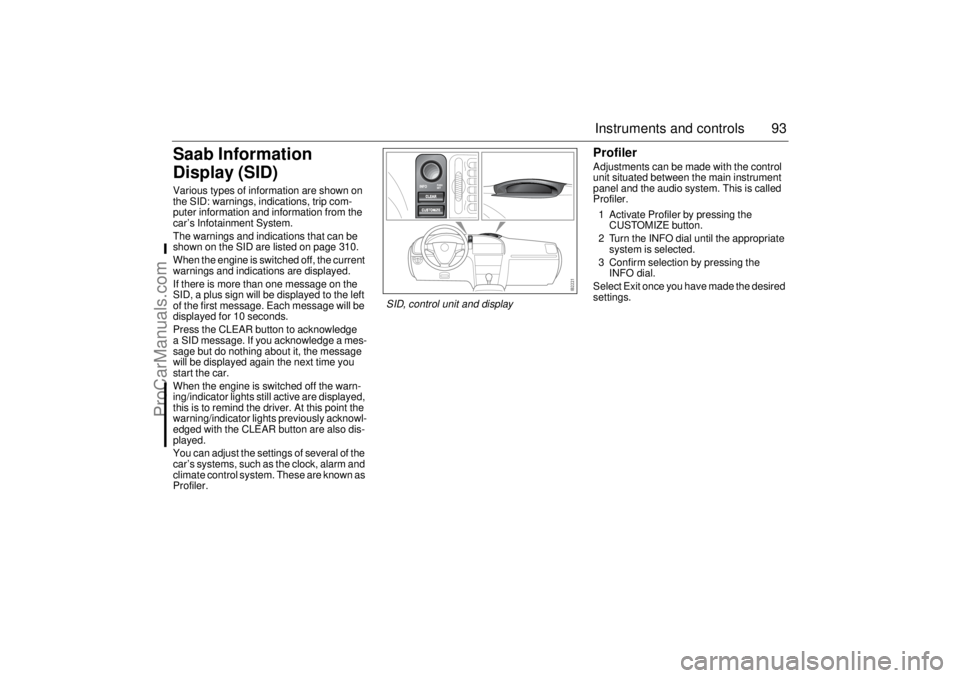
ProfilerAdjustments can be made with the control
unit situated between the main instrument
panel and the audio system. This is called
Profiler.
1 Activate Profiler by pressing the
CUSTOMIZE button.
2 Turn the INFO dial until the appropriate
system is selected.
3 Confirm selection by pressing the
INFO dial.
Select Exit once you have made the desired
settings.
SID, control unit and display
93U S M 06.book Page 93 Friday, February 18, 2005 1:15 PM
ProCarManuals.com
Page 94 of 318
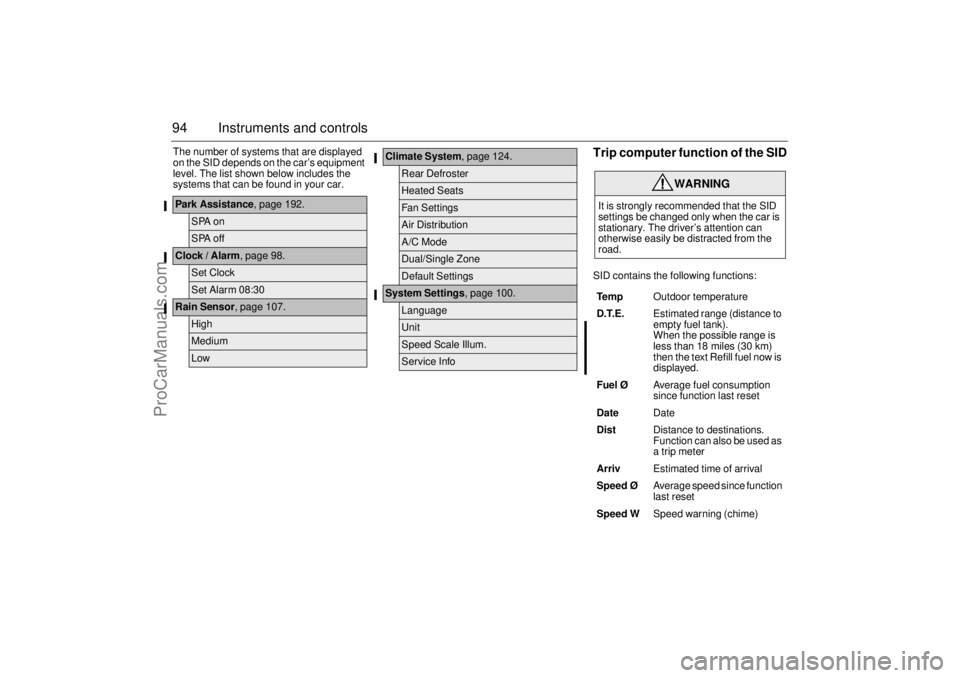
94 Instruments and controlsThe number of systems that are displayed
on the SID depends on the car’s equipment
level. The list shown below includes the
systems that can be found in your car.
Trip computer function of the SIDSID contains the following functions:
Park Assistance, page 192.
SPA onSPA off
Clock / Alarm, page 98.
Set ClockSet Alarm 08:30
Rain Sensor, page 107.
HighMediumLow
Climate System, page 124.
Rear DefrosterHeated SeatsFan SettingsAir DistributionA/C ModeDual/Single ZoneDefault Settings
System Settings, page 100.
LanguageUnitSpeed Scale Illum.Service Info
WARNING
It is strongly recommended that the SID
settings be changed only when the car is
stationary. The driver’s attention can
otherwise easily be distracted from the
road.
Te m pOutdoor temperature
D.T.E. Estimated range (distance to
empty fuel tank).
When the possible range is
less than 18 miles (30 km)
then the text Refill fuel now is
displayed.
Fuel ØAverage fuel consumption
since function last reset
DateDate
DistDistance to destinations.
Function can also be used as
a trip meter
ArrivEstimated time of arrival
Speed Ø Average speed since function
last reset
Speed WSpeed warning (chime)
93U S M 06.book Page 94 Friday, February 18, 2005 1:15 PM
ProCarManuals.com
Page 95 of 318
95 Instruments and controls
When the engine is started, the function that
was selected when the engine was
switched off is displayed, with the following
exceptions:
Te m p is displayed if the outside tempera-
ture is between 26 and 38°F (–3 and
+3°C).
D.T.E is displayed if less than or equal to
30 miles (50 km).
Outdoor temperature
The Temp function is always activated
(even in
NIGHTPANEL
mode) if the outdoor
temperature rises or falls to between 26 and
38°F (–3 and +3°C).
If the temperature sensor, located under the
front bumper, is covered by snow or ice,
temperature readings will be unreliable.
For how to set the year, month and day,
refer to Clock on page 98.Setting values
1 Select one of the functions using the
INFO dial.
Speed W (preset to 55 mph (90 km/h)
Dist (preset to 100 miles (100 km) if not
previously set)
Speed Ø
Arriv
2 Press and hold the INFO dial until given
audible confirmation.
3 Turn the INFO dial to change the value.
(Press CLEAR to reset the value.)
4 Press the INFO dial to finish setup.
Using DIST as a trip meter
1 Select Dist using the INFO dial.
2 Press and hold the CLEAR button for
approx. 1 second.
An arrow will now appear on the right-hand
side of the display, indicating that the trip
meter is running.Resetting a single function
1 Select the function you wish to reset with
the INFO dial.
Fuel Ø
SpeedØ
Tr i p (Dist used as trip meter)
2 Press and hold the CLEAR button for
approx. 1 second.
The selected function will now be reset.
Resetting the trip computer
1 Select one of the functions using the
INFO dial.
Fuel Ø
SpeedØ
D.T.E.
Arriv
Tr i p (Dist used as trip meter)
2 Press and hold the CLEAR button
(approx. 3 seconds) until audible confir-
mation is given.
WARNING
Remember that roads can be icy even at
temperatures of above 38°F (+3°C),
especially on bridges and stretches of
road that are sheltered from the sun.93U S M 06.book Page 95 Friday, February 18, 2005 1:15 PM
ProCarManuals.com
Page 96 of 318

96 Instruments and controlsSpeed warning
This value is preset to 55 mph (90 km/h).
The value can be set to between 0 and
150 mph (0 and 250 km/h).
1 Select Speed W using the INFO dial.
2 Press and hold the INFO dial until given
audible confirmation.
3 Adjust the speed using the INFO dial.
4 Confirm the setting by pressing the
INFO dial.
A star on the right-hand side of the display
indicates when the speed warning function
is active.
An audible alarm will sound if the set speed
is exceeded.
Disengage the function with the CLEAR
button. Re-engage the function using
the INFO dial.Calculating the arrival time
(When will I arrive if I know how far I have to
drive?)
This function should be used before starting
out a journey.
To calculate the arrival time, the distance
must first be given.
1 Select the Dist function using the
INFO dial.
2 Press and hold the INFO dial until given
audible confirmation.
3 Set the distance to the destination using
the INFO dial.
4 Press the INFO dial to finish setup.
Select Arriv during the journey to display
the arrival time based on the average speed
since Dist was set. If you take a break, this
time will be added to the previously calcu-
lated arrival time.
Similarly, you can check the distance left by
selecting Dist.
After the distance to destination has
decreased to zero, Dist will function as a trip
meter (see Using DIST as a trip meter). The
starting value for the trip meter will be the
last distance set for the Dist function.
Example: The Dist function is set to
100 miles. After the count-down has
reached 0 miles, Dist will act as a trip meter
beginning at 100 miles.Calculating the arrival time if a specified
average speed is maintained
(When will I arrive if I know how far I have to
drive and know what my average speed will
be?)
This function should be used before starting
out a journey.
First, set the distance under Dist.
1 Then use the INFO dial to select the
Speed Ø function.
2 Press and hold the INFO dial until given
audible confirmation.
3 Turn the INFO dial to set the estimated
average speed.
4 Press the INFO dial to finish setup.
The time of arrival is updated during the
journey based on the average speed since
Dist was set. The speed of the car must
exceed 12 mph (20 km/h).
By selecting Dist during the journey, you
can see how much distance is left to travel.
When Dist reaches zero it acts as a trip
meter. The tip meter starts from the distance
that was set previously.93U S M 06.book Page 96 Friday, February 18, 2005 1:15 PM
ProCarManuals.com
Page 97 of 318

97 Instruments and controls
Calculating the requisite average speed
(What average speed do I need to maintain
to get to my destination in time?)
This function should be used before starting
out a journey.
To calculate the requisite average speed,
the distance must first be given.
First, set the distance under Dist.
1 Then use the INFO dial to select the
Arriv function.
2 Press and hold the INFO dial until given
audible confirmation.
3 Turn the INFO dial to set the estimated
time of arrival.
4 Press the INFO dial to finish setup.
The average speed (Speed Ø) will be
shown for 10 seconds.
This average speed will be updated during
the journey.Setting the date
1 Select the Date function using the
INFO dial.
2 Press and hold the INFO dial until given
audible confirmation.
3 Turn the INFO dial to set the year.
4 Press the INFO dial.
5 Turn the INFO dial to set the month.
6 Press the INFO dial.
7 Turn the INFO dial to set the day.
8 Confirm the setting by pressing the
INFO dial.
NIGHTPANELTo improve night-driving conditions inside
the car, the Night Panel mode can be
selected. In this mode, the amount of infor-
mation displayed is reduced, and only the
most important instruments and displays
will be illuminated.
When the NIGHTPANEL button is pressed,
only the speedometer will be illuminated.
All other instrument lighting will be switched
off and the needles drop to zero.
Note: All indicator and warning lights and
messages will operate normally if required.
Temp (when the outside temperature falls
or rises to between 26 and 38°F (–3 and
+3°C)) and D.T.E. (when the remaining fuel
is only sufficient for approx. 80 miles
(50 km) of driving) are even shown in Night
Panel model.
93U S M 06.book Page 97 Friday, February 18, 2005 1:15 PM
ProCarManuals.com
Page 98 of 318
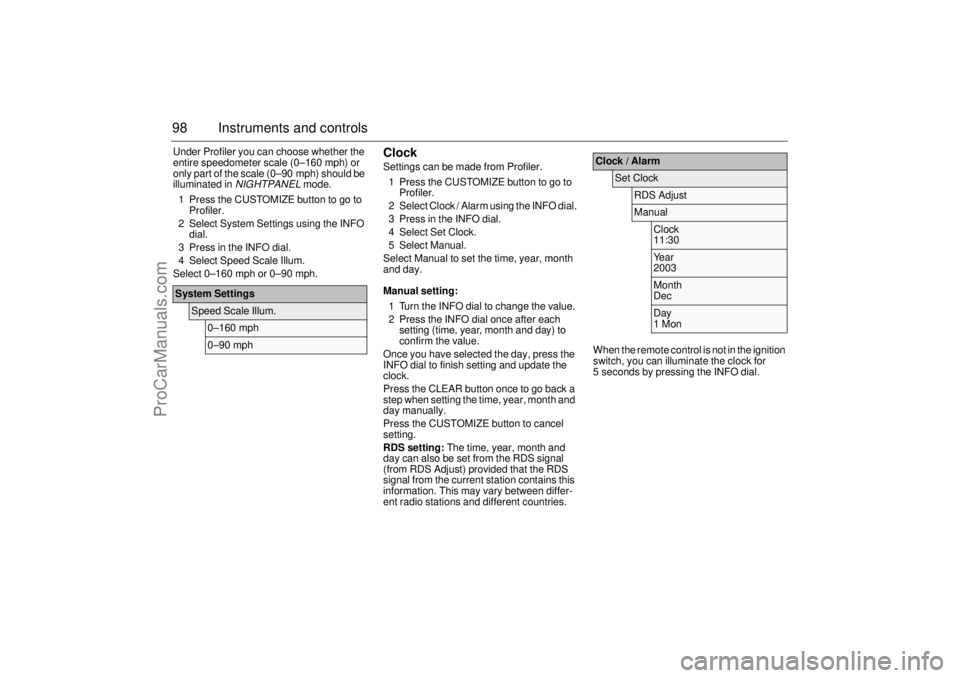
98 Instruments and controlsUnder Profiler you can choose whether the
entire speedometer scale (0–160 mph) or
only part of the scale (0–90 mph) should be
illuminated in
NIGHTPANEL
mode.
1 Press the CUSTOMIZE button to go to
Profiler.
2 Select System Settings using the INFO
dial.
3 Press in the INFO dial.
4 Select Speed Scale Illum.
Select 0–160 mph or 0–90 mph.
ClockSettings can be made from Profiler.
1 Press the CUSTOMIZE button to go to
Profiler.
2 Select Clock / Alarm using the INFO dial.
3 Press in the INFO dial.
4 Select Set Clock.
5 Select Manual.
Select Manual to set the time, year, month
and day.
Manual setting:
1 Turn the INFO dial to change the value.
2 Press the INFO dial once after each
setting (time, year, month and day) to
confirm the value.
Once you have selected the day, press the
INFO dial to finish setting and update the
clock.
Press the CLEAR button once to go back a
step when setting the time, year, month and
day manually.
Press the CUSTOMIZE button to cancel
setting.
RDS setting: The time, year, month and
day can also be set from the RDS signal
(from RDS Adjust) provided that the RDS
signal from the current station contains this
information. This may vary between differ-
ent radio stations and different countries.When the remote control is not in the ignition
switch, you can illuminate the clock for
5 seconds by pressing the INFO dial.
System Settings
Speed Scale Illum.
0–160 mph0–90 mph
Clock / Alarm
Set Clock
RDS AdjustManual
Clock
11:30Year
2003Month
DecDay
1 Mon
93U S M 06.book Page 98 Friday, February 18, 2005 1:15 PM
ProCarManuals.com
Page 99 of 318
99 Instruments and controls
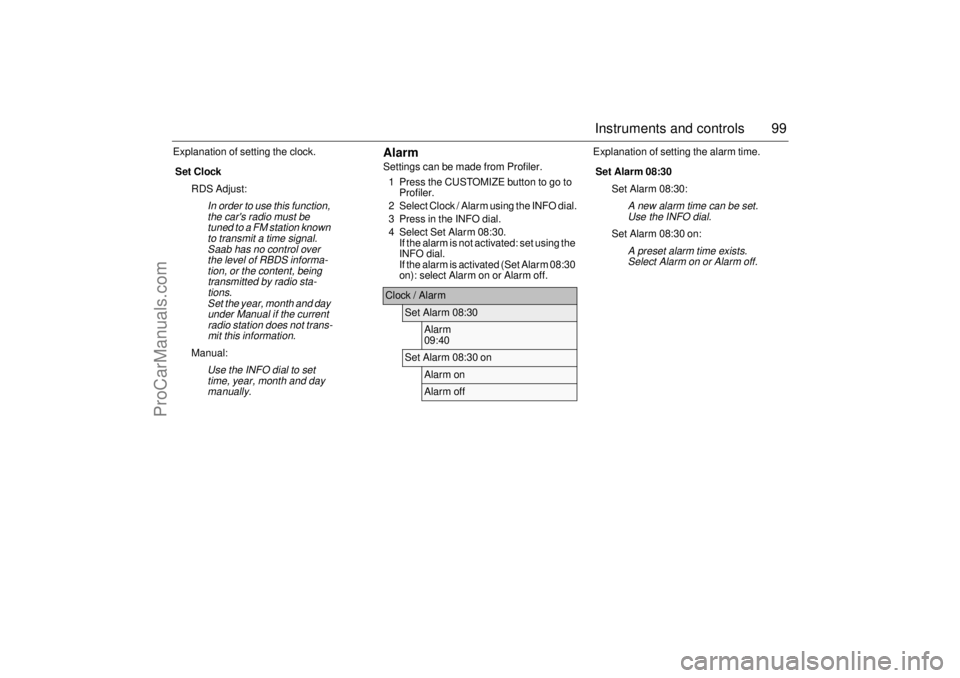
Explanation of setting the clock.
AlarmSettings can be made from Profiler.
1 Press the CUSTOMIZE button to go to
Profiler.
2 Select Clock / Alarm using the INFO dial.
3 Press in the INFO dial.
4 Select Set Alarm 08:30.
If the alarm is not activated: set using the
INFO dial.
If the alarm is activated (Set Alarm 08:30
on): select Alarm on or Alarm off.Explanation of setting the alarm time.
Set Clock
RDS Adjust:
In order to use this function,
the car's radio must be
tuned to a FM station known
to transmit a time signal.
Saab has no control over
the level of RBDS informa-
tion, or the content, being
transmitted by radio sta-
tions.
Set the year, month and day
under Manual if the current
radio station does not trans-
mit this information.
Manual:
Use the INFO dial to set
time, year, month and day
manually.
Clock / Alarm
Set Alarm 08:30
Alarm
09:40
Set Alarm 08:30 on
Alarm onAlarm off
Set Alarm 08:30
Set Alarm 08:30:
A new alarm time can be set.
Use the INFO dial.
Set Alarm 08:30 on:
A preset alarm time exists.
Select Alarm on or Alarm off.
93U S M 06.book Page 99 Friday, February 18, 2005 1:15 PM
ProCarManuals.com
Page 100 of 318
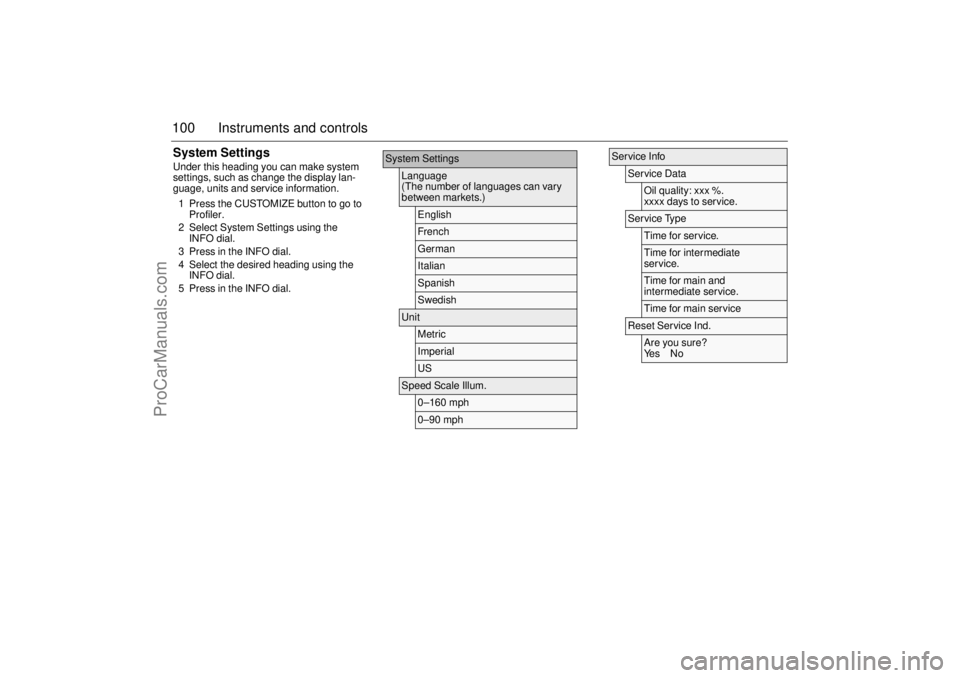
100 Instruments and controlsSystem SettingsUnder this heading you can make system
settings, such as change the display lan-
guage, units and service information.
1 Press the CUSTOMIZE button to go to
Profiler.
2 Select System Settings using the
INFO dial.
3 Press in the INFO dial.
4 Select the desired heading using the
INFO dial.
5 Press in the INFO dial.
System Settings
Language
(The number of languages can vary
between markets.)
EnglishFrenchGermanItalianSpanishSwedish
Unit
MetricImperialUS
Speed Scale Illum.
0–160 mph0–90 mph
Service Info
Service Data
Oil quality: xxx %.
xxxx days to service.
Service Type
Time for ser vice.Time for intermediate
service.Time for main and
intermediate service.Time for main ser vice
Reset Service Ind.
Are you sure?
Ye s N o
93U S M 06.book Page 100 Friday, February 18, 2005 1:15 PM
ProCarManuals.com