SAAB 9-5 2001 Owners Manual
Manufacturer: SAAB, Model Year: 2001, Model line: 9-5, Model: SAAB 9-5 2001Pages: 272, PDF Size: 14.83 MB
Page 201 of 272
201 Car care and technical information
Charging/replacing the batteryConnect the positive lead to the positive (+)
battery terminal (red), and the negative lead
to a good ground point, e.g. the lifting lug at
the front of the engine.
To remove the battery, always disconnect
the negative (black) lead first and reconnect
it last when fitting the new battery.
The battery size must comply with DIN
53735 MFI 230/2.16. NOTETo avert the danger of short-circuiting
between the positive (+) terminal on the
battery and the inlet manifold on the
engine, always disconnect the negative
(-) battery lead first and reconnect it last.NOTE Never reverse the polarity of the bat-
tery by connecting the leads to the
wrong terminals. The red, positive
lead connects to the positive (+) termi-
nal, and the black, negative lead to the
negative (-) terminal.
Serious damage can be done to the
car’s electrical system if a battery or
alternator lead is disconnected while
the engine is running.
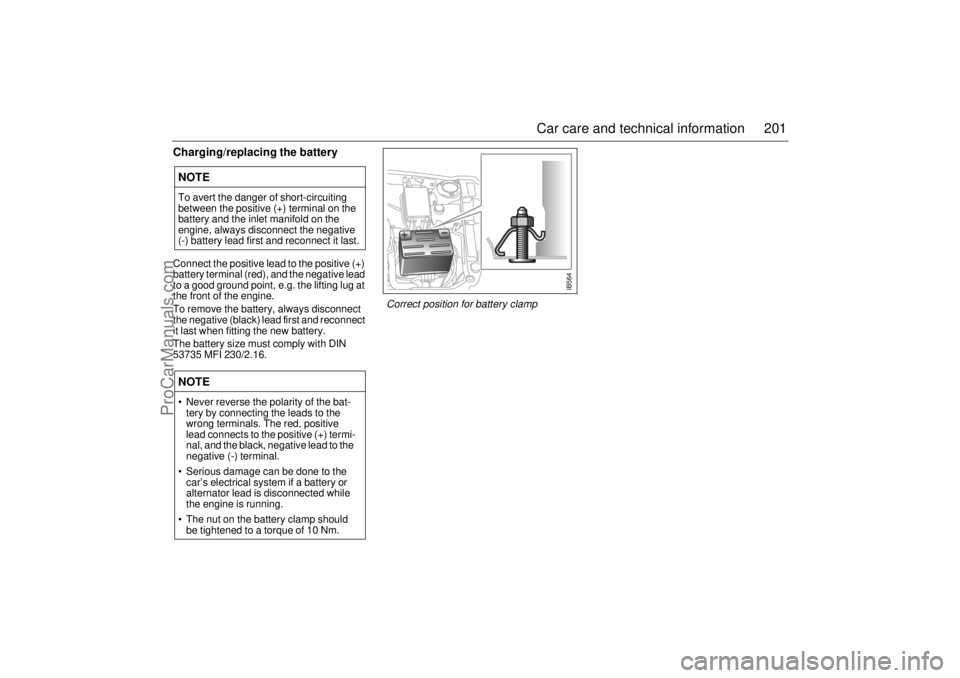
The nut on the battery clamp should
be tightened to a torque of 10 Nm.
IB564
Correct position for battery clamp
ProCarManuals.com
Page 202 of 272
202 Car care and technical informationDrive belts The alternator is situated on the right-hand
side of the engine, adjacent to the bulkhead.
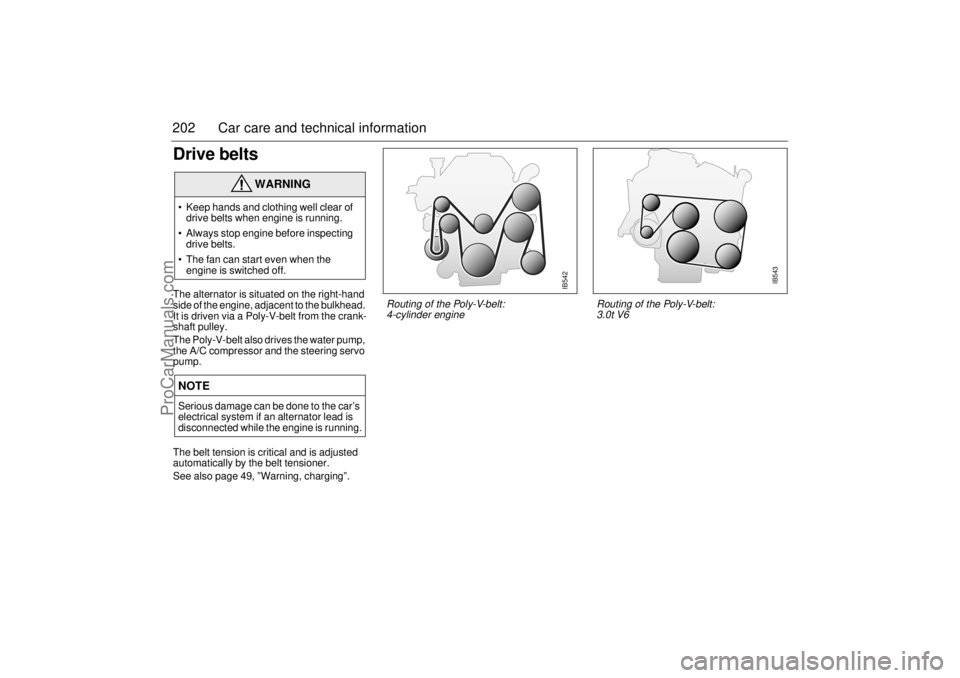
It is driven via a Poly-V-belt from the crank-
shaft pulley.
The Poly-V-belt also drives the water pump,
the A/C compressor and the steering servo
pump.
The belt tension is critical and is adjusted
automatically by the belt tensioner.
See also page 49, ”Warning, charging”.
WARNING
Keep hands and clothing well clear of
drive belts when engine is running.
Always stop engine before inspecting
drive belts.
The fan can start even when the
engine is switched off.NOTESerious damage can be done to the car’s
electrical system if an alternator lead is
disconnected while the engine is running.
IB542
Routing of the Poly-V-belt:
4-cylinder engine
IB543
Routing of the Poly-V-belt:
3.0t V6
ProCarManuals.com
Page 203 of 272
203 Car care and technical information
Wipers and washersCheck and clean all wiper blades regularly.
We recommend Saab washer fluid for
cleaning.
If poor wiper performance is experienced,
clean the windshield with Saab washer fluid.
This is particularly important if the car has
been through an automatic car wash, as
these sometimes leave a wax coating on the
windshield.
If wiper performance is still unsatisfactory,
fit new blades.
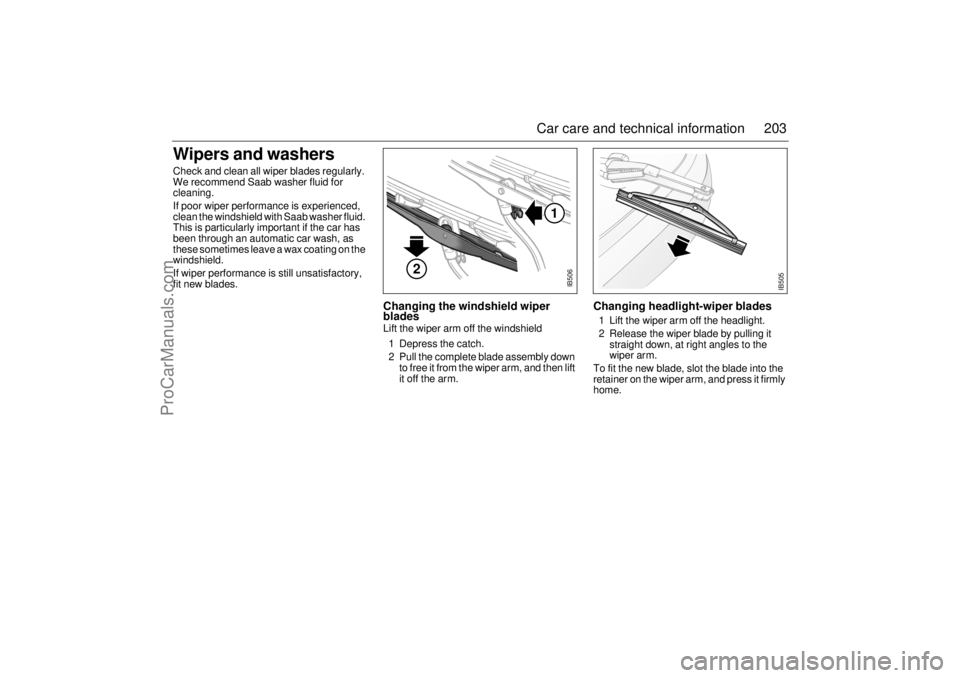
Changing the windshield wiper
bladesLift the wiper arm off the windshield
1 Depress the catch.
2 Pull the complete blade assembly down
to free it from the wiper arm, and then lift
it off the arm.
Changing headlight-wiper blades 1 Lift the wiper arm off the headlight.
2 Release the wiper blade by pulling it
straight down, at right angles to the
wiper arm.
To fit the new blade, slot the blade into the
retainer on the wiper arm, and press it firmly
home.
IB506
2
1
IB505
ProCarManuals.com
Page 204 of 272
204 Car care and technical informationWashersThe washer-fluid reservoir holds 6.4 quarts
(6 liters). When "WASHER FLUID LEVEL
LOW" comes up on the SID, the reservoir is
down to about 1 quart (1 liter) of fluid. Add
at least 50% of washer- fluid to water to pre-
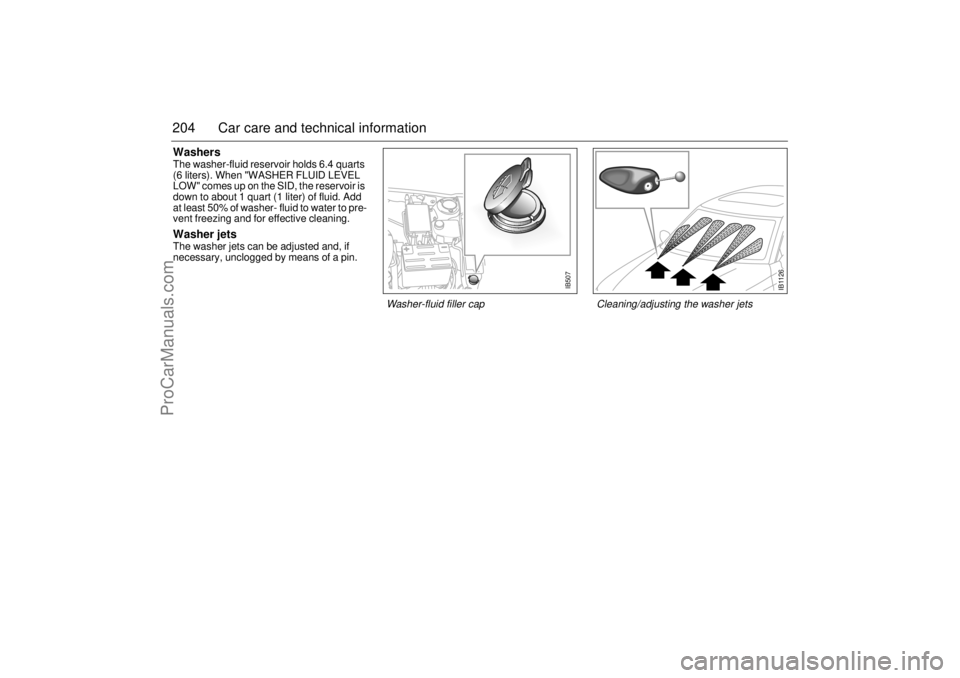
vent freezing and for effective cleaning.Washer jets The washer jets can be adjusted and, if
necessary, unclogged by means of a pin.
IB507
Washer-fluid filler cap
IB1126
Cleaning/adjusting the washer jets
ProCarManuals.com
Page 205 of 272
205 Car care and technical information
Changing bulbs Check that the new bulb is working when finished.
Some bulbs are of the ”Long-Life” type. Make sure the same type is
fitted when changing one of these.
Headlight aiming, see page 238.
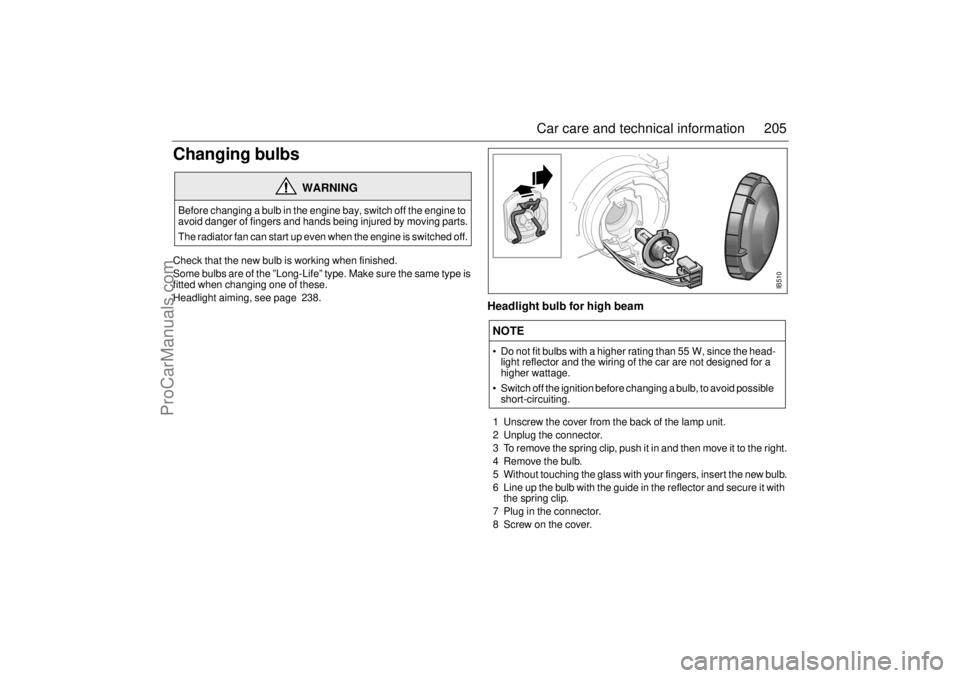
Headlight bulb for high beam1 Unscrew the cover from the back of the lamp unit.
2 Unplug the connector.
3 To remove the spring clip, push it in and then move it to the right.
4 Remove the bulb.
5 Without touching the glass with your fingers, insert the new bulb.
6 Line up the bulb with the guide in the reflector and secure it with
the spring clip.
7 Plug in the connector.
8 Screw on the cover.
WARNING
Before changing a bulb in the engine bay, switch off the engine to
avoid danger of fingers and hands being injured by moving parts.
The radiator fan can start up even when the engine is switched off.
NOTE Do not fit bulbs with a higher rating than 55 W, since the head-
light reflector and the wiring of the car are not designed for a
higher wattage.
Switch off the ignition before changing a bulb, to avoid possible
short-circuiting.
IB510
ProCarManuals.com
Page 206 of 272
206 Car care and technical information
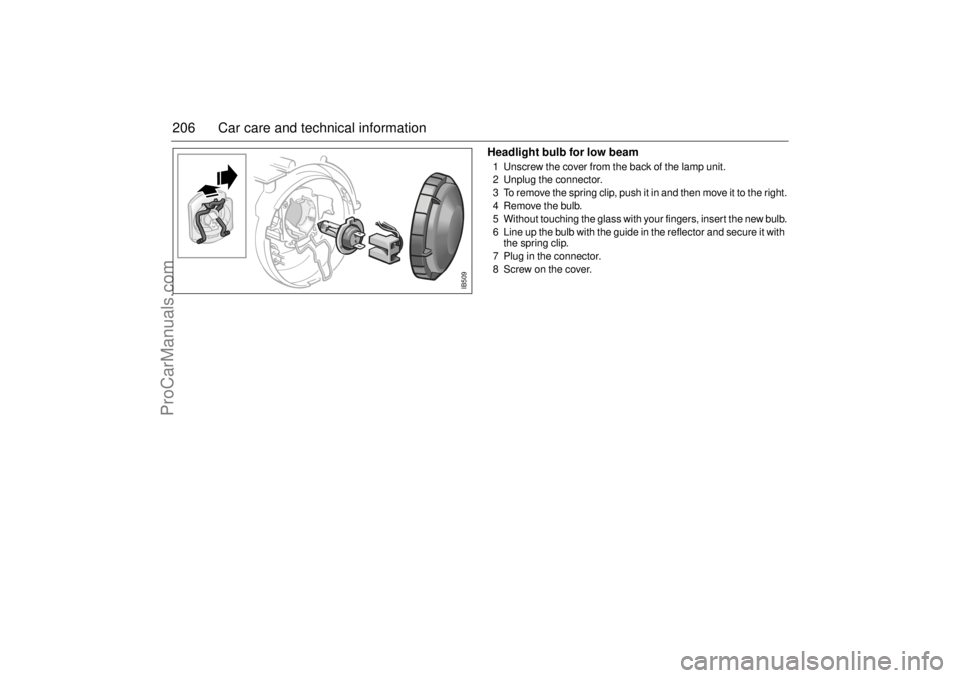
Headlight bulb for low beam1 Unscrew the cover from the back of the lamp unit.
2 Unplug the connector.
3 To remove the spring clip, push it in and then move it to the right.
4 Remove the bulb.
5 Without touching the glass with your fingers, insert the new bulb.
6 Line up the bulb with the guide in the reflector and secure it with
the spring clip.
7 Plug in the connector.
8 Screw on the cover.
IB509
ProCarManuals.com
Page 207 of 272
207 Car care and technical information
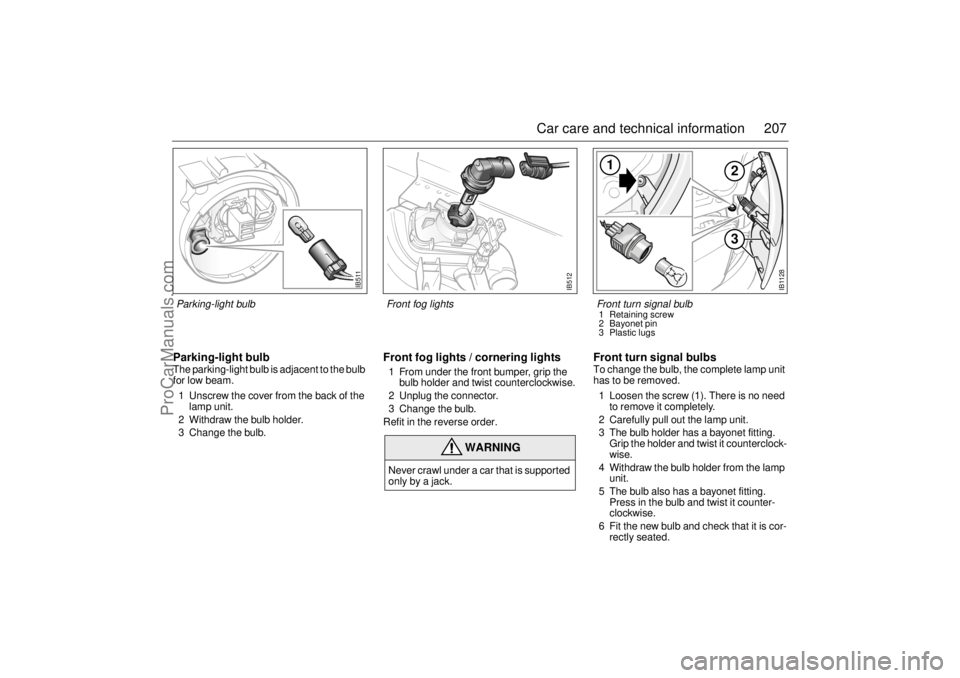
Parking-light bulb The parking-light bulb is adjacent to the bulb
for low beam.
1 Unscrew the cover from the back of the
lamp unit.
2 Withdraw the bulb holder.
3 Change the bulb.
Front fog lights / cornering lights1 From under the front bumper, grip the
bulb holder and twist counterclockwise.
2 Unplug the connector.
3 Change the bulb.
Refit in the reverse order.
Front turn signal bulbsTo change the bulb, the complete lamp unit
has to be removed.
1 Loosen the screw (1). There is no need
to remove it completely.
2 Carefully pull out the lamp unit.
3 The bulb holder has a bayonet fitting.
Grip the holder and twist it counterclock-
wise.
4 Withdraw the bulb holder from the lamp
unit.
5 The bulb also has a bayonet fitting.
Press in the bulb and twist it counter-
clockwise.
6 Fit the new bulb and check that it is cor-
rectly seated.
WARNING
Never crawl under a car that is supported
only by a jack.
IB511
Parking-light bulb
IB512
IB1128
1
23
Front turn signal bulb1 Retaining screw
2 Bayonet pin
3 Plastic lugs
Front fog lights
ProCarManuals.com
Page 208 of 272
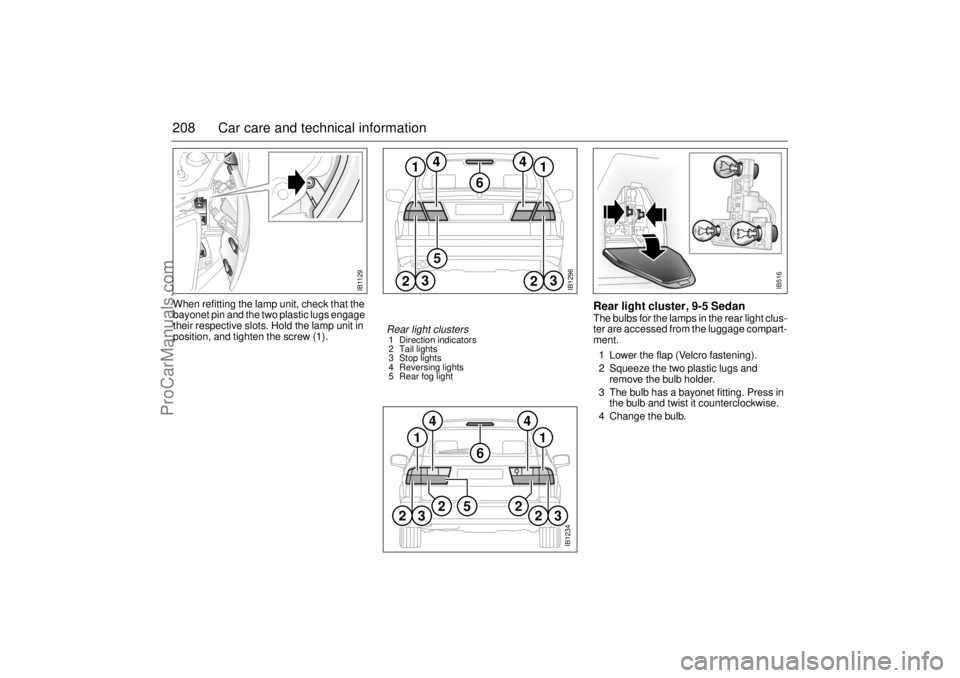
208 Car care and technical informationWhen refitting the lamp unit, check that the
bayonet pin and the two plastic lugs engage
their respective slots. Hold the lamp unit in
position, and tighten the screw (1).
Rear light cluster, 9-5 SedanThe bulbs for the lamps in the rear light clus-
ter are accessed from the luggage compart-
ment.
1 Lower the flap (Velcro fastening).
2 Squeeze the two plastic lugs and
remove the bulb holder.
3 The bulb has a bayonet fitting. Press in
the bulb and twist it counterclockwise.
4 Change the bulb.
IB1129
IB1296
12
3
2
3
5
6
4
1
4
Rear light clusters 1 Direction indicators
2 Tail lights
3 Stop lights
4 Reversing lights
5 Rear fog light
IB516
IB1234
1
4
2
3
2
6
1
42 5
23
ProCarManuals.com
Page 209 of 272
209 Car care and technical information
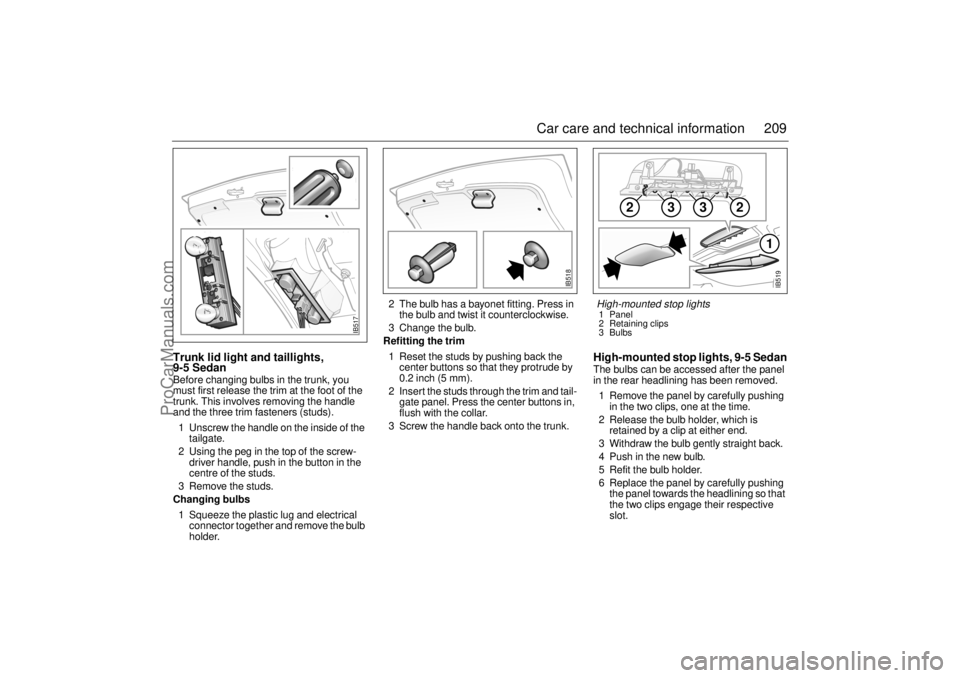
Trunk lid light and taillights,
9-5 SedanBefore changing bulbs in the trunk, you
must first release the trim at the foot of the
trunk. This involves removing the handle
and the three trim fasteners (studs).
1 Unscrew the handle on the inside of the
tailgate.
2 Using the peg in the top of the screw-
driver handle, push in the button in the
centre of the studs.
3 Remove the studs.
Changing bulbs
1 Squeeze the plastic lug and electrical
connector together and remove the bulb
holder.2 The bulb has a bayonet fitting. Press in
the bulb and twist it counterclockwise.
3 Change the bulb.
Refitting the trim
1 Reset the studs by pushing back the
center buttons so that they protrude by
0.2 inch (5 mm).
2 Insert the studs through the trim and tail-
gate panel. Press the center buttons in,
flush with the collar.
3 Screw the handle back onto the trunk.
High-mounted stop lights, 9-5 SedanThe bulbs can be accessed after the panel
in the rear headlining has been removed.
1 Remove the panel by carefully pushing
in the two clips, one at the time.
2 Release the bulb holder, which is
retained by a clip at either end.
3 Withdraw the bulb gently straight back.
4 Push in the new bulb.
5 Refit the bulb holder.
6 Replace the panel by carefully pushing
the panel towards the headlining so that
the two clips engage their respective
slot.
IB517
IB518
3
2
2
3
1
IB519
High-mounted stop lights1 Panel
2 Retaining clips
3 Bulbs
ProCarManuals.com
Page 210 of 272
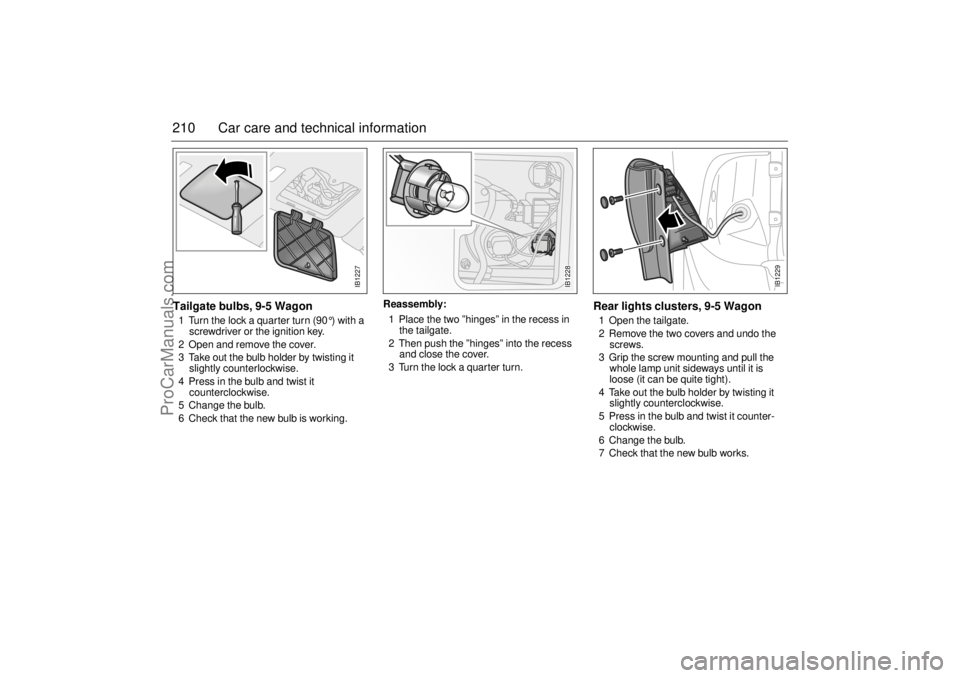
210 Car care and technical informationTailgate bulbs, 9-5 Wagon1 Turn the lock a quarter turn (90 °) with a
screwdriver or the ignition key.
2 Open and remove the cover.
3 Take out the bulb holder by twisting it
slightly counterlockwise.
4 Press in the bulb and twist it
counterclockwise.
5 Change the bulb.
6 Check that the new bulb is working.Reassembly:
1 Place the two ”hinges” in the recess in
the tailgate.
2 Then push the ”hinges” into the recess
and close the cover.
3 Turn the lock a quarter turn.
Rear lights clusters, 9-5 Wagon1 Open the tailgate.
2 Remove the two covers and undo the
screws.
3 Grip the screw mounting and pull the
whole lamp unit sideways until it is
loose (it can be quite tight).
4 Take out the bulb holder by twisting it
slightly counterclockwise.
5 Press in the bulb and twist it counter-
clockwise.
6 Change the bulb.
7 Check that the new bulb works.
IB1227
IB1228
IB1229
ProCarManuals.com