SAAB 9-5 2004 Owner's Manual
Manufacturer: SAAB, Model Year: 2004, Model line: 9-5, Model: SAAB 9-5 2004Pages: 288, PDF Size: 16.91 MB
Page 21 of 288
21 Safety
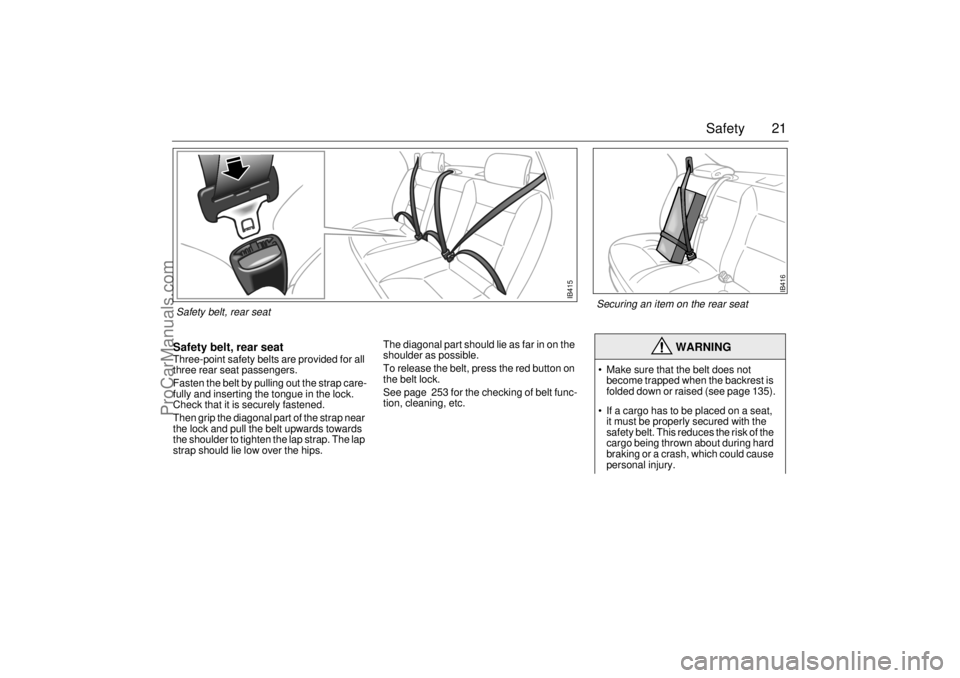
Safety belt, rear seat Three-point safety belts are provided for all
three rear seat passengers.
Fasten the belt by pulling out the strap care-
fully and inserting the tongue in the lock.
Check that it is securely fastened.
Then grip the diagonal part of the strap near
the lock and pull the belt upwards towards
the shoulder to tighten the lap strap. The lap
strap should lie low over the hips.The diagonal part should lie as far in on the
shoulder as possible.
To release the belt, press the red button on
the belt lock.
See page 253 for the checking of belt func-
tion, cleaning, etc.
WARNING
Make sure that the belt does not
become trapped when the backrest is
folded down or raised (see page 135).
If a cargo has to be placed on a seat,
it must be properly secured with the
safety belt. This reduces the risk of the
cargo being thrown about during hard
braking or a crash, which could cause
personal injury.
IB???IB415
Safety belt, rear seat
IB416
Securing an item on the rear seat
ProCarManuals.com
Page 22 of 288
22 Safety Check that the belt is not twisted or
lying against sharp edges.
Make sure you use the correct safety
belt buckle. The buckles for the center
and left-hand rear seats are close
together.
WARNING
Safety belts are designed to bear upon
the bony structure of the body, and should
be worn low across the front of the pelvis
or the pelvis, chest and shoulders, as
applicable; wearing the lap section of the
belt across the abdominal area must be
avoided.
Safety belts should be adjusted as firmly
as possible, consistent with comfort, to
provide the protection for which they have
been designed. A loose belt will greatly
reduce the protection afforded to the
wearer.
Care should be taken to avoid contamina-
tion of the webbing with polishes, oils and
chemicals, and particularly battery acid.
Cleaning may safely be carried out using
mild soap and water. The belt should be
replaced if webbing becomes frayed,
contaminated or damaged.
It is essential to replace the entire assem-
bly after it has been worn in a severe
impact even if damage to the assembly is
not obvious.
Belts should not be worn with straps
twisted.
Each belt assembly must only be used by
one occupant; it is dangerous to put a belt
around a child being carried on the occu-
pant´s lap.
No modifications or additions should be
made by the user which will either prevent
the safety belt adjusting device from oper-
ating to remove slack, or prevent the
safety belt assembly from being adjusted
to remove slack.
ProCarManuals.com
Page 23 of 288
23 Safety
Child safety
Car safety tips
For Trunk Release Handle information see
page 44 and 144.
WARNING
Children must always be suitably
restrained in the car.
DEATH or SERIOUS
INJURY can occur.
Children 12 and under or
shorter than 55 inches
(140 cm) can be killed by
the airbag.
The BACK SEAT is the SAFEST place
for children.
NEVER put a rear-facing child seat in
the front.
Sit as far back as possible from the
airbag.
ALWAYS use SAFETY BELTS and
CHILDREN RESTRAINTS.
WARNING
Never leave children unattended in a
car, even for a short time.
– Children can suffer heat stroke – per-
haps die – in a matter of minutes.
– Children can put the car into gear and
hurt themselves or others.
At gas stations, take the keys from the
car while filling the tank.
Never allow children to climb on top of
– or under cars.
Always look for children before back-
ing your car out of a garage or drive-
way.
To avoid carbon monoxide poisoning,
never let a car idle in the garage.
Supervise young children around
buckets of water while washing your
car. Small children can drown in a
short time in less than an inch of water.
WARNING
Protect children from getting
trapped in the trunk of a car
Teach children not to play in or around
cars.
Watch children when loading or
unloading the car so they don’t get
locked in by mistake.
Always lock the doors and trunk of
your car, and keep the keys out of chil-
dren´s sight and reach.
Keep the rear fold-down seats closed
to help prevent kids from getting into
the trunk from inside the car.
ProCarManuals.com
Page 24 of 288
24 SafetyThe same attention must be given to child
safety in the car as is given to adults.
Saab recommends rearward facing child
restraints.
Children travel most safely when properly
restrained, but restraints must be suitable
for the size of the child. Always follow the
child seat/booster cushion manufacturer´s
instructions when installing these devices in
your vehicle.
Make sure you are acquainted with the
legal requirements for seating children
in the car.
Make sure that it is possible to fit a child
restraint in accordance with the manufac-
turer’s child seat instructions.
When fitting child seats in cars you must
always read the instructions supplied by
the manufacturer.
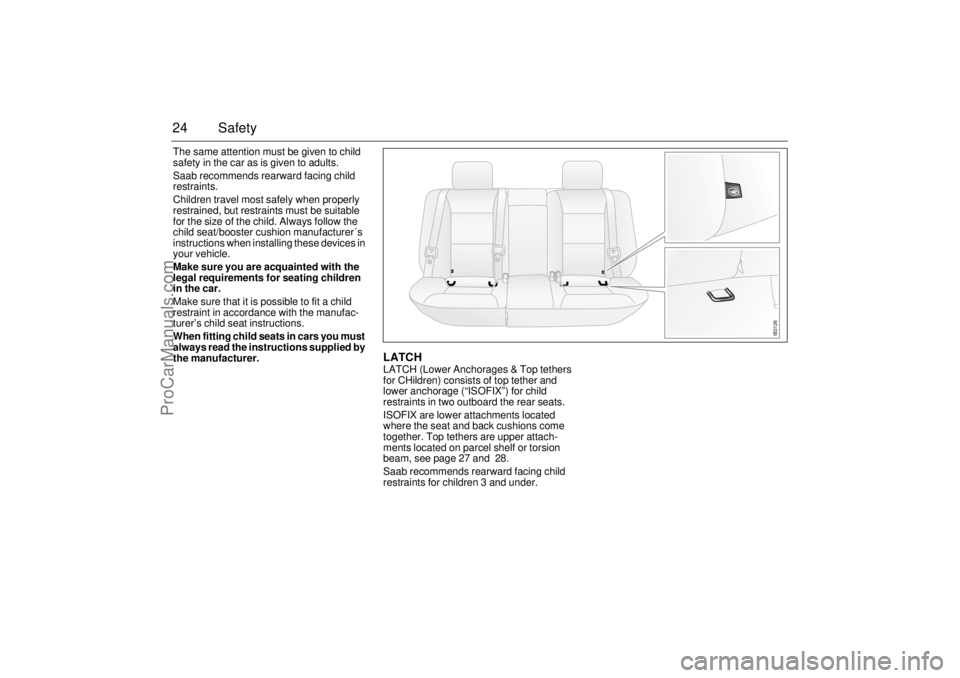
LATCHLATCH (Lower Anchorages & Top tethers
for CHildren) consists of top tether and
lower anchorage (“ISOFIX”) for child
restraints in two outboard the rear seats.
ISOFIX are lower attachments located
where the seat and back cushions come
together. Top tethers are upper attach-
ments located on parcel shelf or torsion
beam, see page 27 and 28.
Saab recommends rearward facing child
restraints for children 3 and under.
IB3126
ProCarManuals.com
Page 25 of 288

25 Safety
LATCH installationTo facilitate the proper fitting of new
specially-designed child restraints, rigid
lower anchorages (ISOFIX) have been
installed to the vehicle that shall be used
with the top tether anchorages in the two
outboard rear seating positions. There is an
additional top tether anchorage for the
center rear seating position that is to be
used together with the safety belt.
LATCH is a U.S./Canadian government
standard for an uniform method of fitting
child restraints without using the standard
safety belts. Only certain child restraints are
equipped to utilize these rigid lower anchor-
ages behind where the seat cushion and
seat back come together. LATCH child
seats also utilize a top tether strap that is
found on some newer child seats that still
require installation with the standard safety
belts.There are two bars attached to the car body
for each specially designed LATCH child
restraint. A small label is located on the seat
back just above the outer attachment bars
to facilitate installing the child restraint. The
label contains a circle and a rearward facing
child restraint.
1 Place the child restraint on the seat
cushion.
2 Press the child restraint rearward into
the space between the backrest and
cushion, lining up the restraint attach-
ment arms with the labels.
3 Follow the child restraint instructions to
confirm that both restraint arms are
properly attached to the bars.
4 Attach the top tether strap to the in-car
anchorage and tighten according to the
restraint instructions, see page 27 and
28.
5 Pull the child restraint to make a second
check that restraint is securely attached
at both the lower anchorage bars and
the top tether strap.
ProCarManuals.com
Page 26 of 288
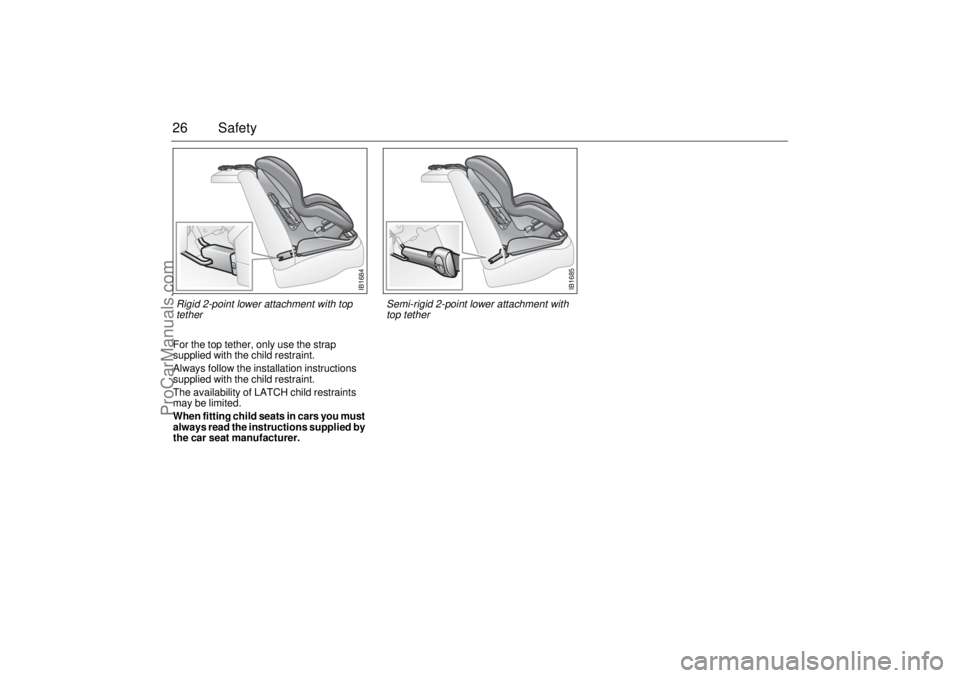
26 SafetyFor the top tether, only use the strap
supplied with the child restraint.
Always follow the installation instructions
supplied with the child restraint.
The availability of LATCH child restraints
may be limited.
When fitting child seats in cars you must
always read the instructions supplied by
the car seat manufacturer.
IB1684
Rigid 2-point lower attachment with top
tether
IB1685
Semi-rigid 2-point lower attachment with
top tether
ProCarManuals.com
Page 27 of 288
27 Safety
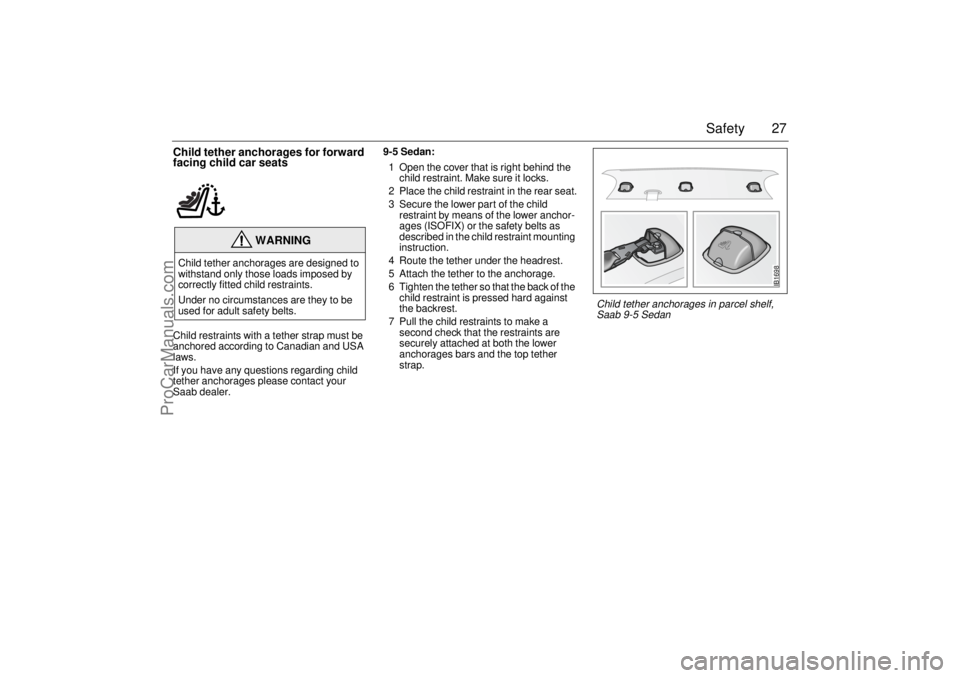
Child tether anchorages for forward
facing child car seatsChild restraints with a tether strap must be
anchored according to Canadian and USA
laws.
If you have any questions regarding child
tether anchorages please contact your
Saab dealer.9-5 Sedan:
1 Open the cover that is right behind the
child restraint. Make sure it locks.
2 Place the child restraint in the rear seat.
3 Secure the lower part of the child
restraint by means of the lower anchor-
ages (ISOFIX) or the safety belts as
described in the child restraint mounting
instruction.
4 Route the tether under the headrest.
5 Attach the tether to the anchorage.
6 Tighten the tether so that the back of the
child restraint is pressed hard against
the backrest.
7 Pull the child restraints to make a
second check that the restraints are
securely attached at both the lower
anchorages bars and the top tether
strap.
WARNING
Child tether anchorages are designed to
withstand only those loads imposed by
correctly fitted child restraints.
Under no circumstances are they to be
used for adult safety belts.
IB1698
Child tether anchorages in parcel shelf,
Saab 9-5 Sedan
ProCarManuals.com
Page 28 of 288
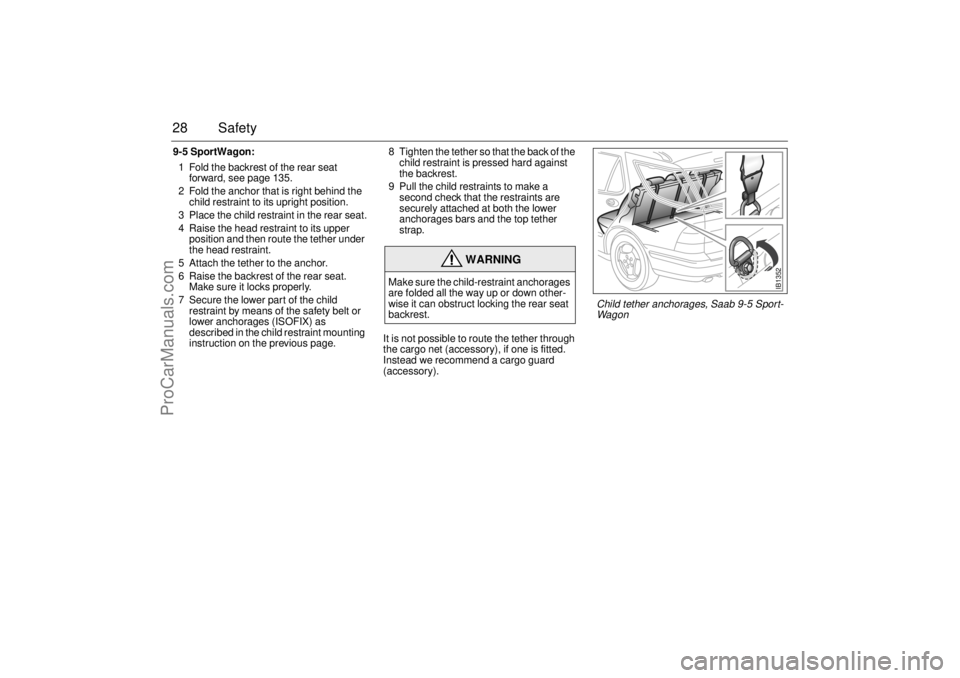
28 Safety9-5 SportWagon:
1 Fold the backrest of the rear seat
forward, see page 135.
2 Fold the anchor that is right behind the
child restraint to its upright position.
3 Place the child restraint in the rear seat.
4 Raise the head restraint to its upper
position and then route the tether under
the head restraint.
5 Attach the tether to the anchor.
6 Raise the backrest of the rear seat.
Make sure it locks properly.
7 Secure the lower part of the child
restraint by means of the safety belt or
lower anchorages (ISOFIX) as
described in the child restraint mounting
instruction on the previous page.8 Tighten the tether so that the back of the
child restraint is pressed hard against
the backrest.
9 Pull the child restraints to make a
second check that the restraints are
securely attached at both the lower
anchorages bars and the top tether
strap.
It is not possible to route the tether through
the cargo net (accessory), if one is fitted.
Instead we recommend a cargo guard
(accessory).
WARNING
Make sure the child-restraint anchorages
are folded all the way up or down other-
wise it can obstruct locking the rear seat
backrest.
IB1352
Child tether anchorages, Saab 9-5 Sport-
Wagon
ProCarManuals.com
Page 29 of 288
29 Safety
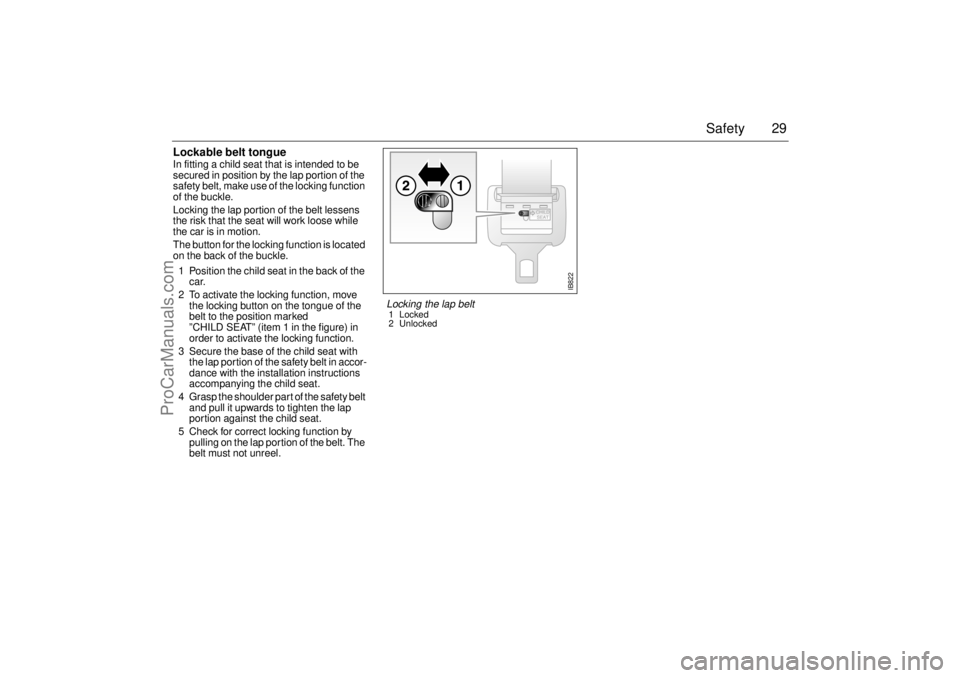
Lockable belt tongue In fitting a child seat that is intended to be
secured in position by the lap portion of the
safety belt, make use of the locking function
of the buckle.
Locking the lap portion of the belt lessens
the risk that the seat will work loose while
the car is in motion.
The button for the locking function is located
on the back of the buckle.
1 Position the child seat in the back of the
car.
2 To activate the locking function, move
the locking button on the tongue of the
belt to the position marked
”CHILD SEAT” (item 1 in the figure) in
order to activate the locking function.
3 Secure the base of the child seat with
the lap portion of the safety belt in accor-
dance with the installation instructions
accompanying the child seat.
4 Grasp the shoulder part of the safety belt
and pull it upwards to tighten the lap
portion against the child seat.
5 Check for correct locking function by
pulling on the lap portion of the belt. The
belt must not unreel.
IB822
Locking the lap belt1 Locked
2 Unlocked
ProCarManuals.com
Page 30 of 288
30 SafetyInstallation of child restraint using the
standard safety belt
Child restraints that are approved for rear-
ward facing installation in the rear seat can
be positioned in any of the three rear places.
If you intend to install another make of child
restraint make sure that it is possible to fit it
in accordance with the manufacturer’s
instructions.
Saab recommends rearward facing child
restraints up to 3 years.
WARNING
Failure to follow all the manufacturer’s
instructions on the use of this child
restraint system can cause your child to
strike the vehicle´s interior during a
sudden stop or crash.
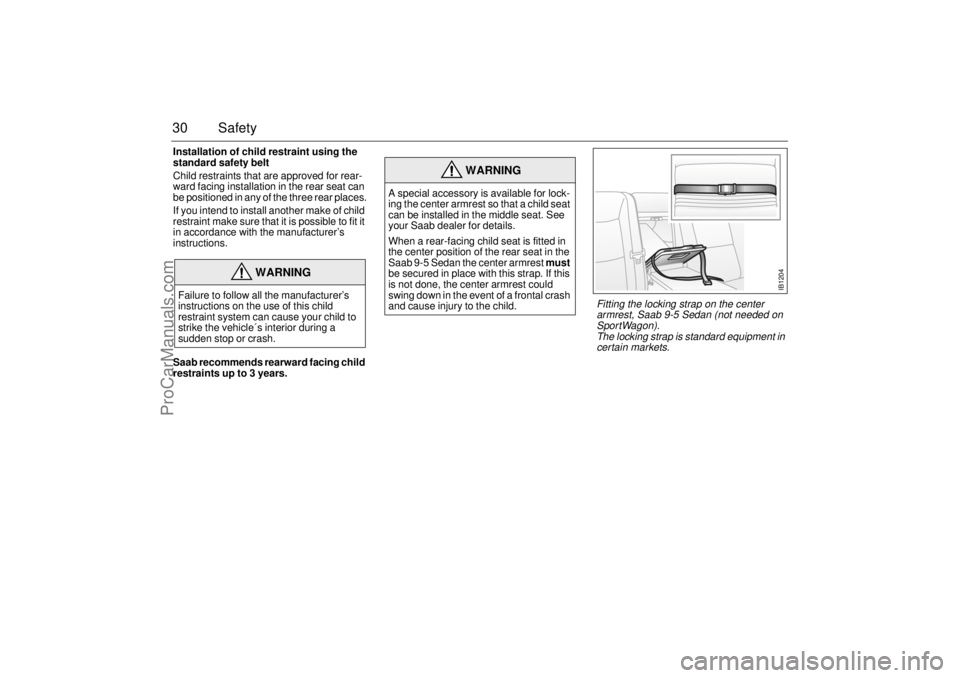
WARNING
A special accessory is available for lock-
ing the center armrest so that a child seat
can be installed in the middle seat. See
your Saab dealer for details.
When a rear-facing child seat is fitted in
the center position of the rear seat in the
Saab 9-5 Sedan the center armrest must
be secured in place with this strap. If this
is not done, the center armrest could
swing down in the event of a frontal crash
and cause injury to the child.
IB1204
Fitting the locking strap on the center
armrest, Saab 9-5 Sedan (not needed on
SportWagon).
The locking strap is standard equipment in
certain markets.
ProCarManuals.com