lock SATURN ASTRA 2009 Repair Manual
[x] Cancel search | Manufacturer: SATURN, Model Year: 2009, Model line: ASTRA, Model: SATURN ASTRA 2009Pages: 314, PDF Size: 1.94 MB
Page 213 of 314

2. Turn the bulb socket
counterclockwise and pull
straight out.
3. Turn bulb counterclockwise
and remove.
4. Install new bulb.
5. Reverse Steps 2 through 4 to
reinstall.
Center High-Mounted
Stoplamp (CHMSL)
1. Open the liftgate. See “Liftgate”
for more information.
2. Remove the two pins in the
tailgate trim.3. Remove the tailgate trim.
Vehicle Service and Care 9-29
ProCarManuals.com
Page 214 of 314

4. Unlock the six Center
High-Mounted Stoplamp
(CHMSL) clips.
5. Remove the CHMSL from the
top of the tailgate.
6. Reverse Steps 1 through 3 to
reinstall the lamp assembly.
Taillamps
(Five-Door Hatchback)
A. Backup Lamp
B. Taillamp
C. Taillamp/Stoplamp/Turn
Signal Lamp
9-30 Vehicle Service and Care
ProCarManuals.com
Page 215 of 314

To replace one of these bulbs:
1. Open the liftgate.
2. To replace the bulbs on the
driver side, turn both locks
and remove the cover.
To replace the bulbs on the
passenger side, turn the
lock clockwise and remove
the cover.
3. Detach the plug connector from
the bulb assembly.4. Turn the nuts counterclockwise
and hold the outside of taillamp
assembly.
5. Pull the taillamp assembly
straight out.
6. Remove the three nuts.
7. Press on the tabs on the outside
of bulb assembly and remove the
bulb assembly.
8. Remove the bulb from the bulb
assembly.9. Install a new bulb without
touching the glass.
10. Reinstall the bulb assembly in
taillamp assembly.
11. Make sure the seals are applied
to the taillamp assembly and
screws.
12. Insert the taillamp assembly
into the body.
13. Reinstall the three nuts.
14. Attach the plug connector to the
bulb assembly.
Vehicle Service and Care 9-31
ProCarManuals.com
Page 216 of 314

Taillamps
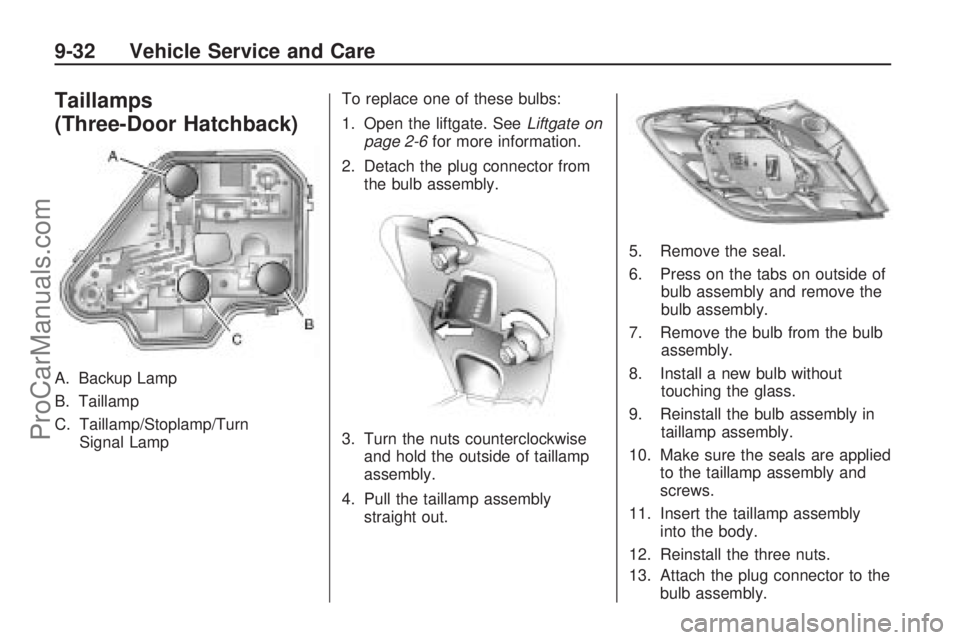
(Three-Door Hatchback)
A. Backup Lamp
B. Taillamp
C. Taillamp/Stoplamp/Turn
Signal LampTo replace one of these bulbs:
1. Open the liftgate. SeeLiftgate on
page 2-6for more information.
2. Detach the plug connector from
the bulb assembly.
3. Turn the nuts counterclockwise
and hold the outside of taillamp
assembly.
4. Pull the taillamp assembly
straight out.5. Remove the seal.
6. Press on the tabs on outside of
bulb assembly and remove the
bulb assembly.
7. Remove the bulb from the bulb
assembly.
8. Install a new bulb without
touching the glass.
9. Reinstall the bulb assembly in
taillamp assembly.
10. Make sure the seals are applied
to the taillamp assembly and
screws.
11. Insert the taillamp assembly
into the body.
12. Reinstall the three nuts.
13. Attach the plug connector to the
bulb assembly.
9-32 Vehicle Service and Care
ProCarManuals.com
Page 217 of 314

License Plate Lamp
To replace one of these bulbs:
1. Push tab in and pull down on it to
remove the license plate lamp.2. Turn and pull the license plate
lamp toward you through the
opening.3. Turn the bulb socket
counterclockwise and pull the
bulb straight out of the socket.
4. Install the new bulb.
5. Reverse Steps 1 through 3 to
reinstall the license plate lamp.
Vehicle Service and Care 9-33
ProCarManuals.com
Page 218 of 314

Replacement Bulbs
Exterior LampBulb
Number
Front Turn
Signal Lamp3157 NAK
License
Plate LampW5W
Parking Lamp 4157K
Taillamp W21
For replacement bulbs not listed
here, contact your dealer/retailer.
Electrical System
Add-On Electrical
Equipment
Notice:Do not add anything
electrical to the vehicle unless you
check with your dealer/retailer
�rst. Some electrical equipment
can damage the vehicle and the
damage would not be covered by
the vehicle’s warranty. Some
add-on electrical equipment can
keep other components from
working as they should.
Add-on equipment can drain the
vehicle battery, even if the vehicle is
not operating.The vehicle has an airbag system.
Before attempting to add anything
electrical to the vehicle, see
Servicing Your Airbag-Equipped
Vehicle on page 1-35.Headlamp Wiring
The headlamp wiring is protected
by fuses in the fuse block.
An electrical overload will cause the
lamps to turn off. If this happens,
have the headlamp wiring checked
right away.
9-34 Vehicle Service and Care
ProCarManuals.com
Page 219 of 314

Fuses
The wiring circuits in the vehicle
are protected from short circuits by
fuses. This greatly reduces the
chance of damage caused by
electrical problems.
Look at the silver-colored band
inside the fuse. If the band is
broken or melted, replace the fuse.
Be sure to replace a bad fuse
with a new one of the identical size
and rating.
There are two fuse blocks in the
vehicle: one in the engine
compartment and one in the trunk.
There is a fuse puller located on
the rear compartment fuse block.
SeeRear Compartment Fuse Block
on page 9-37. It can be used to
easily remove fuses from the
fuse block.
Engine Compartment
Fuse Block
The engine compartment fuse block
is located in the front left side
of the engine compartment.
SeeEngine Compartment
Overview on page 9-6.
To open the fuse block cover,
insert a tool into the latch and turn.
Pull up on the cover to remove.
Notice:Spilling liquid on
any electrical components on
the vehicle may damage it.
Always keep the covers on
any electrical component.
Vehicle Service and Care 9-35
ProCarManuals.com
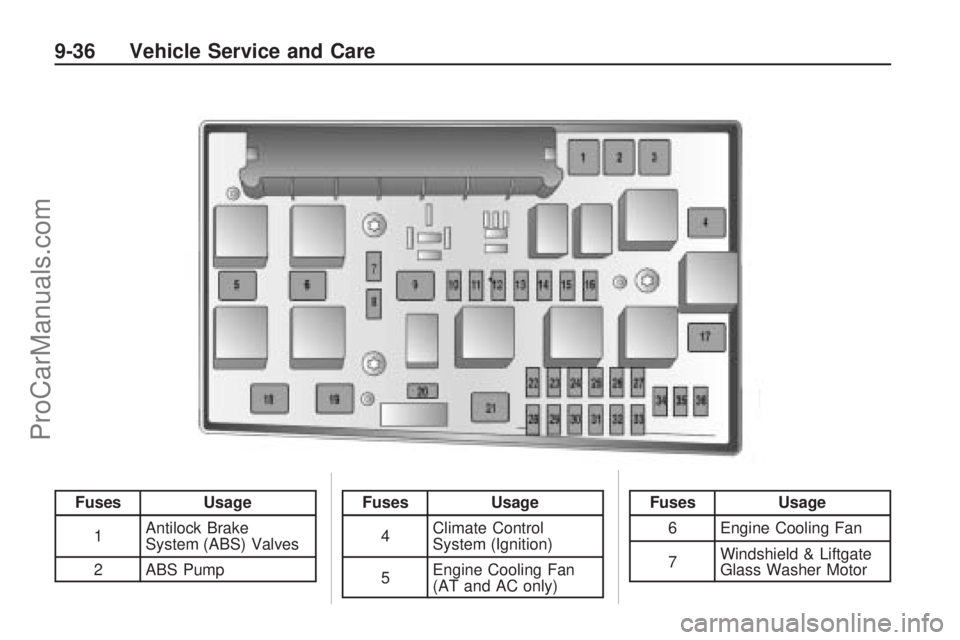
Page 220 of 314

FusesUsage
1 Antilock Brake
System (ABS) Valves
2 ABS PumpFuses Usage
4 Climate Control
System (Ignition)
5 Engine Cooling Fan
(AT and AC only)Fuses
Usage
6 Engine Cooling Fan
7 Windshield & Liftgate
Glass Washer Motor
9-36 Vehicle Service and Care
ProCarManuals.com
Page 221 of 314

Fuses Usage
8 Horn
10 Door Locks
13 Foglamps
14Windshield Wipers
(high speed)
15Windshield Wipers
(low speed)
16Antilock Brake System,
Brake Lamp Switch
17 Vacuum Pump
18 Starter
20 Air Conditioning Clutch
21Engine Control
Module (ECM)
(Main Relay)
22 ECM (Battery)
24 Fuel Pump/Injectors
26ECM (Sensor and
Actuators)Fuses Usage
27 Power Steering
28Automatic
Transmission (Battery)
29Automatic
Transmission (Ignition)
30 ECM (Ignition)
32 Brake Switch
34Steering Column
Module
35 Radio
36OnStar™ Module/
OnStar™ Interface
Module/DisplayRear Compartment
Fuse Block
To open the liftgate, SeeLiftgate on
page 2-6.
The rear compartment fuse block
is located on the left side of
the cargo area behind a cover.
Use the fuse puller, to remove and
replace fuses.
Vehicle Service and Care 9-37
ProCarManuals.com
Page 223 of 314

Fuses Usage
16Front Passenger Seat
Detection Sensor
17Tire Pressure
Monitoring
System (TPMS)/Rain
Sensor/Inside
Rearview Mirror
18 Interior Lights
21 Outside Mirror Heating
22 Sunroof
23 Rear Power Window
24Diagnostic Link
Connector
29Accessory Power
Outlet (APO)
34 Sunroof
38 Door Locks
39 Seat Heating Driver
40Seat Heating Front
Passenger
Vehicle Service and Care 9-39
ProCarManuals.com