SATURN ASTRA 2009 Manual Online
Manufacturer: SATURN, Model Year: 2009, Model line: ASTRA, Model: SATURN ASTRA 2009Pages: 314, PDF Size: 1.94 MB
Page 81 of 314

Resuming a Set Speed
Once the vehicle speed reaches
about 25 mph (40 km/h) or more and
the cruise control is on, press
W.
The vehicle returns to the previous
speed selected before the cruise
was disengaged.
The stored speed is deleted if the
ignition is turned off.
Increasing Speed While Using
Cruise Control
Press and holdJuntil the
desired speed is reached,
then release it.
To increase vehicle speed in
small increments, brie�y
press
Jrepeatedly. Each time
this is done, the vehicle speed
increase by about 1 mph
(1.6 km/h) without using the
accelerator pedal.
When the
Jbutton is released
the current speed is stored
and maintained.
Reducing Speed While Using
Cruise Control
Press and holdWuntil the
desired lower speed is reached,
then release it.
To reduce vehicle speed in small
increments, brie�y press
W
repeatedly. Each time this is
done, the vehicle speed
decreases by about 1 mph
(1.6 km/h).
When the
Wbutton is released
the current speed is stored
and maintained.
Passing Another Vehicle
While Using Cruise Control
Use the accelerator pedal to
increase the vehicle speed.
When the accelerator pedal is
released, the vehicle will return to
the previously set cruise speed.
Using Cruise Control on Hills
How well the cruise control will
work on hills depends upon
the vehicle speed, load, and the
steepness of the hills. While going
up steep hills, you might have
to step on the accelerator pedal to
maintain the vehicle’s speed.
While going downhill, you might
have to brake or shift to a lower gear
to keep the vehicle’s speed down.
Of course, applying the brake
turns off the cruise control.
Ending Cruise Control
There are several ways to end
cruise control:
Step lightly on the brake or
clutch pedal.
The automatic transmission is
placed in N (Neutral).
Press the9button.
Erasing Speed Memory
The cruise control set speed memory
is erased when the cruise control or
the ignition is turned off.
Instruments and Controls 4-7
ProCarManuals.com
Page 82 of 314

Turn and Lane-Change
Signals
To signal a turn, move the lever all
the way up or down, past the
detent. The lever returns to its
starting position when released.
An arrow on the instrument panel
cluster �ashes in the direction of the
turn or lane change.
To signal a lane change, raise or
lower the lever until the arrow starts
to �ash, and then release the
lever. Do not move the lever past
the detent. The turn signal will
automatically �ash three times and
turn off.
To cancel it before turning, move
the lever slightly in either direction.
Do not past the detent.
If the turn signal is moved up or down
and left engaged, the headlamps and
taillamps will remain on and the
battery could be drained.
Headlamp High/
Low-Beam Changer
23
(Headlamp High/Low
Beam Changer):To change the
headlamps from low to high
beam, push the multifunction lever
towards the instrument panel.
To return to low-beam headlamps,
push the lever towards the
instrument panel again or pull the
lever toward you. Then release it.
This indicator light on the instrument
panel cluster is on while the high
beam headlamps are on.
Flash-to-Pass
Pull the turn signal/multifunction
lever towards you to �ash the high
beams from low beam.
Windshield Wipers
Clear ice and snow from the wiper
blades before using them. If the
wiper blades are frozen to the
windshield, gently loosen or thaw
them. If the blades do become
damaged, install new blades or blade
inserts. SeeWindshield Wiper Blade
Replacement on page 9-21.
Heavy snow or ice can overload the
wiper motor. A circuit breaker will
stop the motor until it cools down.
Clear away snow or ice to prevent
an overload.
4-8 Instruments and Controls
ProCarManuals.com
Page 83 of 314

The lever on the right side of the
steering column operates the
windshield wipers. Push up or pull
down on the lever
to place it in one of the following
positions.
[(High):For rapid wiping cycles.
— (Low):For slow, steady wiping
cycles.
-- (Intermittent/RainSense™):
See RainSense™ wipers below.
9(Off):Turns off the wipers.For a single wipe pull the lever
down from the off position.
The lever will return to its original
position. For more cycles, hold
the lever down before releasing it.
RainSense™ Wipers
There is a moisture sensor mounted
on the windshield next to the
inside rearview mirror. When active,
the sensor is able to detect
moisture on the windshield and
automatically control the frequency
of the wipes according to the
weather conditions.
To turn on the RainSense feature,
the wipers must be set to the
intermittent delay setting on the
windshield wiper lever.
To turn off RainSense, move the
lever downwards.
Notice:Going through an
automatic car wash with the
wipers on can damage them.
Turn the wipers off when going
through an automatic car wash.
Windshield Washer
{CAUTION
In freezing weather, do not use
your washer until the windshield is
warmed. Otherwise the washer
�uid can form ice on the
windshield, blocking your vision.
Pull the windshield wiper lever
toward you to spray washer �uid on
the windshield. The wipers will
run for a few cycles to clear the
windshield. For more wash cycles,
pull the lever forward and hold.
Rear Window
Wiper/Washer
For vehicles with the rear
wiper/washer feature, it is turned
on by moving the windshield
wiper lever.
To turn the rear wiper on or off,
push the windshield wiper lever.
Instruments and Controls 4-9
ProCarManuals.com
Page 84 of 314

To turn on the rear washer, hold the
windshield wiper lever toward the
front of the vehicle to spray the
rear window.
The rear wiper turns on
automatically when the windshield
wiper is turned on and the shift lever
is in R (Reverse).
The rear window washer uses the
same �uid bottle as the windshield
washer. However, the rear window
washer will run out of �uid before
the windshield washer. If washer
�uid sprays onto the windshield but
not the rear window, check the
�uid level. SeeWindshield Washer
Fluid on page 9-20.
For information on replacing the
rear wiper blades, seeWindshield
Wiper Blade Replacement on
page 9-21.Accessory Power
Outlet(s)
The 12-volt accessory power outlets
can be used to connect electrical
equipment, such as a cellular phone.
There may be a accessory power
outlet located inside the console
below the climate controls.
Notice:Leaving electrical
equipment on for extended
periods will drain the battery.
Always turn off electrical
equipment when not in use and
do not plug in equipment that
exceeds the maximum 20 ampere
rating.
Certain electrical accessories
may not be compatible with the
accessory power outlet and could
result in blown vehicle or adapter
fuses. If there is a problem,
see your dealer/retailer for
additional information on the
accessory power outlet.Notice:Adding any electrical
equipment to your vehicle
may damage it or keep other
components from working as
they should. The repairs would not
be covered by your warranty.
Check with your dealer/retailer
before adding electrical
equipment.
When adding electrical equipment,
be sure to follow the installation
instructions included with the
equipment.
Notice:Improper use of the
power outlet can cause damage
not covered by the warranty.
Do not hang any type of
accessory or accessory bracket
from the plug because the
power outlets are designed for
accessory power plugs only.
4-10 Instruments and Controls
ProCarManuals.com
Page 85 of 314

Warning Lights,
Gages, and Indicators
Warning lights and gages can
signal that something is wrong
before it becomes serious enough
to cause an expensive repair or
replacement. Paying attention to the
warning lights and gages could
prevent injury.
Warning lights come on when there
may be or is a problem with one
of the vehicle’s functions. Some
warning lights come on brie�y when
the engine is started to indicate
they are working.Gages can indicate when there may
be or is a problem with one of the
vehicle’s functions. Often gages and
warning lights work together to
indicate a problem with the vehicle.
When one of the warning lights
comes on and stays on while
driving, or when one of the gages
shows there may be a problem,
check the section that explains what
to do. Follow this manual’s advice.
Waiting to do repairs can be
costly and even dangerous.
Instruments and Controls 4-11
ProCarManuals.com
Page 86 of 314

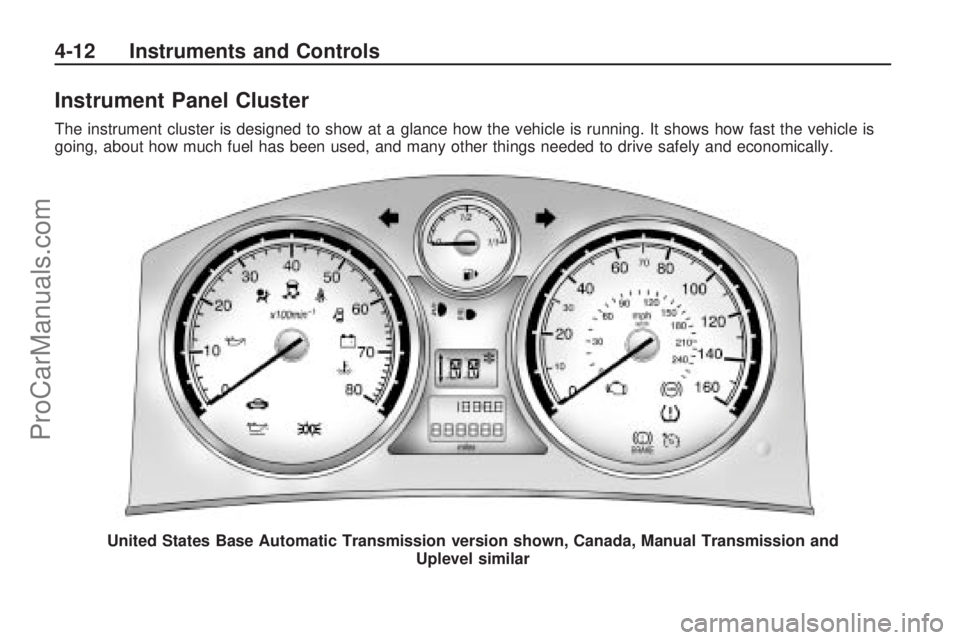
Instrument Panel Cluster
The instrument cluster is designed to show at a glance how the vehicle is running. It shows how fast the vehicle is
going, about how much fuel has been used, and many other things needed to drive safely and economically.United States Base Automatic Transmission version shown, Canada, Manual Transmission and Uplevel similar
4-12 Instruments and Controls
ProCarManuals.com
Page 87 of 314

Speedometer and
Odometer
The speedometer shows the
vehicle’s speed in both miles per
hour (mph) or kilometers per
hour (km/h).
The odometer shows how far the
vehicle has been driven, in either
miles or kilometers.
If a new odometer is installed, the
new one is set to the mileage total
of the old odometer. If it cannot,
it will be set at zero and a label
must be put on the driver’s door to
show the old mileage reading
when the new odometer was
installed. If the mileage is unknown,
the label should then indicate
“previous mileage unknown.”
Trip Odometer(s)
The trip odometer, located at the
center of the instrument panel
cluster, tells how far the vehicle has
been driven since the trip odometer
was set to zero.To reset the trip odometer, hold the
reset stem, located to the right of
the speedometer, for approximately
one second while the trip odometer
is displayed. The engine must be
turned on.
Service Display
The vehicle may have a display
above the odometer that shows when
service is needed. The number that
displays with “INSP” is the remaining
distance that can be driven until
service is required. SeeEngine Oil
Life System on page 9-9and the
index of the Saturn Astra Limited
Warranty, Maintenance and Owner
Assistance Information Manual.
Tachometer
The tachometer displays the engine
speed in revolutions per minute.
Safety Belt Reminders
Driver Safety Belt Reminder
Light
There is a Driver Safety Belt
Reminder Light on the instrument
panel cluster.
When the engine is started this light
and chime come on and stay on
for several seconds to remind
drivers to fasten their safety belts.
The light also begins to �ash.
This cycle repeats if the driver
remains unbuckled and the vehicle
is moving.
If the driver safety belt is already
buckled, neither the light nor chime
come on.
Instruments and Controls 4-13
ProCarManuals.com
Page 88 of 314

Passenger Safety Belt
Reminder Light
For vehicles with this light, it
operates the same as the Safety
Belt Reminder Light except that it
is meant for the front passenger.
If the passenger safety belt is
buckled, neither the chime nor the
light comes on.
The front passenger safety belt
warning light and chime may
turn on if an object is put on the
seat such as a briefcase, handbag,
grocery bag, laptop or other
electronic device. To turn off the
warning light and or chime, remove
the object from the seat or buckle
the safety belt
Airbag Readiness Light
This light shows if there is an
electrical problem. The system
check includes the airbag sensor,
the pretensioners, the airbag
modules, the wiring and the crash
sensing and diagnostic module.
For more information on the airbag
system, seeAirbag System on
page 1-24.
This light will come on and stay on
for several seconds when the
vehicle is started. Then the light
should go out.If the airbag readiness light stays on
after the vehicle has been started
or comes on when while driving,
the airbag system may not work
properly. Have the vehicle serviced
right away.
{CAUTION
If the airbag readiness light stays
on after the vehicle is started or
comes on while driving, it means
the airbag system might not be
working properly. The airbags in
the vehicle might not in�ate in a
crash, or they could even in�ate
without a crash. To help avoid
injury, have the vehicle serviced
right away.
4-14 Instruments and Controls
ProCarManuals.com
Page 89 of 314

Passenger Airbag Status
Indicator
The vehicle has a passenger
sensing system. SeePassenger
Sensing System on page 1-30
for important safety information.
The rearview mirror has a
passenger airbag status indicator.
When the vehicle is started, the
passenger airbag status indicator
will light ON and OFF, or the symbol
for on and off, for several secondsas a system check. Then, after
several more seconds, the status
indicator will light either ON or OFF,
or either the on or off symbol to
let you know the status of the right
front passenger frontal and
seat-mounted side impact airbags.
If the word ON or the on symbol
is lit on the passenger airbag status
indicator, it means that the right
front passenger frontal airbag and
seat-mounted side impact airbag are
enabled (may in�ate).
If the word OFF or the off symbol is
lit on the passenger airbag status
indicator, it means that the
passenger sensing system has
turned off the right front passenger
frontal airbag and seat-mounted
side impact airbag. SeePassenger
Sensing System on page 1-30
for more on this, including important
safety information.If, after several seconds, both status
indicator lights remain on, or if
there are no lights at all, there
may be a problem with the lights or
the passenger sensing system.
See your dealer/retailer for service.
{CAUTION
If the airbag readiness light ever
comes on and stays on, it means
that something may be wrong with
the airbag system. To help avoid
injury to yourself or others, have
the vehicle serviced right away.
SeeAirbag Readiness Light on
page 4-14for more information,
including important safety
information. United States
Canada
Instruments and Controls 4-15
ProCarManuals.com
Page 90 of 314

Charging System Light
The charging system light comes on
brie�y when the ignition is turned
on, but the engine is not running,
as a check to show the light is
working. It should go out when the
engine is started.
If the light stays on, or comes on
while driving, there could be a
problem with the electrical charging
system. Have it checked by your
dealer/retailer. Driving while this light
is on could drain the battery.
If a short distance must be driven
with the light on, be sure to turn off
all accessories, such as the radio
and air conditioner.
Brake System Warning
Light
The brake indicator light should
come on brie�y as the engine
is started. If it does not come on
have the vehicle serviced by
your dealer/retailer.
When the ignition is on, the brake
system warning light comes on
when the parking brake is set.
The light stays on if the parking
brake does not fully release.
If it stays on after the parking brake
is fully released, there is a brake
problem. Have the brake system
inspected immediately.
{CAUTION
The brake system might not be
working properly if the brake
system warning light is on.
Driving with the brake system
warning light on can lead to a
crash. If the light is still on after
the vehicle has been pulled off
the road and carefully stopped,
have the vehicle towed for
service.
If the light comes on while driving, a
chime sounds. Pull off the road
and stop. The pedal might be harder
to push or go closer to the �oor.
It might also take longer to stop.
If the light is still on, have the vehicle
towed for service. SeeTowing
Your Vehicle on page 9-73.
United StatesCanada
4-16 Instruments and Controls
ProCarManuals.com