ignition SATURN ION 2004 Workshop Manual
[x] Cancel search | Manufacturer: SATURN, Model Year: 2004, Model line: ION, Model: SATURN ION 2004Pages: 380, PDF Size: 2.89 MB
Page 216 of 380
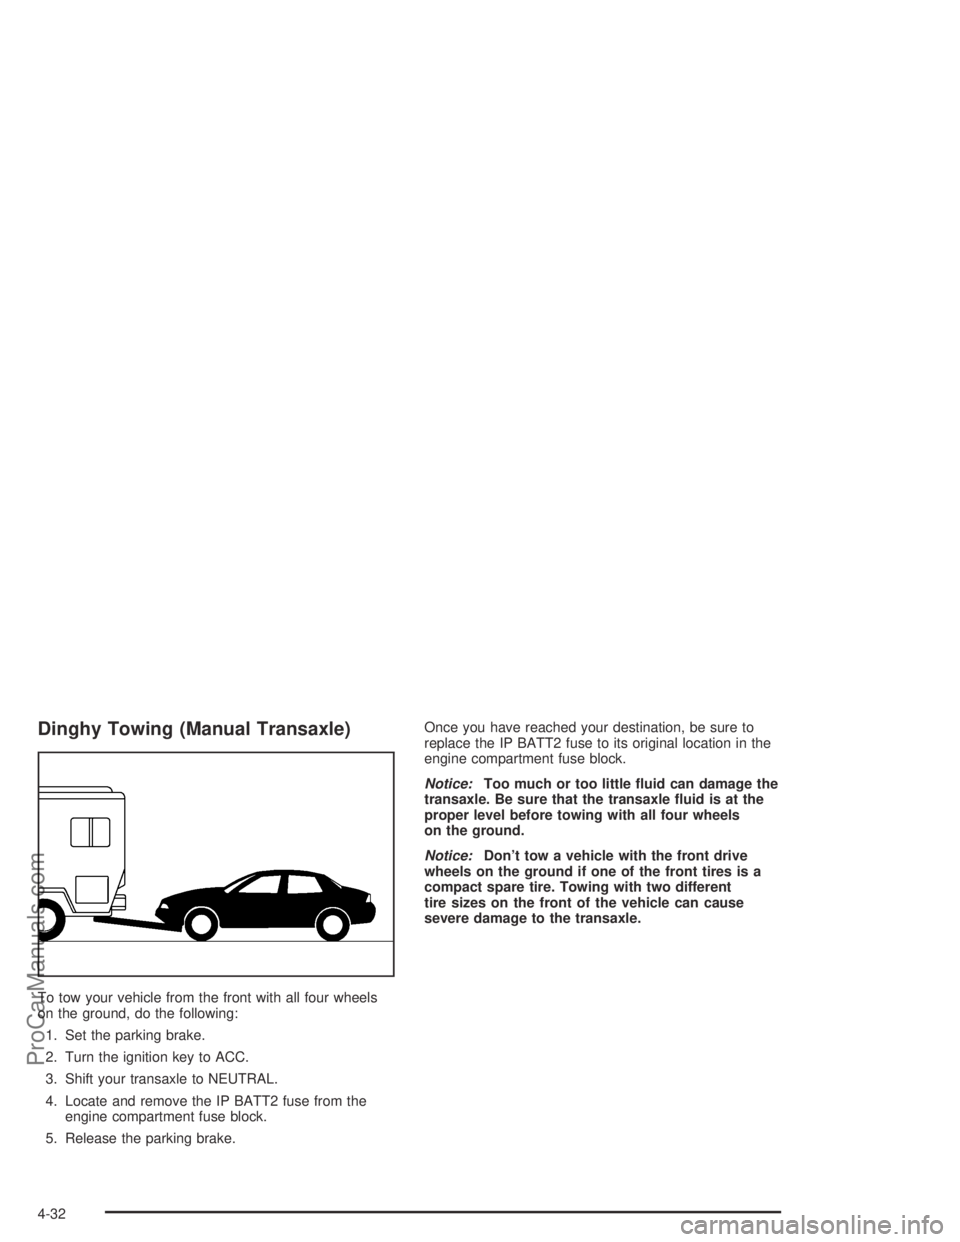
Dinghy Towing (Manual Transaxle)
To tow your vehicle from the front with all four wheels
on the ground, do the following:
1. Set the parking brake.
2. Turn the ignition key to ACC.
3. Shift your transaxle to NEUTRAL.
4. Locate and remove the IP BATT2 fuse from the
engine compartment fuse block.
5. Release the parking brake.Once you have reached your destination, be sure to
replace the IP BATT2 fuse to its original location in the
engine compartment fuse block.
Notice:Too much or too little �uid can damage the
transaxle. Be sure that the transaxle �uid is at the
proper level before towing with all four wheels
on the ground.
Notice:Don’t tow a vehicle with the front drive
wheels on the ground if one of the front tires is a
compact spare tire. Towing with two different
tire sizes on the front of the vehicle can cause
severe damage to the transaxle.
4-32
ProCarManuals.com
Page 272 of 380
Jump Starting
If your battery has run down, you may want to use
another vehicle and some jumper cables to start your
vehicle. Be sure to follow the steps below to do it safely.
{CAUTION:
Batteries can hurt you. They can be dangerous
because:
They contain acid that can burn you.
They contain gas that can explode or ignite.
They contain enough electricity to burn you.
If you do not follow these steps exactly, some or
all of these things can hurt you.
Notice:Ignoring these steps could result in costly
damage to your vehicle that would not be covered
by your warranty.
Trying to start your vehicle by pushing or pulling it
will not work, and it could damage your vehicle.
1. Check the other vehicle. It must have a 12-volt
battery with a negative ground system.Notice:If the other vehicle’s system is not a 12-volt
system with a negative ground, both vehicles can
be damaged. Only use vehicles with 12-volt systems
with negative grounds to jump start your vehicle.
2. Get the vehicles close enough so the jumper cables
can reach, but be sure the vehicles aren’t touching
each other. If they are, it could cause a ground
connection you don’t want. You wouldn’t be able to
start your vehicle, and the bad grounding could
damage the electrical systems.
To avoid the possibility of the vehicles rolling, set
the parking brake �rmly on both vehicles involved
in the jump start procedure. Put an automatic
transaxle in PARK (P) or a manual transaxle in
NEUTRAL before setting the parking brake.
Notice:If you leave your radio or other accessories
on during the jump starting procedure, they could
be damaged. The repairs would not be covered
by your warranty. Always turn off your radio and
other accessories when jump starting your vehicle.
3. Turn off the ignition on both vehicles. Unplug
unnecessary accessories plugged into the cigarette
lighter or in the accessory power outlet. Turn off
the radio and all lamps that aren’t needed. This will
avoid sparks and help save both batteries. And it
could save your radio!
5-42
ProCarManuals.com
Page 278 of 380
Bulb Replacement
For the type of bulb to use, seeReplacement Bulbs on
page 5-56.
For any bulb changing procedure not listed in this
section, contact your retailer.
Halogen Bulbs
{CAUTION:
Halogen bulbs have pressurized gas inside and
can burst if you drop or scratch the bulb. You or
others could be injured. Be sure to read and
follow the instructions on the bulb package.
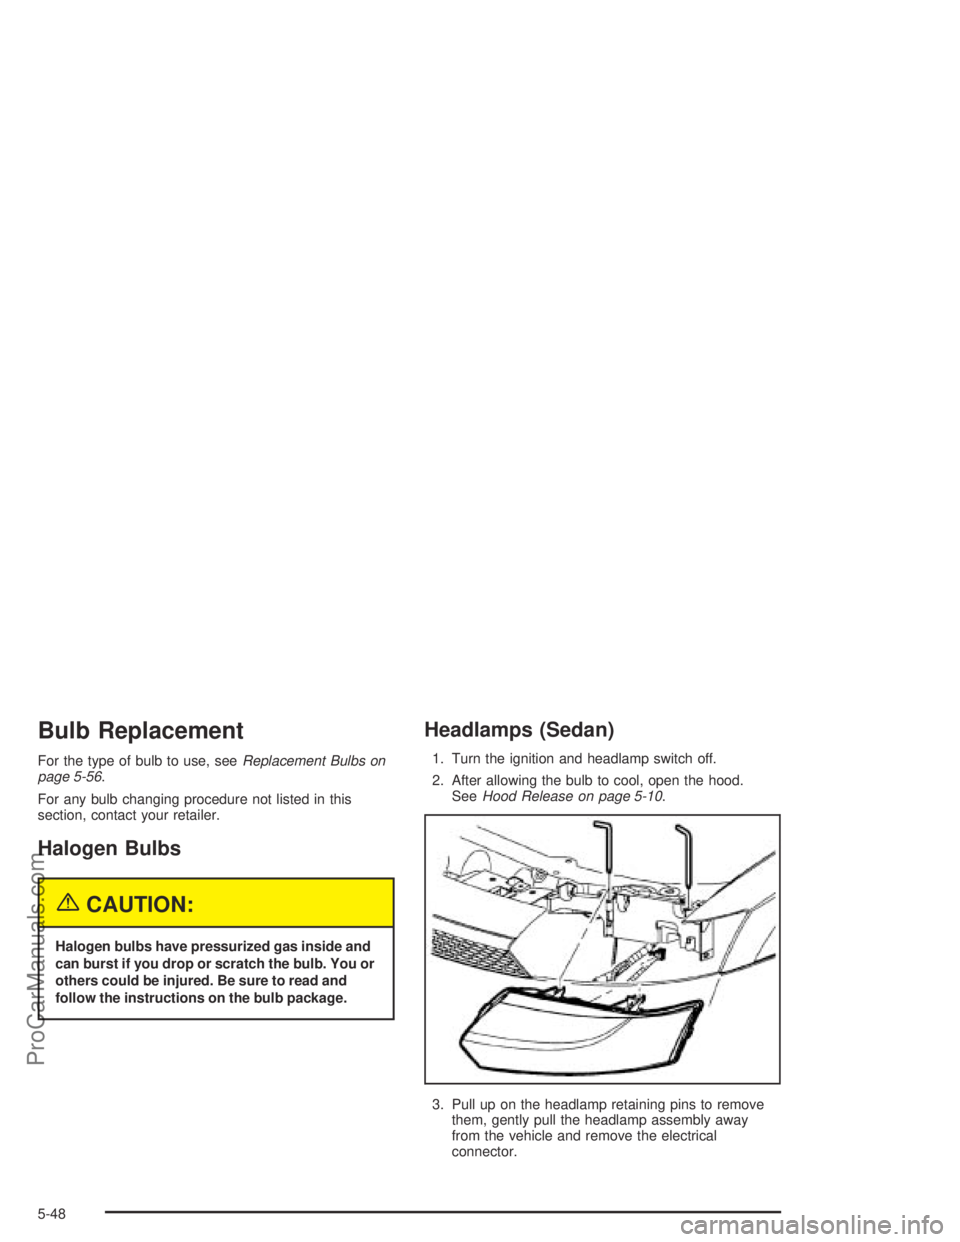
Headlamps (Sedan)
1. Turn the ignition and headlamp switch off.
2. After allowing the bulb to cool, open the hood.
SeeHood Release on page 5-10.
3. Pull up on the headlamp retaining pins to remove
them, gently pull the headlamp assembly away
from the vehicle and remove the electrical
connector.
5-48
ProCarManuals.com
Page 280 of 380
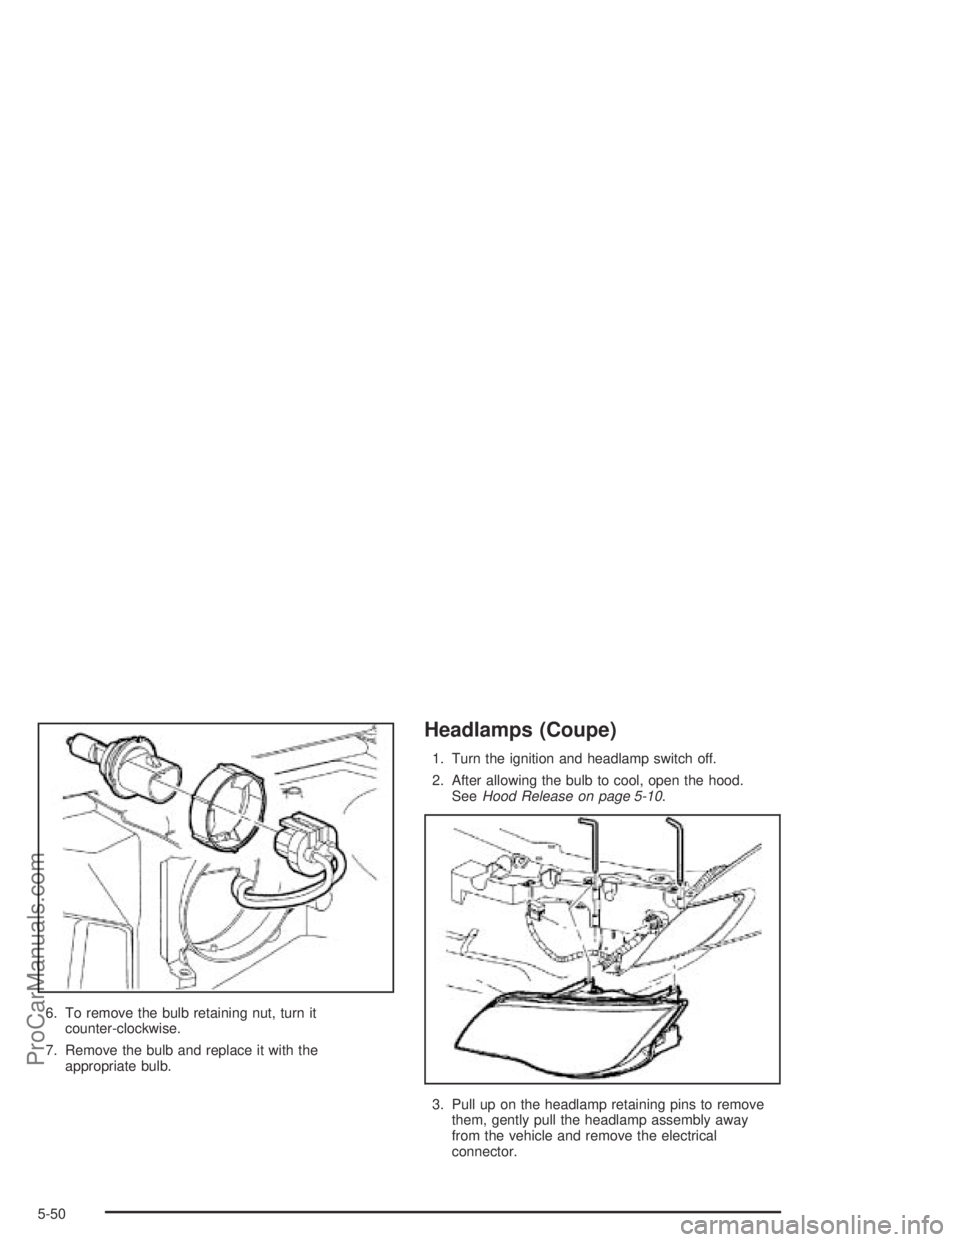
6. To remove the bulb retaining nut, turn it
counter-clockwise.
7. Remove the bulb and replace it with the
appropriate bulb.
Headlamps (Coupe)
1. Turn the ignition and headlamp switch off.
2. After allowing the bulb to cool, open the hood.
SeeHood Release on page 5-10.
3. Pull up on the headlamp retaining pins to remove
them, gently pull the headlamp assembly away
from the vehicle and remove the electrical
connector.
5-50
ProCarManuals.com
Page 281 of 380
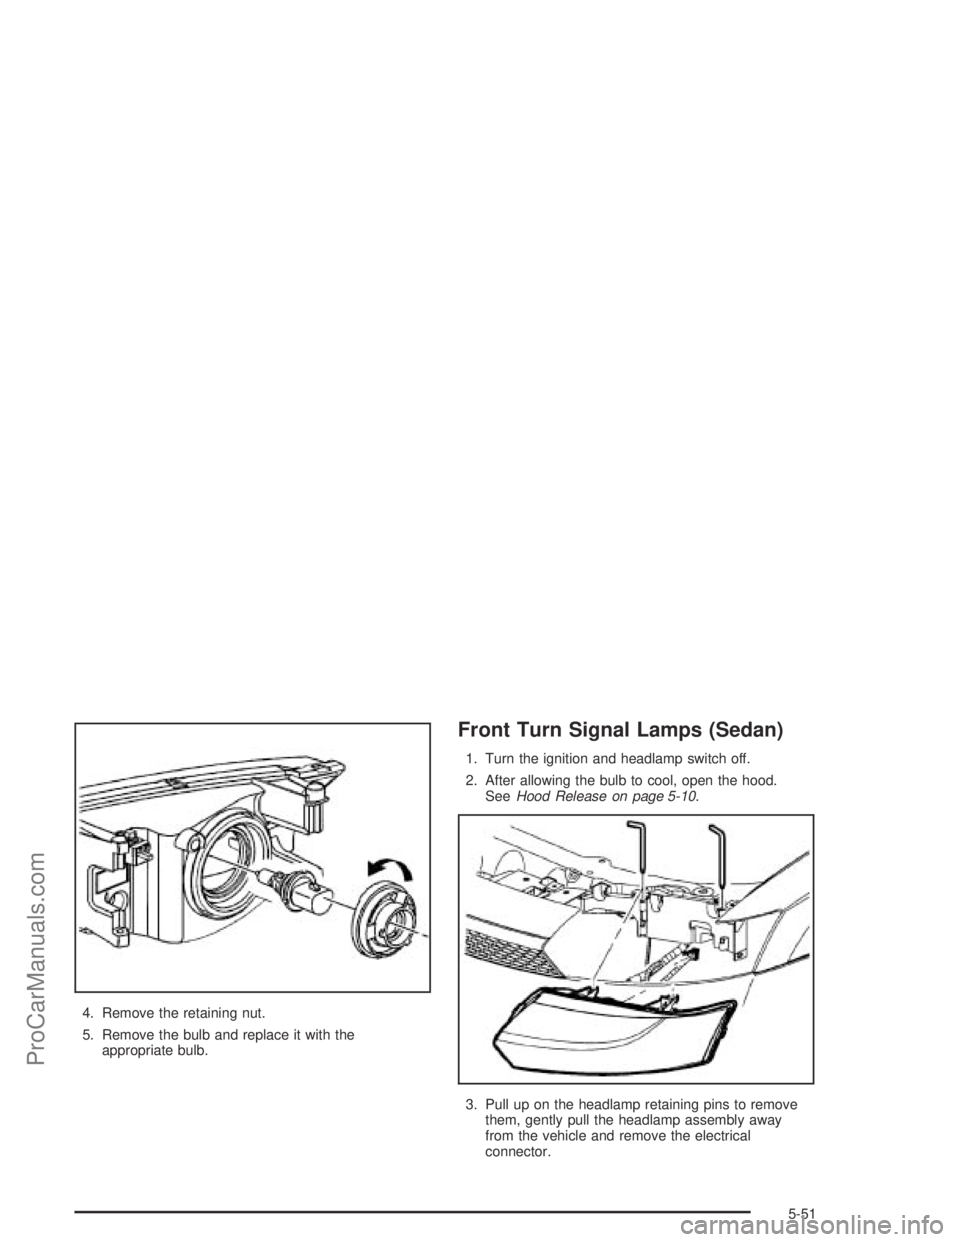
4. Remove the retaining nut.
5. Remove the bulb and replace it with the
appropriate bulb.
Front Turn Signal Lamps (Sedan)
1. Turn the ignition and headlamp switch off.
2. After allowing the bulb to cool, open the hood.
SeeHood Release on page 5-10.
3. Pull up on the headlamp retaining pins to remove
them, gently pull the headlamp assembly away
from the vehicle and remove the electrical
connector.
5-51
ProCarManuals.com
Page 284 of 380
Sidemarker Lamps (Coupe)
1. Turn the ignition and headlamp switch off.
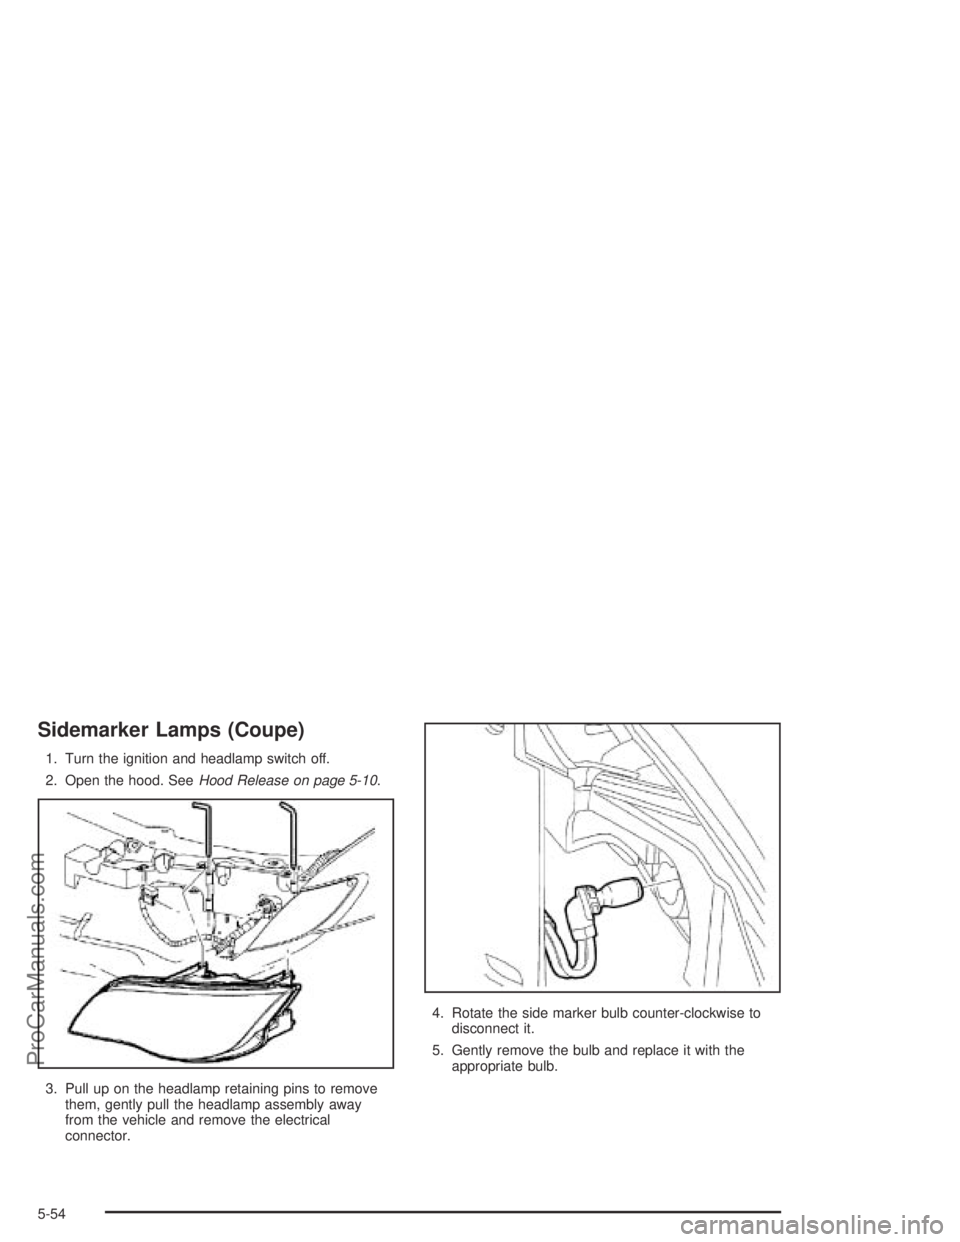
2. Open the hood. SeeHood Release on page 5-10.
3. Pull up on the headlamp retaining pins to remove
them, gently pull the headlamp assembly away
from the vehicle and remove the electrical
connector.4. Rotate the side marker bulb counter-clockwise to
disconnect it.
5. Gently remove the bulb and replace it with the
appropriate bulb.
5-54
ProCarManuals.com
Page 287 of 380
Windshield Wiper Blade
Replacement
Windshield wiper blades should be inspected at least
twice a year for wear or cracking. See “Windshield
Wipers, Blade Check” underScheduled Maintenance on
page 6-4for more information.
Replacement blades come in different types and are
removed in different ways. For proper type and length,
seeNormal Maintenance Replacement Parts on
page 6-16. Here’s how to remove the wiper blades:
1. Turn on the wipers to the low wipe setting.
2. Turn off the ignition while the wipers are at the
outer positions of the wiper pattern. The blades
are more accessible for removal/replacement while
in this position.
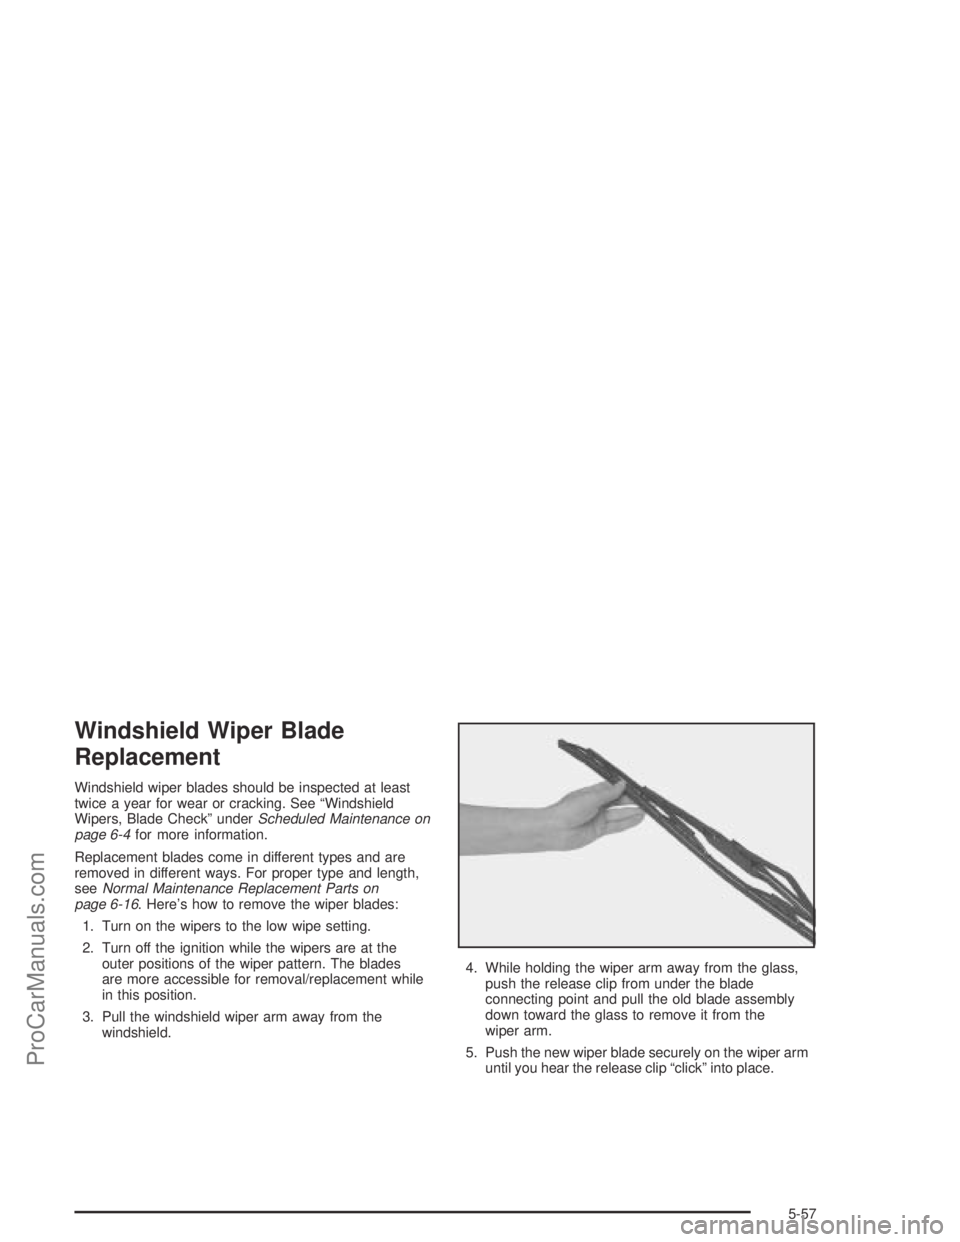
3. Pull the windshield wiper arm away from the
windshield.4. While holding the wiper arm away from the glass,
push the release clip from under the blade
connecting point and pull the old blade assembly
down toward the glass to remove it from the
wiper arm.
5. Push the new wiper blade securely on the wiper arm
until you hear the release clip “click” into place.
5-57
ProCarManuals.com
Page 327 of 380
Fuses Usage
FUEL PUMP Fuel Pump Relay
HVAC Climate Control
CLUSTER Instrument Panel Cluster
LIGHTER Cigar Lighter
RADIO
(BATT1)Radio Receiver, Entertainment
Memory
RADIO (ACC) Radio Receiver, Entertainment
SUNROOF Power Sunroof, OnStar Mirror
WIPER SWWindshield Wipers and Washers,
Transaxle Shift Lock Control Switch
DASH Instrument Panel, Dimming Switch
IGN SW Ignition Switch
PARK Headlamp Switch
PWR OUTLET Auxiliary Power OutletFuses Usage
PWR
WINDOWSPower Window Switches
STOP Stoplamp (Brake) Switch
BCM ELECTIgnition Switch, Body Control
Module (BCM)
BMC (PWR) Entry Control, Trunk Release
Relay Usage
RUNClimate Control (HVAC Blower,
Control Heads)
ACCPower Windows, Sunroof, Radio,
Wiper/Washer Switch, Accessory
Power Outlet
FUEL PUMP Fuel Pump
ALC/PARKOnStar, Radio, Instrument Panel
Cluster, Body Control Module
(Entry Control), Cigar Lighter,
Headlamp Switch, License Lamp
5-97
ProCarManuals.com
Page 328 of 380
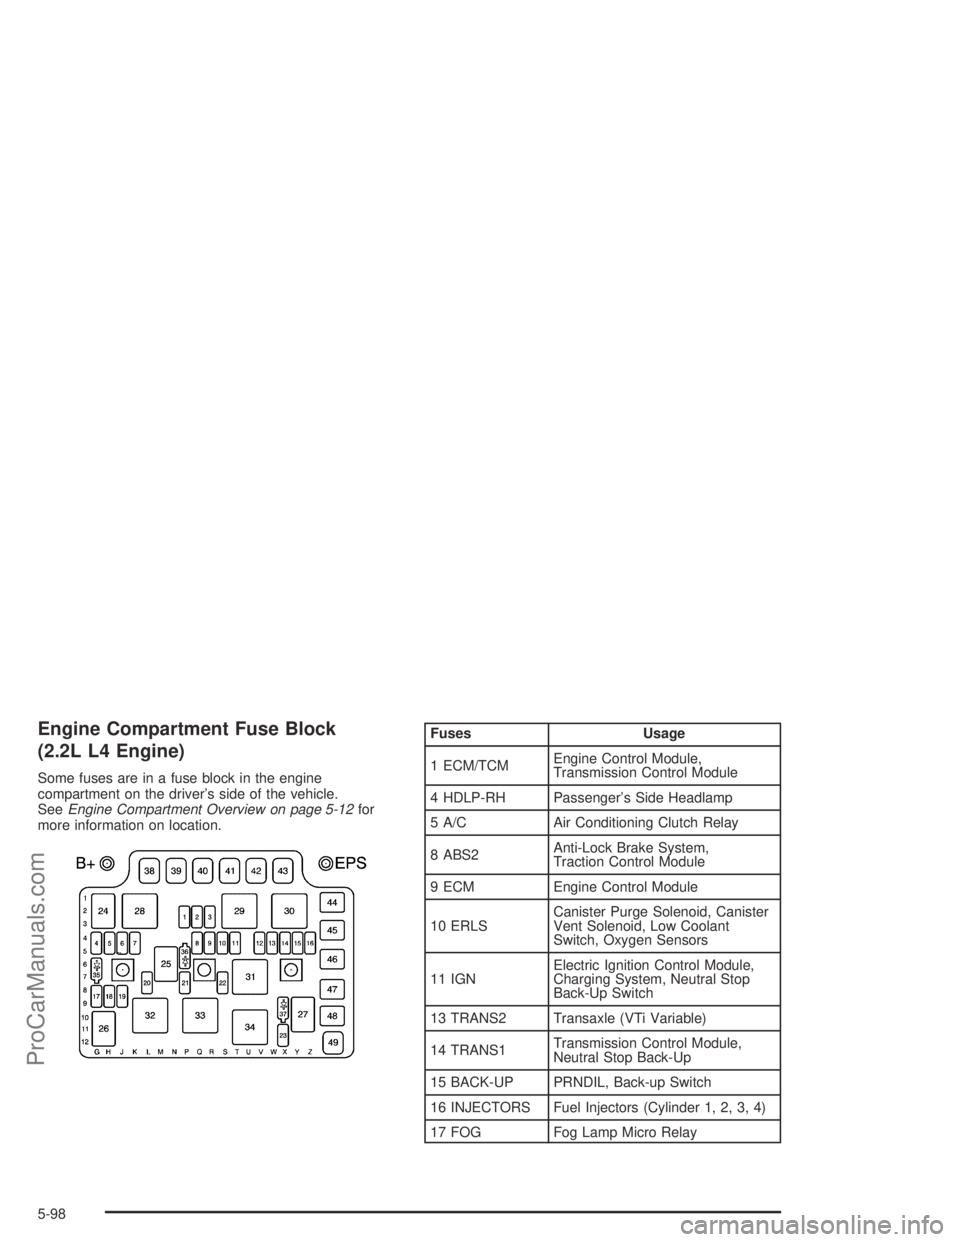
Engine Compartment Fuse Block
(2.2L L4 Engine)
Some fuses are in a fuse block in the engine
compartment on the driver’s side of the vehicle.
SeeEngine Compartment Overview on page 5-12for
more information on location.
Fuses Usage
1 ECM/TCMEngine Control Module,
Transmission Control Module
4 HDLP-RH Passenger’s Side Headlamp
5 A/C Air Conditioning Clutch Relay
8 ABS2Anti-Lock Brake System,
Traction Control Module
9 ECM Engine Control Module
10 ERLSCanister Purge Solenoid, Canister
Vent Solenoid, Low Coolant
Switch, Oxygen Sensors
11 IGNElectric Ignition Control Module,
Charging System, Neutral Stop
Back-Up Switch
13 TRANS2 Transaxle (VTi Variable)
14 TRANS1Transmission Control Module,
Neutral Stop Back-Up
15 BACK-UP PRNDIL, Back-up Switch
16 INJECTORS Fuel Injectors (Cylinder 1, 2, 3, 4)
17 FOG Fog Lamp Micro Relay
5-98
ProCarManuals.com
Page 329 of 380
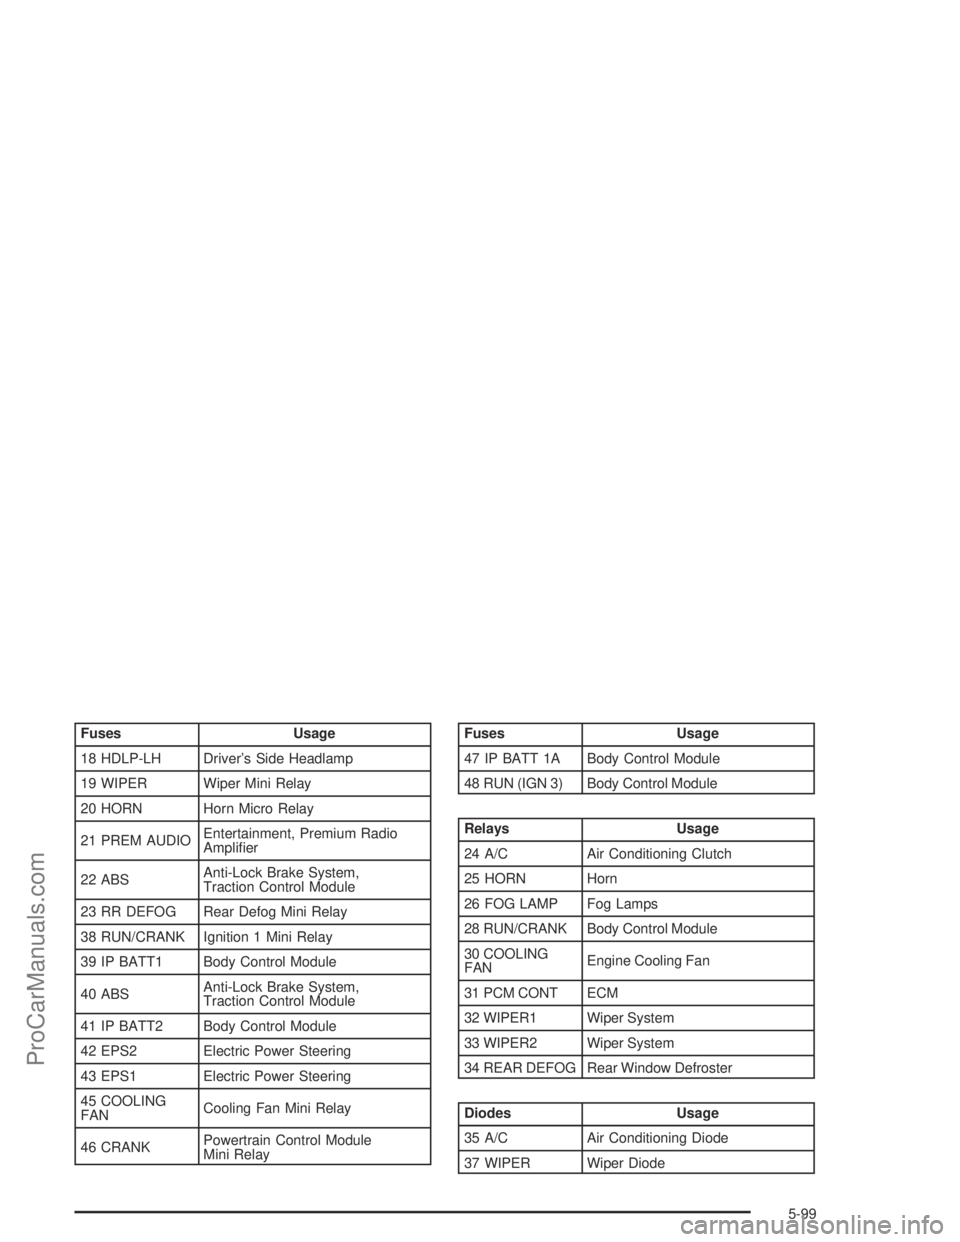
Fuses Usage
18 HDLP-LH Driver’s Side Headlamp
19 WIPER Wiper Mini Relay
20 HORN Horn Micro Relay
21 PREM AUDIOEntertainment, Premium Radio
Ampli�er
22 ABSAnti-Lock Brake System,
Traction Control Module
23 RR DEFOG Rear Defog Mini Relay
38 RUN/CRANK Ignition 1 Mini Relay
39 IP BATT1 Body Control Module
40 ABSAnti-Lock Brake System,
Traction Control Module
41 IP BATT2 Body Control Module
42 EPS2 Electric Power Steering
43 EPS1 Electric Power Steering
45 COOLING
FANCooling Fan Mini Relay
46 CRANKPowertrain Control Module
Mini RelayFuses Usage
47 IP BATT 1A Body Control Module
48 RUN (IGN 3) Body Control Module
Relays Usage
24 A/C Air Conditioning Clutch
25 HORN Horn
26 FOG LAMP Fog Lamps
28 RUN/CRANK Body Control Module
30 COOLING
FANEngine Cooling Fan
31 PCM CONT ECM
32 WIPER1 Wiper System
33 WIPER2 Wiper System
34 REAR DEFOG Rear Window Defroster
Diodes Usage
35 A/C Air Conditioning Diode
37 WIPER Wiper Diode
5-99
ProCarManuals.com