SATURN VUE HYBRID 2009 Owners Manual
Manufacturer: SATURN, Model Year: 2009, Model line: VUE HYBRID, Model: SATURN VUE HYBRID 2009Pages: 346, PDF Size: 2.1 MB
Page 101 of 346
Cargo Tie Downs
Four cargo tie-downs are located in
the rear compartment of the
vehicle. The tie-downs can be used
to secure small loads.
Cargo Management
System
If the vehicle has a cargo
management system in the rear of
the vehicle, it will have rails with
adapters and hooks. These are used
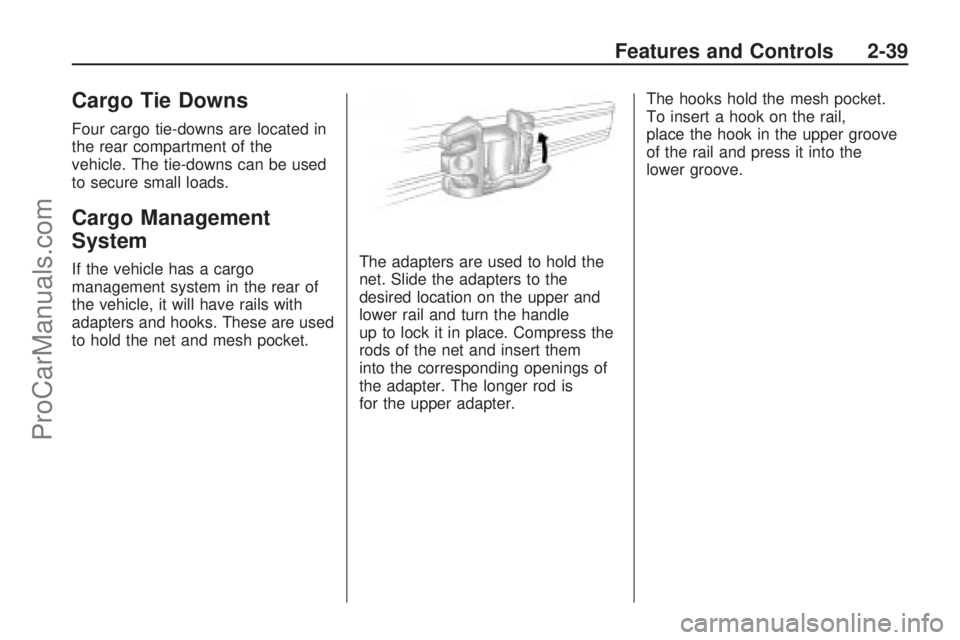
to hold the net and mesh pocket.The adapters are used to hold the
net. Slide the adapters to the
desired location on the upper and
lower rail and turn the handle
up to lock it in place. Compress the
rods of the net and insert them
into the corresponding openings of
the adapter. The longer rod is
for the upper adapter.The hooks hold the mesh pocket.
To insert a hook on the rail,
place the hook in the upper groove
of the rail and press it into the
lower groove.
Features and Controls 2-39
ProCarManuals.com
Page 102 of 346
✍NOTES
2-40 Features and Controls
ProCarManuals.com
Page 103 of 346

Instrument Panel
Instrument Panel
Overview
Instrument Panel
Overview...........................3-4
Hazard Warning Flashers. . .3-5
Horn...................................3-5
Tilt Wheel...........................3-6
Turn Signal/Multifunction
Lever................................3-6
Turn and Lane-Change
Signals.............................3-6
Headlamp High/
Low-Beam Changer..........3-7
Flash-to-Pass......................3-7
Windshield Wipers..............3-7
Rainsense™ II Wipers........3-8
Windshield Washer.............3-8
Rear Window Wiper/
Washer.............................3-9
Cruise Control....................3-9
Exterior Lamps..................3-12
Wiper Activated
Headlamps......................3-12
Daytime Running
Lamps (DRL)..................3-13
Automatic Headlamp
System............................3-13
Instrument Panel
Brightness.......................3-14
Dome Lamp......................3-14
Entry Lighting....................3-14
Reading Lamps.................3-14
Electric Power
Management...................3-14
Battery Run-Down
Protection........................3-15
Accessory Power
Outlet(s)..........................3-16
Climate ControlsAutomatic Climate
Control System................3-17
Outlet Adjustment.............3-22
Warning Lights, Gages,
and Indicators
Warning Lights, Gages,
and Indicators.................3-22
Instrument Panel Cluster. . .3-23
Speedometer and
Odometer........................3-24
Trip Odometer..................3-24
Tachometer.......................3-24
Safety Belt Reminders......3-24
Airbag Readiness Light.....3-25
Passenger Airbag Status
Indicator..........................3-26
Charging System Light......3-27
Brake System Warning
Light................................3-27
Antilock Brake System
(ABS) Warning Light.......3-28
StabiliTrak®/Traction
Control System (TCS)
Warning Light
..................3-28
Engine Coolant
Temperature Warning
Light
................................3-29
Instrument Panel 3-1
ProCarManuals.com
Page 104 of 346
Tire Pressure Light...........3-29
Malfunction
Indicator Lamp................3-30
Oil Pressure Light.............3-33
Change Engine Oil Light. . .3-33
Security Light....................3-33
Cruise Control Light..........3-33
Highbeam On Light...........3-34
Low Washer Fluid
Warning Light..................3-34
Fuel Gage........................3-34
Low Fuel Warning Light. . . .3-34
Auto Stop Mode................3-35
Charge/Assist Gage..........3-35
Fuel Economy Light..........3-35
Driver Information
Center (DIC)
Driver Information
Center (DIC)...................3-36
DIC Operation and
Displays..........................3-36
DIC Compass...................3-40
DIC Warnings and
Messages........................3-42
DIC Vehicle
Customization..................3-49
Audio System(s)
Audio System(s)................3-56
Setting the Clock..............3-56
Radio(s)............................3-58
Using an MP3...................3-66
XM Radio Messages.........3-71
Bluetooth®........................3-72
Theft-Deterrent Feature.....3-82
Audio Steering Wheel
Controls..........................3-82
Radio Reception...............3-83
Fixed Mast Antenna..........3-84
XM™ Satellite Radio
Antenna System..............3-84
Chime Level Adjustment. . .3-84
3-2 Instrument Panel
ProCarManuals.com
Page 105 of 346
✍NOTES
Instrument Panel 3-3
ProCarManuals.com
Page 106 of 346
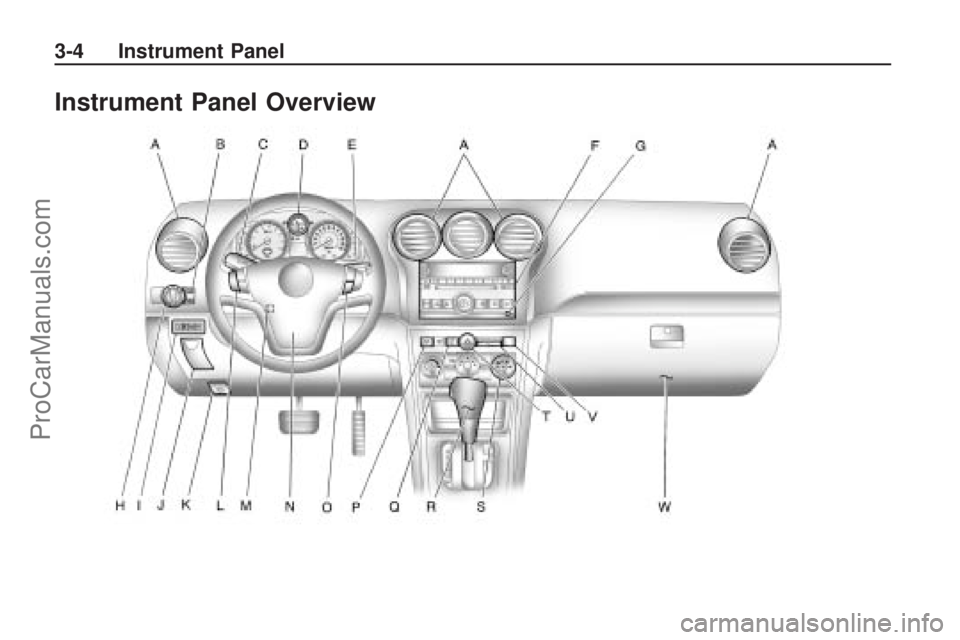
Instrument Panel Overview
3-4 Instrument Panel
ProCarManuals.com
Page 107 of 346
The main components of the
instrument panel are the following:
A.Outlet Adjustment on
page 3-22.
B.Instrument Panel Brightness on
page 3-14.
C.Turn Signal/Multifunction Lever
on page 3-6.
D.Instrument Panel Cluster on
page 3-23.
E.Windshield Wipers on page 3-7.
F.Audio System(s) on page 3-56.
G. Auxiliary Input Jack. See
Radio(s) on page 3-58.
H.Exterior Lamps on page 3-12.
I.Driver Information Center
(DIC) on page 3-36.
J.Driver Storage Compartment on
page 2-38.
K.Hood Release on page 5-9.
L.Cruise Control on page 3-9.
M.Tilt Wheel on page 3-6.
N.Horn on page 3-5.O.Audio Steering Wheel Controls
on page 3-82.
P.Rear Window Wiper/Washer on
page 3-9.
Q.Traction Control System (TCS)
on page 4-8
R. Shift Lever. SeeAutomatic
Transmission Operation on
page 2-20.
S.Automatic Climate Control
System on page 3-17.
T.Hazard Warning Flashers on
page 3-5.
U.Passenger Airbag Status
Indicator on page 3-26.
V.Safety Belt Reminders on
page 3-24.
W.Glove Box on page 2-37.Hazard Warning Flashers
|
(Hazard Warning Flasher):
Press this button located on
the instrument panel, to make the
front and rear turn signal lamps �ash
on and off. This warns others that
you are having trouble.
Press
|again to turn the
�ashers off.
Horn
Press near or on the horn symbols
on the steering wheel pad to
sound the horn.
Instrument Panel 3-5
ProCarManuals.com
Page 108 of 346

Tilt Wheel
The tilt lever lets the steering wheel
be adjusted.
The tilt lever is located on the left
side of the steering column.
To adjust the steering wheel, hold
the wheel and push the lever down.
Then move the wheel to a
comfortable position and pull the
lever up �rmly to lock the steering
column in place.
Turn Signal/Multifunction
Lever
The lever on the left side of the
steering column includes:
G:Turn and Lane-Change
Signals
3:Headlamp High/Low-Beam
Changer
Flash-to-Pass Feature.
Information for these features is on
the pages following.
Turn and Lane-Change
Signals
An arrow on the instrument panel
cluster �ashes in the direction of the
turn or lane change.
Move the lever all the way up or
down to signal a turn.
Raise or lower the lever until the
arrow starts to �ash and then
release, to signal a lane change.
The turn signal �ashes automatically
three times.
The lever returns to its starting
position whenever it is released.
If after signaling a turn or lane
change the arrow �ashes rapidly or
does not come on, a signal bulb
may be burned out.
3-6 Instrument Panel
ProCarManuals.com
Page 109 of 346

Have the bulbs replaced. If a bulb is
not burned out, check the fuse. See
Fuses and Circuit Breakers on
page 5-75and for burned-out bulbs.
Headlamp High/
Low-Beam Changer
23
Headlamp High/Low Beam
Changer:Push the turn
signal/multifunction lever away from
you to turn the high beams on.
Pull the lever towards you to return
to low beams.
This indicator light turns on in the
instrument panel cluster when
the high beam headlamps are on.
Flash-to-Pass
This feature lets you use your
high-beam headlamps to signal a
driver in front of you that you want
to pass.
To �ash the high beams
from low beam, pull the turn
signal/multifunction lever all the
way towards you. Then release it.
Windshield Wipers
The windshield wiper lever is
located on the right side of the
steering column.
Push up or pull down on the lever to
place it in one of the following
positions.
8(Mist):For a single wiping
cycle. The lever returns to its
starting position when released. For
more cycles, hold the lever down
before releasing it.
9(Off):Turns the wipers off.
&(Intermittent):Sets a delay
between wipes. To set for a shorter
or longer delay between wipes,
move the switch on top of the lever
left or right to decrease or
increase wiper movement.
a(Low):For slow, steady wiping
cycles.
1(High):For rapid wiping cycles.
Clear ice and snow from the wiper
blades before using them. If the
wiper blades are frozen to the
windshield, gently loosen or thaw
them. If they become damaged,
install new blades or blade inserts.
SeeWindshield Wiper Blade
Replacement on page 5-38.
Instrument Panel 3-7
ProCarManuals.com
Page 110 of 346

Heavy snow or ice can overload the
wiper motor. A circuit breaker will
stop the motor until it cools down.
Rainsense™ II Wipers
For vehicles with Rainsense™ II
windshield wipers, the moisture
sensor is located next to the inside
rearview mirror and is mounted
on the windshield. When active,
these sensors are able to detect
moisture on the windshield and
automatically turn on the wipers.
To turn on the Rainsense feature,
the wipers must be set to one
of the �ve delay settings on the
multifunction lever. Each of the �ve
settings adjusts the sensitivity of
the sensor.Since different drivers have
different setting preferences, it is
recommended that the mid-range
setting (position 3) be used initially.
For more wipes, select the higher
settings; for fewer wipes, select the
lower settings located closer to the
off position on the multifunction lever.
The sensor will automatically control
the frequency of the wipes from
the off setting to the high speed
setting according to the weather
conditions. The wipers can be left in
a rainsense mode even when it is
not raining.
When Rainsense is active, the
headlamps will turn on automatically
if the exterior lamp control is in
the AUTO position and the wipers
are active.
Notice:Going through an
automatic car wash with the
wipers on can damage them. Turn
the wipers off when going
through an automatic car wash.
Windshield Washer
{CAUTION
In freezing weather, do not use
your washer until the windshield is
warmed. Otherwise the washer
�uid can form ice on the
windshield, blocking your vision.
Pull the windshield wiper lever
toward you to spray washer �uid on
the windshield. The wipers will run
for a few cycles to clear the
windshield. For more wash cycles,
pull the lever forward and hold.
Heated Windshield Washer
Nozzles
This feature prevents the windshield
washer �uid from freezing on the
nozzle during cold conditions.
The heated nozzles are turned on
when the rear window defogger
is activated. SeeAutomatic Climate
Control System on page 3-17.
3-8 Instrument Panel
ProCarManuals.com