height adjustment Seat Alhambra 2011 Owner's Manual
[x] Cancel search | Manufacturer: SEAT, Model Year: 2011, Model line: Alhambra, Model: Seat Alhambra 2011Pages: 385, PDF Size: 7.92 MB
Page 13 of 385
11
Safe driving WARNING (Continued)
● Keep your back straight and resting completely against the backrest
and the fr ont
seats correctly adjusted. Never place any part of your body
in the area of the airbag or very close to it.
● If passengers on the rear seats are not sitting in an upright position,
the risk of
severe injury due to incorrect positioning of the belt web in-
creases. WARNING
Incorrect seat adjustment may lead to accidents and severe injuries.
● Only adjust the seats when the vehicle is stationary, as the seats
cou l
d move unexpectedly while the vehicle is in motion and you could
lose control of the vehicle. Furthermore, an incorrect position is adopted
when adjusting the seat.
● Only adjust the height, backrest and forwards or backwards position
of the seat
when there is nobody in the seat adjustment area.
● There must be no objects blocking the seat adjustment area.
● Only adjust the height, angle and longitudinal position of the rear
seats
when nobody is in the way.
● The seat adjustment and lock areas must be kept clean.
Danger of injuries due to an incorrect sitting position If the seat belts are worn incorrectly or not at all, the risk of severe injuries
incr
e
ases. Seat belts can provide optimal protection only if the belt web is
properly worn. The seat belt cannot offer its full protection if the belt web is
not positioned correctly. This could result in severe and even fatal injuries.
The risk of severe or fatal injuries is especially increased when a deploying
airbag strikes an occupant who has assumed an incorrect sitting position.
The driver is responsible for all passengers in the vehicle, particularly chil-
dren. The following list shows just some examples of incorrect sitting positions
which can be d
angerous to all occupants.
Whenever the vehicle is in motion:
● Never stand in the vehicle.
● Never stand on the seats.
● Never kneel on the seats.
● Never tilt your backrest too far to the rear.
● Never lean against the dash panel.
● Never lie on the rear bench.
● Never sit on the front edge of a seat.
● Never sit sideways.
● Never lean out of a window.
● Never put your feet out of a window.
● Never put your feet on the dash panel.
● Never put your feet on the surface of a seat or backrest.
● Never travel in a footwell.
● Never sit on the armrests.
● Never travel on a seat without wearing the seat belt.
● Never carry any person in the luggage compartment. WARNING
Every incorrect sitting position increases the risk of severe or fatal inju-
ries in the ev
ent of accidents or sudden braking or manoeuvres.
● All passengers must assume the proper sitting position and be prop-
erly belted in whi
le travelling.
● Occupants in incorrect sitting positions, not wearing their seat belt or
too clo
se to the airbag run the risk of suffering severe or fatal injuries,
particularly if the airbag deploys and hits an occupant sitting in an incor-
rect position.
Safety First Operating instructions Practical tips Technical Data
Page 27 of 385
25
Seat belts Fig. 14 Correct position-
ing of
se
at belts during
pregnancy.
Seat belts offer their maximum protection in the event of an accident and
reduce the ri
sk of sustaining severe or fatal injuries only when they are
properly positioned. Furthermore, if the webbing is correctly positioned, the
seat belt will hold the occupants in the optimum position to ensure the air-
bag provides the utmost protection. The seat belt must therefore always be
worn and the webbing correctly positioned.
Incorrectly worn seat belts can cause severe or even fatal injuries
⇒ page 10, Adjusting the seat position.
Correct seat belt position
● The shoulder part of the seat belt must lie on the centre of the shoulder,
never acr
oss the neck or the arm, under the arm or behind the shoulder.
● The lap part of the seat belt must lie across the pelvis, never across the
stom
ach.
● The seat belt must lie flat and fit comfortably. Pull the belt tight if neces-
sary
to take up any slack.
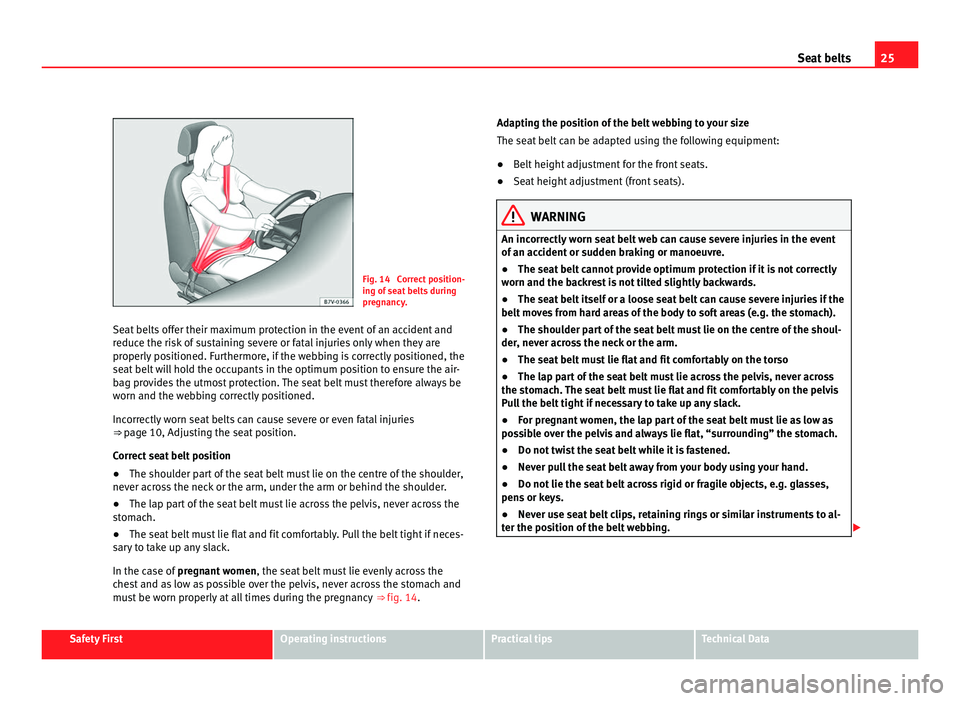
In the case of pregnant women , the seat belt must lie evenly across the
chest and as low as possible over the pelvis, never across the stomach and
must be worn properly at all times during the pregnancy ⇒ fig. 14.Adapting the position of the belt webbing to your size
The seat belt
can be adapted using the following equipment:
● Belt height adjustment for the front seats.
● Seat height adjustment (front seats). WARNING
An incorrectly worn seat belt web can cause severe injuries in the event
of an ac c
ident or sudden braking or manoeuvre.
● The seat belt cannot provide optimum protection if it is not correctly
worn and the bac
krest is not tilted slightly backwards.
● The seat belt itself or a loose seat belt can cause severe injuries if the
belt mov
es from hard areas of the body to soft areas (e.g. the stomach).
● The shoulder part of the seat belt must lie on the centre of the shoul-
der, never ac
ross the neck or the arm.
● The seat belt must lie flat and fit comfortably on the torso
● The lap part of the seat belt must lie across the pelvis, never across
the stom
ach. The seat belt must lie flat and fit comfortably on the pelvis
Pull the belt tight if necessary to take up any slack.
● For pregnant women, the lap part of the seat belt must lie as low as
poss
ible over the pelvis and always lie flat, “surrounding” the stomach.
● Do not twist the seat belt while it is fastened.
● Never pull the seat belt away from your body using your hand.
● Do not lie the seat belt across rigid or fragile objects, e.g. glasses,
pens or k
eys.
● Never use seat belt clips, retaining rings or similar instruments to al-
ter the pos
ition of the belt webbing. Safety First Operating instructions Practical tips Technical Data
Page 28 of 385
26
Seat belts Note
If you physical constitution prevents you from maintaining the correct posi-
tion of the belt w
ebbing, contact a Technical Service for help with any spe-
cial devices to ensure the optimum protection of the seat belt and airbag.
SEAT recommends visiting a Technical Service.
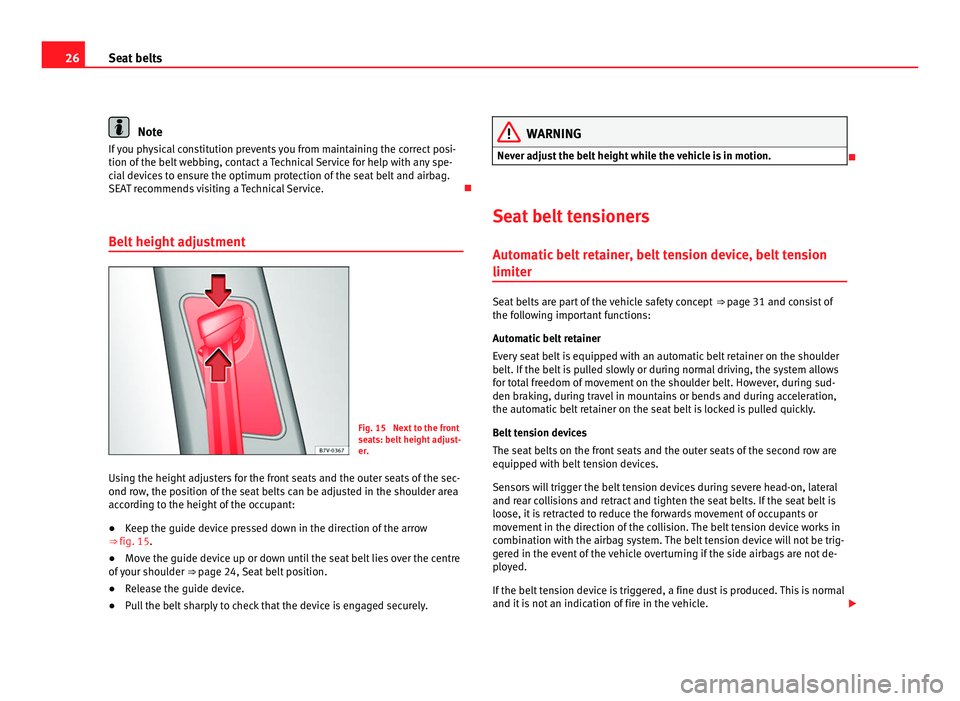
Belt height adjustment Fig. 15 Next to the front
seat
s: belt
height adjust-
er.
Using the height adjusters for the front seats and the outer seats of the sec-
ond row
, the position of the seat belts can be adjusted in the shoulder area
according to the height of the occupant:
● Keep the guide device pressed down in the direction of the arrow
⇒ fig. 15.
● Move the guide device up or down until the seat belt lies over the centre
of y
our shoulder ⇒ page 24, Seat belt position.
● Release the guide device.
● Pull the belt sharply to check that the device is engaged securely. WARNING
Never adjust the belt height while the vehicle is in motion.
Seat belt tensioners
Autom atic
belt retainer, belt tension device, belt tension
limiter Seat belts are part of the vehicle safety concept
⇒ page 31 and c
onsist of
the following important functions:
Automatic belt retainer
Every seat belt is equipped with an automatic belt retainer on the shoulder
belt. If the belt is pulled slowly or during normal driving, the system allows
for total freedom of movement on the shoulder belt. However, during sud-
den braking, during travel in mountains or bends and during acceleration,
the automatic belt retainer on the seat belt is locked is pulled quickly.
Belt tension devices
The seat belts on the front seats and the outer seats of the second row are
equipped with belt tension devices.
Sensors will trigger the belt tension devices during severe head-on, lateral
and rear collisions and retract and tighten the seat belts. If the seat belt is
loose, it is retracted to reduce the forwards movement of occupants or
movement in the direction of the collision. The belt tension device works in
combination with the airbag system. The belt tension device will not be trig-
gered in the event of the vehicle overturning if the side airbags are not de-
ployed.
If the belt tension device is triggered, a fine dust is produced. This is normal
and it is not an indication of fire in the vehicle.
Page 33 of 385
31
Airbag system CAUTION
Always pay attention to any lit lamps and to the corresponding descriptions
and ins truction
s to avoid damage to the vehicle.
Airbag system Des
cription and function of the airbag The airbag can protect vehicle occupants in the event of an accidents, cush-
ioning the mo
v
ement of the occupants in the direction of the collision in
frontal and side accidents.
Deployed airbags fill with a propellant gas. This causes the airbag covers to
break and the airbags to deploy extremely quickly in their entire deploy-
ment space within fractions of a second. When an occupant with the seat
belt properly fastened puts pressure on the inflated airbag, the propellant
gas escapes to absorb the force of the impact and slow the movement. This
reduces the risk of severe or fatal injuries. Airbag deployment does not
mean that other types of injury such as swelling, bruising, burns and skin
injuries can be ruled out.
Airbags do not protect the arms or the lower part of the body.
The most important factors for triggering the airbag are the type of accident,
the angle of impact, the vehicle speed and the characteristics of the object
the vehicle hits. Therefore, airbags are not triggered every time the vehicle
is visibly damaged.
The airbag system is designed to be triggered in collisions with a severe im-
pact. The front, curtain, side and knee airbags may be triggered under spe-
cial circumstances. The scope of any visible damage to the vehicle is not an
indication of airbag deployment. Airbags act in conjunction with three-point seat belts in the event of certain
accidents, when the
vehicle deceleration rate is severe enough to trigger
the airbags. Airbags only deploy once and only under certain circumstan-
ces. Seat belts remain present to offer protection in situations where air-
bags are not triggered or where they have already deployed. For example,
when a vehicle hits another after an initial collision or is hit by another vehi-
cle.
The airbag system is an integral part of the car's passive safety system. The
airbag system can only work effectively when the occupants are wearing
their seat belts correctly and have adjusted the head restraints properly
⇒ page 10.
Vehicle safety components
The following safety equipment makes up the vehicle safety design to re-
duce the risk of severe and fatal injuries. Depending on the vehicle equip-
ment, some equipment may not be fitted in the vehicle or may not be avail-
able in some markets.
● Optimised seat belts for all seats.
● Belt tension devices for the driver and front passenger and, where appli-
cabl
e, on the outer seats of the second row of seats in combination with the
side airbags.
● Furthermore, belt tension limiters for the driver's and front passenger's
seat belt
.
● Belt height adjustment for the front seats and, where applicable, the
outer seats
of the second row of seats.
● Seat belt warning lamp
● Frontal airbags for driver and passenger.
● Side airbags for the driver, front passenger and, where applicable, the
outer seats
of the second row of seats.
● Left and right curtain airbags.
● One airbag for the driver's knees.
● Airbag control lamp .
● PASSENGER AIR BAG contro
l lamp. Safety First Operating instructions Practical tips Technical Data
Page 44 of 385
42
Child safety
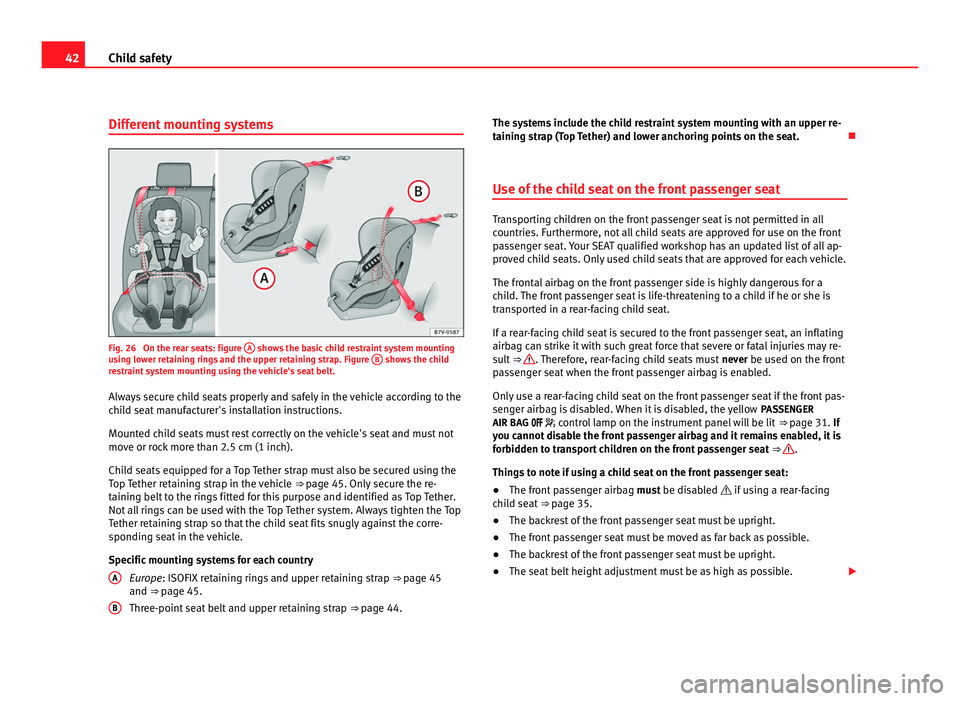
Different mounting systems Fig. 26 On the rear seats: figure
A shows the basic child restraint system mounting
us in
g lower retaining rings and the upper retaining strap. Figure B shows the child
re s
traint system mounting using the vehicle's seat belt.
Always secure child seats properly and safely in the vehicle according to the
child seat manufacturer's installation instructions.
Mounted child seats must rest correctly on the vehicle's seat and must not
move or rock more than 2.5 cm (1 inch).
Child seats equipped for a Top Tether strap must also be secured using the
Top Tether retaining strap in the vehicle ⇒ page 45. Only secure the re-
taining belt to the rings fitted for this purpose and identified as Top Tether.
Not all rings can be used with the Top Tether system. Always tighten the Top
Tether retaining strap so that the child seat fits snugly against the corre-
sponding seat in the vehicle.
Specific mounting systems for each country
Europe: ISOFIX retaining rings and upper retaining strap ⇒ page 45
and ⇒ page 45.
Three-point seat belt and upper retaining strap ⇒ page 44.
A B The systems include the child restraint system mounting with an upper re-
tainin
g s
trap (Top Tether) and lower anchoring points on the seat.
Use of the child seat on the front passenger seat Transporting children on the front passenger seat is not permitted in all
cou
ntrie
s. Furthermore, not all child seats are approved for use on the front
passenger seat. Your SEAT qualified workshop has an updated list of all ap-
proved child seats. Only used child seats that are approved for each vehicle.
The frontal airbag on the front passenger side is highly dangerous for a
child. The front passenger seat is life-threatening to a child if he or she is
transported in a rear-facing child seat.
If a rear-facing child seat is secured to the front passenger seat, an inflating
airbag can strike it with such great force that severe or fatal injuries may re-
sult ⇒ . Therefore, rear-facing child seats must
never be u
sed on the front
passenger seat when the front passenger airbag is enabled.
Only use a rear-facing child seat on the front passenger seat if the front pas-
senger airbag is disabled. When it is disabled, the yellow PASSENGER
AIR BAG control lamp on the instrument panel will be lit ⇒ page 31. If
you cannot disable the front passenger airbag and it remains enabled, it is
forbidden to transport children on the front passenger seat ⇒ .
Thing s
to note if using a child seat on the front passenger seat:
● The front passenger airbag must
be disabled if using a rear-facing
child seat ⇒ page 35.
● The backrest of the front passenger seat must be upright.
● The front passenger seat must be moved as far back as possible.
● The backrest of the front passenger seat must be upright.
● The seat belt height adjustment must be as high as possible.
Page 45 of 385
43
Child safety
Suitable child seats
The chi l
d seat must be authorised by the manufacturer especially for use on
a front passenger seat with a frontal or side airbag.
If the front passenger seat is equipped with retaining rings, the child seat
can be secured using the approved retaining system provided it is approved
for this type of vehicle in accordance with current regulations in the country
in question.
Universal seats for children in groups 0, 0+, 1, 2 or 3 according to the ECE-
R 44 regulation. WARNING
If a child seat is mounted on the front passenger seat, the risk of the
chi l
d sustaining severe or fatal injuries in the event of an accident increa-
ses. Rear-facing child seats must never be mounted on the front passen-
ger seat when the front passenger airbag is enabled. This is life-threaten-
ing to the child should the frontal airbag deploy, as the child seat would
be struck by the inflated airbag and thrown against the backrest. WARNING
If, in exceptional circumstances, a child must be transported in a rear-fac-
ing c hi
ld seat on the front passenger seat, strictly observe the following:
● Always disable the front passenger airbag and leave it disabled.
● The child seat must be approved by the manufacturer for use on a
front p
assenger seat with frontal and side airbag.
● Follow the installation instructions of the child seat manufacturer and
obser
ve the warnings.
● Move the front passenger seat as far back as possible and adjust it to
its highe
st position to keep as far away as possible from the frontal air-
bag. WARNING (Continued)
● Move the backrest to the upright position.
● The se
at
belt height adjustment must be as high as possible.
● Children must always be protected with an approved child restraint
syst
em suited to their height and weight.
Use of the child seat on the rear seat If a child seat is mounted on the rear seat, adapt the position of the front
pa
s
senger seat so that the child has enough space. Therefore, adapt the
front passenger seat to the size of the child seat and the height of the child.
Ensure the passenger is in the correct position ⇒ page 10.
Move the second and third row of seats fully back and lock them. Place the
seat backs in a vertical position and fold the armrests down.
ISOFIX child seats approved for rear seats
The rear seats are suitable for child seats with the ISOFIX system specially
designed for this type of vehicle in accordance with regulation ECE-R 44.
ISOFIX child seats are divided into “specific categories for the vehicle”,
“limited” or “semi-universal”.
Child seat manufacturers supply a list of vehicles with each ISOFIX seat,
which includes the models for which the ISOFIX child seat in question is ap-
proved. If the vehicle is included in the manufacturer's list and the ISOFIX
child seat belongs to a seat category included in the list, then it can be
used in your vehicle. If necessary, contact the child seat manufacturer for an
updated list of vehicles. Safety First Operating instructions Practical tips Technical Data
Page 46 of 385
44
Child safety Group (weight
cat e
gory) ISOFIX child seat cate-
gory Seat position on the rear seats
Group 0: chil-
dr en up t
o 10 kg E IUF
a) Group 0+: chil-
dr en up t
o 13 kg E IUF
a) D IUF
a) C IUF
a) Group 1: 9 to 18
kg D IUF
a) C IUF
a) B IUF
a) B1 IUF
a) A IUF
a) a)
IUF: suitable for “universal” ISOFIX child seats authorised for use in this group. WARNING
If child seats are fitted to all the seats in the second row then it is possi-
bl e th
at the seats of this row cannot be folded down from the third row of
seats in case of an accident. In case of an emergency, passengers in the
third row of seats will not be able to leave the vehicle or to help them-
selves.
● Child seats should not occupy all the seats of the second row if other
pas
sengers are to occupy the third row of seats.
Securing child seats with the seat belt Securing the child seat using the seat belt
●
Please read and observe the child seat manufacturer's handling instruc-
tions.
● Po
sitioning the child seat on the seat according to the manufacturer's
instruction
s. ●
The seat belt height adjustment must be as high as possible.
● Fa
sten the seat belt or pass it around the child seat structure in the man-
ner desc
ribed in the manufacturer's instructions.
● Make sure the seat belt is not twisted.
● Insert the latch plate into the buckle for the appropriate seat and push it
down unti
l it is securely locked with an audible click.
● Ensure that the upper belt web lies tightly on the child seat.
● Pull the belt (it must be no longer possible to pull the lower belt web-
bing out).
R
emoving the child seat
The seat belt must not be unfastened until the vehicle has come to a stand-
still ⇒ .
● Press the red button on the buckle. The latch plate is released from the
buc k
le.
● Guide the belt back by hand so that it rolls up easily and the trim will not
be damag
ed.
● Remove the child seat from the vehicle. WARNING
Unbuckling the seat belt while the vehicle is in motion can cause severe
or fat a
l injuries in the event of an accident or sudden braking.
● The seat belt must not be unfastened until the vehicle has come to a
stand
still.
Page 116 of 385
114
Seats and storage compartments
Seats and storage compartments
Seat adjustment
Mec h
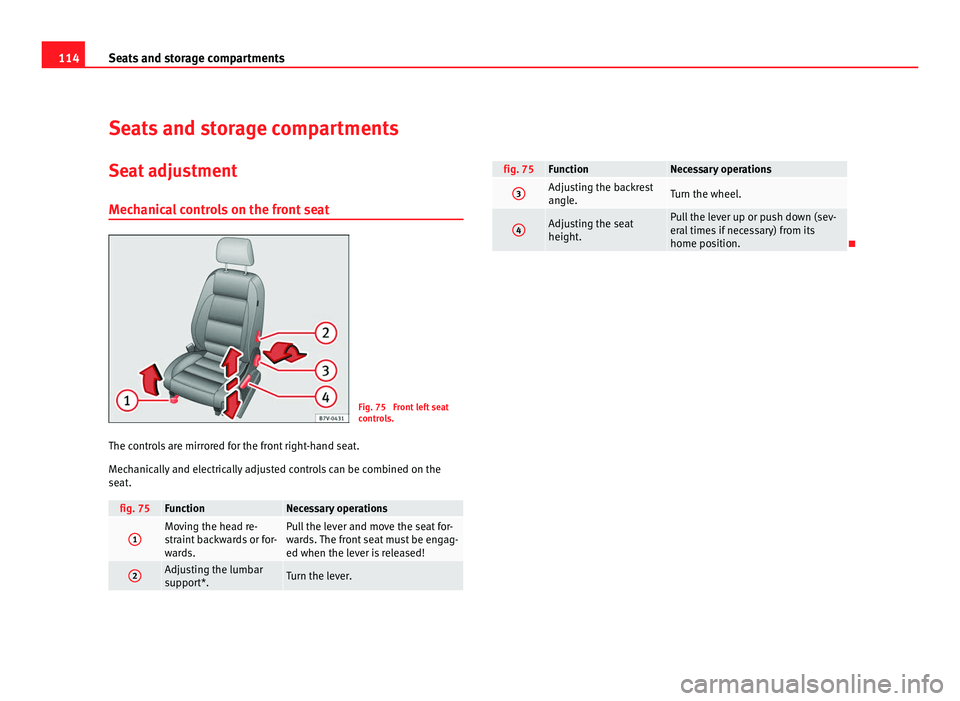
anical controls on the front seat Fig. 75 Front left seat
contr
o
ls.
The controls are mirrored for the front right-hand seat.
Mech
anically and electrically adjusted controls can be combined on the
seat. fig. 75 Function Necessary operations
1 Moving the head re-
str
aint
backwards or for-
wards. Pull the lever and move the seat for-
war
d
s. The front seat must be engag-
ed when the lever is released! 2 Adjusting the lumbar
sup
por
t*. Turn the lever. fig. 75 Function Necessary operations
3 Adjusting the backrest
angl
e. Turn the wheel.
4 Adjusting the seat
height. Pull the lever up or push down (sev-
eral
time
s if necessary) from its
home position.
Page 117 of 385
115
Seats and storage compartments
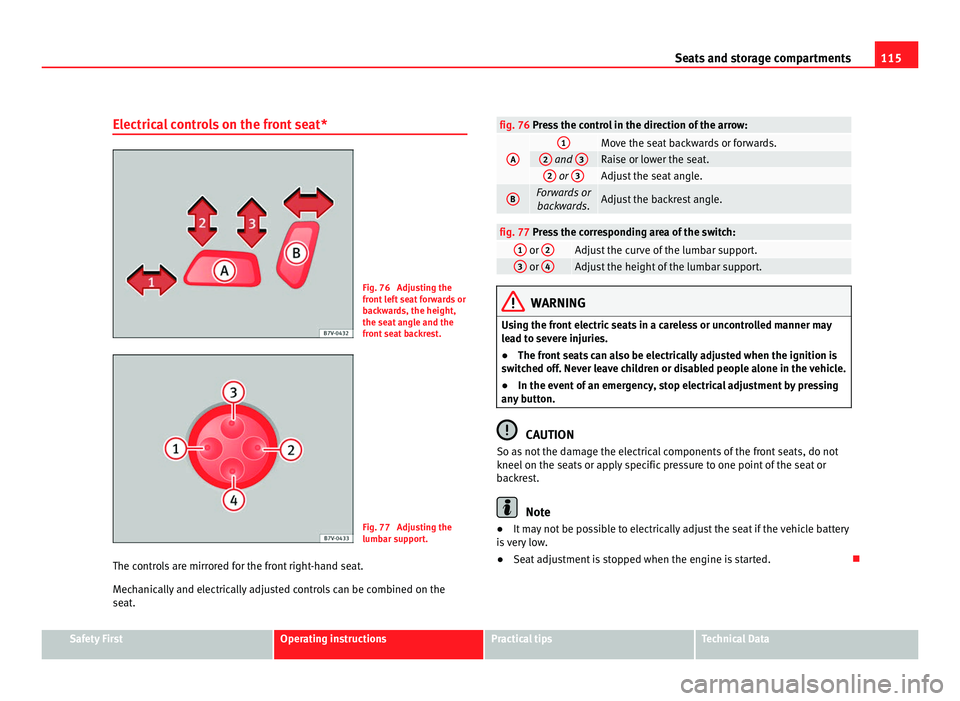
Electrical controls on the front seat* Fig. 76 Adjusting the
front
l
eft seat forwards or
backwards, the height,
the seat angle and the
front seat backrest. Fig. 77 Adjusting the
lumbar s
up
port.
The controls are mirrored for the front right-hand seat.
Mech
anically and electrically adjusted controls can be combined on the
seat. fig. 76 Press the control in the direction of the arrow:
A 1
Move the seat backwards or forwards.
2
and
3 Raise or lower the seat.
2
or
3 Adjust the seat angle.
B Forwards or
backwar ds. Adjust the backrest angle.
fig. 77 Press the corresponding area of the switch:
1
or
2 Adjust the curve of the lumbar support.
3
or
4 Adjust the height of the lumbar support.
WARNING
Using the front electric seats in a careless or uncontrolled manner may
le a
d to severe injuries.
● The front seats can also be electrically adjusted when the ignition is
switc
hed off. Never leave children or disabled people alone in the vehicle.
● In the event of an emergency, stop electrical adjustment by pressing
any b
utton. CAUTION
So as not the damage the electrical components of the front seats, do not
kneel on the se ats
or apply specific pressure to one point of the seat or
backrest. Note
● It may not be possible to electrically adjust the seat if the vehicle battery
i s
very low.
● Seat adjustment is stopped when the engine is started. Safety First Operating instructions Practical tips Technical Data
Page 125 of 385
123
Seats and storage compartments
Head restraints Adjus tin
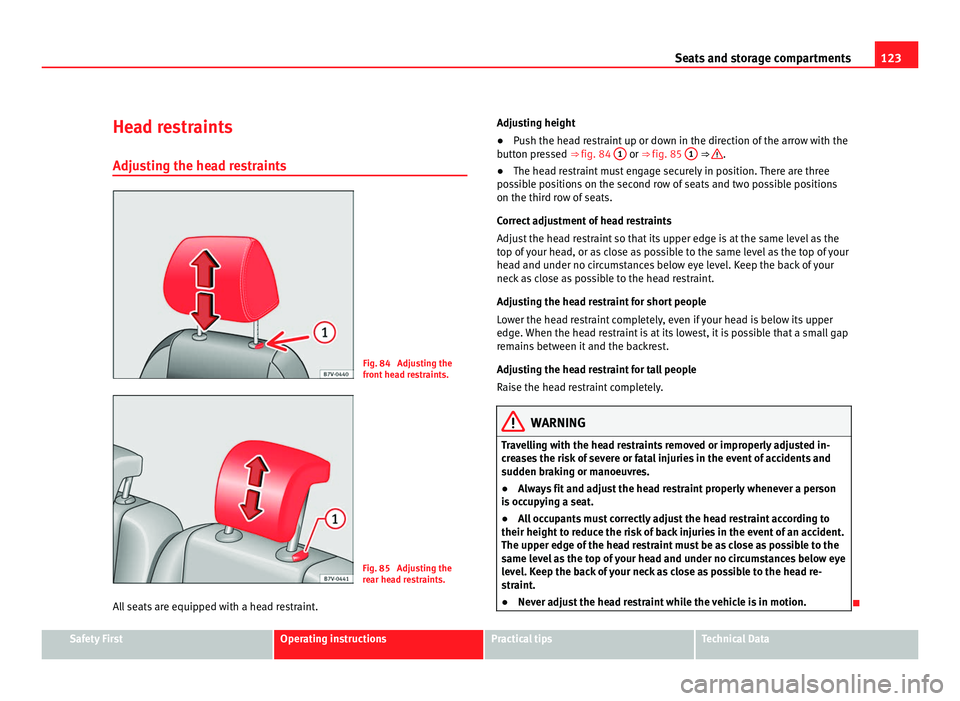
g the head restraints Fig. 84 Adjusting the
front
he
ad restraints. Fig. 85 Adjusting the
re
ar he
ad restraints.
All seats are equipped with a head restraint. Adjusting height
●
Push the head restraint up or down in the direction of the arrow with the
button pr
essed ⇒ fig. 84 1 or ⇒
fig. 85 1 ⇒ .
● The head restraint must engage securely in position. There are three
pos s
ible positions on the second row of seats and two possible positions
on the third row of seats.
Correct adjustment of head restraints
Adjust the head restraint so that its upper edge is at the same level as the
top of your head, or as close as possible to the same level as the top of your
head and under no circumstances below eye level. Keep the back of your
neck as close as possible to the head restraint.
Adjusting the head restraint for short people
Lower the head restraint completely, even if your head is below its upper
edge. When the head restraint is at its lowest, it is possible that a small gap
remains between it and the backrest.
Adjusting the head restraint for tall people
Raise the head restraint completely. WARNING
Travelling with the head restraints removed or improperly adjusted in-
cr e
ases the risk of severe or fatal injuries in the event of accidents and
sudden braking or manoeuvres.
● Always fit and adjust the head restraint properly whenever a person
is oc
cupying a seat.
● All occupants must correctly adjust the head restraint according to
their height to r
educe the risk of back injuries in the event of an accident.
The upper edge of the head restraint must be as close as possible to the
same level as the top of your head and under no circumstances below eye
level. Keep the back of your neck as close as possible to the head re-
straint.
● Never adjust the head restraint while the vehicle is in motion.
Safety First Operating instructions Practical tips Technical Data