technical specifications Seat Alhambra 2013 Owner's Manual
[x] Cancel search | Manufacturer: SEAT, Model Year: 2013, Model line: Alhambra, Model: Seat Alhambra 2013Pages: 387, PDF Size: 6.13 MB
Page 281 of 387
279
Checking and refilling levels
WARNING (Continued)
● Once the engine has cooled, follow the instructions below before
opening the bonnet:
–Turn on the electronic parking brake and place the gear selector
lever in P or the gearbox lever in neutral.
– Remove the key from the ignition.
– Keep children away from the engine compartment and never leave
them unsupervised.
● When the engine is warm or hot, the cooling system is pressurised.
Do not unscrew the cap on the expansion tank when the engine is hot.
Otherwise, coolant may spray out under pressure causing burns and seri-
ous injury.
–Carefully and slowly unscrew the cap anticlockwise, gently press-
ing down on it.
– Always protect your face, hands and arms from hot coolant and
steam using a large, thick cloth.
● When refilling liquids, avoid spilling them on parts of the engine and
the exhaust system. Spilled liquids could cause a fire.
WARNING
The high voltages of the electrical system can give electric shocks as well
as causing burns and serious injury and possibly even death!
● Never cause short circuits in the electrical system. The battery could
explode.
● To minimise the risk of electric shock and serious consequences
while the engine is running or starting the engine, note the following:
–Never touch the electrical wiring of the ignition system.
– Never touch electric cables or the gas discharge lamps.
WARNING
In the engine compartment, there are rotating parts that could cause se-
rious injury.
● Never place your hands on or near the radiator fan. Touching the rotor
blades could seriously harm you. The ventilator works according to the
engine temperature and could start suddenly even when the ignition is
turned off and the key is removed.
● If any work has to be performed when the engine is started or with
the engine running, there is an additional, potentially fatal, safety risk
from the rotating parts, such as the drive belts, alternator, radiator fan
etc as well as from the high-voltage ignition system. Always work with
the utmost caution.
–Always make sure that no parts of your body, jewellery, ties, loose
clothing and long hair can be trapped by the rotating parts of the en-
gine. Before any work, remove ties and jewellery ( necklaces, etc), tie
longhair back and tie all items of loose clothing to your body to make
sure that they cannot be trapped by engine components.
– Take extreme caution when operating the accelerator and remain
attentive. The vehicle could move, even with the electronic parking
brake activated.
● Always make sure you have not left any objects, such as cloths or
tools, in the engine compartment. If any object is left in the engine com-
partment, this could cause malfunctions, engine faults and even a fire.
WARNING
Refill liquids and certain materials can catch fire easily in the engine
compartment, causing a fire and serious injury!
● Never smoke.
● Never work close to places exposed to flames or sparks.
Safety FirstOperating instructionsPractical tipsTechnical Specifications
Page 283 of 387
281
Checking and refilling levels
Opening and closing the bonnet
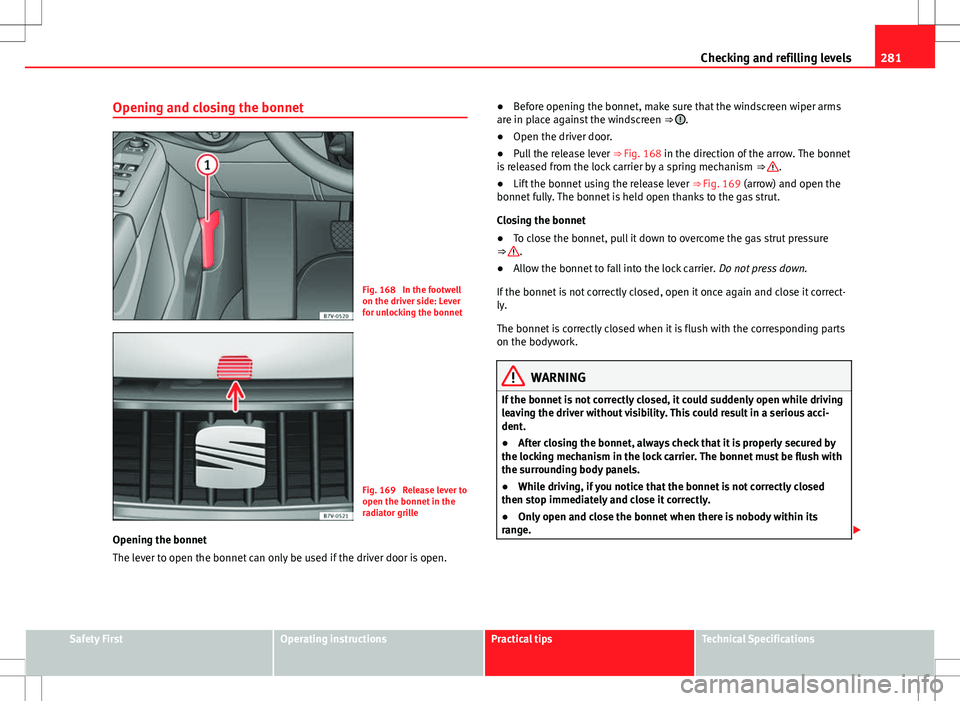
Fig. 168 In the footwell
on the driver side: Lever
for unlocking the bonnet
Fig. 169 Release lever to
open the bonnet in the
radiator grille
Opening the bonnet
The lever to open the bonnet can only be used if the driver door is open. ●
Before opening the bonnet, make sure that the windscreen wiper arms
are in place against the windscreen ⇒
.
● Open the driver door.
● Pull the release lever ⇒ Fig. 168 in the direction of the arrow. The bonnet
is released from the lock carrier by a spring mechanism ⇒
.
● Lift the bonnet using the release lever ⇒ Fig. 169 (arrow) and open the
bonnet fully. The bonnet is held open thanks to the gas strut.
Closing the bonnet
● To close the bonnet, pull it down to overcome the gas strut pressure
⇒
.
● Allow the bonnet to fall into the lock carrier. Do not press down.
If the bonnet is not correctly closed, open it once again and close it correct-
ly.
The bonnet is correctly closed when it is flush with the corresponding parts
on the bodywork.
WARNING
If the bonnet is not correctly closed, it could suddenly open while driving
leaving the driver without visibility. This could result in a serious acci-
dent.
● After closing the bonnet, always check that it is properly secured by
the locking mechanism in the lock carrier. The bonnet must be flush with
the surrounding body panels.
● While driving, if you notice that the bonnet is not correctly closed
then stop immediately and close it correctly.
● Only open and close the bonnet when there is nobody within its
range.
Safety FirstOperating instructionsPractical tipsTechnical Specifications
Page 285 of 387
283
Checking and refilling levels
WARNING
If the warning lamps and messages are ignored, the vehicle may stall in
traffic, or may cause accidents and severe injuries.
● Never ignore the warning lamps or text messages.
● Stop the vehicle safely as soon as possible.
CAUTION
Failure to heed the control lamps and text messages when they appear may
result in faults in the vehicle.
Engine oil specifications
Replacement engine oil must strictly comply with the specifications.
The correct oil must be used to ensure the correct operation and long serv-
ice life of the engine. The engine comes with a high-quality multigrade oil
that can generally be used all year round.
Only use an engine oil that complies to SEAT standards whenever possible
⇒
. If you wish to maintain the long-life service duration, only engine oils
approved for this service according to the corresponding VW standard
( ⇒ table on page 283) may be used. All oils indicated are
synthetic multi-
grade oils.
Engine oils are being continuously further developed. Technical Services
are permanently informed of any modifications. SEAT therefore recommends
that you have the engine oil changed by a Technical Service.
EnginesEngine oil specificationswith LongLife servicewithout LongLife servicePetrol enginesVW 504 00, VW 503 00VW 504 00, VW 502 00Diesel enginesVW 507 00VW 507 00
CAUTION
● Only use engine oils whose specifications are expressly approved by
SEAT. The use of any other type of engine oil could cause engine damage!
● No additives should be used with engine oil. Any damage caused by the
use of such additives would not be covered by the factory warranty.
Safety FirstOperating instructionsPractical tipsTechnical Specifications
Page 287 of 387
285
Checking and refilling levels
● Unscrew the cap from engine oil filler neck on the cylinder head
⇒ Fig. 171. If you are not sure where the cap is, request help from a special-
ist.
● Only refill using engine oil expressly approved by SEAT and in small
quantities (not more than 0.5 l or 1/2 a quarter of a gallon at a time)
⇒ page 283.
● To avoid adding too much oil, each time you add a quantity, wait until
the oil has flowed into the crankcase so that it can be measured with the
dipstick.
● Check the oil level before adding any more oil. Do not top up with too
much engine oil ⇒
.
● When the oil level is in at least the ⇒ Fig. 170 B zone, insert the dip-
stick into the tube fully to avoid engine oil escaping when the engine is run-
ning.
● After topping up the oil, ensure that the cap is screwed on to the filler
neck correctly.
WARNING
Oil could catch fire if it comes into contact with hot engine components.
This could lead to a fire, explosion and severe injuries.
● Always ensure that after topping of oil, the engine oil filler cap is cor-
rectly tightened. This will avoid engine oil spilling onto hot engine parts
when the engine is running.
CAUTION
● If the engine oil level is above the area A do not start the engine. You
should obtain professional assistance. Otherwise catalytic converter and
engine damage may occur.
● When refilling or changing service liquids, ensure that you put the liq-
uids into the right tank. Making a mistake when refilling could cause seri-
ous malfunctions and damage the engine!
For the sake of the environment
The oil level must never be above area A. Otherwise oil can be drawn in
through the crankcase breather and escape into the atmosphere via the ex-
haust system.
Engine oil consumption
The consumption of engine oil can be different from one engine to another
and can vary during the useful life of the engine.
Depending on driving style and the conditions of use, the consumption of
engine oil can reach 1 litre every 2000 km (one quarter of a gallon every
1200 miles); for new vehicles, this could be higher for the first 5000 km
(3000 miles). For this reason the engine oil level must be checked at regular
intervals, preferably when filling the tank and before a journey.
When the engine is working hard, for instance during sustained high-speed
motorway cruising in summer, when towing a trailer or climbing mountain
passes, the oil level should preferably be kept within area ⇒ Fig. 170 A
.
Changing the engine oil
The engine oil must be changed regularly according to the specifications of
the Maintenance Programme.
Due to the problems linked with disposing of used oil and the need for suit-
able tools and special knowledge, always visit a specialised workshop to
have the engine oil and filter changed. SEAT recommends visiting a Techni-
cal Service.
Detailed information on the service intervals are shown in the Maintenance
Programme.
Safety FirstOperating instructionsPractical tipsTechnical Specifications
Page 289 of 387
287
Checking and refilling levels
For the sake of the environment
Coolants and additives can contaminate the environment. Collect any spilt
fluids in suitable containers and dispose of in accordance with legislation
and with the utmost respect for the environment.
Coolant temperature warning lamp and gauge
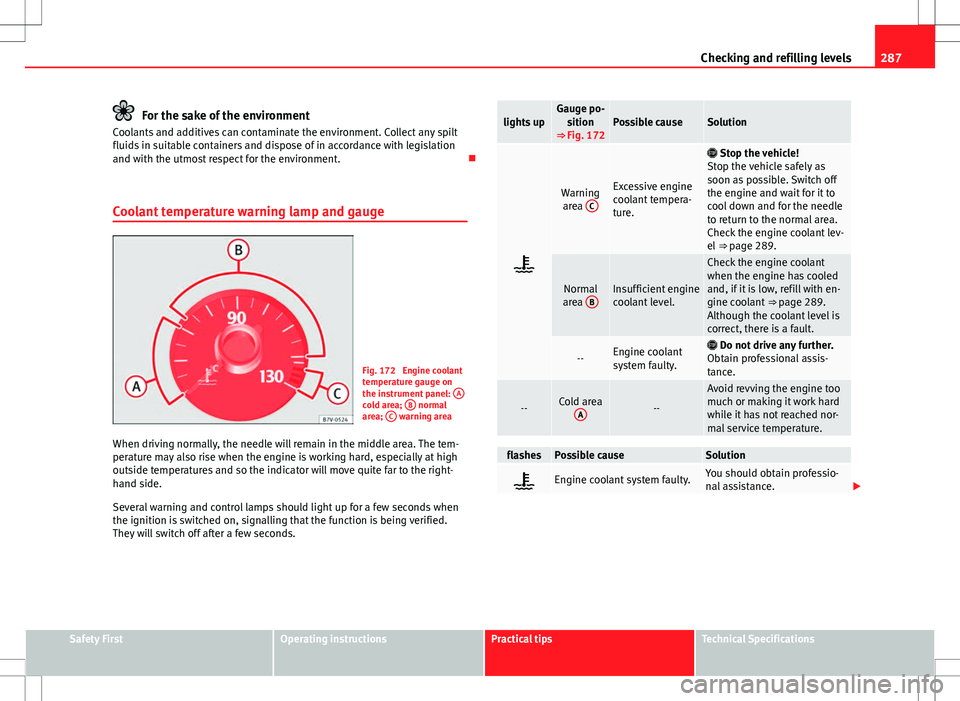
Fig. 172 Engine coolant
temperature gauge on
the instrument panel: A
cold area; B normal
area; C warning area
When driving normally, the needle will remain in the middle area. The tem-
perature may also rise when the engine is working hard, especially at high
outside temperatures and so the indicator will move quite far to the right-
hand side.
Several warning and control lamps should light up for a few seconds when
the ignition is switched on, signalling that the function is being verified.
They will switch off after a few seconds.
lights upGauge po- sition
⇒ Fig. 172Possible causeSolution
Warning area CExcessive engine
coolant tempera-
ture.
Stop the vehicle!
Stop the vehicle safely as
soon as possible. Switch off
the engine and wait for it to
cool down and for the needle
to return to the normal area.
Check the engine coolant lev-
el ⇒ page 289.
Normal
area BInsufficient engine
coolant level.
Check the engine coolant
when the engine has cooled
and, if it is low, refill with en-
gine coolant
⇒ page 289.
Although the coolant level is
correct, there is a fault.
--Engine coolant
system faulty. Do not drive any further.
Obtain professional assis-
tance.
--Cold area A--
Avoid revving the engine too
much or making it work hard
while it has not reached nor-
mal service temperature.
flashesPossible causeSolution
Engine coolant system faulty.You should obtain professio-
nal assistance.
Safety FirstOperating instructionsPractical tipsTechnical Specifications
Page 291 of 387
289
Checking and refilling levels
Checking the engine coolant level and refilling
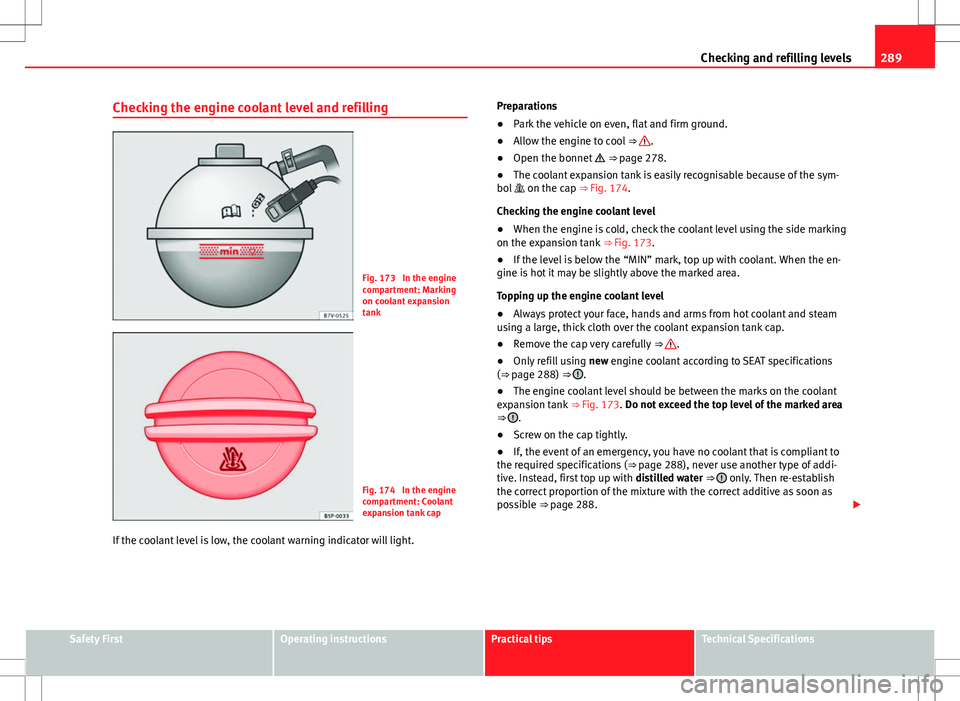
Fig. 173 In the engine
compartment: Marking
on coolant expansion
tank
Fig. 174 In the engine
compartment: Coolant
expansion tank cap
If the coolant level is low, the coolant warning indicator will light. Preparations
●
Park the vehicle on even, flat and firm ground.
● Allow the engine to cool ⇒
.
● Open the bonnet ⇒ page 278.
● The coolant expansion tank is easily recognisable because of the sym-
bol on the cap ⇒ Fig. 174.
Checking the engine coolant level
● When the engine is cold, check the coolant level using the side marking
on the expansion tank ⇒ Fig. 173.
● If the level is below the “MIN” mark, top up with coolant. When the en-
gine is hot it may be slightly above the marked area.
Topping up the engine coolant level
● Always protect your face, hands and arms from hot coolant and steam
using a large, thick cloth over the coolant expansion tank cap.
● Remove the cap very carefully ⇒
.
● Only refill using new engine coolant according to SEAT specifications
(⇒ page 288) ⇒
.
● The engine coolant level should be between the marks on the coolant
expansion tank ⇒ Fig. 173. Do not exceed the top level of the marked area
⇒
.
● Screw on the cap tightly.
● If, the event of an emergency, you have no coolant that is compliant to
the required specifications ( ⇒ page 288), never use another type of addi-
tive. Instead, first top up with distilled water ⇒
only. Then re-establish
the correct proportion of the mixture with the correct additive as soon as
possible ⇒ page 288.
Safety FirstOperating instructionsPractical tipsTechnical Specifications
Page 293 of 387
291
Checking and refilling levels
Vehicle battery
Introduction
The battery is a component of the vehicle's electrical system.
Never work on the electrical system without fully understanding the opera-
tions required, the applicable safety standards and without the correct tools
⇒
! Have the work carried out by a specialised workshop if you are uncer-
tain. SEAT recommends visiting a Technical Service. Negligent work can
cause serious injury.
Location and number of batteries in the vehicle
The battery is located in the engine compartment.
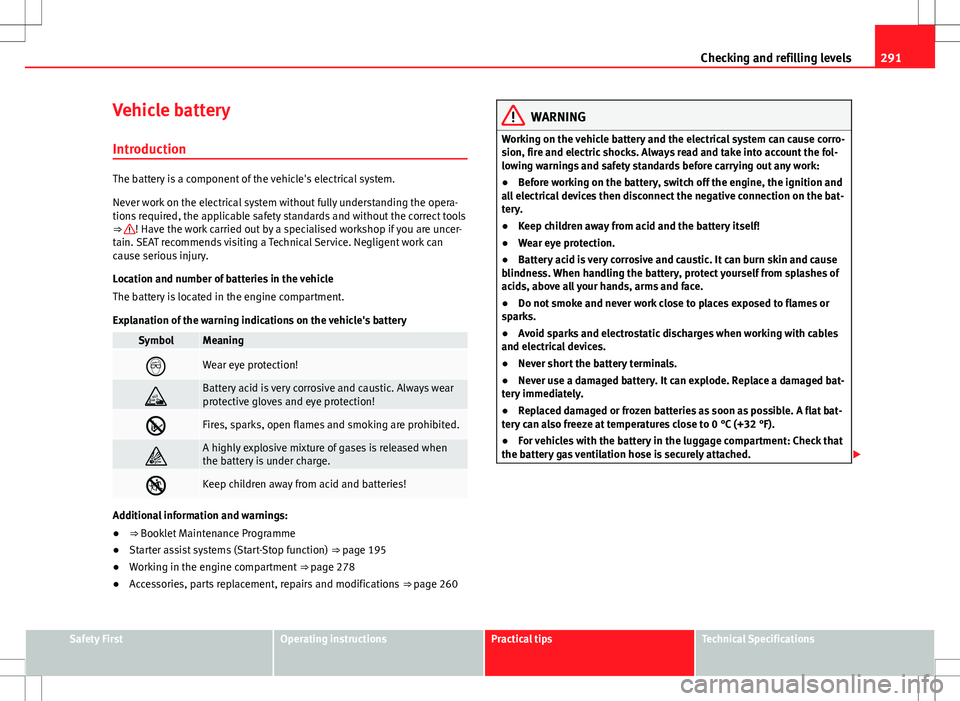
Explanation of the warning indications on the vehicle's battery
SymbolMeaning
Wear eye protection!
Battery acid is very corrosive and caustic. Always wear
protective gloves and eye protection!
Fires, sparks, open flames and smoking are prohibited.
A highly explosive mixture of gases is released when
the battery is under charge.
Keep children away from acid and batteries!
Additional information and warnings:
● ⇒ Booklet Maintenance Programme
● Starter assist systems (Start-Stop function) ⇒ page 195
● Working in the engine compartment ⇒ page 278
● Accessories, parts replacement, repairs and modifications ⇒ page 260
WARNING
Working on the vehicle battery and the electrical system can cause corro-
sion, fire and electric shocks. Always read and take into account the fol-
lowing warnings and safety standards before carrying out any work:
● Before working on the battery, switch off the engine, the ignition and
all electrical devices then disconnect the negative connection on the bat-
tery.
● Keep children away from acid and the battery itself!
● Wear eye protection.
● Battery acid is very corrosive and caustic. It can burn skin and cause
blindness. When handling the battery, protect yourself from splashes of
acids, above all your hands, arms and face.
● Do not smoke and never work close to places exposed to flames or
sparks.
● Avoid sparks and electrostatic discharges when working with cables
and electrical devices.
● Never short the battery terminals.
● Never use a damaged battery. It can explode. Replace a damaged bat-
tery immediately.
● Replaced damaged or frozen batteries as soon as possible. A flat bat-
tery can also freeze at temperatures close to 0 °C (+32 °F).
● For vehicles with the battery in the luggage compartment: Check that
the battery gas ventilation hose is securely attached.
Safety FirstOperating instructionsPractical tipsTechnical Specifications
Page 295 of 387
293
Checking and refilling levels
Checking the electrolyte level of the vehicle battery
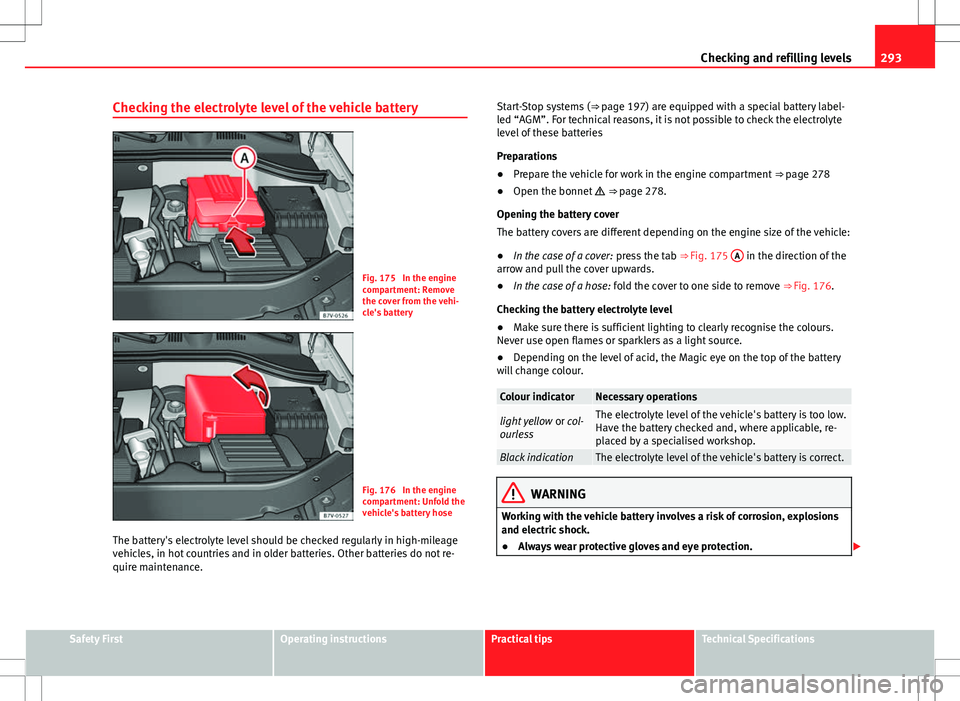
Fig. 175 In the engine
compartment: Remove
the cover from the vehi-
cle's battery
Fig. 176 In the engine
compartment: Unfold the
vehicle's battery hose
The battery's electrolyte level should be checked regularly in high-mileage
vehicles, in hot countries and in older batteries. Other batteries do not re-
quire maintenance. Start-Stop systems (
⇒ page 197) are equipped with a special battery label-
led “AGM”. For technical reasons, it is not possible to check the electrolyte
level of these batteries
Preparations
● Prepare the vehicle for work in the engine compartment ⇒ page 278
● Open the bonnet ⇒ page 278.
Opening the battery cover
The battery covers are different depending on the engine size of the vehicle:
● In the case of a cover: press the tab ⇒ Fig. 175 A
in the direction of the
arrow and pull the cover upwards.
● In the case of a hose: fold the cover to one side to remove ⇒ Fig. 176.
Checking the battery electrolyte level
● Make sure there is sufficient lighting to clearly recognise the colours.
Never use open flames or sparklers as a light source.
● Depending on the level of acid, the Magic eye on the top of the battery
will change colour.
Colour indicatorNecessary operations
light yellow or col-
ourlessThe electrolyte level of the vehicle's battery is too low.
Have the battery checked and, where applicable, re-
placed by a specialised workshop.
Black indicationThe electrolyte level of the vehicle's battery is correct.
WARNING
Working with the vehicle battery involves a risk of corrosion, explosions
and electric shock.
● Always wear protective gloves and eye protection.
Safety FirstOperating instructionsPractical tipsTechnical Specifications
Page 296 of 387
294Checking and refilling levels
WARNING (Continued)
● Battery acid is very corrosive and caustic. It can burn skin and cause
blindness. When handling the battery, protect yourself from splashes of
acids, above all your hands, arms and face.
● Never tilt the vehicle battery. Battery acid could spill out of the open-
ings to release gases and cause corrosion damage.
● Never open the vehicle battery.
● If battery acid splashes on you, immediately rinse your eyes and skin
abundantly with water for several minutes. Then seek medical care imme-
diately.
● If acid is swallowed by mistake, consult a doctor immediately.
Charging, replacing and connecting or disconnecting the
battery
Charging the battery
The vehicle battery should be charged by a specialised workshop only, as
batteries using special technology have been installed and they must be
charged in a controlled environment ⇒
. SEAT recommends visiting a
Technical Service.
Replacing a vehicle battery
The battery has been developed to suit the conditions of its location and
has special safety features. If the battery must be replaced, consult a Tech-
nical Service for information on electromagnetic compatibility, the size and
maintenance, performance and safety requirements of the new battery in
your vehicle before you purchase one. SEAT recommends you have the bat-
tery replaced by a Technical Service.
Use only maintenance-free genuine batteries conforming to TL 825 06 and
VW 7 50 73 Standards. These standards must be dated April 2008 or later. Start-Stop systems (
⇒ page 197) are equipped with a special battery. There-
fore, it must only be replaced with a battery of the same specifications.
Disconnecting the vehicle's battery
If you must disconnect the battery from the electrical system, please note
the following:
● Switch off the ignition and all electrical equipment.
● The vehicle must be unlocked before disconnecting the battery, other-
wise the alarm will be triggered.
● First disconnect the negative cable and then the positive ⇒
.
Connecting the vehicle's battery
● Before reconnecting the battery, switch off the engine, the ignition and
electric devices.
● First reconnect the positive cable and then the negative ⇒
.
Different control lamps may light up after connecting the battery and switch-
ing the ignition on. They will be turned off after a short trip at a speed of
between 15 - 20 km/h (10 - 12 mph). If the warning indicators remain lit,
please visit a specialised workshop to have the vehicle checked.
If the battery has been disconnected for a long time, it is possible that the
next service date is not displayed or calculated correctly ⇒ page 57. Respect
the maximum service intervals permitted ⇒ Booklet Maintenance Pro-
gramme.
Automatic consumer disconnection
The intelligent vehicle electrical system automatically implements a range
of measures to prevent the battery from discharging when high demands
are made on it:
Page 297 of 387
295
Checking and refilling levels
● the idling speed is increased so that the alternator provides more elec-
tricity.
● where necessary, the power of the most powerful consumers is reduced
or even completely disconnected.
● On starting the engine, the power supply from the 12-volt power sockets
and the cigarette lighter may be interrupted for a short time.
The on-board management program cannot always prevent the battery from
running flat. For example, if the ignition is left on for a long period with the
engine off or if the side lights or parking lights are left on while the vehicle
is stationary.
Why does the battery run flat?
● When stationary for a long time without starting the engine, particularly
if the ignition is switched on.
● Use of electrical consumers with the engine switched off.
● If the auxiliary heater is running ⇒ page 164.
WARNING
Incorrectly securing the battery or using the wrong battery can cause
short-circuits, fire and serious injuries.
● Always use only maintenance free batteries that do not run flat alone
and whose properties, specifications and size correspond to the stand-
ard battery. The specifications are indicated on the battery case.
WARNING
A highly explosive mixture of gases is released when the battery is under
charge.
● The batteries should be charged in a well-ventilated room only.
● Never charge a frozen or recently thawed battery. A flat battery can al-
so freeze at temperatures close to 0 °C (+32 °F).
WARNING (Continued)
● Always replace a battery which has frozen.
● Battery cables not correctly connected may cause a short circuit. Re-
connect first the positive cable and then the negative cable.
CAUTION
● Never disconnect the battery if the ignition is switched on or if the en-
gine is running. This could damage the electrical system or electronic com-
ponents.
● Never plug accessories supply current, such as solar panels or a battery
charger, to the 12-volt power sockets or the cigarette lighter. This could
damage the vehicle's electrical system.
For the sake of the environment
● Dispose of the battery in an environment-friendly manner. Batteries con-
tain toxic substances such as sulphuric acid and lead.
● Battery acid can contaminate the environment. Collect any spilt service
fluids and allow a dispose of them correctly.
Safety FirstOperating instructionsPractical tipsTechnical Specifications