brake Seat Alhambra 2013 Owner's Manual
[x] Cancel search | Manufacturer: SEAT, Model Year: 2013, Model line: Alhambra, Model: Seat Alhambra 2013Pages: 387, PDF Size: 6.13 MB
Page 11 of 387
9
Safe driving
ŌŚÅ Are there any SEAT dealers in the destination country?
ŌŚÅ For petrol vehicles: Is unleaded petrol available at the right octane rat-
ing?
ŌŚÅ For diesel engines: Is diesel fuel available with a low sulphur content?
ŌŚÅ Are a suitable engine oil ( ŌćÆŌĆŖpage 282) and other engine fluids comply-
ing with SEAT specifications available in the destination country?
ŌŚÅ Will the navigation system fitted at the factory operate correctly in the
destination country with the available navigation data?
ŌŚÅ Are special tyres required in the destination country?
CAUTION
SEAT does not accept liability for any damage to the vehicle due to the use
of a lower quality fuel, an inadequate service or the non-availability of genu-
ine spare parts. ’āÉ
Driving along flooded roadways
To prevent damage to the vehicle when driving through water, for example,
along a flooded road, please observe the following:
ŌŚÅ Check the depth of the water before entering the flooded zone. The wa-
ter should never come above the lower edge of the bodywork ŌćÆŌĆŖ
.
ŌŚÅ Do not drive faster than a pedestrian.
ŌŚÅ Do not stop in the water, use reverse gear or switch off the engine.
ŌŚÅ Oncoming traffic will cause waves which raise the level of the water,
making it difficult to cross the water.
WARNING
When driving through water, mud, melted snow, etc., please remember
that due to damp or frozen brake discs and shoes in winter, the braking
effect may be delayed, therefore the required braking distance is greater.
ŌŚÅ Dry the brakes and remove ice by braking carefully. Ensure that you
are not endangering other road-users or breaking traffic regulations in
the process.
ŌŚÅ After driving through water, avoid sudden sharp manoeuvres.
CAUTION
ŌŚÅ Driving through flooded areas may severely damage vehicle compo-
nents such as the engine, transmission, running gear or electrical system.
ŌŚÅ Never drive through salt water as salt causes corrosion. Always rinse any
parts of the vehicle which have been in contact with salt water. ’āÉ
Safety FirstOperating instructionsPractical tipsTechnical Specifications
Page 12 of 387
10Safe driving
Adjusting the seat position
Introduction
Number of seats
Depending on the equipment, your vehicle has a total of five or seven seats.
Each seat is equipped with a seat belt.
EquipmentSeats in the frontSeats in the sec- ond rowSeats in thethird row
5 seats23ŌĆō7 seats232
Additional information and warnings:
ŌŚÅ Seat functions ŌćÆŌĆŖpage 117
ŌŚÅ Seat belts ŌćÆŌĆŖpage 21
ŌŚÅ Airbag system ŌćÆŌĆŖpage 32
ŌŚÅ Child seats (accessories) ŌćÆŌĆŖpage 40
WARNING
An incorrect sitting position in the vehicle can lead to severe injuries or
death in the event of sudden braking or manoeuvres, collision or acci-
dents or if the airbag deploys.
ŌŚÅ Before the vehicle moves, assume the proper sitting position and
maintain it throughout the trip. This also includes fastening the seat
belt.
ŌŚÅ Never transport more people than there are seats with a seat belt
available in the vehicle.
WARNING (Continued)
ŌŚÅ Children must always be protected with an approved child restraint
system suited to their height and weight ŌćÆŌĆŖpage 40, ŌćÆŌĆŖpage 32.
ŌŚÅ Always keep your feet in the footwell while the vehicle is in motion.
Never, for example, put your feet on the surface of a seat or on the dash
panel and never put them out of a window. Otherwise the airbag and seat
belt offer insufficient protection and the risk of injury in the event of an
accident is increased.
WARNING
Before every trip, adjust the seat, the seat belt and the head restraints
and instruct your passengers to fasten their seat belts properly.
ŌŚÅ Move the front passenger seat back as far as possible.
ŌŚÅ Adjust the driver seat so that there is a distance of at least 25 cm
(10 inches) between the centre of your chest and the hub of the steering
wheel. Adjust the driver seat so that you are able to press the accelera-
tor, brake and clutch pedals to the floor with your knees slightly angled
and that the distance between your knees and the dash panel is at least
10 cm (4 inches). If your physical constitution prevents you from meeting
these requirements, contact a specialised workshop to make any modifi-
cations required.
ŌŚÅ Never drive with the seat backrest tilted far back. The further the seat
backrests are tilted to the rear, the greater the risk of injury due to incor-
rect positioning of the belt web or to the incorrect sitting position!
ŌŚÅ Never drive with the seat backrest tilted forwards. Should a front air-
bag deploy, it could throw the seat backrest backwards and injure the
passengers of the rear seats.
ŌŚÅ Sit as far away as possible from the steering wheel and the dash pan-
el. ’éŻ
Page 14 of 387
12Safe driving
Correct sitting position
Fig. 1 The correct dis-
tance between the driver
and the steering wheel
must be at least 25 cm
(10 inches)
Fig. 2 Correct belt web
and head restraint posi-
tions
The correct sitting positions for the driver and passengers are shown below.
If your physical constitution prevents you from maintaining the correct sit-
ting position, contact a specialised workshop for help with any special devi-
ces. The seat belt and airbag can only provide optimum protection if a cor- rect sitting position is adopted. SEAT recommends visiting a Technical Serv-
ice.
For your own safety and to reduce the risk of injury in the event of an acci-
dent or sudden braking or manoeuvre, SEAT recommend the following posi-
tions:
Valid for all vehicle occupants:
ŌŚÅ
Adjust the head restraint so that its upper edge is at the same level as
the top of your head, or as close as possible to the same level as the top of
your head and under no circumstances below eye level. Keep the back of
your neck as close as possible to the head restraint ŌćÆŌĆŖFig. 1 and ŌćÆŌĆŖFig. 2.
ŌŚÅ Short people must lower the head restraint completely, even if your
head is below its upper edge.
ŌŚÅ Tall people must raise the head restraint completely.
ŌŚÅ Adjust the seat backrest to an upright position so that your back rests
completely against it.
ŌŚÅ Always keep your feet in the footwell while the vehicle is in motion.
ŌŚÅ Adjust and fasten your seat belt correctly ŌćÆŌĆŖpage 21.
Also valid for the driver:
ŌŚÅ Adjust the steering wheel so that there is a distance of at least 25 cm
(10 inches) between it and your chest ŌćÆŌĆŖFig. 1 and so that you can hold the
steering wheel with both hands on the outside of the ring at the 9 o'clock
and 3 o'clock positions with your arms slightly bent.
ŌŚÅ The adjusted steering wheel must face your chest and not your face.
ŌŚÅ Adjust the driver seat forwards or backwards so that you are able to
press the accelerator, brake and clutch pedals to the floor with your knees
slightly angled and the distance between your knees and the dash panel is
at least 10 cm (4 inches) ŌćÆŌĆŖFig. 1.
ŌŚÅ Adjust the height of the driver seat so that you can easily reach the top
of the steering wheel.
ŌŚÅ Keep both feet in the footwell so that you have the vehicle under control
at all times. ’éŻ
Page 16 of 387
14Safe driving
WARNING
The driving behaviour and braking ability change when transporting
heavy and large objects.
ŌŚÅ Adjust your speed and driving style to visibility, road, traffic and
weather conditions.
ŌŚÅ Accelerate gently and carefully.
ŌŚÅ Avoid sudden braking and manoeuvres.
ŌŚÅ Brake early.
’āÉ
Transporting a load
Secure all objects in the vehicle
ŌŚÅ Distribute the load throughout the vehicle, on the roof and in a trailer as
uniformly as possible.
ŌŚÅ Transport heavy objects as far forward as possible in the luggage com-
partment and lock the seat backs in the vertical position.
ŌŚÅ Secure luggage in the luggage compartment with suitable straps on the
fastening rings ŌćÆŌĆŖpage 126.
ŌŚÅ Check the headlight adjustment ŌćÆŌĆŖpage 95.
ŌŚÅ Use the suitable tyre pressure according to the load being transported.
Read the tire inflation information label ŌćÆŌĆŖpage 296.
ŌŚÅ For vehicles with a tire pressure indicator, change the vehicle load status
ŌćÆŌĆŖpage 224.
CAUTION
Objects on the shelf could chafe against the wires of the heating element in
the heated rear window and cause damage.
Note
Please note the information about loading a trailer ŌćÆŌĆŖpage 236 and the
roof carrier system ŌćÆŌĆŖpage 139. ’āÉ
Driving with the rear lid open
Driving with the rear lid open creates an additional risk. Secure all objects
and secure the rear lid correctly and take all measures possible to reduce
toxic gases from entering the vehicle.
WARNING
Driving with the rear lid unlocked or open could cause serious injuries.
ŌŚÅ Always drive with the rear lid closed.
ŌŚÅ Secure all objects in the vehicle. Loose items could fall out of the ve-
hicle and injure other road users or damage other vehicles.
ŌŚÅ Drive particularly carefully and think ahead.
ŌŚÅ Avoid sudden manoeuvres and braking given that this could cause an
uncontrolled movement of the open rear lid.
ŌŚÅ When transporting objects that protrude out of the luggage compart-
ment, indicate them suitably. Observe legal requirements.
ŌŚÅ If objects must project out of the luggage compartment, the rear lid
must never be used to ŌĆ£secureŌĆØ or ŌĆ£attachŌĆØ objects.
ŌŚÅ If a baggage rack is fitted on the rear lid, it should be removed before
travelling with the rear lid open. ’éŻ
Page 17 of 387
15
Safe driving
WARNING
Toxic gases may enter the vehicle interior when the rear lid is open. This
could cause loss of consciousness, carbon monoxide poisoning, serious
injury and accidents.
ŌŚÅ To avoid toxic gases entering the vehicle always drive with the rear lid
closed.
ŌŚÅ In exceptional circumstances, if you must drive with the rear lid open,
observe the following to reduce the entry of toxic gases inside the vehi-
cle:
ŌĆōClose all windows and the sliding sunroof.
ŌĆō Turn off the air recirculation for the heating and air conditioner.
ŌĆō Open all of the air outlets in the dash panel.
ŌĆō Turn the heating fan and heater to the highest level.
CAUTION
An open rear lid changes the length and height of the vehicle. ’āÉ
Driving a loaded vehicle
For the best handling when driving a loaded vehicle, note the following:
ŌŚÅ Secure all objects
ŌćÆŌĆŖpage 14.
ŌŚÅ Accelerate gently and carefully.
ŌŚÅ Avoid sudden braking and manoeuvres.
ŌŚÅ Brake early.
ŌŚÅ If necessary, read the instructions for driving with a trailer
ŌćÆŌĆŖpage 236.
ŌŚÅ If necessary, read the instructions for driving with a roof carrier system
ŌćÆŌĆŖ page 139.
WARNING
A sliding load could considerably affect the stability and safety of the ve-
hicle resulting in an accident with serious consequences.
ŌŚÅ Secure loads correctly so they do not move.
ŌŚÅ When transporting heavy objects, use suitable ropes or straps.
ŌŚÅ Lock the seat backs in vertical position.
’āÉ
Specific vehicle weight information
The instructions in the official vehicle documents take precedence. All the
technical data provided in this documentation is applicable to the basic
model. The vehicle data label in the Maintenance Programme or the vehicle
documentation shows which engine is installed in your vehicle.
The figures may be different depending whether additional equipment is fit-
ted, for different models and for special vehicles.
WARNING
Exceeding the maximum authorised weight and the load on the axles
could cause damage to the vehicle, accidents and serious injuries.
ŌŚÅ The real load on the axles should never exceed the maximum permit-
ted.
ŌŚÅ The load and its distribution in the vehicle have effects on the vehicle
handling and the braking ability. Always drive at a suitable speed.
CAUTION
Distribute the load as uniformly and as low down on the vehicle as possible.
When transporting heavy objects in the luggage compartment, these
should be placed as far forward as possible or over the rear axle to have as
little influence on handling as possible. ’āÉ
Safety FirstOperating instructionsPractical tipsTechnical Specifications
Page 56 of 387
54Cockpit
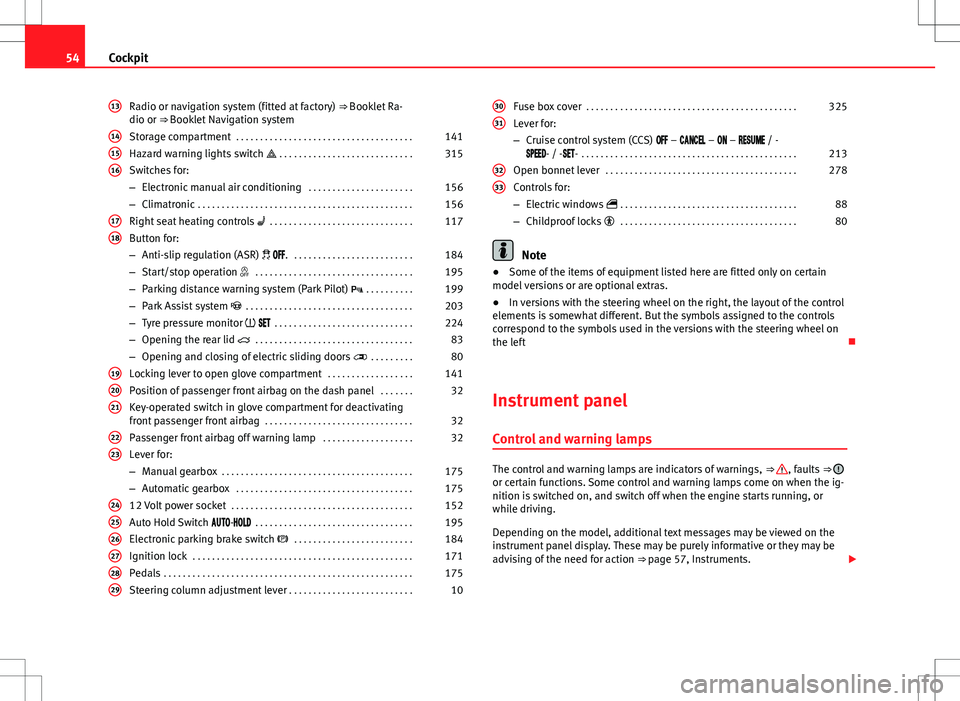
Radio or navigation system (fitted at factory) ŌćÆŌĆŖBooklet Ra-
dio or ŌćÆŌĆŖBooklet Navigation system
Storage compartment . . . . . . . . . . . . . . . . . . . . . . . . . . . . . . . . . . . . . 141
Hazard warning lights switch ’ĆŠ . . . . . . . . . . . . . . . . . . . . . . . . . . . . 315
Switches for:
ŌĆō Electronic manual air conditioning . . . . . . . . . . . . . . . . . . . . . .156
ŌĆō Climatronic . . . . . . . . . . . . . . . . . . . . . . . . . . . . . . . . . . . . . . . . . . . . . 156
Right seat heating controls ’üĪ . . . . . . . . . . . . . . . . . . . . . . . . . . . . . . 117
Button for:
ŌĆō Anti-slip regulation (ASR) ’āČ ’üÅ’üå’üå. . . . . . . . . . . . . . . . . . . . . . . . . . 184
ŌĆō Start/stop operation ’ā¦ . . . . . . . . . . . . . . . . . . . . . . . . . . . . . . . . . 195
ŌĆō Parking distance warning system (Park Pilot) ’üŹ . . . . . . . . . . 199
ŌĆō Park Assist system ’é¬ . . . . . . . . . . . . . . . . . . . . . . . . . . . . . . . . . . . 203
ŌĆō Tyre pressure monitor ’āć ’üō’üģ’üö . . . . . . . . . . . . . . . . . . . . . . . . . . . . . 224
ŌĆō Opening the rear lid ’é▓ . . . . . . . . . . . . . . . . . . . . . . . . . . . . . . . . . 83
ŌĆō Opening and closing of electric sliding doors ’āŚ . . . . . . . . . 80
Locking lever to open glove compartment . . . . . . . . . . . . . . . . . .141
Position of passenger front airbag on the dash panel . . . . . . .32
Key-operated switch in glove compartment for deactivating
front passenger front airbag . . . . . . . . . . . . . . . . . . . . . . . . . . . . . . . 32
Passenger front airbag off warning lamp . . . . . . . . . . . . . . . . . . .32
Lever for:
ŌĆō Manual gearbox . . . . . . . . . . . . . . . . . . . . . . . . . . . . . . . . . . . . . . . . 175
ŌĆō Automatic gearbox . . . . . . . . . . . . . . . . . . . . . . . . . . . . . . . . . . . . . 175
12 Volt power socket . . . . . . . . . . . . . . . . . . . . . . . . . . . . . . . . . . . . . . 152
Auto Hold Switch ’üü’üĢ’üö’üÅ-’üł’üÅ’üī’üä . . . . . . . . . . . . . . . . . . . . . . . . . . . . . . . . . 195
Electronic parking brake switch ’ü¦ . . . . . . . . . . . . . . . . . . . . . . . . . 184
Ignition lock . . . . . . . . . . . . . . . . . . . . . . . . . . . . . . . . . . . . . . . . . . . . . . 171
Pedals . . . . . . . . . . . . . . . . . . . . . . . . . . . . . . . . . . . . . . . . . . . . . . . . . . . . 175
Steering column adjustment lever . . . . . . . . . . . . . . . . . . . . . . . . . . 10
13
141516
1718
192021
2223
242526272829
Fuse box cover
. . . . . . . . . . . . . . . . . . . . . . . . . . . . . . . . . . . . . . . . . . . . 325
Lever for:
ŌĆō Cruise control system (CCS) ’üÅ’üå’üå ŌĆō ’üā’üü’üÄ’üā’üģ’üī ŌĆō ’üÅ’üÄ ŌĆō ’üÆ’üģ’üō’üĢ’üŹ’üģ / -
’üō’üÉ’üģ’üģ’üä- / -’üō’üģ’üö- . . . . . . . . . . . . . . . . . . . . . . . . . . . . . . . . . . . . . . . . . . . . . 213
Open bonnet lever . . . . . . . . . . . . . . . . . . . . . . . . . . . . . . . . . . . . . . . . 278
Controls for:
ŌĆō Electric windows ’ĆĮ . . . . . . . . . . . . . . . . . . . . . . . . . . . . . . . . . . . . . 88
ŌĆō Childproof locks ’éĘ . . . . . . . . . . . . . . . . . . . . . . . . . . . . . . . . . . . . . 80
Note
ŌŚÅ Some of the items of equipment listed here are fitted only on certain
model versions or are optional extras.
ŌŚÅ In versions with the steering wheel on the right, the layout of the control
elements is somewhat different. But the symbols assigned to the controls
correspond to the symbols used in the versions with the steering wheel on
the left ’āÉ
Instrument panel Control and warning lamps
The control and warning lamps are indicators of warnings, ŌćÆŌĆŖ, faults ŌćÆŌĆŖor certain functions. Some control and warning lamps come on when the ig-
nition is switched on, and switch off when the engine starts running, or
while driving.
Depending on the model, additional text messages may be viewed on the
instrument panel display. These may be purely informative or they may be
advising of the need for action ŌćÆŌĆŖpage 57, Instruments. ’éŻ
30
31
3233
Page 57 of 387
55
Cockpit
Depending upon the equipment fitted in the vehicle, instead of a warning
lamp, sometimes a symbol may be displayed on the instrument panel.
When certain control and warning lamps are lit, an audible warning is also
heard.
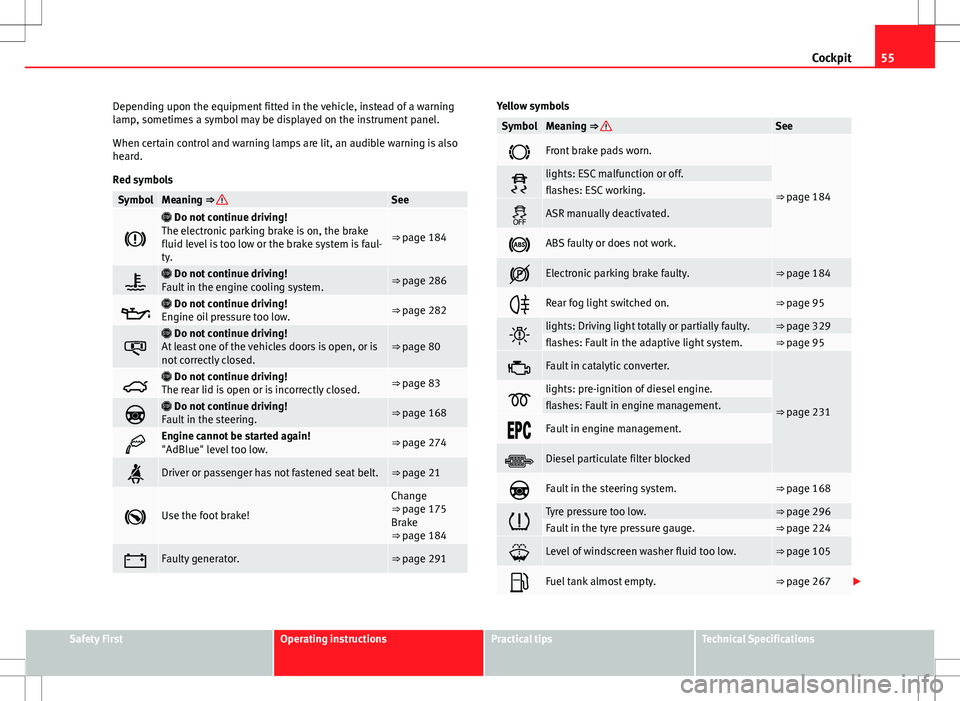
Red symbols
SymbolMeaning ŌćÆŌĆŖSee
’ü©
’é▓ Do not continue driving!
The electronic parking brake is on, the brake
fluid level is too low or the brake system is faul-
ty.
ŌćÆŌĆŖpage 184
’é┐’é▓ Do not continue driving!
Fault in the engine cooling system.ŌćÆŌĆŖpage 286
’üź’é▓ Do not continue driving!
Engine oil pressure too low.ŌćÆŌĆŖpage 282
’é┤
’é▓ Do not continue driving!
At least one of the vehicles doors is open, or is
not correctly closed.ŌćÆŌĆŖpage 80
’é▓’é▓ Do not continue driving!
The rear lid is open or is incorrectly closed.ŌćÆŌĆŖpage 83
’ü║’é▓ Do not continue driving!
Fault in the steering.ŌćÆŌĆŖpage 168
’üŠEngine cannot be started again!
"AdBlue" level too low.ŌćÆŌĆŖpage 274
’é¬Driver or passenger has not fastened seat belt.ŌćÆŌĆŖpage 21
’ü½Use the foot brake!
Change
ŌćÆŌĆŖpage 175
Brake
ŌćÆŌĆŖpage 184
’ü”Faulty generator.ŌćÆŌĆŖpage 291
Yellow symbols
SymbolMeaning ŌćÆŌĆŖSee
’ü®Front brake pads worn.
ŌćÆŌĆŖpage 184’āČlights: ESC malfunction or off.flashes: ESC working.
’é½ASR manually deactivated.
’ü¬ABS faulty or does not work.
’Ć¼Electronic parking brake faulty.ŌćÆŌĆŖpage 184
’ƬRear fog light switched on.ŌćÆŌĆŖpage 95
’ĆĮlights: Driving light totally or partially faulty.ŌćÆŌĆŖpage 329flashes: Fault in the adaptive light system.ŌćÆŌĆŖpage 95
’üĖFault in catalytic converter.
ŌćÆŌĆŖpage 231’üżlights: pre-ignition of diesel engine.flashes: Fault in engine management.
’üģ’üÉ’üāFault in engine management.
’āĘDiesel particulate filter blocked
’ü║Fault in the steering system.ŌćÆŌĆŖpage 168
’āćTyre pressure too low.ŌćÆŌĆŖpage 296Fault in the tyre pressure gauge.ŌćÆŌĆŖpage 224
’ü╣Level of windscreen washer fluid too low.ŌćÆŌĆŖpage 105
’üēFuel tank almost empty.ŌćÆŌĆŖpage 267 ’éŻ
Safety FirstOperating instructionsPractical tipsTechnical Specifications
Page 58 of 387
56Cockpit
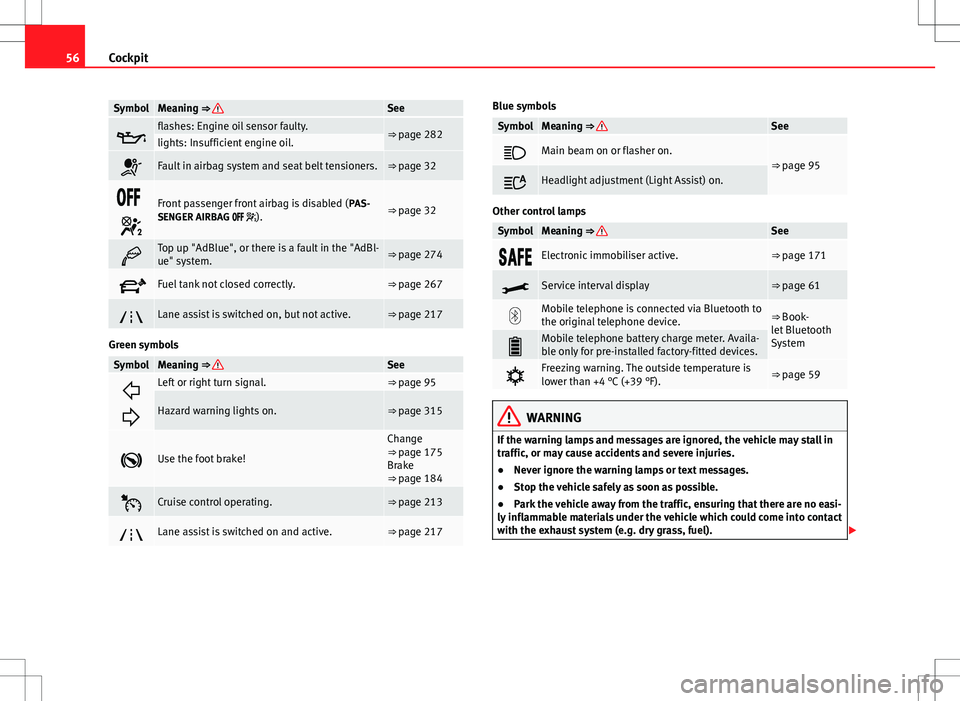
SymbolMeaning ŌćÆŌĆŖSee
’üźflashes: Engine oil sensor faulty.ŌćÆŌĆŖpage 282lights: Insufficient engine oil.
’ü┤Fault in airbag system and seat belt tensioners.ŌćÆŌĆŖpage 32
’üÅ’üå’üå
’Ć╣Front passenger front airbag is disabled ( PAS-
SENGER AIRBAG ’üÅ’üå’üå ’Ć╣).ŌćÆŌĆŖpage 32
’üŠTop up "AdBlue", or there is a fault in the "AdBl-
ue" system.ŌćÆŌĆŖpage 274
’ā▓Fuel tank not closed correctly.ŌćÆŌĆŖpage 267
’ĆŠLane assist is switched on, but not active.ŌćÆŌĆŖpage 217
Green symbols
SymbolMeaning ŌćÆŌĆŖSee
’Ć¼
’ĆŁLeft or right turn signal.ŌćÆŌĆŖpage 95
Hazard warning lights on.ŌćÆŌĆŖpage 315
’ü½Use the foot brake!
Change
ŌćÆŌĆŖpage 175
Brake
ŌćÆŌĆŖpage 184
’üØCruise control operating.ŌćÆŌĆŖpage 213
’ĆŠLane assist is switched on and active.ŌćÆŌĆŖpage 217
Blue symbols
SymbolMeaning ŌćÆŌĆŖSee
’ĆżMain beam on or flasher on.ŌćÆŌĆŖpage 95
’üćHeadlight adjustment (Light Assist) on.
Other control lamps
SymbolMeaning ŌćÆŌĆŖSee
’üō’üü’üå’üģElectronic immobiliser active.ŌćÆŌĆŖpage 171
’üżService interval displayŌćÆŌĆŖpage 61
’ƬMobile telephone is connected via Bluetooth to
the original telephone device.ŌćÆŌĆŖBook-
let Bluetooth
System
’üģMobile telephone battery charge meter. Availa-
ble only for pre-installed factory-fitted devices.
’üøFreezing warning. The outside temperature is
lower than +4 ┬░C (+39 ┬░F).ŌćÆŌĆŖpage 59
WARNING
If the warning lamps and messages are ignored, the vehicle may stall in
traffic, or may cause accidents and severe injuries.
ŌŚÅ Never ignore the warning lamps or text messages.
ŌŚÅ Stop the vehicle safely as soon as possible.
ŌŚÅ Park the vehicle away from the traffic, ensuring that there are no easi-
ly inflammable materials under the vehicle which could come into contact
with the exhaust system (e.g. dry grass, fuel). ’éŻ
Page 63 of 387
61
Cockpit
Calibrating compass
To calibrate the compass you must be in one of the valid magnetic zones
with sufficient space to be able to trace a circumference with the vehicle.
ŌŚÅ Switch the ignition on.
ŌŚÅ Select the Settings menu followed by the option Compass and Calibrate.
ŌŚÅ Confirm the message Describe a complete circumference to calibrate the
compass with OK
and then trace a complete circumference driving at ap-
proximately 10 km/h (6 mph).
When the corresponding cardinal point is displayed, the calibration is com-
plete. ’āÉ
Service interval display
The service indication is shown on the instrument panel display
ŌćÆŌĆŖFig. 35 4.
SEAT makes a difference between services with engine oil change (Interval
Service) and services without engine oil change (Inspection Service). The
service interval display only gives information for service dates which in-
volve an engine oil change. The dates of the remaining services (for exam-
ple, the next Inspection Service or change of brake fluid) are listed on the
label attached to the door strut, or even in the Maintenance Programme.
In vehicles with Services established by time or mileage , the service inter-
vals are already pre-defined.
In vehicles with LongLife Service , the intervals are determined individually.
Technical progress has made it possible to considerably reduce servicing re-
quirements. The technology used by SEAT ensures that your vehicle only
has an Interval Service when it is necessary. To establish when the Interval
Service is due (max. 2 years), the vehicle's conditions of use and individual
driving styles are considered. The service pre-warning first appears 20 days
before the date established for the corresponding service. The kilometres remaining until the next service are always rounded up to the nearest
100 km (miles) and the remaining time is given in complete days. The cur-
rent service message cannot be viewed until 500 km (miles) after the last
service. Prior to this only lines are visible on the display.
Inspection reminder
When the Service date is approaching, when the ignition is switched on a
Service reminder is displayed.
In vehicles without text messages
, a spanner is displayed on the instrument
panel ’üż with a figure given in km. The number of kilometres shown is the
maximum number that may be driven until the next service. After a few sec-
onds, the display mode changes. A clock symbol appears and the number
of days until the next service appointment is due.
In vehicles with text messages , Service in --- km (miles) or --- days is dis-
played on the instrument panel.
Service due
After the service date, an audible warning is given when the ignition is
switched on and the spanner displayed on the screen flashes for a few sec-
onds ’üż. In vehicles with text messages , Service in --- km (miles) or --- days is
displayed on the instrument panel.
Reading a service notification
With the ignition switched on, the engine off and the vehicle at a standstill,
the current service notification can be read:
ŌŚÅ Press the button ’ā½
on the instrument panel several times until the
spanner symbol is displayed ’üż.
ŌŚÅ OR: select the Settings menu.
ŌŚÅ From the Service submenu, select the option Info.
When the service date has past , a minus sign is displayed in front of the
number of kilometres or days. In vehicles with text messages the following
is displayed: Service --- km (miles) or --- days ago .’éŻ
Safety FirstOperating instructionsPractical tipsTechnical Specifications
Page 83 of 387
81
Opening and closing
WARNING
If a sliding door is not fully open, it could close unexpectedly and cause
serious injuries.
ŌŚÅ Always open the sliding door fully.
WARNING
Opening sliding doors while driving is dangerous. The sliding door could
be pushed open or closed when the vehicle accelerates and brakes caus-
ing serious injuries.
ŌŚÅ Never open the sliding doors when the vehicle is in movement.
’āÉ
Manually opening and closing the sliding door
Fig. 49 On the sliding
door. door handle 1
FunctionNecessary operations
Open the sliding door from the
inside.When the sliding door is released, open
the door fully by pulling on the outside
handle.
Opening the sliding door from
the inside.When the sliding door is released, open
the door fully by pulling on its interior
handle ŌćÆŌĆŖFig. 49 1
.
Closing the sliding door.
Pull on the inside or outside door handle
and close the sliding door by pushing
gently. Make sure that the sliding door is
closed properly.
’āÉ
Opening and closing the sliding door electrically*
Fig. 50 On the dash pan-
el, on the remote control
key and on the interior
lining of the sliding door:
Button for opening and
closing the electric slid-
ing door
All of the electric sliding doors can be opened and closed manually using
more force. ’éŻ
Safety FirstOperating instructionsPractical tipsTechnical Specifications