key Seat Ateca 2018 User Guide
[x] Cancel search | Manufacturer: SEAT, Model Year: 2018, Model line: Ateca, Model: Seat Ateca 2018Pages: 348, PDF Size: 7.32 MB
Page 90 of 348
Safety
front door is damaged, the airbag system
ma
y
not work correctly. All work carried out
on the front door must be done in a special-
ised workshop. Deactivating airbags
Activ ation and de
activation of front
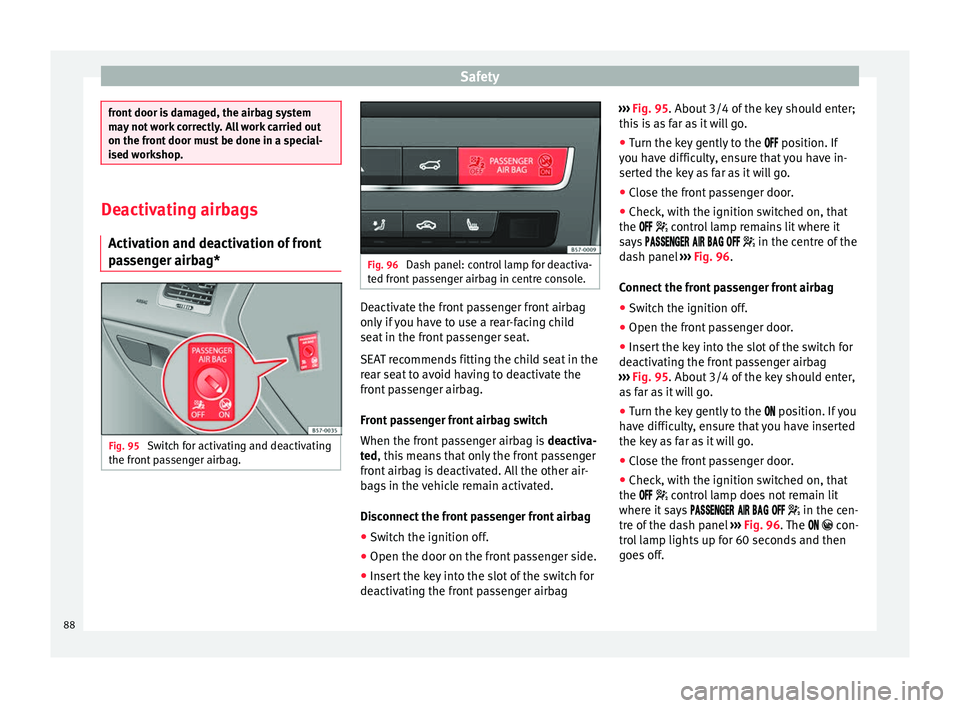
passenger airbag* Fig. 95
Switch for activating and deactivating
the fr ont
p
assenger airbag. Fig. 96
Dash panel: control lamp for deactiva-
ted fr ont
passenger airbag in centre console. Deactivate the front passenger front airbag
on
ly
if
you have to use a rear-facing child
seat in the front passenger seat.
SEAT recommends fitting the child seat in the
rear seat to avoid having to deactivate the
front passenger airbag.
Front passenger front airbag switch
When the front passenger airbag is deactiva-
ted, this means that only the front passenger
front airbag is deactivated. All the other air-
bags in the vehicle remain activated.
Disconnect the front passenger front airbag
● Switch the ignition off.
● Open the door on the front passenger side.
● Insert the key into the slot of the switch for
deactivatin
g the front passenger airbag ›››
Fig. 95. About 3/4 of the k
ey should enter;
this is as far as it will go.
● Turn the key gently to the position. If
y
ou have difficulty, ensure that you have in-
serted the key as far as it will go.
● Close the front passenger door.
● Check, with the ignition switched on, that
the contro
l lamp remains lit where it
says in the centre of the
dash panel ››› Fig. 96.
Connect the front passenger front airbag ● Switch the ignition off.
● Open the front passenger door.
● Insert the key into the slot of the switch for
deactivatin
g the front passenger airbag
››› Fig. 95. About 3/4 of the key should enter,
as far as it will go.
● Turn the key gently to the position. If
you
have difficulty, ensure that you have inserted
the key as far as it will go.
● Close the front passenger door.
● Check, with the ignition switched on, that
the contro
l lamp does not remain lit
where it says in the cen-
tre of the dash panel ››› Fig. 96. The con-
trol lamp lights up for 60 seconds and then
goes off.
88
Page 91 of 348
Airbag system
WARNING
● The driver of the
vehicle is responsible for
disabling or switching on the airbag.
● Always switch off the ignition before disa-
bling the fr
ont passenger airbag! Failure to do
so could result in a fault in the airbag deacti-
vation system.
● Never leave the key in the airbag disabling
switc
h as it could get damaged or enable or
disable the airbag during driving.
● If for any reason an airbag is deactivated,
reactiv
ate it as soon as possible so that it can
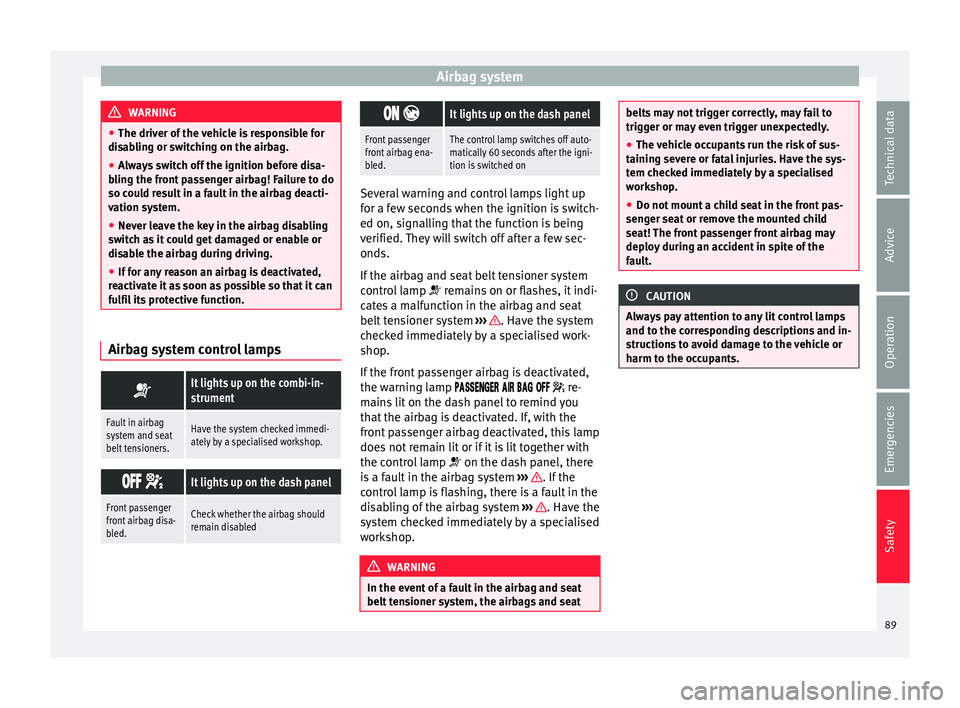
fulfil its protective function. Airbag system control lamps
It lights up on the combi-in-
strument
Fault in airbag
system and seat
belt tensioners.Have the system checked immedi-
ately by a specialised workshop.
It lights up on the dash panel
Front passenger
front airbag disa-
bled.Check whether the airbag should
remain disabled
It lights up on the dash panel
Front passenger
front airbag ena-
bled.The control lamp switches off auto-
matically 60 seconds after the igni-
tion is switched on
Several warning and control lamps light up
for a f
ew sec
onds when the ignition is switch-
ed on, signalling that the function is being
verified. They will switch off after a few sec-
onds.
If the airbag and seat belt tensioner system
control lamp remains on or flashes, it indi-
cates a malfunction in the airbag and seat
belt tensioner system ››› . Have the system
c hec
k
ed immediately by a specialised work-
shop.
If the front passenger airbag is deactivated,
the warning lamp re-
mains lit on the dash panel to remind you
that the airbag is deactivated. If, with the
front passenger airbag deactivated, this lamp
does not remain lit or if it is lit together with
the control lamp on the dash panel, there
is a fault in the airbag system ››› . If the
c ontr
o
l lamp is flashing, there is a fault in the
disabling of the airbag system ››› . Have the
sy s
t
em checked immediately by a specialised
workshop. WARNING
In the event of a fault in the airbag and seat
belt t en
sioner system, the airbags and seat belts may not trigger correctly, may fail to
trigg
er or m
ay even trigger unexpectedly.
● The vehicle occupants run the risk of sus-
taining sev
ere or fatal injuries. Have the sys-
tem checked immediately by a specialised
workshop.
● Do not mount a child seat in the front pas-
senger se
at or remove the mounted child
seat! The front passenger front airbag may
deploy during an accident in spite of the
fault. CAUTION
Always pay attention to any lit control lamps
and to the c orr
esponding descriptions and in-
structions to avoid damage to the vehicle or
harm to the occupants. 89
Technical data
Advice
Operation
Emergencies
Safety
Page 92 of 348
Safety
Transporting children safely Saf ety
f
or children
Introduction For safety reasons, as we have learned from
acc
ident
statistics, we recommend that chil-
dren under 12 years of age travel in the rear
seats. Depending on their age, height and
weight, children travelling in rear seats must
use a child seat or a seat belt. For safety rea-
sons, the child seat should be installed in the
rear seat, behind the front passenger seat or
in the centre back seat.
The physical laws involved and the forces
acting in a collision apply also to children
››› page 81. But unlike adults, children do not
have fully developed muscle and bone struc-
tures. This means that children are subject to
a greater risk of injury.
To reduce the risk of injuries, children must
always use special child restraint systems
when travelling in the vehicle.
We recommend the use of child safety prod-
ucts from the SEAT Original Accessories Pro-
gramme, which includes systems for all ages made by “Peke” (not for all countries) (see
www.se
at
.com).
These systems have been especially de-
signed and approved, complying with the
ECE-R44. regulation.
SEAT recommends securing the child seats
shown on the website as described below:
● Child seats in the opposite direction of
travel
(group 0+): ISOFIX and support bracket
(Peke G0 Plus + ISOFIX Base (RWF)).
● Child seats in the direction of travel (group
1): ISOFIX and T
op Tether (Peke G1 ISOFIX
DUO Plus).
● Child seats in the direction of travel (group
2): seat belt
and ISOFIX (Peke G3 KIDFIX) 1)
.
● Child seats in the direction of travel (group
3): with seat
belt (Peke G3 KIDFIX) 1)
.
Follow the manufacturer's instructions and
observe any statutory requirements when in-
stalling and using child seats. Always read
and note ››› page 90.
We recommend you always carry the manu-
facturer's Child Seat Instruction Manual to-
gether with the on-board documentation. Important information regarding the
front p
assenger's airbag Read the additional information carefully
›› ›
page 24.
Read and always observe the safety informa-
tion included in the following chapters:
● Safety distance with respect to the passen-
ger airbag ›
›› page 84.
● Objects between the passenger and the
pas
senger side airbag ››› in Front airbags
on p ag
e 86
.
The passenger side front airbag, when ena-
bled, is a serious risk for a child that is facing
backward since the airbag can strike the seat
with such force that it can cause serious or
fatal injuries. Children up to 12 years old
should always travel on the rear seat.
Therefore we strongly recommend you to
transport children on the rear seats. This is
the safest location in the vehicle. Alternative-
ly, the front passenger airbag can be disa-
bled with a key-operated switch ›››
page 88.
When transporting children, use a child seat
suitable for the age and size of each child
››› page 92. 1)
Temporarily, the child seat recommended by the
Ac c
essories Programme for groups 2 and 3 will be
ROMER KIDFIX XP ©
instead of Peke G3 KIDFIX. It is
available from the SEAT website.
90
Page 93 of 348
Transporting children safely
WARNING
● If a c hi
ld seat is secured to the front pas-
senger seat, the risk to the child of sustain-
ing critical or fatal injuries in the event of an
accident increases.
● An inflating front passenger airbag can
strike the r
ear-facing child seat and project it
with great force against the door, the roof or
the backrest.
● Never install a child seat facing backwards
on the front p
assenger seat unless the front
passenger front airbag has been disabled.
Risk of potentially fatal injuries to the child!
However, if it is necessary, in exceptional ca-
ses, to transport a child in the front passen-
ger seat, the front passenger front airbag
must always be disabled ››› page 89. If the
passenger seat has a height adjustment op-
tion, move it to the highest, most upright po-
sition. If you have a fixed seat, do not install
any child restraint system in this location.
● For those vehicles that do not include a key
lock sw
itch to deactivate the airbag, the vehi-
cle must be taken to a technical service. Do
not forget to reconnect the airbag when an
adult wants to sit in the front passenger seat.
● All vehicle occupants, especially children,
must
assume the proper sitting position and
be properly belted in while travelling.
● Never hold children or babies on your lap,
this c
an result in potentially fatal injuries to
the child!
● Never allow a child to be transported in a
vehicl
e without being properly secured, or to stand up or kneel on a seat while travelling.
In an acc
ident, the c
hild could be flung
through the vehicle, causing possibly fatal in-
juries to themselves and to the other vehicle
occupants.
● If children assume an improper sitting posi-
tion when the vehic
le is moving, they expose
themselves to greater risk of injury in the
event of a sudden braking manoeuvre or in an
accident. This is particularly important if the
child is travelling on the front passenger seat
and the airbag system is triggered in an acci-
dent; as this could cause serious injury or
even death.
● A suitable child seat can protect your child!
● Never leave a child alone in the child seat
or inside the
vehicle because depending on
the season, very high temperatures may be
reached inside a parked vehicle, which could
be fatal.
● Children who are less than 1.5 metres tall
must
not wear a normal seat belt without a
child seat, as this could cause injuries to the
abdominal and neck areas during a sudden
braking manoeuvre or in an accident.
● Do not allow the seat belt to become twis-
ted and the seat
belt should be properly in
place ››› page 79.
● Only one child may occupy a child seat
›››
page 91, Child seats.
● When a child seat is mounted in the rear
seats, the door c
hild-proof lock should be ac-
tivated ››› page 134. Child seats
Saf ety
in
structions Read the additional information carefully
›› ›
page 24. WARNING
When travelling, children must be secured in
the v ehic
le with a restraint system suitable
for age, weight and size.
● Read and always observe information and
warning
s concerning the use of child seats
››› page 90. WARNING
The retaining rings are designed only for use
with “ISOFIX” and T op
Tether* system child
seats.
● Never secure other child seats that do not
have the “ISOFIX” or T
op Tether* system, or
retaining belts or objects to the fastening
rings - this can result in potentially fatal inju-
ries to the child.
● Ensure that the child seat is secured cor-
rectly u
sing the “ISOFIX” and Top Tether* se-
curing rings. WARNING
An undue installation of the safety seat will
incr e
ase the risk of injury in the event of a
crash. » 91
Technical data
Advice
Operation
Emergencies
Safety
Page 99 of 348
Self-help
CAUTION
Switch off the air compressor after a maxi-
mum of 8 oper ation
al minutes to avoid over-
heating! Before switching on the air compres-
sor again, let it cool for several minutes. Check after 10 minutes of driving
Screw the inflator tube
›››
Fig. 97 5 again
and chec k
the pressure on the gauge 6 .
1.3 bar (19 p s
i / 130 kPa) and lower:
● Stop the vehicle! The tyre c
annot be sealed
sufficiently with the tyre mobility set.
● You should obtain professional assistance
›››
.
1.4 b ar (20 p
s
i / 140 kPa) and higher:
● Set the tyre pressure to the correct value
again.
● Car
efully resume your journey until you
reac
h the nearest specialised workshop with-
out exceeding 80 km/h (50 mph).
● Have the damaged tyre replaced. WARNING
Driving with an unsealed tyre is dangerous
and can c au
se accidents and serious injury.
● Do not continue driving if the tyre pressure
is 1.3
bar (19 psi / 130 kPa) and lower. ●
Seek s pec
ialist assistance. Manual unlocking/locking
Introduction Read the additional information carefully
›› ›
page 16,
›››
page 17.
The doors, rear lid and panoramic tilting sun-
roof can be locked manually and partially
opened, for example if the key or the central
locking is damaged. WARNING
Opening and closing doors carelessly can
cau se seriou
s injury.
● If the vehicle is locked from outside, the
doors and w
indows cannot be opened from
the inside.
● Never leave children or disabled people
alone in the car
. They could be trapped in the
car in an emergency and will not be able to
get themselves to safety.
● Depending on the time of the year, temper-
ature
s inside a locked and closed vehicle can
be extremely high or extremely low resulting
in serious injuries and illness or even death,
particularly for young children. WARNING
Getting in the way of the doors and the rear
lid is d
angerous and can lead to serious in-
jury.
● Open and close the doors and the rear lid
only when ther
e is nobody in the way. CAUTION
When opening and closing in an emergency,
car ef
ully disassemble components and then
reassemble them carefully to avoid damage
to the vehicle. Changing the windscreen wiper
b
la
des
Changing the windscreen and rear
window wiper blades Read the additional information carefully
› ›
›
page 71.
The windscreen wiper blades are supplied as
standard with a layer of graphite. This layer is
responsible for ensuring that the wipe is si-
lent. If the graphite layer is damaged, the
noise of the water as it is wiped across the
windscreen will be louder.
Check the condition of the wiper blades regu-
larly. If the wipers scrape across the glass ,»
97
Technical data
Advice
Operation
Emergencies
Safety
Page 100 of 348
Emergencies
they should be changed if they are damaged,
or c l
e
aned if they are dirty ››› .
Dam ag
ed w
indscreen wiper blades should be
replaced immediately. These are available
from qualified workshops. WARNING
Worn or dirty windscreen wiper blades reduce
vi s
ibility and increase the risk of accident
and serious injury.
● Always replace damaged or worn wind-
scr
een wiper blades or blades that no longer
clean the windscreen properly. CAUTION
● Damag ed or dir
ty windscreen wipers could
scratch the glass.
● If products containing solvents, rough
spong
es or sharp objects are used to clean
the blades, the graphite layer will be dam-
aged.
● Never use fuel, nail varnish remover, paint
thinner or simil
ar products to clean the win-
dows.
● In icy conditions, always check that the
wiper bl
ades are not frozen to the glass be-
fore using the wipers. In cold weather, it may
help to leave the vehicle parked with the wip-
ers in service position ›››
page 71. CAUTION
● To pr ev
ent damage to the bonnet and the
wiper arms, only leave them in the service
position.
● Before driving, always lower the wiper
arms. Tow-starting and towing
Introduction Tow-starting me
an
s
starting the engine of
the vehicle while another pulls it.
Towing means one vehicle pulling another
that is not roadworthy.
Always consider the legal provisions relating
to tow-starting and towing.
For technical reasons, towing a vehicle with a
discharged battery is not allowed. The jump
start should be used instead ›››
page 69.
If the vehicle comes with the Keyless Access
system, towing is only allowed with the igni-
tion on!
The vehicle battery drains if the vehicle is
towed with the engine switched off and the
ignition connected. Depending on the battery
charge status, the drop in voltage may be so
large, even after just a few minutes, that no
electrical device in the vehicle may work e.g. the hazard warning lights. In vehicles with
the Keyle
ss Access system, the steering
wheel could lock ››› .
WARNING
A vehicle with no power should never be tow-
ed.
● During towing, never switch off the ignition
with the s t
arter button. Otherwise, the elec-
tronic lock of the steering column could sud-
denly get blocked and it would be impossible
to steer the vehicle. This could cause an acci-
dent, serious injury and loss of control of the
vehicle.
● If during towing the vehicle runs out of
power
, stop towing immediately and request
the assistance of specialist personnel. WARNING
Vehicle handling and braking capacity
ch an
ge considerably during towing. Please
observe the following instructions to mini-
mise the risk of serious accidents and injury:
● As the driver of the vehicle being towed:
– You shoul
d depress the brake much hard-
er as the brake servo does not operate.
Pay the utmost attention to avoid crash-
ing into the towing vehicle.
– More strength is required at the steering
wheel as the power steering does not op-
erate when the engine is switched off.
● As the driver of the towing vehicle: 98
Page 101 of 348
Self-help
–
Ac c
elerate with particular care and cau-
tion.
– Avoid sudden braking and manoeuvres.
– Brake earlier than usual and more
smoothly. CAUTION
● To av oid d
amaging the vehicle, for example
the paint, remove and replace the lid and
towing eye carefully.
● Unburnt fuel could enter the catalytic con-
vert
er and damage it during towing. Indications for tow-starting
Vehicle's should not generally be tow-star-
t
ed.
The jump s
tart should be used instead
››› page 69.
For technical reasons, towing the following
vehicles is not allowed:
● Vehicles with an automatic gearbox.
● If the vehicle battery is discharged, be-
cause in
vehicles with the Keyless Access
locking and ignition system the steering re-
mains locked and the electronic parking
brake cannot be deactivated nor can the elec-
tronic lock of the steering column be re-
leased if they are activated. ●
If the batt
ery is flat, it is possible that the
engine control units may not operate correct-
ly.
However, if the vehicle must absolutely be
tow-started (in the case of manual gearbox-
es):
● Engage the 2nd or 3rd gear.
● Keep the clutch pressed down.
● Switch on the ignition and the hazard warn-
ing lights.
● Once both
vehicles are moving, release the
clutc
h.
● Once the engine starts, press the clutch
and diseng
age the gear to avoid colliding
with the towing vehicle. CAUTION
When tow-starting, unburnt fuel could enter
the cat a
lytic converter and damage it. Note
The vehicle can only be tow-started if the
electr onic
parking brake and, if appropriate,
the electronic lock of the steering column are
deactivated. If the vehicle has no power sup-
ply or there is an electric system fault, the
engine must be tow-started to deactivate the
electronic parking brake and the electronic
lock of the steering column. Indications for towing
Tow rope or tow bar
It i
s
safer for the vehicle to be towed using a
tow bar, avoiding damage to the vehicle. A
tow rope should only be used if a tow bar is
not available.
A tow rope should be slightly elastic to avoid
damage to both vehicles. It is advisable to
use a tow rope made of synthetic fibre or sim-
ilarly elastic material.
Only attach the tow rope or the tow bar to the
towing eyes provided or a towing bracket.
If the vehicle is factory-equipped with a tow-
ing bracket, it is only allowed to tow with a
tow bar if this has been specially designed to
be installed with a tow hitch ›››
page 276.
When the vehicle needs to be towed:
Check whether the vehicle may be towed
››› page 100, Cases where towing a vehicle
is not allowed .
● Switch the ignition on.
● Put the gearbox lever in neutral or the se-
lect or l
ever in the N ›››
page 192 position.
● Do not allow the vehicle to be towed at
speeds
of over 50 km/h (30 mph).
● The vehicle must not be towed further than
50 km (30 mil e
s). »
99
Technical data
Advice
Operation
Emergencies
Safety
Page 102 of 348
Emergencies
● If a br
e
akdown lorry is used, vehicles with
automatic transmission are only allowed to
be towed with the front wheels suspended.
Towing vehicles with four-wheel drive
(4Drive)
Four-wheel drive vehicles (4Drive) can be
towed using a tow bar or tow rope. If the ve-
hicle is towed with the front or rear axle sus-
pended, the engine must be switched off,
otherwise the transmission may be damaged.
Cases where towing a vehicle is not allowed
● If, due to a fault, the gearbox is out of lubri-
cant.
● If
the vehicle battery is discharged, be-
cause the s
teering remains locked and, if ap-
propriate, the electronic parking brake can-
not be deactivated or the electronic lock of
the steering column released.
● If a distance above 50 km needs to be trav-
elled.
● When, f
or example, after an accident, the
smooth rotation of
the wheels or the steering
operation cannot be guaranteed.
When the vehicle is to tow another vehicle:
● Observe legal requirements.
● Keep in mind the instructions in the man-
ual on to
wing vehicles. Note
The vehicle can only be towed if the electron-
ic p ark
ing brake and the electronic lock of the
steering column are deactivated. If the vehi-
cle has no power supply or there is an electric
system fault, the engine must be tow-started
››› page 69 to deactivate the electronic
parking brake and the electronic lock of the
steering column. Fitting the front towing eye
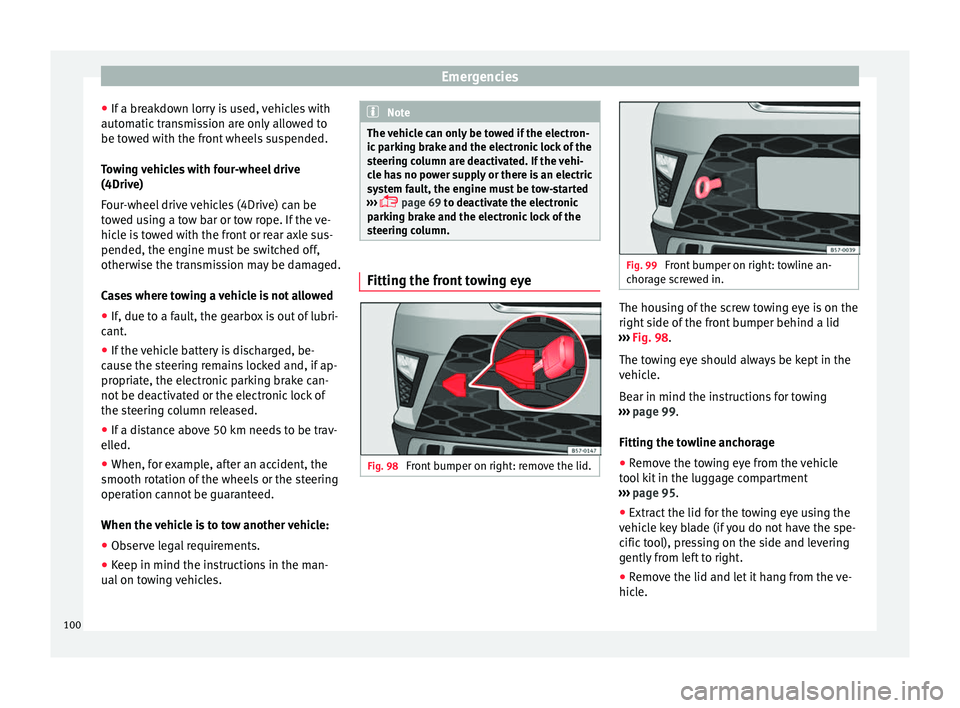
Fig. 98
Front bumper on right: remove the lid. Fig. 99
Front bumper on right: towline an-
chor ag
e screwed in. The housing of the screw towing eye is on the
right
s
ide of
the front bumper behind a lid
››› Fig. 98.
The towing eye should always be kept in the
vehicle.
Bear in mind the instructions for towing
››› page 99.
Fitting the towline anchorage
● Remove the towing eye from the vehicle
tool
kit in the luggage compartment
››› page 95.
● Extract the lid for the towing eye using the
vehicl
e key blade (if you do not have the spe-
cific tool), pressing on the side and levering
gently from left to right.
● Remove the lid and let it hang from the ve-
hicle.
100
Page 105 of 348
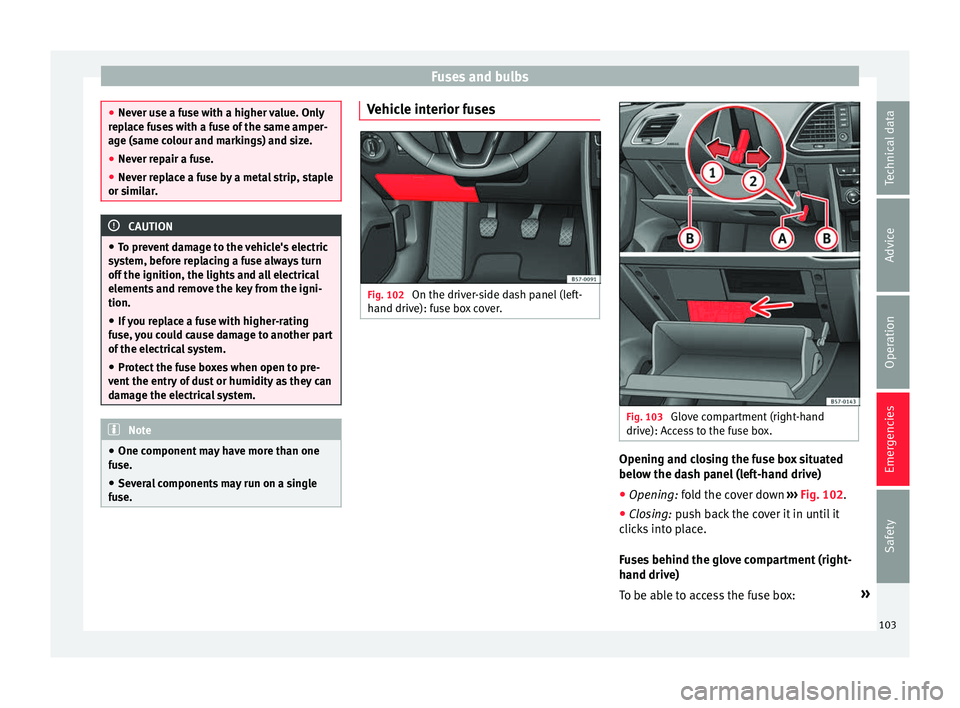
Fuses and bulbs
●
Never u se a f
use with a higher value. Only
replace fuses with a fuse of the same amper-
age (same colour and markings) and size.
● Never repair a fuse.
● Never replace a fuse by a metal strip, staple
or simil
ar. CAUTION
● To pr ev
ent damage to the vehicle's electric
system, before replacing a fuse always turn
off the ignition, the lights and all electrical
elements and remove the key from the igni-
tion.
● If you replace a fuse with higher-rating
fuse,
you could cause damage to another part
of the electrical system.
● Protect the fuse boxes when open to pre-
vent the entr
y of dust or humidity as they can
damage the electrical system. Note
● One component m
ay have more than one
fuse.
● Several components may run on a single
fuse. Vehicle interior fuses
Fig. 102
On the driver-side dash panel (left-
h and driv
e): f
use box cover. Fig. 103
Glove compartment (right-hand
driv e): A
c
cess to the fuse box. Opening and closing the fuse box situated
belo
w the d
a
sh panel (left-hand drive)
● Opening: fold the cover down ››
› Fig. 102.
● Closing: push back the cover it in until it
clic
ks into place.
Fuses behind the glove compartment (right-
hand drive)
To be able to access the fuse box: »
103
Technical data
Advice
Operation
Emergencies
Safety
Page 108 of 348

Emergencies
●
Ple a
se note that the above lists, while cor-
rect at the time of printing, are subject to
change. Changing a bulb
Topic intr
oductionRead the additional information carefully
›› ›
page 62.
Changing bulbs requires a certain degree of
practical skill.
If you choose to change the engine compart-
ment lamps yourself, remember that it is a
dangerous area ››› in Working in the en-
gine c omp
ar
tment on page 299.
Always use identical bulbs with the same
designation. The name can be found on the
base of the bulb holder.
Depending on how equipped the vehicle is,
there are different sets of headlights and tail
lights:
● Halogen headlights.
● Full-LED main headlights*
● Rear bulb light
● LED rear light* Full-LED headlight system*
Ful
l-LED headlights handle all light functions
(daylight, side light, turn signal, dipped
beam and route light) with light emitting di-
odes (LEDs) as a light source.
Full-LED headlights are designed to last the
lifetime of the car and light bulbs cannot be
replaced. In case of headlight failure, go to
an authorised workshop to have it replaced. WARNING
● Tak e p
articular care when working on com-
ponents in the engine compartment if the en-
gine is warm. Risk of burns.
● Bulbs are highly sensitive to pressure. The
glas
s can break when you touch the bulb,
causing injury.
● When changing bulbs, please take care not
to injure
yourself on sharp edges, in particu-
lar on the headlight housing. CAUTION
● Remo v
e the ignition key before working on
the electric system. Otherwise, a short circuit
could occur.
● Switch off the lights and the parking light
before c
hanging a bulb.
● Take good care to avoid damaging any com-
ponents. For the sake of the environment
Please ask your specialist retailer how to dis-
pose of u
sed bulbs in the proper manner. Note
● Ple a
se check at regular intervals that all
lighting (especially the exterior lighting) on
your vehicle is functioning properly. This is
not only in the interest of your own safety,
but also that of all other road users.
● Before changing a bulb, make sure you
have the c
orrect new bulb.
● Do not touch the glass part of the bulb with
your bar
e hands, use a cloth or paper towel
instead, since the fingerprints left on the
glass will vaporise as a result of the heat gen-
erated by the bulb, they will be deposited on
the reflector and will impair its surface.
● Depending on the level of equipment fitted
in the vehic
le, LEDs may be used for part or
all of the interior and/or exterior lighting.
LEDs have an estimated life that exceeds than
that of the car. If an LED light fails, go to an
authorised workshop for its replacement. 106