key Seat Ateca 2018 Owner's Manual
[x] Cancel search | Manufacturer: SEAT, Model Year: 2018, Model line: Ateca, Model: Seat Ateca 2018Pages: 348, PDF Size: 7.32 MB
Page 5 of 348
Frequently Asked Ques-
tion
sBefore driving
How do you adjust the seat?
››› page 18
How do you adjust the steering wheel? ››› page 20
How do you adjust the exterior mirrors? ››› page 20
How do you turn on the exterior lights? ››› page 30
How does the automatic gearbox selector lever work?
››› page 49
How do you refuel? ››› page 56
How do you activate the windscreen wipers and wind-
screen washer system? ››› page 32
Emergency situations
A warning lamp lights up or flashes. What does this
mean? ››› page 46
How do you open the bonnet? ››› page 17
How do you perform a jump start? ››› page 69
Where is the vehicle tool kit located? ››› page 64
How do you repair a tyre with the anti-puncture kit?
››› page 63
How do you change a wheel? ››› page 64
How do you change a fuse? ››› page 61
How do you change a light? ››› page 62
How do you tow a vehicle? ››› page 68
Useful tips
How do you set the time? ››› page 115
When should the vehicle inspection should be per-
formed? ››› page 43
What functions do the buttons/thumbwheels on the
steering wheel perform? ››› page 121
How do you remove the luggage compartment cover?
››› page 167
How do you drive in an economical and environmental-
ly-friendly way? ››› page 201
How do you check and top up the engine oil?
››› page 57
How do you check and top up the engine coolant?
››› page 58
How do you top up the windscreen washer fluid?
››› page 59
How do you check and top up the brake fluid?
››› page 59
How do you check and adjust tyre pressure values?
››› page 308
Vehicle washing tips ››› page 285
Functions of interest
Easy Connect, CAR menu ››› page 33
How does the START-STOP system work? ››› page 208
What parking assistants are available? ››› page 262
How does the rear assist work? ››› page 270
How does the adaptive cruise control work?
››› page 221
How can the SEAT driving mode be adjusted?
››› page 242
How does the lane departure warning system work?
››› page 230
How does tyre pressure monitoring work? ››› page 312
How do you open the vehicle without a key (Keyless Ac-
cess)? ››› page 129
Interior lighting and ambient light ››› page 152
Page 17 of 348
The essentials
How it works
Un loc
k
ing and locking
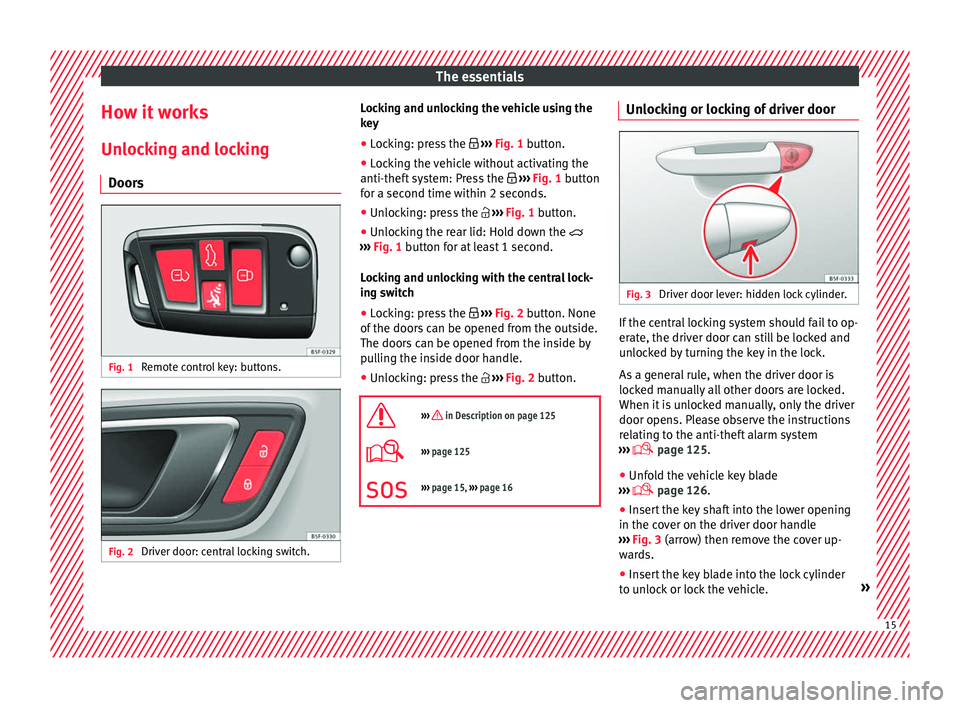
Doors Fig. 1
Remote control key: buttons. Fig. 2
Driver door: central locking switch. Locking and unlocking the vehicle using the
k
ey
● Loc
king: press the ›››
Fig. 1 button.
● Locking the vehicle without activating the
anti-theft sy
stem: Press the ››› Fig. 1 button
for a second time within 2 seconds.
● Unlocking: press the ›››
Fig. 1 button.
● Unlocking the rear lid: Hold down the
›››
Fig. 1 button for at least 1 second.
Locking and unlocking with the central lock-
ing switch
● Locking: press the ›››
Fig. 2 button. None
of the doors can be opened from the outside.
The doors can be opened from the inside by
pulling the inside door handle.
● Unlocking: press the ›››
Fig. 2 button.
››› in Description on page 125
››› page 125
››› page 15, ››› page 16 Unlocking or locking of driver door
Fig. 3
Driver door lever: hidden lock cylinder. If the central locking system should fail to op-
er
at
e, the driv
er door can still be locked and
unlocked by turning the key in the lock.
As a general rule, when the driver door is
locked manually all other doors are locked.
When it is unlocked manually, only the driver
door opens. Please observe the instructions
relating to the anti-theft alarm system
››› page 125.
● Unfold the vehicle key blade
›››
page 126.
● Insert the key shaft into the lower opening
in the cov
er on the driver door handle
››› Fig. 3 (arrow) then remove the cover up-
wards.
● Insert the key blade into the lock cylinder
to un
lock or lock the vehicle. » 15
Page 18 of 348
The essentials
Special Characteristics
● The anti-theft alarm will remain active when
v ehic
l
es are unlocked. However, the alarm
will not be triggered ›››
page 125.
● After the driver door is opened, you have
15 seconds
to switch on the ignition. Once
this time has elapsed, the alarm is triggered.
● Switch the ignition on. The electronic im-
mobi
lizer recognises a valid vehicle key and
deactivates the anti-theft alarm system. Note
The anti-theft alarm is not activated when the
vehic l
e is locked manually using the key
shaft ›››
page 125. Emergency locking of doors without
door cylinder
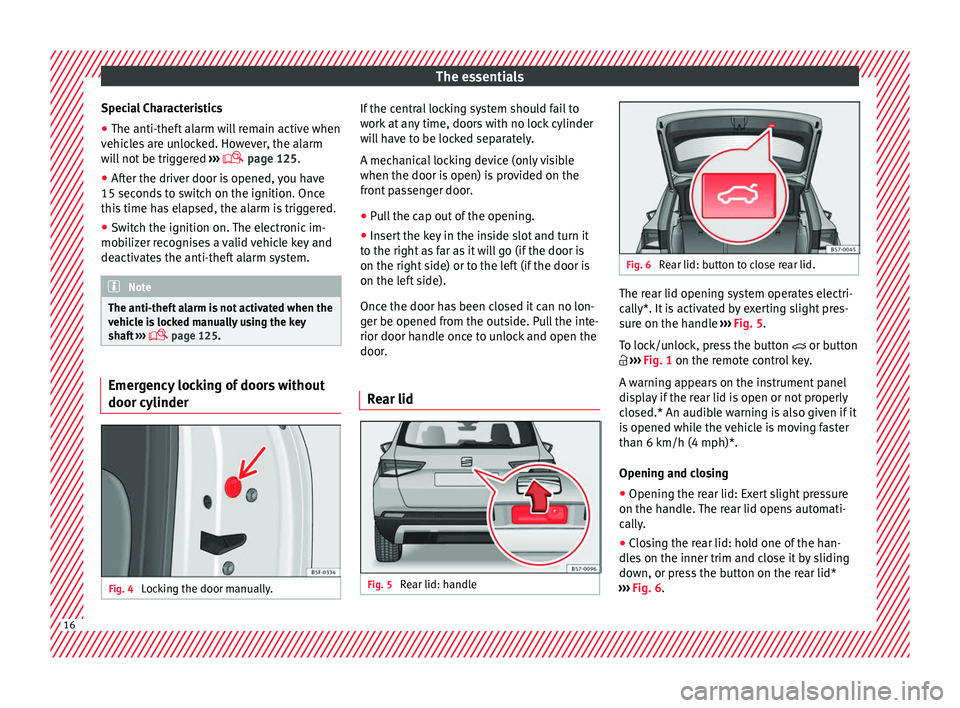
Fig. 4
Locking the door manually. If the central locking system should fail to
w
ork
at
any time, doors with no lock cylinder
will have to be locked separately.
A mechanical locking device (only visible
when the door is open) is provided on the
front passenger door.
● Pull the cap out of the opening.
● Insert the key in the inside slot and turn it
to the right a
s far as it will go (if the door is
on the right side) or to the left (if the door is
on the left side).
Once the door has been closed it can no lon-
ger be opened from the outside. Pull the inte-
rior door handle once to unlock and open the
door.
Rear lid Fig. 5
Rear lid: handle Fig. 6
Rear lid: button to close rear lid. The rear lid opening system operates electri-
c
al
ly*. It
is activated by exerting slight pres-
sure on the handle ››› Fig. 5.
To lock/unlock, press the button or button
››› Fig. 1 on the remote control key.
A warning appears on the instrument panel
display if the rear lid is open or not properly
closed.* An audible warning is also given if it
is opened while the vehicle is moving faster
than 6 km/h (4 mph)*.
Opening and closing
● Opening the rear lid: Exert slight pressure
on the handle.
The rear lid opens automati-
cally.
● Closing the rear lid: hold one of the han-
dles
on the inner trim and close it by sliding
down, or press the button on the rear lid*
››› Fig. 6.16
Page 19 of 348
The essentials
››› in Rear lid automatic locking on
page 139
››› page 137
››› page 17 Manual release mechanism for the
rear lid
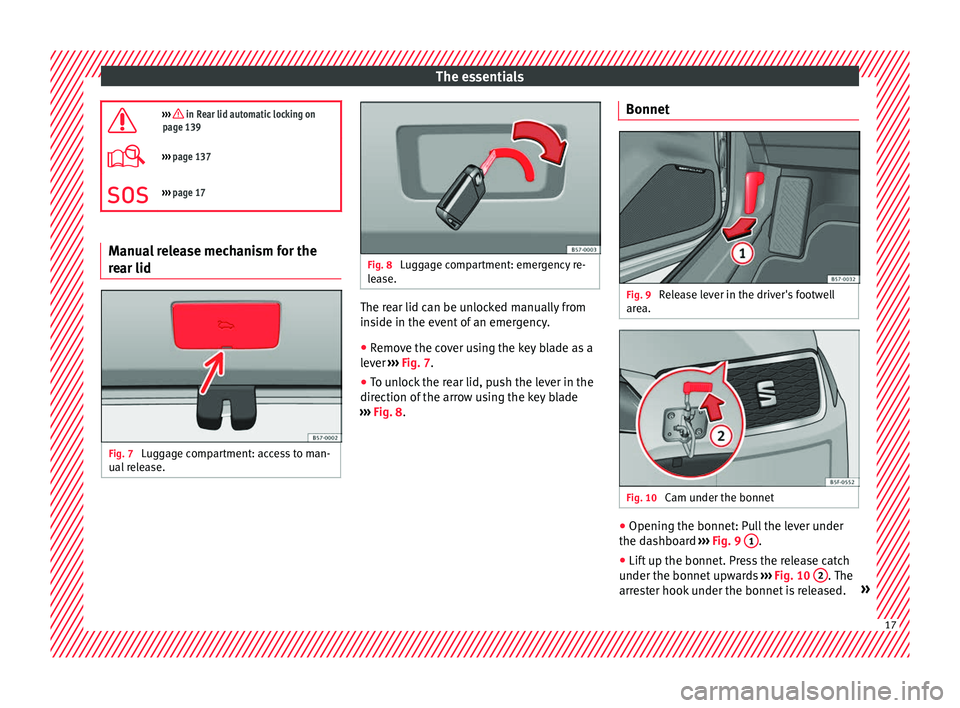
Fig. 7
Luggage compartment: access to man-
ual r
el
ease. Fig. 8
Luggage compartment: emergency re-
le a
se. The rear lid can be unlocked manually from
in
s
ide in the ev
ent of an emergency.
● Remove the cover using the key blade as a
lever ›
›› Fig. 7.
● To unlock the rear lid, push the lever in the
direction of the arr
ow using the key blade
››› Fig. 8. Bonnet Fig. 9
Release lever in the driver's footwell
ar e
a. Fig. 10
Cam under the bonnet ●
Opening the bonnet: Pull the lever under
the d a
shbo
ard ››› Fig. 9 1 .
● Lift up the bonnet. Press the release catch
u nder the bonnet
up
wards ››› Fig. 10 2 . The
arr e
s
ter hook under the bonnet is released. » 17
Page 24 of 348
The essentials
the event of a severe frontal collision ››
› in
Fr ont
airb
ags on page 86.
Their special design allows the controlled es-
cape of the propellant gas when an occupant
puts pressure on the bag. Thus, the head and
chest are protected by the airbag. After the
collision, the airbag deflates sufficiently to
allow visibility.
››› page 86 Deactivating the front passenger front
airb
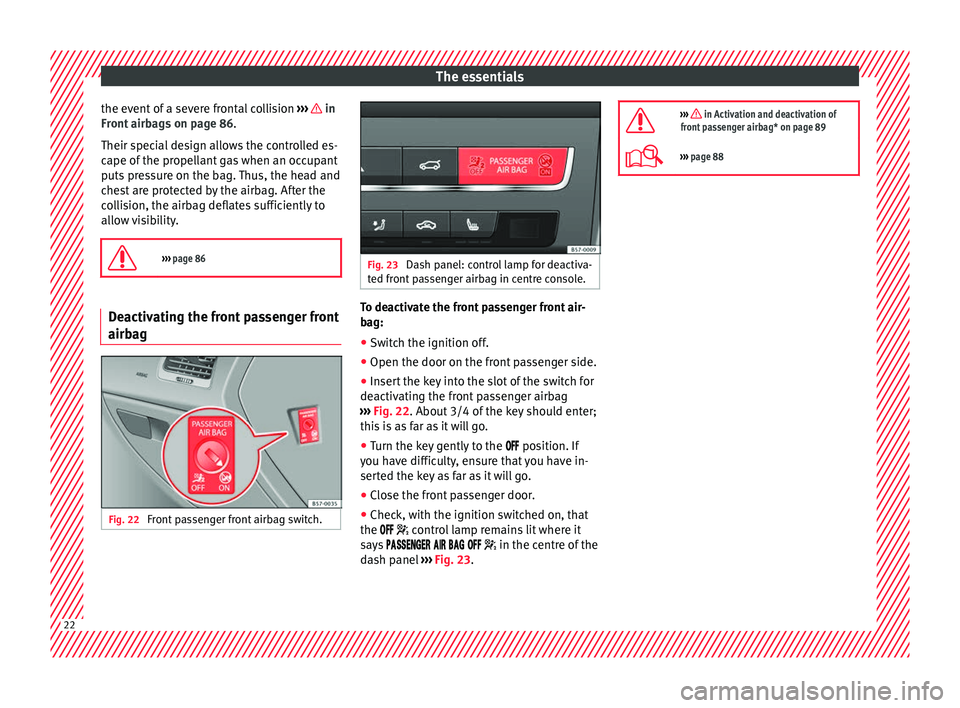
ag Fig. 22
Front passenger front airbag switch. Fig. 23
Dash panel: control lamp for deactiva-
ted fr ont
passenger airbag in centre console. To deactivate the front passenger front air-
b
ag:
● Sw it
ch the ignition off.
● Open the door on the front passenger side.
● Insert the key into the slot of the switch for
deactivatin
g the front passenger airbag
››› Fig. 22. About 3/4 of the key should enter;
this is as far as it will go.
● Turn the key gently to the position. If
y
ou have difficulty, ensure that you have in-
serted the key as far as it will go.
● Close the front passenger door.
● Check, with the ignition switched on, that
the contro
l lamp remains lit where it
says in the centre of the
dash panel ››› Fig. 23.
››› in Activation and deactivation of
front passenger airbag* on page 89
››› page 88 22
Page 32 of 348
The essentials
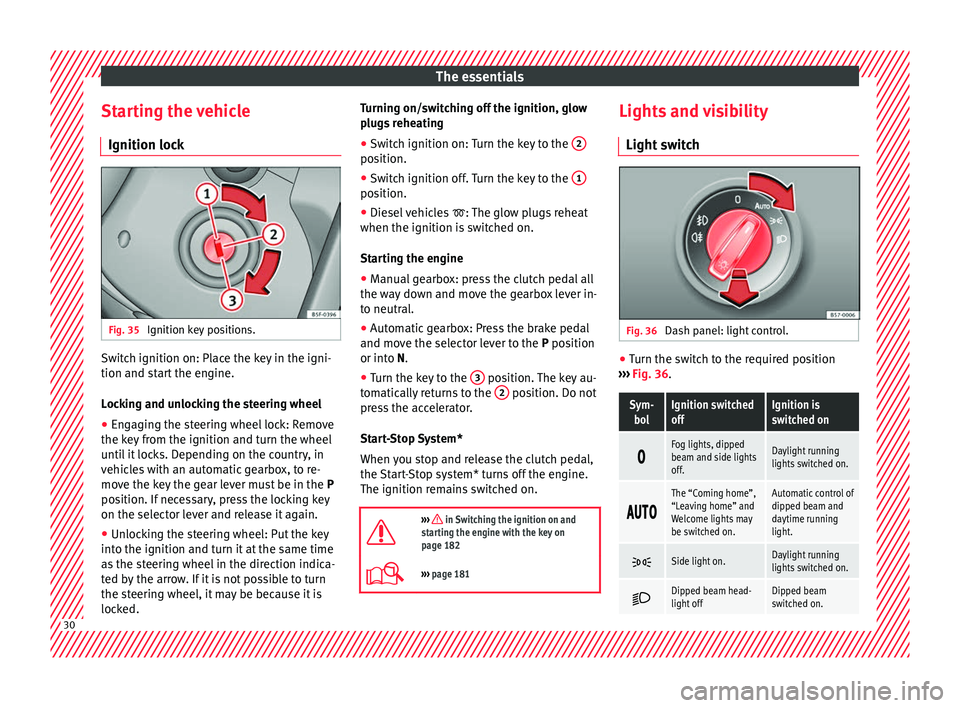
Starting the vehicle Ignition loc kFig. 35
Ignition key positions. Switch ignition on: Place the key in the igni-
tion and s
t
ar
t the engine.
Locking and unlocking the steering wheel
● Engaging the steering wheel lock: Remove
the key fr
om the ignition and turn the wheel
until it locks. Depending on the country, in
vehicles with an automatic gearbox, to re-
move the key the gear lever must be in the P
position. If necessary, press the locking key
on the selector lever and release it again.
● Unlocking the steering wheel: Put the key
into the ignition and turn it
at the same time
as the steering wheel in the direction indica-
ted by the arrow. If it is not possible to turn
the steering wheel, it may be because it is
locked. Turning on/switching off the ignition, glow
plugs
reheating
● Switch ignition on: Turn the key to the 2 position.
●
Switch ignition off. Turn the key to the 1 position.
●
Diesel vehicles : The glo
w p
lugs reheat
when the ignition is switched on.
Starting the engine
● Manual gearbox: press the clutch pedal all
the way
down and move the gearbox lever in-
to neutral.
● Automatic gearbox: Press the brake pedal
and move the sel
ector lever to the P position
or into N.
● Turn the key to the 3 position. The key au-
t om
atic
ally returns to the 2 position. Do not
pr e
s
s the accelerator.
Start-Stop System*
When you stop and release the clutch pedal,
the Start-Stop system* turns off the engine.
The ignition remains switched on.
››› in Switching the ignition on and
starting the engine with the key on
page 182
››› page 181 Lights and visibility
Light sw
it
ch Fig. 36
Dash panel: light control. ●
Turn the switch to the required position
› ›
›
Fig. 36.
Sym-
bolIgnition switched
offIgnition is
switched on
Fog lights, dipped
beam and side lights
off.Daylight running
lights switched on.
The “Coming home”,
“Leaving home” and
Welcome lights may
be switched on.Automatic control of
dipped beam and
daytime running
light.
Side light on.Daylight running
lights switched on.
Dipped beam head-
light offDipped beam
switched on.
30
Page 34 of 348
The essentialsKnobFunction
Central position
or
a)
Door contact switch-on.
The interior lights come on automati-
cally when the vehicle is unlocked, a
door is opened or the key is removed
from the ignition.
The light goes off a few seconds af-
ter all the doors are closed, the vehi-
cle is locked or the ignition is switch-
ed on.
Turning the reading light on and off
a)
Depending on version.
Ambient light*: light guide on door panel.
Lighting can be selected from 8 possible col-
ours via the menu and the
S
ET
TINGS func-
tion b utt
on.
››› page 152 Windscreen wipers and window wiper
b
l
a
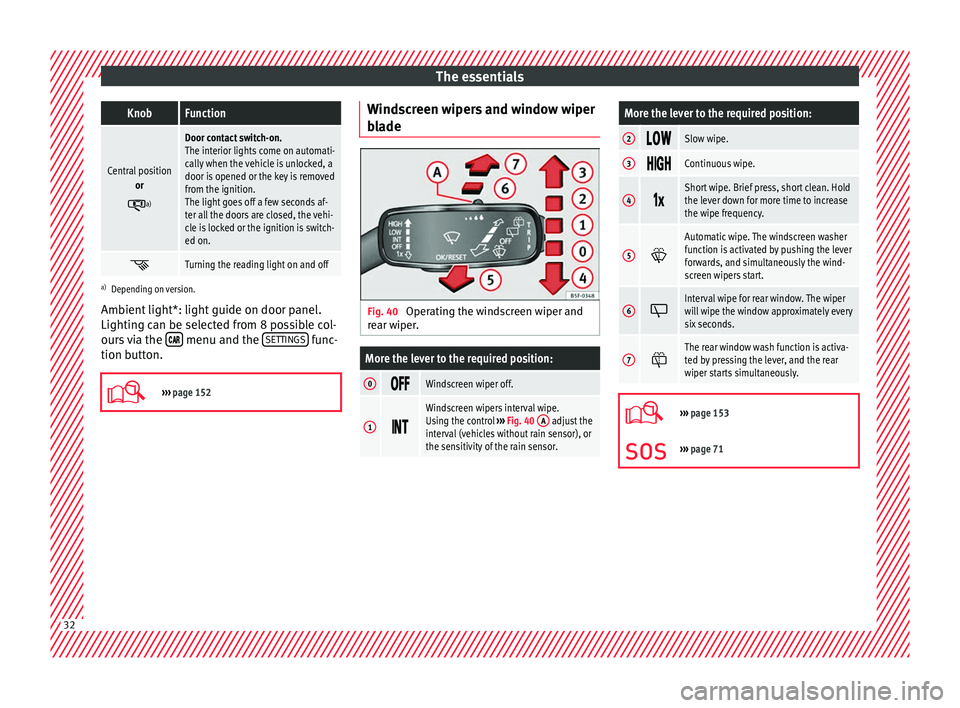
de Fig. 40
Operating the windscreen wiper and
r e
ar w
iper.
More the lever to the required position:
0 Windscreen wiper off.
1
Windscreen wipers interval wipe.
Using the control
››› Fig. 40 A adjust the
interval (vehicles without rain sensor), or
the sensitivity of the rain sensor.
More the lever to the required position:
2 Slow wipe.
3
Continuous wipe.
4
Short wipe. Brief press, short clean. Hold
the lever down for more time to increase
the wipe frequency.
5
Automatic wipe. The windscreen washer
function is activated by pushing the lever
forwards, and simultaneously the wind-
screen wipers start.
6
Interval wipe for rear window. The wiper
will wipe the window approximately every
six seconds.
7
The rear window wash function is activa-
ted by pressing the lever, and the rear
wiper starts simultaneously.
›››
page 153
››› page 71 32
Page 42 of 348
The essentialsMenuFunction
Detection of
traffic
signsDisplay of traffic signs ››› page 245:
Fatigue de-
tection *Switching the fatigue detection on
or off (pause recommendation)
››› page 248. Status display
Bonnet, r e
ar lid and door
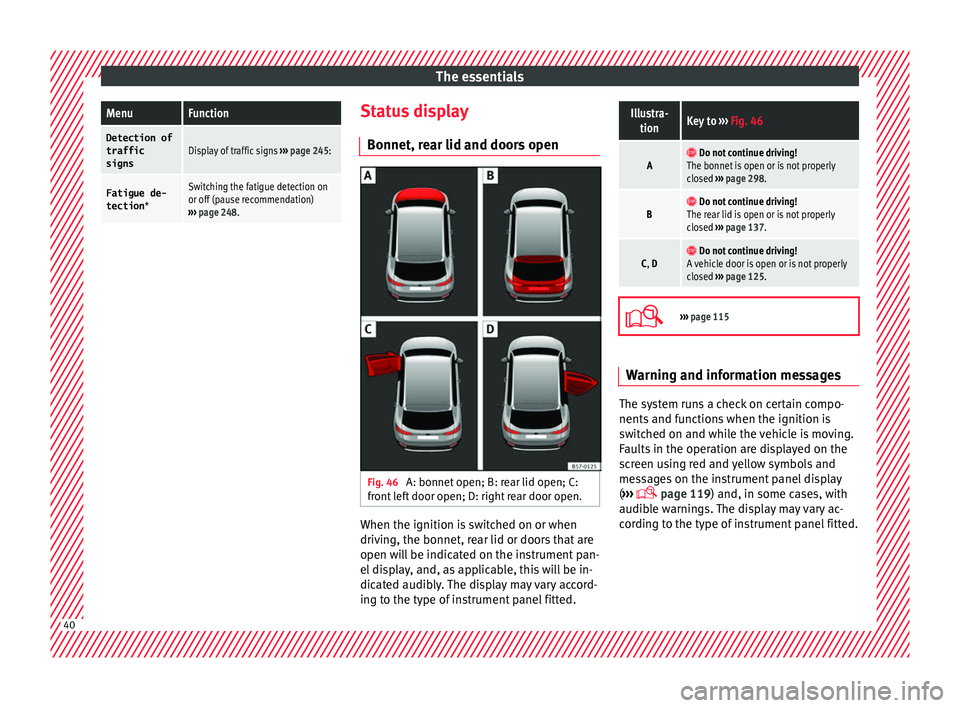
s open Fig. 46
A: bonnet open; B: rear lid open; C:
fr ont
l
eft door open; D: right rear door open. When the ignition is switched on or when
driv
in
g, the bonnet, r
ear lid or doors that are
open will be indicated on the instrument pan-
el display, and, as applicable, this will be in-
dicated audibly. The display may vary accord-
ing to the type of instrument panel fitted.
Illustra- tionKey to ››› Fig. 46
A Do not continue driving!
The bonnet is open or is not properly
closed ››› page 298.
B Do not continue driving!
The rear lid is open or is not properly
closed ››› page 137.
C, D Do not continue driving!
A vehicle door is open or is not properly
closed ››› page 125.
›››
page 115 Warning and information messages
The system runs a check on certain compo-
nents
and f
u
nctions when the ignition is
switched on and while the vehicle is moving.
Faults in the operation are displayed on the
screen using red and yellow symbols and
messages on the instrument panel display
( ›››
page 119) and, in some cases, with
audible warnings. The display may vary ac-
cording to the type of instrument panel fitted. 40
Page 87 of 348
Airbag system
travel on the rear seat. Never transport
chi
l
dren in the vehicle if they are not restrain-
ed or the restraint system is not appropriate
for their age, size or weight.
● If you are not wearing a seat belt, or if you
lean f
orward or to the side while travelling or
assume an incorrect sitting position, there is
a substantially increased risk of injury. This
increased risk of injury will be further in-
creased if you are struck by an inflating air-
bag.
● To reduce the risk of injury from an inflating
airbag, alw
ays wear the seat belt properly
››› page 79.
● Always adjust the front seats properly. Description of airbag system
Read the additional information carefully
› ›
›
page 21.
The airbag system is not a substitute for the
seat belts. The airbag system offers addition-
al protection for the driver and passenger in
combination with the seat belts.
The airbag system comprises the following
modules (as per vehicle equipment): ● Electronic control unit
● Front airbags for driver and passenger
● Knee airbag for the driver
● Side airbags ●
Head airb
ag
● Airbag control lamp on the instrument
p
anel ››› page 89
● Key-operated switch for front passenger air-
bag
● Contr
ol lamp for disabled/enabled status
of the front
passenger airbag.
The airbag system operation is monitored
electronically. The airbag control lamp will il-
luminate for a few seconds every time the ig-
nition is switched on (self-diagnosis).
There is a fault in the system if the control
lamp :
● does not light up when the ignition is
switc
hed on ››› page 89,
● turns off after 4 seconds after the ignition
is sw
itched on,
● turns off and then lights up again after the
ignition is sw
itched on,
● illuminates or flashes while the vehicle is
movin
g.
The airbag system is not triggered if:
● the ignition is switched off
● there is a minor frontal collision
● there is a minor side collision
● there is a rear-end collision
● the vehicle turns over. WARNING
● The seat belt
s and airbags can only provide
maximum protection if the occupants are
seated correctly ››› page 74, Correct position
of the vehicle occupants .
● If a fault has occurred in the airbag system,
have the sy
stem checked immediately by a
specialised workshop. Otherwise there is a
danger that during a collision, the system
may fail to trigger, or not trigger correctly. Airbag activation
The airbags deploy extremely rapidly, within
thou
s
andths
of a second, to provide addi-
tional protection in the event of an accident.
A fine dust may develop when the airbag de-
ploys. This is normal and it is not an indica-
tion of fire in the vehicle.
The airbag system is only ready to function
when the ignition is on.
In special accidents instances, several air-
bags may activate at the same time.
In the event of minor head-on and side colli-
sions, rear-end collisions, overturning or roll-
over of the vehicle, airbags do not activate.
Activation factors
The conditions that lead to the airbag system
activating in each situation cannot be gener-
alised. Some factors play an important role, »
85
Technical data
Advice
Operation
Emergencies
Safety
Page 88 of 348
Safety
such as the properties of the object the vehi-
c l
e hits
(hard/soft), angle of impact, vehicle
speed, etc.
Deceleration trajectory is key for airbag acti-
vation.
The control unit analyses the collision trajec-
tory and activates the respective restraint
system.
If the deceleration rate is below the prede-
fined reference value in the control unit the
airbags will not be triggered, even though
the accident may cause extensive damage to
the car.
The following airbags are triggered in seri-
ous head-on collisions:
● Driver airbag.
● Front passenger front airbag
● Knee airbag for the driver.
The fol
lowing airbags are triggered in seri-
ous side-on collisions:
● Front side airbag on the side of the acci-
dent.
● Cur
tain (head) airbag on the side of the ac-
cident.
In an ac
cident with airbag activation:
● the interior lights switch on (if the interior
light swit
ch is in the courtesy light position); ●
the hazar
d warning lights switch on;
● all doors are unlocked;
● the fuel supply to the engine is cut.
Airbag safety instructions Front airb
ags Read the additional information carefully
›› ›
page 21. WARNING
● The deplo yment
space between the front
passengers and the airbags must not in any
case be occupied by other passenger, pets
and objects.
● The airbags provide protection for just one
accident; r
eplace them once they have de-
ployed.
● It is also important not to attach any ob-
jects
such as cup holders or telephone
mountings to the surfaces covering the air-
bag units.
● Do not attempt to modify components of
the airbag sys
tem in any way. Knee airbag*
Read the additional information carefully
› ›
›
page 23. WARNING
● The knee airbag i s
deployed in front of the
driver's knees. Always keep the deployment
areas of the knee airbags free.
● Never not fix objects to the cover or in the
deployment
area of the knee airbag.
● Adjust the driver's seat so that there is a
dist
ance of at least 10 cm (4 inches) between
your knees and the location of the this air-
bag. If your physical constitution prevents
you from meeting these requirements, make
sure you contact a specialised workshop. Side airbags*
Read the additional information carefully
› ›
›
page 23. WARNING
● If y
ou do not wear a seat belt, if you lean
forward, or are not seated correctly while the
vehicle is in motion, you are at a greater risk
of injury if the side airbag system is triggered
in an accident.
● In order for the side airbags to provide their
maximum pr
otection, the prescribed sitting
position must always be maintained with
seat belts fastened while travelling.
● In a side-on collision the side airbags will
not work
if the sensors do not correctly meas-
ure the pressure increase on the interior of
the doors, due to air escaping through the 86