stop start Seat Ibiza SC 2009 User Guide
[x] Cancel search | Manufacturer: SEAT, Model Year: 2009, Model line: Ibiza SC, Model: Seat Ibiza SC 2009Pages: 257, PDF Size: 6.61 MB
Page 131 of 257
Driving129
Safety First
Controls and equipment
Practical tips
Technical Data
The immobiliser will be activated again automatically as soon as you pull the
key out of the ignition lock.
The engine can only be started using a genuine SEAT key with its correct code.
Note
A perfect operation of the vehicle is ensured if genuine SEAT keys are used.Starting and stopping the engineStarting petrol engines
The engine can only be started using a genuine SEAT key with
its correct code.– Move the gear lever to the neutral position and depress the
clutch pedal thoroughly and hold it in this position for the starter
to turn the engine on.
– Turn the ignition key to the starting position ⇒ page 128.
– Le t go o f the ig nit io n key as so on as the e ngin e star t s; t he sta r ter motor must not run on with the engine.After starting a very hot engine, you may need to slightly press down the
accelerator.
When starting a very cold engine, it may be a little noisy for the first few
seconds until oil pressure has built up in the hydraulic valve compensators.
This is quite normal, and no cause for concern. If the engine does not start immediately, switch the starter off after
10 seconds and try again after half a minute. If the engine still does not start,
the fuel pump fuse should be checked
⇒page 205, “Fuses”.
WARNING
•Never start or run the engine in unventilated or closed rooms. The
exhaust fumes contain carbon monoxide, an odourless and colourless
poisonous gas. Risk of fatal accidents. Carbon monoxide can cause loss of
consciousness. It can also cause death.•Never leave the vehicle unattended if the engine is running.•Never use “cold start sprays”, they could explode or cause the engine
to run at high revs. Risk of injury.Caution
•When the engine is cold, you should avoid high engine speeds, driving at
full throttle and over-loading the engine. Risk of engine damage.•The vehicle should not be pushed or towed more than 50 metres to start
the engine. Unburnt fuel could enter the catalytic converter and damage it.•Before attempting to push-start or tow a vehicle in order to start it, you
should first try to start it using the battery of another vehicle. Note and follow
the instructions ⇒page 218, “Jump-starting”.For the sake of the environment
Do not warm-up the engine by running the engine with the vehicle stationary.
You should drive off as soon as you start the engine. This helps the engine
reach operating temperature faster and reduces emissions.
IbizaSC_EN.book Seite 129 Mittwoch, 16. September 2009 12:11 12
Page 132 of 257
Driving
130Starting diesel engines
The engine can only be started using a genuine SEAT key with
its correct code.– Move the gear lever to the neutral position and depress the
clutch pedal thoroughly and hold it in this position for the starter
to turn the engine on.
– Turn the ignition key to the starting position.
– Turn the ignition key to position ⇒page 128, fig. 94 . The
indication lamp
will light for engine pre-heating.
– When the warning lamp turns off, turn the key to position to start the engine. Do not press the accelerator.
– Let go of the ignition key as soon as the engine starts, the starter motor must not be allowed to run on with the engine.
When starting a very cold engine, it may be a little noisy for the first few
seconds until oil pressure has built up in the hydraulic valve compensators.
This is quite normal, and no cause for concern.
If there are problems starting the engine, see the ⇒page 218.
Glow plug system for the diesel engine
To avoid unnecessary discharging of the battery, do not use any other major
electrical equipment while the glow plugs are pre-heating.
Start the engine as soon as the glow plug warning lamp goes out.
Starting the engine after the fuel tank has been completely run dry
If the fuel tank has been completely run dry, it may take longer than normal
(up to one minute) to start the engine after refuelling with diesel fuel. This is
because the system must eliminate air first.
WARNING
•Never start or run the engine in un ventilated or closed rooms. The
exhaust fumes contain carbon monoxide, an odourless and colourless
poisonous gas. Risk of fatal accidents. Carbon monoxide can cause loss of
consciousness. It can also cause death.•Never leave the vehicle unattended if the engine is running.•Never use “cold start sprays”, they could explode or cause the engine
to run at high revs. Risk of injury.Caution
•When the engine is cold, you should avoid high engine speeds, driving at
full throttle and over-loading the engine. Risk of engine damage.•The vehicle should not be pushed or towed more than 50 metres to start
the engine. Unburnt fuel could enter the catalytic converter and damage it.•Before attempting to push-start or tow a vehicle in order to start it, you
should first try to start it using the battery of another vehicle. Note and follow
the instructions ⇒page 218, “Jump-starting”.For the sake of the environment
Do not warm-up the engine by running the engine with the vehicle stationary.
You should drive off as soon as you start the engine. This helps the engine
reach operating temperature faster and reduces emissions.Switching the engine off– Stop the engine.
– Turn the ignition key to position ⇒page 128, fig. 94 .
A2A3
A1
IbizaSC_EN.book Seite 130 Mittwoch, 16. September 2009 12:11 12
Page 136 of 257
Driving
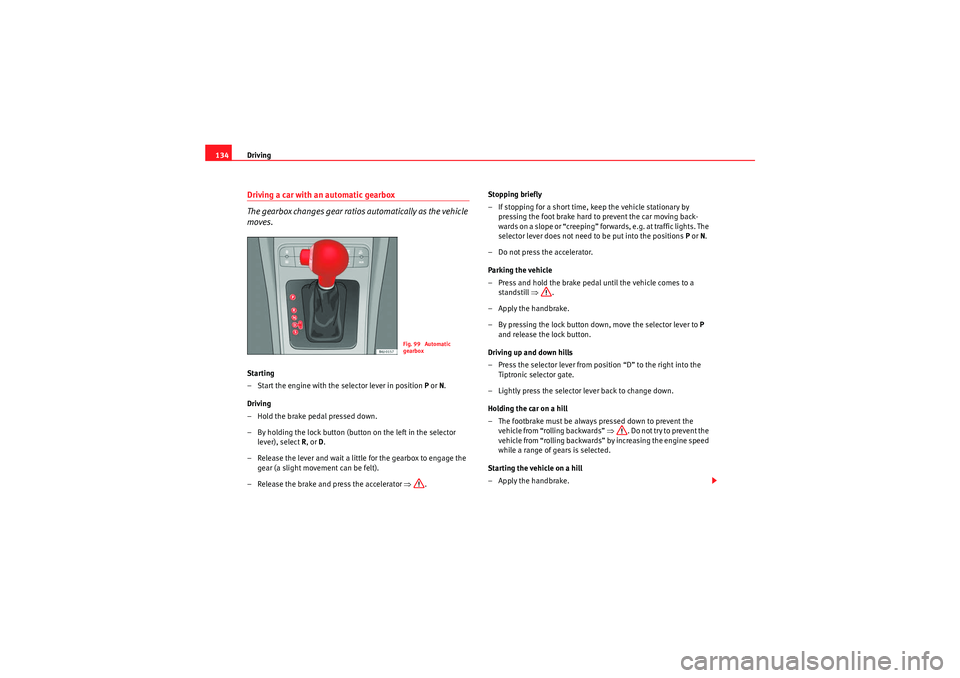
134Driving a car with an automatic gearbox
The gearbox changes gear ratios automatically as the vehicle
moves.Starting
– Start the engine with the selector lever in position P or N.
Driving
– Hold the brake pedal pressed down.
– By holding the lock button (button on the left in the selector lever), select R, or D.
– Release the lever and wait a little for the gearbox to engage the gear (a slight movement can be felt).
– Release the brake and press the accelerator ⇒. Stopping briefly
– If stopping for a short time, keep the vehicle stationary by
pressing the foot brake hard to prevent the car moving back-
wards on a slope or “creeping” forwards, e.g. at traffic lights. The
selector lever does not need to be put into the positions P or N.
– Do not press the accelerator.
Parking the vehicle
– Press and hold the brake pedal until the vehicle comes to a standstill ⇒.
– Apply the handbrake.
– By pressing the lock button down, move the selector lever to P
and release the lock button.
Driving up and down hills
– Press the selector lever from position “D” to the right into the Tiptronic selector gate.
– Lightly press the selector lever back to change down.
Holding the car on a hill
– The footbrake must be always pressed down to prevent the vehicle from “rolling backwards” ⇒. Do not try to prevent the
vehicle from “rolling backwards” by increasing the engine speed
while a range of gears is selected.
Starting the vehicle on a hill
– Apply the handbrake.
Fig. 99 Automatic
gearbox
IbizaSC_EN.book Seite 134 Mittwoch, 16. September 2009 12:11 12
Page 140 of 257
Driving
138•The wiper starts if the windscreen washer is on.•The parking distance warning system switches on.*
N - Neutral (idling)
If this position is selected, the gearbox is in neutral. Power is not transmitted
to the wheels and the engine does not have a braking function.
Never use the N position to drive down a hill. The engine does not function as
a brake and the brakes are subjected to excessive stain.
You could damage the automatic gearbox if you drive down hills with the
selector lever in position N and the engine switched off.
D - Drive (forwards)
In this position the gearbox automatically changes to a lower or higher gear,
according to the engine's demand, driving style and speed. The braking
effect of the engine when driving downhill is ver y limited when the selector is
in this position. The instrument panel screen displays the selected gear as
well as the selector lever in position D .
If position N has been selected and you wish to select D, you must press the
foot brake if the vehicle is stationary, or travelling at under 5 km/h.
S - Standard driving position (Sport programme)
When the selector lever is in position S, it will automatically change up into a
higher gear later, and change down into a low gear, if compared with position
D . This way, it is possible to take full advantage of the engine reserve power,
depending on the engine demand, driving style and speed. The braking
effect of the engine when driving downhill is very limited. On the instrument
panel screen the selected gear is shown as well as the selector lever to posi-
tion S.
To se lec t gea r range S, press the lock button on the selector lever.
WARNING
If the vehicle moves with no control, an accident and serious injury may
occur.•As a driver, you should never leave your vehicle if the engine is running
and a gear is engaged. If you have to leave your vehicle while the engine is
running, you must always apply the parking brake and engage parking lock
P.•If the engine is running and if D or R are engaged, you will need to hold
the vehicle stopped by depressing footbrake down. The car would creep
forward as the power transmission is not fully interrupted even when the
engine is idling.•Never accelerate when changing gear or you may cause an accident.•Never move the selector lever to “R” or “P” when driving. Risk of acci-
dent.•Before driving down a very steep slope, reduce your speed and shift to
position 1st.•Always hold the vehicle on the foot brake if you stop uphill. Otherwise,
the vehicle could roll back.•Never allow the brake to rub and do not use the brake pedal too often
or for long periods. Constant braking will cause the brakes to overheat and
will considerably reduce the brake effect. This increases the braking
distance and could cause the brake system to fail.WARNING
Never switch the engine off until the vehicle is stationary. You could lose
control of your vehicle. This could cause an accident and serious injury.•The airbags and belt tensioners do not work when the ignition is
switched off.•The brake servo does not work when the engine is not running. You
need more force to stop the vehicle.
IbizaSC_EN.book Seite 138 Mittwoch, 16. September 2009 12:11 12
Page 142 of 257
Driving
140
Always apply the handbrake when you leave your vehicle and when
you park.
Applying the handbrake
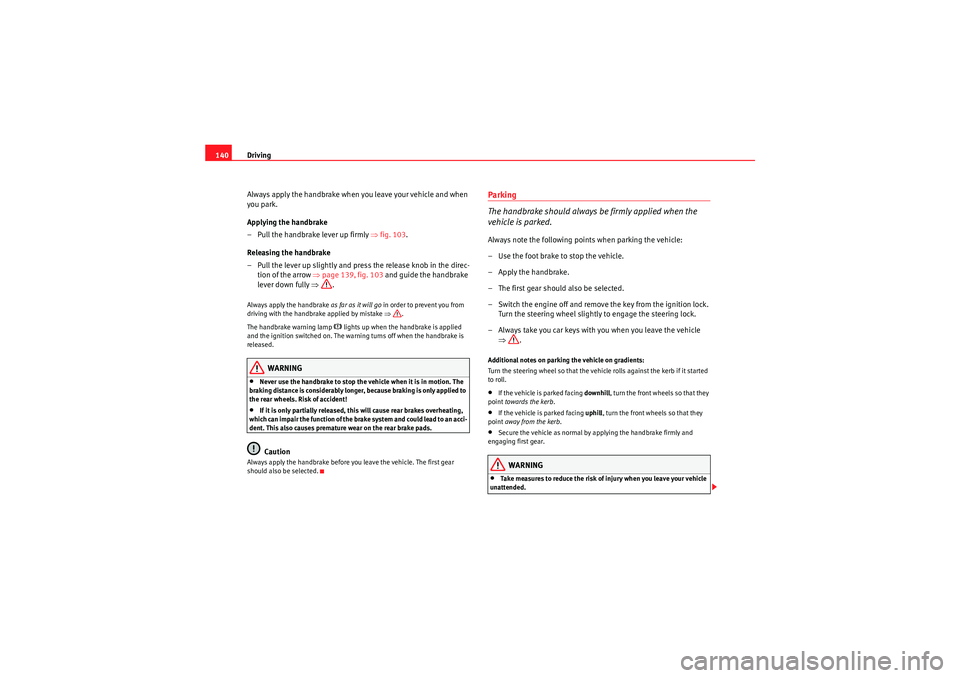
– Pull the handbrake lever up firmly ⇒fig. 103 .
Releasing the handbrake
– Pull the lever up slightly and press the release knob in the direc- tion of the arrow ⇒page 139, fig. 103 and guide the handbrake
lever down fully ⇒.Always apply the handbrake as far as it will go in order to prevent you from
driving with the handbrake applied by mistake ⇒.
The handbrake warning lamp
lights up when the handbrake is applied
and the ignition switched on. The warning turns off when the handbrake is
released.
WARNING
•Never use the handbrake to stop the vehicle when it is in motion. The
braking distance is considerably longer, because braking is only applied to
the rear wheels. Risk of accident!•If it is only partially released, this will cause rear brakes overheating,
which can impair the function of the brake system and could lead to an acci-
dent. This also causes premature wear on the rear brake pads.Caution
Always apply the handbrake before you leave the vehicle. The first gear
should also be selected.
Parking
The handbrake should always be firmly applied when the
vehicle is parked.Always note the following points when parking the vehicle:
– Use the foot brake to stop the vehicle.
– Apply the handbrake.
– The first gear should also be selected.
– Switch the engine off and remove the key from the ignition lock. Turn the steering wheel slightly to engage the steering lock.
– Always take you car keys with you when you leave the vehicle ⇒ .Additional notes on parking the vehicle on gradients:
Turn the steering wheel so that the vehicle rolls against the kerb if it started
to roll.•If the vehicle is parked facing downhill , turn the front wheels so that they
point towards the kerb .•If the vehicle is parked facing uphill, turn the front wheels so that they
point away from the kerb .•Secure the vehicle as normal by applying the handbrake firmly and
engaging first gear.WARNING
•Take measures to reduce the risk of injury when you leave your vehicle
unattended.
IbizaSC_EN.book Seite 140 Mittwoch, 16. September 2009 12:11 12
Page 144 of 257
Driving
142Reverse gear
The distance warning will begin as soon as an obstacle is detected by the
system. The frequency of the bleeps emitted by the system will increase
rapidly as the vehicle approaches the obstacle.
Within a short distance of about 30 cm, a continuous signal sounds (stop
signal). The driver should not reverse any further.
Models with a factory-fitted towing bracket: When the vehicle is less than
0.35 m away from the obstacle the warning tone will sound continuously. The
driver should then not reverse any further.
The warning tone decreases by 30% after 3 seconds from the start of the
system.
Provided that it is not in continuous mode, the tone on the parking aid system
stops when it detects a wall parallel to the vehicle.
Trailer towing
For factory-fitted vehicles with a towing bar, the parking aid system will not
be activated by the engagement of the reverse gear when pulling a trailer, as
the trailer's electric connector will be plugged into the vehicle.
Possible faults
If a continuous bleep sounds for some seconds when the reverse gear is
engaged, this indicates that there is a fault in the parking aid system.
If the fault continues until the ignition is turned off, the acoustic signal
warning of the fault will not be emitted every time the system is reactivated
(by engaging the reverse gear). Thus, the system ready indication will not
sound either. Have the fault repaired by an Authorised Service Centre as soon
as possible.
If there is no ready signal or no acoustic warning signal, then the parking aid
loudspeaker is faulty and may not warn of obstacles.
To ensure that the system works properly, the sensors must be kept clean and
free of ice and snow.
WARNING
•The sensors have blind spots in which obstacles may not be detected.•Always look out for small children and animals because the system will
not always detect them. Always pay attention when reversing to avoid acci-
dents.•The parking aid is not a replacement for driver awareness. The driver
must take full responsibility for parking and other manoeuvres.Caution
•Please note that low obstacles detected by the system may no longer be
registered by the sensors as the car moves closer, so the system will not give
any further warning. Certain kinds of obstacles (such as wire fences, chains,
thin posts or trailer draw bars, high kerbs or painted railings etc) may not
always be detected by the system, so there is a risk of damaging the vehicle
in such cases.•In some cases, obstacles with uniform edges and bumps may not be
detected immediately by the system due to their geometry. Take special care
of this type of obstacle such as corners, rectangular objects, etc.., these can
cause damage to the vehicle.•Be especially careful when manoeuvring into a corner between two
perpendicular walls. Survey the approach of the wall to the side of the vehicle
(using the mirrors)•The parking aid system does not replace use of the mirrors for manoeu-
vres.•Distant ultra-sonic sources (hammers, tyres, construction machinery,
other vehicles with PDC) may interfere with the operation of the system.•Periodic cleaning of the sensors, take care not to damage or scratch them.
When cleaning with high pressure washers or steam cleaners, the sensors
should be sprayed for only a very short period and from a distance of more
than 10 cm.
IbizaSC_EN.book Seite 142 Mittwoch, 16. September 2009 12:11 12
Page 181 of 257
Checking and refilling levels179
Safety First
Controls and equipment
Practical tips
Technical Data
•Wait until no more steam, smoke or coolant is emitted from the bonnet,
then carefully open the bonnet.•When working in the engine compartment, always observe the safety
warnings ⇒page 176.
Closing the bonnet– Slightly raise the bonnet
– Release the bonnet stay and replace it in its support.
– At a height of about 30 cm let it fall so it is locked.If the bonnet does not close, do not press downwards. Open it once more and
let it fall as before.
WARNING
If the bonnet is not closed properly, it could open while you are driving and
completely obscure your view of the road. Risk of accident.•After closing the bonnet, always check that it is properly secured. The
bonnet must be flush with the surrounding body panels.•If you notice that the bonnet latch is not secured when the vehicle is
moving, stop the vehicle immediately and close the bonnet properly. Risk
of accident.
Engine oilEngine oil specifications
The engine oil used must conform with exact specifications.Specifications
The engine comes with a special, high quality, multi grade oil that can be
used in all seasons of the year except for those regions affected by extreme
cold.
As the use of good quality oil is necessary for the correct operation and long
service life of the engine, when it becomes necessary to replenish or change
the oil, always use an oil that complies to the VW standards.
If it is not possible to find oil conforming to the VW standards then oil
conforming to the ACEA or API standards with an appropriate viscosity at
atmospheric temperature should be used instead. The use of this type of oil
may have some repercussions on the performance of the engine for example,
long starting time, increased consumption and a higher emission level.
If a top up is required then different oils may be mixed as long as they all
conform to the VW standards.
The specifications (VW standards) set out in the following page should
appear on the container of the service oil; the container will display together
the different standards for petrol and diesel engines, the oil can be used for
both types of engines.
WARNING (continued)
IbizaSC_EN.book Seite 179 Mittwoch, 16. September 2009 12:11 12
Page 183 of 257
Checking and refilling levels181
Safety First
Controls and equipment
Practical tips
Technical Data
Checking oil level
– Park the vehicle in a horizontal position.
– Briefly run the engine at idle speed until the service temperature
is reached then stop.
– Wait two minutes.
– Pull out the dipstick. Wipe the dipstick with a clean cloth and insert it again, pushing it in as far as it will go.
– Then pull it out once more and check the oil level ⇒ page 180,
fig. 114. Top up with engine oil if necessary.Oil level in area
–Do not add oil.
Oil level in area
–Oil can be topped up. The indicated oil level should afterwards be in
zone .
Oil level in area
–Oil must be topped up. The indicated oil level should afterwards be in
zone .
Depending on how you drive and the conditions in which the car is used, oil
consumption can be up to 0.5 l/1,000 km. Oil consumption is likely to be
higher for the first 5,000 km. For this reason the engine oil level must be
checked at regular intervals, preferably when filling the tank and before a
journey.
WARNING
Any work carried out in the engine compartment or on the engine must be
carried out cautiously.
•When working in the engine compartment, always observe the safety
warnings ⇒page 176.Caution
If the oil level is above the area do not start the engine. This could result
in damage to the engine and catalytic converter. Contact an Authorised
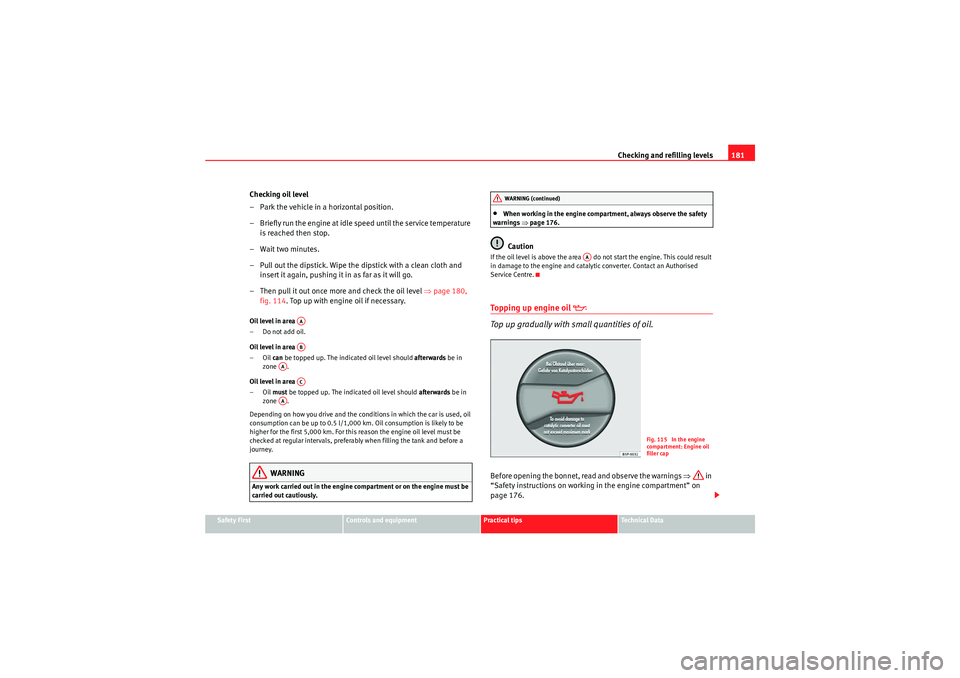
Service Centre.Topping up engine oil
Top up gradually with small quantities of oil.
Before opening the bonnet, read and observe the warnings ⇒ in
“Safety instructions on working in the engine compartment” on
page 176.
AAAB
AA
AC
AA
WARNING (continued)
AA
Fig. 115 In the engine
compartment: Engine oil
filler cap
IbizaSC_EN.book Seite 181 Mittwoch, 16. September 2009 12:11 12
Page 194 of 257
Checking and refilling levels
192New tyres
New tyres must be run in ⇒page 152.
The tread depth of new tyres may vary, according to the type and make of tyre
and the tread pattern.
Concealed damage
Damage to tyres and rims is often not readily visible. If you notice unusual
vibrations or the car pulling to one side, this may indicate that one of the tyres
is damaged. The tyres should be checked immediately by an Authorised
Service Centre.
Tyres with directional tread pattern
An arrow on the tyre sidewall indicates the direction of rotation on tyres with
directional tread. Always observe the direction of rotation indicated when
fitting the wheel. This guarantees optimum grip and helps to avoid aqua-
planing, excessive noise and wear.
WARNING
•New tyres do not have maximum grip in the first 500 km. Drive particu-
larly carefully to avoid risk of accident.•Never drive with damaged tyres. This may cause an accident.•If you notice unusual vibration or if the vehicle pulls to one side when
driving, stop the vehicle immediately and check the tyres for damage.
Checking tyre pressure
The correct tyre pressure can be seen on the sticker on the
inside of the tank flap.1. Read the required tyre inflation pressure from the sticker. The values refer to Summer tyres. 2. The tyre pressures should only be checked when the tyres are
cold. The slightly raised pressu res of warm tyres must not be
reduced.
3. Adjust the tyre pressure to the load you are carrying.
Tyre pressure
The correct tyre pressure is especially important at high speeds. The pressure
should therefore be checked at least once a month and before starting a
journey.
WARNING
A tyre can easily burst if the pressure is too low, causing an accident!•At continuously high speeds, a tyre with insufficient pressure flexes
more. In this way it becomes too hot, and this can cause tread separation
and tyre blow-out. Always observe the recommended tyre pressures.•If the tyre pressure is too low or too high, the tyres will wear prema-
turely and the vehicle will not handle well. Risk of accident!For the sake of the environment
Under-inflated tyres will increase fuel consumption.
IbizaSC_EN.book Seite 192 Mittwoch, 16. September 2009 12:11 12