Seat Ibiza ST 2012 Owner's manual
Manufacturer: SEAT, Model Year: 2012, Model line: Ibiza ST, Model: Seat Ibiza ST 2012Pages: 282, PDF Size: 3.77 MB
Page 241 of 282
239
If and when
– Raise the bonnet.
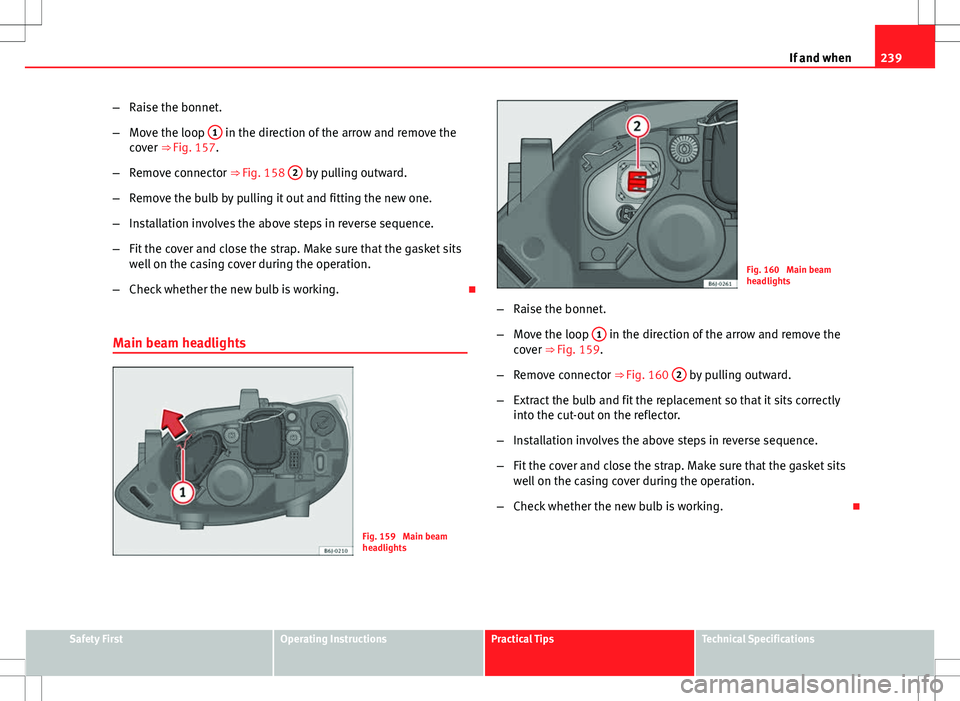
– Move the loop 1
in the direction of the arrow and remove the
cover ⇒ Fig. 157.
– Remove connector ⇒ Fig. 158 2
by pulling outward.
– Remove the bulb by pulling it out and fitting the new one.
– Installation involves the above steps in reverse sequence.
– Fit the cover and close the strap. Make sure that the gasket sits
well on the casing cover during the operation.
– Check whether the new bulb is working.
Main beam headlights
Fig. 159 Main beam
headlights
Fig. 160 Main beam
headlights
– Raise the bonnet.
– Move the loop 1
in the direction of the arrow and remove the
cover ⇒ Fig. 159.
– Remove connector ⇒ Fig. 160 2
by pulling outward.
– Extract the bulb and fit the replacement so that it sits correctly
into the cut-out on the reflector.
– Installation involves the above steps in reverse sequence.
– Fit the cover and close the strap. Make sure that the gasket sits
well on the casing cover during the operation.
– Check whether the new bulb is working.
Safety FirstOperating InstructionsPractical TipsTechnical Specifications
Page 242 of 282
240If and when
Dipped beam headlights
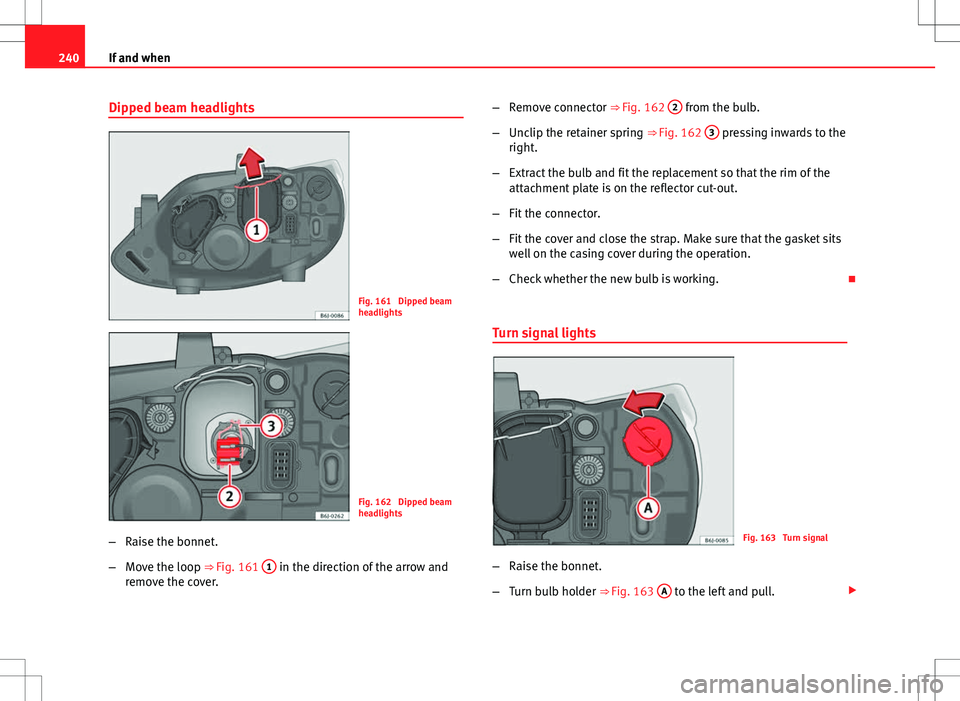
Fig. 161 Dipped beam
headlights
Fig. 162 Dipped beam
headlights
– Raise the bonnet.
– Move the loop ⇒ Fig. 161 1
in the direction of the arrow and
remove the cover. –
Remove connector ⇒ Fig. 162 2
from the bulb.
– Unclip the retainer spring ⇒ Fig. 162 3
pressing inwards to the
right.
– Extract the bulb and fit the replacement so that the rim of the
attachment plate is on the reflector cut-out.
– Fit the connector.
– Fit the cover and close the strap. Make sure that the gasket sits
well on the casing cover during the operation.
– Check whether the new bulb is working.
Turn signal lights
Fig. 163 Turn signal
– Raise the bonnet.
– Turn bulb holder ⇒ Fig. 163 A
to the left and pull.
Page 243 of 282
241
If and when
– Remove the bulb by pressing on the bulb holder and rotating at
the same time to the left.
– Installation involves the above steps in reverse sequence.
Safety FirstOperating InstructionsPractical TipsTechnical Specifications
Page 244 of 282
242If and when
Changing the bulbs of AFS headlights
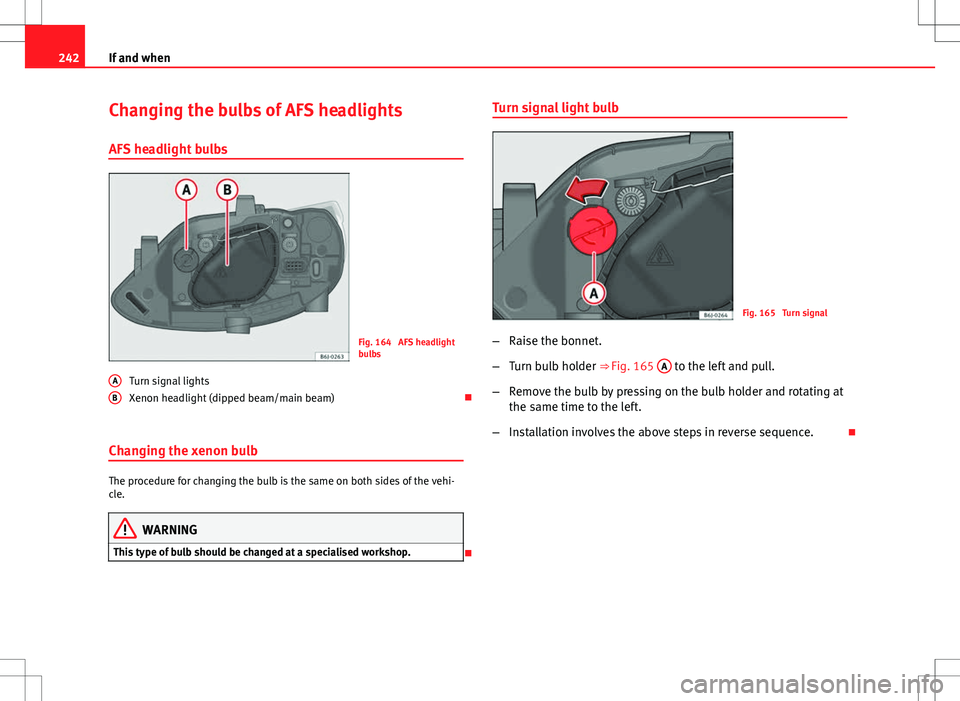
AFS headlight bulbs
Fig. 164 AFS headlight
bulbs
Turn signal lights
Xenon headlight (dipped beam/main beam)
Changing the xenon bulb
The procedure for changing the bulb is the same on both sides of the vehi-
cle.
WARNING
This type of bulb should be changed at a specialised workshop.
A
B
Turn signal light bulb
Fig. 165 Turn signal
– Raise the bonnet.
– Turn bulb holder ⇒ Fig. 165 A
to the left and pull.
– Remove the bulb by pressing on the bulb holder and rotating at
the same time to the left.
– Installation involves the above steps in reverse sequence.
Page 245 of 282
243
If and when
Changing the fog light bulbs
Fog light bulb
Fig. 166 Fog light
Fig. 167 Fog light –
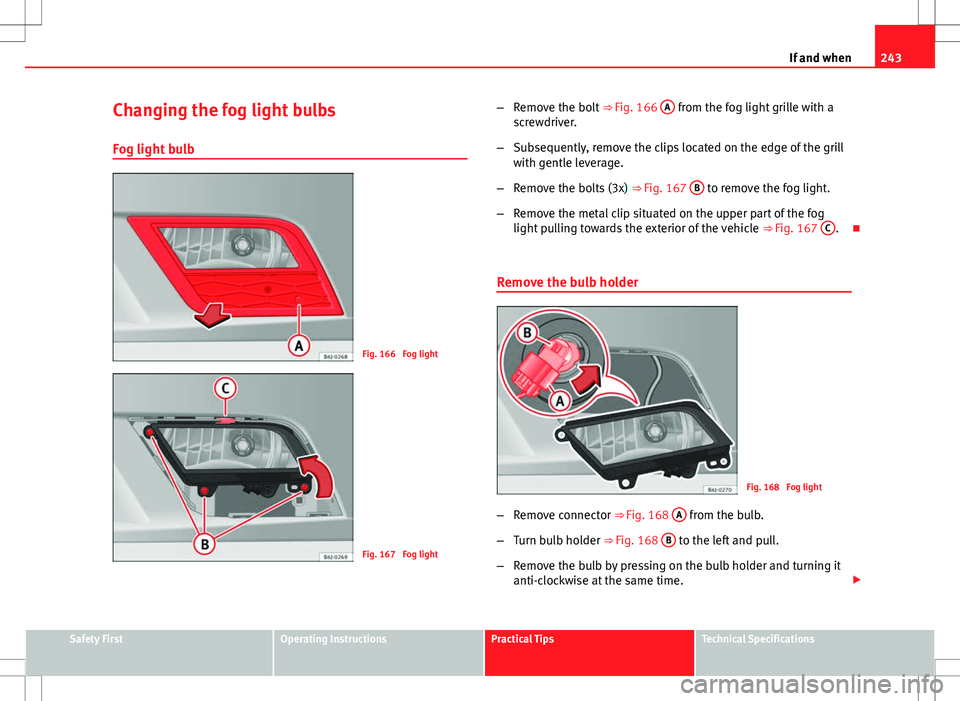
Remove the bolt ⇒ Fig. 166 A
from the fog light grille with a
screwdriver.
– Subsequently, remove the clips located on the edge of the grill
with gentle leverage.
– Remove the bolts (3x) ⇒ Fig. 167 B
to remove the fog light.
– Remove the metal clip situated on the upper part of the fog
light pulling towards the exterior of the vehicle ⇒ Fig. 167 C
.
Remove the bulb holder
Fig. 168 Fog light
– Remove connector ⇒ Fig. 168 A
from the bulb.
– Turn bulb holder ⇒ Fig. 168 B
to the left and pull.
– Remove the bulb by pressing on the bulb holder and turning it
anti-clockwise at the same time.
Safety FirstOperating InstructionsPractical TipsTechnical Specifications
Page 246 of 282
244If and when
–Installation involves the above steps in reverse sequence.
– Check that the bulb works properly.
Changing the rear lights (on the wing) Overview of tail lights
Tail lights on side panel Bulb lamps
● Brake lights
● Side lights
● Turn signal
Tail lights on side panel LED lamps
● Brake lights (LEDS)
● Side lights (LEDS)
● Turn signal Accessing the side light bulbs
Fig. 169 Side lights
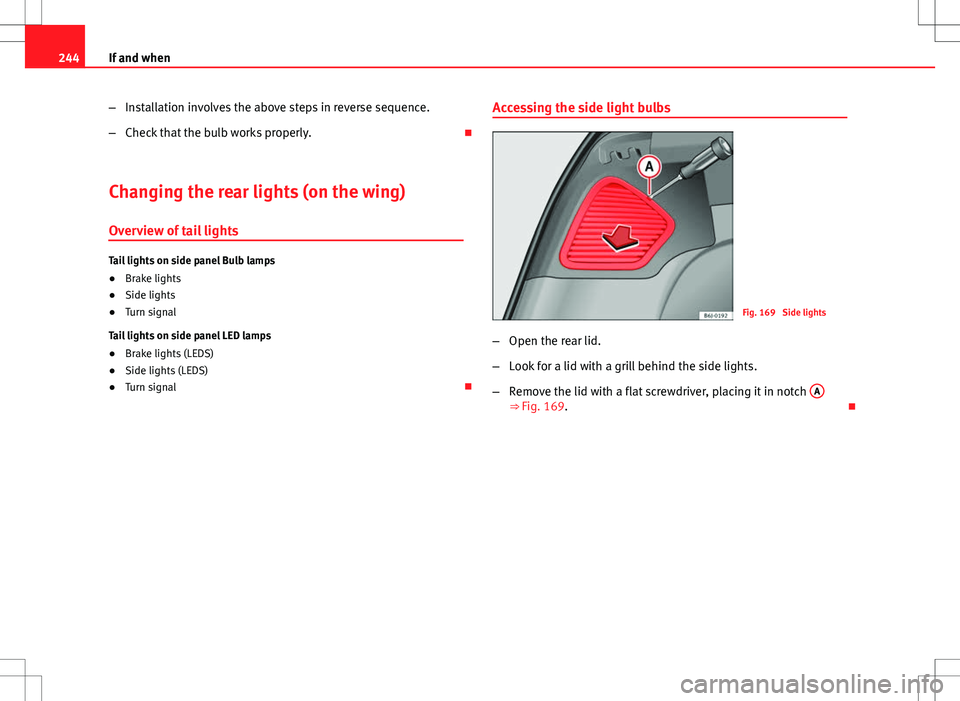
– Open the rear lid.
– Look for a lid with a grill behind the side lights.
– Remove the lid with a flat screwdriver, placing it in notch A
⇒ Fig. 169.
Page 247 of 282
245
If and when
Changing bulbs
Fig. 170 Removing the
bulb holder
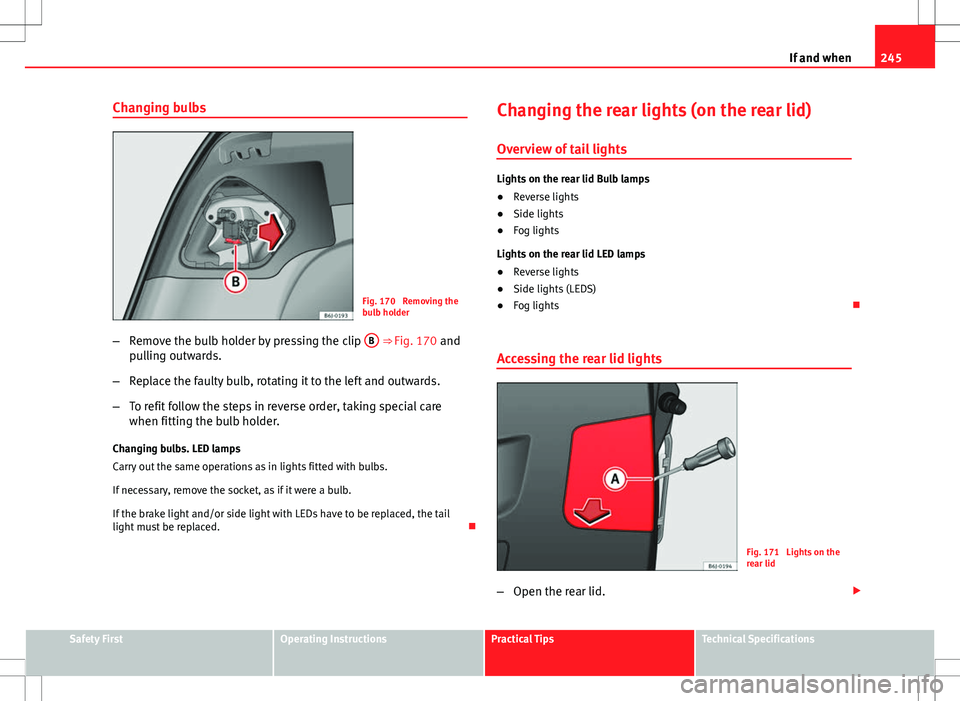
– Remove the bulb holder by pressing the clip B
⇒ Fig. 170 and
pulling outwards.
– Replace the faulty bulb, rotating it to the left and outwards.
– To refit follow the steps in reverse order, taking special care
when fitting the bulb holder.
Changing bulbs. LED lamps
Carry out the same operations as in lights fitted with bulbs.
If necessary, remove the socket, as if it were a bulb.
If the brake light and/or side light with LEDs have to be replaced, the tail
light must be replaced. Changing the rear lights (on the rear lid)
Overview of tail lights
Lights on the rear lid Bulb lamps
●
Reverse lights
● Side lights
● Fog lights
Lights on the rear lid LED lamps
● Reverse lights
● Side lights (LEDS)
● Fog lights
Accessing the rear lid lights
Fig. 171 Lights on the
rear lid
– Open the rear lid.
Safety FirstOperating InstructionsPractical TipsTechnical Specifications
Page 248 of 282
246If and when
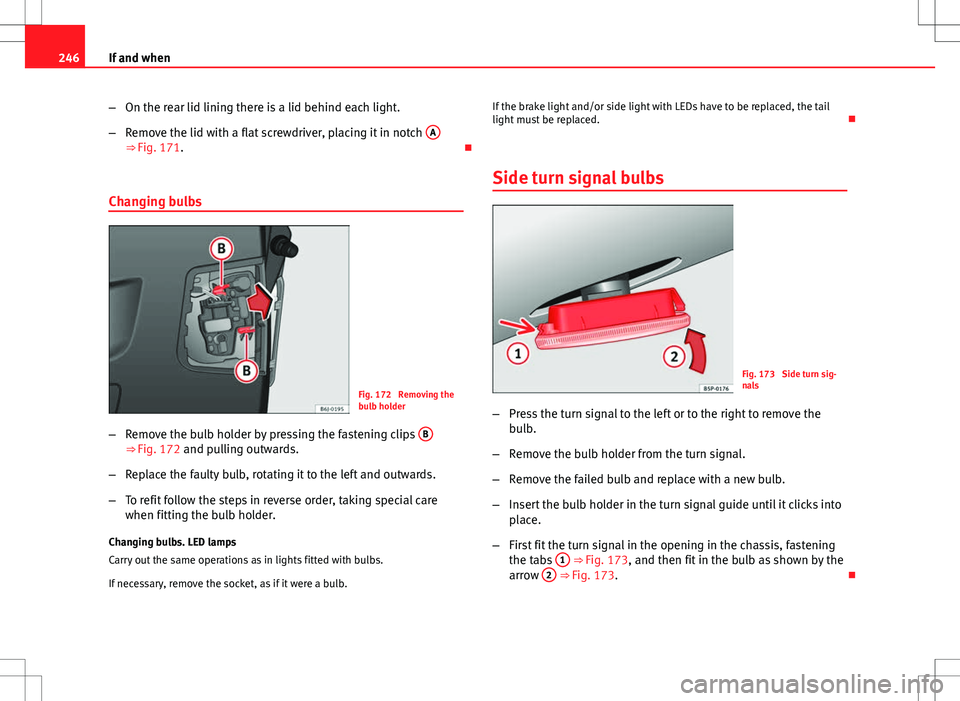
–On the rear lid lining there is a lid behind each light.
– Remove the lid with a flat screwdriver, placing it in notch A
⇒ Fig. 171.
Changing bulbs
Fig. 172 Removing the
bulb holder
– Remove the bulb holder by pressing the fastening clips B
⇒ Fig. 172 and pulling outwards.
– Replace the faulty bulb, rotating it to the left and outwards.
– To refit follow the steps in reverse order, taking special care
when fitting the bulb holder.
Changing bulbs. LED lamps
Carry out the same operations as in lights fitted with bulbs.
If necessary, remove the socket, as if it were a bulb. If the brake light and/or side light with LEDs have to be replaced, the tail
light must be replaced.
Side turn signal bulbs
Fig. 173 Side turn sig-
nals
– Press the turn signal to the left or to the right to remove the
bulb.
– Remove the bulb holder from the turn signal.
– Remove the failed bulb and replace with a new bulb.
– Insert the bulb holder in the turn signal guide until it clicks into
place.
– First fit the turn signal in the opening in the chassis, fastening
the tabs 1
⇒ Fig. 173, and then fit in the bulb as shown by the
arrow 2 ⇒ Fig. 173.
Page 249 of 282
247
If and when
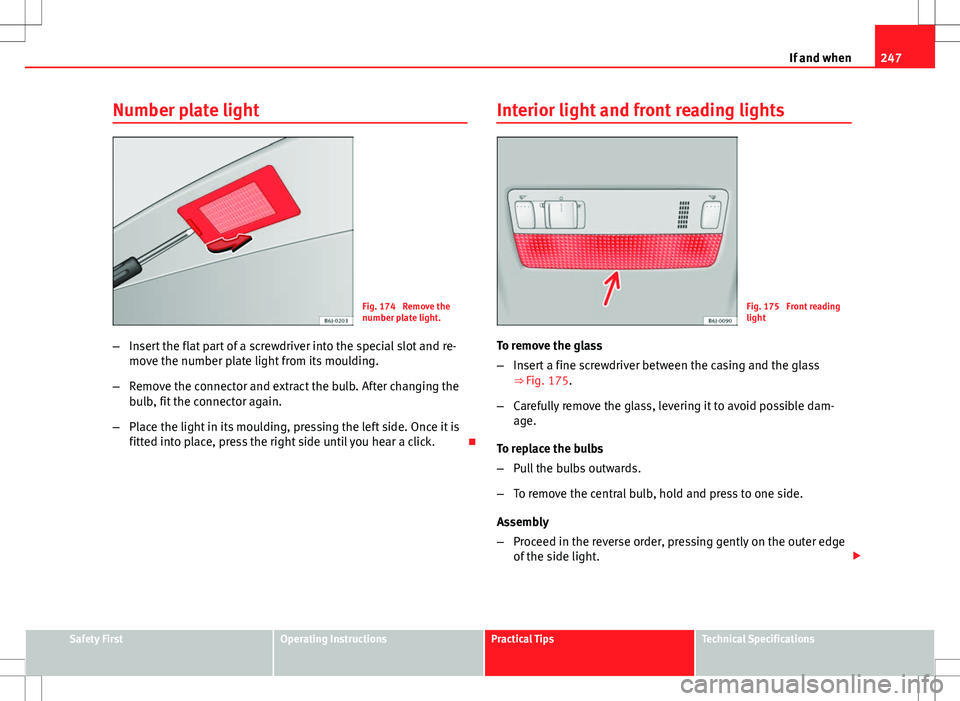
Number plate light
Fig. 174 Remove the
number plate light.
– Insert the flat part of a screwdriver into the special slot and re-
move the number plate light from its moulding.
– Remove the connector and extract the bulb. After changing the
bulb, fit the connector again.
– Place the light in its moulding, pressing the left side. Once it is
fitted into place, press the right side until you hear a click. Interior light and front reading lightsFig. 175 Front reading
light
To remove the glass
– Insert a fine screwdriver between the casing and the glass
⇒ Fig. 175.
– Carefully remove the glass, levering it to avoid possible dam-
age.
To replace the bulbs
– Pull the bulbs outwards.
– To remove the central bulb, hold and press to one side.
Assembly
– Proceed in the reverse order, pressing gently on the outer edge
of the side light.
Safety FirstOperating InstructionsPractical TipsTechnical Specifications
Page 250 of 282
248If and when
–First fit the glass with the fastening tabs over the frame of the
switch. Next press the front part until the two long tabs click on
the support.
Additional brake lights*
Given the difficulty involved in the replacement of this light it should be
done by the Technical Service.
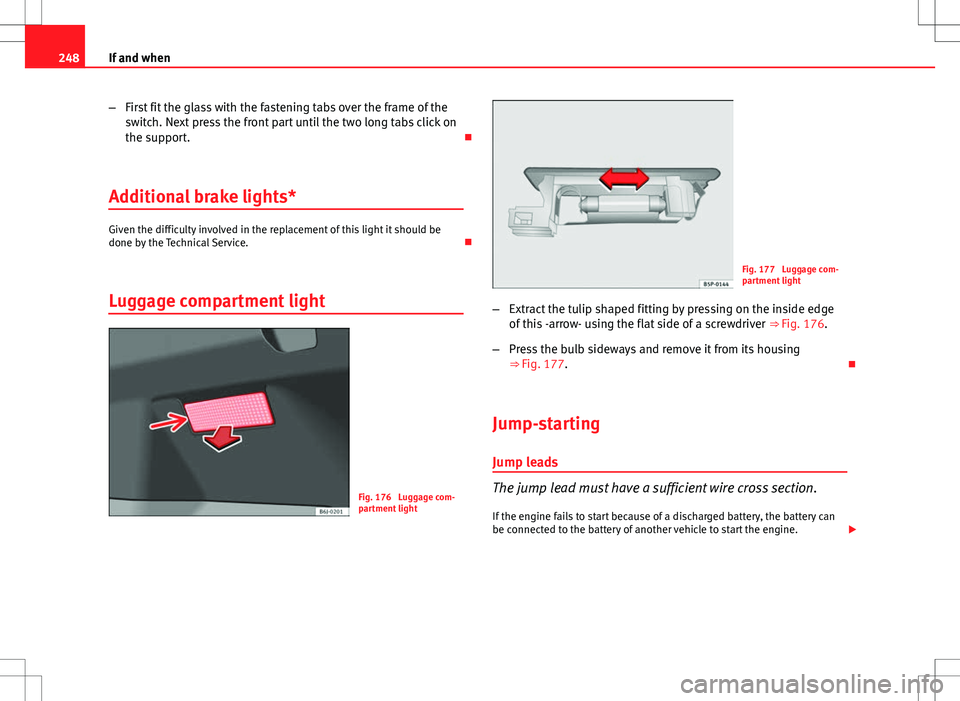
Luggage compartment light
Fig. 176 Luggage com-
partment light
Fig. 177 Luggage com-
partment light
– Extract the tulip shaped fitting by pressing on the inside edge
of this -arrow- using the flat side of a screwdriver ⇒ Fig. 176.
– Press the bulb sideways and remove it from its housing
⇒ Fig. 177.
Jump-starting
Jump leads
The jump lead must have a sufficient wire cross section. If the engine fails to start because of a discharged battery, the battery can
be connected to the battery of another vehicle to start the engine.