rear Seat Ibiza ST 2015 Owners Manual
[x] Cancel search | Manufacturer: SEAT, Model Year: 2015, Model line: Ibiza ST, Model: Seat Ibiza ST 2015Pages: 248, PDF Size: 4.77 MB
Page 195 of 248
Care and maintenance
– Rin se the
v
ehicle thoroughly with water.
– Dry the vehicle surface gently with a cha-
mois l
eather.
– In cold temperature, dry the rubber seals
and their sur
faces to prevent them from
freezing. Apply silicone spray to the rubber
seals.
After washing the vehicle – After washing, avoid sudden and sharp
brakin
g. “Dry” the brakes by braking sever-
al times. WARNING
● Wa sh
your vehicle with the ignition switch-
ed off.
● Protect your hands and arms from cuts on
sharp meta
l edges when cleaning the under-
body, the inside of the wheel housings etc.
Risk of injury.
● Water, ice and salt on the brake system can
reduce br
aking effectiveness. Risk of acci-
dent. CAUTION
● Never r emo
ve dirt, mud or dust if the vehi-
cle surface is dry. Never use a dry cloth or
sponge for cleaning purposes. This could
scratch the paintwork or glass on your vehi-
cle. ●
Wa shin
g the vehicle in low temperatures:
when washing the vehicle with a hose, do not
direct water into the lock cylinders or the
gaps around the doors, rear lid, or sunroof.
Risk of freezing. For the sake of the environment
To protect the environment, the vehicle
shou ld be w
ashed only in specially provided
wash bays, to prevent toxic, oil-laden waste
water from entering the sewer system. In
some places, washing vehicles outside wash
bays is prohibited. Note
Do not wash the vehicle in direct sunlight. Washing the vehicle with a high pres-
s
ur
e c
leaner Be particularly careful when using a high
pr
e
s
sure cleaner!
– Always observe the instructions for the
high-pres
sure cleaner, particularly those
concerning the pressure and the spraying
distance.
– Increase the spraying distance for soft ma-
terial
s and painted bumpers. –
Do not use a high pr
essure cleaner to re-
move ice or snow from windows
››› page 194.
– Never use concentrated jet nozzles (“rotat-
ing jets”) ›
›› .
– After washing, avoid sudden and sharp
br ak
in
g. “Dry” the brakes by braking sever-
al times ››› page 156. WARNING
● Never w a
sh tyres with a concentrated jet
(“rotating nozzle”). Even at large spraying
distances and short cleaning times, damage
can occur to the tyres. This may cause an ac-
cident.
● Water, ice and salt on the brake system can
reduce br
aking effectiveness. Risk of acci-
dent. CAUTION
● Do not u se w
ater hotter than +60°C
(+140°F). This could damage the vehicle.
● To avoid damage to the vehicle, keep a suf-
ficient di
stance from sensitive materials such
as flexible hoses, plastic, soundproofing ma-
terial, etc. This also applies to bumpers pain-
ted in the colour of the bodywork. The closer
the nozzle is to the surface, the greater the
wear on the material. 193
Technical data
Advice
Operation
Emergencies
Safety
Page 196 of 248
Advice
Sensors and camera lenses ●
Use a small brush to remove snow and a
de-icer s pr
ay to remove ice.
● Clean the sensors with a solvent-free prod-
uct and a soft, dr
y cloth.
● Moisten the camera lens using a standard
alcohol-b
ased glass cleaning agent and
clean the lens with a dry cloth. CAUTION
● When y ou c
lean the vehicle with a pressure
washer:
–Stay a suitable distance from the sensors
on the front and rear bumpers.
– Do not clean the camera lenses or sur-
rounding area with the pressure washer.
● Never use warm or hot water to remove
snow and ic
e from the reverse camera lens,
as it could crack the lens.
● Never use abrasive cleaning agents on the
lens. Vehicle paint maintenance
Regular waxing protects the paintwork.
Y
ou need t
o ap
ply wax to your vehicle if water
does not form small drops and run off the
paintwork when it is clean.
Good quality hard wax products are available
at your Technical Service. Regular wax applications help to protect the
paintwork
from environmental contaminants
››› page 191. It is also effective in protecting
against minor scratches.
Even if a wax solution is used regularly in the
vehicle washing tunnel, it is advisable to pro-
tect the paint with a hard wax coating at least
twice a year.
Polishing the paintwork Polishing is only necessary if the paint has
lo
s
t
its shine, and the gloss cannot be
brought back by applying wax. Polishing
products can be purchased in your Technical
Service.
The vehicle must be waxed after polishing if
the polish used does not contain wax com-
pounds to seal the paint ››› page 194, Vehicle
paint maintenance . CAUTION
To prevent damage to the paintwork:
● Do not use polishes and hard wax on pain-
ted p ar
ts with a matt finish or on plastic
parts.
● Do not polish your vehicle in a sandy or
dusty
environment. Caring for plastic parts
If normal washing fails to clean plastic parts,
cl
e
an them with approved solvent-free plas-
tic cleaning and care products. CAUTION
● The use of li
quid air freshener directly over
the air vents of the vehicle may damage the
plastic parts if the liquid is accidentally spil-
led.
● Cleaning products which contain solvents
wil
l damage the material. Cleaning of windows and mirrors
Cleaning windows
– Moisten the windows with commercially
av ai
l
able, alcohol based glass cleaner.
– Dry the windows with a clean chamois
leather or a lint
-free cloth.
Removing snow – Use a small brush to remove snow from the
window
s and mirrors.
Removing ice
– Use a de-icer spray.
Use a cl
ean cloth or chamois leather to dry
the windows. The chamois leathers used on
194
Page 197 of 248
Care and maintenance
painted surfaces are not suitable to clean
w indo
w
s because they are soiled with wax
deposits which could smear the windows.
If possible, use a de-icing spray to remove
ice. If you use an ice scraper, push it in one
direction only without swinging it.
Use window cleaner or a silicone remover to
clean rubber, oil, grease and silicone depos-
its off.
Wax deposits can only be removed with a
special cleaner available at your Technical
Service. Wax deposits on the windscreen
could cause the wiper blades to judder. Add-
ing a window cleaner that dissolves wax to
the windscreen washer fluid prevents wiper
blades from juddering, but wax deposits are
not removed. CAUTION
● Never u se w
arm or hot water to remove
snow and ice from windows and mirrors. This
could cause the glass to crack!
● The heating element for the rear window is
located on the inner s
ide of the window. To
prevent damage, do not put stickers over the
heating elements on the inside of the win-
dow. Cleaning windscreen wiper blades
Clean wiper blades improve visibility. 1. Use a soft cloth to remove dust and dirt
from the w
ind
screen wiper blades.
2. Use window cleaner to clean the wind- scr
een wiper blades. Use a sponge or a
cloth to remove stubborn dirt.
Care of rubber seals If rubber seals are well looked after, they will
not fr
eez
e so quickly.
1. Use a soft cloth to remove dust and dirt from the rubber se al
s.
2. Apply a specialist care product to the rub- ber seals.
The rubber s
trips on the doors, windows, etc.
will remain pliable and last longer if they are
treated with a suitable rubber care product
from time to time (for example silicone
spray).
Caring for rubber seals will also prevent pre-
mature ageing and leaks. The doors will be
easier to open. If rubber seals are well looked
after, they will not freeze so quickly in winter.
Door lock cylinder The door lock cylinders can freeze up in win-
t
er
. T
o de-ice the lock cylinders you should only
use spr
ay with lubricating and anti-corrosive
properties.
Cleaning chrome parts 1. Clean chrome parts with a damp cloth.
2. Polish chrome parts with a soft, dry cloth.
If thi
s
does not provide satisfying results, use
a specialist chrome cleaning product.
Chrome cleaning products will remove stains
from the surface. CAUTION
To prevent scratching chrome surfaces:
● Never use an abrasive cleaning product on
chr ome.
● Do not
clean or polish chrome parts in a
sandy or du
sty environment. Steel wheel rims
–
Clean steel wheel rims regularly using a
sep ar
at
e sponge.
Use an industrial cleaner to remove brake
dust. Any damage to the paint on steel wheel
rims should be repaired before starting to
rust. »
195
Technical data
Advice
Operation
Emergencies
Safety
Page 201 of 248
Checking and refilling levels
Checking and refilling levels
F uel
R ef
uelling Read the additional information carefully
›› ›
page 41
The tank flap is released manually and is lo-
cated at the rear of the vehicle on the right.
The tank holds approximately 45 litres.
Opening the fuel tank cap
– Lift the lid.
– Hold the cap firmly with one hand, then in-
sert the k
ey into the lock and rotate 180° to
the left.
– Unscrew the cap, turning it anticlockwise.
Clos
ing the fuel tank cap
– Screw the tank cap to the right until it
“click
s”.
– Turn the key in the lock, without releasing
the cap, c
lockwise through 180°.
– Remove the key and close the flap until it
click
s into place. The tank cap is secured
with an anti-loss attachment
If the automatic filler nozzle is operated cor-
rectly, it will switch itself off as soon as the tank is “full”. Never attempt to fill beyond
this point, a
s this will fill the expansion
chamber. Fuel may leak out if ambient condi-
tions are warm.
The correct fuel grade for your vehicle is giv-
en on a sticker on the inside of the fuel tank
flap. WARNING
● Fuel i
s highly flammable and can cause se-
rious burns and other injuries.
–Never smoke or come into contact with
sparks when filling the fuel tank of the
vehicle or a spare fuel canister with fuel.
This is an explosion hazard.
– Follow legal requirements for the use of
spare fuel canisters.
– For safety reasons we do not recommend
carrying a spare fuel canister in the vehi-
cle. The canister could be damaged in an
accident and leak.
● If, in exceptional circumstances, you have
to carr
y a spare fuel canister, please observe
the following:
–Never fill the spare fuel canister inside
the vehicle or on it. An electrostatic
charge could build up during filling, caus-
ing the fuel fumes to ignite. This could
cause an explosion. Always place the
canister on the ground to fill it.
– Insert the fuel nozzle into the mouth of
the canister as far as possible. –
If the s p
are fuel canister is made of met-
al, the filling nozzle must be in contact
with the canister during filling. This
helps prevent an electrostatic charge
building up.
– Never spill fuel in the vehicle or in the
luggage compartment. Fuel vapours are
explosive. Danger of death. CAUTION
● Fuel s
pills should be removed from the
paintwork immediately.
● Never run the tank completely dry. Irregular
fuel s
upply can cause misfiring. As a result,
unburnt fuel could enter the catalytic convert-
er and cause damage.
● When filling the fuel tank after having run it
compl
etely dry on a vehicle with a diesel en-
gine the ignition must be switched on for at
least 30 seconds before starting the engine.
Subsequently, when you start the engine it
may take longer than normal to start firing
(up to one minute). This is due to the fact that
the fuel system has to purge itself of air be-
fore starting. For the sake of the environment
Do not try to put in more fuel after the auto-
matic fi
ller nozzle has switched off, this may
cause the fuel to overflow if it becomes warm. 199
Technical data
Advice
Operation
Emergencies
Safety
Page 213 of 248
Checking and refilling levels
the rear lid and lift the floor covering. The
b att
er
y is located next to the spare wheel.
– Check the colour display in the "magic eye"
on the top of the b
attery.
– If there are air bubbles in the window, tap
the window g
ently until they disperse.
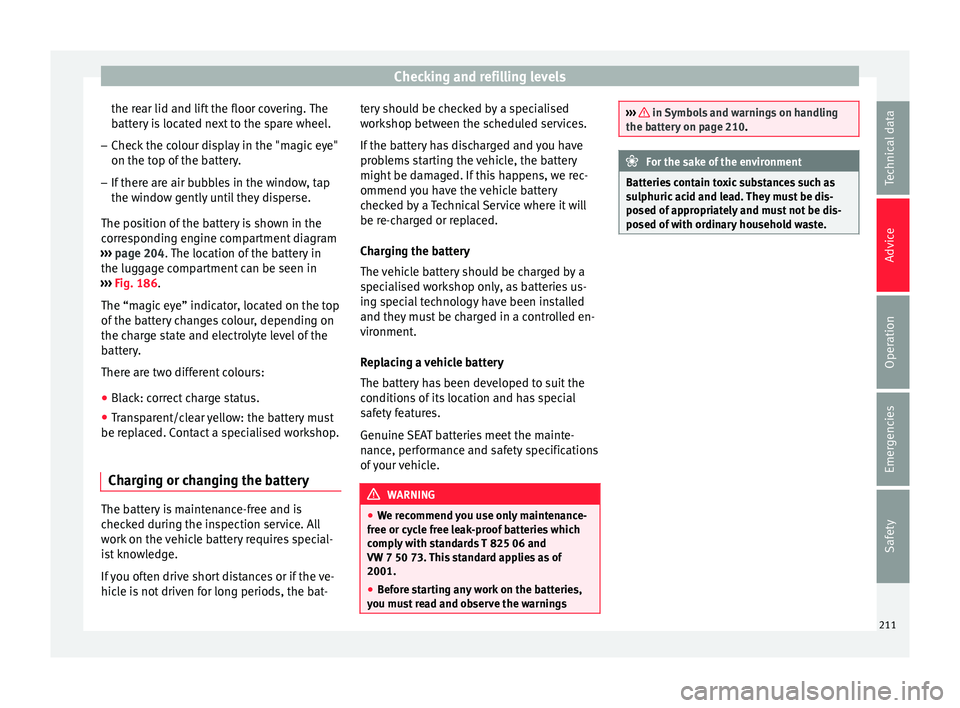
The position of the battery is shown in the
corresponding engine compartment diagram
››› page 204. The location of the battery in
the luggage compartment can be seen in
››› Fig. 186.
The “magic eye” indicator, located on the top
of the battery changes colour, depending on
the charge state and electrolyte level of the
battery.
There are two different colours:
● Black: correct charge status.
● Transparent/clear yellow: the battery must
be repl
aced. Contact a specialised workshop.
Charging or changing the battery The battery is maintenance-free and is
c
hec
k
ed during the inspection service. All
work on the vehicle battery requires special-
ist knowledge.
If you often drive short distances or if the ve-
hicle is not driven for long periods, the bat- tery should be checked by a specialised
workshop betw
een the scheduled services.
If the battery has discharged and you have
problems starting the vehicle, the battery
might be damaged. If this happens, we rec-
ommend you have the vehicle battery
checked by a Technical Service where it will
be re-charged or replaced.
Charging the battery
The vehicle battery should be charged by a
specialised workshop only, as batteries us-
ing special technology have been installed
and they must be charged in a controlled en-
vironment.
Replacing a vehicle battery
The battery has been developed to suit the
conditions of its location and has special
safety features.
Genuine SEAT batteries meet the mainte-
nance, performance and safety specifications
of your vehicle. WARNING
● We r ec
ommend you use only maintenance-
free or cycle free leak-proof batteries which
comply with standards T 825 06 and
VW 7 50 73. This standard applies as of
2001.
● Before starting any work on the batteries,
you mus
t read and observe the warnings ››› in Symbols and warnings on handling
the batt er
y on page 210. For the sake of the environment
Batteries contain toxic substances such as
s u lphuric
acid and lead. They must be dis-
posed of appropriately and must not be dis-
posed of with ordinary household waste. 211Technical data
Advice
Operation
Emergencies
Safety
Page 215 of 248
Wheels
Tyre pressure
The c orr
ect
tyre pressure is especially impor-
tant at high speeds. The pressure should
therefore be checked at least once a month
and before starting a journey.
Depending on the vehicle, tyre pressure can
be adjusted to medium load to improve driv-
ing comfort (“comfort” tyre pressure). When
driving with comfort tyre pressure fuel con-
sumption may increase slightly. WARNING
A tyre can easily burst if the pressure is too
low , c
ausing an accident!
● At continuously high speeds, a tyre with in-
sufficient
pressure flexes more. In this way it
becomes too hot, and this can cause tread
separation and tyre blow-out. Always observe
the recommended tyre pressures.
● If the tyre pressure is too low or too high,
the tyre
s will wear prematurely and the vehi-
cle will not handle well. Risk of accident! For the sake of the environment
Under-inflated tyres will increase fuel con-
sumption. Tyre useful life
Fig. 189
Tyre tread wear indicators. Fig. 190
Diagram for changing wheels The useful life of tyres is dependent on tyre
pr
e
s
sure, driving style and fitting.
Wear indicators
The original tyres on your vehicle have
1.6 mm high “tread wear indicators”
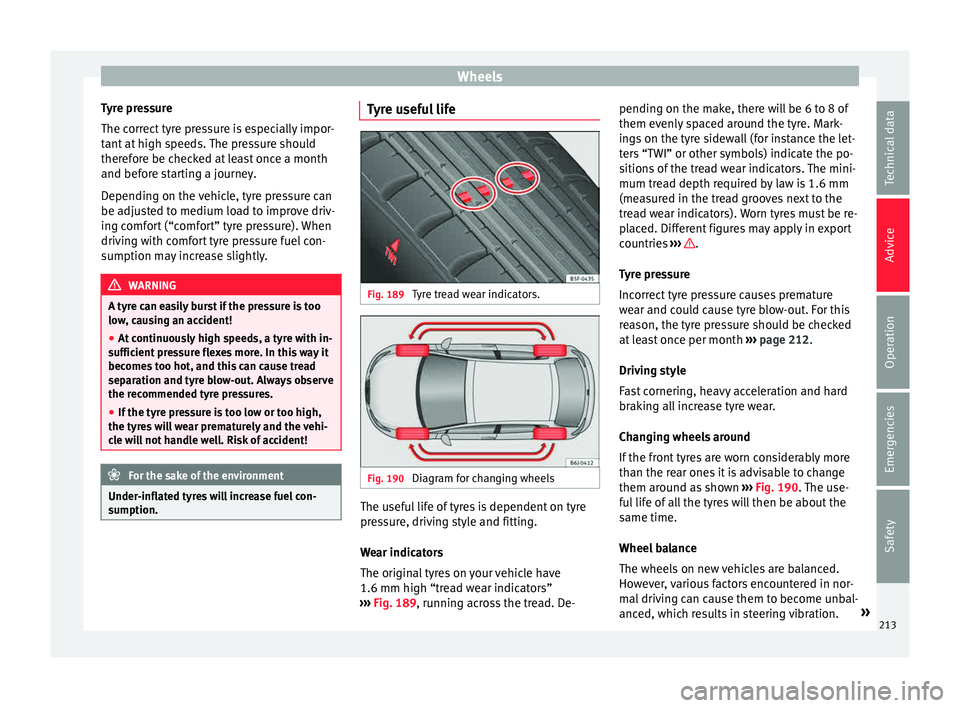
››› Fig. 189, running across the tread. De- pending on the make, there will be 6 to 8 of
them evenly
spaced around the tyre. Mark-
ings on the tyre sidewall (for instance the let-
ters “TWI” or other symbols) indicate the po-
sitions of the tread wear indicators. The mini-
mum tread depth required by law is 1.6 mm
(measured in the tread grooves next to the
tread wear indicators). Worn tyres must be re-
placed. Different figures may apply in export
countries ››› .
T y
r
e pressure
Incorrect tyre pressure causes premature
wear and could cause tyre blow-out. For this
reason, the tyre pressure should be checked
at least once per month ››› page 212.
Driving style
Fast cornering, heavy acceleration and hard
braking all increase tyre wear.
Changing wheels around
If the front tyres are worn considerably more
than the rear ones it is advisable to change
them around as shown ››› Fig. 190. The use-
ful life of all the tyres will then be about the
same time.
Wheel balance
The wheels on new vehicles are balanced.
However, various factors encountered in nor-
mal driving can cause them to become unbal-
anced, which results in steering vibration. »
213
Technical data
Advice
Operation
Emergencies
Safety
Page 216 of 248
Advice
Unbalanced wheels should be rebalanced, as
they other
w
ise cause excessive wear on
steering, suspension and tyres. A wheel must
also be rebalanced when a new tyre is fitted.
Incorrect wheel alignment
Incorrect wheel alignment causes excessive
tyre wear, impairing the safety of the vehicle.
If tyres show excessive wear, you should
have the wheel alignment checked by a Tech-
nical Service. WARNING
There is a serious danger of accidents if a tyre
bur s
ts during driving!
● The tyres must be replaced at the latest
when the trea
d wear indicators are worn
››› page 213. Failure to follow this instruction
could result in an accident. Worn tyres do not
grip well at high speeds on wet roads. There
is also a greater risk of “aquaplaning”.
● At continuously high speeds, a tyre with in-
sufficient
pressure flexes more. This causes it
to overheat. This can cause tread separation
and tyre blow-out. Risk of accident. Always
observe the recommended tyre pressures.
● If tyres show excessive wear, you should
have the ru
nning gear checked by a Technical
Service.
● Keep chemicals such as oil, fuel and brake
fluid awa
y from tyres.
● Damaged wheels and tyres must be re-
plac
ed immediately! For the sake of the environment
Under-inflated tyres will increase fuel con-
sumption. New tyres and wheels
New tyres and wheels have to be run in.
The tyr
e
s and wheel rims are an essential
part of the vehicle's design. Those approved
by SEAT are specially matched to the charac-
teristics of the vehicle and make a major con-
tribution to good road-holding and safe han-
dling ››› .
T y
r
es should be replaced at least in pairs and
not individually (i.e. both front tyres or both
rear tyres together). A knowledge of tyre des-
ignations makes it easier to choose the cor-
rect tyres. Radial tyres have the tyre designa-
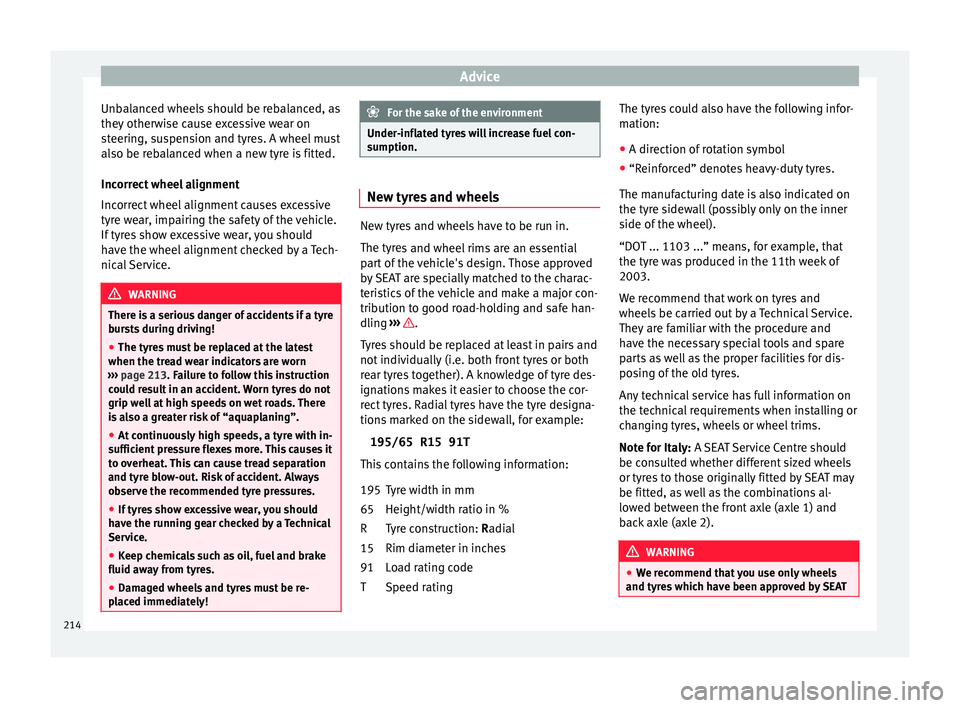
tions marked on the sidewall, for example:
195/65 R15 91T
This contains the following information:
Tyre width in mm
Height/width ratio in %
Tyre construction: Radial
Rim diameter in inches
Load rating code
Speed rating
195
65
R
15
91
T The tyres could also have the following infor-
mation:
● A direction of
rotation symbol
● “Reinforced” denotes heavy-duty tyres.
The manufact
uring date is also indicated on
the tyre sidewall (possibly only on the inner
side of the wheel).
“DOT ... 1103 ...” means, for example, that
the tyre was produced in the 11th week of
2003.
We recommend that work on tyres and
wheels be carried out by a Technical Service.
They are familiar with the procedure and
have the necessary special tools and spare
parts as well as the proper facilities for dis-
posing of the old tyres.
Any technical service has full information on
the technical requirements when installing or
changing tyres, wheels or wheel trims.
Note for Italy: A SEAT Service Centre should
be consulted whether different sized wheels
or tyres to those originally fitted by SEAT may
be fitted, as well as the combinations al-
lowed between the front axle (axle 1) and
back axle (axle 2). WARNING
● We r ec
ommend that you use only wheels
and tyres which have been approved by SEAT 214
Page 220 of 248
Technical data
Vehicles for certain export countries do not
h av
e an identific
ation plate.
Identification plate
The identification plate is located on the right
rib inside the engine compartment.
Vehicle data sticker
The data sticker is placed on the inside of the
spare wheel well, in the boot and on the rear
cover of the Maintenance Programme.
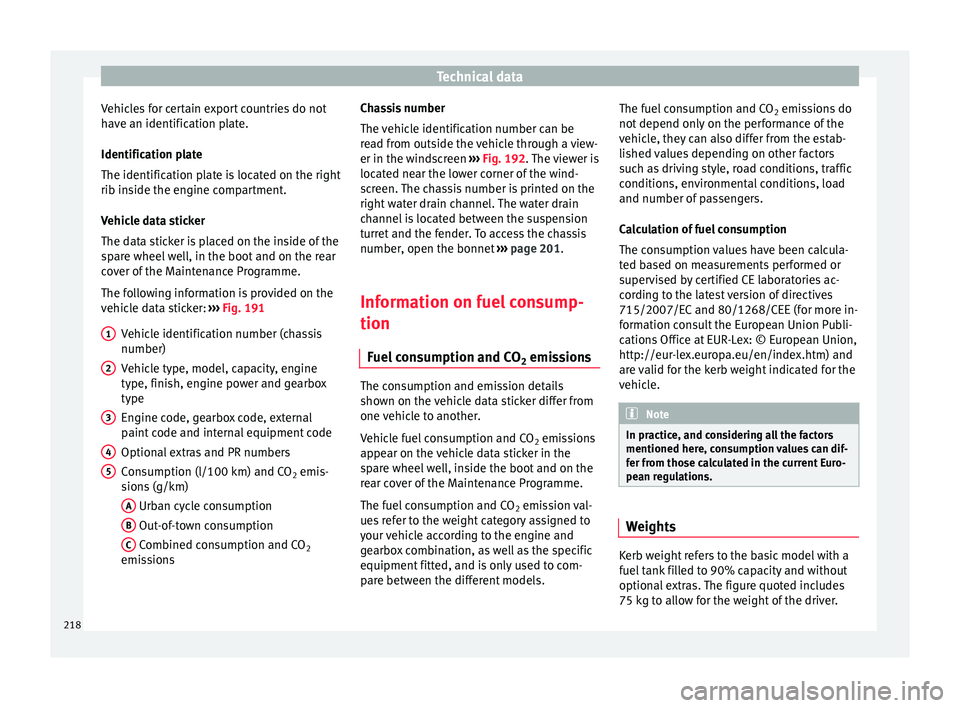
The following information is provided on the
vehicle data sticker: ››› Fig. 191
Vehicle identification number (chassis
number)
Vehicle type, model, capacity, engine
type, finish, engine power and gearbox
type
Engine code, gearbox code, external
paint code and internal equipment code
Optional extras and PR numbers
Consumption (l/100 km) and CO 2 emis-
sions (g/km)
A Urban cycle consumption
B Out-of-town consumption
C Combined consumption and CO
2
emi s
s
ions
1 2
3
4
5 Chassis number
The
v
ehic
le identification number can be
read from outside the vehicle through a view-
er in the windscreen ››› Fig. 192. The viewer is
located near the lower corner of the wind-
screen. The chassis number is printed on the
right water drain channel. The water drain
channel is located between the suspension
turret and the fender. To access the chassis
number, open the bonnet ››› page 201.
Information on fuel consump-
tion Fuel c
onsumption and CO 2 emissions The consumption and emission details
sho
wn on the
v
ehicle data sticker differ from
one vehicle to another.
Vehicle fuel consumption and CO 2 emissions
appear on the vehicle data sticker in the
spare wheel well, inside the boot and on the
rear cover of the Maintenance Programme.
The fuel consumption and CO 2 emission val-
ues refer to the weight category assigned to
your vehicle according to the engine and
gearbox combination, as well as the specific
equipment fitted, and is only used to com-
pare between the different models. The fuel consumption and CO
2 emiss
ions do
not depend only on the performance of the
vehicle, they can also differ from the estab-
lished values depending on other factors
such as driving style, road conditions, traffic
conditions, environmental conditions, load
and number of passengers.
Calculation of fuel consumption
The consumption values have been calcula-
ted based on measurements performed or
supervised by certified CE laboratories ac-
cording to the latest version of directives
715/2007/EC and 80/1268/CEE (for more in-
formation consult the European Union Publi-
cations Office at EUR-Lex: © European Union,
http://eur-lex.europa.eu/en/index.htm) and
are valid for the kerb weight indicated for the
vehicle. Note
In practice, and considering all the factors
mentioned here, c on
sumption values can dif-
fer from those calculated in the current Euro-
pean regulations. Weights
Kerb weight refers to the basic model with a
f
uel
t
ank filled to 90% capacity and without
optional extras. The figure quoted includes
75 kg to allow for the weight of the driver.
218
Page 223 of 248
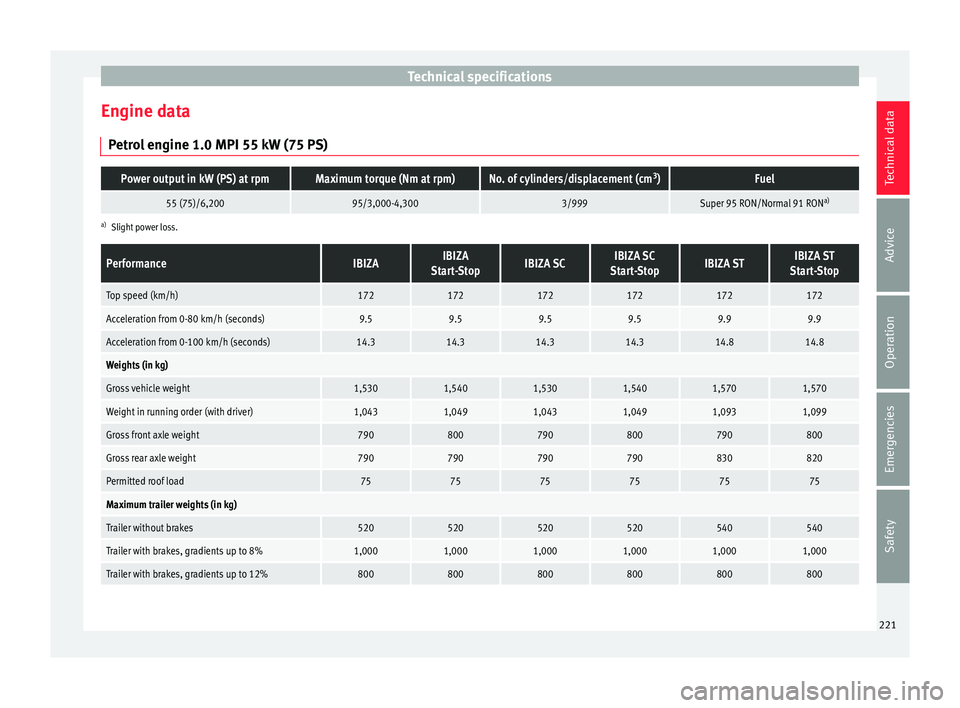
Technical specifications
Engine data P etr
o
l engine 1.0 MPI 55 kW (75 PS)
Power output in kW (PS) at rpmMaximum torque (Nm at rpm)No. of cylinders/displacement (cm 3
)Fuel
55 (75)/6,20095/3,000-4,3003/999Super 95 RON/Normal 91 RON a)
a)
Slight power loss.
PerformanceIBIZAIBIZA
Start-StopIBIZA SCIBIZA SC
Start-StopIBIZA STIBIZA ST
Start-Stop
Top speed (km/h)172172172172172172
Acceleration from 0-80 km/h (seconds)9.59.59.59.59.99.9
Acceleration from 0-100 km/h (seconds)14.314.314.314.314.814.8
Weights (in kg)
Gross vehicle weight1,5301,5401,5301,5401,5701,570
Weight in running order (with driver)1,0431,0491,0431,0491,0931,099
Gross front axle weight790800790800790800
Gross rear axle weight790790790790830820
Permitted roof load757575757575
Maximum trailer weights (in kg)
Trailer without brakes520520520520540540
Trailer with brakes, gradients up to 8%1,0001,0001,0001,0001,0001,000
Trailer with brakes, gradients up to 12%800800800800800800 221
Technical data
Advice
Operation
Emergencies
Safety
Page 224 of 248
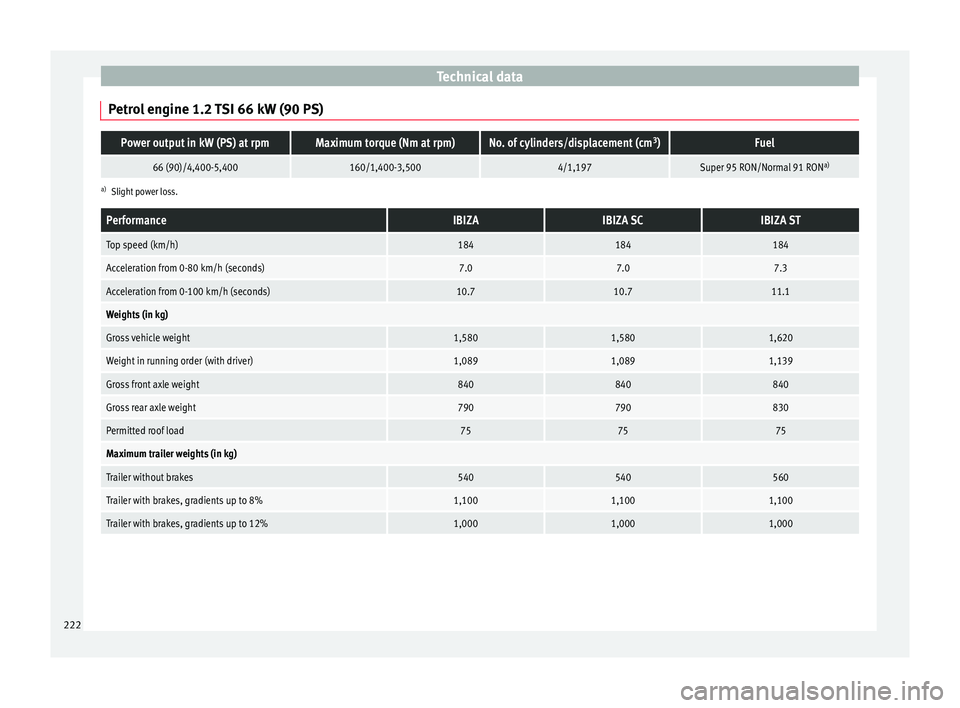
Technical data
Petrol engine 1.2 TSI 66 kW (90 PS)Power output in kW (PS) at rpmMaximum torque (Nm at rpm)No. of cylinders/displacement (cm 3
)Fuel
66 (90)/4,400-5,400160/1,400-3,5004/1,197Super 95 RON/Normal 91 RON a)
a)
Slight power loss.
PerformanceIBIZAIBIZA SCIBIZA ST
Top speed (km/h)184184184
Acceleration from 0-80 km/h (seconds)7.07.07.3
Acceleration from 0-100 km/h (seconds)10.710.711.1
Weights (in kg)
Gross vehicle weight1,5801,5801,620
Weight in running order (with driver)1,0891,0891,139
Gross front axle weight840840840
Gross rear axle weight790790830
Permitted roof load757575
Maximum trailer weights (in kg)
Trailer without brakes540540560
Trailer with brakes, gradients up to 8%1,1001,1001,100
Trailer with brakes, gradients up to 12%1,0001,0001,000 222