rear Seat Ibiza ST 2015 Manual PDF
[x] Cancel search | Manufacturer: SEAT, Model Year: 2015, Model line: Ibiza ST, Model: Seat Ibiza ST 2015Pages: 248, PDF Size: 4.77 MB
Page 139 of 248
Transport and practical equipment
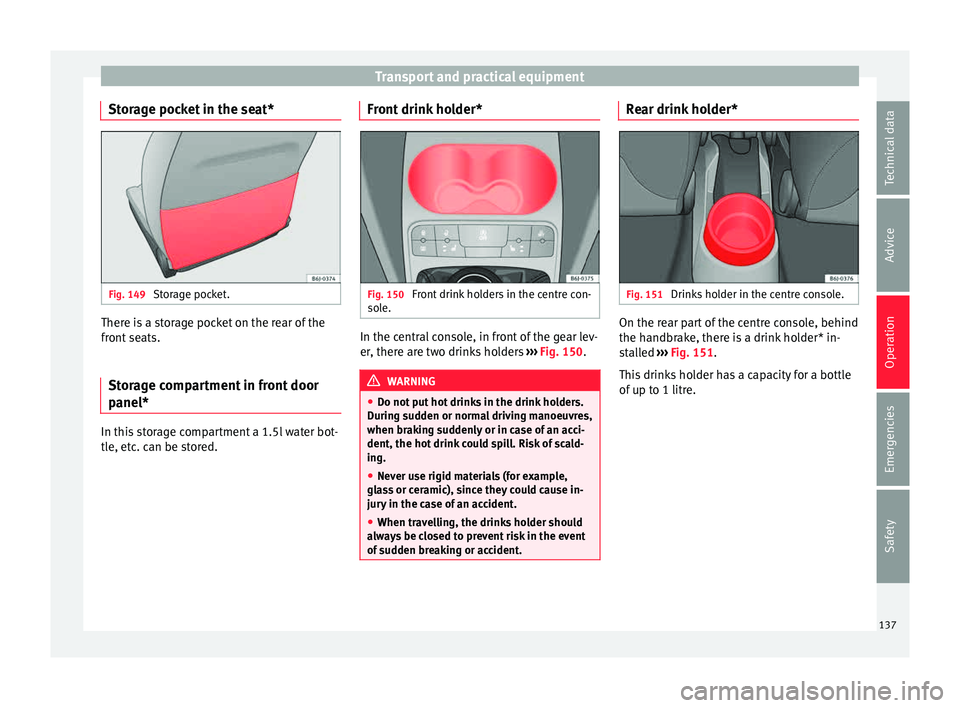
Storage pocket in the seat* Fig. 149
Storage pocket. There is a storage pocket on the rear of the
fr
ont
se
ats.
Storage compartment in front door
panel* In this storage compartment a 1.5l water bot-
tl
e, et
c
. can be stored. Front drink holder* Fig. 150
Front drink holders in the centre con-
so l
e. In the central console, in front of the gear lev-
er
, ther
e ar
e two drinks holders ››› Fig. 150. WARNING
● Do not p ut
hot drinks in the drink holders.
During sudden or normal driving manoeuvres,
when braking suddenly or in case of an acci-
dent, the hot drink could spill. Risk of scald-
ing.
● Never use rigid materials (for example,
glas
s or ceramic), since they could cause in-
jury in the case of an accident.
● When travelling, the drinks holder should
alwa
ys be closed to prevent risk in the event
of sudden breaking or accident. Rear drink holder*
Fig. 151
Drinks holder in the centre console. On the rear part of the centre console, behind
the h
andbr
ak
e, there is a drink holder* in-
stalled ››› Fig. 151.
This drinks holder has a capacity for a bottle
of up to 1 litre.
137
Technical data
Advice
Operation
Emergencies
Safety
Page 142 of 248
Operation
them, particularly in the case of heavy
ob
j
ects.
● Never exceed the allowed axle weights or
allo
wed maximum weight. If said weights are
exceeded, the driving characteristics of the
vehicle may change, leading to accidents, in-
juries and damage to the vehicle.
● Please note that the centre of gravity may
shift when tr
ansporting heavy objects; this
may affect vehicle handling and lead to an ac-
cident. Therefore, it is essential to adjust
your speed and driving style accordingly, to
avoid accidents.
● Never leave your vehicle unattended, espe-
cia
lly when the rear lid is open. Children
could climb into the luggage compartment,
closing the door behind them; they will be
trapped and run the risk of death.
● Never allow children to play in or around
the vehic
le. Close and lock all the doors and
rear lid when you leave the vehicle. Before
you lock the vehicle, make sure that there are
no adults or children in the vehicle.
● Please observe the notes on the ›››
page 56. CAUTION
Hard objects on the rear shelf could chafe
again s
t the wires of the heating element in
the heated rear window and cause damage. Note
● The tyr e pr
essure must be adjusted accord-
ing to the load. When necessary check the
tyre pressures on the label located on the in-
side fuel tank flap ››› page 212.
● Air circulation in the vehicle helps reduce
foggin
g of the windows. Used air escapes
through ventilation slits in the side trim of
the luggage compartment. Ensure that the
ventilation slots are never covered.
● Straps for securing the load to the fasten-
ing ring
s* are commercially available from ac-
cessory shops. Fastening rings*
3 App
lies to the model: IBIZA ST Fig. 157
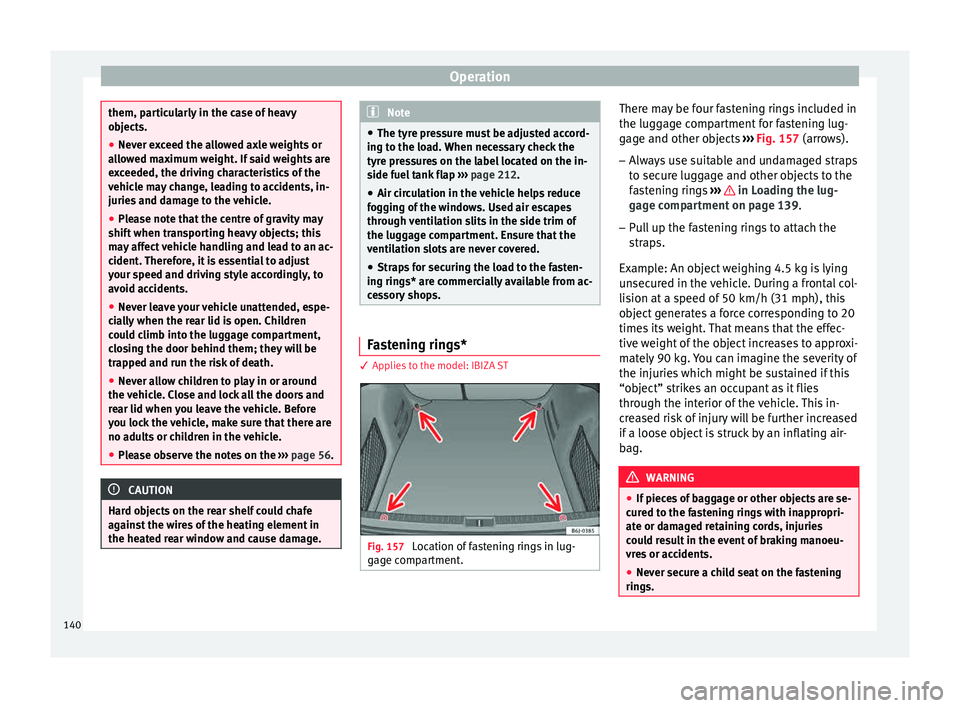
Location of fastening rings in lug-
g ag
e c
ompartment. There may be four fastening rings included in
the lug
g
ag
e compartment for fastening lug-
gage and other objects ››› Fig. 157 (arrows).
– Always use suitable and undamaged straps
to secur
e luggage and other objects to the
fastening rings ››› in Loading the lug-
g ag
e c
ompartment on page 139.
– Pull up the fastening rings to attach the
strap
s.
Example: An object weighing 4.5 kg is lying
unsecured in the vehicle. During a frontal col-
lision at a speed of 50 km/h (31 mph), this
object generates a force corresponding to 20
times its weight. That means that the effec-
tive weight of the object increases to approxi-
mately 90 kg. You can imagine the severity of
the injuries which might be sustained if this
“object” strikes an occupant as it flies
through the interior of the vehicle. This in-
creased risk of injury will be further increased
if a loose object is struck by an inflating air-
bag. WARNING
● If piec e
s of baggage or other objects are se-
cured to the fastening rings with inappropri-
ate or damaged retaining cords, injuries
could result in the event of braking manoeu-
vres or accidents.
● Never secure a child seat on the fastening
rings. 140
Page 143 of 248
Transport and practical equipment
Stretched luggage net* 3 Applies to the model: IBIZA ST
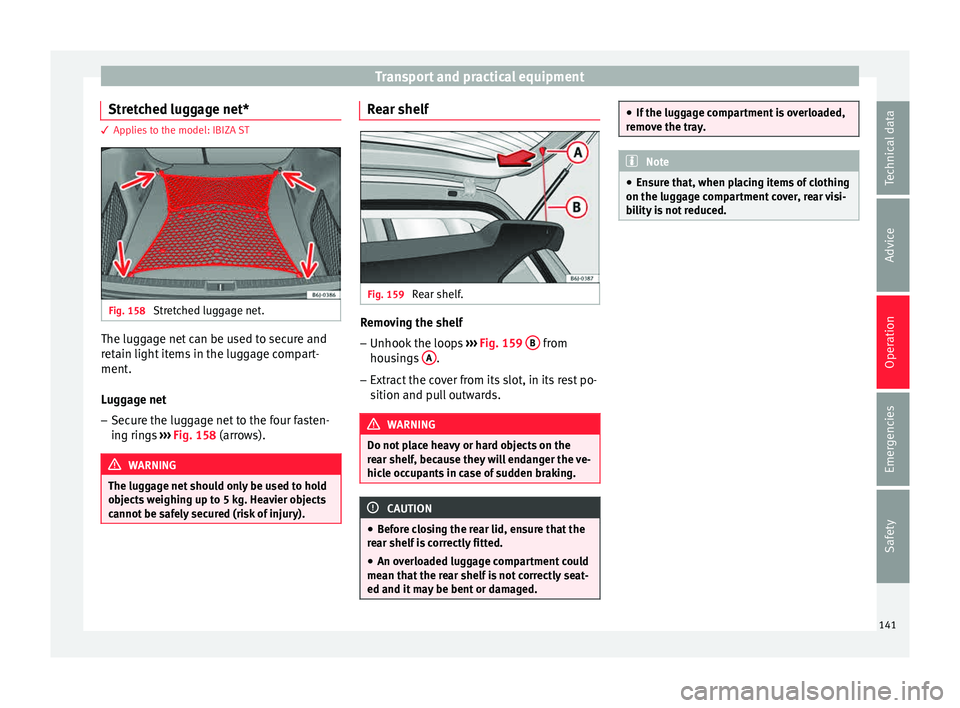
Fig. 158
Stretched luggage net. The luggage net can be used to secure and
r
et
ain light
items in the luggage compart-
ment.
Luggage net
– Secure the luggage net to the four fasten-
ing ring
s ››› Fig. 158 (arrows). WARNING
The luggage net should only be used to hold
ob j
ects weighing up to 5 kg. Heavier objects
cannot be safely secured (risk of injury). Rear shelf
Fig. 159
Rear shelf. Removing the shelf
–
Unhook the loops ››
›
Fig. 159 B from
hou s
in
gs A .
– Extract the cover from its slot, in its rest po-
sition and p
u
ll outwards. WARNING
Do not place heavy or hard objects on the
re ar shelf
, because they will endanger the ve-
hicle occupants in case of sudden braking. CAUTION
● Bef or
e closing the rear lid, ensure that the
rear shelf is correctly fitted.
● An overloaded luggage compartment could
mean that
the rear shelf is not correctly seat-
ed and it may be bent or damaged. ●
If the lug g
age compartment is overloaded,
remove the tray. Note
● En sur
e that, when placing items of clothing
on the luggage compartment cover, rear visi-
bility is not reduced. 141Technical data
Advice
Operation
Emergencies
Safety
Page 144 of 248
Operation
Rear shelf with storage compartment* 3 Applies to the model: IBIZA ST
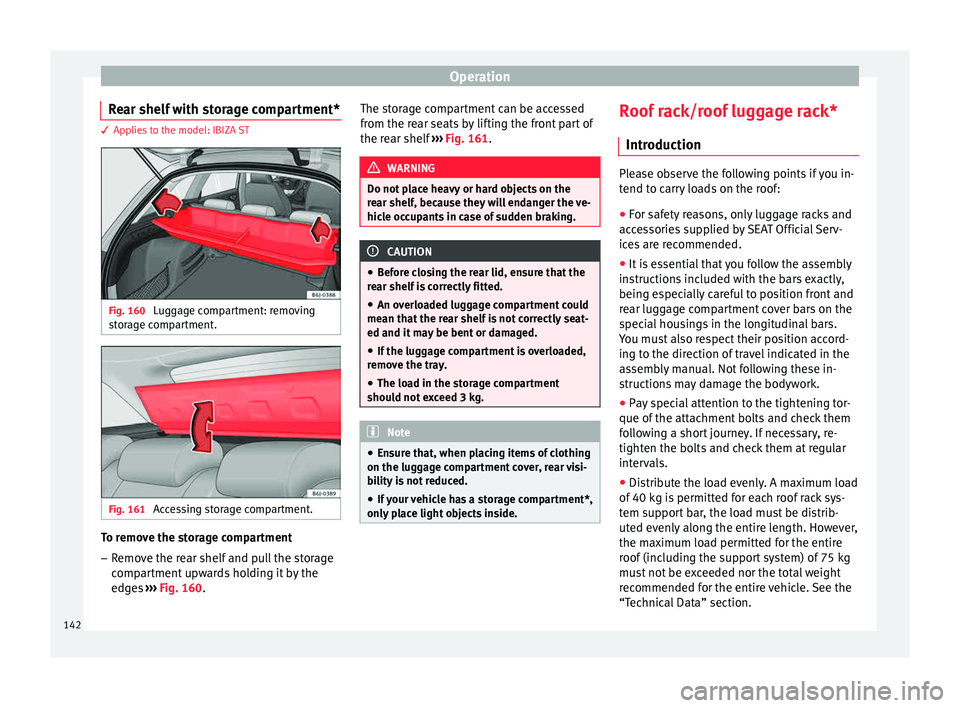
Fig. 160
Luggage compartment: removing
s t
or
age compartment. Fig. 161
Accessing storage compartment. To remove the storage compartment
– Remove the rear shelf and pull the storage
comp
ar
tment upwards holding it by the
edges ››› Fig. 160. The storage compartment can be accessed
from the re
ar seats by lifting the front part of
the rear shelf ››› Fig. 161. WARNING
Do not place heavy or hard objects on the
re ar shelf
, because they will endanger the ve-
hicle occupants in case of sudden braking. CAUTION
● Bef or
e closing the rear lid, ensure that the
rear shelf is correctly fitted.
● An overloaded luggage compartment could
mean that
the rear shelf is not correctly seat-
ed and it may be bent or damaged.
● If the luggage compartment is overloaded,
remov
e the tray.
● The load in the storage compartment
should not
exceed 3 kg. Note
● Ens ur
e that, when placing items of clothing
on the luggage compartment cover, rear visi-
bility is not reduced.
● If your vehicle has a storage compartment*,
only p
lace light objects inside. Roof rack/roof luggage rack*
Intr oduction Please observe the following points if you in-
tend t
o c
arry loads on the roof:
● For safety reasons, only luggage racks and
acce
ssories supplied by SEAT Official Serv-
ices are recommended.
● It is essential that you follow the assembly
instruction
s included with the bars exactly,
being especially careful to position front and
rear luggage compartment cover bars on the
special housings in the longitudinal bars.
You must also respect their position accord-
ing to the direction of travel indicated in the
assembly manual. Not following these in-
structions may damage the bodywork.
● Pay special attention to the tightening tor-
que of the att ac
hment bolts and check them
following a short journey. If necessary, re-
tighten the bolts and check them at regular
intervals.
● Distribute the load evenly. A maximum load
of 40 k
g is permitted for each roof rack sys-
tem support bar, the load must be distrib-
uted evenly along the entire length. However,
the maximum load permitted for the entire
roof (including the support system) of 75 kg
must not be exceeded nor the total weight
recommended for the entire vehicle. See the
“Technical Data” section.
142
Page 145 of 248
Transport and practical equipment
● When tr an
s
porting heavy or large objects
on the roof, any change in the normal vehicle
behaviour due to a change in the centre of
gravity or an increased wind resistance must
be taken into account. For this reason, a suit-
able speed and driving style must be used.
● On vehicles fitted with a sliding/tilting sun-
roof*, mak
e sure it does not hit the load on
the roof upon opening. Attach the cross bars of the roof carri-
er syst
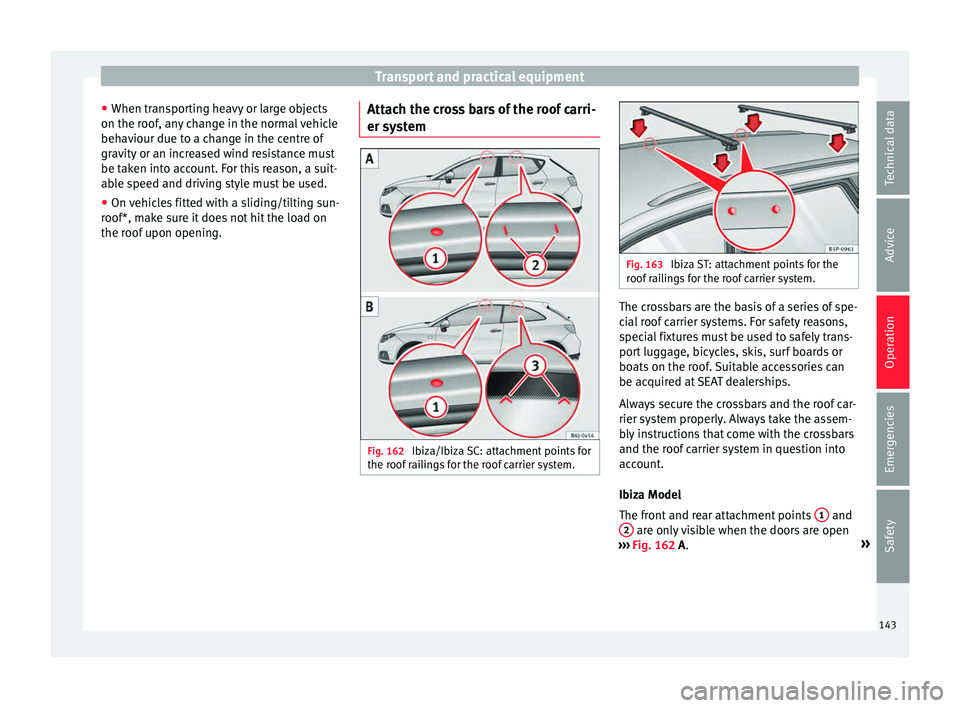
em Fig. 162
Ibiza/Ibiza SC: attachment points for
the r oof
r
ailings for the roof carrier system. Fig. 163
Ibiza ST: attachment points for the
roof r
ailings for the roof carrier system. The crossbars are the basis of a series of spe-
c
i
al
roof carrier systems. For safety reasons,
special fixtures must be used to safely trans-
port luggage, bicycles, skis, surf boards or
boats on the roof. Suitable accessories can
be acquired at SEAT dealerships.
Always secure the crossbars and the roof car-
rier system properly. Always take the assem-
bly instructions that come with the crossbars
and the roof carrier system in question into
account.
Ibiza Model
The front and rear attachment points 1 and
2 are only visible when the doors are open
› ›
›
Fig. 162 A. »
143
Technical data
Advice
Operation
Emergencies
Safety
Page 146 of 248
Operation
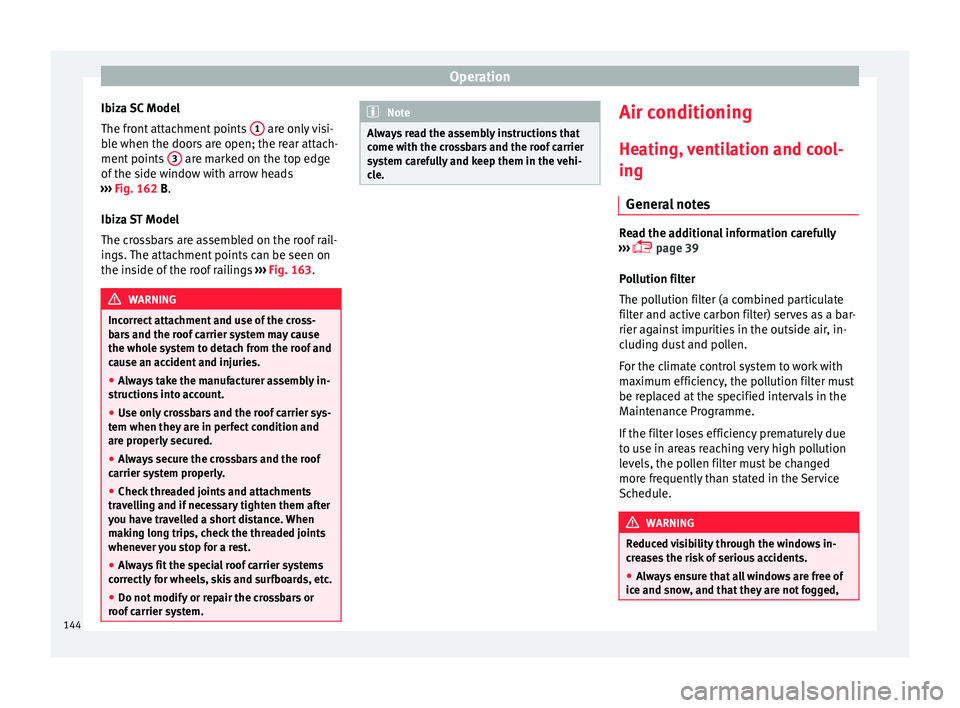
Ibiza SC Model
The fr ont
att
achment points 1 are only visi-
b l
e when the door
s are open; the rear attach-
ment points 3 are marked on the top edge
of the s
ide w
indow with arrow heads
››› Fig. 162 B.
Ibiza ST Model
The crossbars are assembled on the roof rail-
ings. The attachment points can be seen on
the inside of the roof railings ››› Fig. 163. WARNING
Incorrect attachment and use of the cross-
bar s
and the roof carrier system may cause
the whole system to detach from the roof and
cause an accident and injuries.
● Always take the manufacturer assembly in-
structions
into account.
● Use only crossbars and the roof carrier sys-
tem when they ar
e in perfect condition and
are properly secured.
● Always secure the crossbars and the roof
carrier sys
tem properly.
● Check threaded joints and attachments
travel
ling and if necessary tighten them after
you have travelled a short distance. When
making long trips, check the threaded joints
whenever you stop for a rest.
● Always fit the special roof carrier systems
correctly
for wheels, skis and surfboards, etc.
● Do not modify or repair the crossbars or
roof c
arrier system. Note
Always read the assembly instructions that
come w ith the c
rossbars and the roof carrier
system carefully and keep them in the vehi-
cle. Air conditioning
He atin
g,
ventilation and cool-
ing
General notes Read the additional information carefully
›› ›
page 39
Pollution filter
The pollution filter (a combined particulate
filter and active carbon filter) serves as a bar-
rier against impurities in the outside air, in-
cluding dust and pollen.
For the climate control system to work with
maximum efficiency, the pollution filter must
be replaced at the specified intervals in the
Maintenance Programme.
If the filter loses efficiency prematurely due
to use in areas reaching very high pollution
levels, the pollen filter must be changed
more frequently than stated in the Service
Schedule. WARNING
Reduced visibility through the windows in-
cr e
ases the risk of serious accidents.
● Always ensure that all windows are free of
ice and sno
w, and that they are not fogged,144
Page 147 of 248
Air conditioning
so as to maintain good visibility of everything
outs
ide.
● The m
aximum heat output required to de-
fros
t windows as quickly as possible is only
available when the engine has reached its
normal running temperature. Only drive when
you have good visibility.
● Always ensure that you use the heating
syst
em, fresh air system, air conditioner and
the heated rear window to maintain good visi-
bility to the outside.
● Never leave the air recirculation on for a
long period of time. If
the cooling system is
switched off and air recirculation mode
switched on, the windows can mist over very
quickly, considerably limiting visibility.
● Switch air recirculation mode off when it is
not requir
ed. WARNING
Stuffy or used air will increase fatigue and re-
duce driv er c
oncentration possibly resulting
in a serious accident.
● Never leave the fresh air fan turned off or
use the air rec
irculation for long periods of
time; the air in the vehicle interior will not be
refreshed. CAUTION
● If y
ou suspect that the air conditioner is
damaged, switch it off with the A/C button to prevent further damage and have it checked
by
a s
pecialised workshop.
● Repairs to the air conditioner require spe-
cia
list knowledge and special tools. There-
fore, we recommend you to take the vehicle
to a specialised workshop. Note
● If the humidity and t
emperature outside the
vehicle are high, condensation can drip off
the evaporator in the cooling system and
form a pool underneath the vehicle. This is
normal and does not indicate a leak.
● Keep the air intake slots in front of the
winds
creen free of snow, ice and leaves to en-
sure heating and cooling are not impaired,
and to prevent the windows from misting
over.
● The air from the vents flows through the ve-
hicle int
erior and is extracted by slots in the
luggage compartment designed for this pur-
pose. Therefore, you should avoid obstruct-
ing these slots with any kind of object.
● The air conditioner operates most effective-
ly with the w
indows and the sliding/tilting
sunroof* closed. However, if the temperature
inside the vehicle is excessive because of the
sun, the air inside can be cooled faster by
opening the windows for a short time.
● Do not smoke while air recirculation mode
is on, a
s smoke drawn into the air condition- ing system leaves residue on the evaporator,
produc
in
g a permanent unpleasant odour.
● At low outside temperatures, the compres-
sor switc
hes off automatically and cannot be
switched on even with the AUTO button.
● It is advisable to turn on the air condition-
ing at l
east once a month, to lubricate the
system gaskets and prevent leaks. If a de-
crease in the cooling capacity is detected, a
Technical Service should be consulted to
check the system.
● To ensure correct operation, the grilles on
both sides
of the screen must not be obstruc-
ted
● When the engine is under extreme strain,
switc
h off the compressor for a moment. Economic use of the air conditioning
When the air conditioning is switched on, the
c
ompr
e
ssor consumes engine power and has
influence on fuel consumption. Consider the
following points in order to have the system
operating in the minimum possible time.
● If the vehicle interior has overheated due to
an exc
essive solar radiation, it is best to
open the windows or doors to allow the hot
air to escape.
● While in motion, the air conditioning
should not
be switched on if the windows or
the sunroof* are open.
145
Technical data
Advice
Operation
Emergencies
Safety
Page 159 of 248
Driving
the brakes to overheat and the braking
dis
t
ance will increase. Apply and then release
the brakes alternately.
● Never let the vehicle run with the engine
switc
hed off. The braking distance is in-
creased considerably when the brake servo is
not active.
● If the brake fluid loses its viscosity and is
subj
ected to heavy use, vapour bubbles can
form in the brake system. This reduces the ef-
ficiency of the brakes.
● Non-standard or damaged front spoilers
coul
d restrict the airflow to the brakes and
cause them to overheat. Before purchasing
accessories please observe the relevant in-
structions ››› page 190, Modifications.
● If a brake system circuit fails, the braking
dist
ance will be increased considerably. Con-
tact a specialised workshop immediately and
avoid unnecessary journeys. Handbrake
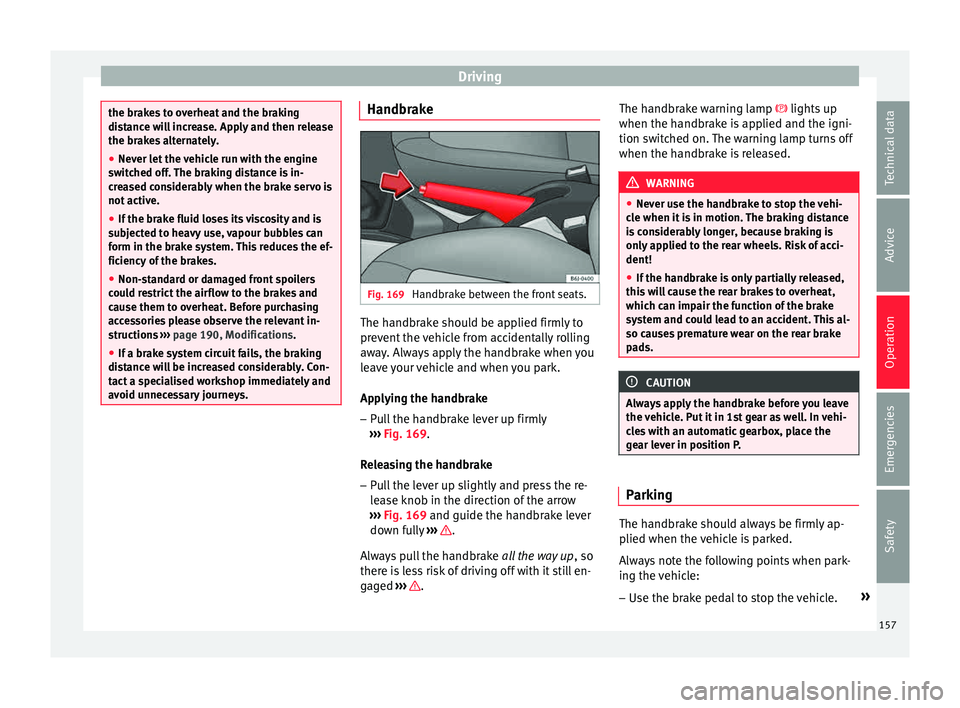
Fig. 169
Handbrake between the front seats. The handbrake should be applied firmly to
pr
ev
ent
the vehicle from accidentally rolling
away. Always apply the handbrake when you
leave your vehicle and when you park.
Applying the handbrake
– Pull the handbrake lever up firmly
›››
Fig. 169.
Releasing the handbrake
– Pull the lever up slightly and press the re-
lea
se knob in the direction of the arrow
››› Fig. 169 and guide the handbrake lever
down fully ››› .
A lw
a
ys pull the handbrake all the way up, so
there is less risk of driving off with it still en-
gaged ››› .The handbrake warning lamp lights
up
when the h andbr
ake is applied and the igni-
tion switched on. The warning lamp turns off
when the handbrake is released. WARNING
● Never u se the h
andbrake to stop the vehi-
cle when it is in motion. The braking distance
is considerably longer, because braking is
only applied to the rear wheels. Risk of acci-
dent!
● If the handbrake is only partially released,
this w
ill cause the rear brakes to overheat,
which can impair the function of the brake
system and could lead to an accident. This al-
so causes premature wear on the rear brake
pads. CAUTION
Always apply the handbrake before you leave
the v ehic
le. Put it in 1st gear as well. In vehi-
cles with an automatic gearbox, place the
gear lever in position P. Parking
The handbrake should always be firmly ap-
p
lied when the
v
ehicle is parked.
Always note the following points when park-
ing the vehicle: – Use the brake pedal to stop the vehicle. »
157
Technical data
Advice
Operation
Emergencies
Safety
Page 170 of 248
Operation
the engine. Avoid running the engine at high
s peed.
P eriodic
maintenance
Periodic maintenance work guarantees that,
before beginning a journey, you will not con-
sume more than the required amount of fuel.
A well-serviced engine gives you the benefit
of improved fuel efficiency as well as maxi-
mum reliability and an enhanced resale val-
ue.
A badly serviced engine can consume up to
10% more fuel than necessary.
Avoid short journeys
To reduce the consumption and emission of
polluting exhaust gases, the engine and the
exhaust gas filtration systems should reach
the optimum operating temperature.
With the engine cold, fuel consumption is
proportionally higher. The engine does not
warm up and fuel consumption does not nor-
malise until having driven approximately four
kilometres (2.5 miles). This is why we recom-
mend avoiding short trips whenever possi-
ble.
Maintain the correct tyre pressures
Bear in mind that keeping the tyres at an ad-
equate pressure saves fuel. If the tyre pres-
sure is just one bar (14.5 psi/100 kPa) too
low, fuel consumption can increase by as much as 5%. Due to the greater rolling resist-
ance, under
-inflation also increases tyre wear
wear and impairs handling.
The tyre pressures should always be checked
when the tyres are cold.
Do not use winter tyres all year round as they
increase fuel consumption by up to 10%.
Avoid unnecessary weight
Given that every kilo of extra weight will in-
crease the fuel consumption, it is advisable
to always check the luggage compartment to
make sure that no unnecessary loads are be-
ing transported.
A roof rack is often left in place for the sake
of convenience, even when it is no longer
needed. At a speed of 100 km/h (62 mph)
and 120 km/h (75 mph) your vehicle will use
about 12% more fuel as a result of the extra
wind resistance caused by the roof rack even
when it is not in use.
Save electricity
The engine activates the alternator, which
produces electricity. With the need for elec-
tricity, fuel consumption also increases. Be-
cause of this, always turn off electrical devi-
ces when you do not need them. Examples of
devices that use a lot of electricity are: the
blower at high speeds, the rear window heat-
ing or the seat heaters*. Note
● If y
our vehicle has Start-Stop, it is not rec-
ommended that you switch this function off.
● It is recommended that you close
the win-
dows when driving at more than 60 km/h
(37 mph)
● Do not drive with your foot resting on the
clutc
h pedal,, as the pressure can make the
plate spin, more fuel will be used and it can
burn the clutch plate lining, causing a serious
fault.
● Do not hold the car on a hill with the clutch,
use the foot
brake or hand brake, using the
latter to start. The fuel consumption will be
lower and you will prevent the clutch plate
from being damaged.
● On descents, use the engine brake, chang-
ing to the g
ear that is more suitable for the
slope. Fuel consumption will be “zero” and
the brakes will not suffer. Driving abroad
To drive abroad, the following must be taken
int
o c
on
sideration:
● For vehicles fitted with a catalytic converter
ensur
e that unleaded petrol is available for
the journey. See the chapter “Refuelling”. Au-
tomobile organisations will have information
about service station networks selling unlea-
ded fuel.
168
Page 172 of 248
Operation
the button
and the function buttons
Set up and
E
SC
System .
WARNING
You should switch on the ESC Sport mode on-
ly if the tr
affic conditions and your driving
ability allow you to do so safely: risk of skid-
ding!
● With ESC in Sport mode, the stabilising
function w
ill be limited to allow for a sportier
drive. The driving wheels could spin and the
vehicle could skid. Note
If the ASR is disconnected or the ESC’s Sport
mode is sel
ected, cruise control* will be
switched off. Electronic Stability Control (ESC)*
This Electronic Stability System reduces the
ri
sk
of
skidding and improves the vehicle's
stability and ability to hold the road.
The Electronic Stability Control (ESC) contains
the electronic differential lock (EDL) and the
traction control system (ASR). The ESC works
together with the ABS. Both control lamps
will light up if the ESC or ABS systems are
faulty.
The ESC system is started automatically
when the engine is started. The ESC system is always active and cannot
be switc
hed off. With the Easy Connect sys-
tem it is only possible to deactivate the ASR
or else select Sport mode.
The ASR can be deactivated when wheel spin
is desirable ››› page 172.
For example:
● When driving with snow chains.
● When driving in deep snow or on loose sur-
face
s.
● When the vehicle is stuck, to rock it back-
ward
s and forwards.
Press the button to switch the ASR back on
when you no longer need wheel spin.
Electronic Stability Control (ESC)*
The ESC reduces the risk of skidding by brak-
ing the wheels individually.
The system uses the steering wheel angle
and road speed to calculate the changes of
direction desired by the driver, and constant-
ly compares them with the actual behaviour
of the vehicle. When irregularities occur, for
example, if the vehicle begins to skid, the
ESC brakes the appropriate wheel automati-
cally.
The forces acting on the braked wheel bring
the vehicle back to a stable condition. If the
vehicle tends to oversteer (the rear end slides out), the system will act on the front
wheel on the outside of
the turn. WARNING
● Do not f or
get that the electronic stability
control ESC cannot defy the laws of physics.
This should be kept in mind, particularly on
slippery and wet roads and when towing a
trailer.
● Always adapt your driving style to suit the
condition of the r
oads and the traffic situa-
tion. The greater safety provided by the ESC
should not encourage you to run any risks. CAUTION
● To en s
ure that the ESC works correctly, all
four wheels must be fitted with the same
tyres. Any differences in the rolling radius of
the tyres can cause the system to reduce en-
gine power when this is not desired.
● Any modifications made to the vehicle (for
examp
le, to the engine, brake system, run-
ning gear or to the combination of wheels
and tyres) may affect the operation of the
ABS, EDL, ESC and ASR. Electronic differential lock (EDS)*
EDL helps the vehicle to start moving, accel-
er
at
e and c
limb a gradient in slippery condi-
tions where this may otherwise be difficult or
even impossible.
170