rear Seat Ibiza ST 2015 Owner's Guide
[x] Cancel search | Manufacturer: SEAT, Model Year: 2015, Model line: Ibiza ST, Model: Seat Ibiza ST 2015Pages: 248, PDF Size: 4.77 MB
Page 66 of 248
Safety
called “kinetic energy” is created both in the
p a
s
sengers and inside the vehicle.
The amount of “kinetic energy” depends on
the speed of the vehicle and the weight of
the vehicle and its passengers. The higher
the speed and the greater the weight, the
more energy there is to be “absorbed” in an
accident.
The most significant factor, however, is the
speed of the vehicle. If the speed doubles
from 25 km/h (15 mph) to 50 km/h
(30 mph), for example, the corresponding ki-
netic energy is multiplied by four.
Because the vehicle occupants in our exam-
ple are not restrained by seat belts, in the
event of crashing against a wall, all of the oc-
cupants' kinetic energy will be absorbed
solely by said impact.
Even at speeds of 30 km/h (19 mph) to
50 km/h (30 mph), the forces acting on bod-
ies in a collision can easily exceed one tonne
(1000 kg). At greater speed these forces are
even higher.
Vehicle occupants not wearing seat belts are
not “attached” to the vehicle. In a head-on
collision, they will move forward at the same
speed their vehicle was travelling just before
the impact. This example applies not only to
head-on collisions, but to all accidents and
collisions. Even at low speeds the forces acting on the
body in a co
llision are so great that it is not
possible to brace oneself with one's hands.
In a frontal collision, unbelted passengers
are thrown forward and will make violent con-
tact with the steering wheel, dash panel,
windscreen or whatever else is in the way
››› Fig. 81.
It is also important for rear passengers to
wear seat belts properly, as they could other-
wise be thrown forward violently through the
vehicle interior in an accident. Passengers in
the rear seats who do not use seat belts en-
danger not only themselves but also the front
occupants ››› Fig. 82. How to properly adjust your
seatbelt
F
astening and unfastening the seat
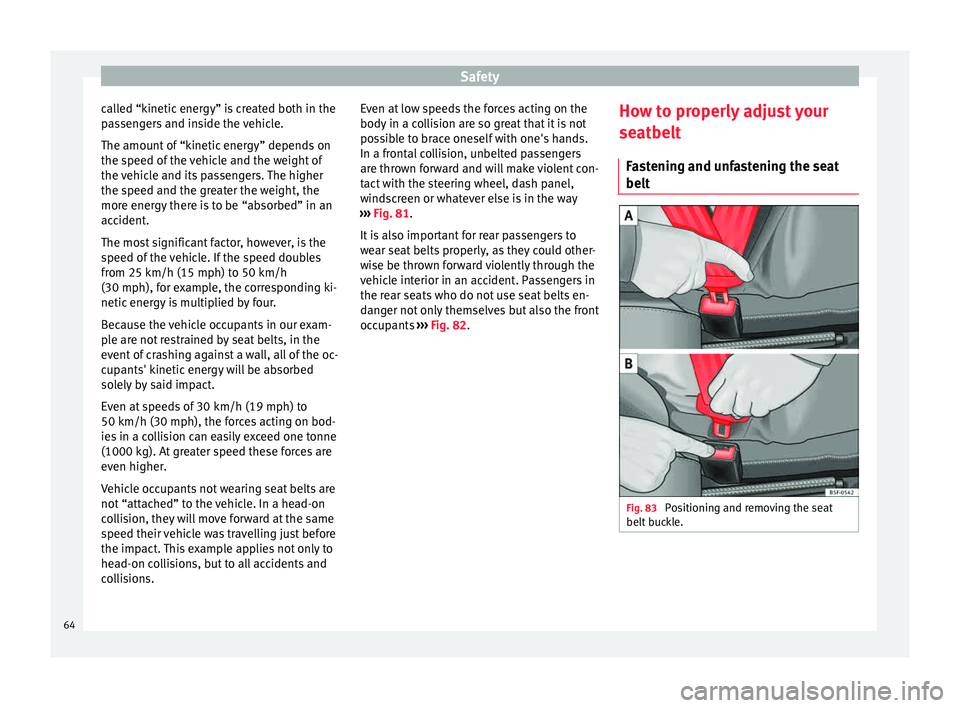
belt Fig. 83
Positioning and removing the seat
belt b
uc
kle. 64
Page 67 of 248
Seat belts
Fig. 84
Position of seat belt during pregnan-
cy . Fasten your seat belt
The se
at
belt
cannot offer its full protection if
the seat belt is not positioned correctly.
● Adjust the seat and head restraint correctly.
● To fasten the belt, take hold of the latch
plat
e and pull it slowly across your chest and
lap.
● Insert the latch plate into the buckle for the
appropri
ate seat and push it down until it is
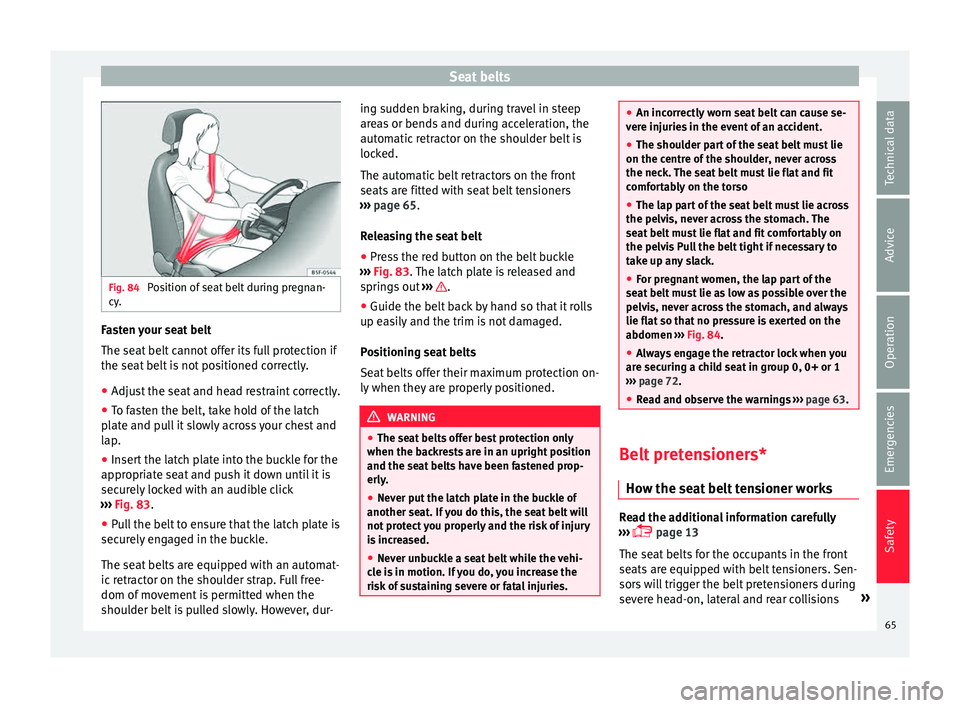
securely locked with an audible click
››› Fig. 83.
● Pull the belt to ensure that the latch plate is
securely
engaged in the buckle.
The seat belts are equipped with an automat-
ic retractor on the shoulder strap. Full free-
dom of movement is permitted when the
shoulder belt is pulled slowly. However, dur- ing sudden braking, during travel in steep
area
s or bends and during acceleration, the
automatic retractor on the shoulder belt is
locked.
The automatic belt retractors on the front
seats are fitted with seat belt tensioners
››› page 65.
Releasing the seat belt ● Press the red button on the belt buckle
›››
Fig. 83. The latch plate is released and
springs out ››› .
● Guide the belt back by hand so that it rolls
up e a
s
ily and the trim is not damaged.
Positioning seat belts
Seat belts offer their maximum protection on-
ly when they are properly positioned. WARNING
● The seat belt
s offer best protection only
when the backrests are in an upright position
and the seat belts have been fastened prop-
erly.
● Never put the latch plate in the buckle of
another seat. If
you do this, the seat belt will
not protect you properly and the risk of injury
is increased.
● Never unbuckle a seat belt while the vehi-
cle i
s in motion. If you do, you increase the
risk of sustaining severe or fatal injuries. ●
An incorr ectly
worn seat belt can cause se-
vere injuries in the event of an accident.
● The shoulder part of the seat belt must lie
on the centre of
the shoulder, never across
the neck. The seat belt must lie flat and fit
comfortably on the torso
● The lap part of the seat belt must lie across
the pelvis, nev
er across the stomach. The
seat belt must lie flat and fit comfortably on
the pelvis Pull the belt tight if necessary to
take up any slack.
● For pregnant women, the lap part of the
seat belt
must lie as low as possible over the
pelvis, never across the stomach, and always
lie flat so that no pressure is exerted on the
abdomen ››› Fig. 84.
● Always engage the retractor lock when you
are securin
g a child seat in group 0, 0+ or 1
››› page 72.
● Read and observe the warnings ›››
page 63. Belt pretensioners*
Ho w the se at
belt tensioner works Read the additional information carefully
› ›
›
page 13
The seat belts for the occupants in the front
seats are equipped with belt tensioners. Sen-
sors will trigger the belt pretensioners during
severe head-on, lateral and rear collisions »
65
Technical data
Advice
Operation
Emergencies
Safety
Page 69 of 248
Airbag system
airbag. In this case, the inflating airbag may
inflict c
ritic
al or fatal injuries on the occu-
pant. This also applies to children.
Always maintain the greatest possible dis-
tance between yourself and the front airbag.
This way, the front airbags can completely
deploy when triggered, providing their maxi-
mum protection.
The most important factors that will trigger
an airbag are: the type of accident, the angle
of collision and the speed of the vehicle.
Whether or not the airbags are triggered de-
pends primarily on the vehicle deceleration
rate resulting from the collision and detected
by the control unit. If the vehicle deceleration
occurring during the collision and measured
by the control unit remains below the speci-
fied reference values, the front, side and/or
curtain airbags will not be triggered. Take in-
to account that the visible damage in a vehi-
cle involved in an accident, no matter how
serious, is not a determining factor for the
airbags to have been triggered. WARNING
● We arin
g the seat belt incorrectly or assum-
ing an incorrect sitting position can lead to
critical or fatal injuries.
● All vehicle occupants, including children,
who are not pr
operly belted can sustain criti-
cal or fatal injuries if the airbag is triggered.
Children up to 12 years old should always travel on the rear seat. Never transport chil-
dren in the
v
ehicle if they are not restrained
or the restraint system is not appropriate for
their age, size or weight.
● If you are not wearing a seat belt, or if you
lean f
orward or to the side while travelling or
assume an incorrect sitting position, there is
a substantially increased risk of injury. This
increased risk of injury will be further in-
creased if you are struck by an inflating air-
bag.
● To reduce the risk of injury from an inflating
airbag, alw
ays wear the seat belt properly.
● Always adjust the front seats properly. Description of airbag system
The airbag system mainly comprises (as per
v
ehic
l
e equipment):
● an electronic control and monitoring sys-
tem (contr
ol unit)
● frontal airbags for driver and passenger,
● side airbags,
● curtain airbags,
● a control lamp on the dash p
anel
››› page 68.
● key-operated switch for front passenger air-
bag,
● a contr
ol lamp for disabling/enabling the
front p
assenger airbag. The airbag system operation is monitored
electronic
ally. The airbag control lamp will il-
luminate for a few seconds every time the ig-
nition is switched on (self-diagnosis).
There is a fault in the system if the control
lamp :
● does not light up when the ignition is
switc
hed on ››› page 68,
● turns off after 4 seconds after the ignition
is sw
itched on
● turns off and then lights up again after the
ignition is sw
itched on
● illuminates or flashes while the vehicle is
movin
g.
The airbag system is not triggered if:
● the ignition is switched off
● there is a minor frontal collision
● there is a minor side collision
● there is a rear-end collision
● the vehicle turns over. WARNING
● The seat belt
s and airbags can only provide
maximum protection if the occupants are
seated correctly ››› page 57, Correct position
for passengers.
● If a fault has occurred in the airbag system,
have the sy
stem checked immediately by a
specialised workshop. Otherwise, during a » 67
Technical data
Advice
Operation
Emergencies
Safety
Page 70 of 248
Safety
frontal collision the system might not trigger
corr
ectly
or may fail to trigger at all. Airbag activation
The airbags deploy extremely rapidly, within
thous
andths
of a second, to provide addi-
tional protection in the event of an accident.
A fine dust may develop when the airbag de-
ploys. This is normal and it is not an indica-
tion of fire in the vehicle.
The airbag system is only ready to function
when the ignition is on.
In special accidents instances, several air-
bags may activate at the same time.
In the event of minor head-on and side colli-
sions, rear-end collisions, overturning or roll-
over of the vehicle, airbags do not activate.
Activation factors
The conditions that lead to the airbag system
activating in each situation cannot be gener-
alised. Some factors play an important role,
such as the properties of the object the vehi-
cle hits (hard/soft), angle of impact, vehicle
speed, etc.
Deceleration trajectory is key for airbag acti-
vation. The control unit analyses the collision trajec-
tor
y
and activates the respective restraint
system.
If the deceleration rate is below the prede-
fined reference value in the control unit the
airbags will not be triggered, even though
the accident may cause extensive damage to
the car.
The following airbags are triggered in seri-
ous head-on collisions
● Driver airbag.
● Front passenger front airbag
The fol
lowing airbags are triggered in seri-
ous side-on collisions
● Front side airbag on the side of the acci-
dent.
● Re
ar side airbag on the side of the acci-
dent.
● Cur
tain (head) airbag on the side of the ac-
cident.
In an ac
cident with airbag activation:
● the interior lights switch on (if the interior
light swit
ch is in the courtesy light position);
● the hazard warning lights switch on;
● all doors are unlocked;
● the fuel supply to the engine is cut. Airbag control lamp and seat belt ten-
sioner The control lamp monitors all airbags and
seat
belt
tensioners in the vehicle, including
control units and wiring connections.
Monitoring of airbag and belt tensioner sys-
tem
Both the airbag and belt tensioner systems
operation is constantly monitored electroni-
cally. The control lamp will light up for a
few seconds every time the ignition is switch-
ed on (self-diagnosis).
The system must be checked when the con-
trol lamp :
● does not light up when the ignition is
swit c
hed on,
● turns off after 4 seconds after the ignition
is sw
itched on
● turns off and then lights up again after the
ignition is sw
itched on
● illuminates or flashes while the vehicle is
movin
g.
In the event of a malfunction, the warning
lamp remains on continuously. Have the air-
bag system inspected immediately by a spe-
cialised workshop.
68
Page 72 of 248
Safety
●
The side and he a
d airbags are managed
through sensors located in the interior of the
front doors. To ensure the correct operation of
the side and curtain (head) airbags neither
the doors nor the door panels should be
modified in any way (e.g. fitting loudspeak-
ers). If the front door is damaged, the airbag
system may not work correctly. All work car-
ried out on the front door must be done in a
specialised workshop.
● In a side-on collision the side airbags will
not work
if the sensors do not correctly meas-
ure the pressure increase on the interior of
the doors, due to air escaping through the
areas with holes or openings in the door pan-
el.
● Never drive if the interior door panels have
been remov
ed or if the panels have not been
correctly fitted.
● Never drive the vehicle if the loudspeakers
in the door panels
have been removed, un-
less the holes left by the loudspeakers have
been closed properly.
● Always check that the openings are closed
or cov
ered if additional loudspeakers or other
equipment are fitted inside the door panels.
● Any work carried out to the doors should be
made in an authori
sed specialised workshop.Curtain airbags*
Read the additional information carefully
› ›
›
page 15. WARNING
The airbag is deployed at high speed in frac-
tions of
a second.
● Do not obstruct the head-protection airbag
deployment
areas.
● Never secure objects over the curtain air-
bag co
ver or in its deployment area.
● Occupants of the front seats and rear side
seats
must never carry any other people, ani-
mals or objects in the deployment space be-
tween them and the airbags. Make sure that
all the vehicle occupants, including children,
observe this.
● The clothes hangers are intended only for
light artic
les of clothing. Do not leave any
heavy or sharp-edged objects in the pockets.
● Do not mount accessories on the doors.
● Use only sun blinds which have been ex-
pres
sly approved for use in your vehicle.
● Do not turn the sun blinds towards the win-
dows
if there are objects, e.g. pens or garage
remote controls, secured to them. Deactivating airbags
D e
activ
ation of front passenger front
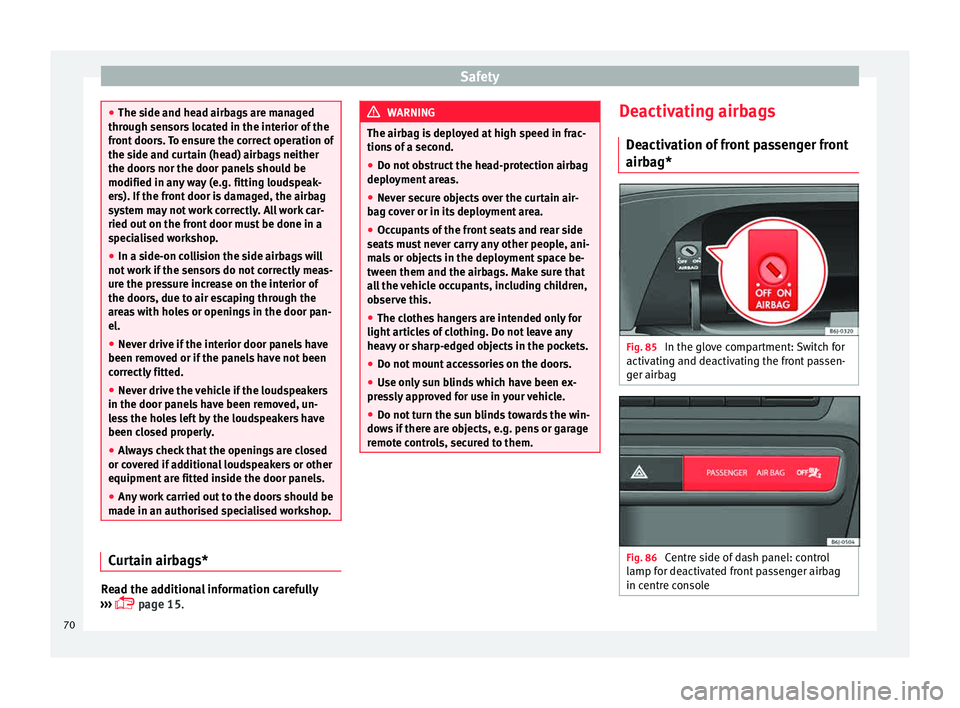
airbag* Fig. 85
In the glove compartment: Switch for
activ atin
g and de
activating the front passen-
ger airbag Fig. 86
Centre side of dash panel: control
l amp f
or de
activated front passenger airbag
in centre console 70
Page 73 of 248
Airbag system
Read the additional information carefully
› ›
›
page 14
If you fit a rear-facing child seat to the front
passenger seat, the front passenger front air-
bag must be de-activated.
When the front passenger airbag is deactiva-
ted, this means that only the front passenger
front airbag is deactivated. All the other air-
bags in the vehicle remain activated.
Activating the front passenger front airbag
– Switch the ignition off.
– Open the glove compartment on the front
pas
senger side.
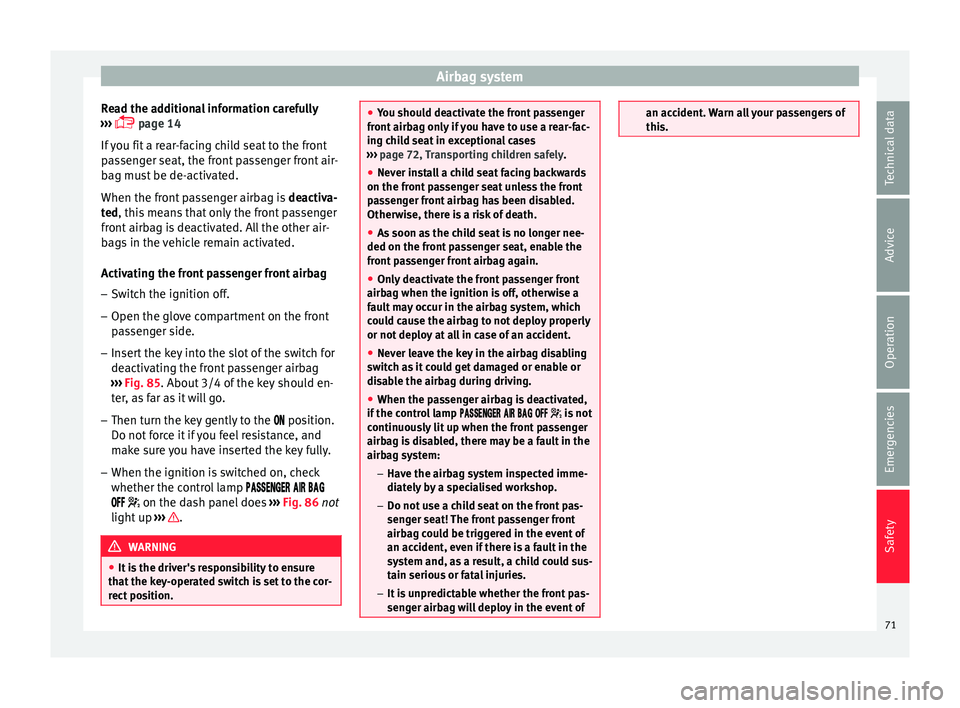
– Insert the key into the slot of the switch for
deactivatin
g the front passenger airbag
››› Fig. 85. About 3/4 of the key should en-
ter, as far as it will go.
– Then turn the key gently to the position.
Do not
force it if you feel resistance, and
make sure you have inserted the key fully.
– When the ignition is switched on, check
whether the contro
l lamp
on the dash panel does ››› Fig. 86 not
light up ››› .
WARNING
● It i s
the driver's responsibility to ensure
that the key-operated switch is set to the cor-
rect position. ●
You shou l
d deactivate the front passenger
front airbag only if you have to use a rear-fac-
ing child seat in exceptional cases
››› page 72, Transporting children safely.
● Never install a child seat facing backwards
on the front p
assenger seat unless the front
passenger front airbag has been disabled.
Otherwise, there is a risk of death.
● As soon as the child seat is no longer nee-
ded on the front p
assenger seat, enable the
front passenger front airbag again.
● Only deactivate the front passenger front
airbag when the ignition is
off, otherwise a
fault may occur in the airbag system, which
could cause the airbag to not deploy properly
or not deploy at all in case of an accident.
● Never leave the key in the airbag disabling
switc
h as it could get damaged or enable or
disable the airbag during driving.
● When the passenger airbag is deactivated,
if the contr
ol lamp is not
continuously lit up when the front passenger
airbag is disabled, there may be a fault in the
airbag system:
–Have the airbag system inspected imme-
diately by a specialised workshop.
– Do not use a child seat on the front pas-
senger seat! The front passenger front
airbag could be triggered in the event of
an accident, even if there is a fault in the
system and, as a result, a child could sus-
tain serious or fatal injuries.
– It is unpredictable whether the front pas-
senger airbag will deploy in the event of an accident. Warn all your passengers of
this.
71
Technical data
Advice
Operation
Emergencies
Safety
Page 74 of 248
Safety
Transporting children safely Saf ety
f
or children
Introduction For safety reasons, as we have learned from
acc
ident
statistics, we recommend that chil-
dren under 12 years of age travel in the rear
seats. Depending on their age, height and
weight, children travelling in rear seats must
use a child seat or a seat belt. For safety rea-
sons, the child seat should be installed in the
rear seat, behind the front passenger seat or
in the centre back seat.
The physical laws involved and the forces
acting in a collision apply also to children
››› page 63. But unlike adults, children do not
have fully developed muscle and bone struc-
tures. This means that children are subject to
a greater risk of injury.
To reduce the risk of injuries, children must
always use special child restraint systems
when travelling in the vehicle.
We recommend the use of child safety prod-
ucts from the SEAT Original Accessories Pro-
gramme, which includes systems for all ages
made by “Peke” (not for all countries).
These systems have been especially de-
signed and approved, complying with the
ECE-R44. regulation. Follow the manufacturer's instructions and
ob
ser
ve any statutory requirements when in-
stalling and using child seats. Always read
and note ››› page 72.
We recommend you always carry the manu-
facturer's Child Seat Instruction Manual to-
gether with the on-board documentation.
Important information regarding the
front p
assenger's airbag Read the additional information carefully
› ›
›
page 16.
Read and always observe the safety informa-
tion included in the following chapters:
● Safety distance with respect to the passen-
ger airbag ›
›› page 66.
● Objects between the passenger and the
pas
senger side airbag ››› in Front airbags
on p ag
e 69
.
The passenger side front airbag, when ena-
bled, is a serious risk for a child that is facing
backward since the airbag can strike the seat
with such force that it can cause serious or
fatal injuries. Children up to 12 years old
should always travel on the rear seat.
Therefore we strongly recommend you to
transport children on the rear seats. This is
the safest location in the vehicle. Alternative-
ly, the front passenger airbag can be disa- bled with a key-operated switch
›››
page 70.
When transporting children, use a child seat
appropriate to the age and size of each child. WARNING
● If a c hi
ld seat is secured to the front pas-
senger seat, the risk to the child of sustain-
ing critical or fatal injuries in the event of an
accident increases.
● An inflating front passenger airbag can
strike the r
ear-facing child seat and project it
with great force against the door, the roof or
the backrest.
● Never install a child seat facing backwards
on the front p
assenger seat unless the front
passenger front airbag has been disabled.
Risk of potentially fatal injuries to the child!
However, if it is necessary, in exceptional ca-
ses, to transport a child in the front passen-
ger seat, the front passenger front airbag
must always be disabled ››› page 70, Deacti-
vation of front passenger front airbag*. If the
front passenger seat has a height adjustment
option, move it to the highest position.
● For those vehicles that do not include a key
lock sw
itch to deactivate the airbag, the vehi-
cle must be taken to a technical service.
● All vehicle occupants, especially children,
must
assume the proper sitting position and
be properly belted in while travelling.
● Never hold children or babies on your lap,
this c
an result in potentially fatal injuries to
the child! 72
Page 75 of 248
Transporting children safely
●
Never a l
low a child to be transported in a
vehicle without being properly secured, or to
stand up or kneel on a seat while travelling.
In an accident, the child could be flung
through the vehicle, causing possibly fatal in-
juries to themselves and to the other vehicle
occupants.
● If children assume an improper sitting posi-
tion when the vehic
le is moving, they expose
themselves to greater risk of injury in the
event of a sudden braking manoeuvre or in an
accident. This is particularly important if the
child is travelling on the front passenger seat
and the airbag system is triggered in an acci-
dent; as this could cause serious injury or
even death.
● A suitable child seat can protect your child!
● Never leave a child alone in the child seat
or inside the
vehicle because depending on
the season, very high temperatures may be
reached inside a parked vehicle, which could
be fatal.
● Children who are less than 1.5 metres tall
must
not wear a normal seat belt without a
child seat, as this could cause injuries to the
abdominal and neck areas during a sudden
braking manoeuvre or in an accident.
● Do not allow the seat belt to become twis-
ted and the seat
belt should be properly in
place ››› page 61.
● Only one child may occupy a child seat
›››
page 73, Child seats. ●
When a chi l
d seat is mounted in the rear
seats, the door child-proof lock should be ac-
tivated ››› page 115. Child seats
Safety in
structions Read the additional information carefully
›› ›
page 16. WARNING
When travelling, children must be secured in
the v ehic
le with a restraint system suitable
for age, weight and size.
● Read and always observe information and
warning
s concerning the use of child seats
››› page 72. WARNING
The retaining rings are designed only for use
with “ISOFIX” and T op
Tether* system child
seats.
● Never secure other child seats that do not
have the “ISOFIX” or T
op Tether* system, or
retaining belts or objects to the fastening
rings - this can result in potentially fatal inju-
ries to the child.
● Ensure that the child seat is secured cor-
rectly u
sing the “ISOFIX” and Top Tether* se-
curing rings. WARNING
An undue installation of the safety seat will
incr e
ase the risk of injury in the event of a
crash.
● Never tie the retainer strap to a hook in the
luggag
e compartment.
● Never secure or tie luggage or other items
to the low
er anchorages (ISOFIX) or the upper
ones (Top Tether). Categorisation of child seats into
gr
oup
s Only use child seats that are officially ap-
pr
o
v
ed and suitable for the child.
Child seats are subject to the regulation ECE-
R 44. ECE-R stands for: Economic Commis-
sion for Europe Regulation.
The child seats are grouped into 5 catego-
ries:
Group 0: Up to 10 kg (up to around 9
months)
Group 0+: Up to 13 kg (up to around 18
months)
Group 1: from 9 to 18 kg (up to approx. 4
years old)
Group 2: from 15 to 25 kg (up to approx. 7
years old) »
73
Technical data
Advice
Operation
Emergencies
Safety
Page 78 of 248
Emergencies
●
Never s t
art the engine when the vehicle is
on the jack. Risk of accident.
● If work is to be carried out underneath the
vehicl
e, this must be secured by suitable
means. Otherwise, there is a risk of injury. Note
The jack does not generally require any main-
t en anc
e. If required, it should be greased us-
ing universal type grease. Spare wheel (temporary spare
wheel)*
The temporary spare wheel is stored under
the floor p
anel
in the lug
gage compartment
and is attached by a thumbnut.
How to use the temporary spare wheel
If you ever have a punctured tyre or loss of
pressure, the temporary spare wheel is only
intended for temporary use until you reach a
workshop. Change it for a duty wheel as soon
as possible.
Please note the following restrictions when
using the temporary spare wheel. This tem-
porary spare wheel has been specially de-
signed for your vehicle, thus, it cannot be
changed with the temporary spare wheel
from another vehicle. No other type of tyre (normal summer or win-
ter tyr
e) may be fitted on the compact tempo-
rary spare wheel rim.
Snow chains
For technical reasons, snow chains must not
be used on the temporary spare wheel.
If you have a puncture on one of the front
wheels when using snow chains, fit the tem-
porary spare wheel in place of one of the rear
wheels. Fit the snow chains on the rear wheel
that you have removed and replace the punc-
tured front wheel with this wheel.
Extraction of the spare wheel in vehicles
with SEAT SOUND 6 speakers (with subwoof-
er)*
● Disassemble the subwoofer's
floor panel
(carpet) as follows:
● Pull the carpet upwards to remove it.
● Disconnect the subwoofer's
speaker cable.
● Turn the securing wheel anti-clockwise.
● Remove the subwoofer
speaker and the
spare wheel.
● When replacing the spare wheel, place the
subwoofer
speaker in the direction indicated
by the arrow and with the word “FRONT” fac-
ing forward.
● Reconnect the speaker cable and firmly ro-
tat e the sec
uring wheel clockwise so that the subwoofer sys
t
em and wheel are firmly in
place. WARNING
● Aft er fittin
g the temporary spare wheel,
check the tyre pressures as soon as possible.
Failure to do so may cause an accident. The
tyre pressures are listed on the inside of the
fuel tank flap.
● Do not drive at over 80 km/h (50 mph)
when the temporar
y spare wheel is fitted on
the vehicle: risk of accident!
● Avoid heavy acceleration, hard braking and
fas
t cornering: risk of accident!
● Never use more than one temporary spare
wheel at the s
ame time, risk of accident.
● No other type of tyre (normal summer or
winter ty
re) may be fitted on the compact
temporary spare wheel rim. Tyre repair
TM S (T
yre Mobility System)* Read the additional information carefully
› ›
›
page 46
The Anti-puncture kit* (Tyre Mobility System)
will reliably seal punctures caused by the
penetration of a foreign body of up to about
4 mm in diameter. Do not remove foreign ob-
jects, e.g. screws or nails, from the tyre.
76
Page 80 of 248
Emergencies
The tyre mobility set is located underneath
the floor c o
v
ering in the luggage compart-
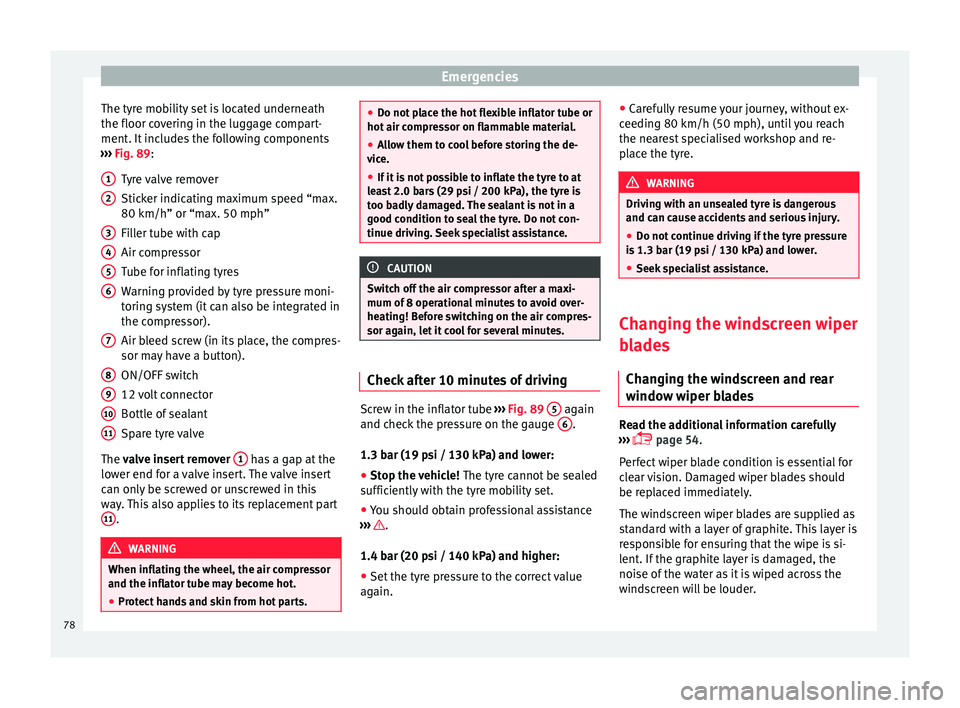
ment. It includes the following components
››› Fig. 89:
Tyre valve remover
Sticker indicating maximum speed “max.
80 km/h” or “max. 50 mph”
Filler tube with cap
Air compressor
Tube for inflating tyres
Warning provided by tyre pressure moni-
toring system (it can also be integrated in
the compressor).
Air bleed screw (in its place, the compres-
sor may have a button).
ON/OFF switch
12 volt connector
Bottle of sealant
Spare tyre valve
The valve insert remover 1 has a gap at the
lo w
er end f
or a valve insert. The valve insert
can only be screwed or unscrewed in this
way. This also applies to its replacement part 11 .
WARNING
When inflating the wheel, the air compressor
and the inflat or t
ube may become hot.
● Protect hands and skin from hot parts. 1
2
3
4
5
6
7
8
9
10
11 ●
Do not p l
ace the hot flexible inflator tube or
hot air compressor on flammable material.
● Allow them to cool before storing the de-
vice.
● If
it is not possible to inflate the tyre to at
lea
st 2.0 bars (29 psi / 200 kPa), the tyre is
too badly damaged. The sealant is not in a
good condition to seal the tyre. Do not con-
tinue driving. Seek specialist assistance. CAUTION
Switch off the air compressor after a maxi-
mum of 8 operation
al minutes to avoid over-
heating! Before switching on the air compres-
sor again, let it cool for several minutes. Check after 10 minutes of driving
Screw in the inflator tube
››
›
Fig. 89 5 again
and c hec
k
the pressure on the gauge 6 .
1.3 b ar (19 p
s
i / 130 kPa) and lower:
● Stop the vehicle! The tyre c
annot be sealed
sufficiently with the tyre mobility set.
● You should obtain professional assistance
›››
.
1.4 b ar (20 p
s
i / 140 kPa) and higher:
● Set the tyre pressure to the correct value
again. ●
Caref
ully resume your journey, without ex-
ceeding 80 km/h (50 mph), until you reach
the nearest specialised workshop and re-
place the tyre. WARNING
Driving with an unsealed tyre is dangerous
and can c au
se accidents and serious injury.
● Do not continue driving if the tyre pressure
is 1.3
bar (19 psi / 130 kPa) and lower.
● Seek specialist assistance. Changing the windscreen wiper
b
l
a
des
Changing the windscreen and rear
window wiper blades Read the additional information carefully
› ›
›
page 54.
Perfect wiper blade condition is essential for
clear vision. Damaged wiper blades should
be replaced immediately.
The windscreen wiper blades are supplied as
standard with a layer of graphite. This layer is
responsible for ensuring that the wipe is si-
lent. If the graphite layer is damaged, the
noise of the water as it is wiped across the
windscreen will be louder.
78