navigation system Seat Ibiza ST 2016 Owner's manual
[x] Cancel search | Manufacturer: SEAT, Model Year: 2016, Model line: Ibiza ST, Model: Seat Ibiza ST 2016Pages: 252, PDF Size: 5.56 MB
Page 28 of 252
The essentials
A specialised workshop will be able to pro-
gr amme or modif
y a
dditional functions, ac-
cording to the vehicle equipment. SEAT rec-
ommends visiting a SEAT Official Service.
Some menu options can only be read when
the vehicle is at a standstill.
As long as a priority 1 warning is displayed, it
will not be possible to read the menus. Some
warning messages can be confirmed and
made to disappear with the windscreen wiper
lever button or the multifunction steering
wheel button.
The information system also provides the fol-
lowing information and displays (depending
on the vehicle's equipment):
Driving data ››› page 29
■ Vehicle status
■ MFD from departure
■ MFD from refuelling
■ MFD total calculation
Assist systems ››› table on page 27
■ Reverse (optional)
Navigation ››› Booklet Navigation system
Audio ››› Booklet Radio or ››› Booklet Naviga-
tion system
Telephone ››› Booklet Radio or ››› Book-
let Navigation system
Vehicle ››› table on page 27 WARNING
Any distraction may lead to an accident, with
the risk of injur
y.
● Do not operate the instrument panel con-
trols
when driving. Operating the instrument panel me-
nus
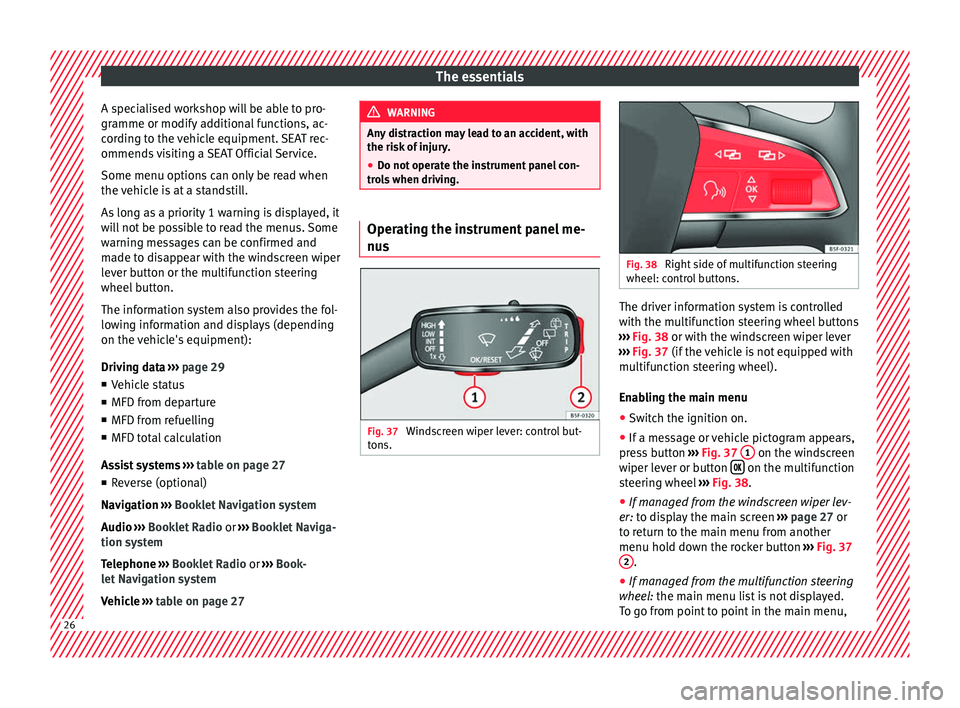
Fig. 37
Windscreen wiper lever: control but-
t on
s. Fig. 38
Right side of multifunction steering
wheel: contro l
buttons. The driver information system is controlled
w
ith the mu
ltifu
nction steering wheel buttons
››› Fig. 38 or with the windscreen wiper lever
››› Fig. 37 (if the vehicle is not equipped with
multifunction steering wheel).
Enabling the main menu
● Switch the ignition on.
● If a message or vehicle pictogram appears,
press
button ››› Fig. 37 1 on the windscreen
w iper l
ever or b
utton on the multifunction
s t
eerin g wheel
››› Fig. 38.
● If managed from the windscreen wiper lev-
er: to disp
lay the main screen ››› page 27 or
to return to the main menu from another
menu hold down the rocker button ››› Fig. 37
2 .
● If managed from the multifunction steering
wheel: the m
ain menu list is not displayed.
To go from point to point in the main menu, 26
Page 29 of 252
The essentials
press button
or
several times
› ›
›
Fig. 38
.
Select a submenu ● Press the rocker switch ››› Fig. 37
2 on the
w ind
sc
reen wiper lever up or down or turn
the thumbwheel of the multifunction steering
wheel ››› Fig. 38 until the desired option ap-
pears marked on the menu.
● The selected option is displayed between
two horizontal
lines. In addition, a triangle is
displayed on the right:
● To consult the submenu option, press but-
ton ›››
Fig. 37 1 on the windscreen wiper
l ev
er or b utt
on on the multifunction steer-
in g wheel
› ›
› Fig. 38.
Making changes according to the menu ● Make the desired changes with the rocker
switch on the w
indscreen wiper lever or the
thumbwheel of the multifunction steering
wheel. To increase or decrease the values
more quickly, turn the thumbwheel faster.
● Mark or confirm the selection with button
››› Fig. 37
1 on the windscreen wiper lever
or b utt
on on the multifunction steering
wheel
›
››
Fig. 38. Menu
MenuFunction
Driving
dataInformation and possible configurations
of the multifunction display (MFD)
››› page 29, ››› page 101.
Assist
systemsInformation and possible configurations
of the driver assistance systems
››› page 101.
Naviga-
tion
Information instructions from the activa-
ted navigation system: when a route guid-
ance is activated, the turning arrows and
proximity bars are displayed. The appear-
ance is similar to the Easy Connect sys-
tem.
If route guidance is not activated, the di-
rection of travel (compass) and the name
of the street along which you are driving
are shown ››› Booklet Navigation system.
Audio
Station display on the radio.
Track name on the CD.
Track name in Media mode ››› Booklet Ra-
dio or ››› Booklet Navigation system.
Tele-
phoneInformation and possible configurations
of the mobile phone preinstallation
››› Booklet Radio or ››› Booklet Navigation
system.
Lap tim-
er *In a racing circuit, measurement and
memorisation of lap times by the vehicle
and comparison with previously measured
best times ››› page 31.
MenuFunction
Vehicle
statusDisplay of the current warning or informa-
tion texts and other system components,
depending on the equipment
››› page 101. Outside temperature display
When the outside temperature is below +4 °C
(+39 °F), the “ice cr
y
stal” symbol (warning of
risk of freezing) is also displayed. At first, this
symbol flashes and then it remains lit until
the outside temperature rises above +6 °C
(+43 °F) ››› in Indications on the display on
p ag
e 98 .
When the
vehicle is at a standstill or when
travelling at very low speeds, the tempera-
ture displayed may be higher than the true
outside temperature as a result of the heat
produced by the engine.
The temperatures measured range from
-40 °C to +50 °C (-40 °F to +122 °F). 27
Page 97 of 252
Controls and displays
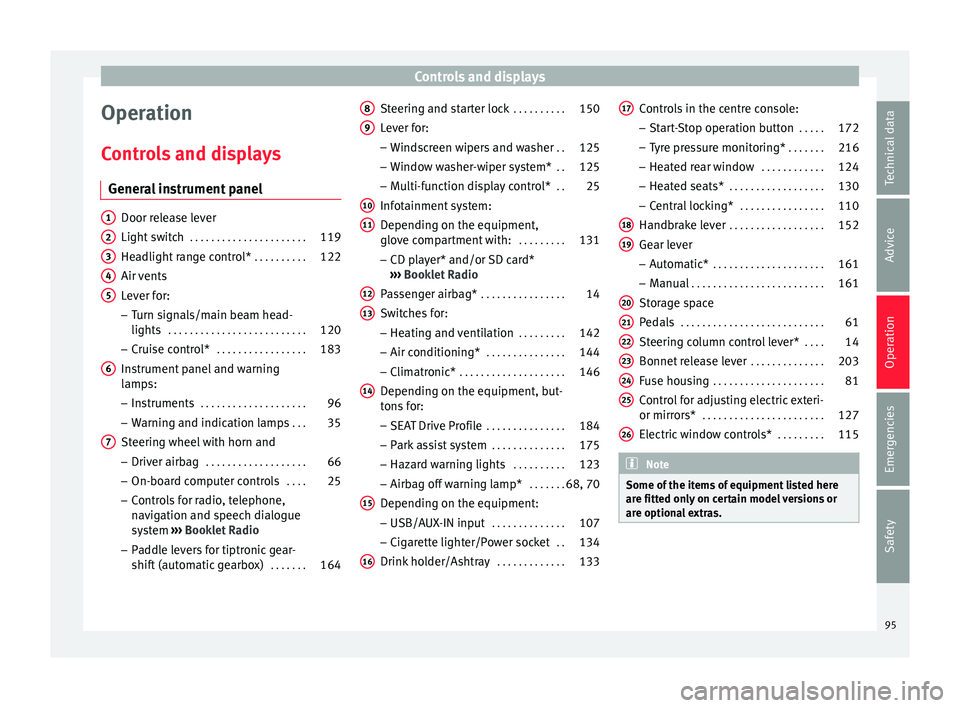
Operation
C ontr
ol
s and displays
General instrument panel Door release lever
Light swit
c
h . . . . . . . . . . . . . . . . . . . . . . 119
Headlight range control* . . . . . . . . . .122
Air vents
Lever for:
– T
urn signals/main beam head-
lights . . . . . . . . . . . . . . . . . . . . . . . . . . 120
– Cruise c ontr
ol* . . . . . . . . . . . . . . . . . 183
Instrument panel and warning
lamps:
– Ins
truments . . . . . . . . . . . . . . . . . . . . 96
– Warning and indic ation l
amps . . . 35
Steering wheel with horn and – Driver airbag . . . . . . . . . . . . . . . . . . . 66
– On-board comp
uter controls . . . .25
– Control
s for radio, telephone,
navigation and speech dialogue
system ›››
Booklet Radio
– Paddle levers for tiptronic gear-
shift (automatic gearbox) . . . . . . .164
1 2
3
4
5
6
7 Steering and starter lock
. . . . . . . . . .150
Lever for: – Wind
sc
reen wipers and washer . .125
– Window wa
sher-wiper system* . .125
– Multi-fu
nction display control* . .25
Infotainment system:
Depending on the equipment,
glov
e compartment with: . . . . . . . . .131
– CD play
er* and/or SD card*
››› Booklet Radio
Passenger airbag* . . . . . . . . . . . . . . . . 14
Switches for:
– Heating and v
entilation . . . . . . . . . 142
– Air conditioning* . . . . . . . . . . . . . . . 144
– Clim
atronic* . . . . . . . . . . . . . . . . . . . . 146
D
epending on the equipment, but-
tons f
or:
– SEAT Drive Profile . . . . . . . . . . . . . . . 184
– Park a s
sist system . . . . . . . . . . . . . . 175
– Hazard warnin
g lights . . . . . . . . . . 123
– Airbag off warnin
g lamp* . . . . . . .68, 70
Depending on the equipment:
– USB/AUX-IN inp ut . . . . . . . . . . . . . . 107
– C
igar ett
e lighter/Power socket . .134
Drink holder/Ashtray . . . . . . . . . . . . .133
8 9
10
11
12
13
14
15
16 Controls in the centre console:
– St ar
t-
Stop operation button . . . . .172
– Tyre pr
essure monitoring* . . . . . . .216
– Heated re
ar window . . . . . . . . . . . . 124
– Heated seats* . . . . . . . . . . . . . . . . . . 130
– C
entral loc
king* . . . . . . . . . . . . . . . . 110
Handbrake lever . . . . . . . . . . . . . . . . . . 152
Gear lever – Automatic* . . . . . . . . . . . . . . . . . . . . . 161
– Manual . . . . . . . . . . . . . . . . . . . . . . . . . 161
St
orag
e space
Pedals . . . . . . . . . . . . . . . . . . . . . . . . . . . 61
St
eering column control lever* . . . .14
Bonnet release lever . . . . . . . . . . . . . .203
Fuse housing . . . . . . . . . . . . . . . . . . . . . 81
Control for adjusting electric exteri-
or mirrors* . . . . . . . . . . . . . . . . . . . . . . . 127
Electric
window controls* . . . . . . . . .115 Note
Some of the items of equipment listed here
are fitted on ly
on certain model versions or
are optional extras. 17
18
19
20
21
22
23
24
25
26
95
Technical data
Advice
Operation
Emergencies
Safety
Page 99 of 252
Instruments and warning/control lamps
CAUTION
● To prev ent
damage to the engine, the rev
counter needle should only remain in the red
zone for a short period of time.
● When the engine is cold, avoid high revs
and heavy acc
eleration and do not make the
engine work hard. For the sake of the environment
Changing up a gear in time reduces fuel con-
sumption and noise. Rev counter
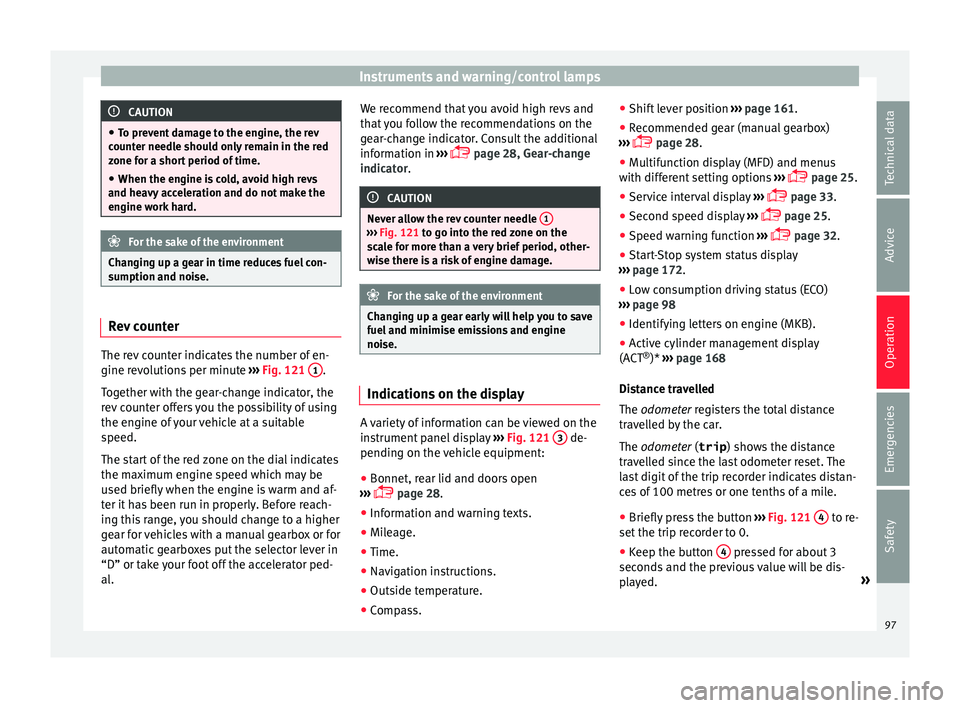
The rev counter indicates the number of en-
gine r
ev
olution
s per minute ›››
Fig. 121 1 .
T og
ether w ith the g
ear-change indicator, the
rev counter offers you the possibility of using
the engine of your vehicle at a suitable
speed.
The start of the red zone on the dial indicates
the maximum engine speed which may be
used briefly when the engine is warm and af-
ter it has been run in properly. Before reach-
ing this range, you should change to a higher
gear for vehicles with a manual gearbox or for
automatic gearboxes put the selector lever in
“D” or take your foot off the accelerator ped-
al. We recommend that you avoid high revs and
that y
ou follow the recommendations on the
gear-change indicator. Consult the additional
information in ›››
page 28, Gear-change
indicator. CAUTION
Never allow the rev counter needle 1 ›››
Fig. 121 to go int o the r
ed zone on the
scale for more than a very brief period, other-
wise there is a risk of engine damage. For the sake of the environment
Changing up a gear early will help you to save
fuel and minimi se emi
ssions and engine
noise. Indications on the display
A variety of information can be viewed on the
in
s
trument p
anel display ›››
Fig. 121 3 de-
pendin g on the
vehic
le equipment:
● Bonnet, rear lid and doors open
››› p
age 28.
● Information and warning texts.
● Mileage.
● Time.
● Navigation instructions.
● Outside temperature.
● Compass. ●
Shift lev
er position ››› page 161.
● Recommended gear (manual gearbox)
››› p
age 28.
● Multifunction display (MFD) and menus
with different
setting options ›››
page 25.
● Service interval display ›››
p
age 33.
● Second speed display ›››
p
age 25.
● Speed warning function ›››
p
age 32.
● Start-Stop system status display
››› p
age 172.
● Low consumption driving status (ECO)
››› p
age 98
● Identifying letters on engine (MKB).
● Active cylinder management display
(ACT ®
)* ›››
page 168
Distance travelled
The odometer registers the total distance
travelled by the car.
The odometer (trip ) shows the distance
travelled since the last odometer reset. The
last digit of the trip recorder indicates distan-
ces of 100 metres or one tenths of a mile.
● Briefly press the button ››› Fig. 121
4 to re-
set the trip r
ecor
der to 0.
● Keep the button 4 pressed for about 3
sec ond
s and the pr
evious value will be dis-
played. »
97
Technical data
Advice
Operation
Emergencies
Safety
Page 100 of 252
Operation
Time
● To set the time, keep the button ››
›
Fig. 121
4 pressed for more than 3 seconds to select
the hour or minut e di
sp
lay.
● To continue setting the time, press the up-
per or lower par
t of the button 4 . Hold but-
t on do
wn to s
croll through the numbers
quickly.
● Press the button 4 again in order to finish
settin g the time.
The time c an also be set
via the key and
Set up function button in the Easy Connect
sy s
tem
›
›› page 101.
Compass
With the ignition on and the navigation sys-
tem on, the cardinal point corresponding to
the direction of travel of the vehicle is dis-
played on the instrument panel.
Selector lever position
The selected gear is displayed on the side of
the selector lever and on the instrument pan-
el display. In positions D and S, and with the
Tiptronic, the corresponding gear is also dis-
played.
Recommended gear (manual gearbox)
The recommended gear in order to save fuel
is displayed on the instrument panel while
you are driving ›››
page 28. Second speed display (mph or km/h)
In addition to the s
peedometer, the speed
can also be displayed in a different unit of
measurement (in miles or in km per hour).
This option cannot be deactivated in models
destined for countries in which the second
speed must always be visible.
The second speed display can be adjusted in
the Easy Connect system via the key and
the Set
up function button
››
›
p
age 101.
Speed warning
When the speed setting is exceeded, this will
be indicated on the instrument panel display.
This is very useful, for example when using
winter tyres that are not designed for driving
at the maximum speed of the vehicle
››› page 32.
The speed warning settings can be adjusted
in the Easy Connect system via the key
and the Set
up function button
››
›
p
age 101.
Start-Stop operating display
Updated information relating to the status is
displayed on the instrument panel
››› page 172.
Low consumption driving status (ECO)*
Depending on the equipment, when driving,
the “ECO ” display appears on the instrument
panel when the vehicle is in low consump- tion status due to active cylinder manage-
ment (ACT
®
)* ›
›› page 30.
Identifying letters on engine (MKB)
Hold the button ››› Fig. 121 4 down for more
th an 15 sec
onds
to display the identifying
letters of the vehicle engine (MKB). To do
this, the ignition must be switched on and
the engine switched off. WARNING
Observe the safety warnings ››› in Warning
symbols on p ag
e 101. WARNING
Even though outside temperatures are above
freezin g, some r
oads and bridges may be icy.
● At outside temperatures above +4°C
(+39°F), even when the “ice cr
ystal symbol”
is not visible, there may still be patches of ice
on the road.
● Do not rely on the outside temperature in-
dicator! Note
● Different
versions of the instrument panel
are available and therefore the versions and
instructions on the display may vary. In the
case of displays without warning or informa-
tion texts, faults are indicated exclusively by
the warning lamps. 98
Page 105 of 252
Communications and multimedia
Communications and multi-
medi a
St eerin g wheel
controls*
General information The steering wheel includes a multifunction
module fr
om wher
e it is possible to control
the audio, telephone and radio/navigation
functions without needing to distract the
driver.
There are two versions of the multifunction
module:
● Audio system + telephone without voice
contro l
version (MID) : for controlling the au-
dio functions available (radio, audio CD,
MP3, iPod ®1)
, USB 1)
, SD 1)
) and Bluetooth sys-
tem from the steering wheel.
● Audio system + telephone with voice con-
trol
version (HIGH) : for controlling the audio
functions available (radio, audio CD, MP3,
iPod ®1)
, USB 1)
, SD 1)
) and Bluetooth system
from the steering wheel. 1)
Depending on the vehicle equipment.
103
Technical data
Advice
Operation
Emergencies
Safety
Page 106 of 252
Operation
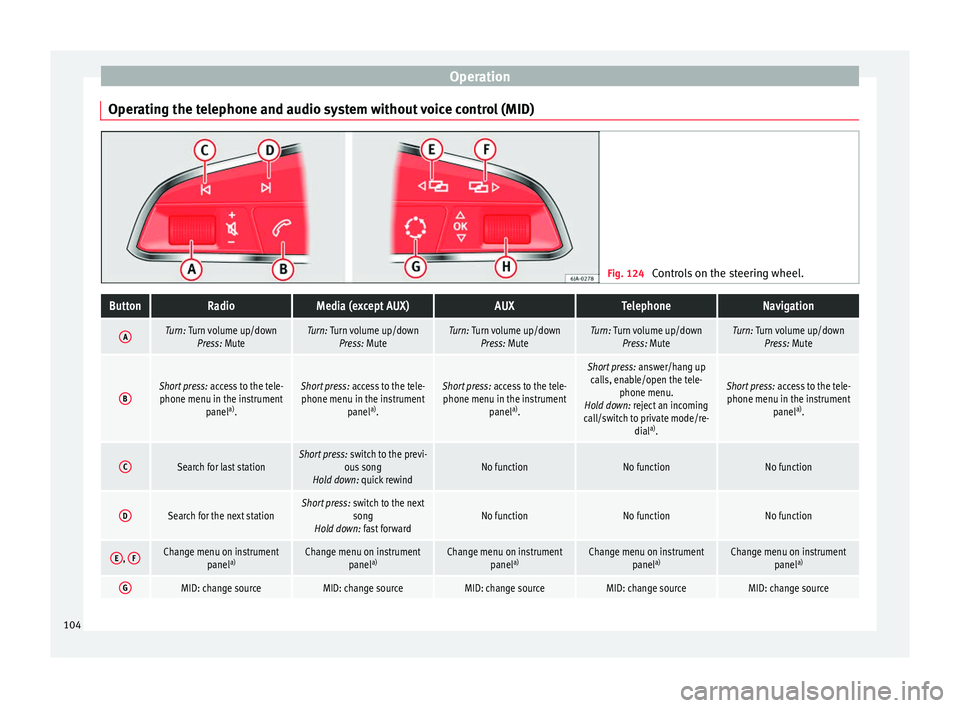
Operating the telephone and audio system without voice control (MID) Fig. 124
Controls on the steering wheel.ButtonRadioMedia (except AUX)AUXTelephoneNavigation
ATurn: Turn volume up/down
Press: MuteTurn: Turn volume up/downPress: MuteTurn: Turn volume up/downPress: MuteTurn: Turn volume up/downPress: MuteTurn: Turn volume up/downPress: Mute
BShort press: access to the tele-
phone menu in the instrument panela)
.Short press: access to the tele-
phone menu in the instrument panela)
.Short press: access to the tele-
phone menu in the instrument panela)
.
Short press: answer/hang up
calls, enable/open the tele- phone menu.
Hold down: reject an incoming
call/switch to private mode/re- diala)
.
Short press: access to the tele-
phone menu in the instrument panela)
.
CSearch for last stationShort press: switch to the previ-
ous song
Hold down: quick rewindNo functionNo functionNo function
DSearch for the next stationShort press: switch to the next
song
Hold down: fast forwardNo functionNo functionNo function
E, FChange menu on instrument
panela)Change menu on instrument
panela)Change menu on instrument
panela)Change menu on instrument
panela)Change menu on instrument
panela)
GMID: change sourceMID: change sourceMID: change sourceMID: change sourceMID: change source104
Page 107 of 252
Communications and multimediaButtonRadioMedia (except AUX)AUXTelephoneNavigation
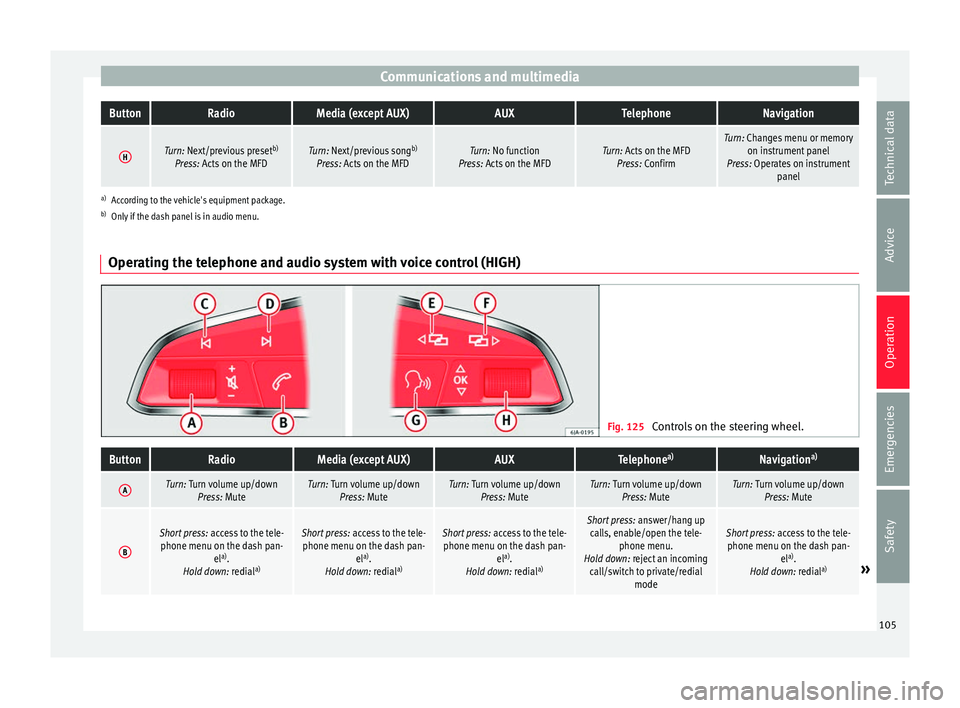
HTurn: Next/previous preset
b)
Press: Acts on the MFDTurn: Next/previous song b)
Press: Acts on the MFDTurn: No function
Press: Acts on the MFDTurn: Acts on the MFD Press: ConfirmTurn: Changes menu or memory on instrument panel
Press: Operates on instrument panel
a)According to the vehicle's equipment package.
b) Only if the dash panel is in audio menu.
Operating the telephone and audio system with voice control (HIGH) Fig. 125
Controls on the steering wheel.
ButtonRadioMedia (except AUX)AUXTelephone a)Navigation a)
ATurn: Turn volume up/down
Press: MuteTurn: Turn volume up/downPress: MuteTurn: Turn volume up/downPress: MuteTurn: Turn volume up/downPress: MuteTurn: Turn volume up/downPress: Mute
B
Short press: access to the tele-
phone menu on the dash pan- ela)
.
Hold down: redial a)Short press:
access to the tele-
phone menu on the dash pan- ela)
.
Hold down: redial a)Short press:
access to the tele-
phone menu on the dash pan- ela)
.
Hold down: redial a)Short press:
answer/hang up
calls, enable/open the tele- phone menu.
Hold down: reject an incoming call/switch to private/redial modeShort press: access to the tele-
phone menu on the dash pan- ela)
.
Hold down: redial a)
» 105
Technical data
Advice
Operation
Emergencies
Safety
Page 109 of 252
Opening and closing
Multimedia USB/A UX
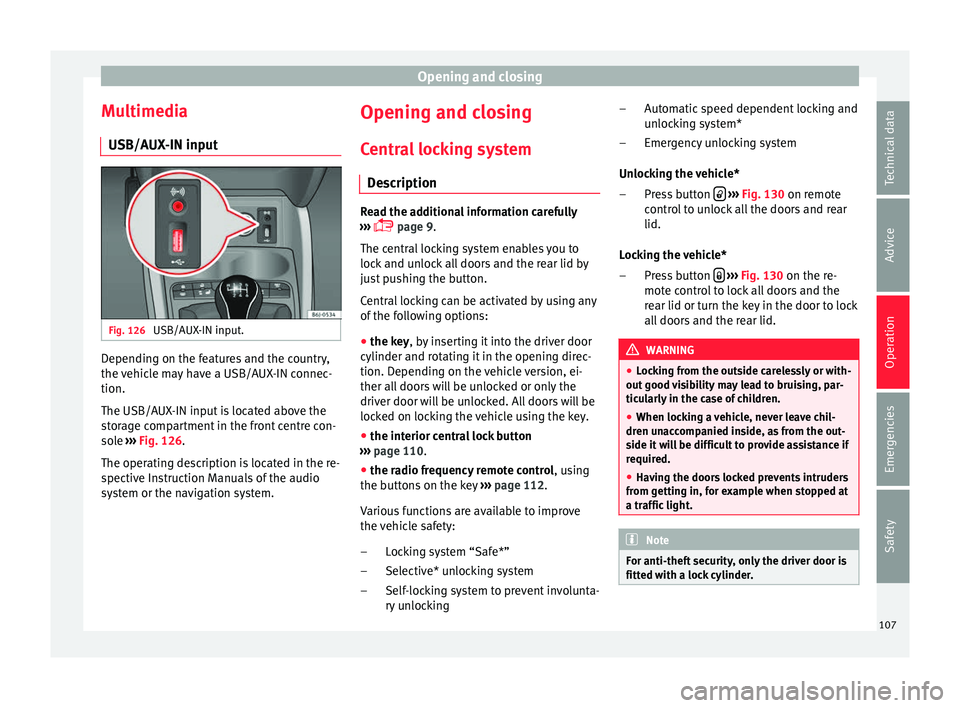
-IN inp ut Fig. 126
USB/AUX-IN input. Depending on the features and the country,
the
v
ehic l
e may have a USB/AUX-IN connec-
tion.
The USB/AUX-IN input is located above the
storage compartment in the front centre con-
sole ››› Fig. 126.
The operating description is located in the re-
spective Instruction Manuals of the audio
system or the navigation system. Opening and closing
C entr
al
locking system
Description Read the additional information carefully
›››
p
age 9.
The central locking system enables you to
lock and unlock all doors and the rear lid by
just pushing the button.
Central locking can be activated by using any
of the following options:
● the key, by inserting it into the driver door
cylinder and rot atin
g it in the opening direc-
tion. Depending on the vehicle version, ei-
ther all doors will be unlocked or only the
driver door will be unlocked. All doors will be
locked on locking the vehicle using the key.
● the interior central lock button
››› p
age 110.
● the radio frequency remote control , using
the b
uttons on the key ›››
page 112.
Various functions are available to improve
the vehicle safety: Locking system “Safe*”
Selective* unlocking system
Self-locking system to prevent involunta-
ry unlocking
–
–
– Automatic speed dependent locking and
unlock
ing system*
Emergency unlocking system
Unlocking the vehicle* Press button
› ››
Fig. 130
on remot
e
control to unlock all the doors and rear
lid.
Locking the vehicle* Press button
› ››
Fig. 130
on the r e-
mot
e control to lock all doors and the
rear lid or turn the key in the door to lock
all doors and the rear lid. WARNING
● Lock in
g from the outside carelessly or with-
out good visibility may lead to bruising, par-
ticularly in the case of children.
● When locking a vehicle, never leave chil-
dren unac
companied inside, as from the out-
side it will be difficult to provide assistance if
required.
● Having the doors locked prevents intruders
from getting in, f
or example when stopped at
a traffic light. Note
For anti-theft security, only the driver door is
fitted with a loc k
cylinder. –
–
–
–
107
Technical data
Advice
Operation
Emergencies
Safety
Page 183 of 252
Driver assistance systems
vehicle of the luggage compartment is carry-
ing a heavy
lo
ad.
● In the following situations, the objects or
other vehicl
es shown in the navigation sys-
tem display appear to be further away or
closer than they really are: Pay special atten-
tion:
– On moving from a horizontal plane to a
slope.
– On moving from a slope to a horizontal
plane.
– If the vehicle is heavily loaded at the
rear.
– When the vehicle approaches objects
that are not on the ground surface or are
jutting out from it. These objects may al-
so be outside the camera's angle of vi-
sion when reversing. Note
● It is impor
tant to take great care and pay
special attention if you are not yet familiar
with the system.
● Rear assist will not be available if the vehi-
cle's r
ear lid is open. Instructions for use
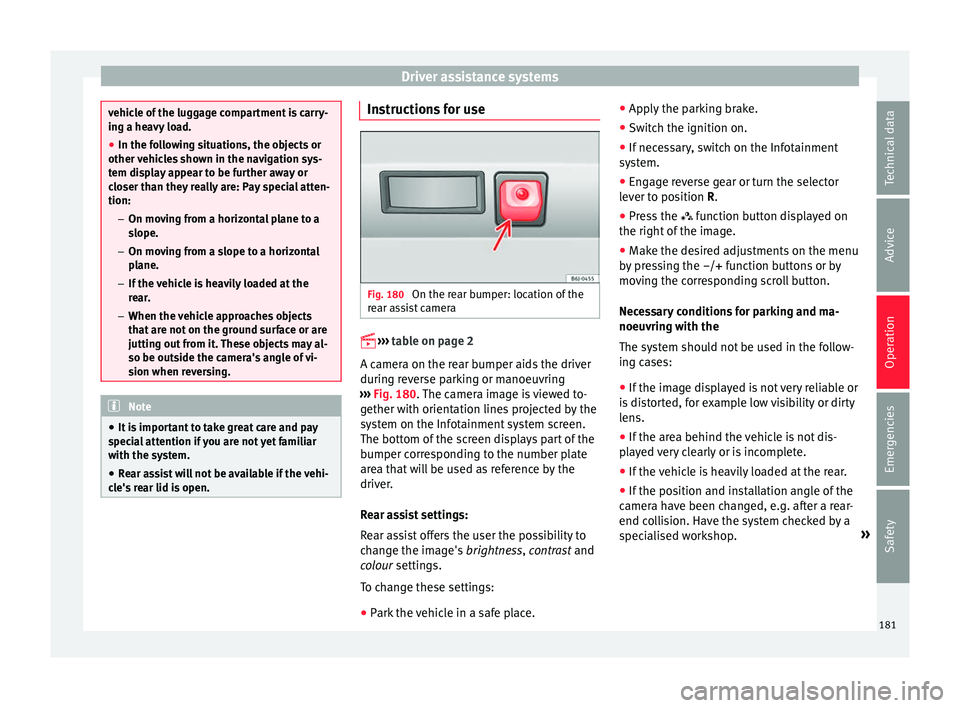
Fig. 180
On the rear bumper: location of the
r e
ar a s
sist camera
››› t
able on page 2
A camera on the rear bumper aids the driver
during reverse parking or manoeuvring
››› Fig. 180. The camera image is viewed to-
gether with orientation lines projected by the
system on the Infotainment system screen.
The bottom of the screen displays part of the
bumper corresponding to the number plate
area that will be used as reference by the
driver.
Rear assist settings:
Rear assist offers the user the possibility to
change the image's brightness, contrast and
colour settings.
To change these settings:
● Park the vehicle in a safe place. ●
Apply the p
arking brake.
● Switch the ignition on.
● If necessary, switch on the Infotainment
system.
● En
gage reverse gear or turn the selector
lever to po
sition R.
● Press the function butt
on displayed on
the right of the image.
● Make the desired adjustments on the menu
by pre
ssing the –/+ function buttons or by
moving the corresponding scroll button.
Necessary conditions for parking and ma-
noeuvring with the
The system should not be used in the follow-
ing cases:
● If the image displayed is not very reliable or
is dis
torted, for example low visibility or dirty
lens.
● If the area behind the vehicle is not dis-
play
ed very clearly or is incomplete.
● If the vehicle is heavily loaded at the rear.
● If the position and installation angle of the
camera hav
e been changed, e.g. after a rear-
end collision. Have the system checked by a
specialised workshop. »
181
Technical data
Advice
Operation
Emergencies
Safety