display Seat Leon 5D 2013 MEDIA SYSTEM PLUS - NAVI SYSTEM
[x] Cancel search | Manufacturer: SEAT, Model Year: 2013, Model line: Leon 5D, Model: Seat Leon 5D 2013Pages: 72, PDF Size: 3 MB
Page 43 of 72
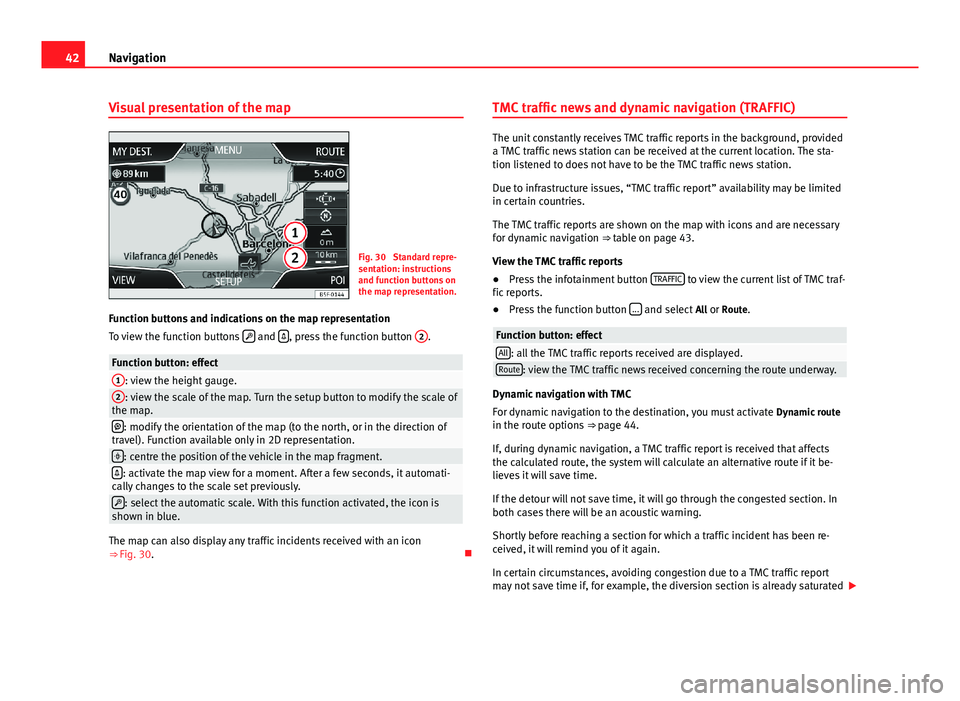
42NavigationVisual presentation of the mapFig. 30
Standard repre-sentation: instructionsand function buttons onthe map representation.
Function buttons and indications on the map representation
To view the function buttons and , press the function button
2
.
Function button: effect1: view the height gauge.2: view the scale of the map. Turn the setup button to modify the scale ofthe map.: modify the orientation of the map (to the north, or in the direction oftravel). Function available only in 2D representation.: centre the position of the vehicle in the map fragment.: activate the map view for a moment. After a few seconds, it automati-cally changes to the scale set previously.: select the automatic scale. With this function activated, the icon isshown in blue.
The map can also display any traffic incidents received with an icon⇒ Fig. 30.
TMC traffic news and dynamic navigation (TRAFFIC)
The unit constantly receives TMC traffic reports in the background, provideda TMC traffic news station can be received at the current location. The sta-tion listened to does not have to be the TMC traffic news station.
Due to infrastructure issues, “TMC traffic report” availability may be limitedin certain countries.
The TMC traffic reports are shown on the map with icons and are necessaryfor dynamic navigation ⇒ table on page 43.
View the TMC traffic reports
●
Press the infotainment button TRAFFIC to view the current list of TMC traf-fic reports.
●
Press the function button ... and select All or Route.
Function button: effectAll: all the TMC traffic reports received are displayed.Route: view the TMC traffic news received concerning the route underway.
Dynamic navigation with TMC
For dynamic navigation to the destination, you must activate Dynamic routein the route options ⇒ page 44.
If, during dynamic navigation, a TMC traffic report is received that affectsthe calculated route, the system will calculate an alternative route if it be-lieves it will save time.
If the detour will not save time, it will go through the congested section. Inboth cases there will be an acoustic warning.
Shortly before reaching a section for which a traffic incident has been re-ceived, it will remind you of it again.
In certain circumstances, avoiding congestion due to a TMC traffic reportmay not save time if, for example, the diversion section is already saturated
Page 45 of 72
44NavigationNavigation setup●
Press the function button Setup in the navigation main menu.
Function button: effect1. Route options: setup for calculating the route. Proposal of 3 alternative routes.: after starting guided navigation, 3 alter-native routes are proposed. Route: select the route type. Economic: seeks a balance between journey time and the distanceto cover.Quick: the quickest route to the destination.Short: the shortest route to the destination, although it may entail alonger journey time.
Dynamic route: dynamic navigation with TMC traffic reports is active⇒ page 42. Avoid motorways: motorways will not be taken into account, as far aspossible, when calculating the route. Avoid ferries and trains: as far as possible, ferries and trains for vehiclesare avoided when calculating the route. Avoid toll roads: as far as possible, toll roads are avoided when calcu-lating the route. Avoid tunnels: tunnels are avoided when calculating the route, provi-ded this is possible. Avoid routes with toll stickers: as far as possible, routes with toll stickers(e.g., Swiss motorways) are avoided.Available toll stickers: the toll stickers available are shown.
2. Map setup: Setup for the visual representation of the map.Function button: effect Perspective: switch the map representation between 2D north, 2D direc-tion of travel and 3D direction of travel.Day/Night: alternates the map representation between day, night or au-tomatic view. Autozoom: The scale of the map is modified automatically with “Auto-zoom” active, depending on the route followed (on motorways, smallscale; in urban areas, expanded scale). It is not possible to select auto-zoom without CENTRING the main screen. Show traffic signs: during guided navigation the traffic signs stored inthe navigation data for the road on which you are currently driving willbe shown.Select categories: select the categories of points of interest that you wishto view on the map. Show favourites: the destinations stored in your Favourites list will beshown on the map (star icon). Lane recommendation: During guided navigation, when you must turnoff a road with several lanes, an additional instruction will recommendwhich lane you should be in.
Fuel options: adjust the fuel refilling options. Select preferred service stations: the service stations selected are displayedon the map. Fuel warning: this function makes a warning pop-up appear in the nav-igation system when fuel is low. The pop-up offers the option of calcu-lating the route to the nearest petrol station.
Navigation announcements: setup for the navigation instructions. Volume: adjust the volume of the acoustic navigation instructions. No voice guidance during call: during a telephone call, no spoken naviga-tion instructions shall be made.Advanced setup: Further adjust navigation setup. Time display: view during guided navigation. ETA: the scheduled time of arrival at your destination is shown.Journey duration: the predicted journey time remaining until youreach your destination is shown.
Page 47 of 72
46CAR menuCAR menuIntroduction to managing the CAR menu
Car menu
By pressing the “CAR” infotainment button you will access its main menuwith the following options:
●
VIEW
●
MINIPLAYER (Radio and Media function)
●
PREVIOUS-NEXT (to change screen)
●
SETUP ⇒ Booklet Instruction Manual, chapter System setup (CAR)
With the function button View you can access the following information:
●
DRIVING DATA
●
ECO
●
VEHICLE STATUS
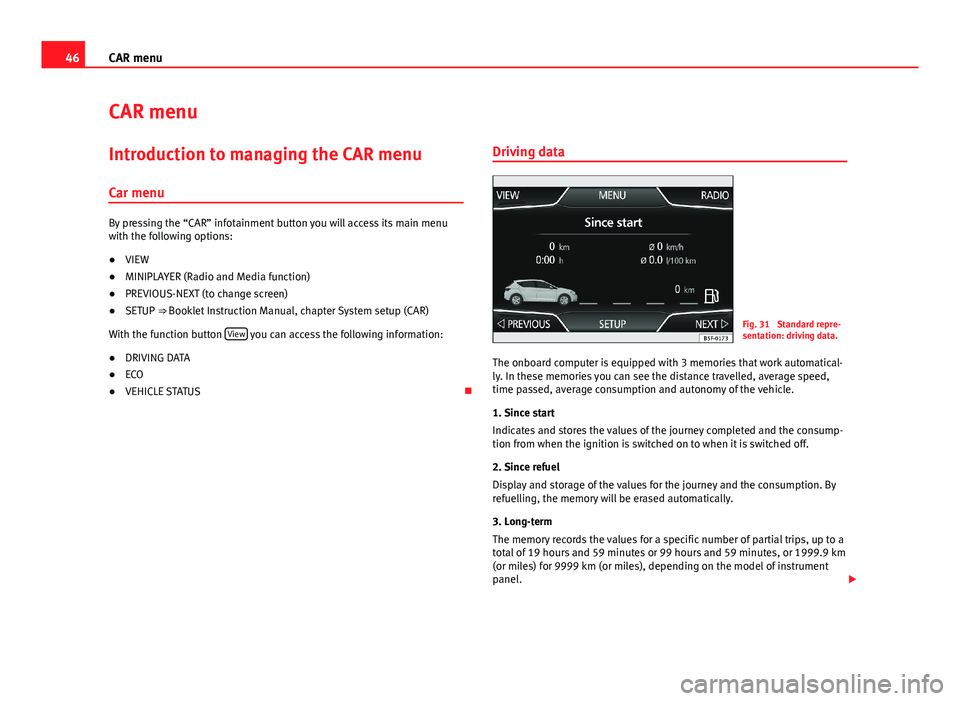
Driving dataFig. 31
Standard repre-sentation: driving data.
The onboard computer is equipped with 3 memories that work automatical-ly. In these memories you can see the distance travelled, average speed,time passed, average consumption and autonomy of the vehicle.
1. Since start
Indicates and stores the values of the journey completed and the consump-tion from when the ignition is switched on to when it is switched off.
2. Since refuel
Display and storage of the values for the journey and the consumption. Byrefuelling, the memory will be erased automatically.
3. Long-term
The memory records the values for a specific number of partial trips, up to atotal of 19 hours and 59 minutes or 99 hours and 59 minutes, or 1999.9 km(or miles) for 9999 km (or miles), depending on the model of instrumentpanel.
Page 48 of 72
47CAR menuWhen one of these values is reached (depending on the version of the in-strument panel), the memory is automatically deleted and it starts countingfrom 0 again.
ECO
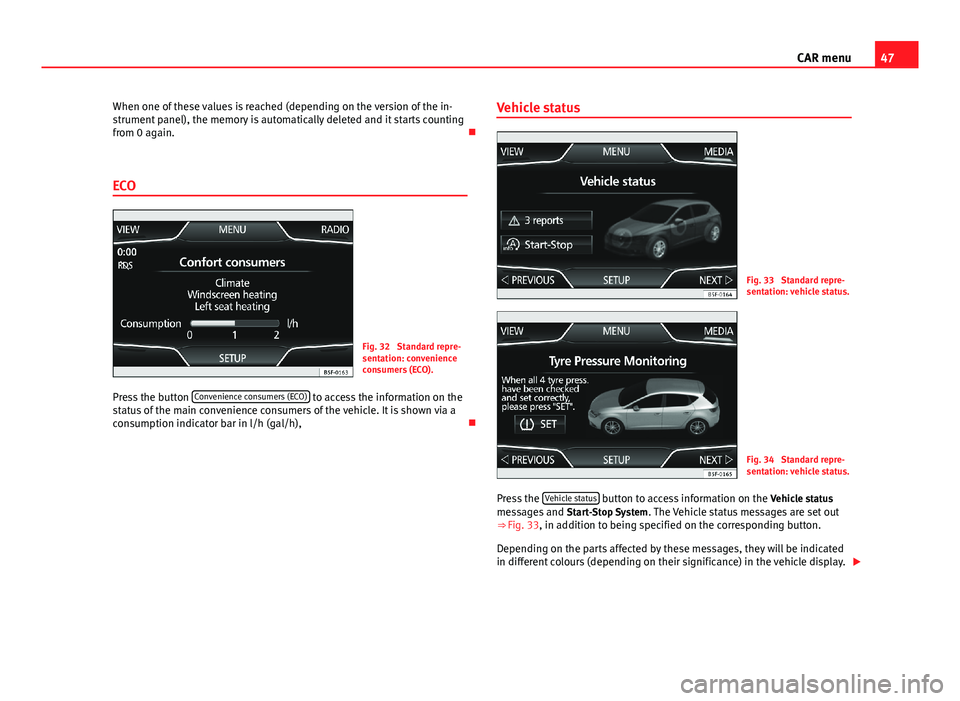
Fig. 32
Standard repre-sentation: convenienceconsumers (ECO).
Press the button Convenience consumers (ECO) to access the information on thestatus of the main convenience consumers of the vehicle. It is shown via aconsumption indicator bar in l/h (gal/h),
Vehicle statusFig. 33
Standard repre-sentation: vehicle status.
Fig. 34
Standard repre-sentation: vehicle status.
Press the Vehicle status button to access information on the Vehicle statusmessages and Start-Stop System. The Vehicle status messages are set out⇒ Fig. 33, in addition to being specified on the corresponding button.
Depending on the parts affected by these messages, they will be indicatedin different colours (depending on their significance) in the vehicle display.
Page 52 of 72
51Telephone management (PHONE)the amount of data stored on your mobile phone. When the loading processis complete, the data will be available to the infotainment system.
Starting the link from the system
●
Make sure the mobile device is active and visible.
●
Press the PHONE unit button.
●
Press the Find phone function button.
OR:
●
Press the PHONE unit button.
●
Press the Setup function button.
●
Press the function button Select phone and then Find phone.
OR:
●
Press the PHONE unit button.
●
Press the Setup function button.
●
Press the Bluetooth setup function button.
●
Press the Find devices function button.
OR:
●
Make the connection from the mobile device itself (ensure that the visi-bility of the infotainment system in the menu Phone setup > BT setup is ac-tive).
The search process can take up to 1 minute. On the screen the system willdynamically update the names of the bluetooth devices found.
●
Select the infotainment system or the mobile phone to which you wantto connect from the list of Bluetooth devices found.
The infotainment system and the mobile phone will now be connected toeach other. In certain circumstances, it is possible that to finish the connec-tion between the two devices, you must enter additional data in the mobilephone and infotainment system.
●If necessary, confirm the link to the mobile phone.●
Use your mobile phone to enter and confirm your PIN code, as indicatedin the display of the infotainment system.
●
OR: Compare the PIN code shown in the display of the infotainment sys-tem with the PIN code that appears on the mobile phone. If they coincide,you must confirm it on both devices.
Once the link is complete, the main menu PHONE will be shown.
Linking and connecting mobile telephones
You can link up to 20 mobile telephones to the infotainment system, butonly one mobile phone can be connected as hands-free, and only one de-vice as BT audio at any time.
When you turn on the infotainment system the connection is automaticallyestablished with the mobile phone that was last connected. If it cannot es-tablish a connection with that mobile phone, the telephone manager willautomatically try to establish a connection with the next mobile phone thatappears on the list of linked devices.
The working radius of the Bluetooth connection is a maximum of 10 metres.If this working radius is exceeded, the connection established through Blue-tooth will be interrupted. The connection is automatically re-established assoon as this device comes back into the Bluetooth working radius.
If the maximum number of linked devices is reached and you wish to linkanother one to the system, it will automatically replace the one that has re-cently been used the least. If you wish to replace it with another one, theuser must erase it beforehand. To do so:
●
Press the unit button Setup within the telephone context.
●
Press the function button Bluetooth setup.
●
Press the function button My devices.
●
In the list of devices linked, press the function button remove after themobile phone to be deleted and then press Delete to confirm the process.
Page 54 of 72
53Telephone management (PHONE)Setup of voice control ⇒ page 63.
When you activate voice control, you can choose which text and icons takeon the colour of the different functions:
●
Red (RADIO and MEDIA) ⇒ page 54 and ⇒ page 54
●
Green (PHONE) ⇒ page 54
●
Blue (NAV) ⇒ page 54
Start and stop the voice control
●
To activate the voice control, briefly press the button on the multi-func-tion steering wheel . It can also be activated with the VOICE button in theMIB.
●
When voice control is activated there will be an ascending acoustic sig-nal and a main command menu will be displayed within the function (themenu will be displayed if option ⇒ page 63 is activated in the voice con-trol setup). The spoken instructions will guide you through the following“dialogue”.
●
Pronounce the desired order and follow the instructions of the “dia-logue”. A function can often be activated with different spoken commands.In case of doubt, try to give a command. Due to the quantity of commandsthe system can admit, this manual only includes the most important ones.
●
When an action is carried out (e.g. calling a contact), the voice controlautomatically deactivates and must be reactivated when needed again.There are certain commands after which the voice control does not end andwaits with What do you wish to do now?.
●
To end voice control manually, keep the button pressed on the multi-function steering wheel until you hear the corresponding confirmation (de-scending sound), or press the button in the display. You can also brieflypress the VOICE button twice to deactivate voice control. (Voice control isdeactivated in the following ways: by briefly pressing the VOICE button orCommand on the steering wheel twice; or by pressing VOICE or Commandon the steering wheel for a few moments, and touching the screen or anybutton on the radio).
Help with voice control
The first time you use the voice control, listen to the Help.
●
Press the function button .
●
Give the “Help” command in the language established in the Systemsetup, and follow the dialogue instructions.
Operation during the dialogue
While the infotainment system transmits a spoken indication, the displaywill show the symbol .
●
Briefly press the button on the multi-function steering wheel to inter-rupt the spoken indication of the infotainment system and give the nextcommand.
IMPORTANT: The system will ONLY recognise a command when the sym-bol is displayed as “active” on the display or touch screen.
If you make a mistake when giving a command or give an incomplete com-mand, and it has no effect, you can repeat the command. The symbol remains active.
●
Briefly press the button of the multi-function steering wheel to repeatthe command.
Instructions for voice control
For optimum functioning of the voice control, follow these instructions:
●
Speak slowly and clearly, as far as possible. The system will not recog-nise words pronounced unclearly, or words and figures in which syllablesare omitted.
●
Telephone numbers must be indicated figure by figure or in blocks ofnumbers in units, tens or hundreds.
●
Speak at a normal volume, without exaggerated intonation or long pau-ses.
●
Avoid noise from the exterior and nearby (for example, conversations in-side the vehicle). Close all doors, windows and the sliding roof.
Page 58 of 72
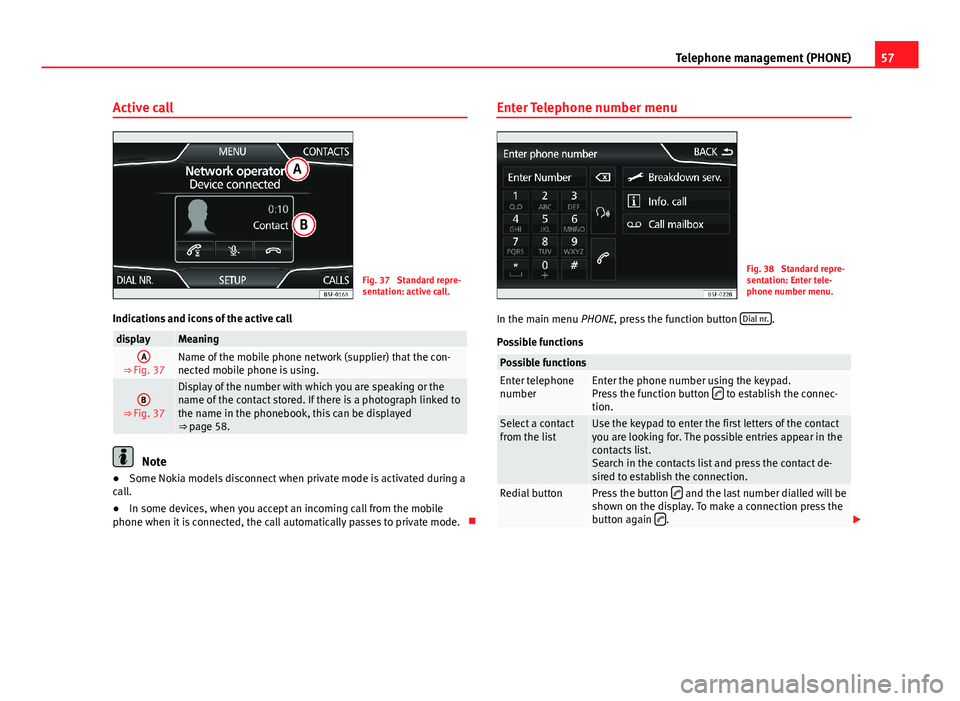
57Telephone management (PHONE)Active callFig. 37
Standard repre-sentation: active call.
Indications and icons of the active call
displayMeaningA
⇒ Fig. 37Name of the mobile phone network (supplier) that the con-nected mobile phone is using.
B
⇒ Fig. 37
Display of the number with which you are speaking or thename of the contact stored. If there is a photograph linked tothe name in the phonebook, this can be displayed⇒ page 58.
Note
●Some Nokia models disconnect when private mode is activated during acall.●
In some devices, when you accept an incoming call from the mobilephone when it is connected, the call automatically passes to private mode.
Enter Telephone number menuFig. 38
Standard repre-sentation: Enter tele-phone number menu.
In the main menu PHONE, press the function button Dial nr..
Possible functions
Possible functionsEnter telephonenumberEnter the phone number using the keypad.Press the function button to establish the connec-tion.
Select a contactfrom the listUse the keypad to enter the first letters of the contactyou are looking for. The possible entries appear in thecontacts list.Search in the contacts list and press the contact de-sired to establish the connection.
Redial buttonPress the button and the last number dialled will beshown on the display. To make a connection press thebutton again .
Page 59 of 72
58Telephone management (PHONE)Possible functionsCall voice mailboxKeep button number 1 pressed for approximately 2seconds or press the button .If you still have not saved the voice mail number, enterthe number and confirm it with OK.A phone number that has already been stored can bemodified in the User profile setup ⇒ page 61 menu.
Activating voice controlEnter a nationaldialling codeWhen you enter a country code, instead of the two firstdigits (for example, “00”), you can enter the “+” sym-bol. Keep the function button pressed 0 for about 2seconds to add the + symbol.
Breakdown serv-ice call Press the function button to obtain help in the event ofbreakdown. For this the network of SEAT dealerships isavailable to you with their Mobile Service.
Information call Press the function button to obtain information on theSEAT brand and the additional services contracted re-lated to traffic and travel.
Note
Breakdown service and information calls can incur an additional cost onyour telephone bill.
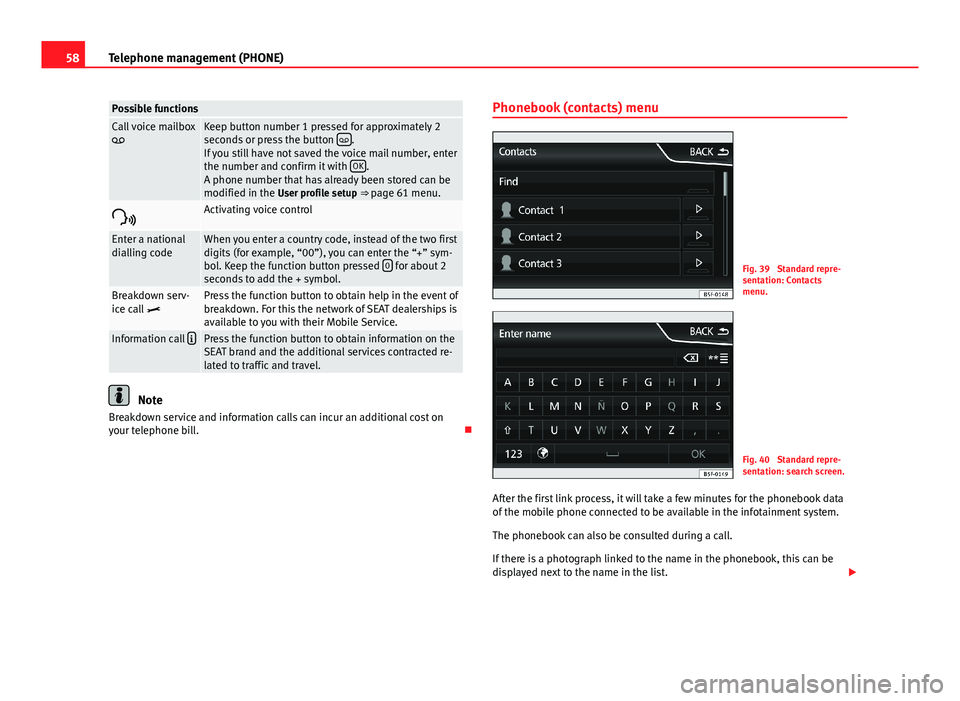
Phonebook (contacts) menuFig. 39
Standard repre-sentation: Contactsmenu.
Fig. 40
Standard repre-sentation: search screen.
After the first link process, it will take a few minutes for the phonebook dataof the mobile phone connected to be available in the infotainment system.
The phonebook can also be consulted during a call.
If there is a photograph linked to the name in the phonebook, this can bedisplayed next to the name in the list.
Page 60 of 72
59Telephone management (PHONE)For this purpose the option “show pictures for contacts” must be activatedin the phone setup context (check the compatibility lists).
In the main menu PHONE, press the function button Contacts.
Searching directory entry
Select acontactfrom the list
Search in the list and press the desired contact to establishthe connection. If the contact has more than one number youmust select the one you wish to use and press again to es-tablish the connection.
Search for acontact us-ing thesearchscreen
Press the function button Search ⇒ Fig. 39 1 to open thesearch screen. Enter the name you wish to search for in thesearch screen ⇒ Fig. 40. Each time you enter a character, aphonebook will be displayed in the data entry field.On the right of the data entry field the corresponding num-ber of results is shown. Press the function button to changeto the list view mode.Search in the list and press the desired contact to establishthe connection.Press the icon (pencil) to edit the number before calling.
Note
If you edit the number before calling, this will only be used for the call andwill not be stored in the phonebook.
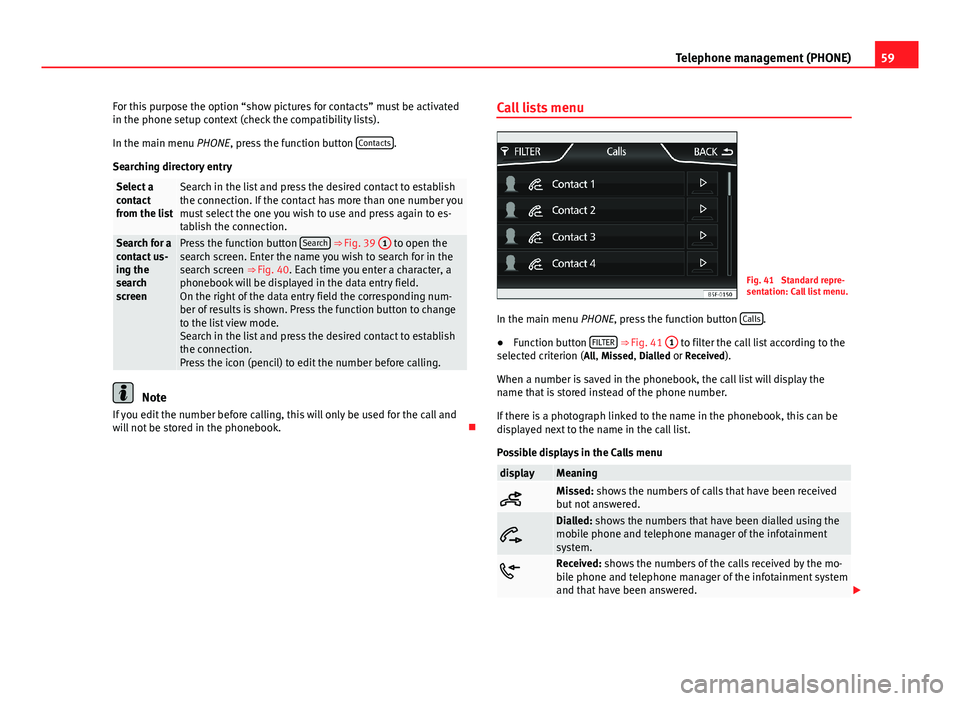
Call lists menuFig. 41
Standard repre-sentation: Call list menu.
In the main menu PHONE, press the function button Calls.
●
Function button FILTER ⇒ Fig. 41
1
to filter the call list according to theselected criterion (All, Missed, Dialled or Received).
When a number is saved in the phonebook, the call list will display thename that is stored instead of the phone number.
If there is a photograph linked to the name in the phonebook, this can bedisplayed next to the name in the call list.
Possible displays in the Calls menu
displayMeaningMissed: shows the numbers of calls that have been receivedbut not answered.
Dialled: shows the numbers that have been dialled using themobile phone and telephone manager of the infotainmentsystem.Received: shows the numbers of the calls received by the mo-bile phone and telephone manager of the infotainment systemand that have been answered.
Page 61 of 72
60Telephone management (PHONE)NoteThe call list display will depend on the mobile phone used.
Speed dial keys
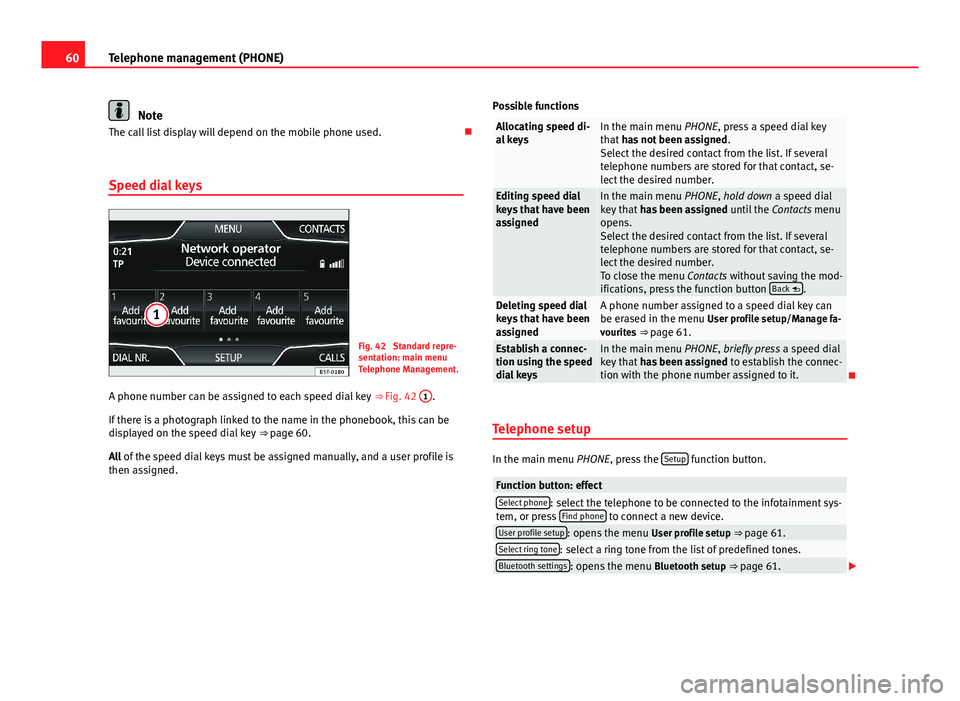
Fig. 42
Standard repre-sentation: main menuTelephone Management.
A phone number can be assigned to each speed dial key ⇒ Fig. 42
1
.
If there is a photograph linked to the name in the phonebook, this can bedisplayed on the speed dial key ⇒ page 60.
All of the speed dial keys must be assigned manually, and a user profile isthen assigned.
Possible functionsAllocating speed di-al keysIn the main menu PHONE, press a speed dial keythat has not been assigned.Select the desired contact from the list. If severaltelephone numbers are stored for that contact, se-lect the desired number.
Editing speed dialkeys that have beenassigned
In the main menu PHONE, hold down a speed dialkey that has been assigned until the Contacts menuopens.Select the desired contact from the list. If severaltelephone numbers are stored for that contact, se-lect the desired number.To close the menu Contacts without saving the mod-ifications, press the function button Back .
Deleting speed dialkeys that have beenassigned
A phone number assigned to a speed dial key canbe erased in the menu User profile setup/Manage fa-vourites ⇒ page 61.
Establish a connec-tion using the speeddial keys
In the main menu PHONE, briefly press a speed dialkey that has been assigned to establish the connec-tion with the phone number assigned to it.
Telephone setup
In the main menu PHONE, press the Setup function button.
Function button: effectSelect phone: select the telephone to be connected to the infotainment sys-tem, or press Find phone to connect a new device.User profile setup: opens the menu User profile setup ⇒ page 61.Select ring tone: select a ring tone from the list of predefined tones.Bluetooth settings: opens the menu Bluetooth setup ⇒ page 61.