left Seat Leon 5D 2013 Service Manual
[x] Cancel search | Manufacturer: SEAT, Model Year: 2013, Model line: Leon 5D, Model: Seat Leon 5D 2013Pages: 339, PDF Size: 4.8 MB
Page 245 of 339
243
Care and cleaning
sponge. If the stains are difficult to remove, a washing paste can be applied
directly onto the stain and worked into the fabric. The surface will then have
to be wiped with clear water to remove any residue left by the paste. To do
so, use a damp cloth or sponge and then dab the stain with an absorbent
cloth.
Remove chocolate or make-up stains with a cleaning paste (for e.g., soft
soap). Then remove the soap with water (wet sponge).
A spirit-based cleaner can be used to remove grease, oil, lipstick or ball
point pen. Then dab the dissolved grease or colour particles off with an ab-
sorbent cloth or similar. You may also have to treat the stain once more us-
ing washing paste and water.
If the covers or textile trim panels are badly soiled we recommend that you
have them cleaned by a professional cleaning company with a shampoo
and spray.
Note
Open Velcro fasteners on clothes can damage the seat upholstery. Make
sure that Velcro fasteners are closed.
Natural leather
SEAT does everything possible to preserve the genuine qual-
ities of this natural product. General information
Our range of leathers is large. The main type used is nappa in various forms,
that is, leather with a smooth surface in various different colours.
The amount of dye used determines the appearance and properties of leath-
er. If the leather is left in a more natural state, it retains its typical natural
napped appearance and confers excellent all-weather properties to the
seats. Fine veins, healed scars, insect bites, wrinkles and a subtle variation in shading remain visible; these are the characteristic features of genuine
natural leather.
Natural napped leather does not have a protective surface coating of dye. It
is therefore somewhat more prone to damage. This should be borne in mind
if children or pets often travel in the car, or if there are other factors that
could lead to damage.
Types of leather with a coloured surface coating are likely to be more resist-
ant to damage. This has a great advantage for day-to-day use. However, this
means that the typical natural characteristics of the surface are less appa-
rent, though this does not affect quality.
Cleaning and care
Due to the natural properties of the specially selected hides employed, the
finished leather has a certain sensitivity to grease and dirt, etc. so a degree
of care is required in everyday use and when looking after the leather. Dark
clothing (especially if damp or incorrectly dyed) may stain leather uphols-
tery. Dust and grit in the pores and seams can scratch and damage the sur-
face. Therefore leather should be cleaned at regular intervals, depending on
the actual amount of use. When they have been in use for a certain time,
your car seats will acquire a typical and unmistakable patina. This is charac-
teristic for leather as a natural product and is a sign of genuine quality.
To maintain the value of natural leather you should note the following
points:CAUTION
● Avoid exposing leather to direct sunlight for long periods, otherwise it
may tend to lose some of its colour. If the car is left for a prolonged period
in the bright sun, it is best to cover the leather.
● Sharp-edged objects on clothing, such as belts, zip fasteners, rivets or
similar, can also leave permanent scratches and rough marks on the surface
of the leather.
Safety FirstOperating instructionsPractical TipsTechnical specifications
Page 247 of 339

245
Care and cleaning
CAUTION
On no account use solvents (such as petrol, turpentine), wax polish, shoe
cream or similar materials.
Cleaning Alcantara upholstery
Removing dust and dirt
– Moisten a cloth just a little and wipe down the seat covers.
Removing stains
– Moisten a cloth with lukewarm water or diluted white spirits.
– Dab at the stain. Start at the outside and work inwards.
– Dry the area you have cleaned with a soft cloth.
Do not use leather cleaning products on Alcantara seat covers.
You may use a suitable shampoo on dust and dirt.
Dust and grit in the pores and seams can scratch and damage the surface. If
the car is left standing in the sun for long periods, Alcantara leather should
be protected against direct sunlight to prevent it from fading. However,
slight colour variations will arise in normal use.
CAUTION
● Do not use solvents, wax polish, shoe cream, stain removers, leather
cleaning products or any similar products on Alcantara.
● To avoid damage, stubborn stains should be removed by a specialised
workshop.
● On no account use brushes, hard sponges or similar utensils. Seat belts
–
Keep the seat belts clean.
– For cleaning, use a mild solution of soap and water.
– Check the condition of the seat belts at regular intervals.
The retract function may not operate properly in very dirty belts. Make sure
that the inertia reel seat belts are completely dry before allowing them to
retract.
CAUTION
● Do not remove the seat belts from the vehicle to clean them.
● Do not use chemical cleaning agents on the seat belts, as this can dam-
age the webbing. Ensure that the seat belts do not come into contact with
corrosive fluids.
● If you find any damage to the belt webbing, belt fittings, the belt retrac-
tor or the buckle, the belt in question must be replaced by a specialised
workshop.
Safety FirstOperating instructionsPractical TipsTechnical specifications
Page 250 of 339
248Checking and refilling levels
The engine management automatically adapts to the natural gas used ac-
cording to its quality. Therefore, different quality gases can be mixed in the
tank, without the need for comprehensive draining before applying a differ-
ent quality gas.
The instrument panel display shows information on the current natural gas
quality ⇒ page 73.
Natural gas and safety
If you can smell gas or suspect that there is a leak ⇒
:
● Stop the vehicle immediately.
● Switch the ignition off.
● Open the doors to appropriately ventilate the vehicle.
● Extinguish cigarettes immediately.
● Move away from the vehicle or switch off objects that may cause sparks
or a fire.
● If you continue to smell gas, do not continue driving!
● Seek specialist assistance. Have the fault repaired.
WARNING
Failure to act when you can smell gas in the vehicle or when refuelling
can cause serious injuries.
● Carry out the necessary operations.
● Leave the danger zone.
● If necessary, warn the emergency services.
WARNING
The vehicle is not prepared to use liquefied natural gas (LNG) and this
fuel must not be added under any circumstances. Liquefied natural gas
can cause the natural gas tank to explode resulting in serious injury.
Note
Have natural gas system checked regularly by a specialised workshop in ac-
cordance with the Maintenance Programme.
Filling the tank Filling the tank
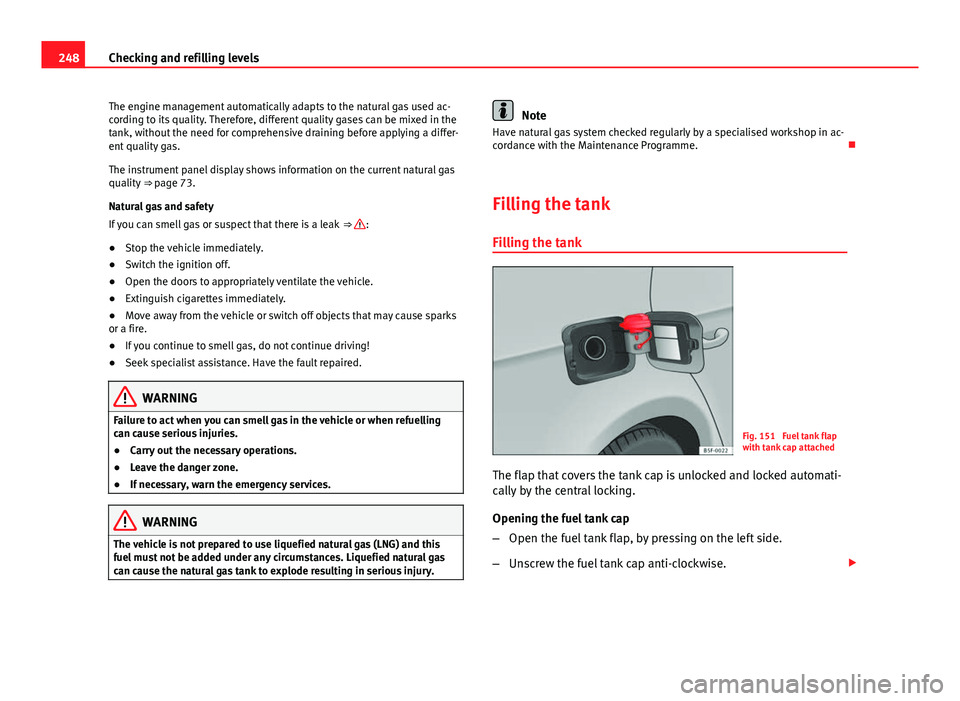
Fig. 151 Fuel tank flap
with tank cap attached
The flap that covers the tank cap is unlocked and locked automati-
cally by the central locking.
Opening the fuel tank cap
– Open the fuel tank flap, by pressing on the left side.
– Unscrew the fuel tank cap anti-clockwise.
Page 260 of 339

258Checking and refilling levels
WARNING
If there is not enough anti-freeze in the coolant system, the engine may
fail leading to serious damage.
● Please make sure that the percentage of additive is correct with re-
spect to the lowest expected ambient temperature in the zone in which
the vehicle is to be used.
● When the outside temperature is very low, the coolant could freeze
and the vehicle would be immobilised. In this case, the heating would
not work either and inadequately dressed passengers could die of cold.
CAUTION
The original additives should never be mixed with coolants which are not
approved by SEAT. Otherwise, you run the risk of causing severe damage to
the engine and the engine cooling system.
● If the fluid in the expansion tank is not purple but is, for example,
brown, this indicates that the G 13 additive has been mixed with an inade-
quate coolant. The coolant must be changed as soon as possible if this is
the case! This could result in serious faults and engine damage.
For the sake of the environment
Coolants and additives can contaminate the environment. If any fluids are
spilled, they should be collected and correctly disposed of, with respect to
the environment. Topping up coolant
Top up coolant when the level is below the MIN (minimum)
mark.
Fig. 156 Engine com-
partment: Coolant expan-
sion tank cap
Checking coolant level
– Park the vehicle in a horizontal position.
– Switch the ignition off
– Read off the coolant level on coolant expansion tank. When the
engine is cold, the coolant level should be between the marks.
When the engine is hot, it may be slightly above the upper
mark.
Topping up coolant
– Wait for the engine to cool down.
– Cover the coolant expansion tank cap with a cloth and carefully
unscrew it to the left ⇒
.
Page 262 of 339

260Checking and refilling levels
WARNING
● Brake fluid should be stored in the closed original container in a safe
place out of reach of children. Risk of poisoning!
● If the brake fluid is left in the system for too long and the brakes are
subjected to heavy use, vapour bubbles may form in the brake system.
This would seriously affect the efficiency of the brakes and the safety of
the vehicle. This may cause an accident.
CAUTION
Brake fluid should not come into contact with the vehicle paintwork, as it is
abrasive.
Battery General information
The battery is located in the engine compartment and is almost mainte-
nance-free. It is checked as part of the Inspection Service. Nevertheless,
check the terminals are clean and have the correct tightening torque, espe-
cially in summer and winter.
Disconnecting the battery
The battery should only be disconnected in exceptional cases. When the
battery is disconnected, some of the vehicle's functions are “lost” ( ⇒ table
on page 260). These functions will require resetting after the battery is re-
connected.
Deactivate the anti-theft alarm* before you disconnect the battery Other-
wise the alarm will be triggered.
effectReprogrammingOne-touch function of the electric
windows⇒ page 104, One-touch opening and
closing*
Remote control keyIf the vehicle does not respond to the
key, they should be synchronised
⇒ page 91
Digital clock⇒ page 63
ESC warning lampAfter driving for a few metres, the
warning lamp goes out again.
If the vehicle is not used for long periods
The vehicle has a system for monitoring the current consumption when the
engine is left unused for long periods of time ⇒ page 226. Some functions,
such as the interior lights, or the remote door opening, may be temporarily
disabled to prevent the battery from running flat. These functions will come
back on as soon as the ignition is switched on and the engine started.
Winter conditions
During the winter, the starting power may be reduced, and if necessary, the
battery should be charged ⇒
in Important safety warnings for handling a
vehicle battery on page 261
Important safety warnings for handling a vehicle battery
All work on batteries requires specialist knowledge. Please refer to a SEAT
Official Service or a workshop specialising in batteries: risk of burns or ex-
ploding battery!
The battery must not be opened. Never try to change the fluid level of the
battery. Explosive gas is released from the battery that could cause an ex-
plosion.
Page 281 of 339

279
Emergencies
Anti-theft wheel bolts
Fig. 167 Anti-theft
wheel bolt with cap and
adapter
A special adapter (vehicle tools) is required to remove the anti-
theft wheel bolts.
– Remove the wheel cover* or the cap*.
– Insert the adapter onto the anti-theft wheel bolt and push it on
as far as it will go.
– Insert the wheel brace (vehicle tools) onto the adapter as far as
it will go.
– Remove the wheel bolt ⇒ page 279.
Note
Make a note of the code number of the anti-theft wheel bolt and keep it in a
safe place, but not in your vehicle. If you need a new adapter, you can ob-
tain it from the SEAT Official Service, indicating the code number.
Loosening the wheel bolts
Fig. 168 Wheel: loosen
the wheel bolts
– Insert the box spanner (vehicle tools) onto the wheel bolt as far
as it will go 1)
.
– Turn the wheel bolt approximately one turn to the left ⇒ Fig. 168
-arrow-. To apply the required torque, hold the wheel brace at
the end. If it is not possible to loosen a wheel bolt, carefully ap-
ply pressure with one foot on the end of the box spanner. Hold
on to the vehicle for support and take care not to slip.
1)
An adapter is required to unscrew or tighten the anti-theft wheel bolts ⇒ page 279.
Safety FirstOperating instructionsPractical TipsTechnical specifications
Page 289 of 339
287
Emergencies
Note
● Please observe legal requirements when doing so.
● Switch on the hazard warning lights of both vehicles. However, observe
any regulations to the contrary.
● The tow rope must not be twisted. Otherwise the front towline anchor-
age could be pulled off the vehicle.
Towline anchorage at the front of the vehicle
The front towline anchorage is only mounted if the vehicle
has to be towed.
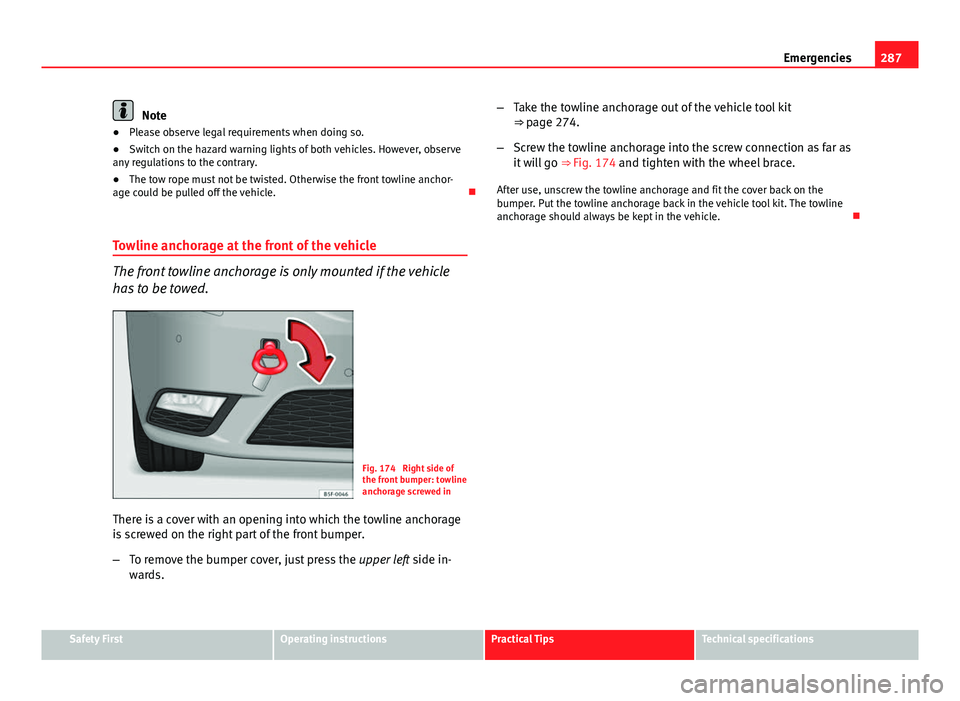
Fig. 174 Right side of
the front bumper: towline
anchorage screwed in
There is a cover with an opening into which the towline anchorage
is screwed on the right part of the front bumper.
– To remove the bumper cover, just press the upper left side in-
wards. –
Take the towline anchorage out of the vehicle tool kit
⇒ page 274.
– Screw the towline anchorage into the screw connection as far as
it will go ⇒ Fig. 174 and tighten with the wheel brace.
After use, unscrew the towline anchorage and fit the cover back on the
bumper. Put the towline anchorage back in the vehicle tool kit. The towline
anchorage should always be kept in the vehicle.
Safety FirstOperating instructionsPractical TipsTechnical specifications
Page 290 of 339

288Emergencies
Rear towline anchorage
The rear towline anchorage should only be mounted if you
wish to tow another vehicle.
Fig. 175 Right side of
the rear bumper: cover
cap
Fig. 176 Right side of
the rear bumper: towline
anchorage screwed in Vehicles with towline anchorage
On the right of the rear bumper there is a cover which covers a
threaded hole.
–
Take the towline anchorage out of the vehicle tool set
⇒ page 274.
– To remove the bumper cover, press the upper side of the cover
inwards -arrow- and remove the cover by levering on the left
side ⇒ Fig. 175.
– Screw the towline anchorage into the screw connection as far as
it will go ⇒ Fig. 176 and tighten with the wheel brace.
After use, unscrew the towline anchorage and put it back in the vehicle tool
kit. Replace the cover on the bumper. The towline anchorage should always
be kept in the vehicle.
WARNING
● If the towline anchorage is not screwed in as far as the stop, there is a
risk of the screw connection shearing off during towing (accident risk).
● If your car has a towing bracket, only use special towing ropes. Risk
of accident!
CAUTION
In vehicles fitted with a towing bracket, only use special tow bars to prevent
damage to the ball joint. These tow bars have been specially approved for
use with towing brackets.
Page 296 of 339
294Fuses and bulbs
Full-LED headlight system*
Full-LED headlights handle all light functions (daylight, side light, turn sig-
nal, dipped beam and route light) with light emitting diodes (LEDs) as a
light source.
Full-LED headlights are designed to last the lifetime of the car and light
bulbs cannot be replaced. In case of headlight failure, go to an authorised
workshop to have it replaced.
Bulbs (12 V)
Halogen headlightsTypeDaytime driving light/side lightP21W SLLDipped beam headlightsH7 LLMain beam headlightsH7 LLTurn signalPY21W LL
Full-LED main headlightsTypeNo bulbs may be replaced. All functions are
with LEDs
Front fog lightTypeFog/cornering lights*H8
Rear bulb lightTypeBrake lights/tail lightsP21W LLSide lights2x W5W LLTurn signalPY21W LLRear fog lightH21WReverse lightsP21W LL
LED rear lightTypeTurn signalPY21W LLRear fog lightH21W
LED rear lightTypeReverse lightsP21W LLThe remaining functions work with LEDs
WARNING
● Take particular care when working on components in the engine com-
partment if the engine is warm. Risk of burns.
● Bulbs are highly sensitive to pressure. The glass can break when you
touch the bulb, causing injury.
● When changing bulbs, please take care not to injure yourself on sharp
edges, in particular on the headlight housing.
CAUTION
● Remove the ignition key before working on the electric system. Other-
wise, a short circuit could occur.
● Switch off the lights or parking lights before you change a bulb.
● Take good care to avoid damaging any components.
For the sake of the environment
Please ask your specialist retailer how to dispose of used bulbs in the prop-
er manner.
Note
● Please check at regular intervals that all lighting (especially the exterior
lighting) on your vehicle is functioning properly. This is not only in the inter-
est of your own safety, but also that of all other road users.
● Before changing a bulb, make sure you have the correct new bulb.
● Do not touch the glass part of the bulb with your bare hands, use a cloth
or paper towel instead. Otherwise, the fingerprints left on the glass will va-
porise as a result of the heat generated by the bulb, they will be deposited
on the reflector and will impair its surface.
Page 297 of 339
295
Fuses and bulbs
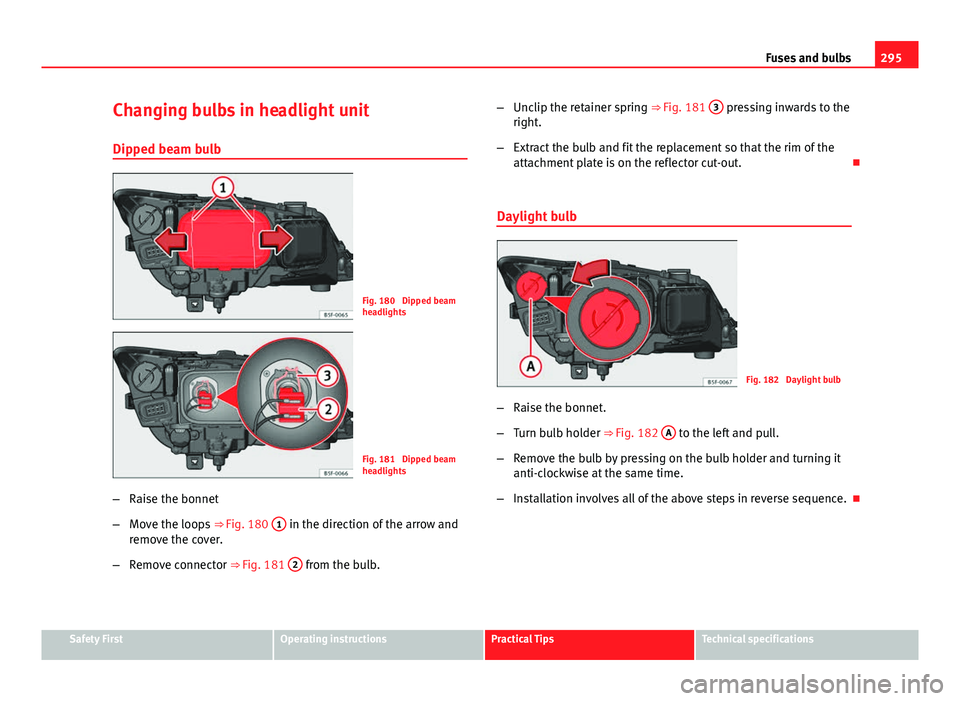
Changing bulbs in headlight unit Dipped beam bulb
Fig. 180 Dipped beam
headlights
Fig. 181 Dipped beam
headlights
– Raise the bonnet
– Move the loops ⇒ Fig. 180 1
in the direction of the arrow and
remove the cover.
– Remove connector ⇒ Fig. 181 2
from the bulb. –
Unclip the retainer spring ⇒ Fig. 181 3
pressing inwards to the
right.
– Extract the bulb and fit the replacement so that the rim of the
attachment plate is on the reflector cut-out.
Daylight bulb
Fig. 182 Daylight bulb
– Raise the bonnet.
– Turn bulb holder ⇒ Fig. 182 A
to the left and pull.
– Remove the bulb by pressing on the bulb holder and turning it
anti-clockwise at the same time.
– Installation involves all of the above steps in reverse sequence.
Safety FirstOperating instructionsPractical TipsTechnical specifications