ECO mode Seat Leon 5D 2014 User Guide
[x] Cancel search | Manufacturer: SEAT, Model Year: 2014, Model line: Leon 5D, Model: Seat Leon 5D 2014Pages: 284, PDF Size: 5.85 MB
Page 102 of 284
Operation
Motorway lights* The motorway light is available on vehicles
equipped with full-LED lights.
The function is connected/disconnected via
the corresponding Easy Connect system
menu.
●
Activation: when going above 110 km/h for
mor e th
an 30 seconds, the dipped beam rai-
ses slightly to increase the distance of visibil-
ity of the driver.
● Deactivation: when reducing the speed of
the c ar belo
w 100 km/h, the dipped beam re-
turns to its normal position.
Driving abroad The light beam of the dipped beam lights is
asymmetric: the side of the road on which
you are driving is lit more intensely.
When a car that is manufactured in a country
that drives on the right travels to a country
that drives on the left (or vice versa), it is nor-
mally necessary to cover part of the headlight
bulbs with stickers or to change the adjust-
ment of the headlights to avoid dazzling oth-
er drivers.
In such cases, the regulations specify certain
light values that must be complied with for designated points of the light distribution.
This is known as “Tourist light”.
The light distribution that the halogen and
full-LED headlights of the SEAT Leon range
have allows the specific “tourist light” values
to be met without the need for stickers or
changes in the settings.
Note
“Tourist light” is only allowed temporarily. If
you are planning a long stay in a country that
drives on the other side, you should take the
vehicle to an Authorised Technical Service to
change the headlights. Headlight range control, lighting of
the instrument panel and controls
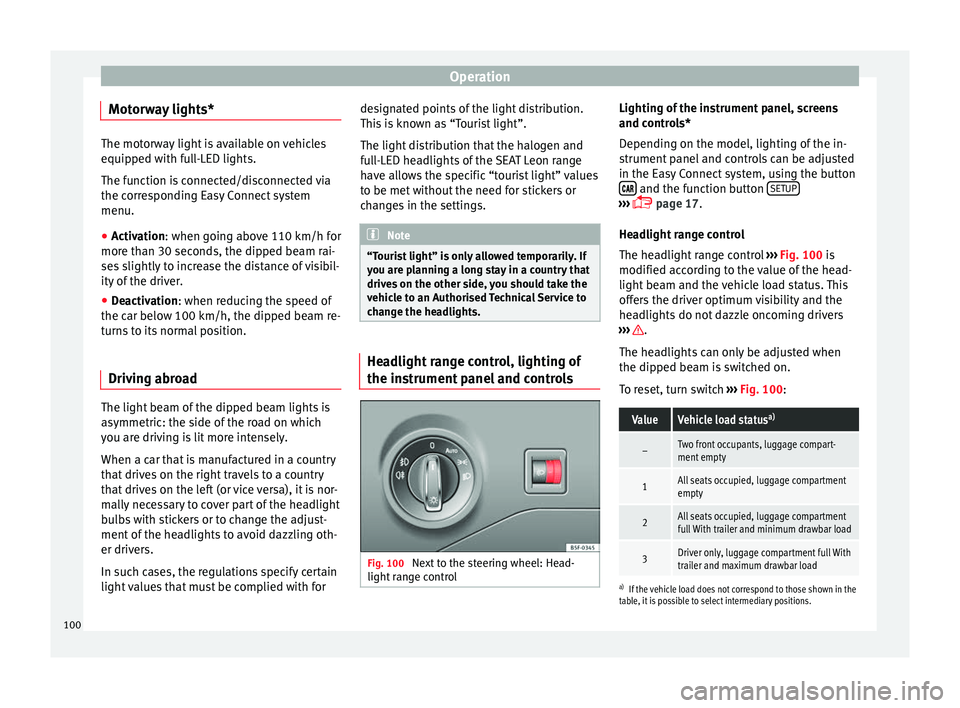
Fig. 100
Next to the steering wheel: Head-
light range control Lighting of the instrument panel, screens
and controls*
Depending on the model, lighting of the in-
strument panel and controls can be adjusted
in the Easy Connect system, using the button
and the function button
SETUP ›››
page 17
.
He a
dlight range control
The headlight range control ››› Fig. 100 is
modified acc
ording to the value of the head-
light beam and the vehicle load status. This
offers the driver optimum visibility and the
headlights do not dazzle oncoming drivers
››› .
The headlights can only be adjusted when
the dipped beam is switched on.
To reset, turn switch ››› Fig. 100 :
ValueVehicle load status a)
–Two front occupants, luggage compart-
ment empty
1All seats occupied, luggage compartment
empty
2All seats occupied, luggage compartment
full With trailer and minimum drawbar load
3Driver only, luggage compartment full With
trailer and maximum drawbar load
a)
If the vehicle load does not correspond to those shown in the
table, it is possible to select intermediary positions.
100
Page 104 of 284
Operation
● The sun visor can be pulled out of its
mounting and turned towards the door
››› Fig. 101 1 .
● Swing the sun visor towards the door, lon-
gitudinally backwards.
Vanity mirror light
There may be a vanity mirror, with a cover, on
the rear of the sun visor. When the cover is
opened 2 a light comes on.
The lamp goes out when the vanity mirror
cover is closed or the sun visor is pushed
back up. WARNING
Folded sun blinds can reduce visibility.
● Always store sun blinds and visors in their
housing when not in use. Note
The light above the sun visor automatically
switches off after a few minutes in certain
conditions. This prevents the battery from
discharging. Sun blind*
3 Applies to the model: LEON ST
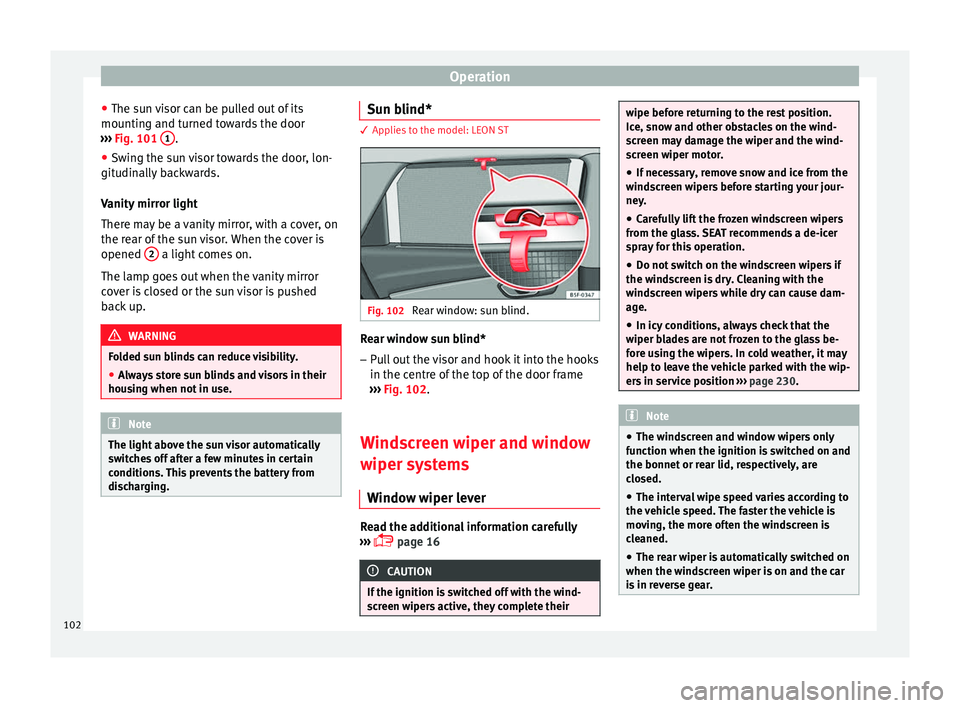
Fig. 102
Rear window: sun blind. Rear window sun blind*
– Pull out the visor and hook it into the hooks
in the centre of the top of the door frame
››› Fig. 102 .
W ind
screen wiper and window
wiper systems
Window wiper lever Read the additional information carefully
››› page 16 CAUTION
If the ignition is switched off with the wind-
screen wipers active, they complete their wipe before returning to the rest position.
Ice, snow and other obstacles on the wind-
screen may damage the wiper and the wind-
screen wiper motor.
● If necessary, remove snow and ice from the
windscreen wipers before starting your jour-
ney.
● Carefully lift the frozen windscreen wipers
from the glass. SEAT recommends a de-icer
spray for this operation.
● Do not switch on the windscreen wipers if
the windscreen is dry. Cleaning with the
windscreen wipers while dry can cause dam-
age.
● In icy conditions, always check that the
wiper blades are not frozen to the glass be-
fore using the wipers. In cold weather, it may
help to leave the vehicle parked with the wip-
ers in service position ››› page 230. Note
● The windscreen and window wipers only
function when the ignition is switched on and
the bonnet or rear lid, respectively, are
closed.
● The interval wipe speed varies according to
the vehicle speed. The faster the vehicle is
moving, the more often the windscreen is
cleaned.
● The rear wiper is automatically switched on
when the windscreen wiper is on and the car
is in reverse gear. 102
Page 105 of 284
Lights and visibility
Windscreen wiper functionsWindscreen wiper performance in different sit-
uations
If the vehicle is at a
standstillThe activated position provision-
ally changes to the previous posi-
tion.
During automatic
wipe
The air conditioner comes on for
approximately 30 seconds in air
recirculation mode to prevent the
smell of the windscreen washer
fluid entering the inside the vehi-
cle.
For the interval wipe
Intervals between wipes depend
on the vehicle's speed. The high-
er the vehicle speed the shorter
the intervals. Heated windscreen washer jets
The heating only thaws the frozen jets, it
does not thaw the water in the washer hoses.
The heated windscreen washer jets automati-
cally adjust the heat depending on the ambi-
ent temperature, when the ignition is switch-
ed on.
Headlight wash/wipe system
The headlight washers/wipers clean the
headlight lenses.
After the ignition is switched on, the first and
every fifth time the windscreen washer is
switched on, the headlights are also washed. Therefore, the windscreen wiper lever should
be pulled towards the steering wheel when
the dipped beam or main beam are on. Any
incrusted dirt (such as insects) should be
cleaned regularly (e.g. when refuelling).
To ensure the headlight washers work cor-
rectly in winter, any snow which has got into
the bumper jet supports should be cleaned
away. If necessary, remove snow with an anti-
icing spray.
Note
The wiper will try to wipe away any obstacles
that are on the windscreen. The wiper will
stop moving if the obstacle blocks its path.
Remove the obstacle and switch the wiper
back on again. Rain sensor*
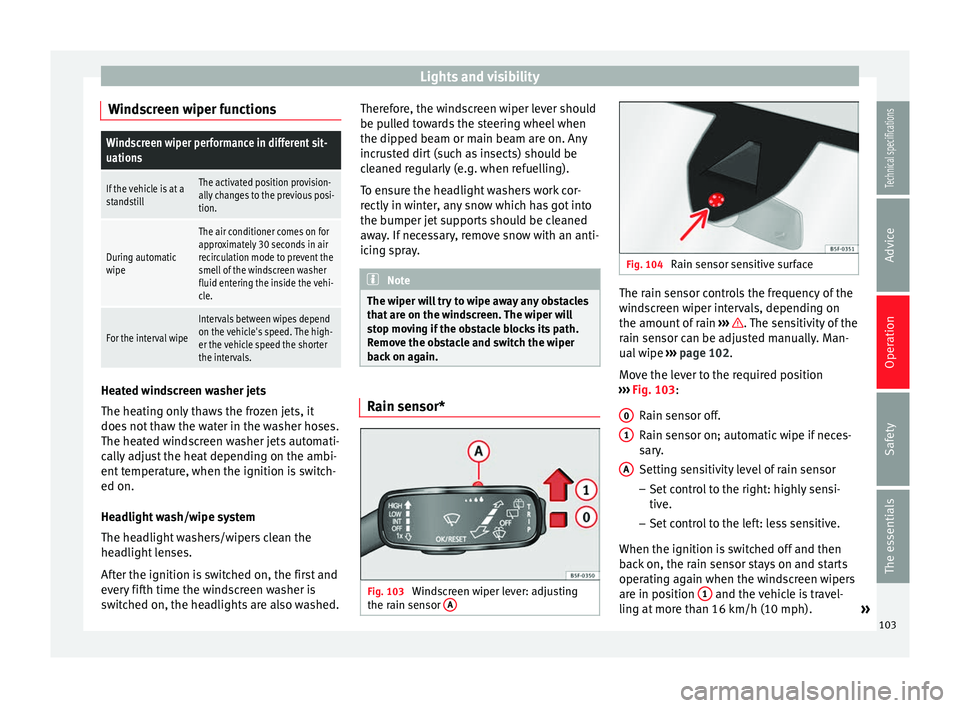
Fig. 103
Windscreen wiper lever: adjusting
the rain sensor A Fig. 104
Rain sensor sensitive surface The rain sensor controls the frequency of the
windscreen wiper intervals, depending on
the amount of rain
››› . The sensitivity of the
rain sensor can be adjusted manually. Man-
ual wipe ››› page 102 .
Mo v
e the lever to the required position
››› Fig. 103:
Rain sen
sor off.
Rain sensor on; automatic wipe if neces-
sary.
Setting sensitivity level of rain sensor
– Set control to the right: highly sensi-
tive.
– Set control to the left: less sensitive.
When the ignition is switched off and then
back on, the rain sensor stays on and starts
operating again when the windscreen wipers
are in position 1 and the vehicle is travel-
ling at more than 16 km/h (10 mph). »
0 1
A
103
Technical specifications
Advice
Operation
Safety
The essentials
Page 112 of 284
Operation
compartment will not fly forward through the
interior during sudden braking.
CAUTION
● With the backrest inclined there is a danger
of damaging the rear head restraints when
adjusting the front seats backwards.
● When folding the backrest forwards, make
sure to place the side seat belts in the trim
clip to prevent them from being damaged by
becoming trapped in the backrest lock. Folding down and lifting the rear seat
backrest
3 Applies to the model: LEON ST
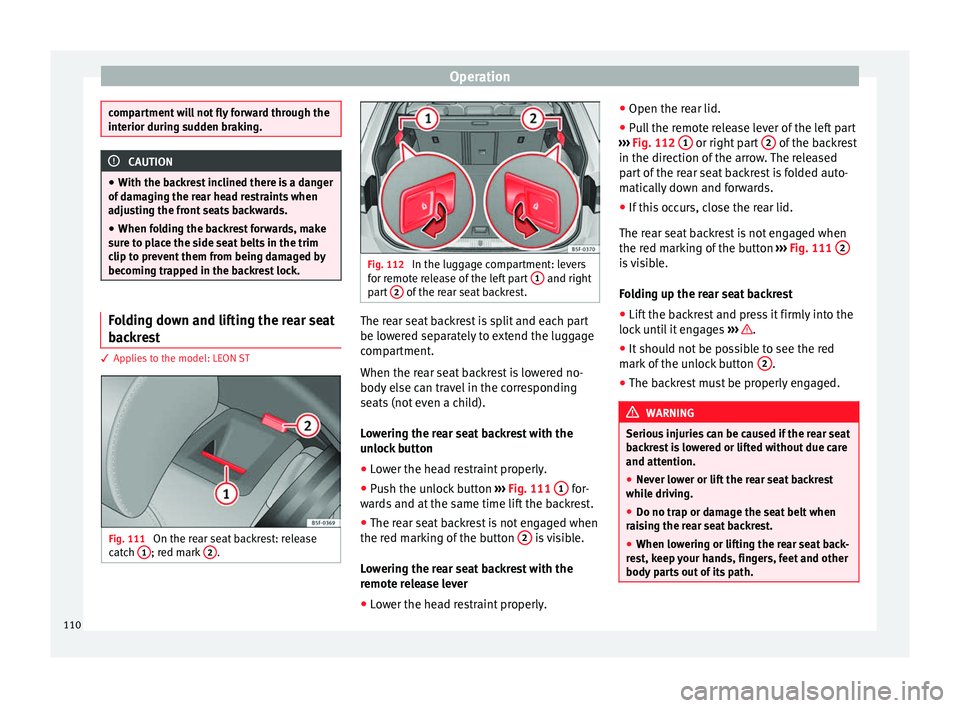
Fig. 111
On the rear seat backrest: release
catch 1 ; red mark
2 . Fig. 112
In the luggage compartment: levers
for remote release of the left part 1 and right
part 2 of the rear seat backrest.
The rear seat backrest is split and each part
be lowered separately to extend the luggage
compartment.
When the rear seat backrest is lowered no-
body else can travel in the corresponding
seats (not even a child).
Lowering the rear seat backrest with the
unlock button
● Lower the head restraint properly.
● Push the unlock button ››› Fig. 111 1 for-
wards and at the same time lift the backrest.
● The rear seat backrest is not engaged when
the red marking of the button 2 is visible.
Lowering the rear seat backrest with the
remote release lever
● Lower the head restraint properly. ●
Open the rear lid.
● Pull the remote release lever of the left part
››› Fig. 112 1 or right part
2 of the backrest
in the direction of the arrow. The released
part of the rear seat backrest is folded auto-
matically down and forwards.
● If this occurs, close the rear lid.
The rear seat backrest is not engaged when
the red marking of the button ››› Fig. 111 2 is visible.
Folding up the rear seat backrest
●
Lift the backrest and press it firmly into the
lock until it engages ››› .
● It should not be possible to see the red
mark of the unlock button 2 .
● The backrest must be properly engaged. WARNING
Serious injuries can be caused if the rear seat
backrest is lowered or lifted without due care
and attention.
● Never lower or lift the rear seat backrest
while driving.
● Do no trap or damage the seat belt when
raising the rear seat backrest.
● When lowering or lifting the rear seat back-
rest, keep your hands, fingers, feet and other
body parts out of its path. 110
Page 113 of 284
Transport and practical equipment
●
For the rear seat seat belts to offer the nec-
essary protection all the parts of the rear
backrest must be properly engaged. This is
particularly important in the case of the cen-
tre rear seat. If someone is seated in a seat
whose backrest is not properly engaged they
will fly forward, along with the backrest, dur-
ing an accident or a sudden driving or braking
manoeuvre.
● A red signal on the button 2 warns that
the backrest is not engaged. Always check
that the red marking is not visible when the
backrest is in the upright position.
● When the rear seat backrest is lowered or is
not properly engaged nobody else can travel
in the corresponding seats (not even a child). CAUTION
Serious damage can be caused to the vehicle
and other objects if the rear seat backrest is
lowered or lifted without due care and atten-
tion.
● Before lowering the rear seat backrest, al-
ways adjust the front seats so that neither
the head restraints nor the cushions of the
rear backrest can hit them. Transport and practical
equipment
Storage compartments Storage areas under the front seats* Fig. 113
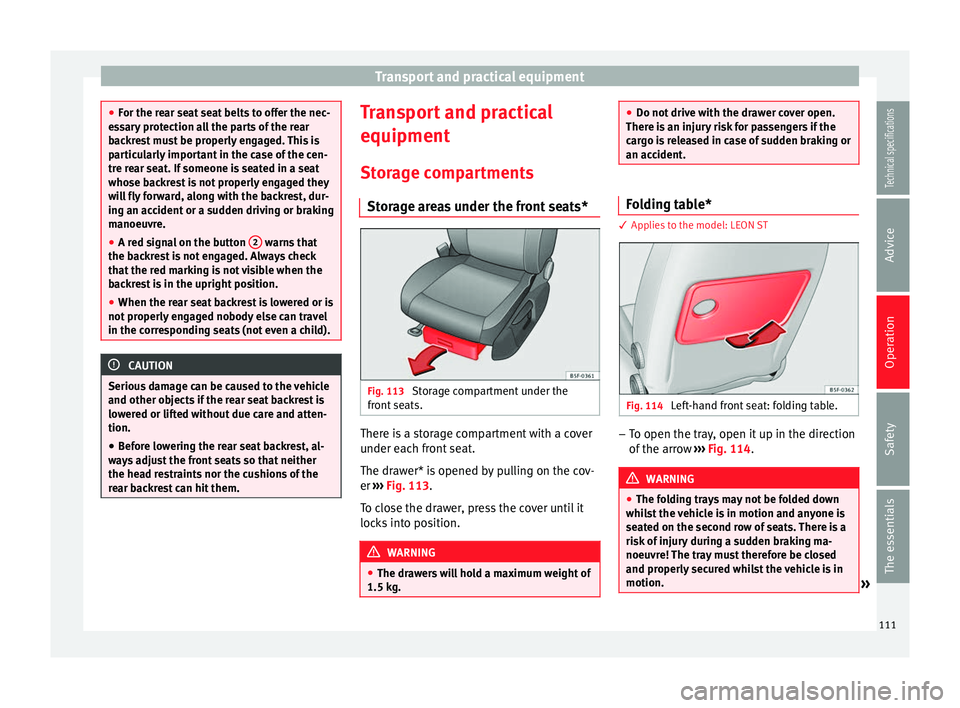
Storage compartment under the
front seats. There is a storage compartment with a cover
under each front seat.
The drawer* is opened by pulling on the cov-
er
››› Fig. 113 .
T o c
lose the drawer, press the cover until it
locks into position. WARNING
● The drawers will hold a maximum weight of
1.5 kg. ●
Do not drive with the drawer cover open.
There is an injury risk for passengers if the
cargo is released in case of sudden braking or
an accident. Folding table*
3 Applies to the model: LEON ST
Fig. 114
Left-hand front seat: folding table. –
To open the tray, open it up in the direction
of the arrow ››› Fig. 114 . WARNING
● The folding trays may not be folded down
whilst the vehicle is in motion and anyone is
seated on the second row of seats. There is a
risk of injury during a sudden braking ma-
noeuvre! The tray must therefore be closed
and properly secured whilst the vehicle is in
motion. » 111
Technical specifications
Advice
Operation
Safety
The essentials
Page 121 of 284
Transport and practical equipment
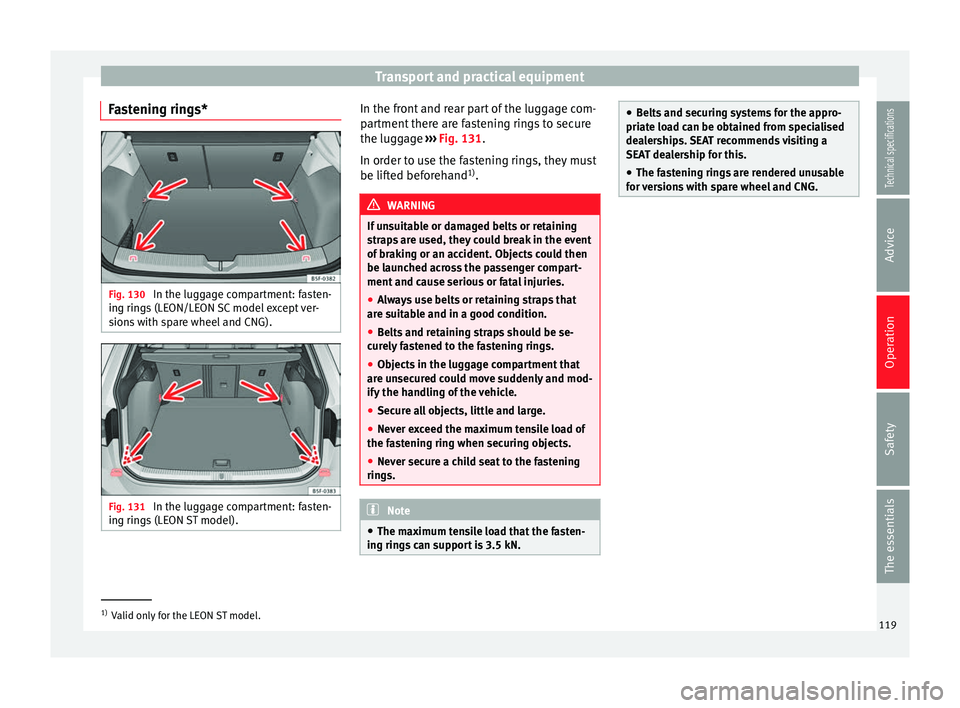
Fastening rings* Fig. 130
In the luggage compartment: fasten-
ing rings (LEON/LEON SC model except ver-
sions with spare wheel and CNG). Fig. 131
In the luggage compartment: fasten-
ing rings (LEON ST model). In the front and rear part of the luggage com-
partment there are fastening rings to secure
the luggage
››› Fig. 131 .
In or der t
o use the fastening rings, they must
be lifted beforehand 1)
. WARNING
If unsuitable or damaged belts or retaining
straps are used, they could break in the event
of braking or an accident. Objects could then
be launched across the passenger compart-
ment and cause serious or fatal injuries.
● Always use belts or retaining straps that
are suitable and in a good condition.
● Belts and retaining straps should be se-
curely fastened to the fastening rings.
● Objects in the luggage compartment that
are unsecured could move suddenly and mod-
ify the handling of the vehicle.
● Secure all objects, little and large.
● Never exceed the maximum tensile load of
the fastening ring when securing objects.
● Never secure a child seat to the fastening
rings. Note
● The maximum tensile load that the fasten-
ing rings can support is 3.5 kN. ●
Belts and securing systems for the appro-
priate load can be obtained from specialised
dealerships. SEAT recommends visiting a
SEAT dealership for this.
● The fastening rings are rendered unusable
for versions with spare wheel and CNG. 1)
Valid only for the LEON ST model.
119
Technical specifications
Advice
Operation
Safety
The essentials
Page 127 of 284

Air conditioning
WARNING
Reduced visibility through the windows in-
creases the risk of serious accidents.
● Always ensure that all windows are free of
ice and snow, and that they are not fogged,
so as to maintain good visibility of everything
outside.
● The maximum heat output required to de-
frost windows as quickly as possible is only
available when the engine has reached its
normal running temperature. Only drive when
you have good visibility.
● Always ensure that you use the heating
system, fresh air system, air conditioner and
the heated rear window to maintain good visi-
bility to the outside.
● Never leave the air recirculation on for a
long period of time. If the cooling system is
switched off and air recirculation mode
switched on, the windows can mist over very
quickly, considerably limiting visibility.
● Switch air recirculation mode off when it is
not required. WARNING
Stuffy or used air will increase fatigue and re-
duce driver concentration possibly resulting
in a serious accident.
● Never leave the fresh air fan turned off or
use the air recirculation for long periods of
time; the air in the vehicle interior will not be
refreshed. CAUTION
● Switch the air conditioner off if you think it
may be broken. This will avoid additional
damage. Have the air conditioner checked by
a specialised workshop.
● Repairs to the air conditioner require spe-
cialist knowledge and special tools. SEAT rec-
ommends visiting a SEAT Official Service. Note
● When the cooling system is turned off, air
coming from the outside will not be dried. To
prevent fogging of the windows, SEAT recom-
mends leaving the cooling system (compres-
sor) turned on. To do this, press the button . The button lamp should light up.
● The maximum heat output required to de-
frost windows as quickly as possible is only
available when the engine has reached its
normal running temperature.
● Keep the air intake slots in front of the
windscreen free of snow, ice and leaves to en-
sure heating and cooling are not impaired,
and to prevent the windows from misting
over. Adjust using the Easy Connect
system*
3 Applies to vehicles with a Touch/Colour Media
S
y
stem.
In the Easy Connect system it is also possible
to perform various adjustments to the Clima-
tronic.
Open the air conditioner menu ● Pre
ss the Setup button.
● OR: press the MENU button in Easy Con-
nect. With the rotating switch select the air
conditioner menu and open it.
On the touch screen you can see and change
the current settings, for example, the temper-
ature set for the driver and passenger sides,
the air distribution and the fan speed. With
button the driver and passenger side
temperatures are synchronised ›››
Book-
let Media System Touch/Colour, chapter Air
conditioning .
T o sw
itch a function on or off, or to select a
submenu, you must press the corresponding
function button.
For more information about functions
››› page 81
.
»
125
Technical specifications
Advice
Operation
Safety
The essentials
Page 140 of 284

Operation
– Take your left foot off the brake pedal. WARNING
● Always adapt your driving style to the traf-
fic conditions.
● Only use the launch control programme
when road and traffic conditions permit, and
make sure your manner of driving and accel-
erating the vehicle does not inconvenience or
endanger other road users.
● Make sure that the ESC remains switched
on. Please note that when the ASR and ESC
are deactivated, the wheels may start to spin,
causing the vehicle to lose grip. Risk of acci-
dent!
● After putting the vehicle into gear, the
“sport” mode of the ESC should be deactiva-
ted again by briefly pressing the OFF but-
ton. Note
● After using the Launch control programme,
the temperature in the gearbox may have in-
creased considerably. In this case, the pro-
gramme could be disabled for several mi-
nutes. The programme can be used again af-
ter the cooling phase.
● Accelerating with the Launch control pro-
gramme places a heavy load on all parts of
the vehicle. This can result in increased wear
and tear. Downhill speed control*
The downhill speed control function helps
the driver when driving down steep gradi-
ents.
Downhill speed control is activated when the
selector lever is in D/S and the driver applies
the foot brake. The automatic gearbox auto-
matically engages a lower gear that is suita-
ble for the slope. The downhill speed control
function attempts to maintain the speed at
which the vehicle was travelling when the
foot brake was applied (subject to the laws of
physics and technical drive limitations). It
may be necessary to adjust the speed again
using the foot brake in certain situations. Giv-
en that the downhill speed control can only
change down to 3rd gear, on very steep de-
scents the tiptronic mode may be required. In
this case, manually reduce the tiptronic to
2nd or 1st gear to use the engine brake and
reduce the charge on the brakes.
Downhill speed control is deactivated as
soon as the road levels out again or you
press the accelerator pedal.
On vehicles with cruise control system*
››› page 150 , downhill speed control is acti-
v at
ed when you set a cruising speed. WARNING
The downhill speed control cannot defy the
laws of physics. Therefore, speed cannot be maintained constant in all situations. Always
be prepared to use the brakes!
Inertia mode
The inertia mode enables the kinetic energy
of the vehicle to be harnessed enabling cer-
tain stretches to be driven without using the
accelerator. This enables fuel to be saved.
Use the inertia mode to “let the vehicle roll”
before, for example, arriving in a town.
Switching on inertia mode
Important: selector lever must be in position
D, gradients below 12 %.
–
Select, in SEAT Drive Profile*, Eco mode
››› page 169 .
– Tak
e your foot off the accelerator.
The driver message Inertia will be displayed.
At speeds higher than 20 km/h (12 mph), the
gearbox will automatically disengage and the
vehicle will roll freely, without the effect of
the engine brake. While the vehicle rolls, the
engine runs at idling speed.
Stopping inertia mode
– Press the brake or the accelerator pedal.
To make use of the braking force and switch
off the engine again, simply press the brake
pedal briefly.
138
Page 141 of 284

Driving
Applying both the inertia mode (= prolonged
section w ith l
ess energy) and the switching
off using inertia (= shorter section without
the need for fuel) facilitates improved fuel
consumption and emission balance. WARNING
● If the inertia mode has been switched on,
take into account, when approaching an ob-
stacle and releasing the accelerator pedal,
that the vehicle will not decelerate in the usu-
al manner: risk of accident!
● When using inertia mode while travelling
down hills, the vehicle can increase speed:
risk of accident!
● If other users drive your vehicle, warn them
about inertia mode. Note
● Inertia mode is only available in eco (SEAT
Drive Profile*) driving mode.
● The driver message Inertia is only displayed
w ith the c
urrent consumption. In inertia
mode the gear will no longer be displayed
(for example “E” will appear instead of “E7”).
● On downhill sections with gradients above
15 %, the inertia mode will automatically be
switched off temporarily. Backup programme
A backup programme is in place if a fault
should occur in the control system.
If all the positions of the selector lever are
shown over a light background on the instru-
ment panel display, there is a system fault
and the automatic gearbox will operate in
with the backup programme. When the back-
up programme is activated, it is possible to
drive the vehicle, however, at low speeds and
within a selected range of gears. In some ca-
ses
driving in reverse gear may not be possi-
ble . CAUTION
If the gearbox operates with the backup pro-
gramme, take the vehicle to a specialised
workshop and have the fault repaired without
delay. Clutch
Clutch overheating! Please stop!
The clutch has overheated and could be dam-
aged. Stop the vehicle and wait for the gear-
box to cool with the engine at idling speed
and the selector lever in position P. When the
warning lamp and the driver message switch
off, have the fault corrected by a specialised
workshop without delay. If the warning lamp
and the driver message do not switch off, do not continue driving. Seek specialist assis-
tance.
Faults in the gearbox
Gearbox: Fault! Stop the vehicle and place
the lever in the position P.
There is a fault in the gearbox. Stop the vehi-
cle in a safe place and do not continue driv-
ing. Seek specialist assistance. Gearbox: System fault! You may continue
driving.
Have the fault corrected by a specialised
workshop without delay. Gearbox: System fault! You can continue
driving with restrictions. Reverse gear disa-
bled
Take the vehicle to a specialised workshop
and have the fault repaired without delay. Gearbox: System fault! You can continue
driving in D until switching off the engine
Stop the vehicle in a safe place well away
from moving traffic. Seek specialist assis-
tance. Gearbox: too hot. Adapt your driving ac-
cordingly
Continue driving at moderate speeds. When
the warning lamp switches off, you can con-
tinue driving in a normal manner. »
139
Technical specifications
Advice
Operation
Safety
The essentials
Page 142 of 284

Operation
Gearbox: press the brake and engage a
gear again.
If the fault was caused by a gearbox with a
high temperature, this driver message will be
displayed when the gearbox has cooled
again.
Run-in and economical driving Running in the engine A new vehicle should be run in over a dis-
tance of 1500 km (1000 miles). For the first
1,000 km the engine speed should not ex-
ceed 2/3 of the maximum permissible engine
speed. In doing so, do not accelerate at full
throttle and do not drive with a trailer! From
1000 to 1500 km (600 to 1000 miles) you
can gradually increase the engine rpm and
road speed.
During its first few hours of running, the in-
ternal friction in the engine is greater than
later on when all the moving parts have bed-
ded down.
How the vehicle is driven for the first 1,500
km influences the future engine perform-
ance. Subsequently, also drive at a moderate
rate, especially when the engine is still cold:
this will lead to less engine wear and tear
and will prolong its useful life. You should also avoid driving with the engine
speed too
low
. Change down to a lower gear
when the en
gine no longer runs “smoothly”.
If the engine revs too much, cut fuel injection
to protect the engine.
Environmental friendliness Environmental protection is a top priority in
the design, choice of materials and manufac-
ture of your new SEAT.
Constructive measures to encourage
recycling
● Joints and connections designed for easy
dismantling
● Modular construction to facilitate disman-
tling
● Increased use of single-grade materials.
● Plastic parts and elastomers are marked in
accordance with ISO 1043, ISO 11469 and
ISO 1629.
Choice of materials
● Use of recycled materials.
● Use of compatible plastics in the same part
if its components are not easily separated.
● Use of recycled materials and/or materials
originating from renewable sources. ●
Reduction of volatile components, includ-
ing odour, in plastic materials.
● Use of CFC-free coolants.
Ban on heavy metals, with the exceptions
dictated by law (Annex II of ELV Directive
2000/53/EC): cadmium, lead, mercury, hexa-
v al
ent chromium.
Manufacturing methods
● Reduction of the quantity of thinner in the
protective wax for cavities.
● Use of plastic film as protection during ve-
hicle transport.
● Use of solvent-free adhesives.
● Use of CFC-free coolants in cooling sys-
tems.
● Recycling and energy recovery from resi-
dues (RDF).
● Improvement in the quality of waste water.
● Use of systems for the recovery of residual
heat (thermal recovery, enthalpy wheels,
etc.).
● The use of water-soluble paints.
140