check engine Seat Mii 2013 Owner's Guide
[x] Cancel search | Manufacturer: SEAT, Model Year: 2013, Model line: Mii, Model: Seat Mii 2013Pages: 306, PDF Size: 4.3 MB
Page 170 of 306

168Air conditioning
The air conditioning operates most effectively with the windows closed.
However, if the vehicle has heated up after standing in the sun for some
time, the air inside can be cooled more quickly by opening the windows
briefly.
Setting for conditions of optimal visibility
When the air conditioning is switched on, the temperature and the air hu-
midity in the vehicle interior drop. Hence, when the outside air humidity is
high, the windows do not mist over and comfort for the vehicle occupants is
improved:
● Disable air recirculation mode ⇒ page 169.
● Set the fan to the required setting.
● Turn the temperature control to the centre position.
● Open and direct the air outlets in the dash panel ⇒ page 169.
● Turn the air distribution control to the defrost position.
● Press the AC
button to turn on cooling. The button will light up.
The cooling system does not switch on
If the air conditioning system cannot be switched on, this may be caused by
the following: ●
The engine is not running.
● The fan is switched off.
● The air conditioner fuse has blown.
● The outside temperature is lower than approximately +2 °C (+36 °F).
● The air conditioner compressor has been temporarily switched off be-
cause the engine coolant temperature is too high.
● Another fault in the vehicle. Have the air conditioner checked by a speci-
alised workshop.
Things to note
If the humidity and temperature outside the vehicle are high, condensation
can drip off the evaporator in the cooling system and form a pool under-
neath the vehicle. This is normal and does not indicate a leak!Note
After starting it, any residual humidity in the air conditioner could mist over
the windscreen. Switch on the defrost function as soon as possible to clear
the windscreen of condensation.
Page 177 of 306
175
At the filling station
Refuelling with natural gas
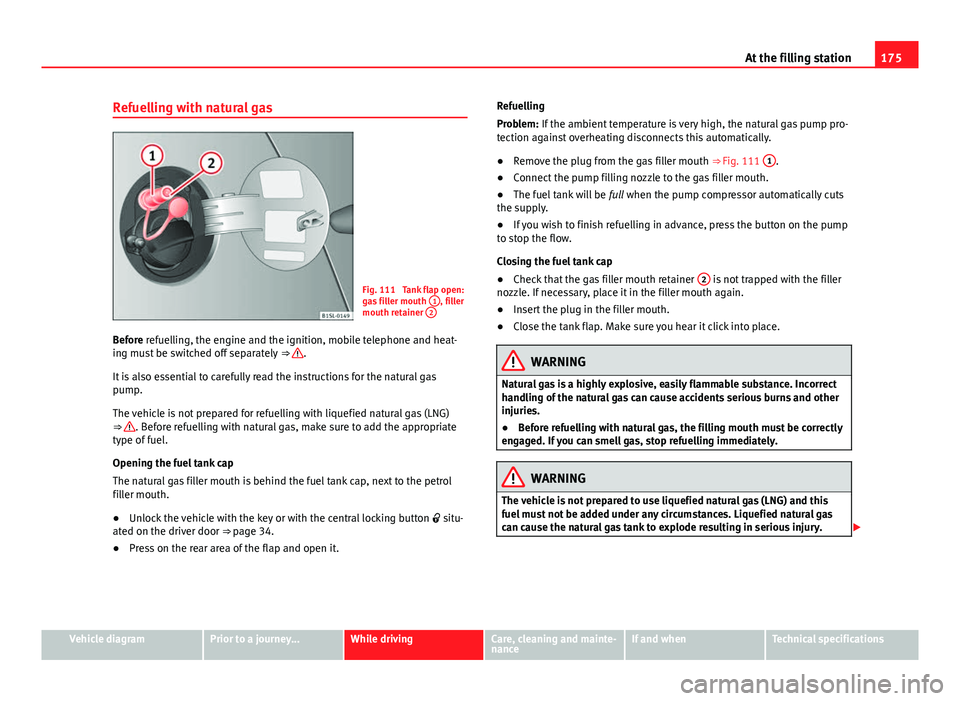
Fig. 111 Tank flap open:
gas filler mouth 1, filler
mouth retainer 2
Before refuelling, the engine and the ignition, mobile telephone and heat-
ing must be switched off separately
⇒ .
It is also essential to carefully read the instructions for the natural gas
pump.
The vehicle is not prepared for refuelling with liquefied natural gas (LNG)
⇒
. Before refuelling with natural gas, make sure to add the appropriate
type of fuel.
Opening the fuel tank cap
The natural gas filler mouth is behind the fuel tank cap, next to the petrol
filler mouth.
● Unlock the vehicle with the key or with the central locking button situ-
ated on the driver door ⇒ page 34.
● Press on the rear area of the flap and open it. Refuelling
Problem: If the ambient temperature is very high, the natural gas pump pro-
tection against overheating disconnects this automatically.
●
Remove the plug from the gas filler mouth ⇒ Fig. 111 1
.
● Connect the pump filling nozzle to the gas filler mouth.
● The fuel tank will be full when the pump compressor automatically cuts
the supply.
● If you wish to finish refuelling in advance, press the button on the pump
to stop the flow.
Closing the fuel tank cap
● Check that the gas filler mouth retainer 2
is not trapped with the filler
nozzle. If necessary, place it in the filler mouth again.
● Insert the plug in the filler mouth.
● Close the tank flap. Make sure you hear it click into place.
WARNING
Natural gas is a highly explosive, easily flammable substance. Incorrect
handling of the natural gas can cause accidents serious burns and other
injuries.
● Before refuelling with natural gas, the filling mouth must be correctly
engaged. If you can smell gas, stop refuelling immediately.
WARNING
The vehicle is not prepared to use liquefied natural gas (LNG) and this
fuel must not be added under any circumstances. Liquefied natural gas
can cause the natural gas tank to explode resulting in serious injury.
Vehicle diagramPrior to a journey...While drivingCare, cleaning and mainte-
nanceIf and whenTechnical specifications
Page 178 of 306
176At the filling station
Note
● The filling nozzles of natural gas pumps can differ in the way they are
operated. If you are unacquainted with the pump, it is advisable that a
member of staff of the service station performs the refuelling operation.
● Noises heard when refuelling are normal and do not indicate the pres-
ence of a fault in the system.
● The vehicle natural gas system is prepared both for refuelling with a
small compressor (slow refuel) and a large compressor (fast refuel) in natu-
ral gas service stations.
Refilling precautions
Checklist
Never work on the engine or in the engine compartment if you are not famil-
iar with the operations to be carried out, the applicable safety standards
and if you do not have the instruments, liquids and tools necessary
⇒ page 180, Working in the engine compartment ! In such a case, have any
work carried out by a Specialised workshop. Check the following regularly,
preferably when you refuel:
Windscreen washer fluid level
⇒ page 89
Engine oil level
⇒ page 185
Engine coolant level
⇒ page 189
Brake fluid level
⇒ page 134
Tyre pressure ⇒ page 210
Vehicle lighting required to guarantee road safety:
– Turn signals
– Side lights, dipped beam headlights and main beam headlights
– Rear lights
– Brake lights
– Rear fog light ⇒ page 82
Information on bulb replacement ⇒ page 266.
Page 182 of 306

180In the engine compartment
Care, cleaning and maintenance
In the engine compartment
Working in the engine compartmentIntroduction
Before working in the engine compartment, make sure that the vehicle is
parked on horizontal and firm ground.
The engine compartment of the vehicle is a hazardous area. Never work on
the engine or in the engine compartment if you are not familiar with the op-
erations to be carried out, the applicable safety standards and especially if
you do not have the instruments, liquids and tools necessary ⇒
! In such
a case, have any work carried out by a Specialised workshop. Negligent
work can cause serious injury.
Additional information and warnings:
● Exterior detail ⇒ page 6
● Windscreen wash system ⇒ page 89
● Start and stop the engine ⇒ page 119
● Brake fluid ⇒ page 134
● Checks when filling up ⇒ page 171
● Engine oil ⇒ page 185
● Engine coolant ⇒ page 189
● Vehicle battery ⇒ page 193
● Accessories, parts replacement, repairs and modifications ⇒ page 222
WARNING
If the vehicle moves unexpectedly, this could cause serious injury.
● Never work underneath the vehicle if it is not secured against moving.
If you must work underneath the vehicle with the wheels in contact with
the ground then it should be parked on flat ground, the wheels should be
prevented from moving and the key must be removed from the ignition.
● If you have to work underneath the vehicle, you must use suitable
stands additionally to support the vehicle, there is a risk of accident!.
The jack is not intended for this kind of work and its failure could lead to
severe injuries.
● Disconnect the Start-Stop system.
WARNING
The engine compartment is a dangerous area capable of causing serious
injury.
● For all type of work, always take the utmost precautions, work care-
fully and note the general safety standards in force. Never take personal
risks.
● Never work on the engine or in the engine compartment if you are not
familiar with the necessary operations. If you are not sure about proce-
dures then visit a specialised workshop to carry out the necessary work.
Incorrect work can cause serious injuries.
Page 184 of 306

182In the engine compartment
WARNING
Refill liquids and certain materials can catch fire easily in the engine
compartment, causing a fire and serious injury!
● Never smoke.
● Never work close to places exposed to flames or sparks.
● Never pour service fluids over the engine. These fluid may ignite hot
engine parts and cause injuries.
● If it is necessary to work on the fuel system or the electrical system,
please follow the instructions below:
–Always disconnect the vehicle battery.
– Never work close to heaters, heat sources or places exposed to
flames or sparks.
● Always keep a recently serviced and perfectly working fire extin-
guisher close by.
CAUTION
When refilling or changing service liquids, ensure that you put the liquids
into the right tank. Making a mistake when refilling could cause serious
malfunctions and damage the engine!
For the sake of the environment
Service fluids leaks are harmful to the environment. For this reason you
should make regular checks on the ground underneath your vehicle. Take
the vehicle to a specialised workshop to be checked if you see stains, oil or
other fluids on the ground. Collect any spilt service fluids and allow a pro-
fessional to dispose of them. Preparing the vehicle for work in the engine compartment
Checklist
Carry out the operations below in the order indicated before starting work in
the engine compartment
⇒
:
Park the vehicle on an even and solid surface.
Press and hold the brake pedal until the vehicle comes to a stand-
still.
Apply the handbrake firmly
⇒ page 134.
Move the gear lever into the neutral position
⇒ page 124.
Stop the engine and remove the key from the ignition
⇒ page 119.
Wait for the engine to cool down.
Always keep children and other people far from the engine compart-
ment.
Ensure that the vehicle can not move off unexpectedly.
WARNING
Always complete the operations given in the checklist and observe the
general rules of safety.
● Ignoring this checklist, drawn up for your own safety, could result in
serious injury.
Page 186 of 306
184In the engine compartment
Opening the bonnet
● Before opening the bonnet, make sure that the windscreen wiper arms
are in place against the windscreen ⇒
.
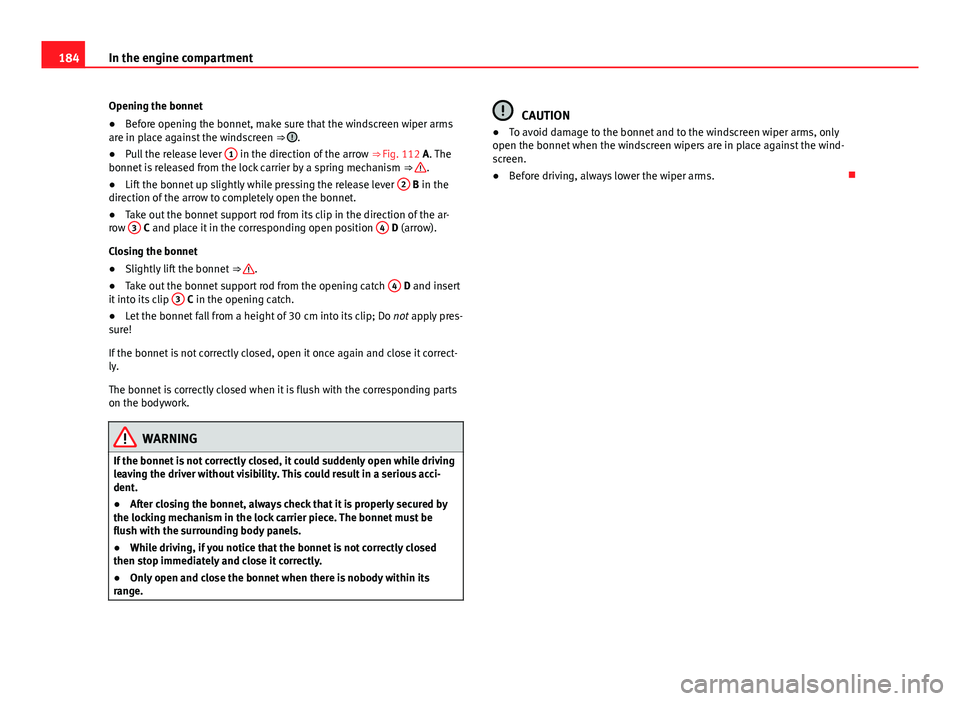
● Pull the release lever 1 in the direction of the arrow
⇒ Fig. 112 A. The
bonnet is released from the lock carrier by a spring mechanism ⇒ .
● Lift the bonnet up slightly while pressing the release lever 2 B in the
direction of the arrow to completely open the bonnet.
● Take out the bonnet support rod from its clip in the direction of the ar-
row 3
C and place it in the corresponding open position 4 D (arrow).
Closing the bonnet
● Slightly lift the bonnet ⇒
.
● Take out the bonnet support rod from the opening catch 4 D and insert
it into its clip 3 C in the opening catch.
● Let the bonnet fall from a height of 30 cm into its clip; Do not apply pres-
sure!
If the bonnet is not correctly closed, open it once again and close it correct-
ly.
The bonnet is correctly closed when it is flush with the corresponding parts
on the bodywork.
WARNING
If the bonnet is not correctly closed, it could suddenly open while driving
leaving the driver without visibility. This could result in a serious acci-
dent.
● After closing the bonnet, always check that it is properly secured by
the locking mechanism in the lock carrier piece. The bonnet must be
flush with the surrounding body panels.
● While driving, if you notice that the bonnet is not correctly closed
then stop immediately and close it correctly.
● Only open and close the bonnet when there is nobody within its
range.
CAUTION
● To avoid damage to the bonnet and to the windscreen wiper arms, only
open the bonnet when the windscreen wipers are in place against the wind-
screen.
● Before driving, always lower the wiper arms.
Page 187 of 306
185
In the engine compartment
Engine oil Introduction
Additional information and warnings:
● ⇒ Booklet Maintenance Programme
● Working in the engine compartment ⇒ page 180
● Accessories, parts replacement, repairs and modifications ⇒ page 222
WARNING
Incorrectly handling engine oil can cause injury and serious burns.
● Always protect your eyes when handling engine oil.
● Oil is toxic and must be kept out of the reach of children.
● Engine oil must only be kept closed in its original container. The same
applies to use oil until it has been disposed of.
● Never store engine oil in empty food containers or bottles as other
people may accidentally drink it.
● Regular contact with engine oil can be bad for the skin. If you come
into contact with engine oil, wash your skin with soap and water.
● With the engine running, the engine oil gets extremely hot and can
cause severe skin burns. Always wait until the engine has fully cooled.
For the sake of the environment
Similar to the other service liquids, spilled engine oil can be bad for the en-
vironment. Collect any spilt fluids in suitable containers and dispose of in
accordance with legislation and with the utmost respect for the environ-
ment. Warning and control lamps
flashesPossible causeSolution
Engine oil pressure too low.
Stop the vehicle!
Switch off the engine. Check the
engine oil level, and if necessa-
ry, refill with ⇒ page 186.
engine oil - If the warning indica-
tor flashes although the oil level
is correct, do not continue driv-
ing or leave the engine running.
Otherwise, the engine could be
damaged. Seek specialist assis-
tance.
WARNING
If the warning lamps are ignored, the vehicle may stall in traffic, or may
cause accidents and severe injuries.
● Never ignore the warning lamps.
● Stop the vehicle safely as soon as possible.
CAUTION
Failure to heed the warning lamps when they appear may result in faults in
the vehicle.
Engine oil specifications
Replacement engine oil must strictly comply with the specifications.
Vehicle diagramPrior to a journey...While drivingCare, cleaning and mainte-
nanceIf and whenTechnical specifications
Page 188 of 306
186In the engine compartment
The correct oil must be used to ensure the correct operation and long serv-
ice life of the engine. The engine comes with a high-quality multigrade oil
that can generally be used all year round.
Only use an engine oil that complies to SEAT standards whenever possible
⇒
. Only refill engine oil using approved engine oil in accordance with the
corresponding SEAT standard ( ⇒ table on page 186). All oils indicated are
synthetic multigrade oils .
Engine oils are being continuously further developed. Technical Services
are permanently informed of any modifications. SEAT therefore recommends
that you have the engine oil changed by a Technical Service.
EnginesSpecifications of engine oil with a service dependent on time/dis- tance travelled
44 kW - 55 kW Petrol enginesVW 504 00, VW 502 00
CAUTION
● Only use engine oils whose specifications are expressly approved by
SEAT. The use of any other type of engine oil could cause engine damage!
● No additives should be used with engine oil. Any damage caused by the
use of such additives would not be covered by the factory warranty. Checking the engine oil level and topping up
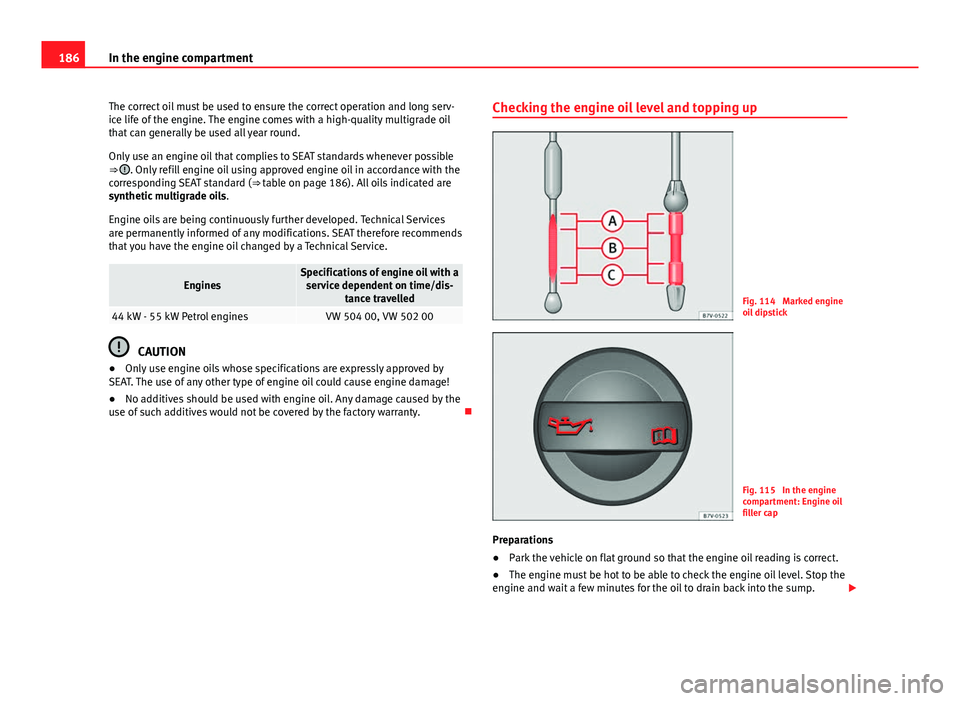
Fig. 114 Marked engine
oil dipstick
Fig. 115 In the engine
compartment: Engine oil
filler cap
Preparations
● Park the vehicle on flat ground so that the engine oil reading is correct.
● The engine must be hot to be able to check the engine oil level. Stop the
engine and wait a few minutes for the oil to drain back into the sump.
Page 189 of 306
187
In the engine compartment
● Open the bonnet ⇒ page 180.
● The engine oil filler neck can be recognised by the symbol on the
cap ⇒ Fig. 115 and the dipstick by its coloured handle.
Check the engine oil level
● Pull out the dipstick and wipe it on a clean cloth.
● Replace the dipstick, pushing it in as far as it will go. If the dipstick to
measure engine oil has a mark, when you reintroduce it this mark should
slot into the corresponding groove located on the upper end of the tube.
● Remove the dipstick again and check the engine oil level ⇒ table on
page 187.
● After reading the oil level, replace the dipstick in the tube completely.
Engine oil topping up ranges
Fig. 114Operations required depending on the engine oil topping
up level:
Area ADo not top up oil
⇒ .Area BYou can add oil, but keep the level in this zone.
Area COil
must be added. After topping up the oil level should be
in area B.
Adding oil after checking the level
Only add engine oil in small quantities and in steps.
●
Unscrew the cap from engine oil filler neck on the cylinder head
⇒ Fig. 115. If you are not sure where the cap is, request help from a special-
ist.
● Only refill using approved SEAT engine oil in small quantities (no more
than 0.5 ltr) ⇒ page 185.
● To avoid adding too much oil, each time you add a quantity, wait until
the oil has flowed into the crankcase so that it can be measured with the
dipstick.
● Check the oil level before adding any more oil. Do not top up with too
much engine oil ⇒
. ●
When the oil level is in at least the ⇒ Fig. 114 B
zone, insert the dip-
stick into the tube fully to avoid engine oil escaping when the engine is run-
ning.
● After topping up the oil, ensure that the cap is screwed on to the filler
neck correctly.
WARNING
Oil could catch fire if it comes into contact with hot engine components.
This could lead to a fire, explosion and severe injuries.
● Always ensure that after topping of oil, the engine oil filler cap is cor-
rectly tightened. This will avoid engine oil spilling onto hot engine parts
when the engine is running.
CAUTION
● If the engine oil level is above the area A do not start the engine. Seek
specialist assistance. Otherwise catalytic converter and engine damage may
occur.
● When refilling or changing service liquids, ensure that you put the liq-
uids into the right tank. Making a mistake when refilling could cause seri-
ous malfunctions and damage the engine!
For the sake of the environment
The oil level must never be above area A. Otherwise oil can be drawn in
through the crankcase breather and escape into the atmosphere via the ex-
haust system.
Engine oil consumption
The consumption of engine oil can be different from one engine to another
and can vary during the useful life of the engine.
Vehicle diagramPrior to a journey...While drivingCare, cleaning and mainte-
nanceIf and whenTechnical specifications
Page 190 of 306
188In the engine compartment
Depending on how you drive and the conditions in which the vehicle is
used, oil consumption can be up to 1 ltr./2000 km. In the case of new vehi-
cles, the consumption can exceed this figure over 5000 kilometres. For this
reason the engine oil level must be checked at regular intervals, preferably
when filling the tank and before a journey.
When the engine is working hard, for instance during sustained high-speed
motorway cruising in summer, or when climbing mountain passes, the oil
level should preferably be kept within area ⇒ Fig. 114 A
.
Changing the engine oil
The engine oil must be changed regularly according to the specifications of
the Maintenance Programme.
Due to the problems linked with disposing of used oil and the need for suit-
able tools and special knowledge, always visit a specialised workshop to
have the engine oil and filter changed. SEAT recommends visiting a Techni-
cal Service.
Detailed information on the service intervals are shown in the Maintenance
Programme.
Engine oil additives make new oil darker after the engine has been running
for a short period. This is normal and does not mean more frequent oil
changes are required.
WARNING
If, in exceptional circumstances, you must change the engine oil yourself,
please note the following:
● Wear eye protection.
WARNING (Continued)
● Always wait until the engine has completely cooled to avoid being
burned.
● Always keep your arms horizontal when unscrewing the oil drainage
bolt so that the oil does not run down your arms when it begins to drain.
● Use a suitable and large enough container to collect all of the used oil
in the engine.
● Never collect engine oil in empty food containers, cans, bottles and
other containers as not all people are able to identify engine oil.
● Oil is toxic and must be kept out of the reach of children.
For the sake of the environment
Before changing the engine oil, find a suitable location or service for proper
disposal.
For the sake of the environment
Always dispose of engine oil with the utmost respect for the environment.
Never dispose of used engine oil in places such as a garden, woods, drains,
roads, paths, rivers and drainage systems.