sensor Seat Toledo 2008 User Guide
[x] Cancel search | Manufacturer: SEAT, Model Year: 2008, Model line: Toledo, Model: Seat Toledo 2008Pages: 289, PDF Size: 9.18 MB
Page 124 of 289
Lights and visibility123
Safety First
Operating instructions
Practical tips
Te c h n i c a l D a t a
Rain sensor*
The rain sensor controls the frequency of the windscreen
wiper intervals, depending on the amount of rain.
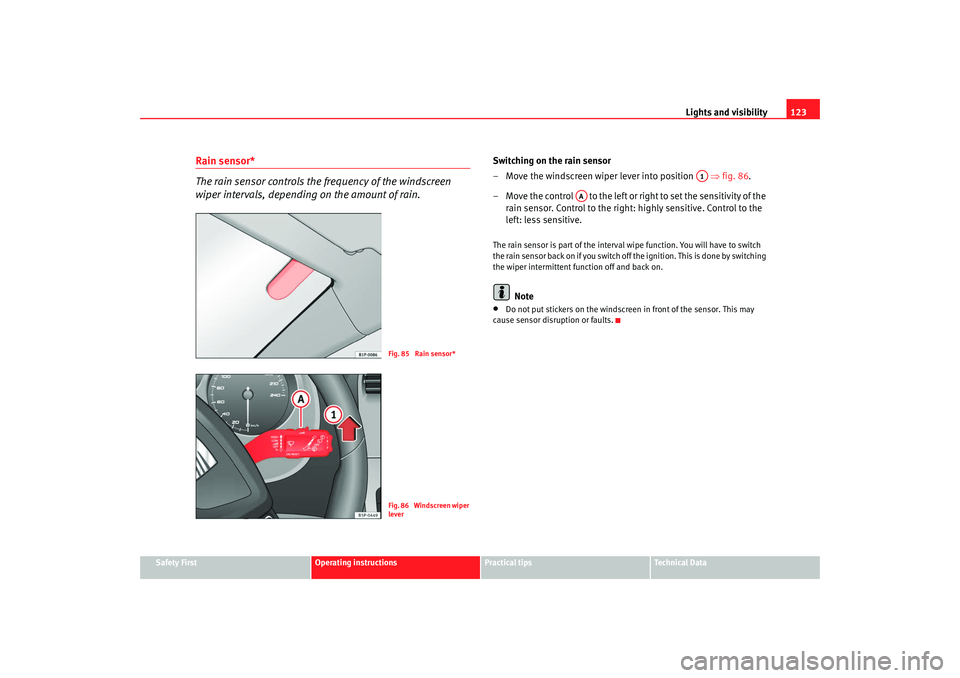
Switching on the rain sensor
– Move the windscreen wiper lever into position ⇒fig. 86 .
– Move the control to the left or right to set the sensitivity of the rain sensor. Control to the right: highly sensitive. Control to the
left: less sensitive.The rain sensor is part of the interval wipe function. You will have to switch
the rain sensor back on if you switch off the ignition. This is done by switching
the wiper intermittent function off and back on.
Note
•
Do not put stickers on the windscreen in front of the sensor. This may
cause sensor disruption or faults.
Fig. 85 Rain sensor*Fig. 86 Windscreen wiper
lever
A1
AA
Toledo_EN.book Seite 123 Dienstag, 20. Januar 2009 12:58 12
Page 127 of 289

Lights and visibility
126
Note•
The automatic anti-dazzle function will only work properly if the sun
blind* for the rear window is retracted and there are no other objects
preventing light from reac hing the interior mirror.
•
If you have to stick any type of sticker on the windscreen, do not do so in
front of the sensors. Doing so could pr event the anti-dazzle function from
working well or even from working at all.
Exterior mirrors
The exterior mirrors can be adjusted using the rotary knob in
the centre console.Basic setting of exterior mirrors
1. Turn knob ⇒fig. 89 to position L ( left exterior mirror). 2. Turn the rotary knob to position the mirror so that you have a
good view to the rear of the vehicle.
3. Turn knob to position R (right exterior mirror ).
4. Swivel the rotary knob to position the mirror so that you have a good view to the rear of the car ⇒.
Heating the exterior mirrors*
– Turn the knob forwards to the central position ⇒fig. 89 so
that the heated rear view mirrors warm up and the heated wind-
screen* in the wiper blade rest area is activated ⇒page 121.
– The wing mirror heating is not activated in temperatures above approximately 20°C.
Folding in exterior mirrors*
– Turn the control ⇒fig. 89 to position
to fold in the exterior
mirrors. You should always fold in the exterior mirrors if you are
driving through an automatic car wash. This will help prevent
damage.
Folding rear view mirrors with convenience control*
– The outer rear view mirror will fold back automatically with convenience closing (with the remote or the key)
– To unfold it again, open the door and use the contact.
Folding exterior mirrors back out to the extended position*
– Turn the knob to another position to fold the exterior mirrors back out ⇒ .
Fig. 89 Controls of exte-
rior mirrors
A1
Toledo_EN.book Seite 126 Dienstag, 20. Januar 2009 12:58 12
Page 177 of 289
Driving
176•
Never park where the hot exhaust system could ignite inflammable
materials, such as dry grass, low bushes, spilt fuel etc.
•
Never allow vehicle occupants to remain in the vehicle when it is
locked. They would be unable to open the vehicle from the inside, and
could become trapped in the vehicle in an emergency. In the event of an
emergency, locked doors will delay assistance to occupants.
•
Never leave children alone in the vehicle. They could set the vehicle in
motion, for example, by releasing the handbrake or the gear lever /
selector lever.
•
Depending on weather conditions, it may become extremely hot or cold
inside the vehicle. This can be fatal.
Starting on an uphill*
This function is only included in vehicles fitted with ESP.This device helps when starting uphill.
These are the basic operation conditions: doors closed, brake pedal pressed
down and vehicle in neutral. The system gets activated on engaging gear.
After removing your foot from the brake pedal, the braking force is maintained
for a few seconds to prevent the vehicle from moving backward when put into
gear. This short space of time is enough to start the vehicle with ease.
This system also works when reversing uphill.
WARNING
•
If you do not start the vehicle immedi ately after taking your foot off the
brake pedal, the vehicle may start to roll back under certain conditions.
Depress the brake pedal or use the hand brake immediately.
•
If the engine stalls, depress the brake pedal or use the hand brake
immediately.
•
When following a line of traffic uphill, if you want to prevent the vehicle
from rolling back accidentally when starting off, hold the brake pedal down
for a few seconds before starting off.Note
The Official Service or a specialist workshop can tell you if your vehicle is
equipped with this system.Parking aid acoustic system* Rear parking aid
The parking aid system will use an acoustic signal to warn of
the approach of any object towards the rear of the vehicle.Description
The acoustic parking aid system will measure the distance between the rear
of the vehicle and any possible obstacle using four ultrasonic sensors located
on the rear bumper. The measuring range of the sensors starts at approxi-
mately and depending on the nature of the obstacle at a distance of:•
side of the rear bumper: 0.8 m
•
middle of the rear bumper: 1.5 m
Activation
The system is activated by engagement of the reverse gear. A brief acoustic
signal confirms the activation and correct function of the system.
WARNING (continued)
WARNING (continued)
Toledo_EN.book Seite 176 Dienstag, 20. Januar 2009 12:58 12
Page 178 of 289

Driving177
Safety First
Operating instructions
Practical tips
Te c h n i c a l D a t a
Reverse gear
The distance warning will begin as soon as an obstacle is detected by the
system. The frequency of the bleeps emitted by the system will increase
rapidly as the vehicle approaches the obstacle.
Within a short distance of about 25 cm, a continuous signal sounds (stop
signal). The driver should not reverse any further.
Trailer towing
For factory-fitted vehicles eith a towing
bar, the parking aid system will not be
activated by the engagement of the reverse gear when pulling a trailer, as the
trailer's electric connecter will be plugged into the vehicle.
Possible faults
If a continuous bleep sounds for some seconds when the reverse gear is
engaged, this indicates that there is a fault in the parking aid system.
If the fault continues until the ignition is turned off, the acoustic signal
warning of the fault will not be emitted every time the system is reactivated
(by engaging the reverse gear). Thus, the system ready indication will not
sound either. Have the fault repaired by an Authorised Service Centre as soon
as possible.
If there is no ready signal or no acous tic warning signal, then the parking aid
loudspeaker is faulty and may not warn of obstacles.
To ensure that the system works properly, the sensors must be kept clean and
free of ice and snow.
WARNING
•
The sensors have blind spots in which obstacles may not be detected.
•
Always look out for small children and animals because the system will
not always detect them. Always pay attention when reversing to avoid acci-
dents.
•
The parking aid is not a replacement for driver awareness. The driver
must take full responsibility for parking and other manoeuvres.Caution
•
Please note that low obstacles detected by the system may no longer be
registered by the sensors as the car moves closer, so the system will not give
any further warning. Certain kinds of ob stacles (such as wire fences, chains,
thin posts or trailer draw bars, high kerbs or painted railings etc) may not
always be detected by the system, so there is a risk of damaging the vehicle
in such cases.
•
In some cases, obstacles with uniform edges and bumps may not be
detected immediately by the system due to their geometry. Take special care
of this type of obstacle such as corners, rectangular objects, etc.., these can
cause damage to the vehicle.
•
Be especially careful when manoeu vring into a corner between two
perpendicular walls. Survey the approach of the wall to the side of the vehicle
(using the mirrors)
•
The parking aid system does not replace use of the mirrors for manoeu-
vres.
•
Distant ultra-sonic sources (hammers , tyres, construction machinery,
other vehicles with PDC) may interfere with the operation of the system.
•
Periodic cleaning of the sensors, take care not to damage or scratch them.
When cleaning with high pressure washers or steam cleaners, the sensors
should be sprayed for only a very short period and from a distance of more
than 10 cm.WARNING (continued)
Toledo_EN.book Seite 177 Dienstag, 20. Januar 2009 12:58 12
Page 186 of 289
Intelligent technology185
Safety First
Operating instructions
Practical tips
Te c h n i c a l D a t a
•
With compact temporary spare wheel.
•
When using the snow chains.
•
When driving in deep snow or on loose surfaces
•
When the vehicle is bogged-down, to free it by “rocking.”
The TCS should be switched on again afterwards as soon as possible.
WARNING
•
It must be remembered that TCS cann ot defy the laws of physics. This
should be kept in mind, particular ly on slippery and wet roads and when
towing a trailer.
•
Always adapt your driving style to suit the condition of the roads and
the traffic situation. Do not let the extra safety afforded by TCS tempt you
into taking any risks when driving, this can cause accidents.Caution
•
In order to ensure that TCS function correctly, all four wheels must be
fitted with the same tyres. Any differences in the rolling radius of the tyres can
cause the system to reduce engine power when this is not desired.
•
Modifications to the vehicle (e.g. to the engine, the brake system, running
gear or any components affecting the wh eels and tyres) could affect the effi-
ciency of the ABS and TCS.
XDS*
Driveshaft differentialWhen taking a bend, the driveshaft differential mechanism allows the outer
wheel to turn at a higher speed than the inner wheel. In this way, the wheel
which is turning faster (outer wheel) receives less drive torque than the inner
wheel. This may mean that in certain situations the torque provided to the inner wheel is too high, causing the wheels to spin. On the other hand, the
outer wheel receives a lower drive torque than it could transmit. This causes
an overall loss of lateral grip on the front shaft, resulting in understeering or
“lengthening” of the path.
The XDS system is able, using the ESP sensors and signals, to detect and
correct this effect.
The XDS, via the ESP, brakes the inner wheel thus counteracting the excess
drive torque in this wheel. This means that the path requested by the driver
is more precise,
The XDS system operates in combination with the ESP and is always active,
even when the traction control, TCS, is disconnected.
Electronic stabilisation programme (ESP)*General notes
The electronic stabilisation programme increases the
vehicle‘s stability on the road.The electronic stabilisation programme helps to reduce the danger of skid-
ding.
The electronic stabilisation programme (ESP) consists of
ABS, EDL, TCS and
Steering manoeuvre recommendations.
Electronic Stabilising Program (ESP)*
ESP reduces the danger of skidding by braking the wheels individually.
The system uses the steering wheel angle and road speed to calculate the
changes of direction desired by the driver, and constantly compares them
with the actual behaviour of the vehi cle. If the desired course is not being
Toledo_EN.book Seite 185 Dienstag, 20. Januar 2009 12:58 12
Page 187 of 289
Intelligent technology
186maintained (for instance, if the car is starting to skid), then the ESP compen-
sates automatically by braking the appropriate wheel.
The forces acting on the braked wheel bring the vehicle back to a stable
condition. If the vehicle tends to oversteer, the system will act on the front
wheel on the outside of the turn.
Steering manoeuvre recommendations
This is a complementary safety function included in the ESP This function aids
the driver to better stabilize the vehicle in a critical situation. For example, in
case of sudden braking surface with varied adherence, the vehicle will tend
to destabilize its trajectory to the right to or to the left. In this case the ESP
recognizes the situation and helps the driver with a counter steering
manoeuvre from the power steering.
This function simply provides the driver with a recommended manoeuvre in
critical situations.
The vehicle doesn't steer itself with this function, the driver has full control of
the vehicle at all times.
WARNING
•
It must be remembered that ESP cannot defy the laws of physics. This
should be kept in mind, particularly on slippery and wet roads and when
towing a trailer.
•
Always adapt your driving style to suit the condition of the roads and
the traffic situation. Do not let the extra safety afforded by ESP tempt you
into taking any risks when driv ing, this can cause accidents.Caution
•
In order to ensure that ESP functions correctly, all four wheels must be
fitted with the same tyres. Any differences in the rolling radius of the tyres can
cause the system to reduce engine power when this is not desired.
•
Modifications to the vehicle (e.g. to the engine, the brake system, running
gear or any components affecting the wheels and tyres) could affect the effi-
ciency of the ABS, EDL, ESP and TCS.
Anti-lock brake system (ABS)The anti-lock brake system prevents the wheels locking during braking
⇒ page 184.Electronic differential lock (EDL)*
The electronic differential lock helps prevent the loss of trac-
tion caused if one of the driven wheels starts spinning.EDL helps the vehicle to start moving, accelerate and climb a gradient in slip-
pery conditions where this may otherwise be difficult or even impossible.
The system will control the revolutions of the drive wheels using the ABS
sensors (in case of an EDL fault th e warning lamp for ABS lights up)
⇒ page 77.
At speeds of up to approximately 80 km/h, it is able to balance out differ-
ences in the speed of the driven wheels of approximately 100 rpm caused by
a slippery road surface on one side of the vehicle. It does this by braking the
wheel which has lost traction and distributing more driving force to the other
driven wheel via the differential.
To prevent the disc brake of the braking wheel from overheating, the EDL cuts
out automatically if subjected to excessive loads. The vehicle will continue to
function normally without EDL. For this reason, the driver is not informed that
the EDL has been switched off.
The EDL will switch on again automatically when the brake has cooled down.
Toledo_EN.book Seite 186 Dienstag, 20. Januar 2009 12:58 12
Page 232 of 289
Wheels and tyres231
Safety First
Operating instructions
Practical tips
Te c h n i c a l D a t a
2. The tyre pressures should only be checked when the tyres are
cold. The slightly raised pressures of warm tyres must not be
reduced.
3. Adjust the tyre pressure to the load you are carrying.Tyre pressure
The correct tyre pressure is especially important at high speeds. The pressure
should therefore be checked at least once a month and before starting a
journey.
The sticker with the tyre pressure values can be found on the inside of the
tank flap. The tyre pressure values given are for cold tyres. The slightly raised
pressures of warm tyres must not be reduced ⇒.
WARNING
•
Check the tyre pressure at least once per month. Checking tyre pressure
value is very important. If the tyre pre ssure is too high or too low, there is
an increased danger of accidents - particularly at high speeds.
•
A tyre can easily burst if the pressure is too low, causing an accident!
•
At continuously high speeds, a tyre with insufficient pressure flexes
more. In this way it becomes too hot, and this can cause tread separation
and tyre blow-out. Always observe the recommended tyre pressures.
•
If the tyre pressure is too low or too high, the tyres will wear prema-
turely and the vehicle will not handle well. Risk of accident!For the sake of the environment
Under-inflated tyres will increase fuel consumption.
Tyre pressure monitoring*
The tyre pressure monitoring system constantly checks the
pressure of the tyres.The system uses the speed sensors of the ABS wheels. It operates by
analysing the speed and frequency spectrum of each wheel.
For optimum performance, use genuine SEAT tyres. In addition, check and
adjust tyre pressures regularly.
Whenever the tyre pressures are changed or one or more tyres are changed,
the system should be Reset by pressing the SET switch on the central console.
The system warns the driver in the event of a loss of pressure by means of
symbols and messages in the instrument cluster display. The system uses
ESP ⇒page 185.
Note that tyre pressure also depends on tyre temperature. Tyre pressure
increases about 0.1 bar for each 10°C in tyre temperature increase. The tyre
heats up while the vehicle is being driven and the tyre pressure will rise
accordingly. For this reason, you should only adjust the tyre pressures when
they are cold (i.e. approximately at ambient temperature).
To ensure that the tyre pressure monitoring system works reliably, you should
check and, if necessary, adjust the tyre pressures at regular intervals and
store the correct pressures (reference values) in the system.
A tyre pressure information label is attached to the inside of the fuel tank flap.
WARNING
•
Never adjust tyre pressure when the tyres are hot. This may damage or
even burst the tyres. Risk of accident!
•
An insufficiently inflated tyre flexes a lot more at high speeds and
causes significant heating of the ty re. Under these conditions, the tyre
bead may be released or the tyre may burst. Risk of accident!
Toledo_EN.book Seite 231 Dienstag, 20. Januar 2009 12:58 12
Page 251 of 289

If and when
250Fuses on left side of dash panelFusesNumber
Consumer
Amperes
1
Vacant
2
Vacant
3
Vacant
4
Vacant
5
Vacant
6
Vacant
7
Vacant
8
Vacant
9
Airbag
5
10
RSE input (roof screen)
10
11
Vacant
11
Vacant
12
Left xenon headlight
10
13
Heating controls / ESP, ASR switch / Reverse / Pre-
installation of telephone / Tomtom Navigator
5
14
ABS/ESP switchboard / Engine / Headlights /
Trailer switchboard / Light switch / Instrument
panel
10
15
Headlight regulation switchboard / Heated wipers
/ Instrument lights / Diagnosis Switchboard
10
16
Right xenon headlight
10
17
Engine management
10
18
Vacant
19
Vacant
20
Park Pilot (Parking assistant) / Gear lever/ ESP
switchboard
10
21
Cable control unit
7,5
22
Volumetric alarm sensor/ Alarm horn
5
23
Diagnosis / Rain sensor / Light switch
10
24
Vacant
25
Switchboard coupling automatic gearbox
20
26
Vacuum pump
20
27
RSE input (roof screen)
10
28
Rear wiper motor / Switchboard wiring
20
29
Vacant
30
Cigarette lighter / socket
20
31
Vacant
32
Vacant
33
Heater
40
34
Vacant
35
Vacant
36
Engine management
10
37
Engine management
10
38
Engine management
10
39
Trailer control unit (coupling)
15
Number
Consumer
Amperes
Toledo_EN.book Seite 250 Dienstag, 20. Januar 2009 12:58 12
Page 253 of 289

If and when
252
Bulb changeGeneral notesBefore changing any bulb, first turn off the failed component.
Do not touch the bulb glass. Fingerprints vaporise in the heat, causing a
reduction in the bulb life and condensation on the mirror surface, thus
reducing efficiency.
A bulb should only be replaced by one of the same type. The type is inscribed
on the bulb, either on the glass part or on the base.
It is highly recommended to keep a box of spare bulbs in the vehicle. At the
very least, the following spare bulbs, which are essential for road safety,
should be kept in the vehicle.
Main headlights
Dipped beam - H7
Main beam - H1
Position - W5W
Indicator - PY21W
Xenon headlights
22)/ self-adjusting*
Dipped and full beam - D1S
23)
Daylight - P21W SLL
Position W5W
Indicators PY21W
15
Engine management
5
Pump relay
10
16
Right li ghting
30
17
Horn
15
18
Vacant
19
Clean
30
20
Water pump
10
Pressure sensor pump for 1.8 engine
20
21a)
Lambda probe
15
22
Brake pedal, speed sensor
5
23a)
Engine management
5
Engine management
10
Engine management
15
24
AKF, gearbox valve
10
25a)
ABS pump
40
26
Left lighting
30
27a)
Engine management
40
Engine management
50
28
Vacant
29a)
Electric windows (front and back)
50
Electric windows (front)
30
30
Ignition key
50
a)Ampere rating according to motorisationNumber
Consumer
Amperes
22)On this type of headlight, the bulb changes must be made by the SEAT dealer, given
that complex elements must be removed from the vehicle and a reset must be made
on the automatic control system incorporated.23)The Xenon bulbs discharge 2.5 times the light flux and have an average lifespan of 5
times more than that of halogen bulbs, this means that, except due to unusual circum-
stances, there is no need to change the bulbs for the whole life of the vehicle.
Toledo_EN.book Seite 252 Dienstag, 20. Januar 2009 12:58 12
Page 285 of 289
Index
284
Instruments . . . . . . . . . . . . . . . . . . . . . . . . . . 55
Warning lamps . . . . . . . . . . . . . . . . . . . . . . . 73
PPaintwork
Polishing . . . . . . . . . . . . . . . . . . . . . . . . . . . 202
Parking . . . . . . . . . . . . . . . . . . . . . . . . . . . . . . . . 175
Parking aid acoustic system . . . . . . . . . . . . . . . 176
Parking lights . . . . . . . . . . . . . . . . . . . . . . . . . . 116
Parts . . . . . . . . . . . . . . . . . . . . . . . . . . . . . . . . . . 208
Parts replacement . . . . . . . . . . . . . . . . . . . . . . . 208
Pedals . . . . . . . . . . . . . . . . . . . . . . . . . . . . . . . . . 16
Petrol . . . . . . . . . . . . . . . . . . . . . . . . . . . . . . . . . 211 Driving abroad . . . . . . . . . . . . . . . . . . . . . . . 194
Petrol additives . . . . . . . . . . . . . . . . . . . . . . . . . 211
Petrol engines, starting . . . . . . . . . . . . . . . . . . 166
Physical principles of a frontal collision . . . . . . 20
Plastic key tab . . . . . . . . . . . . . . . . . . . . . . . . . . . 97
Plastic parts . . . . . . . . . . . . . . . . . . . . . . . . . . . . 202
Plastic parts cleaning . . . . . . . . . . . . . . . . . . . . 206
Pollen filter . . . . . . . . . . . . . . . . . . . . . . . . . . . . 161
Power steering . . . . . . . . . . . . . . . . . . . . . . . . . . 189
Power steering system warning light . . . . . . . . . . . . . . . . . . . . . . . . . 80
Products for vehicle maintenance . . . . . . . . . . 199RRadio frequency remote control Changing the battery . . . . . . . . . . . . . . . . . . 99 Radio navigation Steering wheel controls
audio + telephone version . . . . . . . . . . . . . . 87
audio version . . . . . . . . . . . . . . . . . . . . . . . . . 87
Radio wave remote control . . . . . . . . . . . . . . . . . 98
Rain sensor* . . . . . . . . . . . . . . . . . . . . . . . . . . . 123
Rear drink holder* Armrest* . . . . . . . . . . . . . . . . . . . . . . . . . . . . 140
Rear fog light Indication lamp . . . . . . . . . . . . . . . . . . . . . . 109
Warning lamp . . . . . . . . . . . . . . . . . . . . . . . . 76
Rear interior lights . . . . . . . . . . . . . . . . . . . . . . 119
Rear lights . . . . . . . . . . . . . . . . . . . . . . . . . . . . . 256
Rear reading lights . . . . . . . . . . . . . . . . . . . . . . 119
Rear seat bench . . . . . . . . . . . . . . . . . . . . . . . . . 133
Rear window heating Heating element wires . . . . . . . . . . . . . . . . 203
Rear window wiper . . . . . . . . . . . . . . . . . . . . . . 124
Rear-view mirror . . . . . . . . . . . . . . . . . . . . . . . . 125
Recommended gear display . . . . . . . . . . . . . . . . 59
Refuelling . . . . . . . . . . . . . . . . . . . . . . . . . . . . . . 210
Registration light . . . . . . . . . . . . . . . . . . . . . . . . 261
Remote control key Buttons . . . . . . . . . . . . . . . . . . . . . . . . . . . . . 98
Synchronising . . . . . . . . . . . . . . . . . . . . . . . . 99
Removing and fitting the wheel . . . . . . . . . . . . 245
Repairs airbags . . . . . . . . . . . . . . . . . . . . . . . . . . . . . . 31
Replacement keys . . . . . . . . . . . . . . . . . . . . . . . . 97
Rev counter . . . . . . . . . . . . . . . . . . . . . . . . . . . . . 57 Reverse gear
Manual gearbox . . . . . . . . . . . . . . . . . . . . . 169
Roll-back function Sliding/tilting roof . . . . . . . . . . . . . . . . . . . 108
Windows . . . . . . . . . . . . . . . . . . . . . . . . . . . 105
Roof aerial* . . . . . . . . . . . . . . . . . . . . . . . . . . . . 209
Roof carrier* . . . . . . . . . . . . . . . . . . . . . . . . . . . 150
Roof stowage compartment* . . . . . . . . . . . . . . 137
Rubber seals . . . . . . . . . . . . . . . . . . . . . . . . . . . 203
Running in Engine . . . . . . . . . . . . . . . . . . . . . . . . . . . . . 190
SSafe driving . . . . . . . . . . . . . . . . . . . . . . . . . . . . . . 7
Safety . . . . . . . . . . . . . . . . . . . . . . . . . . . . . . . . . . . 8
Safety equipment . . . . . . . . . . . . . . . . . . . . . . . . . 7
Safety instructionsCoolant temperature . . . . . . . . . . . . . . . . . . . 76
Safety notes Airbags . . . . . . . . . . . . . . . . . . . . . . . . . . . . . . 31
Belt tension devices . . . . . . . . . . . . . . . . . . . 27
Curtain airbags . . . . . . . . . . . . . . . . . . . . . . . 41
Disabling front passenger airbag . . . . . . . . 44
frontal airbags . . . . . . . . . . . . . . . . . . . . . . . . 36
side airbags . . . . . . . . . . . . . . . . . . . . . . . . . . 39
Using child seats . . . . . . . . . . . . . . . . . . . . . 45
Using seat belts . . . . . . . . . . . . . . . . . . . . . . 22
Safety system- safe . . . . . . . . . . . . . . . . . . . . . . . 92
Seals . . . . . . . . . . . . . . . . . . . . . . . . . . . . . . . . . 203
Seat adjustment . . . . . . . . . . . . . . . 128, 131, 133
Toledo_EN.book Seite 284 Dienstag, 20. Januar 2009 12:58 12