child seat Seat Toledo 2008 Owner's Guide
[x] Cancel search | Manufacturer: SEAT, Model Year: 2008, Model line: Toledo, Model: Seat Toledo 2008Pages: 289, PDF Size: 9.18 MB
Page 49 of 289
Child safety
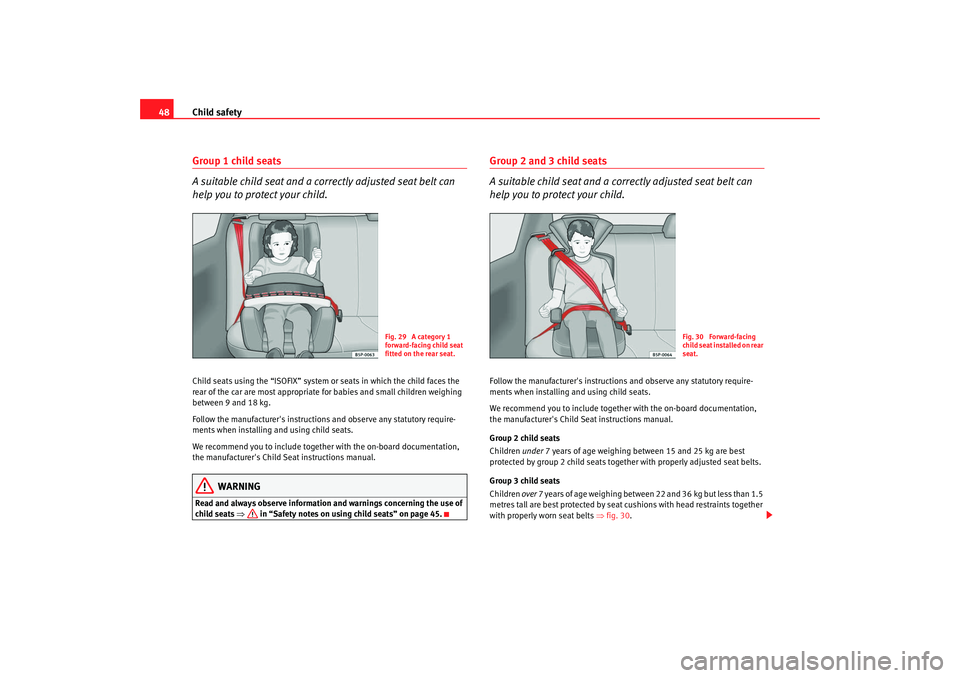
48Group 1 child seats
A suitable child seat and a corr ectly adjusted seat belt can
help you to protect your child.Child seats using the “ISOFIX” system or seats in which the child faces the
rear of the car are most appropriate for babies and small children weighing
between 9 and 18 kg.
Follow the manufacturer's instructions and observe any statutory require-
ments when installing and using child seats.
We recommend you to include together with the on-board documentation,
the manufacturer's Child Seat instructions manual.
WARNING
Read and always observe information and warnings concerning the use of
child seats ⇒ in “Safety notes on using child seats” on page 45.
Group 2 and 3 child seats
A suitable child seat and a corr ectly adjusted seat belt can
help you to protect your child.Follow the manufacturer's instructions and observe any statutory require-
ments when installing and using child seats.
We recommend you to include together with the on-board documentation,
the manufacturer's Child Seat instructions manual.
Group 2 child seats
Children under 7 years of age weighing between 15 and 25 kg are best
protected by group 2 child seats together with properly adjusted seat belts.
Group 3 child seats
Children over 7 years of age weighing between 22 and 36 kg but less than 1.5
metres tall are best protected by seat cushions with head restraints together
with properly worn seat belts ⇒fig. 30 .
Fig. 29 A category 1
forward-facing child seat
fitted on the rear seat.
Fig. 30 Forward-facing
child seat installed on rear
seat.
Toledo_EN.book Seite 48 Dienstag, 20. Januar 2009 12:58 12
Page 50 of 289
Child safety49
Safety First
Operating instructions
Practical tips
Te c h n i c a l D a t a
WARNING
•
The shoulder part of the seat belt mu st lie approximately on the centre
of the shoulder, never across the neck or the arm. The seat belt must lie
close to the upper part of the body. The lap belt part must lie across the
pelvis, not across the stomach, and always fit closely. Pull the belt tight if
necessary to take up any slack ⇒page 23, “Seat belts”.
•
Read and always observe information and warnings concerning the use
of child seats ⇒ in “Safety notes on using child seats” on page 45.
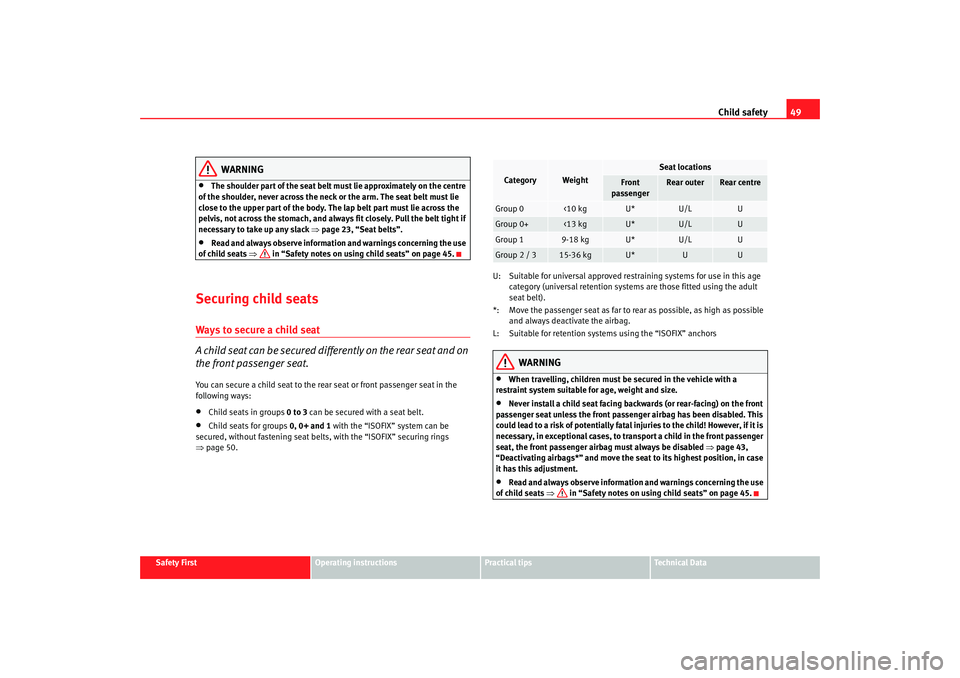
Securing child seatsWays to secure a child seat
A child seat can be secured differently on the rear seat and on
the front passenger seat.You can secure a child seat to the rear seat or front passenger seat in the
following ways:•
Child seats in groups 0 to 3 can be secured with a seat belt.
•
Child seats for groups 0, 0+ and 1 with the “ISOFIX” system can be
secured, without fastening seat belts, with the “ISOFIX” securing rings
⇒ page 50. U: Suitable for universal approved restraining systems for use in this age
category (universal retention systems are those fitted using the adult
seat belt).
*: Move the passenger seat as far to rear as possible, as high as possible and always deactivate the airbag.
L: Suitable for retention systems using the “ISOFIX” anchors
WARNING
•
When travelling, children must be secured in the vehicle with a
restraint system suitable for age, weight and size.
•
Never install a child seat facing backwards (or rear-facing) on the front
passenger seat unless the front passenger airbag has been disabled. This
could lead to a risk of potentially fatal injuries to the child! However, if it is
necessary, in exceptional cases, to transport a child in the front passenger
seat, the front passenger airbag must always be disabled ⇒page 43,
“Deactivating airbags*” and move the seat to its highest position, in case
it has this adjustment.
•
Read and always observe information and warnings concerning the use
of child seats ⇒ in “Safety notes on using child seats” on page 45.Category
Weight
Seat locations
Front
passenger
Rear outer
Rear centre
Group 0
<10 kg
U*
U/L
U
Group 0+
<13 kg
U*
U/L
U
Group 1
9-18 kg
U*
U/L
U
Group 2 / 3
15-36 kg
U*
U
U
Toledo_EN.book Seite 49 Dienstag, 20. Januar 2009 12:58 12
Page 51 of 289

Child safety
50Securing child seat with the “ISOFIX” system
The child seat with “ISOFIX” system can be secured quickly,
easily and safely on the rear outer seats using the systemWhen removing or fitting the child seat, please be sure to follow the
manufacturer's instructions.
– Move the seat as far to rear as it will go.
– Press the child seat onto the “ISOFIX” retaining rings until the
child seat can be heard to engage securely. If the child seat is
equipped with anchor points, secu re it to the correspondent ring.
If the child seat is fitted with any other antirotation system, follow
the manufacturer instructions carefully.
– Pull on both sides of the child se at to ensure that it is secure.
Two “ISOFIX” retaining rings are fitted on each rear seat. In some vehicles, the
rings are secured to the seat frame and, in others, they are secured to the rear
floor. The access to “ISOFIX” rings is between the rear back rest and the seat.
Child seats with “ISOFIX” mountings are available in your Authorised Service
Centres.
WARNING
•
The retaining rings are designed only for use with “ISOFIX” child seats.
•
Never secure child seats without the “ISOFIX” system, retaining belts
or objects to the fastening rings – this c an result in potentially fatal injuries
to the child.
•
Ensure that the child seat is secured correctly to the “ISOFIX”
anchors.
Fig. 31 ISOFIX securing
rings
Toledo_EN.book Seite 50 Dienstag, 20. Januar 2009 12:58 12
Page 129 of 289
Seats and stowage
128Seats and stowageThe importance of correct seat adjustmentProper seat adjustment optimi ses the level of protection
offered by seat belts and airbags.Your vehicle has five seats, two on the front part and three on the rear part.
Each seat is equipped with a three-point seat belt.
The driver seat and the front passenger seat can be adjusted in many ways to
suit the physical requirements of the vehicle occupants. The correct seat
position is very important for:•
a fast and easy operation of all controls on the instrument panel,
•
a relaxed posture which does not cause drowsiness,
•
a safe driving ⇒ page 7,
•
ensuring that the seat belts and airbag system provide maximum protec-
tion ⇒page 19.
WARNING
•
If the driver and passengers assume improper sitting positions, they
may sustain critical injuries.
•
More people than available seats must never be transported in your
vehicle.
•
Every passenger in the vehicle must properly fasten and wear the seat
belt belonging to his or her seat. Children must be protected with an appro-
priate child restraint system ⇒page 45, “Child safety”.
•
The front seats and all head restraints must always be adjusted to body
size and the seat belt must always be properly adjusted to provide you and
your passengers with optimum protection.
•
Always keep your feet on the foot well when the vehicle is moving;
never rest them on the dash panel, ou t of the window or on the seat. This
is also applied to passengers. An incorrect sitting position exposes you to
an increased risk of injury in case of a sudden braking or an accident. If the
airbag is triggered, you could sustain severe injuries due to an incorrect
sitting position.
•
It is important for the driver and front passenger to keep a distance of
at least 25 cm from the steering wheel or dash panel. Failure to respect the
minimum distance means that the airbag will not protect you. Risk of fatal
injury. The distance between the driver and the steering wheel or between
the front passenger and the dash panel should always be as great as
possible.
•
Adjust the driver or front passenger seat only when the vehicle is
stationary. This also applies to the forwards/backwards adjustment of the
rear seats. Otherwise, your seat co uld move unexpectedly while the vehicle
is moving. This could increase the risk of an accident and therefore, injury.
In addition, while adjusting your seat, you will assume an incorrect sitting
position. Risk of fatal accidents.
•
Special guidelines apply to installing a child seat on the front
passenger seat. When installing a chil d seat, observe the warning note in
the ⇒page 45, “Child safety”.WARNING (continued)
Toledo_EN.book Seite 128 Dienstag, 20. Januar 2009 12:58 12
Page 145 of 289

Seats and stowage
144Ashtrays*, cigarette lighter* and electrical
sockets*Ashtray* Opening and closing the ashtray
– To open the ashtray, lift the cover ⇒fig. 115 .
– To close, push the cover down.
Emptying the ashtray
– Extract the ashtray and empty it.
WARNING
Never put paper in the ashtray. Hot ash could ignite the paper in the
ashtray and cause a fire.
Cigarette lighter* – Press on the cigarette lighter ⇒fig. 116 to activate it ⇒.
– Wait for the lighter to pop out slightly.
– Pull out the cigarette lighter and light the cigarette on the glowing coil.
WARNING
•
Improper use of the cigarette lighter can lead to serious injuries or start
a fire.
•
Using the lighter carefully. Carelessness or negligence when using the
cigarette lighter can cause burns, risk of injury.
•
The lighter only works when the ignition is turned on or the engine is
running. To avoid the risk of fire, never leave children alone inside the
vehicle.
Fig. 115 Ashtray located
in the front drink holder
Fig. 116 The cigarette
lighter is located in the
electric socket on the
front of the centre console
Toledo_EN.book Seite 144 Dienstag, 20. Januar 2009 12:58 12
Page 146 of 289

Seats and stowage145
Safety First
Operating instructions
Practical tips
Te c h n i c a l D a t a
Electrical sockets*
Electrical equipment can be connected to any of the 12 volt
sockets.Electrical accessories may be connected to the 12 volt socket in the front
centre console ⇒fig. 117 of the passenger compartment and that of the
boot* The appliances connected to ea ch power point must not exceed a
power rating of 120 Watt.
WARNING
The current power points and the connected accessories will only operate
when the ignition is on or when the engine is running. Improper use of the
sockets or electrical accessories can lead to serious injuries or cause a fire.
To avoid the risk of injury, never leave children alone inside the vehicle.
Note
•
The use of electrical appliances with the engine switched off will cause a
battery discharge.
•
Before using any electrical accessories, see the instructions on
⇒ page 208.
Auxiliary audio connection (AUX-IN)*– Lift the AUX. cover ⇒fig. 118.
– Insert the pin as far as possible (see Radio manual).
Fig. 117 Socket, centre
console, front
Fig. 118 Auxiliary audio
connection
Toledo_EN.book Seite 145 Dienstag, 20. Januar 2009 12:58 12
Page 167 of 289
Driving
166Starting
The engine is started when the key is in this position. Electrical components
with a high power consumption are switched off temporarily.
Every time the vehicle is started again, the ignition key must be turned to
position . The repetitive start prevention lock of the ignition prevents
possible damage to the starter moto r if the engine is already running.
WARNING
•
The ignition key must NOT be removed from the lock until the vehicle
comes to a standstill. Otherwise, the steering could be immediately
blocked- Risk of accident!
•
Always remove the key from the ignition lock when leaving the vehicle,
even for a short period. This is especi ally important if children or disabled
people are left alone in the vehicle. They could accidentally start the
engine or work electrical equipment su ch as the electric windows, conse-
quently resulting in an accident.
•
Unsupervised use of the keys could start the engine or any electrical
system, such as the electric window. This could result in serious injury.Caution
The starter motor will only work when the engine is stopped (ignition key
position ).Electronic immobiliser
The immobiliser prevents unauthorised persons from driving
the vehicle.Inside the key there is a chip that deactivates the electronic immobiliser auto-
matically when the key is inserted into the ignition. The immobiliser will be activated again automatically as soon as you pull the
key out of the ignition lock.
The engine can only be started using a
genuine SEAT key with its correct code.
Note
A perfect operation of the vehicle is ensured if genuine SEAT keys are used.Starting and stopping the engineStarting petrol engines
The engine can only be started using a genuine SEAT key with
its correct code.– Move the gear lever to the neutral position and depress the
clutch pedal thoroughly and hold it in this position for the starter
to turn the engine on.
– Turn the ignition key to the starting ⇒ page 165 position.
– Let go of the ignition key as soon as the engine starts; the starter motor must not run on with the engine.After starting a very hot engine, you may need to slightly press down the
accelerator.
When starting a very cold engine, it may be a little noisy for the first few
seconds until oil pressure has built up in the hydraulic valve compensators.
This is quite normal, and no cause for concern.
A2A0A2
Toledo_EN.book Seite 166 Dienstag, 20. Januar 2009 12:58 12
Page 214 of 289

Checking and refilling levels213
Safety First
Operating instructions
Practical tips
Te c h n i c a l D a t a
Winter driving
Diesel can thicken in winter.Winter-grade diesel
When using “summer-grade diesel fuel”, difficulties may be experienced at
sub-zero temperatures because the fuel thickens due to wax separation.
Therefore, “winter-grade diesel fuel” is available in some countries during
the cold months. It can be used at temperatures as low as -22°C.
In countries with different climatic conditions the diesel fuel generally sold
has different temperature characteristics. Check with an Authorised Service
Centre or filling stations in the country concerned regarding the type of diesel
fuels available.
Filter pre-heater
Your vehicle is fitted with a fuel filter pre-heater, making it well equipped for
operation in winter. This ensures that the fuel system remains operational to
approx. -24°C, provided you use winter-grade diesel which is safe to -15°C.
However, if the fuel has waxed to such an extent that the engine will not start
at temperatures of under -24°C, simply place the vehicle in a warm place for
a while.
Caution
Do not mix fuel additives (“thinners”, or similar additives) with diesel fuel.
Working in the engine compartmentSafety instructions on working in the engine compartment
Any work carried out in the engine compartment or on the
engine must be carried out cautiously.Before starting any work on the engine or in the engine compart-
ment:
1. Switch off the engine and remove the key from the ignition.
2. Apply the handbrake.
3. Move the gear stick to neutral or the selector lever to position P.
4. Wait for the engine to cool down.
5. Keep children away from the vehicle.
6. Raise the bonnet ⇒page 215.You should not do any work in the engine compartment unless you know
exactly how to carry out the jobs and have the correct tools! Have the work
carried out by a qualified workshop if you are uncertain.
All service fluids and consumables, e.g. coolant, engine oil, spark plugs and
batteries, are being constantly developed. SEAT provides a constant flow of
information to the Authorised Service Centres concerning modifications. For
this reason, we recommend you to have service fluids and consumables
replaced by an Authorised Service Centre. Please observe the relevant
instructions ⇒page 208. The engine compartment of any motor vehicle is a
hazardous area ⇒ .
Toledo_EN.book Seite 213 Dienstag, 20. Januar 2009 12:58 12
Page 281 of 289

Index
280Buzzer . . . . . . . . . . . . . . . . . . . . . . . . . . . . 116, 165CCatalytic converter . . . . . . . . . . . . . . . . . . . . . . 191
CD changer . . . . . . . . . . . . . . . . . . . . . . . . . . . . 135
Central locking . . . . . . . . . . . . . . . . . . . . . . . . . . 91
Automatic locking system for involuntary unlocking . . . . . . . . . . . . . . . . . . . . . . . . . . 93
Automatic speed dependent locking and un- locking system* . . . . . . . . . . . . . . . . . . . . . 93
Emergency unlocking system . . . . . . . . . . . . 93
Selective unlocking system* . . . . . . . . . . . . 92
Unlocking system* . . . . . . . . . . . . . . . . . . . . 93
Central locking button Central locking . . . . . . . . . . . . . . . . . . . . . . . 94
unlocking . . . . . . . . . . . . . . . . . . . . . . . . . . . . 94
Centre arm rest . . . . . . . . . . . . . . . . . . . . . . . . . 135
Cetane number . . . . . . . . . . . . . . . . . . . . . . . . . 212
Changing gear See Manual gearbox . . . . . . . . . . . . . . . . . . 169
Changing the lamps Main headlight lamps . . . . . . . . . . . . . . . . . 253
rear lights . . . . . . . . . . . . . . . . . . . . . . . . . . . 256
Changing the main headlight lamps
dipped beam lights . . . . . . . . . . . . . . . . . . . 254
main beam lights . . . . . . . . . . . . . . . . . . . . 255
Side lights . . . . . . . . . . . . . . . . . . . . . . . . . . 256
turn signal lamps . . . . . . . . . . . . . . . . . . . . 254
Changing the rear lights
indicator lights . . . . . . . . . . . . . . . . . . . . . . 258
luggage compartment lights . . . . . . . . . . . 260 rear fog light . . . . . . . . . . . . . . . . . . . . . . . . 259
reverse light . . . . . . . . . . . . . . . . . . . . . . . . . 259
side lights . . . . . . . . . . . . . . . . . . . . . . . . . . 257
Changing windscreen wiper blades . . . . . . . . . 223
Chassis number . . . . . . . . . . . . . . . . . . . . . . . . 270
Checking . . . . . . . . . . . . . . . . . . . . . . . . . . . . . . 228
Checking battery electrolyte level . . . . . . . . . . 228
Checking engine oil level . . . . . . . . . . . . . . . . . 217
Child safety . . . . . . . . . . . . . . . . . . . . . . . . . . . . . 45
Child seat . . . . . . . . . . . . . . . . . . . . . . . . . . . . . . . 47 Categorisation in groups . . . . . . . . . . . . . . . 47
Group 1 . . . . . . . . . . . . . . . . . . . . . . . . . . . . . 48
Group 2 . . . . . . . . . . . . . . . . . . . . . . . . . . . . . 48
Group 3 . . . . . . . . . . . . . . . . . . . . . . . . . . . . . 48
Groups 0 and 0+ . . . . . . . . . . . . . . . . . . . . . . 47
ISOFIX system . . . . . . . . . . . . . . . . . . . . . . . . 50
Safety notes . . . . . . . . . . . . . . . . . . . . . . . . . . 45
Securing . . . . . . . . . . . . . . . . . . . . . . . . . . . . . 49
Child seats on the front passenger seat . . . . . . . . . . . . . 30
Cigarette lighter* . . . . . . . . . . . . . . . . . . . . . . . . 144
Cleaning alloy wheel rims . . . . . . . . . . . . . . . . 204
Cleaning chrome . . . . . . . . . . . . . . . . . . . . . . . . 203
Cleaning engine compartment . . . . . . . . . . . . . 205
Cleaning steel wheel rims . . . . . . . . . . . . . . . . 204
Cleaning windows . . . . . . . . . . . . . . . . . . . . . . . 202
Climatic* . . . . . . . . . . . . . . . . . . . . . . . . . . . . . . 153
Climatronic General notes . . . . . . . . . . . . . . . . . . . . . . . 161
Clock . . . . . . . . . . . . . . . . . . . . . . . . . . . . . . . . . . 57 Cloth seat covers cleaning . . . . . . . . . . . . . . . . 206
Clothes hook . . . . . . . . . . . . . . . . . . . . . . . . . . . 139
Cockpit . . . . . . . . . . . . . . . . . . . . . . . . . . . . . . . . . 53
Control lamps . . . . . . . . . . . . . . . . . . . . . . . . . . . 73
Control lighting . . . . . . . . . . . . . . . . . . . . . . . . . . 53
Controls
Electric windows . . . . . . . . . . . . . . . . . . . . . 104
Light switches . . . . . . . . . . . . . . . . . . . . . . . 109
Convenience closing Sliding/tilting roof . . . . . . . . . . . . . . . . . . . 107
Windows . . . . . . . . . . . . . . . . . . . . . . . . . . . 106
Convenience opening Windows . . . . . . . . . . . . . . . . . . . . . . . . . . . 106
Coolant . . . . . . . . . . . . . . . . . . . . . . . . . . . 220, 221 Warning lamp . . . . . . . . . . . . . . . . . . . . . . . . 63
Coolant Level . . . . . . . . . . . . . . . . . . . . . . . . . . . 221
Coolant level warning light . . . . . . . . . . . . . . . . . . . . . . . . . 75
Coolant Loss . . . . . . . . . . . . . . . . . . . . . . . . . . . 221
Coolant temperature Display . . . . . . . . . . . . . . . . . . . . . . . . . . . . . . 56
Safety instructions . . . . . . . . . . . . . . . . . . . . 76
Cruise control system . . . . . . . . . . . . . . . . . . . . 178 Warning lamp . . . . . . . . . . . . . . . . . . . . . . . . 80
Cruise control* Turning off the cruise control system . . . . 180
Curtain airbags . . . . . . . . . . . . . . . . . . . . . . . . . . 40 Description . . . . . . . . . . . . . . . . . . . . . . . . . . 40
Function . . . . . . . . . . . . . . . . . . . . . . . . . . . . . 41
Safety notes . . . . . . . . . . . . . . . . . . . . . . . . . . 41
Toledo_EN.book Seite 280 Dienstag, 20. Januar 2009 12:58 12
Page 282 of 289

Index281
DDanger of fitting a child seat on the front passenger
seat . . . . . . . . . . . . . . . . . . . . . . . . . . . . . . . 30
Dash panel cleaning . . . . . . . . . . . . . . . . . . . . . 206
Daytime lights . . . . . . . . . . . . . . . . . . . . . . . . . . 111 activating . . . . . . . . . . . . . . . . . . . . . . . . . . . 111
deactivating . . . . . . . . . . . . . . . . . . . . . . . . . 111
Diesel . . . . . . . . . . . . . . . . . . . . . . . . . . . . . . . . . 212
Diesel engine Winter driving . . . . . . . . . . . . . . . . . . . . . . . . 213
Diesel engine particulate filter . . . . . . . . . . . . . 192
Differential lock . . . . . . . . . . . . . . . . . . . . . . . . . 186
Differential lock fault (EDL) warning lamp . . . . . . . . . . . . . . . . . . . . . . . . . 82
Digital clock . . . . . . . . . . . . . . . . . . . . . . . . . . . . . 57
Dipped headlights . . . . . . . . . . . . . . . . . . . . . . . 109
Disabling front passenger airbag Safety notes . . . . . . . . . . . . . . . . . . . . . . . . . . 44
Disabling the airbag Disabling front passenger airbag . . . . . . . . . 43
Display (without warning or information texts) . 58
Displays in the Multi-function display Memory displays . . . . . . . . . . . . . . . . . . . . . . 61
Disposal Airbags . . . . . . . . . . . . . . . . . . . . . . . . . . . . . . 31
Door lock cylinders . . . . . . . . . . . . . . . . . . . . . . 203
Door release lever . . . . . . . . . . . . . . . . . . . . . . . . 53
Doors Childproof locks . . . . . . . . . . . . . . . . . . . . . . . 96
Warning lamp . . . . . . . . . . . . . . . . . . . . . . . . . 80 Drawer . . . . . . . . . . . . . . . . . . . . . . . . . . . . . . . . 136
Drinks holders at the front . . . . . . . . . . . . . . . . 140
Drive wheels traction control system . . . . . . . . 184
Driveshaft differential
XDS . . . . . . . . . . . . . . . . . . . . . . . . . . . . . . . . 185
Driving Driving abroad . . . . . . . . . . . . . . . . . . . . . . . 194
Economical/ Environtmental . . . . . . . . . . . 192
With a trailer . . . . . . . . . . . . . . . . . . . . . . . . . 196
Driving abroad . . . . . . . . . . . . . . . . . . . . . . . . . . 194 Headlights . . . . . . . . . . . . . . . . . . . . . . . . . . 194
Driving programmes . . . . . . . . . . . . . . . . . . . . . 170
Driving safety . . . . . . . . . . . . . . . . . . . . . . . . . . . . . 8
Driving with an automati c gearbox / DSG automatic
gearbox* . . . . . . . . . . . . . . . . . . . . . . . . . . 171
Duplicate keys . . . . . . . . . . . . . . . . . . . . . . . . . . . 97
Dust filter . . . . . . . . . . . . . . . . . . . . . . . . . . . . . . 161
Dynamic curve lights . . . . . . . . . . . . . . . . . . . . . 113
Dynamic headlight range control . . . . . . . . . . . 113
EEcological driving . . . . . . . . . . . . . . . . . . . . . . . 192
Economical driving . . . . . . . . . . . . . . . . . . . . . . 192
EDL . . . . . . . . . . . . . . . . . . . . . . . . . . . . . . . . . . . 186
EDS Warning lamp . . . . . . . . . . . . . . . . . . . . . . . . . 77
Electrical sockets . . . . . . . . . . . . . . . . . . . . . . . . 145
Electronic differential lock . . . . . . . . . . . . . . . . 186 Warning lamp . . . . . . . . . . . . . . . . . . . . . . . . . 77
Electronic immobiliser . . . . . . . . . . . . . . . . . 82, 166 Electronic stabilisation program . . . . . . . . . . . 185
Electronic stabilisation programme . . . . . . . . . . 81
Description . . . . . . . . . . . . . . . . . . . . . . . . . . 164
Warning lamp . . . . . . . . . . . . . . . . . . . . . . . 165
Electronic stabilisation programme (ESP) warning lamp . . . . . . . . . . . . . . . . . . . . . . . . . 81
Emergency braking function . . . . . . . . . . 115, 183
emergency manual locking . . . . . . . . . . . . . . . . . 95
Emergency opening Doors . . . . . . . . . . . . . . . . . . . . . . . . . . . . . . 100
Emission control system warning lamp . . . . . . . . . . . . . . . . . . . . . . . . . 81
Engine Running in . . . . . . . . . . . . . . . . . . . . . . . . . . 190
Engine compartment Working in the engine compartment . . . . . 213
Engine coolant . . . . . . . . . . . . . . . . . . . . . . . . . . 220
Engine fault Warning lamp . . . . . . . . . . . . . . . . . . . . . . . . 76
Engine management Warning lamp . . . . . . . . . . . . . . . . . . . . . . . . 76
Engine oil . . . . . . . . . . . . . . . . . . . . . . . . . . . . . . 216 Changing . . . . . . . . . . . . . . . . . . . . . . . . . . . 219
Checking level . . . . . . . . . . . . . . . . . . . . . . . 217
Oil properties . . . . . . . . . . . . . . . . . . . . . . . . 217
Specifications . . . . . . . . . . . . . . . . . . . . . . . 216
Topping up . . . . . . . . . . . . . . . . . . . . . . . . . . 218
Engine oil dipstick . . . . . . . . . . . . . . . . . . . . . . . 217
Engine oil pressure Warning lamp . . . . . . . . . . . . . . . . . . . . . 63, 80
Toledo_EN.book Seite 281 Dienstag, 20. Januar 2009 12:58 12