ECO mode Seat Toledo 2008 RADIO-NAVIGATION
[x] Cancel search | Manufacturer: SEAT, Model Year: 2008, Model line: Toledo, Model: Seat Toledo 2008Pages: 96, PDF Size: 3.72 MB
Page 5 of 96
Quick Reference Guide
4
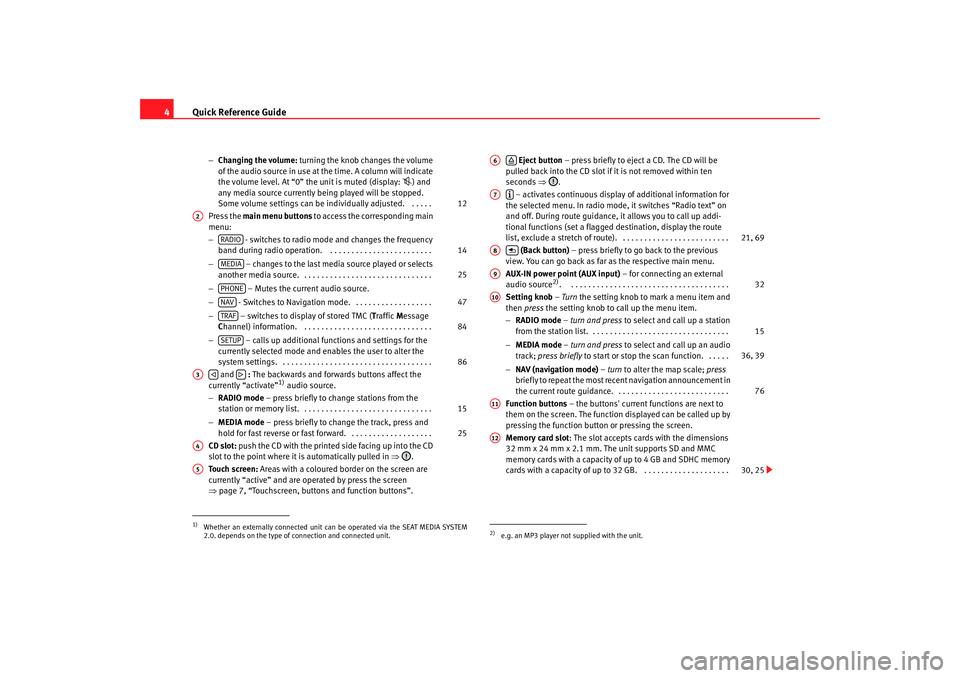
− Changing the volume: turning the knob changes the volume
of the audio source in use at the time. A column will indicate
the volume level. At “0” the unit is muted (display:
) and
any media source currently being played will be stopped.
Some volume settings can be in dividually adjusted. . . . . .
Press the main menu buttons to access the corresponding main
menu:
− - switches to radio mode and changes the frequency
band during radio operation. . . . . . . . . . . . . . . . . . . . . . . . .
− – changes to the last media source played or selects
another media source. . . . . . . . . . . . . . . . . . . . . . . . . . . . . . .
− – Mutes the current audio source.
− - Switches to Navigation mode. . . . . . . . . . . . . . . . . . .
− – switches to display of stored TMC ( Traffic Message
C hannel) information. . . . . . . . . . . . . . . . . . . . . . . . . . . . . . .
− – calls up additional functions and settings for the
currently selected mode and en ables the user to alter the
system settings. . . . . . . . . . . . . . . . . . . . . . . . . . . . . . . . . . . .
and : The backwards and forwards buttons affect the
currently “activate”
1) audio source.
− RADIO mode – press briefly to change stations from the
station or memory list. . . . . . . . . . . . . . . . . . . . . . . . . . . . . . .
− MEDIA mode – press briefly to change the track, press and
hold for fast reverse or fast forward. . . . . . . . . . . . . . . . . . . .
CD slot: push the CD with the printed side facing up into the CD
slot to the point where it is automatically pulled in ⇒.
Touch screen: Areas with a coloured border on the screen are
currently “active” and are operated by press the screen
⇒ page 7, “Touchscreen, buttons and function buttons”.
Eject button – press briefly to eject a CD. The CD will be
pulled back into the CD slot if it is not removed within ten
seconds ⇒.
– activates continuous display of additional information for
the selected menu. In radio mode, it switches “Radio text” on
and off. During route guidance, it allows you to call up addi-
tional functions (set a flagged destination, display the route
list, exclude a stretch of route). . . . . . . . . . . . . . . . . . . . . . . . . .
(Back button) – press briefly to go back to the previous
view. You can go back as far as the respective main menu.
AUX-IN power point (AUX input) – for connecting an external
audio source
2). . . . . . . . . . . . . . . . . . . . . . . . . . . . . . . . . . . . . .
Setting knob – Turn the setting knob to mark a menu item and
then press the setting knob to call up the menu item.
− RADIO mode – turn and press to select and call up a station
from the station list. . . . . . . . . . . . . . . . . . . . . . . . . . . . . . . . .
− MEDIA mode – turn and press to select and call up an audio
track; press briefly to start or stop the scan function. . . . . .
− NAV (navigation mode) – turn to alter the map scale; press
briefly to repeat the most recent navigation announcement in
the current route guidance. . . . . . . . . . . . . . . . . . . . . . . . . . .
Function buttons – the buttons' current functions are next to
them on the screen. The function displayed can be called up by
pressing the function button or pressing the screen.
Memory card slot : The slot accepts cards with the dimensions
32 mm x 24 mm x 2.1 mm. The unit supports SD and MMC
memory cards with a capacity of up to 4 GB and SDHC memory
cards with a capacity of up to 32 GB. . . . . . . . . . . . . . . . . . . . .
1)Whether an externally connected unit can be operated via the SEAT MEDIA SYSTEM
2.0. depends on the type of connection and connected unit.
12
A2
RADIO
14
MEDIA
25
PHONENAV
47
TRAF
84
SETUP
86
A3
15
25
A4A5
2)e.g. an MP3 player not supplied with the unit.A6
A7
21, 69
A8
A9
32
A10
15
36, 39
76
A11A12
30, 25
media_system_ingles.book Seite 4 Donnerstag, 5. Februar 2009 3:31 15
Page 20 of 96
RADIO function selection button19
Storing radio stations to “station buttons”
In the RADIO main menu, you can call up a view of the “station
buttons”, which are used to store radio stations.
Open the RADIO main menu ⇒ page 14.
Switching the station button display on and off
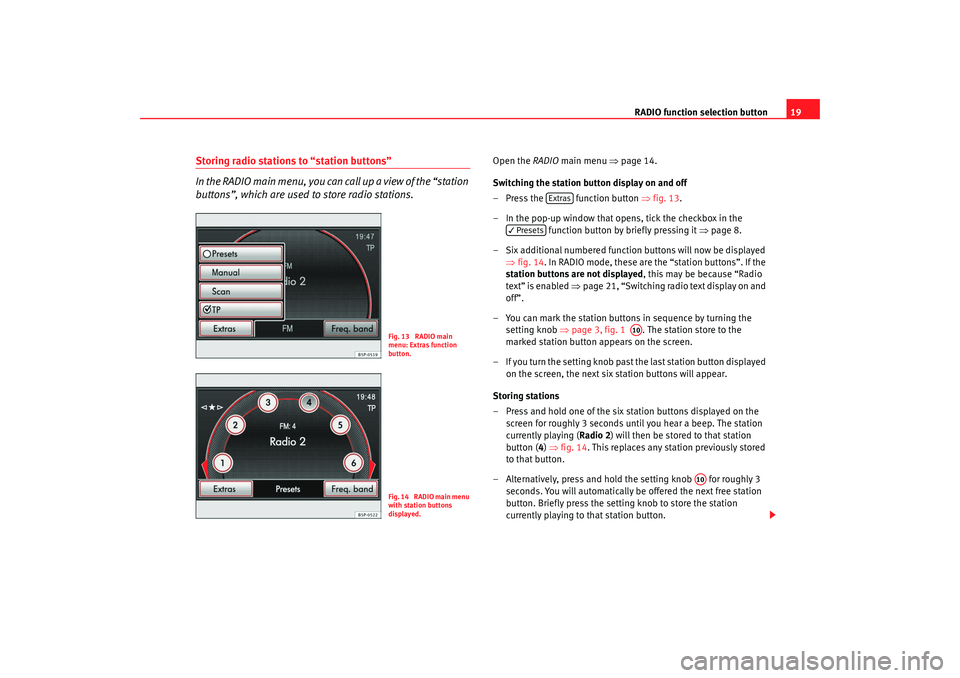
– Press the function button ⇒fig. 13 .
– In the pop-up window that opens, tick the checkbox in the function button by briefly pressing it ⇒page 8.
– Six additional numbered function buttons will now be displayed ⇒fig. 14 . In RADIO mode, these are the “station buttons”. If the
station buttons are not displayed , this may be because “Radio
text” is enabled ⇒page 21, “Switching radio text display on and
off”.
– You can mark the station buttons in sequence by turning the setting knob ⇒page 3, fig. 1 . The station store to the
marked station button appears on the screen.
– If you turn the setting knob past the last station button displayed
on the screen, the next six station buttons will appear.
Storing stations
– Press and hold one of the six st ation buttons displayed on the
screen for roughly 3 seconds until you hear a beep. The station
currently playing ( Radio 2) will then be stored to that station
button ( 4) ⇒ fig. 14 . This replaces any station previously stored
to that button.
– Alternatively, press and hold the setting knob for roughly 3 seconds. You will automatically be offered the next free station
button. Briefly press the setti ng knob to store the station
currently playing to that station button.
Fig. 13 RADIO main
menu: Extras function
button.Fig. 14 RADIO main menu
with station buttons
displayed.
Extras
Presets
A10
A10
media_system_ingles.book Seite 19 Donnerstag, 5. Februar 2009 3:31 15
Page 25 of 96
RADIO function selection button
24Traffic announcements will interrupt the active audio mode. The radio will
switch to the traffic news station for the duration of the traffic announcement.
The media mode will be paused for the duration of the traffic announcement.
If no TP station can be received at any time, e.g. because radio reception is
generally poor, then No TP is displayed instead of TP. Keep in mind that in
covered garages, tunnels, areas with tall buildings or mountains, the radio
signal may encounter interference, perhaps even being lost completely.
On the AM frequency band, traffic news monitoring with the traffic news func-
tion is not possible. No TP is displayed permanently.
EON (Enhanced Other Network)
If the selected radio station does not broadcast its own traffic news, but does
support EON (Enhanced Other Network), the unit will temporarily switch over
to play traffic announcements from a corresponding traffic news station as
they are broadcast. This happens only when the traffic news function is
switched on and the corresponding traffic news station can be received.
If this is the case, pressing the button will not make the unit switch to a
traffic news station. The traffic news function remains active and TP is
displayed.
Search function and traffic news monitoring
If traffic news monitoring is switched on in FM mode, you will only be offered
traffic news stations when carrying out a station search with the arrow
buttons ⇒ page 15 or using the scan function ⇒page 17.
While the unit is in FM mode and the traffic news function is switched on, if
you select via the station buttons or manually tune to a radio station that does
not support the traffic news function, the text NO TP will flash on the display
for three seconds. NO TP is then displayed permanently. The unit will remain
tuned to the selected station. Only when you switch to media mode will the
unit automatically retune in the background to the next receivable traffic
news station and TP will appear again on the display.
In FM mode , the text NO TP will flash for three seconds when the reception of
the selected traffic news station is completely lost. NO TP is then displayed permanently. If you start the automatic station search with the arrow buttons
⇒
page 15, the unit searches for the next traffic news station it can receive.
In media mode the unit will automatically retune in the background to the
next receivable traffic news station when the selected traffic news station can
no longer be received.
Incoming traffic announcement
A pop-up window opens ⇒page 23, fig. 18 while a traffic announcement is
being played.
If you wish to stop the traffic announcement, press the function
button in the pop-up window. The traffic station function remains active and
plays the next traffic bulletin receiv ed. Press the function button to
fully deactivate the TP function.
The unit switches to a predefined volume for the duration of the traffic
announcement. You can adjust the predefined volume in the sound settings
main menu ⇒ page 12. During a traffic announcement, you can alter the
predefined volume with the volume control ⇒page 3, fig. 1 .
TP
Cancel
TP off
A1
media_system_ingles.book Seite 24 Donnerstag, 5. Februar 2009 3:31 15
Page 30 of 96
MEDIA function selection button29
completely filled. The elapsed playing time is displayed at the bottom left and
the remaining playing time at the bottom right of the screen in
minutes/seconds. The remaining playi ng time cannot be displayed for files
with variable bit rate (VBR).
Unit buttons (hard keys) for controlling the media sources
Press the function selec tion button opens the MEDIA main menu.
The arrow buttons on the unit ⇒page 3, fig. 1 or always refer to the
audio source you are currently listening to, whatever menu you are in at the
time.
– press briefly in the MEDIA main menu to open the Media selection
menu and press again to switch to the next available media source
⇒ page 34.
- press briefly to go to the beginni ng of the current track and press again
to go to the beginning of the previous track. Press and hold for fast reverse.
- briefly press to go to the beginning of the next track. Press and hold for
fast forward.
– press briefly to display or hide additional information on the audio file
currently playing (e.g. its loc ation on the data medium).
– press briefly to switch to the MEDIA main menu view.
Setting knob – turn to open the track list and display the track currently
playing ⇒page 36.
– press briefly to open the Media settings menu.
Function buttons in the MEDIA main menu: – press briefly to open a pop-up window with more function buttons
for selection of various play modes ⇒page 34.
– press briefly to open the track list and display the track currently
playing ⇒page 36.
Caution
Refer to the notes on requirements for data media, folders and playlists
⇒page 25.
Note
If any of the function buttons in the Media selection menu is disabled, this
means that no data medium for this sour ce is currently inserted or connected,
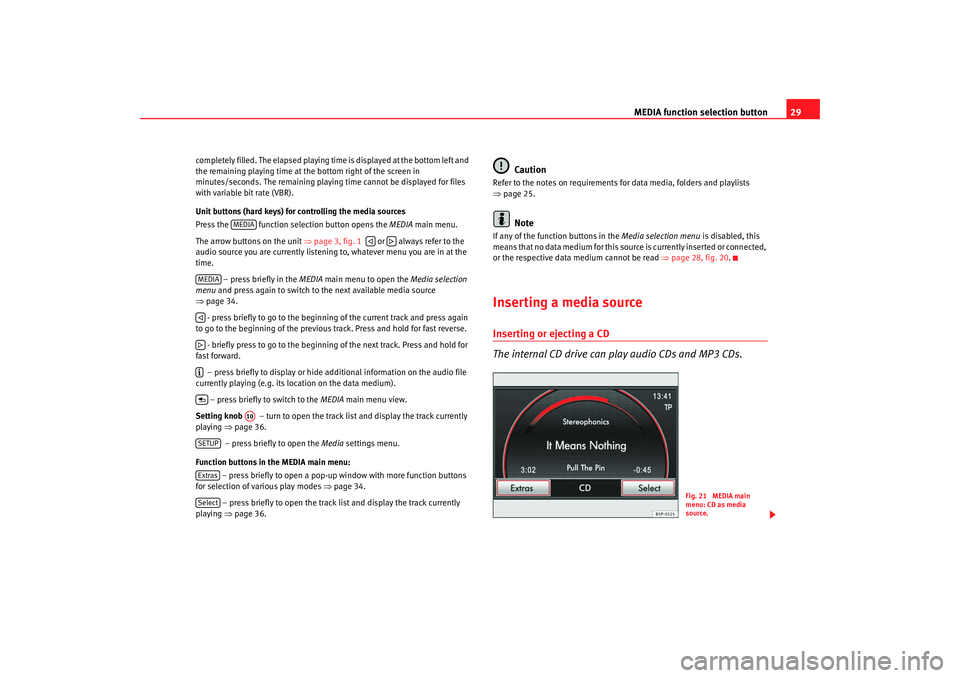
or the respective data medium cannot be read ⇒page 28, fig. 20 .Inserting a media sourceInserting or ejecting a CD
The internal CD drive can play audio CDs and MP3 CDs.
MEDIA
MEDIA
A10
SETUPExtrasSelect
Fig. 21 MEDIA main
menu: CD as media
source.
media_system_ingles.book Seite 29 Donnerstag, 5. Februar 2009 3:31 15
Page 40 of 96
MEDIA function selection button39
– Tick the checkbox in the function button if
you wish to include the current folder's subfolders in the selected
playback mode.
To include subfolders, this setting must be enabled before the playback
mode is selected.
Please also note the following points concerning selectable playback modes
⇒ page 40, “Playing order of files and folders”.
Scan
When scan is switched on, the track of the current folder (with its subfolders
depending on the settings) or the current media source are played in
sequence for 10 seconds each. Automatic playback commences with the
following track.
Alternatively, you can also start and stop the scan function by briefly pressing
the setting knob ⇒page 3, fig. 1 .
Mix (random play)
Random play remains activate for the corresponding media source until it is
closed for that source.
Mix (audio CD): The tracks on the currently playing audio CD will be played in
random order.
Mix folder (MP3 mode): The tracks contained in the currently playing folder
and in its subfolders depending on the settings will be played in random
order.
Mix all (MP3 mode): All tracks on the currently playing media source will be
played in random order ⇒page 38, fig. 30 .
Repeat
The repeat function remains active for the corresponding media source until
it is closed for that source. Repeat track
: When the current track has been played, it will be repeated until
this function is switched off.
Repeat folder (MP3 mode): The playback of all tracks contained in the
currently playing folder and in its subfolders depending on the settings will
be repeated.
Scan/mix/repeat inc
A10
media_system_ingles.book Seite 39 Donnerstag, 5. Februar 2009 3:31 15
Page 46 of 96
MEDIA function selection button45
If the message “Device not functional ” appears, the communication between
the external data medium and the radio-navigation system is anomalous.
Check the connection and make sure the external data medium is ready for
use.
Note
•
Due to the large number of different data media and various iPod genera-
tions available, it is not possible to guarantee fault-free operation of all func-
tions described here.
•
The radio-navigation system does not automatically switch to playing of
an external data medium when it is connected to the multi-media interface or
when a connected data medium is switched on. It must be switched on in the
manner described.
•
If a MEDIA-IN multi-media interface is fitted, an additional option
( ) will appear in the Media settings ⇒ page 32, fig. 24 menu. The
additional AUX-IN socket is switched on by pressing this option, if it forms
part of the unit.
Important information for operating CD
playersSafety precautions for equipment fitted with lasers Laser devices are classified by DIN IEC 76 (CO) 6/ VDE 0837 into safety
classes 1 to 4.
SEAT CD players conform to class 1.
The lasers used in class 1 units are low energy lasers, or are shielded in such
a manner that they present no danger when used correctly.
WARNING
•
The CD player is a class 1 laser product. If it is opened, there is a risk of
injury from invisible laser radiation.
•
The CD player contains no parts which you can service or repair by your-
self. You should, therefore, contact a qualified workshop if there is a
mechanical defect or if the CD player has to be repaired.
Tips on CD mode and handling data media
With the goal of guaranteeing optimum playback quality, try
not to use damaged, scratched or dirty data media.Cleaning a CD
Hold the CD at the sides. Avoid leaving fingerprints on the CD.
Use a soft, lint–free cloth to clean it. Wipe the disk in a straight line from the
centre outwards. Stubborn soiling can be removed with an ordinary CD
cleaning fluid or isopropyl alcohol.
Caution
•
Never use fluids such as petrol, paint thinner or record cleaner, as these
can damage the surface of the CD!
•
Use standard 12 cm CDs only. Special shape discs (sometimes called
“Shape CD”) or 8 cm “singles” cannot be played and they will damage the
player.
•
DVD-Plus, Dual Discs and Flip Discs are thicker than standard CDs and
must not be inserted into the unit.
•
Insert the CD into the CD slot to the point where it is pulled in automati-
cally.
AUX2 input
media_system_ingles.book Seite 45 Donnerstag, 5. Februar 2009 3:31 15
Page 48 of 96
NAV (navigation system) function selection button 47
NAV (navigation system) function selection button IntroductionGeneral points
Using sensors, the data received from the satellites and traffic
information, the best route is planned and the driver is
guided to the destination.How the system works
The current vehicle position is dete rmined by means of the GPS satellite
system (Global Positioning System). Sensors in the vehicle measure
distances that have been driven. The values are compared to the detailed
map information contained in your navigation data and are corrected as
necessary with the support of TMC traffic reports ( TMC = Traffic Message
C hannel) ⇒page 80. With all of this data, an optimal route to the destination
is determined.
The audible navigation indications, the maps that appear on the navigation
equipment's screen and the arrows on th e instrument panel screen will help
you arrive at your destination in the easiest, safest way- as if you were accom-
panied by an invisible guide.
This enables you to drive to an address in an unfamiliar town, find the nearest
petrol station or be guided to a hotel, for example.
Operation
All of the unit's audio sources are fully available while you are navigating to a
destination
14). Navigation announcements are made at the preset volume
and interrupt the active audio mode. Th e volume of the current audio source will then be lowered so that you do not "miss" the navigation announcement
⇒
page 12, “Changing volume settings”.
Pressing the function selection button always switches straight to the
Navigation main menu. To display the vehicle position in the map view, press
the function button.
When entering an address (town, street), only those letters or symbols which
make up a logical entry will be presented. A list of possible names will be
shown. Do not forget to enter the blank space in names made up of more than
one word, such as “St. Helens”.
The route will be recalculated if you leave or disregard the route that was orig-
inally calculated. This process takes only a few seconds.
The last announcement made can be repeated during route guidance by
pressing the setting knob ⇒page 3, fig. 1 . To also display the destina-
tion press the button. During a navigation indication, you can change the
volume by turning the volume knob .
Safety information on use of the navigation systemThe navigation system determines the position of the vehicle and its
heading, plus the distance and route to a selected destination. It takes into
account the traffic rules and regulations stored on the navigation data
medium ⇒. The system guides you using audible indications. Direction
arrows are also shown on the screen.
The destination is entered when the vehicle is stationary. The route guidance
function is designed for cars and is thus unsuitable for larger commercial
vehicles.
14)Exception: when the internal CD drive is being used to navigate directly from a navi-
gation CD.
NAV
Map
A10
A1
media_system_ingles.book Seite 47 Donnerstag, 5. Februar 2009 3:31 15
Page 92 of 96
Index91
forward . . . . . . . . . . . . . . . . . . . . . . . . . . . . . . 36
general instructions . . . . . . . . . . . . . . . . . . . 25
information on the screen . . . . . . . . . . . . . . . 28
inserting a media source . . . . . . . . . . . . . . . . 29
main menu overview . . . . . . . . . . . . . . . . . . . 28
memory card . . . . . . . . . . . . . . . . . . . . . . . . . 30
Mix (random play) . . . . . . . . . . . . . . . . . . . . . 39
MP3 files . . . . . . . . . . . . . . . . . . . . . . . . . . . . . 26
MP3 playlists . . . . . . . . . . . . . . . . . . . . . . . . . 26
opening the main menu . . . . . . . . . . . . . . . . 34
playback mode . . . . . . . . . . . . . . . . . . . . . . . 38
playback with subfolders . . . . . . . . . . . . . . . 38
playing audio files . . . . . . . . . . . . . . . . . . . . . 34
playing subfolders . . . . . . . . . . . . . . . . . . . . . 38
playlists . . . . . . . . . . . . . . . . . . . . . . . . . . . . . 26
random play (Mix) . . . . . . . . . . . . . . . . . . . . . 39
Repeat . . . . . . . . . . . . . . . . . . . . . . . . . . . . . . 39
requirements . . . . . . . . . . . . . . . . . . . . . . . . . 25
reverse . . . . . . . . . . . . . . . . . . . . . . . . . . . . . . 36
Scan . . . . . . . . . . . . . . . . . . . . . . . . . . . . . . . . 39
SD card cannot be read . . . . . . . . . . . . . . . . . 26
selecting a track . . . . . . . . . . . . . . . . . . . . . . 36
selection menu . . . . . . . . . . . . . . . . . . . . . . . 34
SETUP . . . . . . . . . . . . . . . . . . . . . . . . . . . . . . . 38
track list . . . . . . . . . . . . . . . . . . . . . . . . . . . . . 36
track list (MP3) . . . . . . . . . . . . . . . . . . . . . . . . 37
traffic news TP (Traf Programme) . . . . . . . . . 23
unit buttons (hard keys) . . . . . . . . . . . . . . . . 29
VBR (variable bit rate) . . . . . . . . . . . . . . . . . . 27
Media source . . . . . . . . . . . . . . . . . . . . . . . . . . . . 28 MEDIA-IN
anomalies . . . . . . . . . . . . . . . . . . . . . . . . . . . 44
connecting an audio source . . . . . . . . . . . . . 43
location . . . . . . . . . . . . . . . . . . . . . . . . . . . . . 41
MDI . . . . . . . . . . . . . . . . . . . . . . . . . . . . . . . . . 41
multimedia interface . . . . . . . . . . . . . . . . . . . 41
operation . . . . . . . . . . . . . . . . . . . . . . . . . . . . 43
MEDIA-IN multimedia interface . . . . . . . . . . . . . . 41
Medium wave frequency band . . . . . . . . . . . . . . 14
Memory card inserting . . . . . . . . . . . . . . . . . . . . . . . . . . . . . 30
not readable . . . . . . . . . . . . . . . . . . . . . . . . . . 31
removal instructions . . . . . . . . . . . . . . . . . . . 31
removing . . . . . . . . . . . . . . . . . . . . . . . . . . . . 30
memory cards requirements . . . . . . . . . . . . . . . . . . . . . . . . . 25
Mid . . . . . . . . . . . . . . . . . . . . . . . . . . . . . . . . . . . . 12
Miles/kilometres . . . . . . . . . . . . . . . . . . . . . . . . . 87
Mix MEDIA . . . . . . . . . . . . . . . . . . . . . . . . . . . . . . . 39
MP3 mode bit rate . . . . . . . . . . . . . . . . . . . . . . . . . . . . . . 27
playlists . . . . . . . . . . . . . . . . . . . . . . . . . . . . . 26
track playing order . . . . . . . . . . . . . . . . . . . . 40
Multi-function steering wheel . . . . . . . . . . . . . . . 10
MUTE . . . . . . . . . . . . . . . . . . . . . . . . . . . . . . . . . . . . 4
Mute . . . . . . . . . . . . . . . . . . . . . . . . . . . . . . . . . . . . 4
NNAV (navigation) . . . . . . . . . . . . . . . . . . . . . . . . . 47 adjusting the display volume . . . . . . . . . . . . 12
altering the destination address . . . . . . . . . 59
defining route options . . . . . . . . . . . . . . . . . 75
deleting destination memory . . . . . . . . . . . . 70
deleting destinations . . . . . . . . . . . . . . . . . . 67
deleting last destinations . . . . . . . . . . . . . . . 70
demo mode . . . . . . . . . . . . . . . . . . . . . . . . . . 83
destination address . . . . . . . . . . . . . . . . . . . 58
destination address window . . . . . . . . . . . . 59
destination entry . . . . . . . . . . . . . . . . . . . . . . 58
destination memory . . . . . . . . . . . . . . . . . . . 65
Destination memory destination address . . 60
destination selection . . . . . . . . . . . . . . . . . . 58
destination window . . . . . . . . . . . . . . . . . . . . 59
dynamic navigation . . . . . . . . . . . . . . . . . . . . 81
economic route . . . . . . . . . . . . . . . . . . . . 74, 75
editing destinations . . . . . . . . . . . . . . . . . . . 67
entering a stopover destination . . . . . . . . . . 73
entering the postcode . . . . . . . . . . . . . . . . . . 59
entering/deleting an exclusi on . . . . . . . . . . 79
entering/disabling exclude . . . . . . . . . . . . . 79
fast route . . . . . . . . . . . . . . . . . . . . . . . . . 74, 75
flagged destination . . . . . . . . . . . . . . . . . . . . 69
go to a car park . . . . . . . . . . . . . . . . . . . . . . . 62
go to a petrol station . . . . . . . . . . . . . . . . . . . 62
Home address as destination . . . . . . . . . . . . 60
information window . . . . . . . . . . . . . . . . . . . 69
last destination addresses as destination . 60
main menu . . . . . . . . . . . . . . . . . . . . . . . . . . . 52
media_system_ingles.book Seite 91 Donnerstag, 5. Februar 2009 3:31 15