display Seat Toledo 2012 Owner's Guide
[x] Cancel search | Manufacturer: SEAT, Model Year: 2012, Model line: Toledo, Model: Seat Toledo 2012Pages: 249, PDF Size: 3.6 MB
Page 71 of 249

70Controls and displays
Anti-lock system (ABS)
If the warning lamp, is lit up there is a fault in the ABS.
The informative display indicates: ABS fault
The brake system alone is operational in the vehicle, without ABS.
Seek professional help.
WARNING
● If the vehicle has to be stopped for technical reasons, park it a safe
distance away from moving traffic, switch off the engine and turn on the
hazard warning lights ⇒ page 98.
● If the warning lamp ⇒ page 66 lights up together with the warning
lamp , , Stop the vehicle! Seek professional help.
● A fault in the Anti-lock brake system (ABS) can lead to longer braking
distances – Risk of accident!
Rear fog light
The control lamp lights up when the rear fog light is switched on
⇒ page 96. Bulb fault
The control lamp lights up when there is a fault in a bulb:
● For several seconds after switching on the ignition
● When connecting a faulty bulb
This is indicated on the informative display, e.g.: Check the front right dipped beam headlight!
Note
The rear side lights and number plate light contain several bulbs. The con-
trol lamp lights up only when there is a fault in all the number plate
bulbs or side light bulbs (of a combined tail light). Therefore it is advisable
to regularly check the bulb operation.
Emission control system
If the warning lamp is lit up, there is a fault in the emission system. The
engine control unit allows driving to continue in an emergency program.
Seek professional help.
Preheating (diesel engines)
When you switch on the ignition, the warning lamp lights up. The engine
can be started straight away when the lamp switches off.
If the warning lamp does not light up or if it does not switch off , there is
a fault in the glow plug system.
Page 72 of 249

71
Controls and displays
If the warning lamp starts to flash while driving, there is a fault in the
engine power control electronic system. The engine control unit allows driv-
ing to continue in an emergency program.
Seek professional help.
Engine management (diesel engines)
If the warning lamp is lit up, there is a fault in the engine management
system. The engine control unit allows driving to continue in an emergency
program.
Seek professional help.
Particulate filter (diesel engines)
The particulate filter eliminates soot from emissions. The particles accumu-
late in the filter where they are normally burned off.
If the warning lamp is lit up, the filter is obstructed by soot.
In order for the filter to clean itself (if the traffic conditions ⇒
so permit) it
is essential to drive for at least 15 minutes (or until the warning lamp
switches off) with 4th or 5th gear engaged (automatic gearbox: position S)
at a minimum speed of 60 km/h (37 mph) with the engine speed between
1800-2500 1/min.
The warning lamp switches off once the filter has been successfully
cleaned.
If the cleaning process is not successful, the warning lamp does not
switch off and the warning lamp starts to flash.
The informative display indicates: Diesel particulate filter. Instruction Manual!
The engine control unit allows driving to continue in an emergency program.
When switching the ignition off and on again, the warning lamp also
lights up.
Seek professional help.
WARNING
● The particulate filter attains very high temperatures. Therefore, do
not park the vehicle in places where the exhaust pipe could come into
contact with dry grass or with highly-flammable materials. Risk of fire!
● Always adjust your speed to suit the weather, road, terrain and traffic
conditions. Never be encouraged, by the recommendations shown in the
warning lamps, to fail to respect traffic legislation.
CAUTION
While the warning lamp is lit up, the fuel consumption is high, and in
certain conditions, the engine power is reduced.
Note
● In order for the particulate filter to burn off soot in a correct manner,
avoid carrying out frequent short journeys.
● Using diesel fuel with a high sulphur count can considerably reduce the
useful life of the particulate filter. The specialised service provides informa-
tion about the countries where fuel with a high sulphur content is used.
Fuel reserve
The warning lamp lights up when approximately only 7 litres of fuel re-
main in the tank.
Safety FirstOperating instructionsPractical TipsTechnical specifications
Page 73 of 249

72Controls and displays
The informative display indicates: Refuel! Fuel range…km...(miles)
Note
The message on the display switches off only after refuelling and carrying
out a short journey.
Airbag system
If the warning lamp is lit up, there is a fault in the airbag system.
The informative display indicates: Airbag fault!
The airbag system availability is controlled electronically, regardless of
whether an airbag is disabled.
If the front airbag, side airbag, head protection airbag or the belt tensioner
are disabled using the diagnostics system:
● After switching on the ignition, the warning lamp lights up for around
4 seconds and flashes for another 12 seconds.
The informative display indicates:
Airbag/belt tensioner disabled! If the front passenger airbag has been disabled with the airbag switch loca-
ted in the storage compartment side:
●
When the ignition is turned on, the warning light switches on for
around 4 seconds.
● The airbag is disabled, signalled with the warning lamp which
lights up with the word placed in the centre part of the
dash panel ⇒ Fig. 24 ⇒ page 44.
WARNING
When there is a fault in the airbag system, have an inspection carried out
by an Authorised Service. Otherwise the airbags may fail to trigger in an
accident.
Tyre pressure monitoring
If the warning lamp lights up, the pressure of a tyre has decreased signif-
icantly. Check and adjust the pressure of all the tyres ⇒ page 187.
If the warning lamp flashes, there is a fault in the system.
Seek professional help.
Further information ⇒ page 192, Tyre pressure.
Note
If the battery is disconnected the warning lamp lights up when the igni-
tion is switched on. This warning lamp must switch off after covering a short
distance.
Page 74 of 249

73
Controls and displays
Windscreen washer fluid level
If the warning lamp lights up, the level of windscreen washer fluid in the
tank is very low. Fill the windscreen washer fluid ⇒ page 182, Windscreen
washer.
The informative display indicates:
Refill windscreen washer fluid!
Turn signals
Depending on the position of the turn signal lever the left warning lamp on
the left or right flashes.
If there is a turn signal fault the warning lamp flashes at approximately dou-
ble speed.
All the turn signals flash in addition to both warning lamps when the hazard
warning lights are switched on.
Further information ⇒ page 97, Turn signal and main beam lever.
Fog lights
The control lamp lights up when the fog lights are switched on
⇒ page 95. Cruise speed
The warning lamp
lights up when the cruise control is switched on
(cruise speed) ⇒ page 149.
Selector lever lock
If the control lamp lights up, press the brake pedal. This is necessary
when you require the automatic gearbox selector lever to move out of the
positions P or N ⇒ page 146.
Mean beams
The warning lamp lights up with the main beam headlights or when the
headlights are flashed ⇒ page 97.
Safety FirstOperating instructionsPractical TipsTechnical specifications
Page 76 of 249

75
Communication
Audio system adjustment
Fig. 36 Controls on the
steering wheelFig. 37 Steering wheel
controls (depending on
version of model)
ButtonRadioCD/MP3/USB*/iPod ®
*AUXAVolume upVolume upVolume upBVolume downVolume downVolume down
CSearch for next stationNext track
Hold down: Fast forwardNo function specified
DSearch for last stationPrevious track
Hold down: RewindNo function specified
ENo function specifiedNo function specifiedNo function specifiedFSilencePauseSilence
Ga)Operates on instrument panel displayOperates on instrument panel displayOperates on instrument panel displayNext preset b)Next trackb)No function specified b)
Ha)Operates on instrument panel displayOperates on instrument panel displayOperates on instrument panel displayPrevious presetb)Previous trackb)No function specified b)
Ia)Next presetChange folderNo function specifiedChange menu on instrument panelChange menu on instrument panelChange menu on instrument panel
Safety FirstOperating instructionsPractical TipsTechnical specifications
Page 85 of 249

84Opening and closing
If the Safe lock is out of service, the control lamp on the driver door will
flash quickly for 2 seconds before switching off for 30 seconds and then
flashing at a slower rate.
The Safe lock is re-activated on unlocking and locking the vehicle again.
If the vehicle is locked and the Safe lock is deactivated, the vehicle can be
opened from inside by pulling on the door handle.
WARNING
Do not leave people or animals in locked vehicles with the Safe lock acti-
vated: the doors and windows cannot then be opened from the inside.
Doors locked in this manner could delay assistance in an emergency.
Risk of death!
Note
● The anti-theft alarm switches on automatically when the vehicle is
locked, even if the Safe lock is deactivated. The Vehicle interior monitoring,
however, is not activated.
● Given that the Safe function will be activated on locking the vehicle,
CHECK DEADLOCK will be shown on the general instrument panel display. On
vehicles equipped with an informative display, Caution SAFE! On-board docu-
mentation! will be indicated. Unlocking the vehicle with the key
Fig. 46 Key positions
during vehicle locking
and unlocking
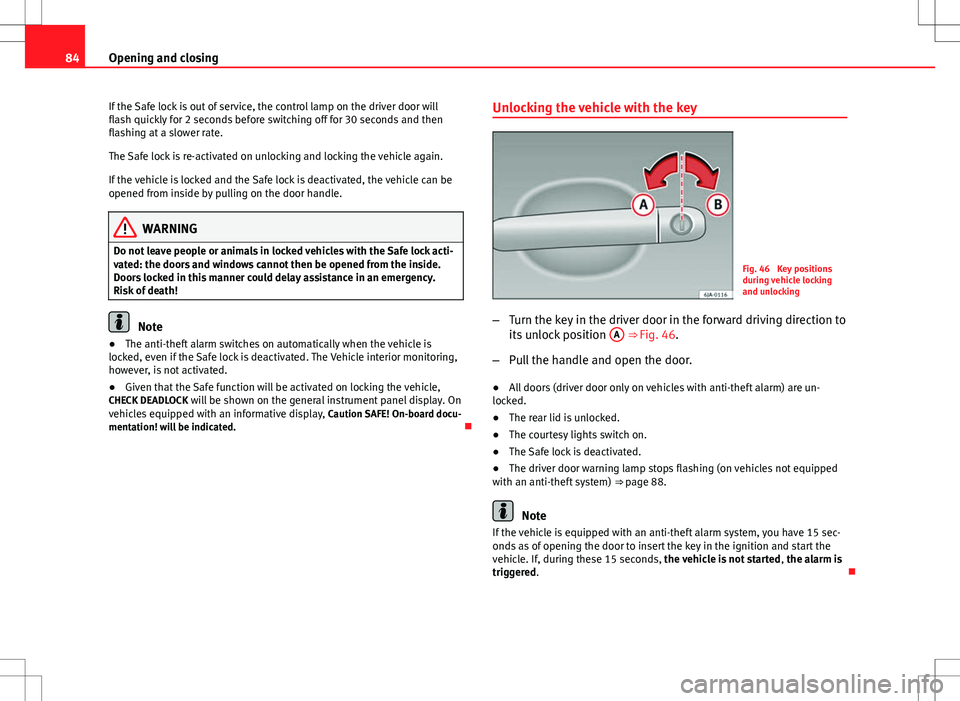
– Turn the key in the driver door in the forward driving direction to
its unlock position A
⇒ Fig. 46.
– Pull the handle and open the door.
● All doors (driver door only on vehicles with anti-theft alarm) are un-
locked.
● The rear lid is unlocked.
● The courtesy lights switch on.
● The Safe lock is deactivated.
● The driver door warning lamp stops flashing (on vehicles not equipped
with an anti-theft system) ⇒ page 88.
Note
If the vehicle is equipped with an anti-theft alarm system, you have 15 sec-
onds as of opening the door to insert the key in the ignition and start the
vehicle. If, during these 15 seconds, the vehicle is not started , the alarm is
triggered.
Page 92 of 249

91
Opening and closing
Opening the rear lid
– Pull on the release lever and lift the rear lid ⇒ Fig. 51. The rear
lid will automatically open.
Closing the rear lid
– Hold the rear lid by one of the two handles on the interior lining
and close it, pushing slightly.
This system may or may not be operative, depending on the situation of the
vehicle.
If the rear lid is locked then it cannot be opened, however if it is unlocked
then the opening system is operative and the rear lid may be opened.
To lock/unlock, press the
button or button
1 on the remote control key.
A warning appears on the instrument panel display if the rear lid is open or
not properly closed.* An audible warning is also given if the rear lid opens
while the vehicle is moving faster than 6 km/h (4 mph).*
WARNING
● Always close the rear lid properly. Risk of accident or injury.
● The rear lid must not be opened when the reverse or rear fog lights
are lit. This may damage the tail lights.
● Do not close the rear lid by pushing it down with your hand on the
rear window. The glass could smash. Risk of injury!
● Ensure the rear lid is locked after closing it. If not, it may open unex-
pectedly while driving.
WARNING (Continued)
● Never allow children to play in or around the vehicle. A locked vehicle
can be subjected to extremely high and low temperatures, depending on
the time of year, thus causing serious injuries/illness. It could even have
fatal consequences. Close and lock both the rear lid and all the other
doors when you are not using the vehicle.
● Closing the rear lid without observing and ensuring it is clear could
cause serious injury to you and to third parties. Make sure that no one is
ever in the closing path of the rear lid.
● Never drive with the rear lid open or half-closed, as exhaust gases
can be drawn into the interior. Risk of intoxication!
● If you open the rear lid only, do not leave the key inside. The vehicle
cannot be opened if the key is left inside.
Manual release of the rear lid
Fig. 53 Manual release
of the rear lid
In the event of a fault in the central locking system, the rear lid can
be released manually.
Safety FirstOperating instructionsPractical TipsTechnical specifications
Page 100 of 249

99
Lights and visibility
Note
Switch on the hazard warning lights to warn other road users, for example:
● When reaching the tail end of a traffic jam
● If the vehicle has a technical fault or you are involved in an emergency
situation.
Interior lights
Interior lighting – version 1
Fig. 60 Interior lighting
– version 1
Switching on the interior light
– Move the switch A
⇒ Fig. 60 towards the side of the light. The
symbol will be displayed.
Switching off the interior light
– Move the switch A
⇒
Fig. 60 to the centre position O
. Operating the courtesy light
–
Move the switch A
⇒ Fig. 60 to the centre of the light. The sym-
bol will be displayed.
Reading lights
– The reading lights are switched on and off by pressing switch
B
⇒ Fig. 60.
Where the courtesy light is on (switch A
⇒ Fig. 60 in position ), the light
will come on if:
● The vehicle is unlocked
● One of the doors is opened
● The key is removed from the ignition
When the courtesy light is on (switch A
in position ), the light will switch
off if:
● The vehicle is locked
● The ignition is switched on
● 30 seconds after all of the doors have been closed
If a door is left open or if switch A
is in position
, the interior lighting is
switched off after about 10 minutes to prevent the battery from running flat.
Safety FirstOperating instructionsPractical TipsTechnical specifications
Page 133 of 249

132Heating and air conditioning
Switching off air recirculation mode
–Press button
1 ⇒ Fig. 99 ⇒ page 129 again and the lamp
in the button will switch off.
If air distribution control C
⇒ Fig. 99 ⇒
page 129 is in position , air recir-
culation mode switches off automatically Press the button to switch air
recirculation mode back on in this position.
WARNING
Never use the air recirculation system for too long, as it prevents fresh air
from entering the vehicle and “used” air can cause tiredness, reduce your
attention span and cause the windows to mist over. This increases the
risk of an accident. Switch off the air recirculation system as soon as the
windows begin to mist over.
Climatronic* (automatic air conditioning) General notes
Climatronic automatically maintains a comfortable temperature. To do so, it
automatically regulates the supplied air temperature and the blower and air
distribution levels. The system also allows for the effect of sunlight, so there
is no need for manual adjustment. Automatic operations ⇒ page 133 guar-
antee maximum comfort any time of year.
Climatronic description
Cooling only works if the following conditions are met:
● The engine is running
● The outside temperature is above +2 °C (+36 °F)
● AC
18 ⇒ Fig. 100 ⇒ page 133 on. In order to ensure engines subject to heavy loads are cooled, the air condi-
tioning compressor is switched off in the event of high coolant tempera-
tures.
Recommended setting for all seasons
●
Set the required temperature. We recommend 22 °C (72 °F).
● Press the AUTO
button 12 ⇒
Fig. 100 ⇒ page 133.
● Adjust vents 3 ⇒ page 126 and 4 so that the air flow is directed slightly
upwards.
Change between degrees Centigrade and degrees Fahrenheit
Keep the AUTO
and AC buttons
⇒ Fig. 100 ⇒ page 133 pressed down at
the same time. The data is displayed on the screen in the units required.
Note
A visit to the specialised service once a year is recommended to clean the
Climatronic system.
Page 134 of 249

133
Heating and air conditioning
Controls
Fig. 100 Climatronic: controls
Buttons/controls Interior temperature setting
Display Selected interior temperature
Degrees Centigrade or Fahrenheit
Automatic air conditioning mode
Defrost or demist windscreen
Air flow direction
Air recirculation
Cooling on/off
Selected blower speed
Buttons/controls Set blower speed
Interior temperature sensor
1
23456789
1011
Automatic mode
Defrost or demist windscreen
Air distribution to windows
Air distribution to upper body
Air distribution to footwells
Air recirculation
Cooling on/off
Note
The interior temperature sensor 11 ⇒ Fig. 100 ⇒
page 133 is at the bottom.
Do not cover it with stickers or the like, as this could have a negative effect
on Climatronic operations.
Automatic mode
Automatic mode is used to maintain a constant temperature and
demist the windows inside the vehicle.
Switching on automatic mode
– Set the temperature to between +18 °C (+64 °F) and +29 °C
(+84 °F).
– Adjust vents 3 ⇒ page 126 and 4 so that the air flow is directed
slightly upwards.
– Press the AUTO
button 12 ⇒
Fig. 100 and AUTO displayed on
the screen.
Automatic mode is switched off by pressing the air distribution buttons or
increasing or decreasing the blower speed. However, the temperature re-
mains regulated.
12
131415161718
Safety FirstOperating instructionsPractical TipsTechnical specifications