Steering wheel Seat Toledo 2013 Owner's Guide
[x] Cancel search | Manufacturer: SEAT, Model Year: 2013, Model line: Toledo, Model: Seat Toledo 2013Pages: 258, PDF Size: 3.94 MB
Page 82 of 258
80Communication
Audio + Telephone system operation
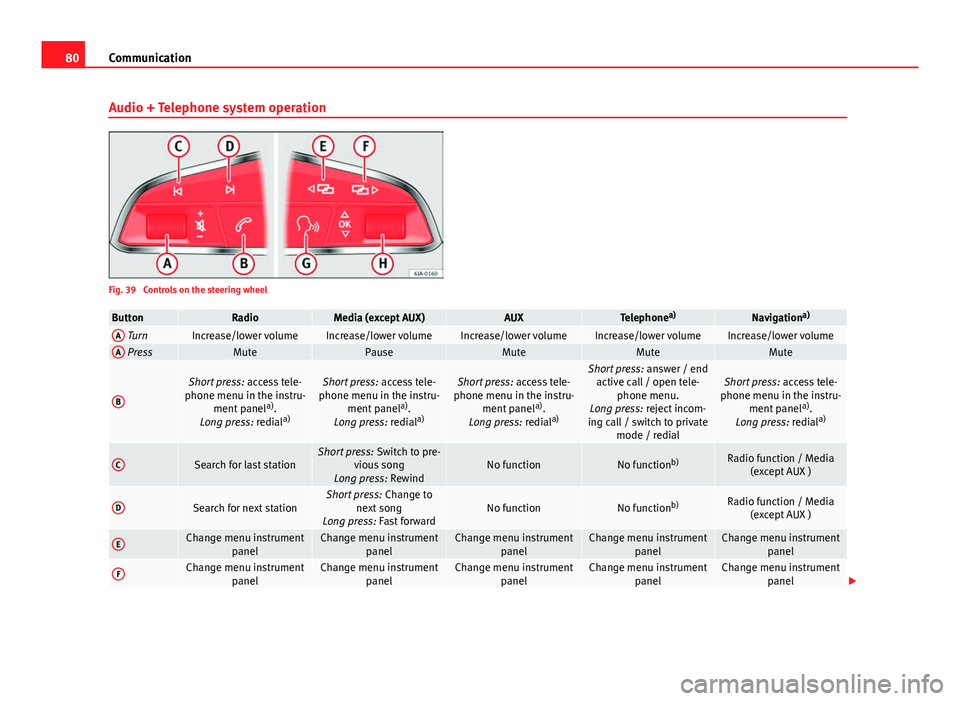
Fig. 39 Controls on the steering wheel
ButtonRadioMedia (except AUX)AUXTelephone a)Navigation a)A TurnIncrease/lower volumeIncrease/lower volumeIncrease/lower volumeIncrease/lower volumeIncrease/lower volumeA PressMutePauseMuteMuteMute
B
Short press:
access tele-
phone menu in the instru- ment panel a)
.
Long press: redial a)Short press:
access tele-
phone menu in the instru- ment panel a)
.
Long press: redial a)Short press:
access tele-
phone menu in the instru- ment panel a)
.
Long press: redial a)Short press:
answer / end
active call / open tele- phone menu.
Long press: reject incom-
ing call / switch to private mode / redialShort press: access tele-
phone menu in the instru- ment panel a)
.
Long press: redial a)
CSearch for last stationShort press:
Switch to pre-
vious song
Long press: RewindNo functionNo function b)Radio function / Media
(except AUX )
DSearch for next stationShort press: Change to
next song
Long press: Fast forwardNo functionNo function b)Radio function / Media
(except AUX )
EChange menu instrument panelChange menu instrumentpanelChange menu instrumentpanelChange menu instrumentpanelChange menu instrumentpanel
FChange menu instrument panelChange menu instrumentpanelChange menu instrumentpanelChange menu instrumentpanelChange menu instrumentpanel
Page 84 of 258
82Communication
The MDI input is composed of the USB and AUX-IN inputs.
The purpose of the MDI input is to connect external devices (i.e. iPod ®
, mp3
players or USB memories) in order to play music using the audio system or
the navigation system.
In order to connect Apple multimedia devices (such as an iPod ®
/iPhone ®
…)
the corresponding adaptor from the SEAT Original Accessories catalogue is
required.
Voice control
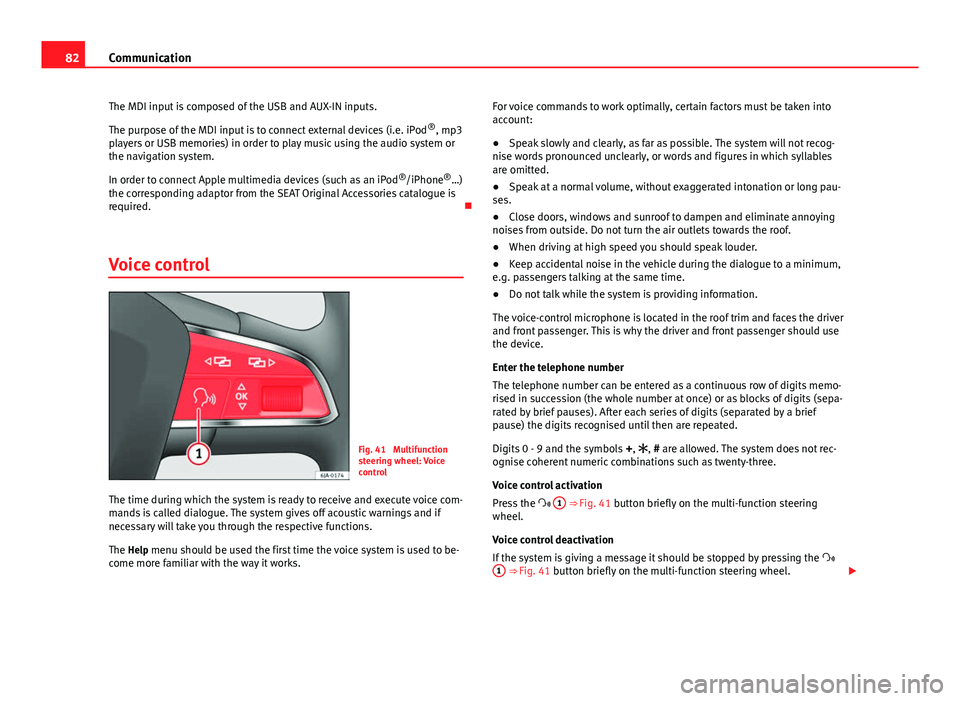
Fig. 41 Multifunction
steering wheel: Voice
control
The time during which the system is ready to receive and execute voice com-
mands is called dialogue. The system gives off acoustic warnings and if
necessary will take you through the respective functions.
The Help menu should be used the first time the voice system is used to be-
come more familiar with the way it works. For voice commands to work optimally, certain factors must be taken into
account:
●
Speak slowly and clearly, as far as possible. The system will not recog-
nise words pronounced unclearly, or words and figures in which syllables
are omitted.
● Speak at a normal volume, without exaggerated intonation or long pau-
ses.
● Close doors, windows and sunroof to dampen and eliminate annoying
noises from outside. Do not turn the air outlets towards the roof.
● When driving at high speed you should speak louder.
● Keep accidental noise in the vehicle during the dialogue to a minimum,
e.g. passengers talking at the same time.
● Do not talk while the system is providing information.
The voice-control microphone is located in the roof trim and faces the driver
and front passenger. This is why the driver and front passenger should use
the device.
Enter the telephone number
The telephone number can be entered as a continuous row of digits memo-
rised in succession (the whole number at once) or as blocks of digits (sepa-
rated by brief pauses). After each series of digits (separated by a brief
pause) the digits recognised until then are repeated.
Digits 0 - 9 and the symbols +, , # are allowed. The system does not rec-
ognise coherent numeric combinations such as twenty-three.
Voice control activation
Press the 1
⇒ Fig. 41 button briefly on the multi-function steering
wheel.
Voice control deactivation
If the system is giving a message it should be stopped by pressing the
1
⇒ Fig. 41 button briefly on the multi-function steering wheel.
Page 85 of 258

83
Communication
If the system is waiting for a voice command the dialogue may be ended as
follows:
● with the CANCEL voice command;
● pressing the 1
⇒ Fig. 41 button briefly on the multi-function steer-
ing wheel.
Basic voice commands
Voice commandAction
HELPAfter this command, the system repeats all the possi-
ble commands.
CALL [XYZ]This command is used to call a contact in the phone
book.
PHONE BOOKAfter this command you can hear the phone book, cor-
rect or delete a name tag for a contact, etc.
CALL LISTLists of the number selected, missed calls, etc.
DIAL NUMBERAfter this command you can enter a phone number to
call the desired person.
REDIALAfter this command the system dials the last number.
MUSICMusic playback from the mobile phone or other paired
telephone.
OTHER OPTIONSAfter this command, the system offers other com-
mands depending on the context.
SETTINGSSelect the setting for Bluetooth ®
, dialogue, etc.CANCELThe dialogue ends.
Note
● An incoming call will end the dialogue immediately.
● Voice control is only possible in vehicles equipped with a multi-function
steering wheel with telephone control (High version).
Safety FirstOperating instructionsPractical TipsTechnical specifications
Page 86 of 258
84Opening and closing
Opening and closing
Keys
General notes
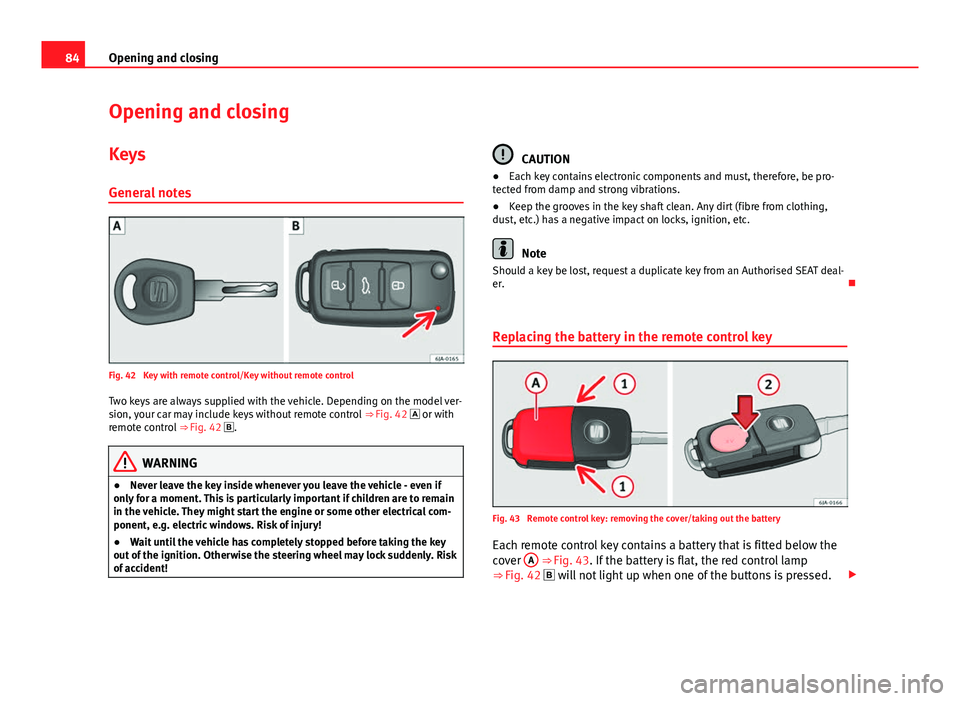
Fig. 42 Key with remote control/Key without remote control Two keys are always supplied with the vehicle. Depending on the model ver-
sion, your car may include keys without remote control ⇒ Fig. 42 or with
remote control ⇒ Fig. 42 .
WARNING
● Never leave the key inside whenever you leave the vehicle - even if
only for a moment. This is particularly important if children are to remain
in the vehicle. They might start the engine or some other electrical com-
ponent, e.g. electric windows. Risk of injury!
● Wait until the vehicle has completely stopped before taking the key
out of the ignition. Otherwise the steering wheel may lock suddenly. Risk
of accident!
CAUTION
● Each key contains electronic components and must, therefore, be pro-
tected from damp and strong vibrations.
● Keep the grooves in the key shaft clean. Any dirt (fibre from clothing,
dust, etc.) has a negative impact on locks, ignition, etc.
Note
Should a key be lost, request a duplicate key from an Authorised SEAT deal-
er.
Replacing the battery in the remote control key
Fig. 43 Remote control key: removing the cover/taking out the battery
Each remote control key contains a battery that is fitted below the
cover A
⇒ Fig. 43. If the battery is flat, the red control lamp
⇒ Fig. 42 will not light up when one of the buttons is pressed.
Page 100 of 258
98Lights and visibility
DAY LIGHT Function*
Switching on daytime driving lights
Turn the light switch ⇒ Fig. 54 ⇒ page 97 to position 0.
Switching off daytime driving lights in vehicles with the START-
STOP system
– Switch the ignition off.
– Move the turn signal lever ⇒ Fig. 57 towards the steering wheel,
pressing it down and keeping it in this position.
– Switch on the ignition – wait for the left turn signal to flash 4
times.
– Switch off the ignition – wait until you hear the audible warning
to confirm that the daytime driving lights have been switched
off.
– Release the turn signal lever.
Switching on daytime driving lights in vehicles with the START-
STOP system
– Switch the ignition off.
– Move the turn signal lever ⇒ Fig. 57 towards the steering wheel,
pressing it up and keeping it in this position.
– Switch on the ignition – wait for the right turn signal to flash 4
times. –
Switch off the ignition – wait until you hear the audible warning
to confirm that the daytime driving lights have been switched
on.
– Release the turn signal lever.
Deactivation of the daytime running light function 1)
● The daytime running light function is deactivated by removing the corre-
sponding fuse ⇒ page 219.
Activation of the daytime running light function 1)
● The daytime running light function is activated by placing the corre-
sponding fuse ⇒ page 219.
Note
The daytime driving lights work when the ignition is switched on.
Front fog lights*
Fig. 55 Instrument pan-
el: light switch
1)
This does not apply to vehicles equipped with the START-STOP system.
Page 102 of 258
100Lights and visibility
Note
Make sure you set the range of the main lights when the dipped beam
headlights are switched on.
Turn signal and main beam lever
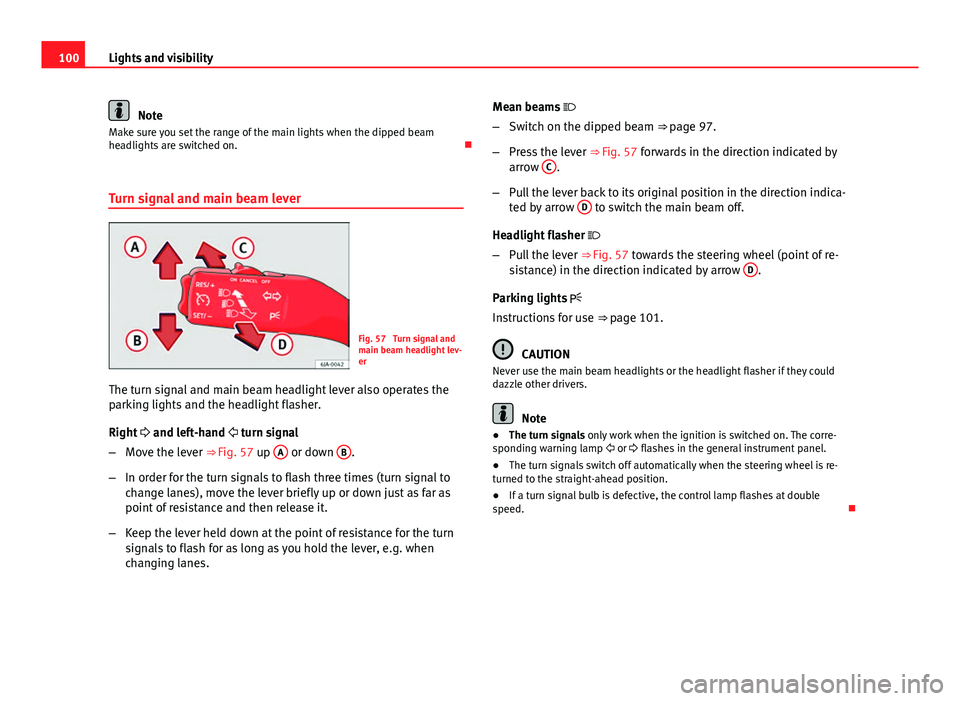
Fig. 57 Turn signal and
main beam headlight lev-
er
The turn signal and main beam headlight lever also operates the
parking lights and the headlight flasher.
Right and left-hand turn signal
– Move the lever ⇒ Fig. 57 up A
or down B.
– In order for the turn signals to flash three times (turn signal to
change lanes), move the lever briefly up or down just as far as
point of resistance and then release it.
– Keep the lever held down at the point of resistance for the turn
signals to flash for as long as you hold the lever, e.g. when
changing lanes. Mean beams
– Switch on the dipped beam ⇒ page 97.
– Press the lever ⇒ Fig. 57 forwards in the direction indicated by
arrow C
.
– Pull the lever back to its original position in the direction indica-
ted by arrow D
to switch the main beam off.
Headlight flasher
– Pull the lever ⇒ Fig. 57 towards the steering wheel (point of re-
sistance) in the direction indicated by arrow D
.
Parking lights
Instructions for use ⇒ page 101.
CAUTION
Never use the main beam headlights or the headlight flasher if they could
dazzle other drivers.
Note
● The turn signals only work when the ignition is switched on. The corre-
sponding warning lamp or flashes in the general instrument panel.
● The turn signals switch off automatically when the steering wheel is re-
turned to the straight-ahead position.
● If a turn signal bulb is defective, the control lamp flashes at double
speed.
Page 103 of 258
101
Lights and visibility
Parking lights*
Parking lights
– Switch the ignition off.
– Move the turn signal lever ⇒ Fig. 57 ⇒ page 100 up or down to
turn on the right or left-hand parking lights respectively.
Parking light on both sides
– Turn the light switch ⇒ Fig. 54 ⇒ page 97 to position and
engage the steering lock.
Note
● The parking lights only work when the ignition is switched on.
● The parking light will not come on automatically on switching the igni-
tion off if the left or right-hand turn signal is left on.
Front fog lights with CORNER function*
Front fog lights with CORNER function provide better lighting of the area
around the car when driving through a corner or parking, etc.
Front fog lights with CORNER function switch on depending on how far you
turn the steering wheel or whether or not the turn signals 1)
are switched on,
if the following conditions are met:
● the vehicle is stationary, the ignition is switched on or you are moving at
a speed less than 40 km/h (25 mph)
● The daytime driving light is switched off ●
The dipped beam is switched on
● The fog lights are switched off
● Reverse gear is not engaged
Hazard warning light switch
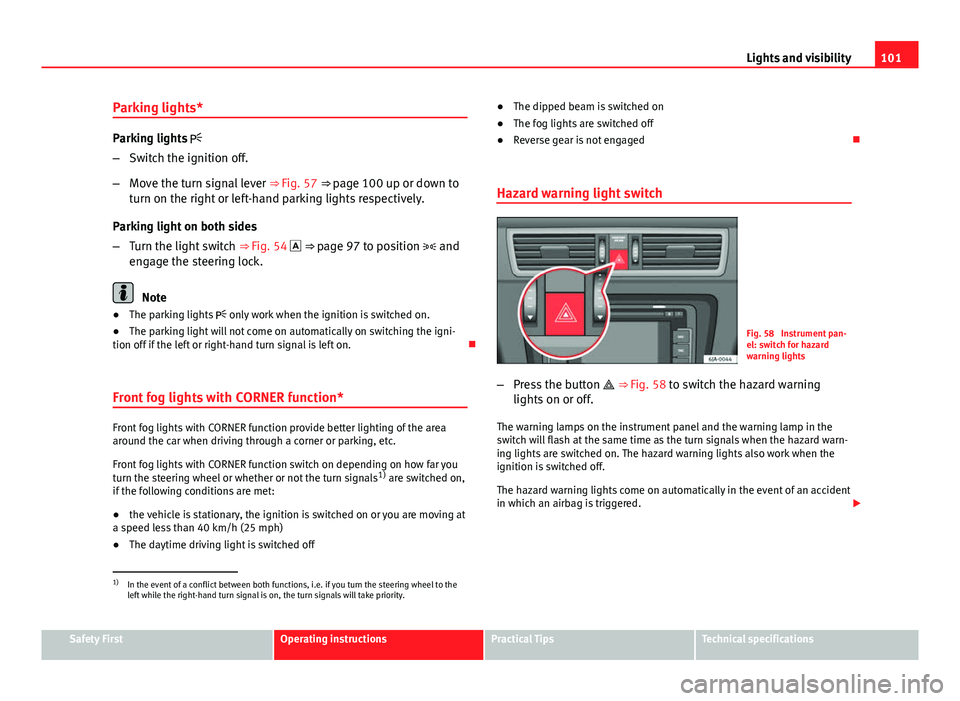
Fig. 58 Instrument pan-
el: switch for hazard
warning lights
– Press the button ⇒ Fig. 58 to switch the hazard warning
lights on or off.
The warning lamps on the instrument panel and the warning lamp in the
switch will flash at the same time as the turn signals when the hazard warn-
ing lights are switched on. The hazard warning lights also work when the
ignition is switched off.
The hazard warning lights come on automatically in the event of an accident
in which an airbag is triggered.
1)
In the event of a conflict between both functions, i.e. if you turn the steering wheel to the
left while the right-hand turn signal is on, the turn signals will take priority.
Safety FirstOperating instructionsPractical TipsTechnical specifications
Page 109 of 258
107
Lights and visibility
Interval wipe
– Move the lever up to the stop 1
⇒ Fig. 65.
– Set the required interval wipe using the control A
.
Slow wipe
– Move the lever up to the stop 2
⇒ Fig. 65.
Continuous wipe
– Move the lever up to the stop 3
⇒ Fig. 65.
Automatic wash and wipe
– Pull the lever towards the steering wheel, position 5
⇒ Fig. 65,
and the windscreen washer and wipers are switched on.
– Release the lever. The washer will stop and the windscreen wip-
ers will keep running for 1–3 wipes (depending on the wind-
screen washer operating time).
Rear window wiper *
– Press the lever forwards to the stop 6
⇒ Fig. 65 and the rear
window wiper will run every 6 seconds.
Automatic rear window wash wipe*
– Press the lever forwards fully to position 7
⇒ Fig. 65 and the
rear window wiper and washer are switched on at the same
time.
– Release the lever. The rear window washer will stop and the rear
window wipers will keep running for 1–3 wipes (depending on
the jet operating time). When released, the lever remains in po-
sition 6
. Switching off the wipers
–
Move the lever to position 0
⇒ Fig. 65.
Headlight washer system*
The headlight washers operate briefly if the dipped or main beam is on and
the lever is raised to position 5 ⇒ Fig. 65. The headlight washer system al-
so operates every ten windscreen wash cycles.
Clean off stubborn dirt (insects, etc.) from the headlights at regular inter-
vals, for instance when filling the fuel tank. Please observe the following in-
dications ⇒ page 175, Headlights.
To ensure the system works properly in winter, keep the nozzle holders free
of snow and remove any ice with a de-icer spray.
CAUTION
Never pull on the nozzle holders. Risk of damage to the system!
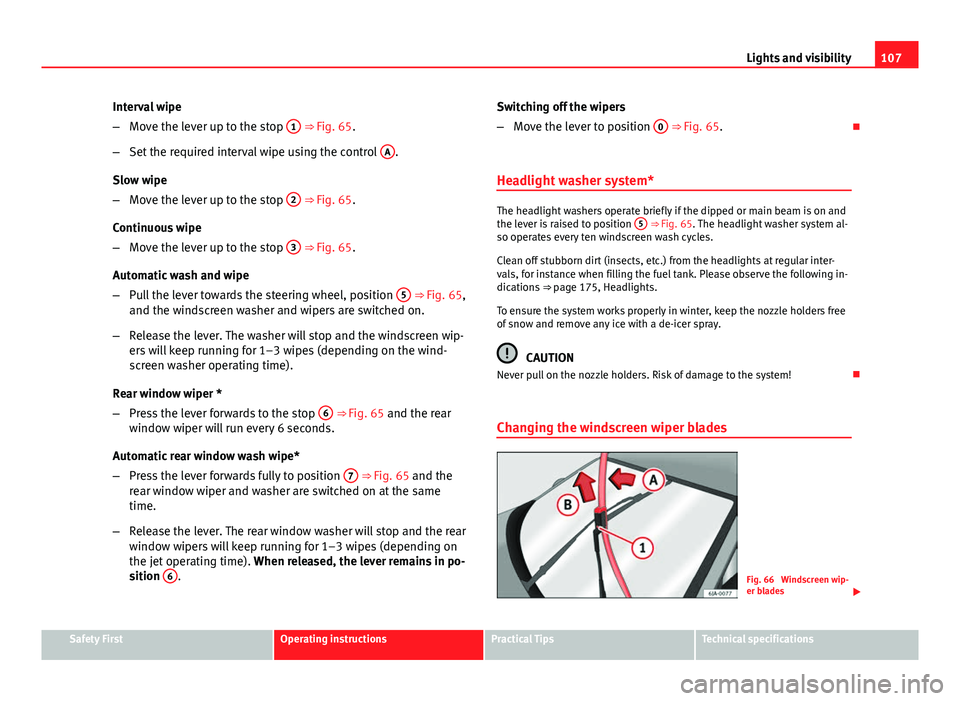
Changing the windscreen wiper blades
Fig. 66 Windscreen wip-
er blades
Safety FirstOperating instructionsPractical TipsTechnical specifications
Page 112 of 258
110Seats and storage
Seats and storage
Front seats
Introduction
Set the driver seat in such a way that the pedals can be fully depressed with
your legs slightly bent.
Set the driver seat backrest in such a way that the upper point of the steer-
ing wheel can be reached with your arms slightly bent.
The correct seat position is very important for:
● Reaching all of the controls safely and quickly
● A relaxed low-fatigue posture
● maximum protection from the seat belts and airbag system
WARNING
● Adjust the driver seat only when the vehicle is stationary. Risk of ac-
cident!
● Be careful when adjusting the front seats! Careless and uncontrolled
adjustment can cause injuries.
● The backrests must not be reclined too far back while driving. This
could limit the effect of the seat belts and the airbag system. Risk of in-
jury!
● Never transport more than the permitted amount of people in your ve-
hicle.
WARNING (Continued)
● Every occupant in the vehicle must properly fasten and wear the seat
belt belonging to his or her seat. Children must be protected with an ap-
propriate child restraint system ⇒ page 46, Child safety.
● The front seats, head restraints and seat belts must always be adjus-
ted to the size of the vehicle occupant to provide you and your passen-
gers with the greatest possible protection.
● Your feet should remain in the footwell while the vehicle is moving;
never rest them on the dash panel, on the window or on the seat! This
also applies to passengers. An incorrect sitting position exposes you to
an increased risk of injury in case of a sudden braking or an accident. If
the airbag is triggered, you could sustain severe injuries due to an incor-
rect sitting position!
● It is important for the driver and front passenger to keep a distance of
at least 25 cm from the steering wheel and dash panel. Failure to respect
the minimum distance means that the airbag will not protect you. Risk of
fatal injury if triggered!
● No items must not be kept in the footwell, as they could block the
pedals in the event of a sudden braking manoeuvre or change of direc-
tion. You would no longer be able to brake, change gear or accelerate.
● Do not place any items on the front passenger seat other than those
allowed (e.g. child seat). Risk of accident!
Note
After a certain time, the backrest angle adjustment mechanism may gain a
certain amount of play.
Page 141 of 258
139
Driving
Driving Starting and stopping the engine
Introduction
WARNING
● Never adjust the steering wheel while the vehicle is moving!
● Maintain at least 25 cm distance between the steering wheel and the
upper part of your body 1
⇒ Fig. 100
⇒ page 140. The airbag system
will not be able to give the required protection if the minimum distance is
not observed. This can cause a risk of fatal injury!
● For safety reasons, the steering wheel adjustment lever must always
be pushed securely against the steering column to prevent the steering
wheel from accidentally changing position while driving. Risk of acci-
dent!
● If the steering wheel is adjusted closer to your face, the protective ef-
fect of the driver airbag will be decreased in the event of an accident.
Check that the steering wheel is pointing towards the upper part of your
body.
● When driving, always hold the steering wheel with both hands on the
outside part at the 9 o'clock and 3 o'clock positions. Never hold the
steering wheel at the 12 o'clock position, or in any other manner (e.g. in
the centre of the steering wheel). In such cases, if the airbag is triggered,
you may sustain injuries to the arms, hands and head.
● When moving with the engine switched off, the ignition key must al-
ways remain in position 2
⇒ Fig. 101 ⇒
page 141 (ignition on). The
control lamps will light up in this position. Otherwise, the steering lock
could engage suddenly. Risk of accident!
WARNING (Continued)
● Do not remove the key from the ignition until the vehicle has come to
a standstill and is secure (e.g. the handbrake is engaged). Otherwise, the
steering lock could suddenly engage. Risk of accident!
● Always take the ignition key with you when you leave the vehicle.
This is particularly important if you leave children in the vehicle. Children
could start the engine, for example, with the subsequent risk of accident.
● Never leave the engine running in unventilated or closed rooms. The
exhaust gases contain carbon monoxide, an odourless and colourless
poisonous gas. Risk of fatal accidents! Carbon monoxide can cause peo-
ple to lose consciousness and can cause death.
● Never leave the vehicle unattended if the engine is running.
● Never switch the engine off until the vehicle is stationary. Risk of ac-
cident!
CAUTION
● Turning the steering wheel fully in either direction when the vehicle is
stationary and the engine in gear puts the power steering under great
stress. This could lead to noise. Never leave the steering wheel turned fully
in either direction for more than 15 seconds. Risk of damage to the power
steering system!
● The starter motor may only be used (key position 3
⇒ Fig. 101
⇒ page 141 in the ignition) if the engine is off. Using the starter motor
when the engine is running could cause damage.
● Immediately release the ignition key when the engine starts, otherwise
damage could be caused to the starter motor.
● When the engine is cold, you should avoid high engine speeds, driving
at full throttle and over-loading the engine before it reaches operating tem-
perature. Risk of engine damage!
Safety FirstOperating instructionsPractical TipsTechnical specifications