ESP Seat Toledo 2013 Owner's Guide
[x] Cancel search | Manufacturer: SEAT, Model Year: 2013, Model line: Toledo, Model: Seat Toledo 2013Pages: 258, PDF Size: 3.94 MB
Page 106 of 258

104Lights and visibility
Visibility
Heated rear window
Fig. 62 Heated rear win-
dow switch
– Switch the heated rear window on or off by pressing the button
⇒ Fig. 62, the warning lamp in the button will come on or go
off respectively.
The heated rear window only works when the engine is running.
After approx. 7 minutes, the rear window heating device switches off auto-
matically.
For the sake of the environment
The heated rear window should be switched off as soon as the glass is dem-
isted. By saving electrical power you can also save fuel ⇒ page 160, Save
electrical energy.
Note
In the event of a drop in voltage in the onboard systems, the heated rear
window switches off automatically to ensure enough power to control the
engine ⇒ page 194, Automatic disconnection of electrical equipment. Sun visors
Fig. 63 Driver sun visor
Fig. 64 Front passenger
sun visor
The sun visors for the driver and the front passenger can be pulled out of
their central supports and turned towards the doors in the direction of arrow 1
⇒ Fig. 63 and 2
⇒ Fig. 64 respectively.
The strip A
is to store small objects such as notepaper, etc.
The front passenger sun visor includes a vanity mirror B
with a cover. The
cover is opened by sliding it in the direction indicated by arrow 3
⇒
Fig. 64.
Page 112 of 258
110Seats and storage
Seats and storage
Front seats
Introduction
Set the driver seat in such a way that the pedals can be fully depressed with
your legs slightly bent.
Set the driver seat backrest in such a way that the upper point of the steer-
ing wheel can be reached with your arms slightly bent.
The correct seat position is very important for:
● Reaching all of the controls safely and quickly
● A relaxed low-fatigue posture
● maximum protection from the seat belts and airbag system
WARNING
● Adjust the driver seat only when the vehicle is stationary. Risk of ac-
cident!
● Be careful when adjusting the front seats! Careless and uncontrolled
adjustment can cause injuries.
● The backrests must not be reclined too far back while driving. This
could limit the effect of the seat belts and the airbag system. Risk of in-
jury!
● Never transport more than the permitted amount of people in your ve-
hicle.
WARNING (Continued)
● Every occupant in the vehicle must properly fasten and wear the seat
belt belonging to his or her seat. Children must be protected with an ap-
propriate child restraint system ⇒ page 46, Child safety.
● The front seats, head restraints and seat belts must always be adjus-
ted to the size of the vehicle occupant to provide you and your passen-
gers with the greatest possible protection.
● Your feet should remain in the footwell while the vehicle is moving;
never rest them on the dash panel, on the window or on the seat! This
also applies to passengers. An incorrect sitting position exposes you to
an increased risk of injury in case of a sudden braking or an accident. If
the airbag is triggered, you could sustain severe injuries due to an incor-
rect sitting position!
● It is important for the driver and front passenger to keep a distance of
at least 25 cm from the steering wheel and dash panel. Failure to respect
the minimum distance means that the airbag will not protect you. Risk of
fatal injury if triggered!
● No items must not be kept in the footwell, as they could block the
pedals in the event of a sudden braking manoeuvre or change of direc-
tion. You would no longer be able to brake, change gear or accelerate.
● Do not place any items on the front passenger seat other than those
allowed (e.g. child seat). Risk of accident!
Note
After a certain time, the backrest angle adjustment mechanism may gain a
certain amount of play.
Page 116 of 258
114Seats and storage
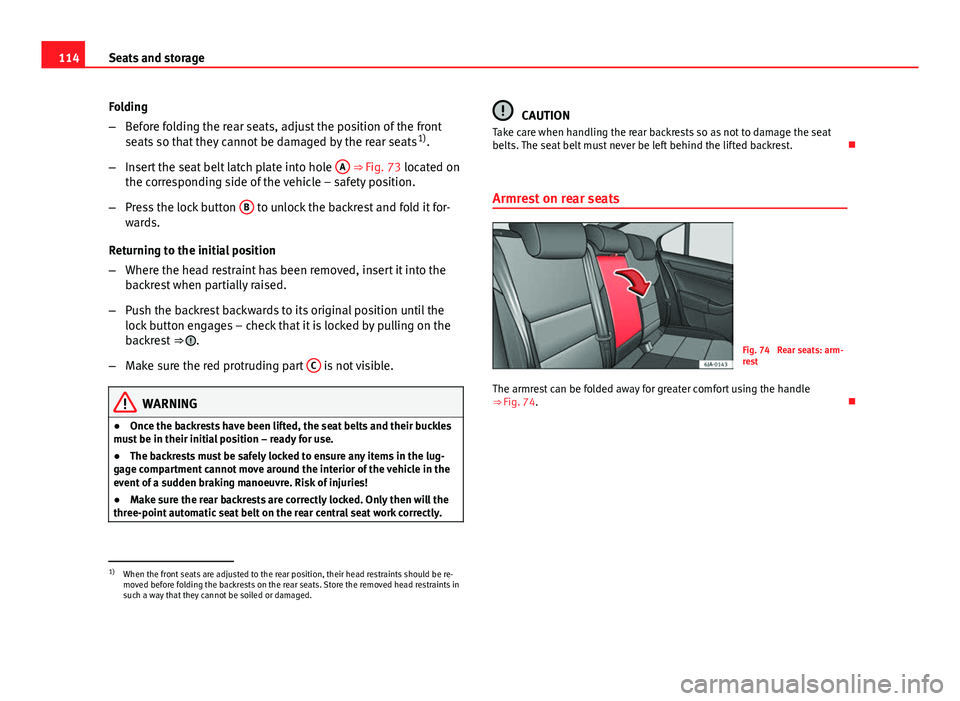
Folding
–Before folding the rear seats, adjust the position of the front
seats so that they cannot be damaged by the rear seats 1)
.
– Insert the seat belt latch plate into hole A
⇒ Fig. 73 located on
the corresponding side of the vehicle – safety position.
– Press the lock button B
to unlock the backrest and fold it for-
wards.
Returning to the initial position
– Where the head restraint has been removed, insert it into the
backrest when partially raised.
– Push the backrest backwards to its original position until the
lock button engages – check that it is locked by pulling on the
backrest ⇒
.
– Make sure the red protruding part C
is not visible.
WARNING
● Once the backrests have been lifted, the seat belts and their buckles
must be in their initial position – ready for use.
● The backrests must be safely locked to ensure any items in the lug-
gage compartment cannot move around the interior of the vehicle in the
event of a sudden braking manoeuvre. Risk of injuries!
● Make sure the rear backrests are correctly locked. Only then will the
three-point automatic seat belt on the rear central seat work correctly.
CAUTION
Take care when handling the rear backrests so as not to damage the seat
belts. The seat belt must never be left behind the lifted backrest.
Armrest on rear seats
Fig. 74 Rear seats: arm-
rest
The armrest can be folded away for greater comfort using the handle
⇒ Fig. 74.
1)
When the front seats are adjusted to the rear position, their head restraints should be re-
moved before folding the backrests on the rear seats. Store the removed head restraints in
such a way that they cannot be soiled or damaged.
Page 136 of 258
134Heating and air conditioning
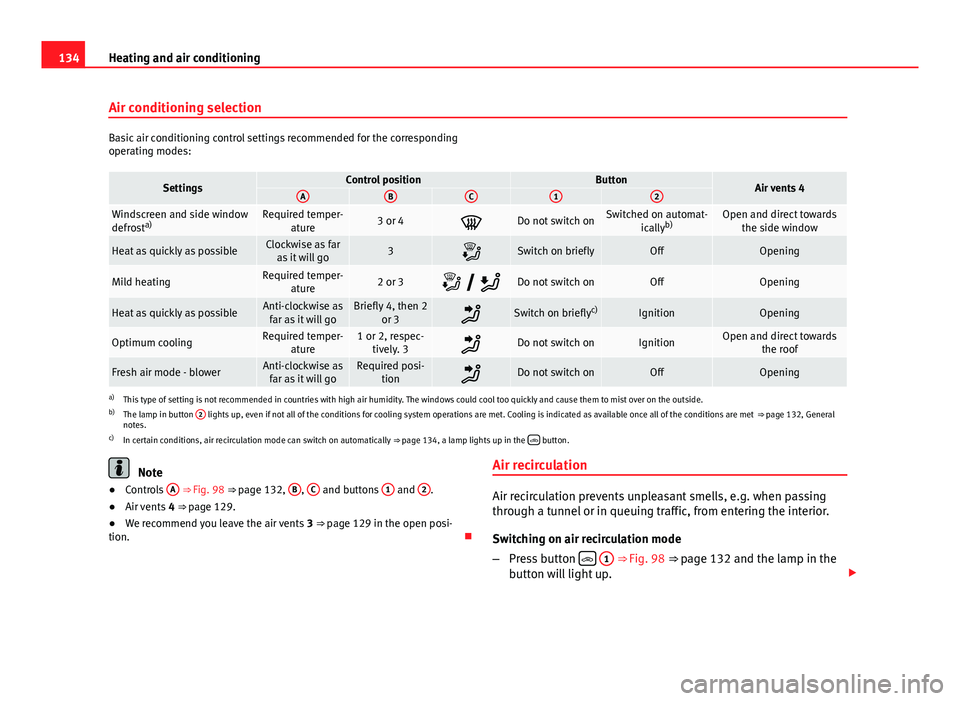
Air conditioning selection
Basic air conditioning control settings recommended for the corresponding
operating modes:
SettingsControl positionButtonAir vents 4ABC12
Windscreen and side window
defrosta)Required temper-
ature3 or 4Do not switch onSwitched on automat- icallyb)Open and direct towards
the side window
Heat as quickly as possibleClockwise as faras it will go3Switch on brieflyOffOpening
Mild heatingRequired temper- ature2 or 3 Do not switch onOffOpening
Heat as quickly as possibleAnti-clockwise as
far as it will goBriefly 4, then 2 or 3Switch on briefly c)IgnitionOpening
Optimum coolingRequired temper-
ature1 or 2, respec-tively. 3Do not switch onIgnitionOpen and direct towards the roof
Fresh air mode - blowerAnti-clockwise asfar as it will goRequired posi- tionDo not switch onOffOpening
a)This type of setting is not recommended in countries with high air humidity. The windows could cool too quickly and cause them to mist over on the outside.
b) The lamp in button 2 lights up, even if not all of the conditions for cooling system operations are met. Cooling is indicated as available once all of the conditions are met
⇒ page 132, General
notes.
c) In certain conditions, air recirculation mode can switch on automatically ⇒ page 134, a lamp lights up in the
button.
Note
● Controls A ⇒ Fig. 98 ⇒ page 132, B, C and buttons 1 and 2.
● Air vents 4 ⇒ page 129.
● We recommend you leave the air vents 3 ⇒ page 129 in the open posi-
tion. Air recirculationAir recirculation prevents unpleasant smells, e.g. when passing
through a tunnel or in queuing traffic, from entering the interior.
Switching on air recirculation mode
–
Press button
1 ⇒ Fig. 98 ⇒ page 132 and the lamp in the
button will light up.
Page 139 of 258
137
Heating and air conditioning
Temperature selection
– When you switch on the ignition, control 1 ⇒ Fig. 99
⇒ page 136 can be used to set the required interior tempera-
ture.
The interior temperature can be adjusted between +18 °C (+64 °F) and
+29 °C (+84 °F). The temperature is regulated automatically within this
range. If a temperature below +18 °C (+64 °F) is selected, “LO” is displayed
on the screen. If a temperature above +29 °C (+84 °F) is selected, “HI” is
displayed on the screen. At both extremes, Climatronic works at maximum
cooling or heating power, respectively. The temperature is not regulated.
In the event of prolonged, irregular distribution of the air flow from the out-
lets (particularly the footwells) and significant differences in temperature,
e.g. on leaving the vehicle, sensitive people may catch a cold.
Air recirculation
Air recirculation prevents unpleasant smells, e.g. when passing
through a tunnel or in queuing traffic, from entering the interior.
Switching on air recirculation mode
– Press button
17 ⇒ Fig. 99 ⇒ page 136 and the
symbol
is displayed on the screen.
Switching off air recirculation mode
– Press button
17 ⇒ Fig. 99 ⇒ page 136 and the
symbol
disappears from the screen.
WARNING
Never use the air recirculation system for too long, as it prevents fresh air
from entering the vehicle and “used” air can cause tiredness, reduce your
attention span and cause the windows to mist over. This increases the
risk of an accident. Switch off the air recirculation system as soon as the
windows begin to mist over.
Note
If air recirculation mode remains on for 15 minutes, the symbol will
start to flash on the screen to indicate prolonged air recirculation. If air recir-
culation is not switched off, the symbol will continue to flash for 5 minutes.
Blower selection
Climatronic automatically regulates the blower speed according to
the interior temperature. It is possible, however, to set the blower
speed to suit requirements.
– Turn rotary control 10
⇒ Fig. 99 ⇒
page 136 anti-clockwise (de-
crease speed) or clockwise (increase speed).
Climatronic will switch off when the blower switches off.
WARNING
● “Used air” can cause tiredness, reduce attention spans and cause the
windows to mist over. This increases the risk of an accident.
● Do not switch off Climatronic for longer than necessary.
● Switch Climatronic back on as soon as the windows begin to mist
over.
Safety FirstOperating instructionsPractical TipsTechnical specifications
Page 147 of 258
145
Driving
The HHC is activated on gradients of over 5 %, as the driver door is closed.
It only works to start on hills, moving both forwards and in reverse. It is not
activated during start-up down hill.
Anti-lock system (ABS)
The ABS system prevents the wheels locking during braking. This helps the
driver keep control of the vehicle.
The driver is made aware of ABS assistance by the pulsating of the brake
pedal and a characteristic noise.
Keep the brake pedal pressed down while the ABS is working. The ABS will
switch off when the brake pedal is released. Never brake intermittently
while the ABS is working!
Traction control system (ASR)
If the wheels start to slide, the ASR adapts the engine speed to the driving
conditions. Particularly in unfavourable conditions, ASR helps starting, ac-
celerating and hill starts.
The 1)
warning lamp in the general instrument panel flashes when the
system is working. Electronic differential lock
If one of the wheels starts to skid, the EDL brakes that wheel, transmitting
the driving force to the other wheels. This increases vehicle stability and im-
proves driving stability.
To prevent the disc brake of the braking wheel from overheating, the EDL
cuts out automatically if subjected to excessive loads. The vehicle will con-
tinue to function normally without EDL. The EDL will switch on again auto-
matically when the brake has cooled down.
Manual gearbox
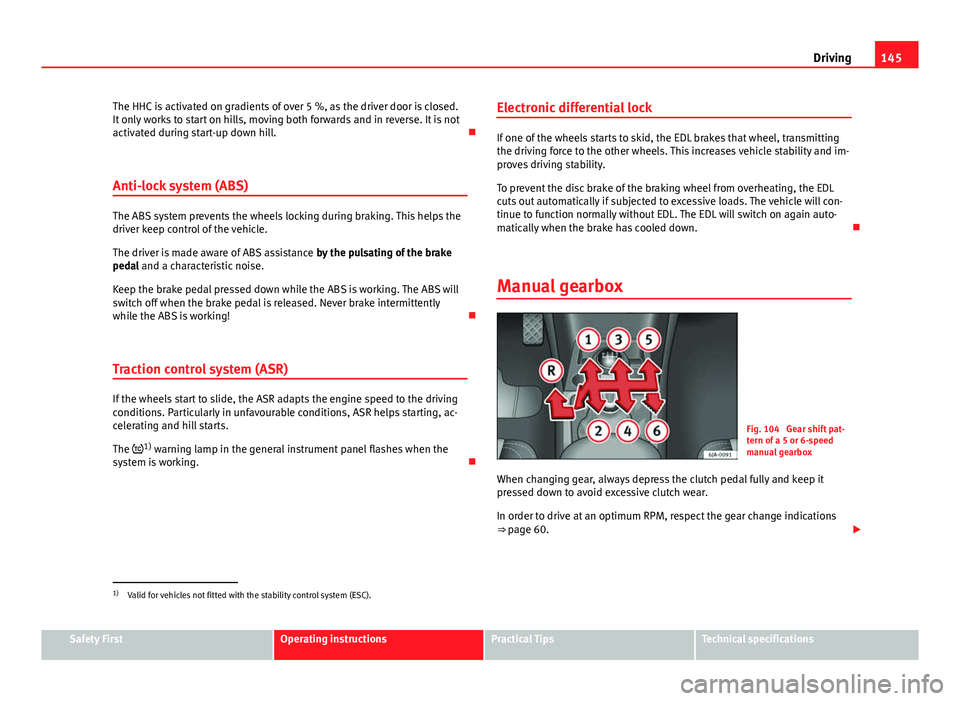
Fig. 104 Gear shift pat-
tern of a 5 or 6-speed
manual gearbox
When changing gear, always depress the clutch pedal fully and keep it
pressed down to avoid excessive clutch wear.
In order to drive at an optimum RPM, respect the gear change indications
⇒ page 60.
1)
Valid for vehicles not fitted with the stability control system (ESC).
Safety FirstOperating instructionsPractical TipsTechnical specifications
Page 152 of 258
150Driving
With a sporty driving style , characterised by sudden acceleration, heavy ac-
celeration, speeds that often increase and decrease and maximum speed,
the gearbox adapts to this driving style when the accelerator is pressed fully
down (kick-down) by shifting down as quickly as possible and can even
shift down by several gears at once.
Selecting the best driving programmes is an endless job. Regardless of this,
the driver can also make the gearbox switch to a more dynamic gear shift
programme by pressing the accelerator quickly. This makes the automatic
gearbox shift down into a lower gear that would normally apply to the cur-
rent speed for more rapid acceleration (e.g. to overtake another vehicle)
without having to press the accelerator fully down into the kick-down posi-
tion. On shifting up in a corresponding driving style, the gearbox returns to
the original programme.
When driving along mountain roads, the gearbox adapts to the gradients.
This avoids having to frequently change gears when driving uphill. In Tip-
tronic mode, it is possible to shift down manually when driving downhill to
use the braking effect of the engine.
Back-up programme
A back-up programme exists in case of faults.
In the event of a fault in the gearbox electronics, this will continue to work
in one of the corresponding back-up programmes. All segments of the
screen are lit up or switched off.
The fault can be seen as follows:
● The gearbox only engages certain gears
● Reverse gear R cannot be engaged
● The manual gearbox switches off in the back-up programme
Note
If the gearbox switches to the back-up programme, visit an Authorised Serv-
ice as soon as possible to solve the problem.
Manual release of the selector lever
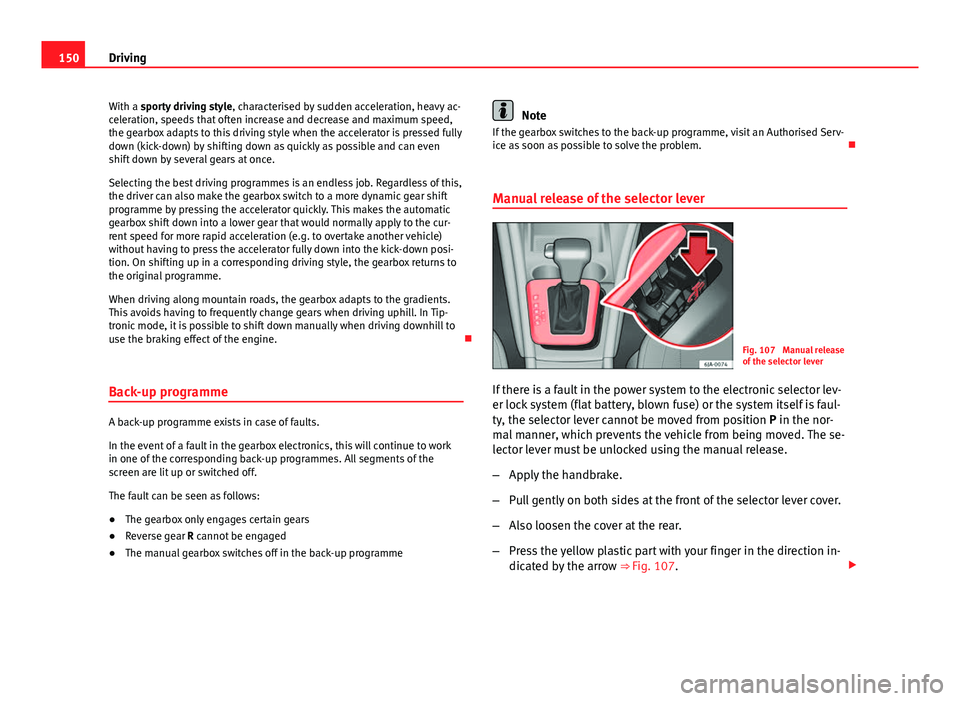
Fig. 107 Manual release
of the selector lever
If there is a fault in the power system to the electronic selector lev-
er lock system (flat battery, blown fuse) or the system itself is faul-
ty, the selector lever cannot be moved from position P in the nor-
mal manner, which prevents the vehicle from being moved. The se-
lector lever must be unlocked using the manual release.
– Apply the handbrake.
– Pull gently on both sides at the front of the selector lever cover.
– Also loosen the cover at the rear.
– Press the yellow plastic part with your finger in the direction in-
dicated by the arrow ⇒
Fig. 107.
Page 153 of 258
151
Driving
– Press the interlock button on the selector lever knob at the
same time and move the selector lever to position N (if the se-
lector lever were to be moved back to position P then it would
lock again).
Foot pedals
Under no circumstances must correct use of the pedals be impaired!
Only a floor mat secured to the two corresponding fastening points may be
used in the driver footwell.
Only use floor mats from the catalogue of SEAT Original Accessories that
fasten at two points.
WARNING
No object must be left in the driver footwell. Risk of preventing or limit-
ing use of the foot pedals!
Parking aid*
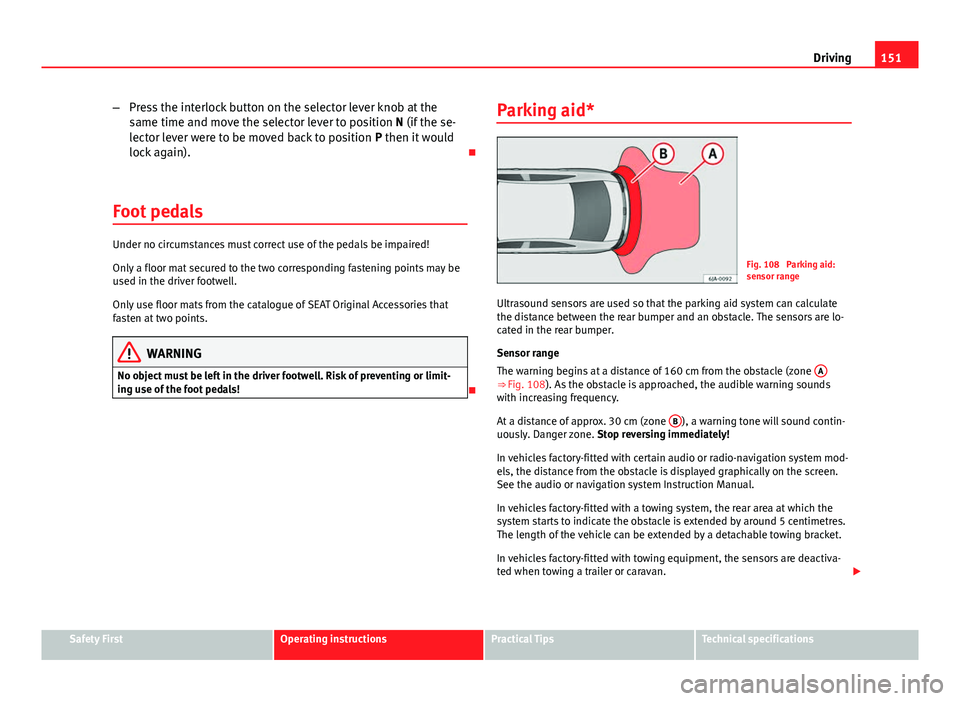
Fig. 108 Parking aid:
sensor range
Ultrasound sensors are used so that the parking aid system can calculate
the distance between the rear bumper and an obstacle. The sensors are lo-
cated in the rear bumper.
Sensor range
The warning begins at a distance of 160 cm from the obstacle (zone A
⇒ Fig. 108). As the obstacle is approached, the audible warning sounds
with increasing frequency.
At a distance of approx. 30 cm (zone B
), a warning tone will sound contin-
uously. Danger zone. Stop reversing immediately!
In vehicles factory-fitted with certain audio or radio-navigation system mod-
els, the distance from the obstacle is displayed graphically on the screen.
See the audio or navigation system Instruction Manual.
In vehicles factory-fitted with a towing system, the rear area at which the
system starts to indicate the obstacle is extended by around 5 centimetres.
The length of the vehicle can be extended by a detachable towing bracket.
In vehicles factory-fitted with towing equipment, the sensors are deactiva-
ted when towing a trailer or caravan.
Safety FirstOperating instructionsPractical TipsTechnical specifications
Page 154 of 258
152Driving
Switching the parking aid system on and off
Parking aid is switched on when the ignition is on and reverse gear engag-
ed. This is confirmed by a short audible warning.
Parking aid is switched off when reverse gear is released.
WARNING
● Parking aid does not free the driver from responsibility when parking
or performing similar manoeuvres. Pay special attention to small children
or animals, as the parking aid sensors may not always be able to detect
them.
● Before reversing or parking, make sure there are no small obstacles,
e.g. stones, narrow pillars, towing brackets, etc. in front and behind the
vehicle. These obstacles may not always be detected by the parking aid
device.
● The surface of certain objects may not reflect the signals of the park-
ing aid sensors. Therefore, people wearing clothing of this kind may not
be detected by the parking aid system.
● Outside noise may interfere with the parking aid system. Under cer-
tain unfavourable circumstances, certain objects or people may not be
detected.
Note
● If a constant sound at a higher frequency is emitted for 3 seconds when
the system is switched on then there is a fault in the system. Please take the
vehicle to a specialised technical service to solve this fault.
● To ensure that the parking aid system works properly, the sensors must
be kept clean (e.g. free of ice).
● If the parking aid system is switched on when the automatic gearbox se-
lector lever is in position P, the acoustic signal will be interrupted (the car
cannot be moved). Cruise control (Cruise control system)*
Introduction
The cruise control system allows you to drive at a constant speed of 30 km/
h (19 mph) or higher without having to press the accelerator. However, the
speed is only maintained within the margin permitted by the engine power
and the braking effect of the engine.
The warning lamp lights up on the general instrument panel if cruise con-
trol is switched on.
WARNING
● For safety reasons the cruise control system must not be used in
dense traffic or where roads conditions are poor (e.g. due to ice, aqua-
planing, loose grit, snow). Risk of accident!
● The programmed speed can only be re-established if it is not too high
for current traffic conditions.
● Always switch the cruise control system off after using it in order to
avoid involuntary use.
CAUTION
● The cruise control cannot maintain a constant speed when the vehicle is
moving downhill. The vehicle tends to accelerate under its own weight.
Therefore, shift down or use the brake pedal in good time to slow the vehi-
cle.
Note
● In vehicles with an automatic gearbox, the cruise control system cannot
be switched on if the selector lever is in position P, N or R.
● In vehicles with a manual gearbox, the cruise control cannot be switched
on if first gear or reverse gear is engaged.
Page 159 of 258
157
Driving and the environment
New tyres
New tyres must be submitted to “running in”, given that initially their grip is
not yet at the maximum level. During approximately the first 500 km (120
miles) drive very carefully.
New brake pads
New brake pads do not yet provide maximum friction capacity. New brake
pads must be “run in” first. During approximately the first 200 km (120
miles) drive very carefully.
Catalytic converter
An exhaust gas emission control system (catalytic converter) that functions
perfectly is vitally important for vehicle operation that respects the environ-
ment.
Please observe the following indications:
● Refuel only using unleaded petrol ⇒ page 180, Unleaded petrol in pet-
rol engine vehicles.
● Do not add too much oil to the engine ⇒ page 186, Checking the en-
gine oil level;.
● Do not switch off the ignition while driving.
If you are required to drive in a country where unleaded fuel is not available
and when returning to a country where using a catalytic converter is obliga-
tory, the catalytic converter must be replaced.
WARNING
● Due to the high temperatures that the catalytic converter can reach,
the vehicle must be stopped so that the catalytic converter does not
come into contact with easily flammable material underneath the vehicle.
Risk of fire!
● Never use substances for additional underbody protection or anti-cor-
rosion for the exhaust pipes, the catalytic converter or the antithermic
screen. Risk of fire!
CAUTION
● Never completely empty the tank! An irregular fuel supply can cause ig-
nition faults, which can result in damage to a substantial amount of engine
parts and the exhaust system.
● Refuelling just once with leaded petrol disables the exhaust system!
Economical and ecological driving General notes
Fuel consumption, environmental impact and engine, brake and tyre wear
depend largely on three factors:
● personal driving style
● the conditions in which the vehicle is used
● prior technical conditions
By adopting an economical driving style and anticipating the traffic situa-
tion ahead, you can easily reduce fuel consumption by 10-15%.
Safety FirstOperating instructionsPractical TipsTechnical specifications