technical data Seat Toledo 2015 Owner's Guide
[x] Cancel search | Manufacturer: SEAT, Model Year: 2015, Model line: Toledo, Model: Seat Toledo 2015Pages: 248, PDF Size: 5.06 MB
Page 113 of 248
Opening and closing
WARNING
● Never l e
ave the key inside whenever you
leave the vehicle - even if only for a moment.
This is particularly important if children are
to remain in the vehicle. Children might start
the engine or some other electrical compo-
nent, e.g. electric windows. Risk of injury!
● Wait until the vehicle has completely stop-
ped before t
aking the key out of the ignition.
Otherwise the steering wheel may lock sud-
denly. Risk of accident! CAUTION
● Eac h k
ey contains electronic components
and must, therefore, be protected from damp-
ness and strong vibrations.
● Keep the grooves in the key shaft clean.
Any dir
t (fibre from clothing, dust, etc.) has a
negative impact on locks, ignition, etc. Note
Should a key be lost, request a duplicate key
from an Authori sed S
EAT dealer. Replacing the battery in the remote
c
ontr
o
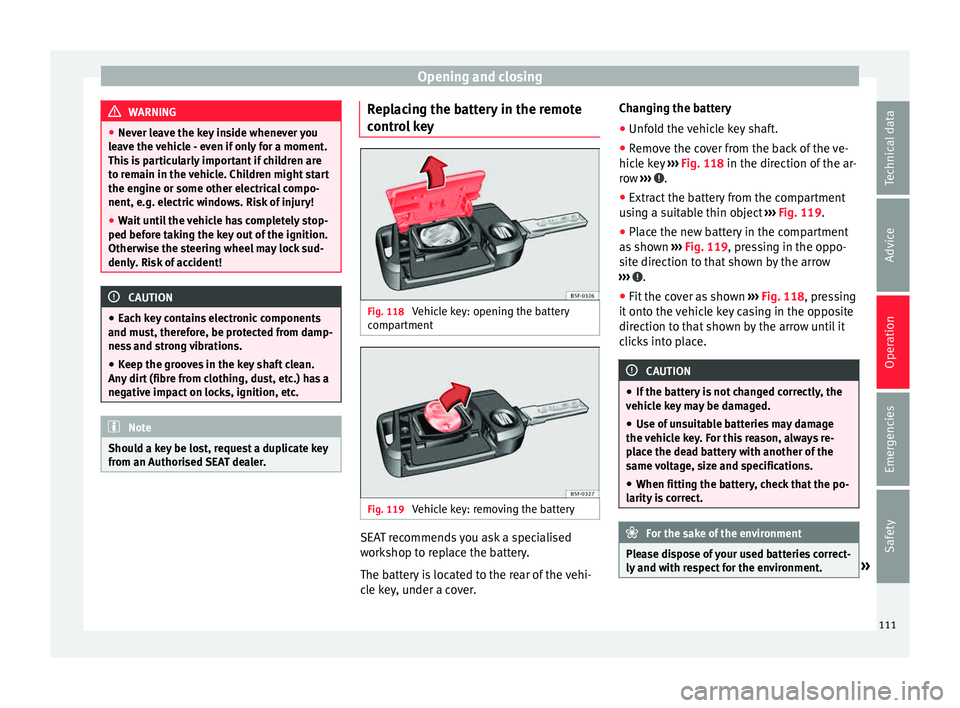
l key Fig. 118
Vehicle key: opening the battery
c omp
ar
tment Fig. 119
Vehicle key: removing the battery SEAT recommends you ask a specialised
w
ork
shop t
o replace the battery.
The battery is located to the rear of the vehi-
cle key, under a cover. Changing the battery
● Unfold the vehicle key shaft.
● Remove the cover from the back of the ve-
hicle k
ey ››› Fig. 118 in the direction of the ar-
row ››› .
● Extract the battery from the compartment
u s
in
g a suitable thin object ››› Fig. 119.
● Place the new battery in the compartment
as sho
wn ››› Fig. 119, pressing in the oppo-
site direction to that shown by the arrow
››› .
● Fit the cover as shown ››
›
Fig. 118 , pressing
it onto the vehicle key casing in the opposite
direction to that shown by the arrow until it
clicks into place. CAUTION
● If the b att
ery is not changed correctly, the
vehicle key may be damaged.
● Use of unsuitable batteries may damage
the vehic
le key. For this reason, always re-
place the dead battery with another of the
same voltage, size and specifications.
● When fitting the battery, check that the po-
larity i
s correct. For the sake of the environment
Please dispose of your used batteries correct-
ly and w ith r
espect for the environment. » 111
Technical data
Advice
Operation
Emergencies
Safety
Page 115 of 248
Opening and closing
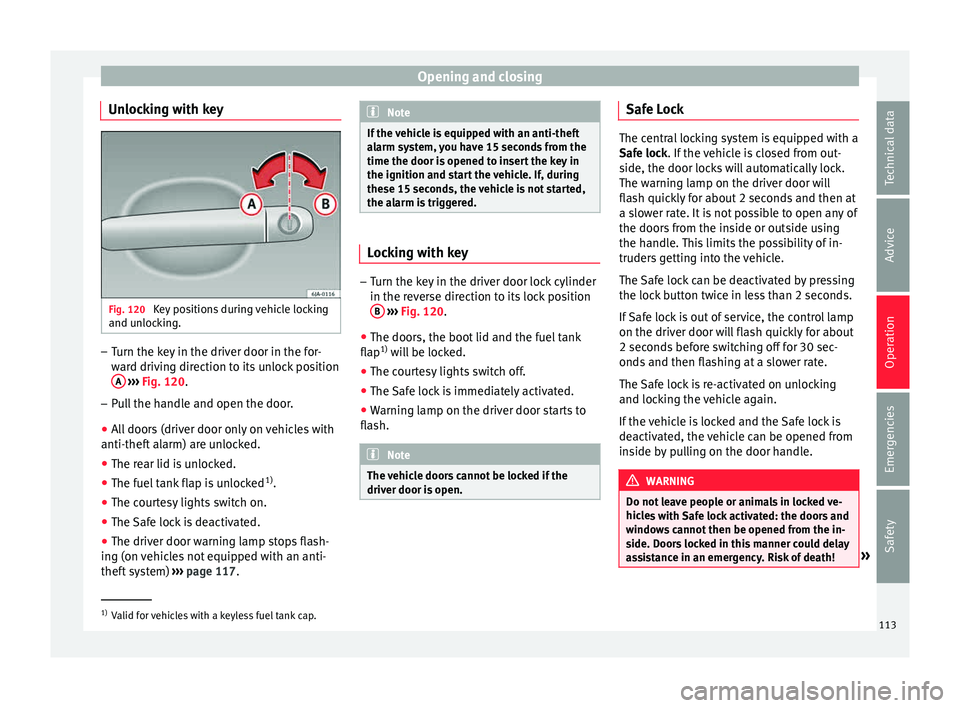
Unlocking with key Fig. 120
Key positions during vehicle locking
and u n
loc
king. –
Turn the key in the driver door in the for-
war
d driv
ing direction to its unlock position
A
› ›
›
Fig. 120.
– Pull the handle and open the door.
● All doors (driver door only on vehicles with
anti-theft al
arm) are unlocked.
● The rear lid is unlocked.
● The fuel tank flap is unlocked 1)
.
● The courtesy lights switch on.
● The Safe lock is deactivated.
● The driver door warning lamp stops flash-
ing (on v
ehicles not equipped with an anti-
theft system) ›››
page 117. Note
If the vehicle is equipped with an anti-theft
al arm sy
stem, you have 15 seconds from the
time the door is opened to insert the key in
the ignition and start the vehicle. If, during
these 15 seconds, the vehicle is not started,
the alarm is triggered. Locking with key
–
Turn the key in the driver door lock cylinder
in the rev er
se direction to its lock position
B
› ›
›
Fig. 120.
● The doors, the boot lid and the fuel tank
flap 1)
wi
ll be locked.
● The courtesy lights switch off.
● The Safe lock is immediately activated.
● Warning lamp on the driver door starts to
flash. Note
The vehicle doors cannot be locked if the
driver door i s
open. Safe Lock
The central locking system is equipped with a
Safe loc
k
. If the vehicle is closed from out-
side, the door locks will automatically lock.
The warning lamp on the driver door will
flash quickly for about 2 seconds and then at
a slower rate. It is not possible to open any of
the doors from the inside or outside using
the handle. This limits the possibility of in-
truders getting into the vehicle.
The Safe lock can be deactivated by pressing
the lock button twice in less than 2 seconds.
If Safe lock is out of service, the control lamp
on the driver door will flash quickly for about
2 seconds before switching off for 30 sec-
onds and then flashing at a slower rate.
The Safe lock is re-activated on unlocking
and locking the vehicle again.
If the vehicle is locked and the Safe lock is
deactivated, the vehicle can be opened from
inside by pulling on the door handle. WARNING
Do not leave people or animals in locked ve-
hicl e
s with Safe lock activated: the doors and
windows cannot then be opened from the in-
side. Doors locked in this manner could delay
assistance in an emergency. Risk of death! »1)
Valid for vehicles with a keyless fuel tank cap.
113
Technical data
Advice
Operation
Emergencies
Safety
Page 117 of 248
Opening and closing
Unlocking and locking the vehicle
w ith K
eyl
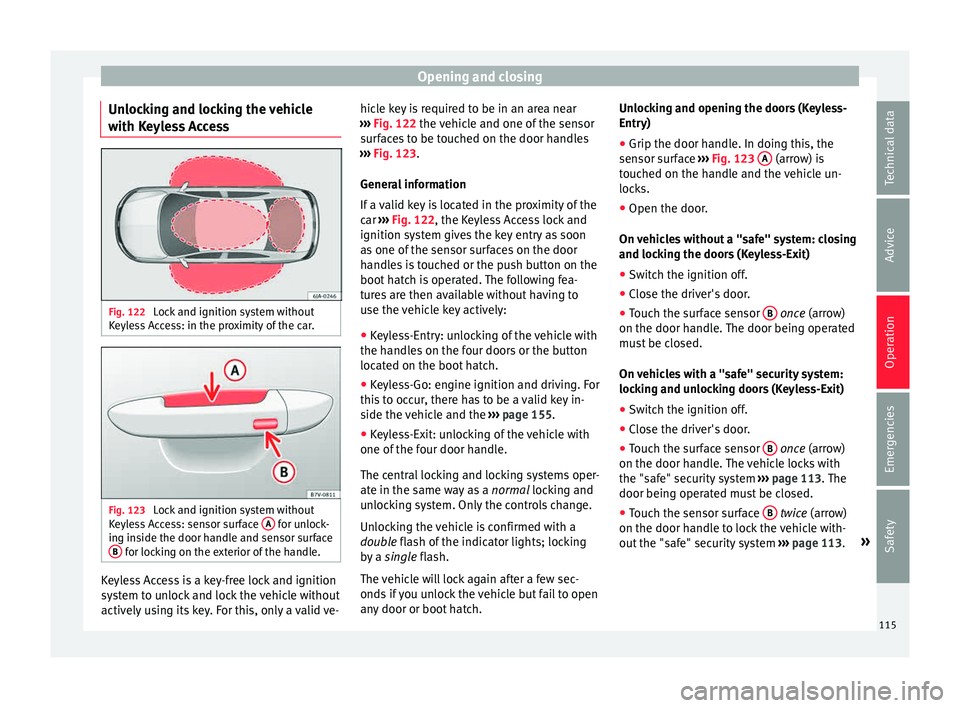
ess Access Fig. 122
Lock and ignition system without
K eyl
e
ss Access: in the proximity of the car. Fig. 123
Lock and ignition system without
K eyl
e
ss Access: sensor surface A for unlock-
in g in
s
ide the door handle and sensor surface
B for locking on the exterior of the handle.
Keyless Access is a key-free lock and ignition
sy
s
t
em to unlock and lock the vehicle without
actively using its key. For this, only a valid ve- hicle key is required to be in an area near
›››
Fig. 122 the vehicle and one of the sensor
surfaces to be touched on the door handles
››› Fig. 123.
General information
If a valid key is located in the proximity of the
car ››› Fig. 122, the Keyless Access lock and
ignition system gives the key entry as soon
as one of the sensor surfaces on the door
handles is touched or the push button on the
boot hatch is operated. The following fea-
tures are then available without having to
use the vehicle key actively:
● Keyless-Entry: unlocking of the vehicle with
the handle
s on the four doors or the button
located on the boot hatch.
● Keyless-Go: engine ignition and driving. For
this t
o occur, there has to be a valid key in-
side the vehicle and the ››› page 155.
● Keyless-Exit: unlocking of the vehicle with
one of the four door h
andle.
The central locking and locking systems oper-
ate in the same way as a normal locking and
unlocking system. Only the controls change.
Unlocking the vehicle is confirmed with a
double flash of the indicator lights; locking
by a single flash.
The vehicle will lock again after a few sec-
onds if you unlock the vehicle but fail to open
any door or boot hatch. Unlocking and opening the doors (Keyless-
Entry)
●
Grip the door handl
e. In doing this, the
sensor sur
face ››› Fig. 123 A (arrow) is
t ouc
hed on the h
andle and the vehicle un-
locks.
● Open the door.
On vehic
les without a "safe" system: closing
and locking the doors (Keyless-Exit)
● Switch the ignition off.
● Close the driver's door.
● Touch the surface sensor B onc
e (arrow)
on the door h andl
e. The door being operated
must be closed.
On vehicles with a "safe" security system:
locking and unlocking doors (Keyless-Exit)
● Switch the ignition off.
● Close the driver's door.
● Touch the surface sensor B onc
e (arrow)
on the door h andl
e. The vehicle locks with
the "safe" security system ››› page 113. The
door being operated must be closed.
● Touch the sensor surface B twic
e (arrow)
on the door h andl
e to lock the vehicle with-
out the "safe" security system ››› page 113. »
115
Technical data
Advice
Operation
Emergencies
Safety
Page 119 of 248
Opening and closing
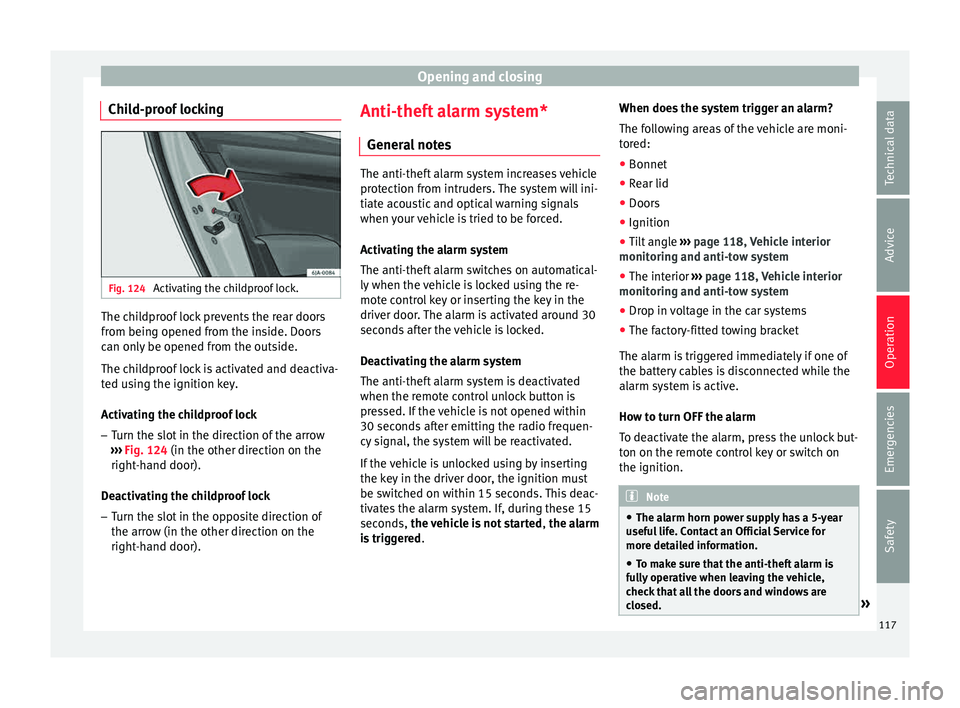
Child-proof locking Fig. 124
Activating the childproof lock. The childproof lock prevents the rear doors
fr
om bein
g opened fr
om the inside. Doors
can only be opened from the outside.
The childproof lock is activated and deactiva-
ted using the ignition key.
Activating the childproof lock
– Turn the slot in the direction of the arrow
›››
Fig. 124 (in the other direction on the
right-hand door).
Deactivating the childproof lock – Turn the slot in the opposite direction of
the arrow (in the other dir
ection on the
right-hand door). Anti-theft alarm system*
General
notes The anti-theft alarm system increases vehicle
prot
ection fr
om intruders. The system will ini-
tiate acoustic and optical warning signals
when your vehicle is tried to be forced.
Activating the alarm system
The anti-theft alarm switches on automatical-
ly when the vehicle is locked using the re-
mote control key or inserting the key in the
driver door. The alarm is activated around 30
seconds after the vehicle is locked.
Deactivating the alarm system
The anti-theft alarm system is deactivated
when the remote control unlock button is
pressed. If the vehicle is not opened within
30 seconds after emitting the radio frequen-
cy signal, the system will be reactivated.
If the vehicle is unlocked using by inserting
the key in the driver door, the ignition must
be switched on within 15 seconds. This deac-
tivates the alarm system. If, during these 15
seconds, the vehicle is not started , the alarm
is triggered . When does the system trigger an alarm?
The fo
l
lowing areas of the vehicle are moni-
tored:
● Bonnet
● Rear lid
● Doors
● Ignition
● Tilt angle ››› pag
e 118, Vehicle interior
monitoring and anti-tow system
● The interior ››› pag
e 118, Vehicle interior
monitoring and anti-tow system
● Drop in voltage in the car systems
● The factory-fitted towing bracket
The alarm is
triggered immediately if one of
the battery cables is disconnected while the
alarm system is active.
How to turn OFF the alarm
To deactivate the alarm, press the unlock but-
ton on the remote control key or switch on
the ignition. Note
● The al arm horn po
wer supply has a 5-year
useful life. Contact an Official Service for
more detailed information.
● To make sure that the anti-theft alarm is
ful
ly operative when leaving the vehicle,
check that all the doors and windows are
closed. » 117
Technical data
Advice
Operation
Emergencies
Safety
Page 121 of 248
Opening and closing
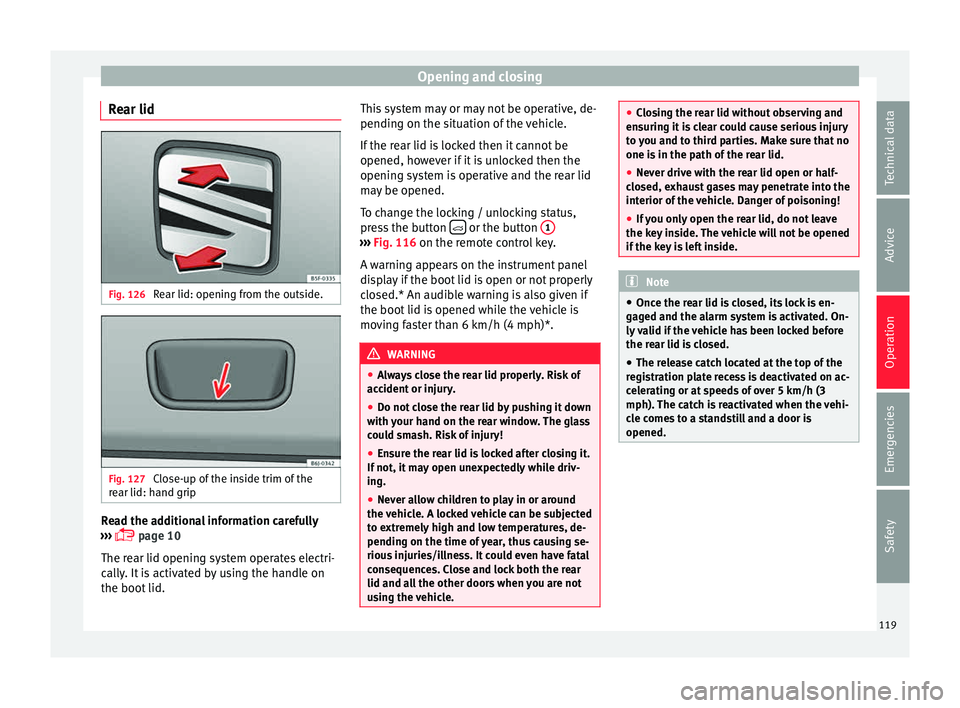
Rear lid Fig. 126
Rear lid: opening from the outside. Fig. 127
Close-up of the inside trim of the
r e
ar lid: h
and grip Read the additional information carefully
› ›
›
page 10
The rear lid opening system operates electri-
cally. It is activated by using the handle on
the boot lid. This system may or may not be operative, de-
pending on the sit
uation of the vehicle.
If the rear lid is locked then it cannot be
opened, however if it is unlocked then the
opening system is operative and the rear lid
may be opened.
To change the locking / unlocking status,
press the button or the button
1 ›››
Fig. 116 on the r emot
e c
ontrol key.
A warning appears on the instrument panel
display if the boot lid is open or not properly
closed.* An audible warning is also given if
the boot lid is opened while the vehicle is
moving faster than 6 km/h (4 mph)*. WARNING
● Alw a
ys close the rear lid properly. Risk of
accident or injury.
● Do not close the rear lid by pushing it down
with y
our hand on the rear window. The glass
could smash. Risk of injury!
● Ensure the rear lid is locked after closing it.
If not, it m
ay open unexpectedly while driv-
ing.
● Never allow children to play in or around
the vehic
le. A locked vehicle can be subjected
to extremely high and low temperatures, de-
pending on the time of year, thus causing se-
rious injuries/illness. It could even have fatal
consequences. Close and lock both the rear
lid and all the other doors when you are not
using the vehicle. ●
Clo s
ing the rear lid without observing and
ensuring it is clear could cause serious injury
to you and to third parties. Make sure that no
one is in the path of the rear lid.
● Never drive with the rear lid open or half-
closed, e
xhaust gases may penetrate into the
interior of the vehicle. Danger of poisoning!
● If you only open the rear lid, do not leave
the key in
side. The vehicle will not be opened
if the key is left inside. Note
● Onc e the r e
ar lid is closed, its lock is en-
gaged and the alarm system is activated. On-
ly valid if the vehicle has been locked before
the rear lid is closed.
● The release catch located at the top of the
regi
stration plate recess is deactivated on ac-
celerating or at speeds of over 5 km/h (3
mph). The catch is reactivated when the vehi-
cle comes to a standstill and a door is
opened. 119
Technical data
Advice
Operation
Emergencies
Safety
Page 123 of 248
Lights and visibility
If an obstacle is present, the closing mecha-
ni sm w
i
ll stop and the window will roll back a
few centimetres.
If an obstacle prevents closing for the next
10 seconds, the closing mechanism will once
again stop and the window will roll back an-
other few centimetres.
If in the next 10 seconds you attempt to close
the window after it has rolled back the sec-
ond time, only the closing mechanism will be
stopped even if the obstacle is still present.
The roll-back function is still connected.
The roll-back function will only be disconnec-
ted if you once again attempt to close the
window in the following 10 seconds. In this
case, the window will close at full force .
If you wait for a further 10 seconds, the roll-
back function will be once again connected. Lights and visibility
Light s
Intr oduction Read the additional information carefully
›› ›
page 18
The location of the controls of right-hand
drive cars differs slightly from the location
shown here ››› Fig. 129 ››› page 121. Howev-
er, the symbols indicating the respective po-
sitions of the controls remain the same. WARNING
Never drive with only the side lights on! The
side light s
are not bright enough to illumi-
nate the road ahead and to ensure that other
road users are able to see you. Always use
your dipped beam headlights if it is dark or if
visibility is poor. CAUTION
● Use the light s
in line with local law.
● However, drivers always remain responsi-
ble f
or correctly adjusting and using the
lights. Note
● An audibl e w
arning will be heard when the
light control is set to and you remove the ignition key and open the door. Once the
driver door i
s
closed (ignition off), the audi-
ble warning will stop, whereas the side lights
will remain on to light up the stationary vehi-
cle in case this is necessary.
● Depending on weather conditions (cold or
wet), the lights
may mist up temporarily on
the inside. This is particularly the case in the
event of a difference in temperature between
the inside and in front of the light. By switch-
ing on the lights, the area through which the
beam of light is projected will quickly be
demisted, although the edges may remain
misted. The real lights and turn signals can
mist up. This has no influence on the useful
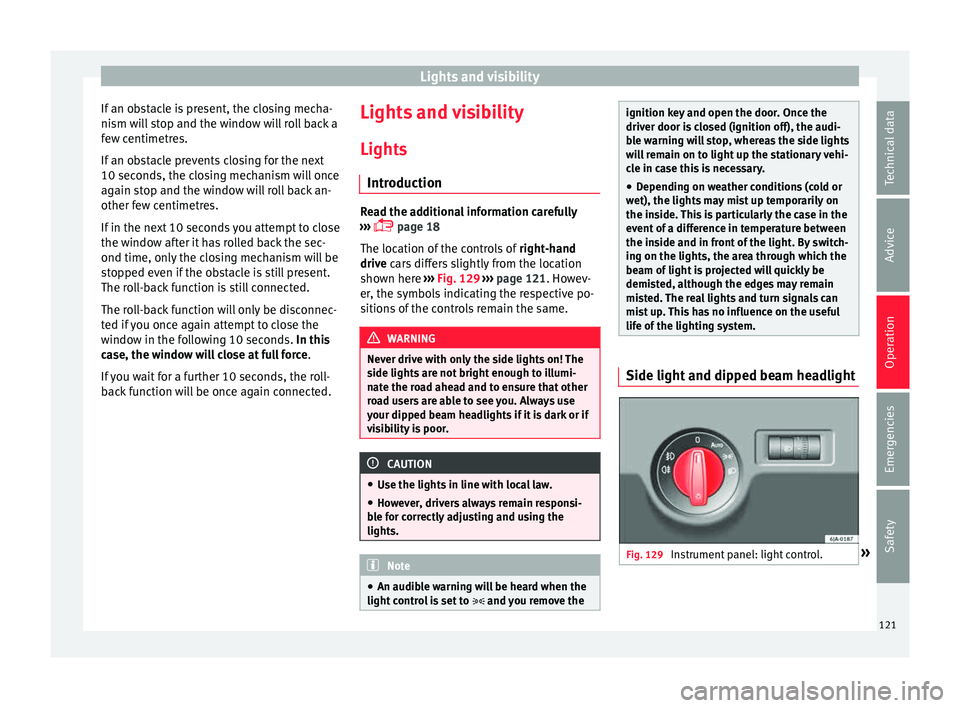
life of the lighting system. Side light and dipped beam headlight
Fig. 129
Instrument panel: light control. » 121Technical data
Advice
Operation
Emergencies
Safety
Page 125 of 248
Lights and visibility
time, the dipped beams and the instrument
p anel
lightin
g will automatically come on as
required (e.g. when entering a tunnel) and
the daytime running lights will switch off.
When the automatic dipped beam control
switches off the dipped beams (e.g. when
coming out of a tunnel), the daytime running
lights come back on. WARNING
The rear lights do not come on with the day-
time drivin g light
. A vehicle which does not
have the rear lights on may not be visible to
other drivers in the darkness, if it is raining
or in conditions of poor visibility. Note
Please observe any relevant legal require-
ments whic
h may apply in your country. Turn signal and main beam lever
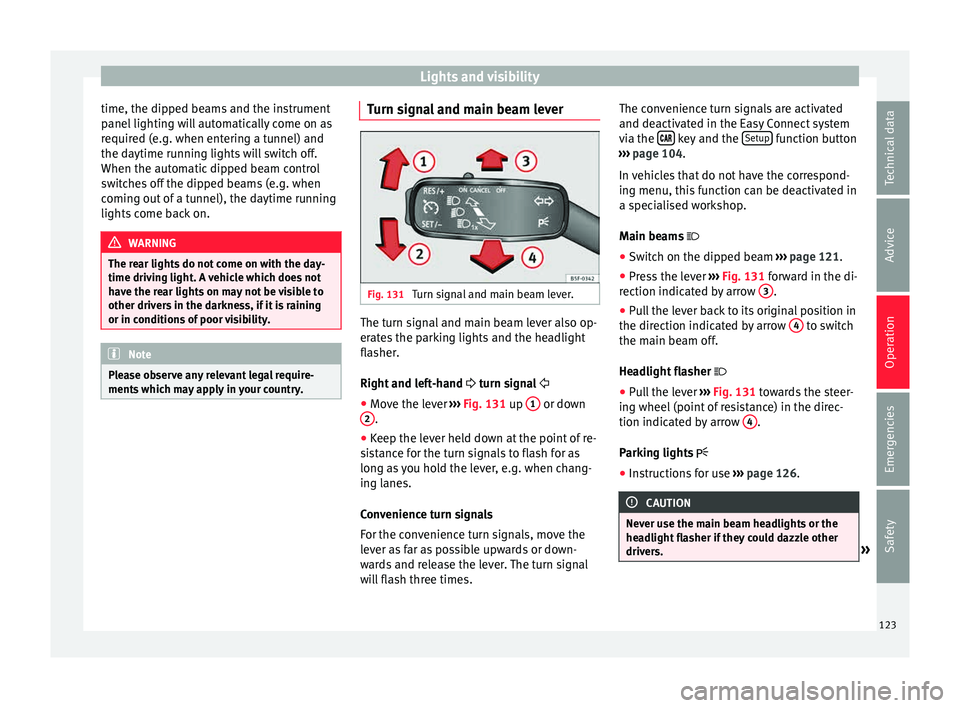
Fig. 131
Turn signal and main beam lever. The turn signal and main beam lever also op-
er
at
e
s the parking lights and the headlight
flasher.
Right and left-hand turn signal
● Move the lever ›››
Fig. 131 up 1 or down
2 .
● Keep the lever held down at the point of re-
s i
s
tance for the turn signals to flash for as
long as you hold the lever, e.g. when chang-
ing lanes.
Convenience turn signals
For the convenience turn signals, move the
lever as far as possible upwards or down-
wards and release the lever. The turn signal
will flash three times. The convenience turn signals are activated
and deactivat
ed in the Easy Connect system
via the key and the
Set
up function button
› ›
›
page 104.
In vehicles that do not have the correspond-
ing menu, this function can be deactivated in
a specialised workshop.
Main beams
● Switch on the dipped beam ›››
page 121.
● Press the lever ›››
Fig. 131 forward in the di-
rection indicated by arrow 3 .
● Pull the lever back to its original position in
the dir ection indic
at
ed by arrow 4 to switch
the m ain be
am off
.
Headlight flasher
● Pull the lever ›››
Fig. 131 towards the steer-
ing wheel (point of resistance) in the direc-
tion indicated by arrow 4 .
P ark
in
g lights
● Instructions for use ›››
page 126. CAUTION
Never use the main beam headlights or the
hea dlight
flasher if they could dazzle other
drivers. » 123
Technical data
Advice
Operation
Emergencies
Safety
Page 127 of 248
Lights and visibility
steering wheel or whether or not the turn sig-
n al
s1)
ar
e switched on, if the following condi-
tions are met:
● The vehicle is stationary, the ignition is
switc
hed on or you are moving at a speed of
less than 40 km/h (25 mph);
● The daytime driving light is switched off
● The dipped beam is switched on
● The fog lights are switched off
● Reverse gear is not engaged
Rear fog light Switching on the rear fog light
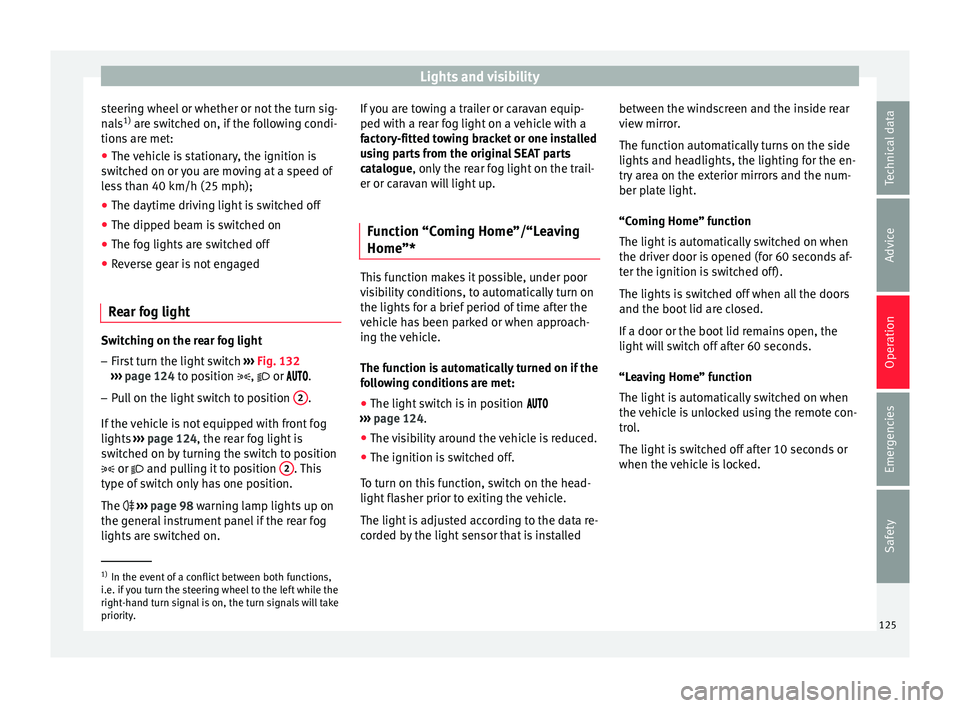
– First turn the light switch ››
›
Fig. 132
››› page 124 to position , or .
– Pull on the light switch to position 2 .
If the
v
ehicle is not equipped with front fog
lights ››› page 124, the rear fog light is
switched on by turning the switch to position
or and pulling it to position 2 . This
type of sw
it
ch only has one position.
The ›››
page 98 warning lamp lights up on
the general instrument panel if the rear fog
lights are switched on. If you are towing a trailer or caravan equip-
ped with a re
ar fog light on a vehicle with a
factory-fitted towing bracket or one installed
using parts from the original SEAT parts
catalogue, only the rear fog light on the trail-
er or caravan will light up.
Function “Coming Home”/“Leaving
Home”* This function makes it possible, under poor
v
i
s
ibility conditions, to automatically turn on
the lights for a brief period of time after the
vehicle has been parked or when approach-
ing the vehicle.
The function is automatically turned on if the
following conditions are met:
● The light switch is in position
››
› page 124.
● The visibility around the vehicle is reduced.
● The ignition is switched off.
To turn on thi
s function, switch on the head-
light flasher prior to exiting the vehicle.
The light is adjusted according to the data re-
corded by the light sensor that is installed between the windscreen and the inside rear
view mirror
.
The function automatically turns on the side
lights and headlights, the lighting for the en-
try area on the exterior mirrors and the num-
ber plate light.
“Coming Home” function
The light is automatically switched on when
the driver door is opened (for 60 seconds af-
ter the ignition is switched off).
The lights is switched off when all the doors
and the boot lid are closed.
If a door or the boot lid remains open, the
light will switch off after 60 seconds.
“Leaving Home” function
The light is automatically switched on when
the vehicle is unlocked using the remote con-
trol.
The light is switched off after 10 seconds or
when the vehicle is locked. 1)
In the event of a conflict between both functions,
i.e. if
you turn the steering wheel to the left while the
right-hand turn signal is on, the turn signals will take
priority. 125
Technical data
Advice
Operation
Emergencies
Safety
Page 129 of 248
Lights and visibility
Interior lights Int erior lightin
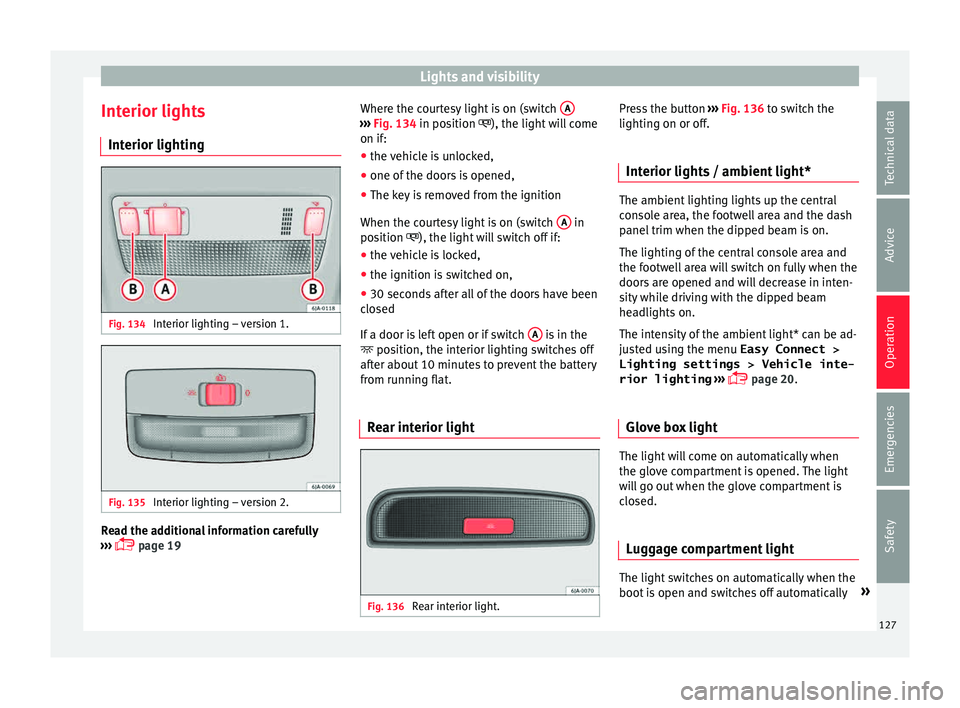
gFig. 134
Interior lighting – version 1. Fig. 135
Interior lighting – version 2. Read the additional information carefully
› ›
›
page 19 Where the courtesy light is on (switch
A ›››
Fig. 134 in po s
ition
), the light will come
on if:
● the vehicle is unlocked,
● one of the doors is opened,
● The key is removed from the ignition
When the court
esy light is on (switch A in
po s
ition
), the light will switch off if:
● the vehicle is locked,
● the ignition is switched on,
● 30 seconds after all of the doors have been
closed
If
a door is left open or if switch A is in the
po s
ition, the int
erior lighting switches off
after about 10 minutes to prevent the battery
from running flat.
Rear interior light Fig. 136
Rear interior light. Press the button
››
›
Fig. 136 to switch the
lighting on or off.
Interior lights / ambient light* The ambient lighting lights up the central
con
so
le area, the footwell area and the dash
panel trim when the dipped beam is on.
The lighting of the central console area and
the footwell area will switch on fully when the
doors are opened and will decrease in inten-
sity while driving with the dipped beam
headlights on.
The intensity of the ambient light* can be ad-
justed using the menu Easy Connect > Lighting settings > Vehicle inte-
rior lighting ›››
page 20.
Glove box light The light will come on automatically when
the glo
v
e c
ompartment is opened. The light
will go out when the glove compartment is
closed.
Luggage compartment light The light switches on automatically when the
boot
i
s
open and switches off automatically »
127
Technical data
Advice
Operation
Emergencies
Safety
Page 131 of 248
Lights and visibility
Windscreen wipers and wind-
s c
r
een washers
Introduction The windscreen wipers and windscreen
wa
sher
s only work when the ignition is
switched on.
The speed of the automatic wipe in case of
rain is automatically adjusted according to
the intensity of the rainfall.
The rear window is wiped once if the wind-
screen wipers are switched on and reverse
gear is engaged.
Fill the windscreen washer fluid ›››
page 210. WARNING
● Mak e s
ure the blades ›››
page 53 are in
perfect condition for good visibility and safe
driving.
● In cold conditions, you should not use the
wash/w
ipe system unless you have warmed
the windscreen with the heating and ventila-
tion system. The windscreen washer fluid
could otherwise freeze on the windscreen and
obscure your view of the road. CAUTION
● Durin g w
inter, always check that the wind-
screen wiper blades are not frozen to the
glass before each trip or before switching on the ignition. If you switch on the windscreen
wiper
s
when the wiper blades are frozen to
the glass, this could damage both the wiper
blades and the wiper motor.
● If the ignition is switched off when the
winds
creen wipers are on, they will start op-
erating in the same mode when the ignition
is switched back on. The wiper blades may be
frozen to the glass at low temperatures when
the ignition is switched off.
● Carefully separate the frozen wipers from
the winds
creen or rear window.
● Remove snow and ice from the wipers be-
fore s
tarting your journey.
● Careless handling could lead to the wiper
arms dam
aging the windscreen.
● For safety reasons, the wiper blades should
be chan
ged once or twice a year. They can be
purchased at a SEAT Authorised Service.
● The ignition cannot be switched on while
the winds
creen wiper arms are in a raised po-
sition. Otherwise, the windscreen wipers
would return to their original position and
could damage the paintwork on the bonnet. Note
Keep the wipers clean. The wipers can be
soil ed w
ith remains of wax solutions from car
washes ››› page 195.
● On vehicles equipped with windscreen
washer j
ets, these are heated once the en-
gine is running. Operating windscreen wipers and
w
a
sher
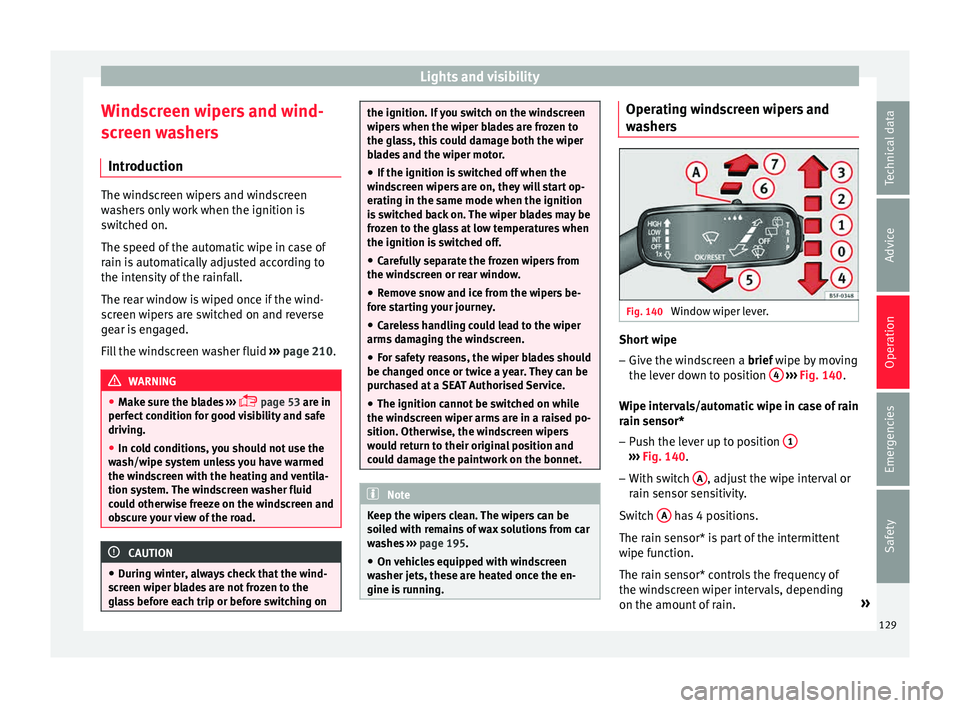
s Fig. 140
Window wiper lever. Short wipe
– Give the windscreen a brief w ipe b
y
moving
the lever down to position 4
› ›
› Fig. 140 .
Wipe intervals/automatic wipe in case of rain
rain sensor* – Push the lever up to position 1 ›››
Fig. 140.
– With switch A , adjust the wipe interval or
r ain sen
sor sen
sitivity.
Switch A has 4 positions.
The r ain sen
sor* i
s part of the intermittent
wipe function.
The rain sensor* controls the frequency of
the windscreen wiper intervals, depending
on the amount of rain. »
129
Technical data
Advice
Operation
Emergencies
Safety