battery Seat Toledo 2017 Owner's manual
[x] Cancel search | Manufacturer: SEAT, Model Year: 2017, Model line: Toledo, Model: Seat Toledo 2017Pages: 248, PDF Size: 5.86 MB
Page 6 of 248
Table of Contents
Engine management and emission control sys-
t em
. . . . . . . . . . . . . . . . . . . . . . . . . . . . . . . . . . . 167
Driv
ing tips . . . . . . . . . . . . . . . . . . . . . . . . . . . . . 169
Driver assistance systems . . . . . . . . . . . . . . . . . 170
Parking aid . . . . . . . . . . . . . . . . . . . . . . . . . . . . . 170
Rear Assist “Rear View Camera”* . . . . . . . . . . . 175
Cruise speed (Cruise Control)* . . . . . . . . . . . . . 178
Emergency brake assist system (Front As-
sis
t)* . . . . . . . . . . . . . . . . . . . . . . . . . . . . . . . . . . 179
Start-Stop System* . . . . . . . . . . . . . . . . . . . . . . . 183
Fatigue detection (break recommendation)* . . 185
Towing bracket device . . . . . . . . . . . . . . . . . . . . 186
Driving with a trailer . . . . . . . . . . . . . . . . . . . . . . 186
Towing bracket device . . . . . . . . . . . . . . . . . . . . 188
Advice . . . . . . . . . . . . . . . . . . . . . . . . . . . . . . . . 194
Care and maintenance . . . . . . . . . . . . . . . . . . . . 194
Accessories and modifications to the vehi-
cle
. . . . . . . . . . . . . . . . . . . . . . . . . . . . . . . . . . . . 194
Care and cleaning . . . . . . . . . . . . . . . . . . . . . . . 195
Checking and refilling levels . . . . . . . . . . . . . . . 201
Fuel . . . . . . . . . . . . . . . . . . . . . . . . . . . . . . . . . . . 201
Engine compartment . . . . . . . . . . . . . . . . . . . . . 204
Engine oil . . . . . . . . . . . . . . . . . . . . . . . . . . . . . . 207
Coolant . . . . . . . . . . . . . . . . . . . . . . . . . . . . . . . . 210
Brake fluid . . . . . . . . . . . . . . . . . . . . . . . . . . . . . 211
Window washer system . . . . . . . . . . . . . . . . . . . 212
Battery . . . . . . . . . . . . . . . . . . . . . . . . . . . . . . . . . 213
Wheels and tyres . . . . . . . . . . . . . . . . . . . . . . . . 217
Tyres . . . . . . . . . . . . . . . . . . . . . . . . . . . . . . . . . . 217
Spare wheel . . . . . . . . . . . . . . . . . . . . . . . . . . . . 220
Tyre monitoring systems . . . . . . . . . . . . . . . . . . 221
Winter service . . . . . . . . . . . . . . . . . . . . . . . . . . . 222
Technical data . . . . . . . . . . . . . . . . . . . . . . . . 223
Technical specifications . . . . . . . . . . . . . . . . . . 223
Important information . . . . . . . . . . . . . . . . . . . . 223
Information on fuel consumption . . . . . . . . . . . 224 Driving with a trailer . . . . . . . . . . . . . . . . . . . . . . 225
Wheels . . . . . . . . . . . . . . . . . . . . . . . . . . . . . . . . 226
Engine data . . . . . . . . . . . . . . . . . . . . . . . . . . . . . 227
Dimensions . . . . . . . . . . . . . . . . . . . . . . . . . . . . . 233
Index . . . . . . . . . . . . . . . . . . . . . . . . . . . . . . . . . 235
4
Page 37 of 248
The essentials
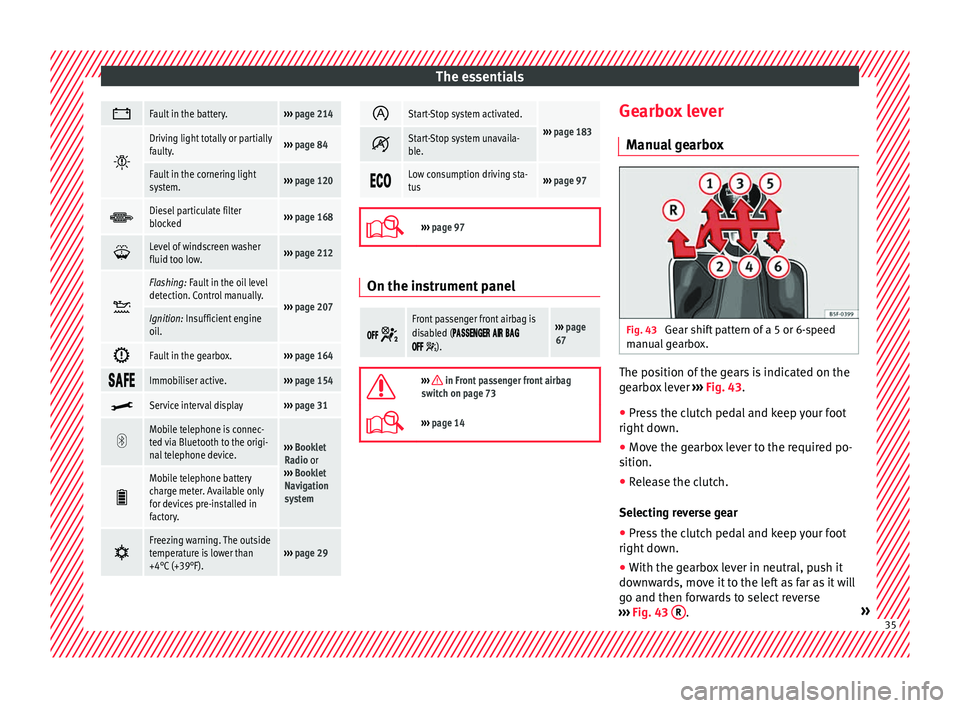
Fault in the battery.›››
page 214
Driving light totally or partially
faulty.›››
page 84
Fault in the cornering light
system.››› page 120
Diesel particulate filter
blocked›››
page 168
Level of windscreen washer
fluid too low.›››
page 212
Flashing: Fault in the oil level
detection. Control manually.
›››
page 207Ignition: Insufficient engine
oil.
Fault in the gearbox.›››
page 164
Immobiliser active.›››
page 154
Service interval display›››
page 31
Mobile telephone is connec-
ted via Bluetooth to the origi-
nal telephone device.
›››
Booklet
Radio or
››› Booklet
Navigation
system
Mobile telephone battery
charge meter. Available only
for devices pre-installed in
factory.
Freezing warning. The outside
temperature is lower than
+4°C (+39°F).›››
page 29
Start-Stop system activated.
›››
page 183 Start-Stop system unavaila-
ble.
Low consumption driving sta-
tus›››
page 97
›››
page 97 On the instrument panel
Front passenger front airbag is
disabled (
).
››› page
67
››› in Front passenger front airbag
switch on page 73
››› page 14 Gearbox lever
M anua
l
gearbox Fig. 43
Gear shift pattern of a 5 or 6-speed
m anual
g
earbox. The position of the gears is indicated on the
g
e
arbo
x lever ››› Fig. 43.
● Press the clutch pedal and keep your foot
right down.
● Mo
ve the gearbox lever to the required po-
sition.
● Rel
ease the clutch.
Selecting r
everse gear
● Press the clutch pedal and keep your foot
right down.
● W
ith the gearbox lever in neutral, push it
downw
ards, move it to the left as far as it will
go and then forwards to select reverse
››› Fig. 43 R .
» 35
Page 45 of 248
The essentials
››› in Topping up the coolant level on
page 211
››› page 210 Brake fluid
Fig. 53
Engine compartment: brake fluid res-
er v
oir c
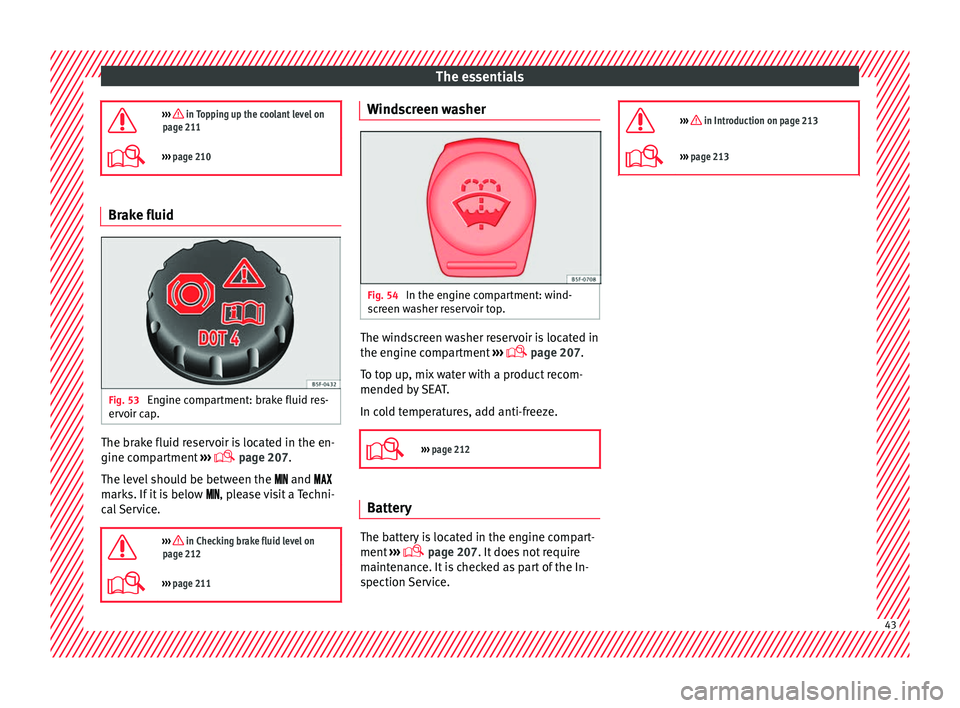
ap. The brake fluid reservoir is located in the en-
gine c
omp
ar
tment ›››
page 207
.
The level should be between the and
marks. If it is below , please visit a Techni-
cal Service.
››› in Checking brake fluid level on
page 212
››› page 211 Windscreen washer
Fig. 54
In the engine compartment: wind-
s c
r
een washer reservoir top. The windscreen washer reservoir is located in
the en
gine c
omp
artment ›››
page 207.
To top up, mix water with a product recom-
mended by SEAT.
In cold temperatures, add anti-freeze.
››› page 212 Battery
The battery is located in the engine compart-
ment
›
›
› page 207. It does not require
maintenance. It is checked as part of the In-
spection Service.
››› in Introduction on page 213
›››
page 213 43
Page 54 of 248
The essentials
Notes for the driver of the towing vehicle
● The tow rope must be taut before you drive
off .
● Rel
ease the clutch very carefully when start-
ing the v
ehicle (manual gearbox), or acceler-
ate gently (automatic gearbox).
Driving style
Towing requires some experience, especially
when using a tow rope. Both drivers should
realise how difficult it is to tow a vehicle. In-
experienced drivers should not attempt to
tow.
Do not pull too hard with the towing vehicle
and take care to avoid jerking the tow rope.
When towing on an unpaved road, there is al-
ways a risk of overloading and damaging the
anchorage points.
The towline anchorages are located under
the floor panel in the luggage compartment.
Switch on the ignition so that the turn sig-
nals, windscreen wipers and windscreen
washer can work. Ensure that the steering
wheel is unlocked and moves freely.
Place the gear lever in neutral on vehicles
with a manual gearbox. With an automatic
gearbox, place the lever in N.
To brake, press the brake pedal firmly. The
brake servo does not work when the engine
is switched off. The power steering only works when the igni-
tion is sw
itched on and the vehicle is moving,
provided that the battery is sufficiently charg-
ed. Otherwise, it will need more force.
Ensure that the tow rope remains taut at all
times.
››› page 79 Tow-starting
If the engine will not start, first try starting it
u
s
in
g the battery of another vehicle
››› page 52. You should only attempt to tow-
start a vehicle if charging the battery does
not work. This is done by leveraging wheel
movement.
When tow-starting a vehicle with a petrol en-
gine, do not tow it more than a short dis-
tance, otherwise unburned fuel can enter the
catalytic converter.
● Engage 2nd or 3rd gear before moving off.
● Press the clutch and hold the pedal down.
● Switch the ignition on.
● Once both vehicles are moving, release the
clutc
h.
● As soon as the engine has started, press
the clutc
h and move the gear lever to neutral. How to jump start
Jump lea
ds The jump lead must have a sufficient wire
cr
o
ss section.
If the engine fails to start because of a dis-
charged battery, the battery can be connec-
ted to the battery of another vehicle to start
the engine.
Both batteries need to have nominal voltage
of 12 V. The capacity (Ah) of the back-up bat-
tery should not be notably less than the
drained battery.
Jump leads must comply with standard DIN
72553 (see cable manufacturer's instruc-
tions). The wire cross section must be at least
25 mm 2
for petrol engines and at least
35 mm 2
for diesel engines.
Jump leads
Positive cable – usually red
Negative cable – usually black WARNING
● A flat b
attery can also freeze at tempera-
tures slightly below 0°C (+32°F). Do not at-
tempt to start the vehicle with a frozen bat-
tery. Risk of explosion! 52
Page 55 of 248
The essentials
●
Ple a
se note the safety warnings referring to
working in the engine compartment
››› page 204.
● The non-insulated parts of the battery
clamp
s must not be allowed to touch. Addi-
tionally, the jump lead attached to the posi-
tive battery terminal must not touch metal
parts of the vehicle. Risk of short circuit!
● Do not connect the negative lead to the
negativ
e terminal of the discharged battery.
In the event of sparks when starting the en-
gine, the explosive gas given off by the bat-
tery could catch fire.
● Position the jump leads in such a way that
they cannot
come into contact with any mov-
ing parts in the engine compartment.
● Do not bend over the battery. Risk of acid
burns!
● The s
crew plugs on the battery cells must
be scr
ewed in firmly.
● Keep sources of fire (flames, lit cigarettes,
etc.) a
way from the battery. - Risk of explo-
sion!
● Never use the jump leads on batteries in
which the electr
olyte level is too low. Risk of
explosion and acid burns. Note
● The v ehic
les must not touch each other, as
electricity could flow as soon as the positive
terminals are connected. ●
The dis c
harged battery must be properly
connected to the vehicle electrical system.
● The jump leads should be checked in a spe-
cia
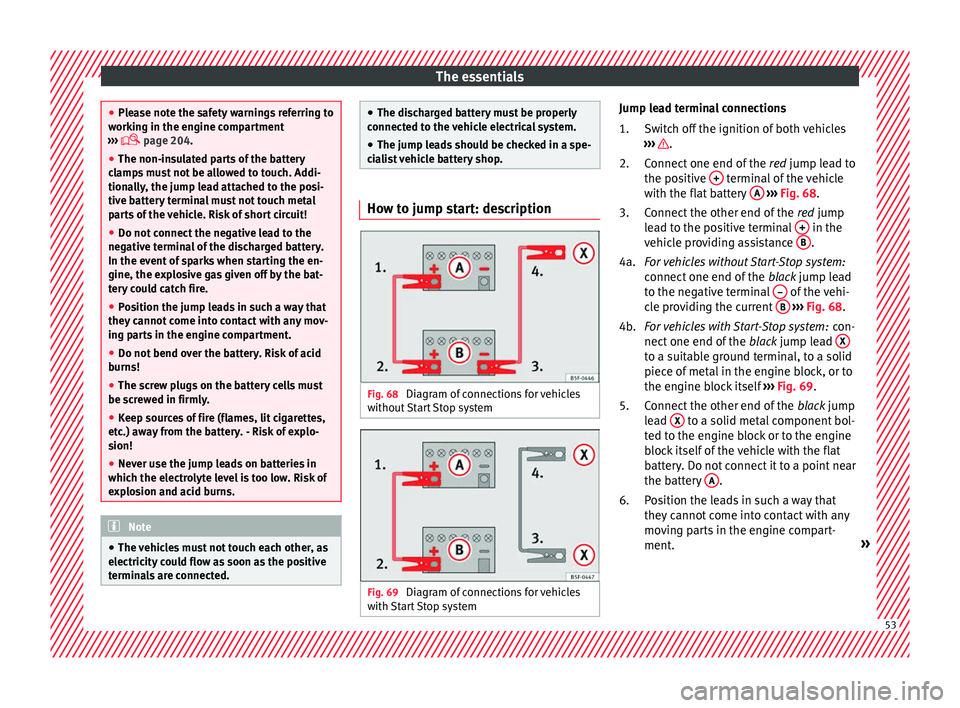
list vehicle battery shop. How to jump start: description
Fig. 68
Diagram of connections for vehicles
w ithout
Start Stop system Fig. 69
Diagram of connections for vehicles
w ith
St
art Stop system Jump lead terminal connections
Switc
h off the ignition of both vehicles
››› .
C onnect
one end of
the red jump lead to
the positive + terminal of the vehicle
w ith the fl
at
battery A
› ››
Fig. 68
.
C
onnect the other end of the red jump
lead to the positive terminal + in the
v ehic
l
e providing assistance B .
F or
vehicles without Start-Stop system:
connect one end of the black jump lead
to the negative terminal – of the vehi-
c l
e pr
oviding the current B
› ›
› Fig. 68 .
For vehicles with Start-Stop system: con-
nect one end of the black jump lead X to a suitable ground terminal, to a solid
piec
e of
met
al in the engine block, or to
the engine block itself ››› Fig. 69.
Connect the other end of the black jump
lead X to a solid metal component bol-
t ed t
o the en
gine block or to the engine
block itself of the vehicle with the flat
battery. Do not connect it to a point near
the battery A .
P o
s
ition the leads in such a way that
they cannot come into contact with any
moving parts in the engine compart-
ment. »
1.
2.
3.
4a.
4b.
5.
6.
53
Page 56 of 248
The essentials
Starting Star
t
the engine of the vehicle with the
boosting battery and let it run at idling
speed.
Start the engine of the vehicle with the
flat battery and wait for 2 or 3 minutes
until the engine is running.
Removing the jump leads Before you remove the jump leads,
switch off the dipped beam headlights if
they are switched on.
Turn on the heater blower and heated
rear window in the vehicle with the flat
battery. This helps minimise voltage
peaks which are generated when the
leads are disconnected.
When the engine is running, disconnect
the leads in reverse order to the details
given above.
Make sure the battery clamps have sufficient
metal-to-metal contact with the battery termi-
nals.
If the engine fails to start after about 10 sec-
onds, switch off the starter and try again after
about 1 minute. WARNING
● Ple a
se note the safety warnings referring to
working in the engine compartment
››› page 204. 7.
8.
9.
10.
11. ●
The batt er
y providing assistance must have
the same voltage as the flat battery (12V) and
approximately the same capacity (see imprint
on battery). Failure to comply could result in
an explosion.
● Never use jump leads when one of the bat-
teries
is frozen. Danger of explosion! Even af-
ter the battery has thawed, battery acid could
leak and cause chemical burns. If a battery
freezes, it should be replaced.
● Keep sparks, flames and lighted cigarettes
awa
y from batteries, danger of explosion.
Failure to comply could result in an explo-
sion.
● Observe the instructions provided by the
manufact
urer of the jump leads.
● Do not connect the negative cable from the
other vehic
le directly to the negative terminal
of the flat battery. The gas emitted from the
battery could be ignited by sparks. Danger of
explosion.
● Never attach the negative cable to fuel sys-
tem component
s or the brake lines in the oth-
er vehicle.
● The non-insulated parts of the battery
clamp
s must not be allowed to touch. The
jump lead attached to the positive battery
terminal must not touch metal parts of the ve-
hicle, this can cause a short circuit.
● Position the leads in such a way that they
cannot c
ome into contact with any moving
parts in the engine compartment.
● Do not lean on the batteries. This could re-
sult
in chemical burns. Note
The vehicles must not touch each other, oth-
erw i
se electricity could flow as soon as the
positive terminals are connected. Changing the windscreen wiper
bl
a
des
Changing the wiper blades Fig. 70
Windscreen wiper blades. Set the windscreen wiper arms to the service
po
s
ition bef
ore changing the blades.
Service position
● Close the bonnet.
● Switch the ignition on and off. 54
Page 82 of 248
Emergencies
CAUTION
● Do not t o
w-start the engine. Risk of engine
damage! In vehicles with a catalytic convert-
er, fuel that has not been burned could reach
the catalytic converter and catch fire in it.
This could damage and destroy the catalytic
converter. You may use the battery from an-
other vehicle to help you start your engine
››› page 53.
● If, due to a fault, there is no oil in the gear-
box, the car m
ay only be towed with the driv-
en wheels lifted clear of the road and trans-
ported on a special vehicle transporter or
trailer.
● If normal towing is not possible or if the ve-
hicle i
s to be towed for further than 50 km,
the vehicle must be transported on a special
vehicle transporter or trailer.
● The towrope should be slightly elastic to
reduce the lo
ad on both vehicles during tow-
ing. It is advisable to use a towrope made of
synthetic fibre or similar material only.
● Do not pull too hard with the towing vehicle
and alwa
ys take care to avoid jerking the tow-
rope. When towing on a loose surface there is
always a risk of overloading and damaging
the anchorage points.
● Attach the towrope or towbar only to the
towline anc
horages or to the removable tow-
ing bracket ››› page 186, or ››› page 80. Note
● We r ec
ommend you use the towrope or tow-
bar available in the SEAT Original Accessories
programme from authorised SEAT dealers.
● Towing a vehicle requires a certain degree
of practic
al skill. Both drivers should be fa-
miliar with the technique required for towing.
Inexperienced drivers should not attempt to
tow away another vehicle or to have their ve-
hicle towed.
● Note the legal regulations concerning tow-
ing, par
ticularly those regarding the signal-
ling of the towed and towing vehicle.
● The towrope must not be twisted, as under
cert
ain circumstances this could unscrew the
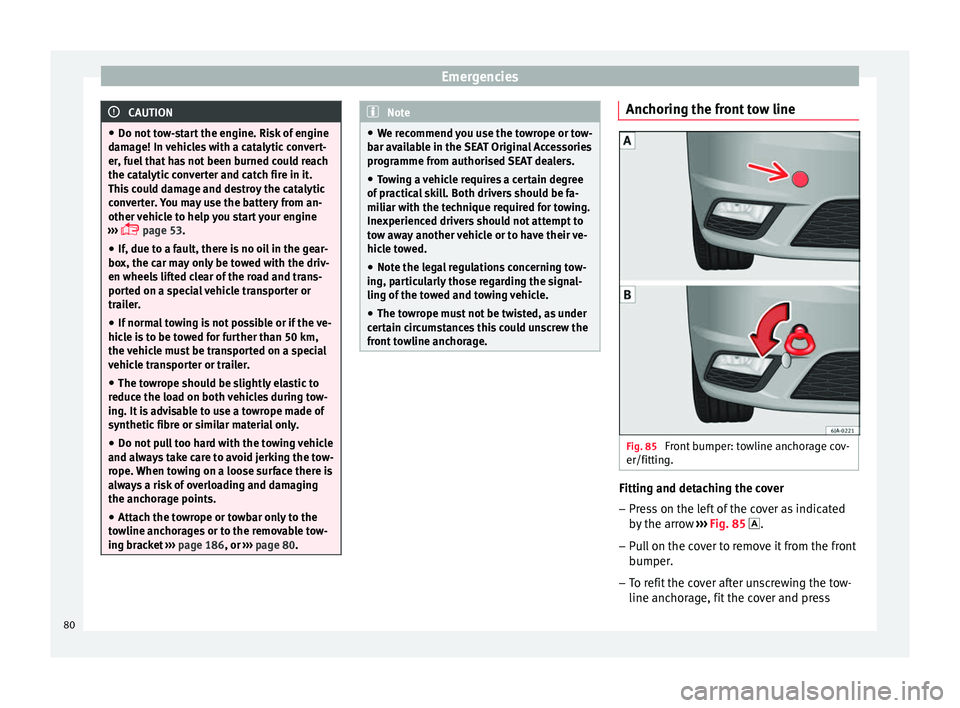
front towline anchorage. Anchoring the front tow line
Fig. 85
Front bumper: towline anchorage cov-
er/fittin g. Fitting and detaching the cover
– Press on the left of the cover as indicated
by
the arr
ow ››› Fig. 85 .
– Pull on the cover to remove it from the front
bumper.
– T
o refit the cover after unscrewing the tow-
line anchorag
e, fit the cover and press
80
Page 86 of 248
Emergencies
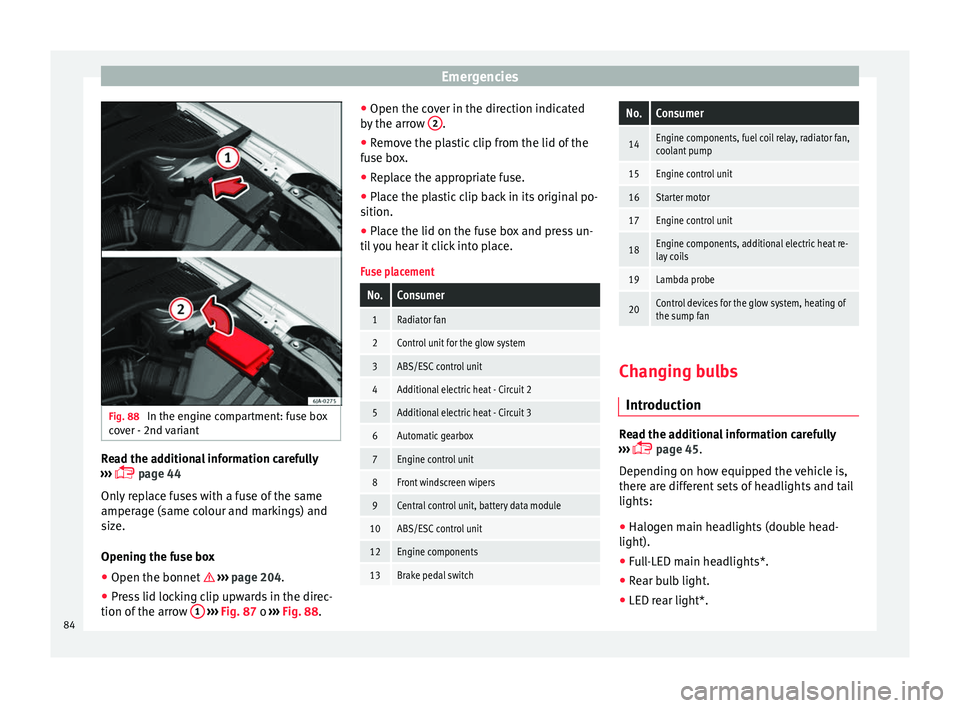
Fig. 88
In the engine compartment: fuse box
c o
v
er - 2nd variant Read the additional information carefully
› ›
›
page 44
Only replace fuses with a fuse of the same
amperage (same colour and markings) and
size.
Opening the fuse box ● Open the bonnet ›››
page 204.
● Press lid locking clip upwards in the direc-
tion of the arro
w 1
› ›
› Fig. 87 o ››› Fig. 88. ●
Open the cov
er in the direction indicated
by the arrow 2 .
● Remove the plastic clip from the lid of the
f u
se bo
x.
● Replace the appropriate fuse.
● Place the plastic clip back in its original po-
sition.
● Plac
e the lid on the fuse box and press un-
til
you hear it click into place.
Fuse placement
No.Consumer
1Radiator fan
2Control unit for the glow system
3ABS/ESC control unit
4Additional electric heat - Circuit 2
5Additional electric heat - Circuit 3
6Automatic gearbox
7Engine control unit
8Front windscreen wipers
9Central control unit, battery data module
10ABS/ESC control unit
12Engine components
13Brake pedal switch
No.Consumer
14Engine components, fuel coil relay, radiator fan,
coolant pump
15Engine control unit
16Starter motor
17Engine control unit
18Engine components, additional electric heat re-
lay coils
19Lambda probe
20Control devices for the glow system, heating of
the sump fan Changing bulbs
Intr oduction Read the additional information carefully
› ›
›
page 45.
Depending on how equipped the vehicle is,
there are different sets of headlights and tail
lights:
● Halogen main headlights (double head-
light).
● Full-LED main headlights*.
● Rear bulb light.
● LED rear light*.
84
Page 110 of 248
Operation
Multimedia USB/A UX
-IN inp
utFig. 117
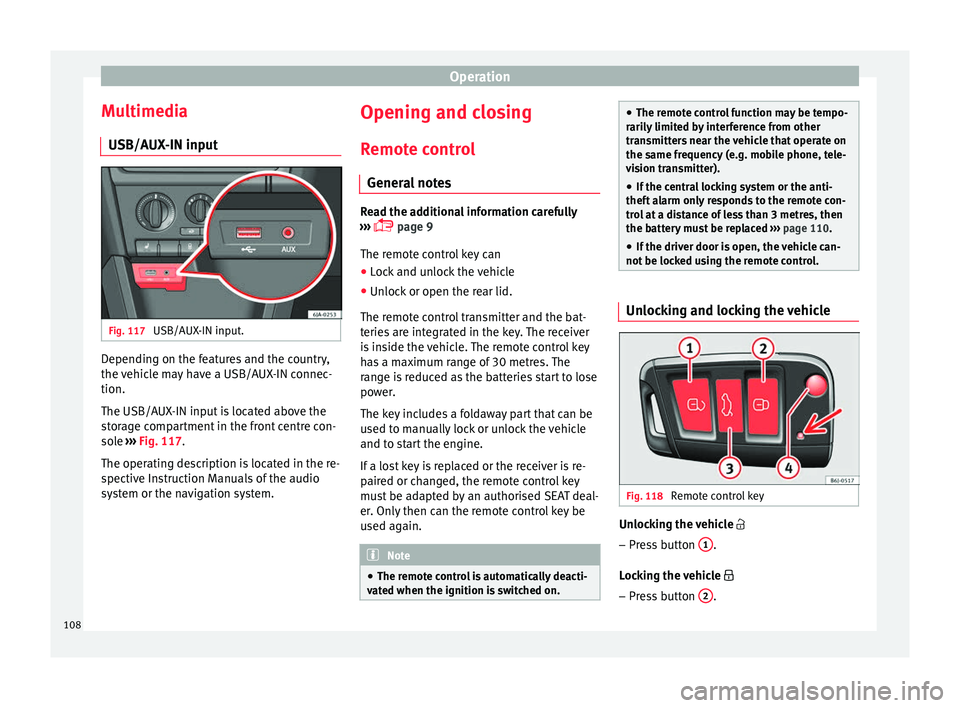
USB/AUX-IN input. Depending on the features and the country,
the
v
ehic
le may have a USB/AUX-IN connec-
tion.
The USB/AUX-IN input is located above the
storage compartment in the front centre con-
sole ››› Fig. 117.
The operating description is located in the re-
spective Instruction Manuals of the audio
system or the navigation system. Opening and closing
R emot
e c
ontrol
General notes Read the additional information carefully
›› ›
page 9
The remote control key can
● Lock and unlock the vehicle
● Unlock or open the rear lid.
The remot e c
ontrol transmitter and the bat-
teries are integrated in the key. The receiver
is inside the vehicle. The remote control key
has a maximum range of 30 metres. The
range is reduced as the batteries start to lose
power.
The key includes a foldaway part that can be
used to manually lock or unlock the vehicle
and to start the engine.
If a lost key is replaced or the receiver is re-
paired or changed, the remote control key
must be adapted by an authorised SEAT deal-
er. Only then can the remote control key be
used again. Note
● The remot e c
ontrol is automatically deacti-
vated when the ignition is switched on. ●
The remot e c
ontrol function may be tempo-
rarily limited by interference from other
transmitters near the vehicle that operate on
the same frequency (e.g. mobile phone, tele-
vision transmitter).
● If the central locking system or the anti-
theft a
larm only responds to the remote con-
trol at a distance of less than 3 metres, then
the battery must be replaced ››› page 110.
● If the driver door is open, the vehicle can-
not be lock
ed using the remote control. Unlocking and locking the vehicle
Fig. 118
Remote control key Unlocking the vehicle
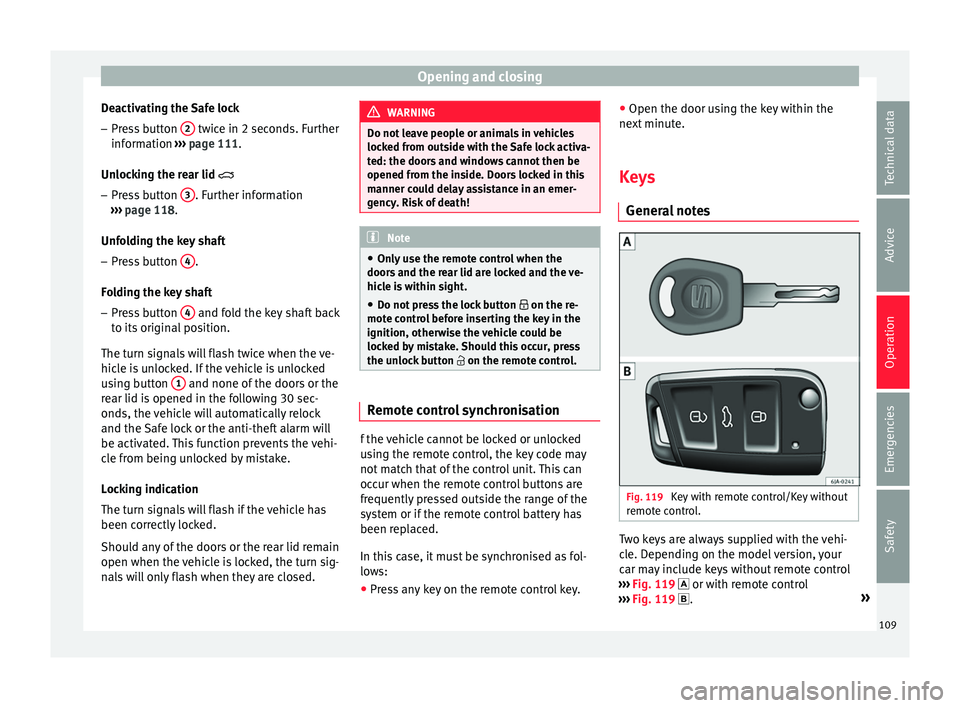
– Press button 1 .
L oc
k
ing the vehicle
– Press button 2 .
108
Page 111 of 248
Opening and closing
Deactivating the Safe lock – Press button 2 twice in 2 seconds. Further
inf orm
ation ›
›› page 111.
Unlocking the rear lid
– Press button 3 . Further information
› ›
›
page 118.
Unfolding the key shaft
– Press button 4 .
F o
l
ding the key shaft
– Press button 4 and fold the key shaft back
t o its
origin
al position.
The turn signals will flash twice when the ve-
hicle is unlocked. If the vehicle is unlocked
using button 1 and none of the doors or the
r e
ar lid i
s opened in the following 30 sec-
onds, the vehicle will automatically relock
and the Safe lock or the anti-theft alarm will
be activated. This function prevents the vehi-
cle from being unlocked by mistake.
Locking indication
The turn signals will flash if the vehicle has
been correctly locked.
Should any of the doors or the rear lid remain
open when the vehicle is locked, the turn sig-
nals will only flash when they are closed. WARNING
Do not leave people or animals in vehicles
lock ed fr
om outside with the Safe lock activa-
ted: the doors and windows cannot then be
opened from the inside. Doors locked in this
manner could delay assistance in an emer-
gency. Risk of death! Note
● Only u
se the remote control when the
doors and the rear lid are locked and the ve-
hicle is within sight.
● Do not press the lock button on the re-
mote c
ontrol before inserting the key in the
ignition, otherwise the vehicle could be
locked by mistake. Should this occur, press
the unlock button on the remote control. Remote control synchronisation
f the vehicle cannot be locked or unlocked
u
s
in
g the remote control, the key code may
not match that of the control unit. This can
occur when the remote control buttons are
frequently pressed outside the range of the
system or if the remote control battery has
been replaced.
In this case, it must be synchronised as fol-
lows:
● Press any key on the remote control key. ●
Open the door usin
g the key within the
next minute.
Keys General
notes Fig. 119
Key with remote control/Key without
r emot
e c
ontrol. Two keys are always supplied with the vehi-
c
l
e. D
epending on the model version, your
car may include keys without remote control
››› Fig. 119 or with remote control
››› Fig. 119 . »
109
Technical data
Advice
Operation
Emergencies
Safety